LINCOLN NAVIGATOR 2017 Owners Manual
Manufacturer: LINCOLN, Model Year: 2017, Model line: NAVIGATOR, Model: LINCOLN NAVIGATOR 2017Pages: 532, PDF Size: 3.9 MB
Page 131 of 532
•
Heated mirrors.
• Heated rear window.
You can adjust the default remote start
settings using the information display
controls. See Information Displays (page
102).
Automatic Settings
In hot weather, the system is set to
72°F
(22°C). The cooled seats are set to high (if
available, and selected to AUTO in the
information display).
In moderate weather, the system either heats
or cools (based on previous settings). The
rear defroster, heated mirrors and heated
seats do not automatically turn on.
In cold weather, the system is set to
72°F
(22°C). The heated seats are set to high (if
available, and selected to AUTO in the
information display). The rear defroster and
heated mirrors automatically turn on.
128
Navigator (TB5) Canada/United States of America, enUSA, First Printing Climate Control
Page 132 of 532
SITTING IN THE CORRECT
POSITION
WARNINGS
Sitting improperly, out of position or
with the seatback reclined too far can
take weight off the seat cushion and affect
the decision of the passenger sensing
system, resulting in serious injury or death
in the event of a crash. Always sit upright
against your seat back, with your feet on the
floor. Do not recline the seatback as this can
cause the occupant to slide under the
safety belt, resulting in serious injury in the
event of a crash. Do not place objects higher than the
seatback to reduce the risk of serious
injury in the event of a crash or during heavy
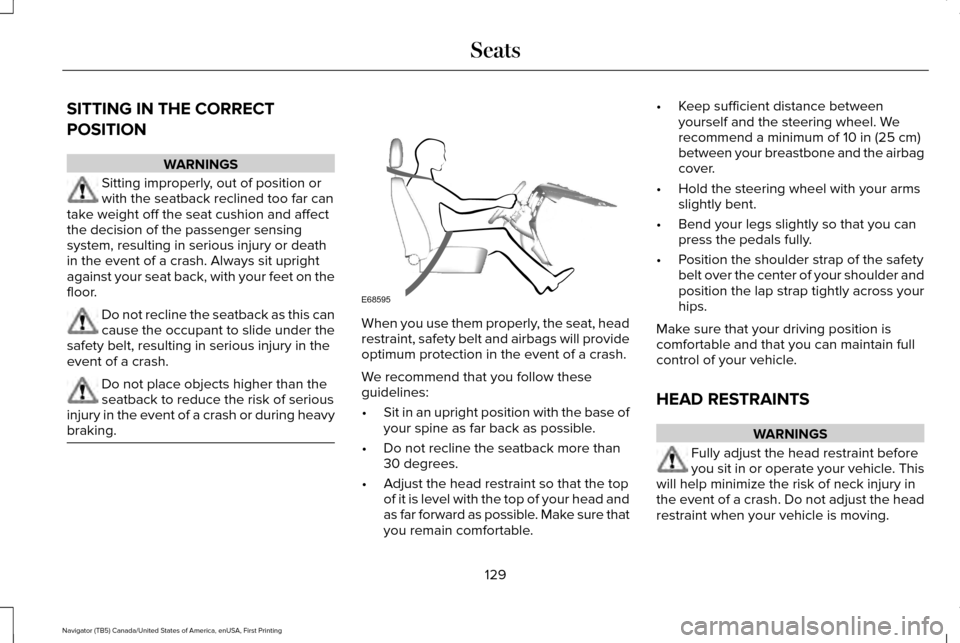
braking. When you use them properly, the seat, head
restraint, safety belt and airbags will provide
optimum protection in the event of a crash.
We recommend that you follow these
guidelines:
•
Sit in an upright position with the base of
your spine as far back as possible.
• Do not recline the seatback more than
30 degrees.
• Adjust the head restraint so that the top
of it is level with the top of your head and
as far forward as possible. Make sure that
you remain comfortable. •
Keep sufficient distance between
yourself and the steering wheel. We
recommend a minimum of 10 in (25 cm)
between your breastbone and the airbag
cover.
• Hold the steering wheel with your arms
slightly bent.
• Bend your legs slightly so that you can
press the pedals fully.
• Position the shoulder strap of the safety
belt over the center of your shoulder and
position the lap strap tightly across your
hips.
Make sure that your driving position is
comfortable and that you can maintain full
control of your vehicle.
HEAD RESTRAINTS WARNINGS
Fully adjust the head restraint before
you sit in or operate your vehicle. This
will help minimize the risk of neck injury in
the event of a crash. Do not adjust the head
restraint when your vehicle is moving.
129
Navigator (TB5) Canada/United States of America, enUSA, First Printing SeatsE68595
Page 133 of 532
WARNINGS
The head restraint is a safety device.
Whenever possible it should be
installed and properly adjusted when the
seat is occupied. Failure to adjust the head
restraint properly could reduce its
effectiveness during certain impacts. Install the head restraint properly to
help minimize the risk of neck injury in
the event of a crash. Note:
Adjust the seatback to an upright
driving position before adjusting the head
restraint. Adjust the head restraint so that
the top of it is level with the top of your head
and as far forward as possible. Make sure
that you remain comfortable. If you are
extremely tall, adjust the head restraint to
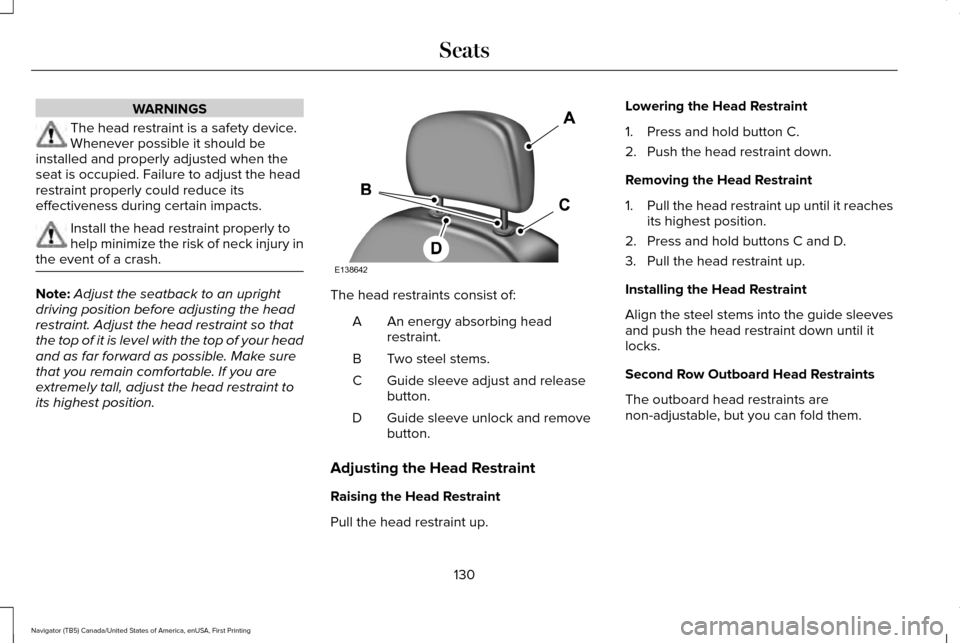
its highest position. The head restraints consist of:
An energy absorbing head
restraint.
A
Two steel stems.
B
Guide sleeve adjust and release
button.
C
Guide sleeve unlock and remove
button.
D
Adjusting the Head Restraint
Raising the Head Restraint
Pull the head restraint up. Lowering the Head Restraint
1. Press and hold button C.
2. Push the head restraint down.
Removing the Head Restraint
1.
Pull the head restraint up until it reaches
its highest position.
2. Press and hold buttons C and D.
3. Pull the head restraint up.
Installing the Head Restraint
Align the steel stems into the guide sleeves
and push the head restraint down until it
locks.
Second Row Outboard Head Restraints
The outboard head restraints are
non-adjustable, but you can fold them.
130
Navigator (TB5) Canada/United States of America, enUSA, First Printing SeatsE138642
Page 134 of 532
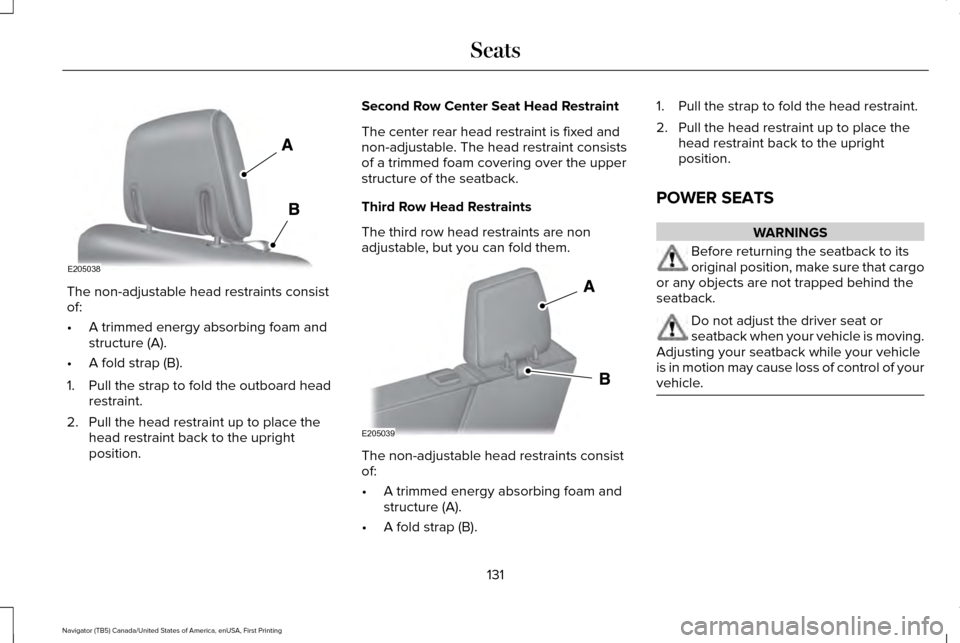
The non-adjustable head restraints consist
of:
•
A trimmed energy absorbing foam and
structure (A).
• A fold strap (B).
1. Pull the strap to fold the outboard head restraint.
2. Pull the head restraint up to place the head restraint back to the upright
position. Second Row Center Seat Head Restraint
The center rear head restraint is fixed and
non-adjustable. The head restraint consists
of a trimmed foam covering over the upper
structure of the seatback.
Third Row Head Restraints
The third row head restraints are non
adjustable, but you can fold them.
The non-adjustable head restraints consist
of:
•
A trimmed energy absorbing foam and
structure (A).
• A fold strap (B). 1. Pull the strap to fold the head restraint.
2. Pull the head restraint up to place the
head restraint back to the upright
position.
POWER SEATS WARNINGS
Before returning the seatback to its
original position, make sure that cargo
or any objects are not trapped behind the
seatback. Do not adjust the driver seat or
seatback when your vehicle is moving.
Adjusting your seatback while your vehicle
is in motion may cause loss of control of your
vehicle. 131
Navigator (TB5) Canada/United States of America, enUSA, First Printing SeatsE205038 E205039
Page 135 of 532
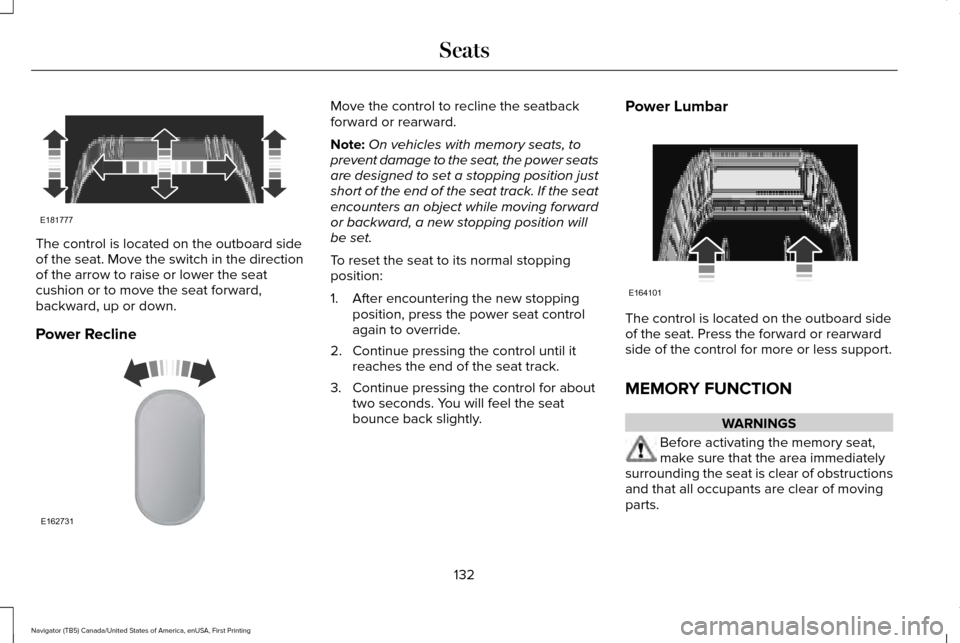
The control is located on the outboard side
of the seat. Move the switch in the direction
of the arrow to raise or lower the seat
cushion or to move the seat forward,
backward, up or down.
Power Recline Move the control to recline the seatback
forward or rearward.
Note:
On vehicles with memory seats, to
prevent damage to the seat, the power seats
are designed to set a stopping position just
short of the end of the seat track. If the seat
encounters an object while moving forward
or backward, a new stopping position will
be set.
To reset the seat to its normal stopping
position:
1. After encountering the new stopping position, press the power seat control
again to override.
2. Continue pressing the control until it reaches the end of the seat track.
3. Continue pressing the control for about two seconds. You will feel the seat
bounce back slightly. Power Lumbar
The control is located on the outboard side
of the seat. Press the forward or rearward
side of the control for more or less support.
MEMORY FUNCTION
WARNINGS
Before activating the memory seat,
make sure that the area immediately
surrounding the seat is clear of obstructions
and that all occupants are clear of moving
parts.
132
Navigator (TB5) Canada/United States of America, enUSA, First Printing SeatsE181777 E162731 E164101
Page 136 of 532
WARNINGS
Do not use the memory function when
your vehicle is moving.
This feature automatically recalls the position
of the following:
•
Driver seat.
• Power mirrors.
• Power steering column.
• Power adjustable foot pedals.
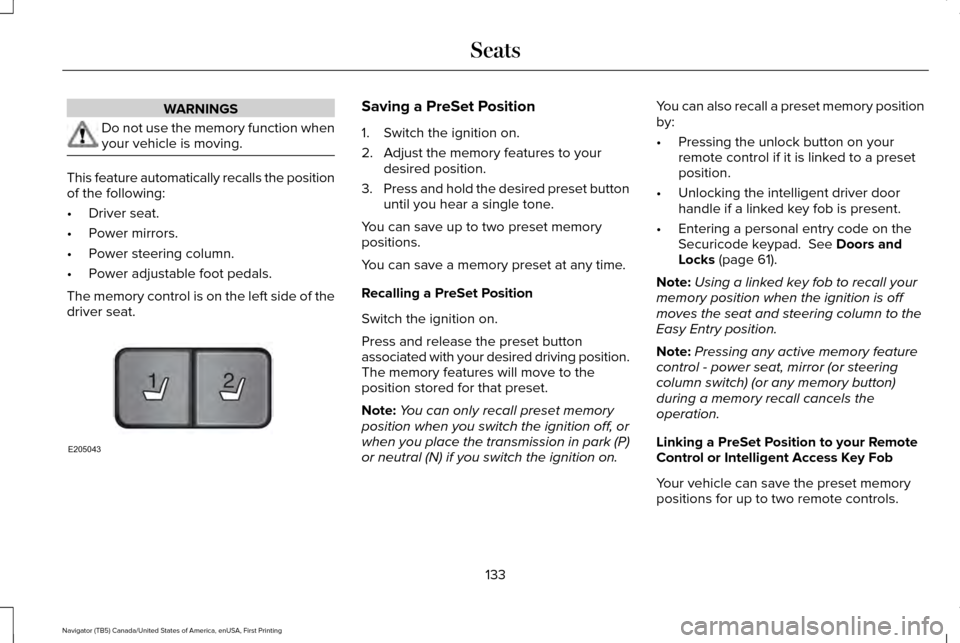
The memory control is on the left side of the
driver seat. Saving a PreSet Position
1. Switch the ignition on.
2. Adjust the memory features to your
desired position.
3. Press and hold the desired preset button
until you hear a single tone.
You can save up to two preset memory
positions.
You can save a memory preset at any time.
Recalling a PreSet Position
Switch the ignition on.
Press and release the preset button
associated with your desired driving position.
The memory features will move to the
position stored for that preset.
Note: You can only recall preset memory
position when you switch the ignition off, or
when you place the transmission in park (P)
or neutral (N) if you switch the ignition on. You can also recall a preset memory position
by:
•
Pressing the unlock button on your
remote control if it is linked to a preset
position.
• Unlocking the intelligent driver door
handle if a linked key fob is present.
• Entering a personal entry code on the
Securicode keypad. See Doors and
Locks (page 61).
Note: Using a linked key fob to recall your
memory position when the ignition is off
moves the seat and steering column to the
Easy Entry position.
Note: Pressing any active memory feature
control - power seat, mirror (or steering
column switch) (or any memory button)
during a memory recall cancels the
operation.
Linking a PreSet Position to your Remote
Control or Intelligent Access Key Fob
Your vehicle can save the preset memory
positions for up to two remote controls.
133
Navigator (TB5) Canada/United States of America, enUSA, First Printing Seats21
E205043
Page 137 of 532
1. With the ignition on, move the memory
positions to the desired positions.
2. Press and hold the desired preset button
for about five seconds. A tone sounds
after about two seconds. Continue
holding until you hear a second tone.
3. Within three seconds, press the lock button on the remote control you are
linking.
To unlink a remote control, follow the same
procedure – except in step 3, press the
unlock button on the remote control.
Note: If more than one linked remote control
or intelligent access key is in range, the
memory function moves to the settings of
the first key to initiate a memory recall.
Easy Entry and Exit Feature (If Equipped)
This feature adjusts the position of the seat
and steering column to allow easier exit and
entry to the vehicle. The driver seat automatically moves 2 inches
(5 centimeters) rearward when the
transmission is in park (P) and you remove
the key from the ignition or you switch the
ignition off.
The driver seat returns to the previous
position when you put the key in the ignition
or switch the ignition on.
You can enable or disable this feature in the
information display.
See Information
Displays (page 102).
REAR SEATS
Folding Down the Second Row 40%
Seat WARNINGS
Use caution when folding the seatback
to the flat back position as the system
will move forward when you lift the release
handle. WARNINGS
Before returning the seatback to its
original position, make sure that cargo
or any objects are not trapped behind the
seatback. After returning the seatback to its
original position, pull on the seatback to
make sure that it has fully latched. An
unlatched seat may become dangerous in
the event of a sudden stop or crash. Make sure that the head restraint is in the
down position and no objects such as books,
purses or briefcases are on the floor in front
of the second row seats before folding them
down.
Move the front passenger seat forward so
that the second row seat head restraint
clears the front seat.
134
Navigator (TB5) Canada/United States of America, enUSA, First Printing Seats
Page 138 of 532
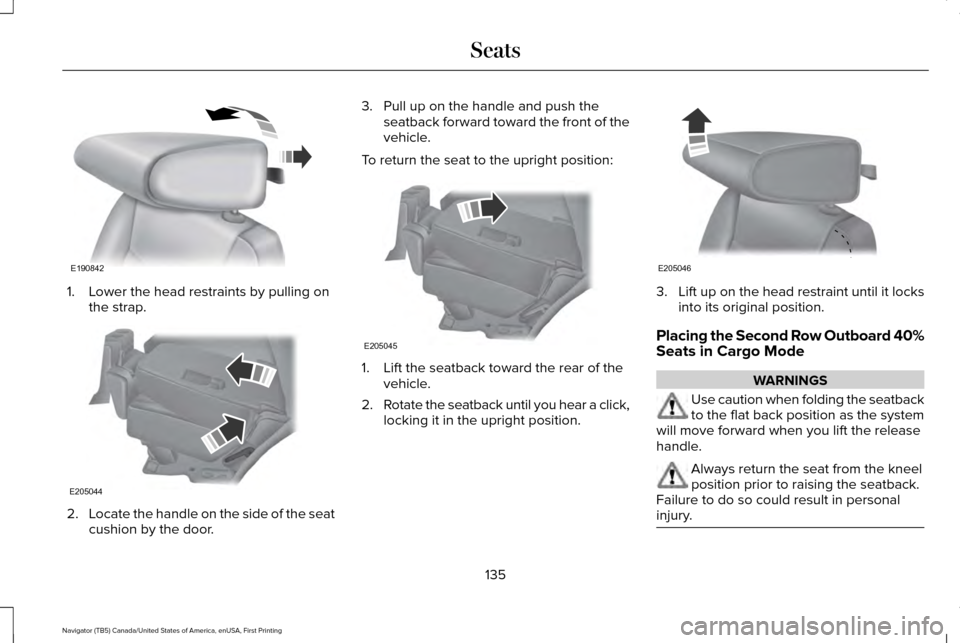
1. Lower the head restraints by pulling on
the strap. 2.
Locate the handle on the side of the seat
cushion by the door. 3. Pull up on the handle and push the
seatback forward toward the front of the
vehicle.
To return the seat to the upright position: 1. Lift the seatback toward the rear of the
vehicle.
2. Rotate the seatback until you hear a click,
locking it in the upright position. 3.
Lift up on the head restraint until it locks
into its original position.
Placing the Second Row Outboard 40%
Seats in Cargo Mode WARNINGS
Use caution when folding the seatback
to the flat back position as the system
will move forward when you lift the release
handle. Always return the seat from the kneel
position prior to raising the seatback.
Failure to do so could result in personal
injury. 135
Navigator (TB5) Canada/United States of America, enUSA, First Printing SeatsE190842 E205044 E205045 E205046
Page 139 of 532
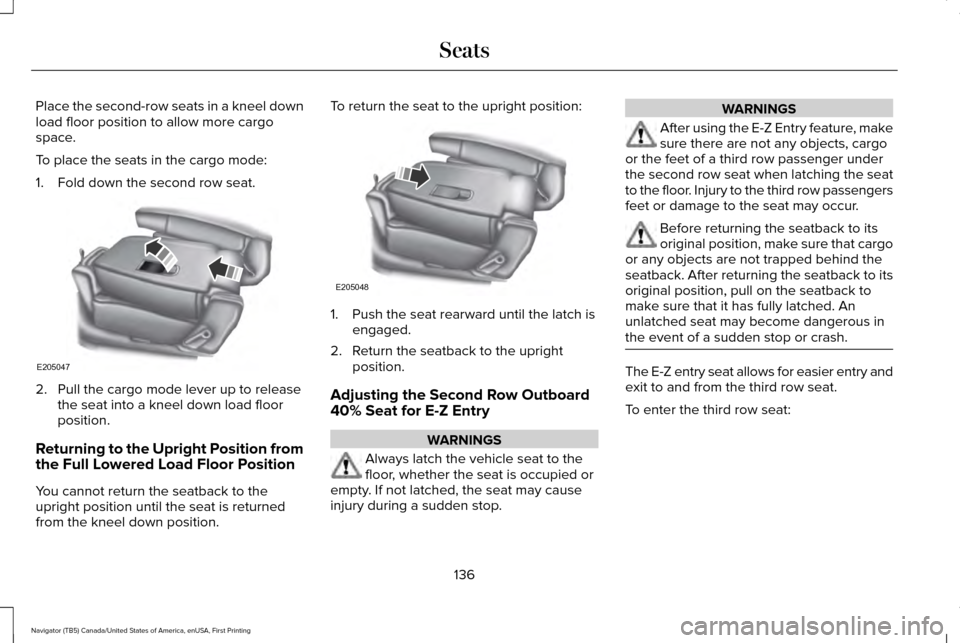
Place the second-row seats in a kneel down
load floor position to allow more cargo
space.
To place the seats in the cargo mode:
1. Fold down the second row seat.
2. Pull the cargo mode lever up to release
the seat into a kneel down load floor
position.
Returning to the Upright Position from
the Full Lowered Load Floor Position
You cannot return the seatback to the
upright position until the seat is returned
from the kneel down position. To return the seat to the upright position:
1. Push the seat rearward until the latch is
engaged.
2. Return the seatback to the upright position.
Adjusting the Second Row Outboard
40% Seat for E-Z Entry WARNINGS
Always latch the vehicle seat to the
floor, whether the seat is occupied or
empty. If not latched, the seat may cause
injury during a sudden stop. WARNINGS
After using the E-Z Entry feature, make
sure there are not any objects, cargo
or the feet of a third row passenger under
the second row seat when latching the seat
to the floor. Injury to the third row passengers
feet or damage to the seat may occur. Before returning the seatback to its
original position, make sure that cargo
or any objects are not trapped behind the
seatback. After returning the seatback to its
original position, pull on the seatback to
make sure that it has fully latched. An
unlatched seat may become dangerous in
the event of a sudden stop or crash. The E-Z entry seat allows for easier entry and
exit to and from the third row seat.
To enter the third row seat:
136
Navigator (TB5) Canada/United States of America, enUSA, First Printing SeatsE205047 E205048
Page 140 of 532
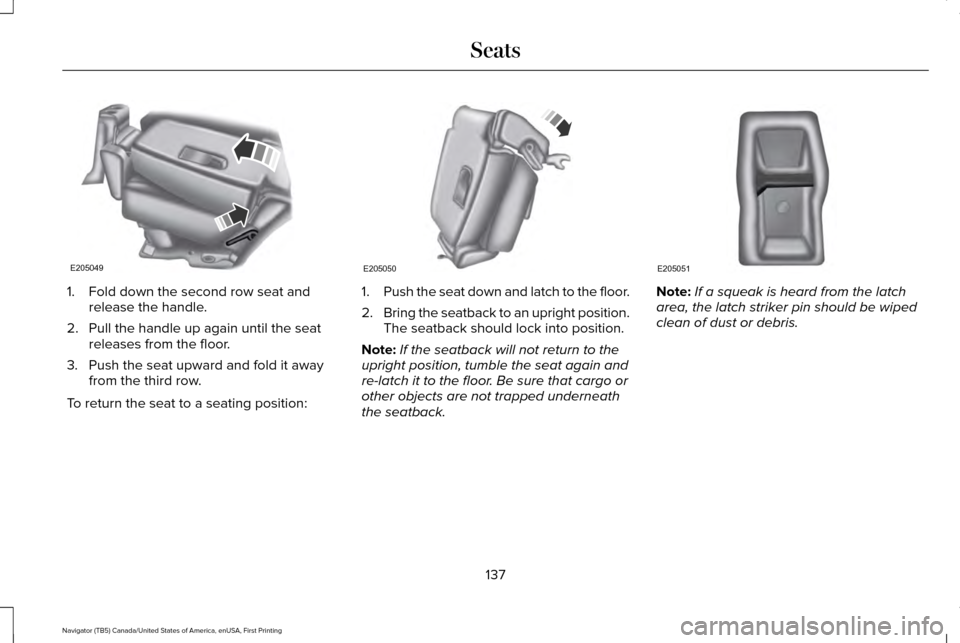
1. Fold down the second row seat and
release the handle.
2. Pull the handle up again until the seat releases from the floor.
3. Push the seat upward and fold it away from the third row.
To return the seat to a seating position: 1.
Push the seat down and latch to the floor.
2. Bring the seatback to an upright position.
The seatback should lock into position.
Note: If the seatback will not return to the
upright position, tumble the seat again and
re-latch it to the floor. Be sure that cargo or
other objects are not trapped underneath
the seatback. Note:
If a squeak is heard from the latch
area, the latch striker pin should be wiped
clean of dust or debris.
137
Navigator (TB5) Canada/United States of America, enUSA, First Printing SeatsE205049 E205050 E205051