LINCOLN NAVIGATOR 2018 Manual Online
Manufacturer: LINCOLN, Model Year: 2018, Model line: NAVIGATOR, Model: LINCOLN NAVIGATOR 2018Pages: 649, PDF Size: 4.96 MB
Page 81 of 649
To Unlock the Liftgate Glass
Enter the factory-set 5-digit code or yourpersonal code, then press 5·6 to unlock theliftgate glass.
Displaying the Factory-Set Code
Note:Two programmed intelligent accesskeys are required for this procedure.
1. Open the floor console storagecompartment lid.
2. With the buttons facing the rear of yourvehicle and the key ring facing upward,place the first intelligent access key intothe backup slot inside the center console.
3. Press the push button ignition switchonce and wait for a few seconds.
4. Press the push button ignition switchagain and remove the intelligent accesskey from the center console.
5. Insert the second programmed key intothe backup slot in the center console,then press the push button ignitionswitch.
The factory-set code appears in theinformation display for a few seconds.
Note:The code may not display until afterany other warning messages first display.
78
Navigator (TB9) Canada/United States of America, enUSA, Edition date: 201708, Third-Printing-
Doors and Locks
Page 82 of 649
POWER LIFTGATE
WARNING: It is extremely dangerousto ride in a cargo area, inside or outside ofa vehicle. In a crash, people riding in theseareas are more likely to be seriouslyinjured or killed. Do not allow people toride in any area of your vehicle that is notequipped with seats and seatbelts. Makesure everyone in your vehicle is in a seatand properly using a seatbelt. Failure tofollow this warning could result in seriouspersonal injury or death.
WARNING: Make sure that you fullyclose the liftgate to prevent exhaust fumesfrom entering your vehicle. If you areunable to fully close the tailgate, open theair vents or the windows to allow fresh airto enter your vehicle. Failure to follow thisinstruction could result in personal injuryor death.
WARNING: Make sure that you fullyclose the liftgate to prevent passengersand cargo from falling out. Failure to followthis instruction could result in personalinjury or death.
WARNING: Keep keys out of reachof children. Do not allow children tooperate or play near an open or movingpower liftgate. You should supervise theoperation of the power liftgate at all times.
Note: Make sure that you close the liftgatebefore operating or moving your vehicle,especially in an enclosure, like a garage ora parking structure. This could damage theliftgate and its components.
Note: Do not hang anything, for example abike rack, from the glass or liftgate. Thiscould damage the liftgate and itscomponents.
The liftgate only operates with thetransmission in park (P).
Three warning tones sound as the liftgatebegins to power close. If there is a problemwith the open or close request, one of thefollowing may occur:
•One tone sounds if the ignition is on andthe transmission is not in park (P).
•Three tones sound if the battery voltageis below the minimum operating voltage.
•One tone sounds if the vehicle speed isat or above 3 mph (5 km/h)
If the liftgate starts to close after it has fullyopened, this indicates there may beexcessive weight on the liftgate or a possiblestrut failure. A repetitive tone sounds andthe liftgate closes under control. Removeany excessive weight from the liftgate. If theliftgate continues to close after opening,have the system checked as soon aspossible.
Opening and Closing the Liftgate
WARNING: Make sure all personsare clear of the power liftgate area beforeusing the power liftgate control.
79
Navigator (TB9) Canada/United States of America, enUSA, Edition date: 201708, Third-Printing-
Liftgate
Page 83 of 649
Note: Objects too close to your vehicle, forexample a wall, garage door or anothervehicle may come into contact with themoving liftgate. Make sure the area behindyour vehicle is free from obstruction and thatthere is enough room for you to operate theliftgate. This could damage the liftgate andits components.
Note:Be careful when opening or closingthe liftgate in a garage or other enclosedarea to avoid damaging the liftgate.
Note: Do not leave the liftgate open whendriving. This could damage the liftgate andits components.
From the Instrument Panel
With the transmission in park (P),press the button on the instrumentpanel.
Remote Control
Press the button twice within a fewseconds.
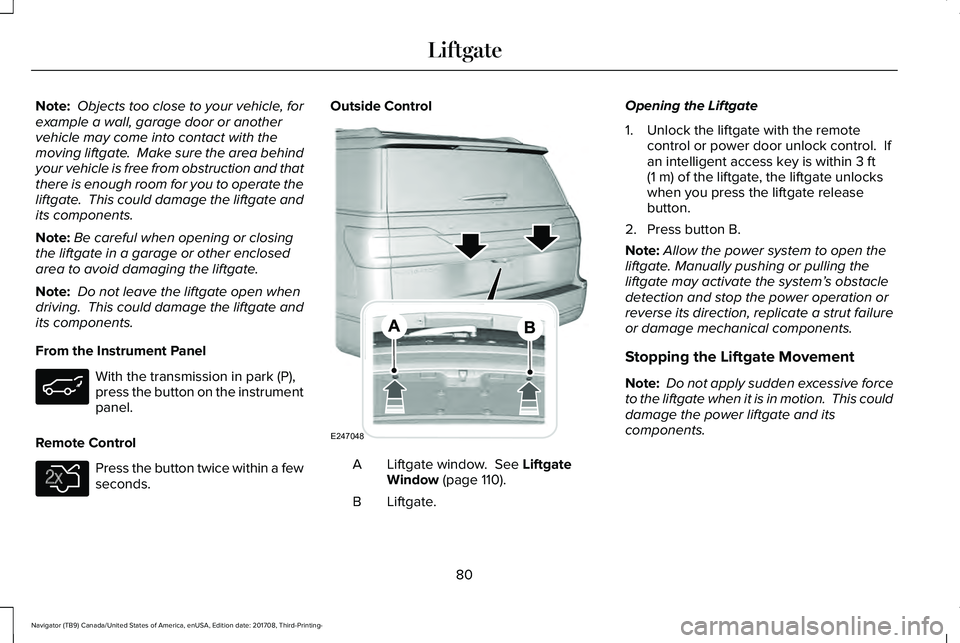
Outside Control
Liftgate window. See LiftgateWindow (page 110).A
Liftgate.B
Opening the Liftgate
1. Unlock the liftgate with the remotecontrol or power door unlock control. Ifan intelligent access key is within 3 ft(1 m) of the liftgate, the liftgate unlockswhen you press the liftgate releasebutton.
2. Press button B.
Note:Allow the power system to open theliftgate. Manually pushing or pulling theliftgate may activate the system’s obstacledetection and stop the power operation orreverse its direction, replicate a strut failureor damage mechanical components.
Stopping the Liftgate Movement
Note: Do not apply sudden excessive forceto the liftgate when it is in motion. This coulddamage the power liftgate and itscomponents.
80
Navigator (TB9) Canada/United States of America, enUSA, Edition date: 201708, Third-Printing-
Liftgate E138630 E247048
Page 84 of 649
You can stop the liftgate movement by doingany of the following:
•Pressing the liftgate control button.
•Pressing the liftgate button on the remotecontrol twice.
•Pressing the liftgate button on theinstrument panel.
Setting the Liftgate Open Height
1. Open the liftgate.
2. Stop the liftgate movement by pressingthe control button on the liftgate when itreaches the desired height.
Note:Once the liftgate has stopped moving,you can also manually move it to the desiredheight.
3.Press and hold the liftgate control buttonon the liftgate until a tone sounds,indicating programming is complete.
Note:You can only use the liftgate controlbutton to program the height.
Note:You cannot program the height if theliftgate position is too low.
The new open liftgate height is recalledwhen the power liftgate is opened. Tochange the programmed height, repeat theabove procedure. Once you open the powerliftgate, you can manually move it to adifferent height.
Note:The system recalls the newprogrammed height, even if you disconnectthe battery.
When operating the power liftgate after youhave programmed a lower height than fullyopen, you can fully open the liftgate bymanually pushing it upward to the maximumopen position.
Obstacle Detection
When Closing
The system stops when it detects anobstacle. Three tones sound and the systemreverses to open. When you remove theobstacle, you can power close the liftgate.
Note:Entering your vehicle when the liftgateis closing can cause your vehicle to bounceand activate obstacle detection. To preventthis, let the power liftgate close completelybefore you enter your vehicle. Before drivingoff, check the instrument cluster for a liftgateor door ajar message or warning indicator.Failure to do this could result inunintentionally leaving the liftgate openwhen driving.
When Opening
The system stops when it detects anobstacle and two short tones sound. Remove the obstacle to operate the liftgate.
Using the Hands-Free Liftgate (If Equipped)
Make sure you have an intelligent accesskey within 3 ft (1 m) of the liftgate.
1. Stand behind your vehicle, and face theliftgate.
2. Move your foot, in a single-kick motion,without pausing, under and away fromthe rear bumper detection area.
3. The liftgate power opens or closes.
81
Navigator (TB9) Canada/United States of America, enUSA, Edition date: 201708, Third-Printing-
Liftgate
Page 85 of 649
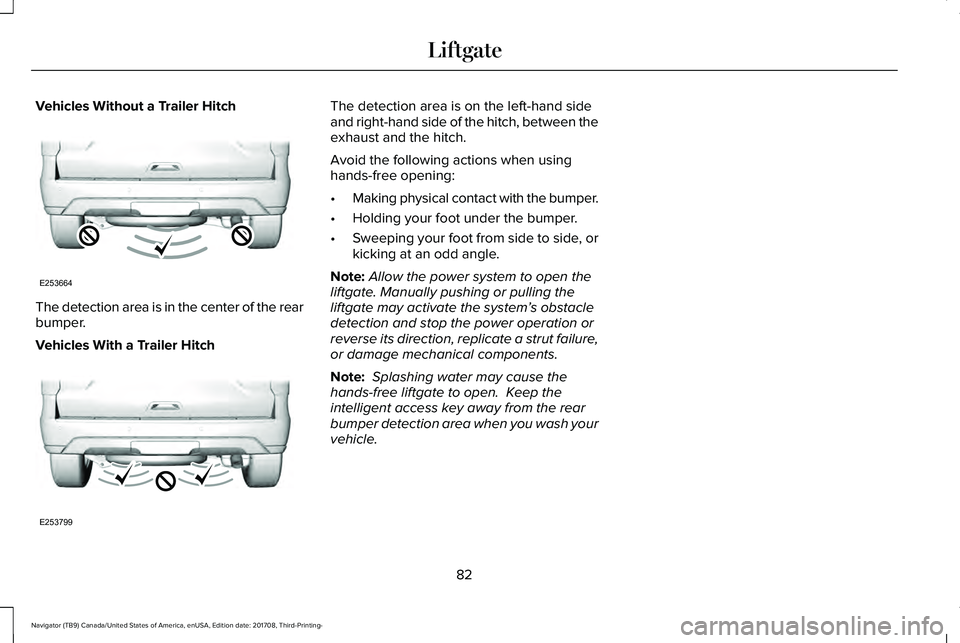
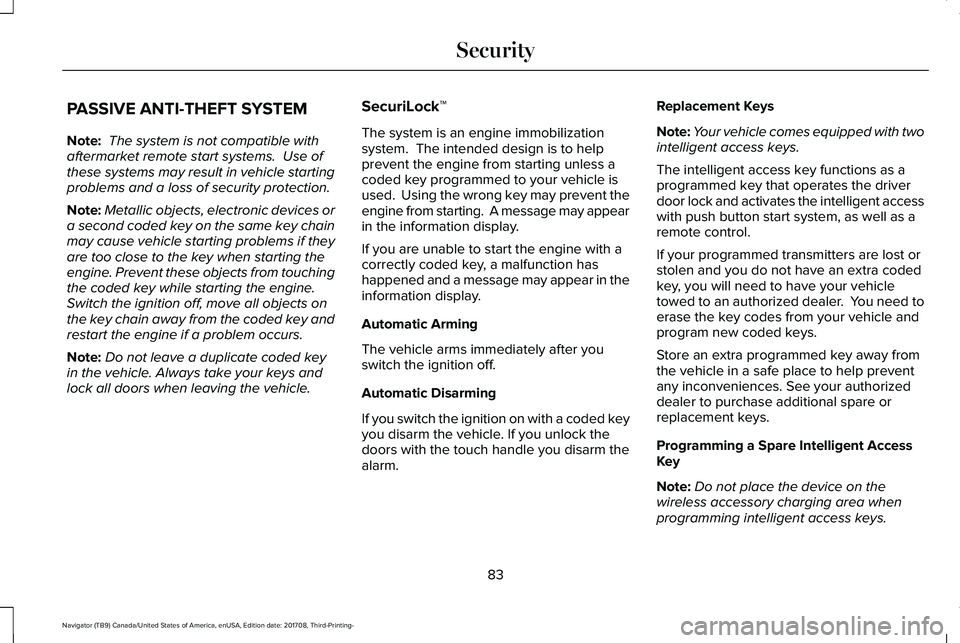
Vehicles Without a Trailer Hitch
The detection area is in the center of the rearbumper.
Vehicles With a Trailer Hitch
The detection area is on the left-hand sideand right-hand side of the hitch, between theexhaust and the hitch.
Avoid the following actions when usinghands-free opening:
•Making physical contact with the bumper.
•Holding your foot under the bumper.
•Sweeping your foot from side to side, orkicking at an odd angle.
Note:Allow the power system to open theliftgate. Manually pushing or pulling theliftgate may activate the system’s obstacledetection and stop the power operation orreverse its direction, replicate a strut failure,or damage mechanical components.
Note: Splashing water may cause thehands-free liftgate to open. Keep theintelligent access key away from the rearbumper detection area when you wash yourvehicle.
82
Navigator (TB9) Canada/United States of America, enUSA, Edition date: 201708, Third-Printing-
LiftgateE253664 E253799
Page 86 of 649
PASSIVE ANTI-THEFT SYSTEM
Note: The system is not compatible withaftermarket remote start systems. Use ofthese systems may result in vehicle startingproblems and a loss of security protection.
Note:Metallic objects, electronic devices ora second coded key on the same key chainmay cause vehicle starting problems if theyare too close to the key when starting theengine. Prevent these objects from touchingthe coded key while starting the engine.Switch the ignition off, move all objects onthe key chain away from the coded key andrestart the engine if a problem occurs.
Note:Do not leave a duplicate coded keyin the vehicle. Always take your keys andlock all doors when leaving the vehicle.
SecuriLock™
The system is an engine immobilizationsystem. The intended design is to helpprevent the engine from starting unless acoded key programmed to your vehicle isused. Using the wrong key may prevent theengine from starting. A message may appearin the information display.
If you are unable to start the engine with acorrectly coded key, a malfunction hashappened and a message may appear in theinformation display.
Automatic Arming
The vehicle arms immediately after youswitch the ignition off.
Automatic Disarming
If you switch the ignition on with a coded keyyou disarm the vehicle. If you unlock thedoors with the touch handle you disarm thealarm.
Replacement Keys
Note:Your vehicle comes equipped with twointelligent access keys.
The intelligent access key functions as aprogrammed key that operates the driverdoor lock and activates the intelligent accesswith push button start system, as well as aremote control.
If your programmed transmitters are lost orstolen and you do not have an extra codedkey, you will need to have your vehicletowed to an authorized dealer. You need toerase the key codes from your vehicle andprogram new coded keys.
Store an extra programmed key away fromthe vehicle in a safe place to help preventany inconveniences. See your authorizeddealer to purchase additional spare orreplacement keys.
Programming a Spare Intelligent AccessKey
Note:Do not place the device on thewireless accessory charging area whenprogramming intelligent access keys.
83
Navigator (TB9) Canada/United States of America, enUSA, Edition date: 201708, Third-Printing-
Security
Page 87 of 649
Note:You can program a maximum of fourkeys to your vehicle.
You must have two previously programmedintelligent access keys inside your vehicleand the new unprogrammed intelligentaccess key readily accessible. You canpurchase replacement keys or remotecontrols from an authorized dealer.
Make sure that the ignition is switched offbefore beginning this procedure. Make surethat you close all the doors before beginningand that they remain closed throughout theprocedure. Carry out all steps within 30seconds of starting the sequence. Stop andwait for at least one minute before startingagain if you carry out any steps out ofsequence.
Read and understand the entire procedurebefore you begin.
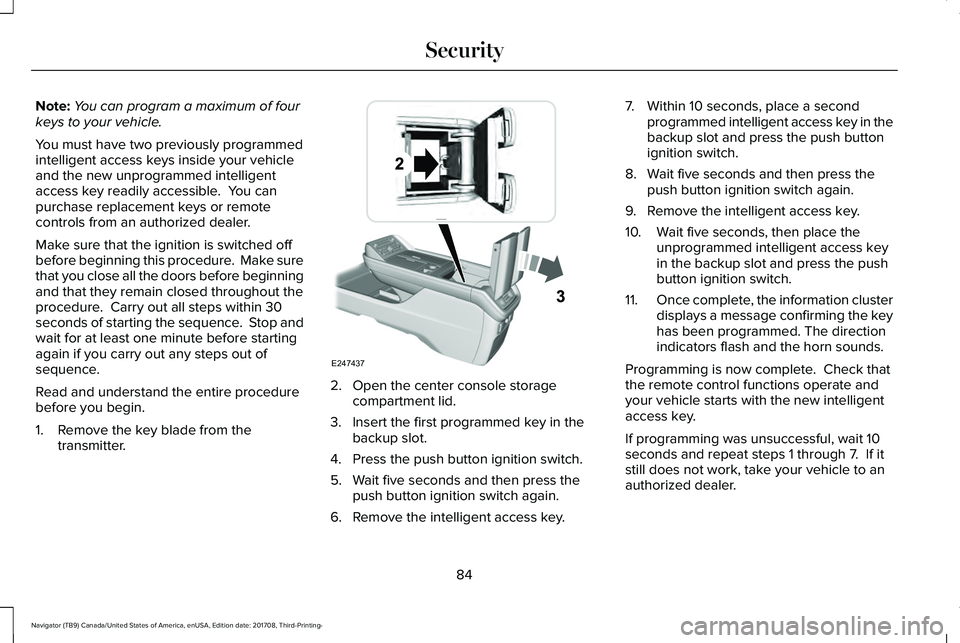
1. Remove the key blade from thetransmitter.
2. Open the center console storagecompartment lid.
3. Insert the first programmed key in thebackup slot.
4. Press the push button ignition switch.
5. Wait five seconds and then press thepush button ignition switch again.
6. Remove the intelligent access key.
7. Within 10 seconds, place a secondprogrammed intelligent access key in thebackup slot and press the push buttonignition switch.
8. Wait five seconds and then press thepush button ignition switch again.
9. Remove the intelligent access key.
10. Wait five seconds, then place theunprogrammed intelligent access keyin the backup slot and press the pushbutton ignition switch.
11.Once complete, the information clusterdisplays a message confirming the keyhas been programmed. The directionindicators flash and the horn sounds.
Programming is now complete. Check thatthe remote control functions operate andyour vehicle starts with the new intelligentaccess key.
If programming was unsuccessful, wait 10seconds and repeat steps 1 through 7. If itstill does not work, take your vehicle to anauthorized dealer.
84
Navigator (TB9) Canada/United States of America, enUSA, Edition date: 201708, Third-Printing-
SecurityE247437
Page 88 of 649
ANTI-THEFT ALARM - VEHICLES
WITH: INTERIOR SENSOR
Alarm System
Perimeter Alarm
The perimeter alarm is a deterrent againstunauthorized access to your vehicle throughthe doors and the hood.
Interior Sensors
Note:Do not cover up the interior lamp unitsensors.
The interior lamp unit sensors are in theoverhead console. The sensors act as adeterrent against unauthorized intrusion bysensing any movement inside your vehicle.
Inclination Sensors
When you lock your vehicle and arm thealarm, the sensors are designed to detectan attempt to raise your vehicle, for exampleto remove a wheel or to tow it away.
Alarm Settings
ALL SENSORS ACTIVE is the standardsetting. In this mode, the interior sensors areon when you arm the alarm.
In PERIMETER SENSING mode, the interiorsensors are off when you arm the alarm.
You can change the setting through theinformation display. See General Information(page 119).
Ask on Exit (If Equipped)
You can set the information display to askyou each time which level of guard you wishto set.
Triggering the Alarm
Once armed, the alarm triggers in any of thefollowing ways:
•If someone opens a door, the liftgate orthe hood without a valid key or remotecontrol.
•If you switch your vehicle on without acorrectly coded key.
•If the interior sensors detect movementwithin your vehicle.
If the alarm triggers, the alarm horn soundsfor 30 seconds and the hazard flashers turnon for five minutes.
Any further attempts to perform one of theabove triggers the alarm again.
Arming the Alarm
To arm the alarm, lock your vehicle. SeeDoors and Locks (page 72).
85
Navigator (TB9) Canada/United States of America, enUSA, Edition date: 201708, Third-Printing-
Security
Page 89 of 649
Disarming the Alarm
Vehicles Without Keyless Entry
Disarm and silence the alarm by unlockingthe doors with the key and switching yourvehicle on with a correctly coded key, or byunlocking the doors with the remote control.
Vehicles with Keyless Entry
Note:A valid remote control must be locatedwithin the detection range of that door forkeyless entry. See Keyless Entry (page 76).
Disarm and silence the alarm by unlockingthe doors and switching your vehicle on, orby unlocking the doors with the remotecontrol.
ANTI-THEFT ALARM - VEHICLES
WITH: ANTI-THEFT ALARM
SYSTEM
The system will warn you of an unauthorizedentry to your vehicle. It will be triggered ifany door, the luggage compartment or thehood is opened without using the key,remote control or keyless entry keypad.
The direction indicators will flash and thehorn will sound if unauthorized entry isattempted while the alarm is armed.
Take all remote controls to an authorizeddealer if there is any potential alarm problemwith your vehicle.
Arming the Alarm
The alarm is ready to arm when there is nota key in your vehicle. Electronically lock yourvehicle to arm the alarm.
Disarming the Alarm
Disarm the alarm by any of the followingactions:
•Unlock the doors or luggagecompartment with the remote control orkeyless entry keypad.
•Switch your vehicle on or start yourvehicle.
•Use a key in the driver door to unlockyour vehicle, then switch your vehicle onwithin 12 seconds.
Note:Pressing the panic button on theremote control will stop the horn and signalindicators, but will not disarm the system.
86
Navigator (TB9) Canada/United States of America, enUSA, Edition date: 201708, Third-Printing-
Security
Page 90 of 649
USING POWER RUNNING BOARDS
WARNING: In extreme climates,excessive ice buildup may occur, causingthe running boards not to deploy. Makesure that the running boards havedeployed, and have finished moving beforeattempting to step on them. The runningboards will resume normal function oncethe blockage is cleared.
WARNING: Switch off the runningboards before jacking or placing any objectunder your vehicle. Never place your handbetween the extended running board andyour vehicle. A moving running board maycause injury.
Note:Do not use the running boards, frontand rear hinge assemblies, running boardmotors, or the running board underbodymounts to lift your vehicle when jacking.Always use proper jacking points.
Note:The running boards may operate moreslowly in cool temperatures.
Note:The running board mechanism maytrap debris such as mud, dirt, snow, ice andsalt. This may cause unwanted noise. If thishappens, manually set the running boardsto the deployed position. Then, wash thesystem, in particular the front and rear hingearms, with a high-pressure car wash wand.
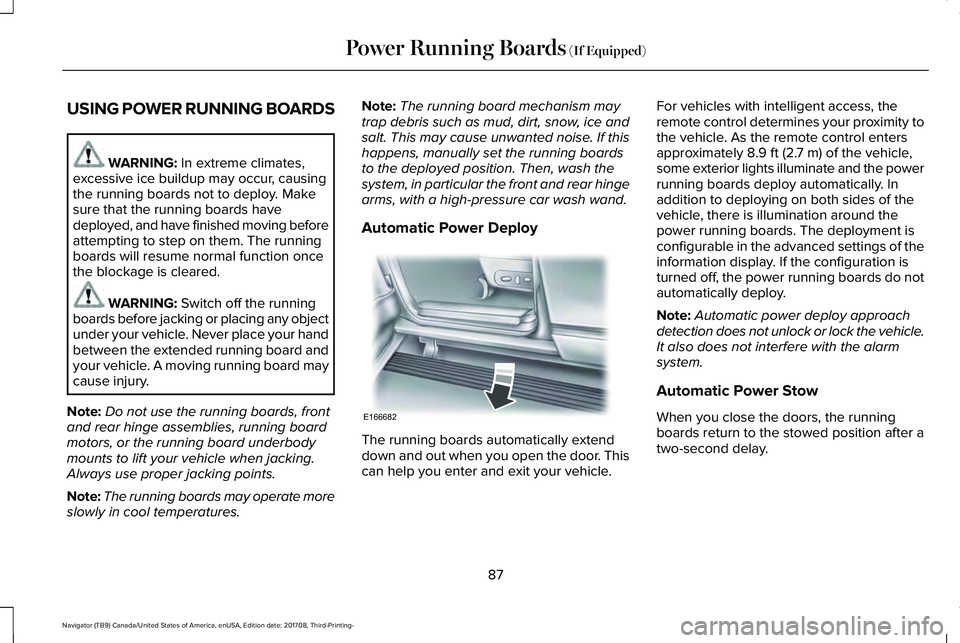
Automatic Power Deploy
The running boards automatically extenddown and out when you open the door. Thiscan help you enter and exit your vehicle.
For vehicles with intelligent access, theremote control determines your proximity tothe vehicle. As the remote control entersapproximately 8.9 ft (2.7 m) of the vehicle,some exterior lights illuminate and the powerrunning boards deploy automatically. Inaddition to deploying on both sides of thevehicle, there is illumination around thepower running boards. The deployment isconfigurable in the advanced settings of theinformation display. If the configuration isturned off, the power running boards do notautomatically deploy.
Note:Automatic power deploy approachdetection does not unlock or lock the vehicle.It also does not interfere with the alarmsystem.
Automatic Power Stow
When you close the doors, the runningboards return to the stowed position after atwo-second delay.
87
Navigator (TB9) Canada/United States of America, enUSA, Edition date: 201708, Third-Printing-
Power Running Boards (If Equipped)E166682