Shield LINCOLN NAVIGATOR 2020 User Guide
[x] Cancel search | Manufacturer: LINCOLN, Model Year: 2020, Model line: NAVIGATOR, Model: LINCOLN NAVIGATOR 2020Pages: 622, PDF Size: 6.47 MB
Page 119 of 622
WHAT IS AUTOMATIC HIGH BEAM
CONTROL
The system turns on high beams if it is dark
enough and no other traffic is present. If it
detects an approaching vehicle
’s headlamps
or tail lamps, or street lighting ahead, the
system turns the high beams off. Low beams
remain on.
A camera sensor, centrally mounted behind
the windshield of your vehicle, continuously
monitors conditions to turn the high beams
on and off.
SWITCHING AUTOMATIC HIGH
BEAM CONTROL ON AND OFF
Switch the system on or off using the
information display. See General
Information (page 133). Activating the Automatic High Beam
Control Switch the lighting control to the
autolamps position to activate.
See
Autolamps (page 110).
Note: Automatic high beams are not
available when autolamps are not turned
on.
When active, the high beams turn on if:
• The ambient light level is low enough.
• There is no traffic in front of your vehicle.
• The vehicle speed is greater than
approximately
32 mph (52 km/h).
When active, the high beams turn off if:
• The ambient light level is high enough
that high beams are not required.
• The system detects an approaching
vehicle's headlamps or tail lamps.
• The system detects severe rain, snow or
fog.
• The camera is blocked.
• The vehicle speed falls below
approximately
27 mph (44 km/h). Note:
The deactivation speed is lower on
curves.
Note: High beam reactivation may be
delayed in certain curvy road situations.
Note: The system may not operate properly
if the sensor is blocked. Keep the windshield
free from obstruction or damage.
Note: The system may not operate properly
in cold or inclement conditions. You can
switch on the high beams by overriding the
system.
Note: If the system detects a blockage, for
example bird droppings, bug splatter, snow
or ice, the system goes into low beam mode
until you clear the blockage. A message may
appear in the information display if the
camera is blocked.
Note: Using much larger tires or equipping
vehicle accessories such as snowplows can
modify your vehicle's ride height and
degrade automatic high beam control
performance.
116
Navigator (TB9) Canada/United States of America, enUSA, Edition date: 201907, Second-Printing Automatic High Beam Control
Page 125 of 622
Auto-Dimming Mirror
Note:
Do not block the sensors on the front
and back of the mirror. A rear center
passenger or raised rear center head
restraint may also block light from reaching
the sensor.
The mirror dims to reduce the effect of bright
light from behind. It returns to normal when
the bright light from behind is no longer
present or if you shift into reverse (R).
CHILDMINDER MIRROR
On overhead consoles, the childminder
mirror allows the driver to view the rear
seating area. WARNING: Do not use the
childminder mirror to view rearward traffic,
do not allow rear passengers to distract
you from the driving task, and make sure
the rear view mirror has a clear view of
rearward traffic. Failure to do so could
increase the risk of a crash from an unseen
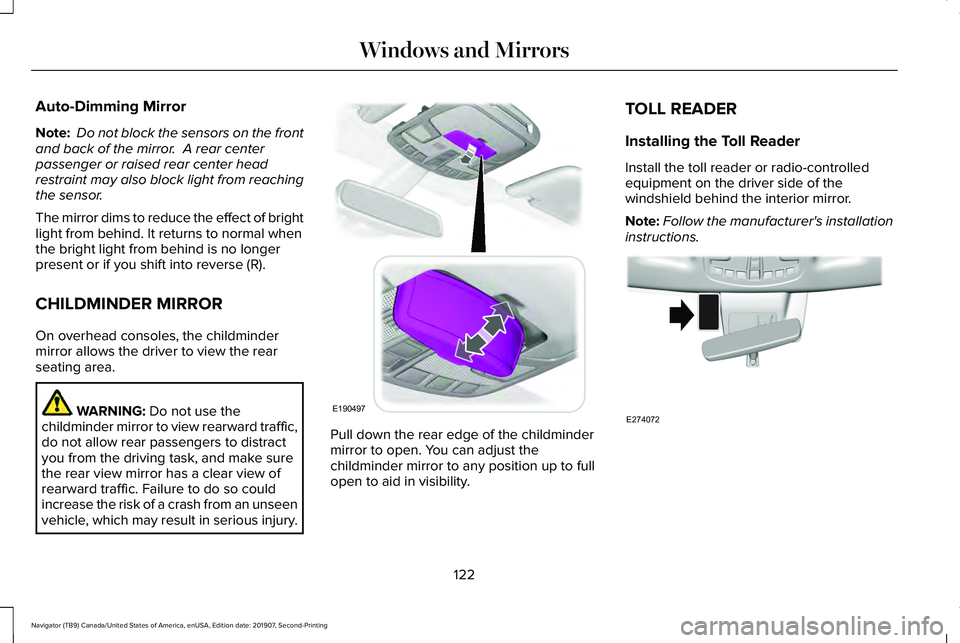
vehicle, which may result in serious injury. Pull down the rear edge of the childminder
mirror to open. You can adjust the
childminder mirror to any position up to full
open to aid in visibility.TOLL READER
Installing the Toll Reader
Install the toll reader or radio-controlled
equipment on the driver side of the
windshield behind the interior mirror.
Note:
Follow the manufacturer's installation
instructions. 122
Navigator (TB9) Canada/United States of America, enUSA, Edition date: 201907, Second-Printing Windows and MirrorsE190497 E274072
Page 151 of 622
Action
Message
Displayed during spare key programming when not enough keys have been programmed.
Not Enough Keys Learned
Displays when the key battery is low. Change the battery as soon as possible.
Key Battery Low Replace Soon
Displays when the vehicle is switched off.
Vehicle Switched Off
Lane Keeping System Action
Message
The system has malfunctioned. Contact an authorized dealer as soon as po\
ssible.
Lane Keeping Sys. Malfunction Service
Required
The system has detected a condition that has caused the system to be tem\
porarily unavailable.
Front Camera Temporarily Not Available
The system has detected a condition that requires the windshield to be c\
leaned to operateproperly.
Front Camera Low Visibility Clean Screen
The system has malfunctioned. Contact an authorized dealer as soon as po\
ssible.
Front Camera Malfunction Service
Required
The system requests the driver to keep their hands on the steering wheel.
Keep Hands on Steering Wheel
148
Navigator (TB9) Canada/United States of America, enUSA, Edition date: 201907, Second-Printing Information Displays
Page 164 of 622
Action
Message
Displays when the brake pedal needs to be depressed to enable the transmission to shift from park.
Depress Brake to Shift from Park
Displays when Stay in Neutral Mode is active. See Automatic Transmission (page 222).
Stay in Neutral Mode Engaged
Displays when the neutral button N needs to be pressed again to enter Stay in Neutral Mode.See
Automatic Transmission (page 222).
To Stay in Neutral When Exiting Vehicle
Select N Again
HEAD UP DISPLAY
(IF EQUIPPED)
Head Up Display (HUD)
This is a visual system that shows information
in your field of view as you drive. The
information comes from various vehicle
systems and includes vehicle speed, speed
limit, navigation, and advanced driver
assistance systems (ADAS), such as adaptive
cruise control (ACC) and the lane keeping
system. This system projects the information
off the windshield, and focuses the image near the end of the hood approximately
7 ft
(2 m) in front of the driver. Viewing this
information does not require you to
significantly move your head, allowing you
to keep your eyes on the road while having
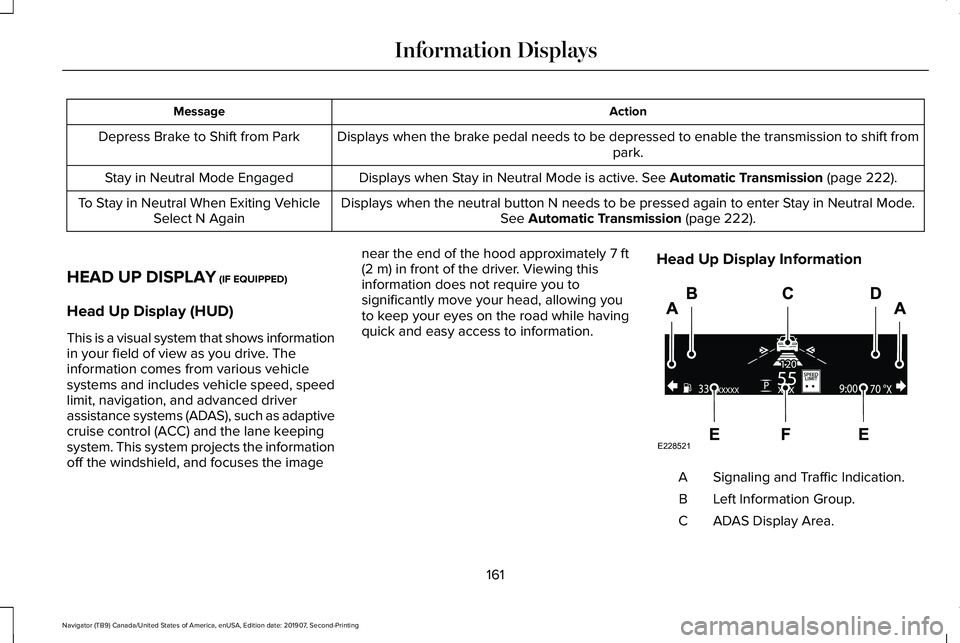
quick and easy access to information. Head Up Display Information Signaling and Traffic Indication.
A
Left Information Group.
B
ADAS Display Area.
C
161
Navigator (TB9) Canada/United States of America, enUSA, Edition date: 201907, Second-Printing Information DisplaysE228521
Page 167 of 622
Maintaining Your Head Up Display
•
Do not place objects onto the transparent
cover, as they may block you from seeing
portions of the image. These objects
could also damage the cover and affect
the quality of the projected image.
• The system uses a special windshield
designed to provide the optimum image
quality. You must replace the windshield
in a vehicle with this system with a
certified original equipment
manufactured (OEM) head up display
windshield. Replacing this system's
windshield with a non-head up display
windshield causes a double image or
distorted image. Have an authorized
dealer or authorized repair facility replace
the windshield.
• Light conditions such as oncoming
headlamps, sunrise, sunset or reflections
off of wet road surfaces can affect the
driver's ability to see the HUD image.
• Clean the windshield often for optimal
HUD performance. See Cleaning the
Windows and Wiper Blades (page 396).
164
Navigator (TB9) Canada/United States of America, enUSA, Edition date: 201907, Second-Printing Information Displays
Page 169 of 622
Note:
The system starts at the previous
setting when you switch on AUTO mode. Note:
You can also switch off dual zone
mode by pressing and holding the button for
more than two seconds.
Auto Mode Indicator Status Description
Auto Mode Indicator Status
One indicator illuminated. •The blower motor speed is reduced.
•Use this setting to minimize the amount of noise from the blower motor.
• This setting increases the time taken to cool the interior.
Two indicators illuminated. •The blower motor speed is moderate.
Three indicators illuminated. •The blower motor speed is increased.
•Use this setting to reduce the time taken to cool the interior.
• This setting increases the amount of noise from the blower motor.
Switching Defrost On and Off Press and release the button to
distribute air through the
windshield air vents and de-mister.
Air directed to the instrument panel and
footwell air vents turns off. You can also use
this setting to defog and clear the windshield
of a thin covering of ice.
Switching the Air Conditioning On and
Off Press and release the button.
Use air conditioning with recirculated air to
improve cooling performance and efficiency.
166
Navigator (TB9) Canada/United States of America, enUSA, Edition date: 201907, Second-Printing Climate Control
Page 170 of 622
Note:
In certain conditions, such as
maximum defrost, the air conditioning
compressor may continue to operate even
though you switch off the air conditioning.
Switching Maximum Air Conditioning
On and Off Press and release the button for
maximum cooling.
The left-hand and right-hand settings set to
LO, recirculated air flows through the
instrument panel air vents, air conditioning
turns on and the blower motor adjusts to the
highest speed.
Switching Recirculated Air On and Off Press and release the button to
switch between outside air and
recirculated air.
The air currently in the passenger
compartment recirculates. This may reduce
the time needed to cool the interior, when
used with A/C, and reduce unwanted odors
from entering your vehicle. Note:
Recirculated air may turn off, or
prevent you from switching on, in all air flow
modes except MAX A/C to reduce the risk
of fogging. Recirculation may also turn on
and off in various air distribution control
combinations during hot weather to improve
cooling efficiency.
Switching the Heated Seats On and Off See
Heated Seats (page 191).
Switching the Ventilated Seats On and
Off See
Ventilated Seats (page 191).
HINTS ON CONTROLLING THE
INTERIOR CLIMATE
General Hints
Note: Prolonged use of recirculated air may
cause the windows to fog up. Note:
You may feel a small amount of air
from the footwell air vents regardless of the
air distribution setting.
Note: To reduce humidity build-up inside
your vehicle, do not drive with the system
switched off or with recirculated air always
switched on.
Note: Do not place objects under the front
seats as this may interfere with the airflow
to the rear seats.
Note: Remove any snow, ice or leaves from
the air intake area at the base of the
windshield.
Note: To improve the time to reach a
comfortable temperature in hot weather,
drive with the windows open until you feel
cold air through the air vents.
Automatic Climate Control
Note: Adjusting the settings when your
vehicle interior is extremely hot or cold is not
necessary. Automatic mode is best
recommended to maintain set temperature.
167
Navigator (TB9) Canada/United States of America, enUSA, Edition date: 201907, Second-Printing Climate Control E268558
Page 171 of 622
Note:
The system adjusts to heat or cool the
interior to the temperature you select as
quickly as possible.
Note: For the system to function efficiently,
the instrument panel and side air vents
should be fully open.
Note: If you select AUTO during cold outside
temperatures, the system directs air flow to
the windshield and side window air vents. In
addition, the blower motor may run at a
slower speed until the engine warms up.
Note: If you select
AUTO during hot
temperatures and the inside of the vehicle
is hot, the system uses recirculated air to
maximize interior cooling. Blower motor
speed may also reduce until the air cools.
Quickly Heating the Interior
1. Press and release
AUTO.
2. Adjust the temperature function to the setting you prefer.
Recommended Settings for Heating
1. Press and release
AUTO. 2. Adjust the temperature function to the
setting you prefer. Use
72°F (22°C) as a
starting point, then adjust the setting as
necessary.
Quickly Cooling the Interior
1. Press and release
MAX A/C.
Recommended Settings for Cooling
1. Press and release
AUTO.
2. Adjust the temperature function to the setting you prefer. Use
72°F (22°C) as a
starting point, then adjust the setting as
necessary.
Defogging the Side Windows in Cold
Weather
1. Press and release defrost or maximum defrost.
2. Adjust the temperature control to the setting you prefer. Use
72°F (22°C) as a
starting point, then adjust the setting as
necessary. REAR PASSENGER CLIMATE
CONTROLS
Note:
Depending on your vehicle option
package, the controls may look different
from what you see here.
Directing Air to the Rear Console Air
Vents Press and release the button to
direct airflow to the rear console
air vents.
168
Navigator (TB9) Canada/United States of America, enUSA, Edition date: 201907, Second-Printing Climate ControlE290004
Page 173 of 622
The system adjusts the blower motor speed,
air distribution, air conditioning operation to
reach and maintain the temperature you
have set.
Switching the Rear Climate Control On
and Off
Press and release the button to
switch the rear climate control on
or off.
Note: If the system is on and Max Defrost is
switched on through the front climate
controls, the system turns off. It turns back
on when Max Defrost is switched off.
Note: If Max Defrost is switched on, the
system can be turned on at the same time.
Switching the Rear Heated Seats On
and Off (If Equipped) See
Heated Seats (page 191).Switching the Rear Ventilated Seats
On and Off
(If Equipped) See
Ventilated Seats (page 191).
HEATED WINDSHIELD
Windshield Wiper De-Icer
The windshield wiper de-icer turns on in low
temperatures.
HEATED REAR WINDOW Press the button to clear the rear
window of thin ice and fog. The
heated rear window turns off after
a short period of time.
Note: Make sure the engine is on before
operating the heated windows. Note:
Do not use harsh chemicals, razor
blades or other sharp objects to clean or
remove decals from the inside of the heated
rear window. The vehicle warranty may not
cover damage to the heated rear window
grid lines.
HEATED EXTERIOR MIRRORS
When you switch the heated rear window
on, the heated exterior mirrors turn on.
Note: Do not remove ice from the mirrors
with a scraper or adjust the mirror glass
when it is frozen in place.
Note: Do not clean the mirror housing or
glass with harsh abrasives, fuel or other
petroleum-based cleaning products. The
vehicle warranty may not cover damage
caused to the mirror housing or glass.
170
Navigator (TB9) Canada/United States of America, enUSA, Edition date: 201907, Second-Printing Climate Control E268558
Page 174 of 622
CABIN AIR FILTER
Your vehicle is equipped with a cabin air
filter, which gives you and your passengers
the following benefits:
•
It improves your driving comfort by
reducing particle concentration.
• It improves the interior compartment
cleanliness.
• It protects the climate control
components from particle deposits.
You can locate the cabin air filter behind the
glove box.
Note: Make sure you have a cabin air filter
installed at all times. This prevents foreign
objects from entering the system. Running
the system without a filter in place could
result in degradation or damage to the
system.
Replace the filter at regular intervals. See
Scheduled Maintenance (page 537).
For additional cabin air filter information, or
to replace the filter, see an authorized dealer. REMOTE START
You can switch this feature on or off and
adjust the settings using the information
display controls.
See Information Displays
(page 133).
The climate control system adjusts the
interior temperature during remote start.
You cannot adjust the climate control setting
during remote start operation. Switch the
ignition on to make adjustments.
Based on your remote start settings, the
following vehicle-dependent features may
or may not remain on after remote starting
your vehicle:
• Climate controlled seats.
• Heated steering wheel.
• Heated mirrors.
• Heated rear window.
• Windshield wiper de-icer.
Note: For dual zone climate controlled seats,
the passenger seat setting defaults to match
the driver seat during remote start. Automatic Settings
If
Auto is on, the system sets the interior
temperature to 72°F (22°C) and heats or
cools the vehicle interior as required to
achieve comfort.
Note: In cold weather, the heated rear
window and heated mirrors turn on.
Last Settings
If
Last Settings is on, the system uses the
settings last selected before you turned off
the vehicle.
Heated and Cooled Features
In
Auto mode, certain heated features may
switch on during cold weather, and cooled
features during hot weather.
171
Navigator (TB9) Canada/United States of America, enUSA, Edition date: 201907, Second-Printing Climate Control