key LINCOLN NAVIGATOR 2020 Workshop Manual
[x] Cancel search | Manufacturer: LINCOLN, Model Year: 2020, Model line: NAVIGATOR, Model: LINCOLN NAVIGATOR 2020Pages: 622, PDF Size: 6.47 MB
Page 211 of 622
AUTO-START-STOP
The system helps reduce fuel consumption
by automatically stopping and restarting the
engine when your vehicle has stopped. The
engine restarts automatically when you
release the brake pedal.
In some situations, your vehicle may restart
automatically, for example:
•
To maintain interior comfort.
• To recharge the battery.
Note: Power assist steering turns off when
the engine is off.
Note: If your vehicle is flex fuel capable,
Auto-Start-Stop is inhibited for a short time
after a refuel event when the system is
verifying the fuel type being used. WARNING: Always fully apply the
parking brake. Make sure you shift into
park (P) for vehicles with an automatic
transmission. Switch the ignition off and
remove the key whenever you leave your
vehicle. WARNING: Before opening the hood
or performing any maintenance, fully apply
the parking brake, shift into park (P) or
neutral (N) and switch the ignition off. WARNING: Always switch the ignition
off before leaving the vehicle. If the ignition
is switched on an automatic restart may
occur at any time. WARNING:
The system may require
the engine to automatically restart when
the auto-start-stop indicator illuminates
green or flashes amber. Failure to follow
this instruction could result in personal
injury.
The Auto-Start-Stop system status is
available at a glance within the information
display.
See Information Displays (page
133).
Enabling Auto-Start-Stop
The system automatically enables every time
you start your vehicle if: •
You do not press the Auto-Start-Stop
button (not illuminated).
• Your vehicle exceeds an initial speed of
3 mph (5 km/h)
after you have initially
started your vehicle.
• You have stopped your vehicle.
• Your foot is on the brake pedal.
• The transmission is in drive.
• Not in Excite mode (enable by pressing
the Auto-Start-Stop button).
• The driver door is closed.
• There is adequate brake vacuum.
• The interior compartment has cooled or
warmed to an acceptable level.
• The front windshield defroster is off.
• You have not turned the steering wheel
rapidly or you do not have it at a sharp
angle.
• The vehicle is not on a steep road grade.
• The battery is within optimal operating
conditions, (with the battery state of
charge and temperature in range).
• The engine coolant is at operating
temperature.
208
Navigator (TB9) Canada/United States of America, enUSA, Edition date: 201907, Second-Printing Unique Driving Characteristics
Page 224 of 622
If the service engine soon indicator remains
on, have your vehicle serviced at the first
available opportunity. Although some
malfunctions detected by the OBD-II may not
have symptoms that are apparent, continued
driving with the service engine soon indicator
on can result in increased emissions, lower
fuel economy, reduced engine and
transmission smoothness and lead to more
costly repairs.
Readiness for Inspection and
Maintenance (I/M) Testing
Some state and provincial and local
governments may have
Inspection/Maintenance (I/M) programs to
inspect the emission control equipment on
your vehicle. Failure to pass this inspection
could prevent you from getting a vehicle
registration.
If the service engine soon indicator
is on or the bulb does not work,
your vehicle may need service.
See On-Board Diagnostics. Your vehicle may not pass the I/M test if the
service engine soon indicator is on or not
working properly (bulb is burned out), or if
the OBD-II system has determined that some
of the emission control systems have not
been properly checked. In this case, the
vehicle is not ready for I/M testing.
If the vehicle
’s engine or transmission has
just been serviced, or the battery has
recently run down or been replaced, the
OBD-II system may indicate that the vehicle
is not ready for I/M testing. To determine if
the vehicle is ready for I/M testing, turn the
ignition key to the on position for 15 seconds
without cranking the engine. If the service
engine soon indicator blinks eight times, it
means that the vehicle is not ready for I/M
testing; if the service engine soon indicator
stays on solid, it means that your vehicle is
ready for I/M testing.
The OBD-II system checks the emission
control system during normal driving. A
complete check may take several days.
If the vehicle is not ready for I/M testing, you
can perform the following driving cycle
consisting of mixed city and highway driving: 1. 15 minutes of steady driving on an
expressway or highway followed by 20
minutes of stop-and-go driving with at
least four 30-second idle periods.
2. Allow your vehicle to sit for at least eight
hours with the ignition off. Then, start the
vehicle and complete the above driving
cycle. The vehicle must warm up to its
normal operating temperature. Once
started, do not turn off the vehicle until
the above driving cycle is complete.
If the vehicle is still not ready for I/M testing,
you need to repeat the above driving cycle.
221
Navigator (TB9) Canada/United States of America, enUSA, Edition date: 201907, Second-Printing Engine Emission Control
Page 225 of 622
AUTOMATIC TRANSMISSION
WARNING: Always fully apply the
parking brake and make sure you shift into
park (P). Failure to follow this instruction
could result in personal injury or death. WARNING:
Do not use tow/haul
when the road surface is slippery. Failure
to follow this instruction could result in the
loss of control of your vehicle. WARNING:
When your vehicle is
stationary, keep the brake pedal fully
pressed when shifting gears. Failure to
follow this instruction could result in
personal injury, death or property damage.
Note: You may not be able to shift out of
park (P) unless the intelligent access key is
inside your vehicle. Understanding the Shift Positions of
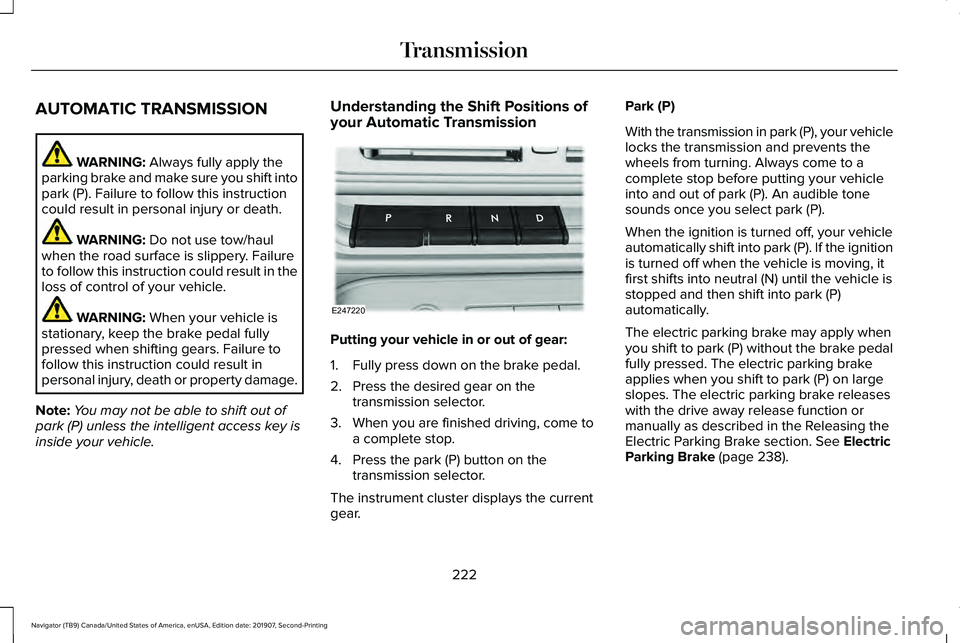
your Automatic Transmission
Putting your vehicle in or out of gear:
1. Fully press down on the brake pedal.
2. Press the desired gear on the
transmission selector.
3. When you are finished driving, come to a complete stop.
4. Press the park (P) button on the transmission selector.
The instrument cluster displays the current
gear. Park (P)
With the transmission in park (P), your vehicle
locks the transmission and prevents the
wheels from turning. Always come to a
complete stop before putting your vehicle
into and out of park (P). An audible tone
sounds once you select park (P).
When the ignition is turned off, your vehicle
automatically shift into park (P). If the ignition
is turned off when the vehicle is moving, it
first shifts into neutral (N) until the vehicle is
stopped and then shift into park (P)
automatically.
The electric parking brake may apply when
you shift to park (P) without the brake pedal
fully pressed. The electric parking brake
applies when you shift to park (P) on large
slopes. The electric parking brake releases
with the drive away release function or
manually as described in the Releasing the
Electric Parking Brake section.
See Electric
Parking Brake (page 238).
222
Navigator (TB9) Canada/United States of America, enUSA, Edition date: 201907, Second-Printing TransmissionE247220
Page 227 of 622
Note:
This only functions if your 12-volt
battery has power and the starter can spin
the engine. If vehicle battery voltage is not
sufficient, an external 12-volt power source
such as jumper cables, battery charger or
jump pack may be required for this feature
to function.
Note: Once in this mode, sufficient battery
voltage must be maintained or your vehicle
returns to park. WARNING: When doing this
procedure, you need to take the
transmission out of park (P) which means
your vehicle can roll freely. To avoid
unwanted vehicle movement, always fully
apply the parking brake prior to doing this
procedure. Use wheels chocks if
appropriate.
1. Do not press the brake pedal. Press the START/STOP
button.
2. Fully press down on the brake pedal. Keep the brakes applied through step 7.
3. Press the accelerator pedal to the floor and hold through step 7. 4. Press the neutral (N) button on the
transmission selector.
5. Press the neutral (N) button again to enter Stay in Neutral mode.
6. Press and release the push to start button, the transmission needs a
minimum of 2 seconds to exit park.
7. When neutral (N) is displayed, the brake and accelerator pedals can be released.
To exit Stay in Neutral mode, select a
different gear.
A message appears in your information
display screen when your vehicle has
entered Stay in Neutral mode.
Drive (D)
Drive (D) is the normal driving position for
the best fuel economy. The overdrive
function allows automatic upshifts and
downshifts through gears one through ten. Adaptive Tow/Haul Mode WARNING:
Do not use tow/haul
when the road surface is slippery. Failure
to follow this instruction could result in the
loss of control of your vehicle.
Adaptive tow/haul has two modes, automatic
that is enabled by default and off.
To turn adaptive tow/haul off or on, use the
information display controls.
See General
Information (page 133). The indicator light
illuminates in the instrument cluster.
Key adaptive tow/haul features:
• The system remains in the same mode,
even after a key cycle.
• Is only available in normal drive modes
(Normal 2H and Normal 4A).
The adaptive tow/haul feature improves
transmission operation when towing a trailer
or a heavy load. All transmission gear ranges
are available when using adaptive tow/haul.
For information on towing.
See Towing (page
311).
224
Navigator (TB9) Canada/United States of America, enUSA, Edition date: 201907, Second-Printing Transmission
Page 239 of 622
LIMITED SLIP DIFFERENTIAL (IF
EQUIPPED)
The Electronic Limited Slip Differential (eLSD)
system directs torque, enabling the vehicle
to drive over terrain and road conditions that
a conventional axle cannot. The system is
active at all times and requires no input from
the driver.
Note: If your vehicle is not at optimal
operating conditions or a system fault is
present, a warning may be displayed in the
instrument cluster. Depending on the
warning, your vehicle may need to be
serviced. You can find more information
regarding the system information messages
in the Information Displays chapter.
See
Information Messages (page 138).
Spare Tire
If your vehicle has an Electronic Limited Slip
Differential, do not use a spare tire of a
different size than the tire provided. If a spare
tire is installed, a message may appear,
indicating the system has disabled
automatically or reduced function to prevent system overheat and damage. It is
recommended to reinstall the repaired or
replaced road tire as soon as possible. When
the road tire is replaced, the system will
resume normal operation on the next key
cycle.
Trailer Towing
The Electronic Limited Slip Differential
enhances vehicle stability during trailer tow
operation. During high demand trailering
events, such as steep slopes, high speeds
or with a spare tire, the system may provide
a warning in the instrument cluster and
reduce function or enter a temporarily
disabled state. To resume normal function,
stop the vehicle in a safe location and allow
the unit to adequately cool. Once the system
has reached normal operating temperatures,
system function will be restored and the
Electronic Limited Slip Differential Restored
message will be displayed.
236
Navigator (TB9) Canada/United States of America, enUSA, Edition date: 201907, Second-Printing Rear Axle
Page 246 of 622
PRINCIPLE OF OPERATION
The traction control system helps avoid drive
wheel spin and loss of traction.
If your vehicle begins to slide, the system
applies the brakes to individual wheels and,
when needed, reduces engine power at the
same time. If the wheels spin when
accelerating on slippery or loose surfaces,
the system reduces engine power in order
to increase traction.
USING TRACTION CONTROL
WARNING: The stability and traction
control light illuminates steadily if the
system detects a failure. Make sure you
did not manually disable the traction
control system using the information
display controls or the switch. If the stability
control and traction control light is still illuminating steadily, have the system
serviced by an authorized dealer
immediately. Operating your vehicle with
the traction control disabled could lead to
an increased risk of loss of vehicle control,
vehicle rollover, personal injury and death.
The system automatically turns on each time
you switch the ignition on.
If your vehicle is stuck in mud or snow,
switching traction control off may be
beneficial as this allows the wheels to spin.
Note: When you switch traction control off,
stability control remains fully active.
Switching the System On and Off
You can switch traction control on and off
through the information display controls. See
General Information
(page 133).
When you switch the system off, a message
and an illuminated icon appear on the
instrument cluster.
Switch traction control on again to return the
system to normal operations. Note:
Your vehicle may have MyKey
restrictions regarding this feature.
See
Principle of Operation (page 78).
System Indicator Lights and Messages The stability and traction control
light temporarily illuminates on
engine start-up and flashes:
• When a driving condition activates either
of the systems.
• If a problem occurs in either of the
systems. The stability and traction control
off light temporarily illuminates on
engine start-up and stays on when
you switch the traction control system off.
243
Navigator (TB9) Canada/United States of America, enUSA, Edition date: 201907, Second-Printing Traction ControlE138639 E130458
Page 250 of 622
PRINCIPLE OF OPERATION
WARNING: To help avoid personal
injury, always use caution when in reverse
(R) and when using the sensing system. WARNING:
The system may not
detect objects with surfaces that absorb
reflection. Always drive with due care and
attention. Failure to take care may result
in a crash. WARNING:
Traffic control systems,
inclement weather, air brakes, external
motors and fans may affect the correct
operation of the sensing system.This may
cause reduced performance or false alerts. WARNING:
The system may not
detect small or moving objects, particularly
those close to the ground. Note:
Certain add-on devices installed
around the bumper or fascia may create
false beeps. For example, large trailer
hitches, bike or surfboard racks, license plate
brackets, bumper covers or any other device
that may block the normal detection zone
of the system.
Note: Keep the sensors, located on the
bumper or fascia, free from snow, ice and
large accumulations of dirt. If the sensors
are covered, the system’ s accuracy can be
affected. Do not clean the sensors with sharp
objects.
Note: If your vehicle sustains damage to the
bumper or fascia, leaving it misaligned or
bent, the sensing zone may be altered
causing inaccurate measurement of
obstacles or false alarms. See your
authorized technician.
Note: When a trailer is connected to your
vehicle, the rear parking aid may detect the
trailer and therefore provide warnings.
Disable the rear parking aid when a trailer
is connected to prevent these warnings. Note:
The sensing system cannot be turned
off when a MyKey is present. See Principle
of Operation
(page 78).
We recommend that you take some time to
get to know the system and its limitations by
reading this section.
The sensing system warns the driver of
obstacles within a certain range of your
vehicle. The system automatically turns on
each time you switch the ignition on.
When receiving a detection warning, the
radio volume reduces to a predetermined
level. After the warning goes away, the radio
volume returns to the previous level. You can turn the system on or off
by pressing the parking aid button.
If your vehicle does not have a
parking aid button, the system can be
switched off through the information display
menu or from the pop-up message that
appears once you shift the transmission into
reverse (R).
See General Information (page
133).
247
Navigator (TB9) Canada/United States of America, enUSA, Edition date: 201907, Second-Printing Parking AidsE139213
Page 282 of 622

WARNING: The system may not
correctly operate if your vehicle is fitted
with a suspension kit not approved by us.
Note: The system works above
40 mph
(64 km/h).
Note: The system works as long as the
camera can detect one lane marking.
Note: When you select aid or alert and aid
mode and the system detects no steering
activity for a short period, the system alerts
you to put your hands on the steering wheel.
The system may detect a light grip or touch
on the steering wheel as hands off driving.
Note: The system may not function if the
camera is blocked, or if the windshield is
damaged or dirty. When you switch the system on and it
detects an unintentional drift out of your lane
is likely to occur, the system notifies or
assists you to stay in your lane through the
steering system and information display. In
Alert mode, the system provides a warning
by vibrating the steering wheel. In Aid mode,
the system provides steering assistance by
gently counter steering your vehicle back
into the lane.When the system is functioning in the
combined Alert and Aid mode, the system
first provides steering assistance by gently
counter steering your vehicle back into the
lane, followed by a warning that vibrates the
steering wheel if the vehicle is still out of the
lane markings.
Switching the System On and Off
Note:
The system on or off setting is stored
until it is manually changed, unless a MyKey™
is detected. If the system detects a MyKey™,
it defaults to on and the mode is set to alert. Press the button on the direction indicator
stalk to switch the system on or off.
279
Navigator (TB9) Canada/United States of America, enUSA, Edition date: 201907, Second-Printing Driving AidsE249505 E132099
Page 315 of 622
RV & Trailer Towing Guide Online
http://www.fleet.ford.com/towing-guides/
Website
TRAILER REVERSING AIDS (IF
EQUIPPED)
Pro Trailer Backup Assist™ WARNING:
Driving while distracted
can result in loss of vehicle control, crash
and injury. We strongly recommend that
you use extreme caution when using any
device that may take your focus off the
road. Your primary responsibility is the safe
operation of your vehicle. We recommend
against the use of any hand-held device
while driving and encourage the use of
voice-operated systems when possible.
Make sure you are aware of all applicable
local laws that may affect the use of
electronic devices while driving. WARNING:
This system is an extra
driving aid. It does not replace your
attention and judgment, or the need to
apply the brakes. This system does NOT
automatically brake your vehicle. If you fail
to press the brake pedal when necessary,
you may collide with another vehicle.
Note: The system is not a substitute for safe
driving practices.
Note: You must always be aware of the
vehicle and trailer combination and the
surrounding environment.
Note: The system does not detect or prevent
the vehicle or trailer from making contact
with obstacles in the surrounding
environment.
Note: Keep in mind that the front end of the
vehicle swings out when changing the
direction of the trailer. Note:
The system relies on user
measurements to determine sticker
placement and system limits. It is critical to
take the key measurements correctly.
Incorrect measurements can result in the
improper function of the system up to and
including contact between the vehicle and
trailer.
Note: The system limits vehicle speed when
backing up. The system is not a replacement
for proper use of the throttle and brake
pedals.
Principle of Operation
This feature helps you to steer your vehicle
when reversing with a trailer attached. Turn
and hold the control knob in the direction
you want the trailer to go and the system
takes over the steering. This allows you to
focus on checking the mirrors and operating
the brake and accelerator.
312
Navigator (TB9) Canada/United States of America, enUSA, Edition date: 201907, Second-Printing Towing
Page 318 of 622
Use the supplied measurement card, a tape
measure and pen to carefully mark the area
where to attach the sticker (supplied in the
back cover pocket of your quick start guide).
Make sure the whole sticker is within the
zone between the two arcs or distance
markers on the diagram, and is also visible
in the rear view camera display.
Step 4: Take Measurements
After you correctly place the sticker on the
trailer, you must take some key
measurements.
Note:
You must take accurate
measurements for the system to operate
properly.
Note: When rounding in inches, round
upward if the measured length is a quarter
inch or greater. Round downward if the
measured length is less than a quarter inch.
For example 12.25 in (31.11 cm) would be
rounded up to 12.50 in (31.75 cm). 12.13 in
(30.8 cm) would be rounded down to 12.00 in
(30.48 cm)
. Note:
When rounding in centimeters, round
to the nearest whole centimeter. If the
measurement is less than
0.2 in (0.5 cm)
round downward. If the measurement is
more than or equal to
0.2 in (0.5 cm) round
upward. For example, 11.9 in (30.3 cm) would
be rounded down to 11.8 in (30 cm). 12.0 in
(30.5 cm) would be rounded up to 12.2 in
(31 cm).
Note: Use consistent metric or imperial units
as required by your country or vehicle.
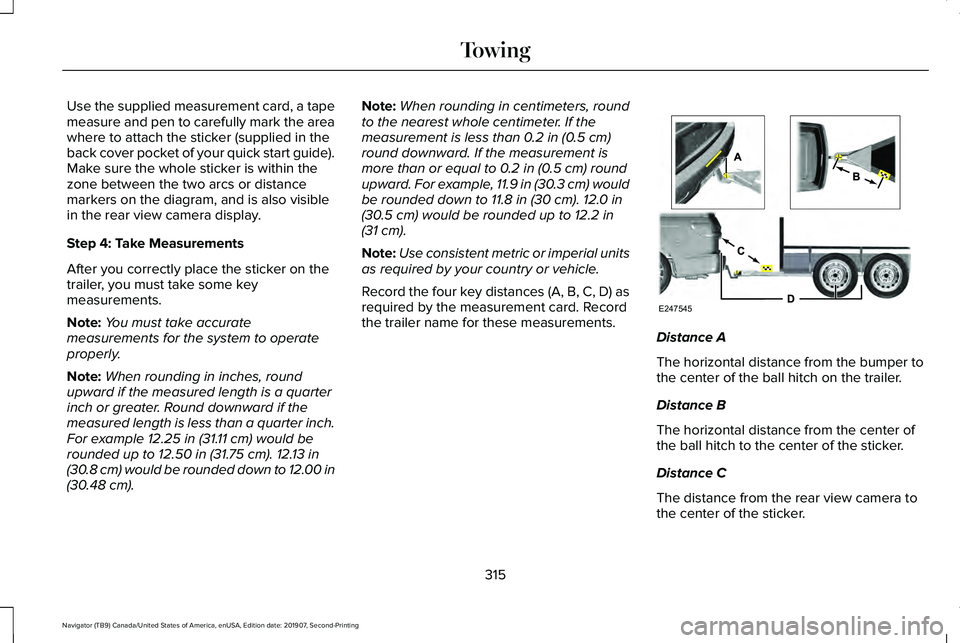
Record the four key distances (A, B, C, D) as
required by the measurement card. Record
the trailer name for these measurements. Distance A
The horizontal distance from the bumper to
the center of the ball hitch on the trailer.
Distance B
The horizontal distance from the center of
the ball hitch to the center of the sticker.
Distance C
The distance from the rear view camera to
the center of the sticker.
315
Navigator (TB9) Canada/United States of America, enUSA, Edition date: 201907, Second-Printing TowingE247545