reset LINCOLN NAVIGATOR 2022 Owner's Guide
[x] Cancel search | Manufacturer: LINCOLN, Model Year: 2022, Model line: NAVIGATOR, Model: LINCOLN NAVIGATOR 2022Pages: 646, PDF Size: 7.29 MB
Page 425 of 646
How Fail-Safe Cooling Works
If the engine begins to overheat,
the coolant temperature gauge
moves toward the red zone:
A warning lamp illuminates and a
message may appear in the
information display.
If the engine reaches a preset
over-temperature condition, the engine
automatically switches to alternating cylinder
operation. Each disabled cylinder acts as an
air pump and cools the engine.
When this occurs, your vehicle still operates,
however:
• Engine power is limited.
• The air conditioning system turns off.
Continued operation increases the engine
temperature, causing the engine to
completely shut down. Your steering and
braking effort increases in this situation.
When the engine temperature cools, you can
re-start the engine. Have your vehicle
checked as soon as possible to minimize
engine damage. When Fail-Safe Mode Is Activated WARNING: Fail-safe mode is for use
during emergencies only. Operate your
vehicle in fail-safe mode only as long as
necessary to bring your vehicle to rest in
a safe location and seek immediate repairs.
When in fail-safe mode, your vehicle will
have limited power, will not be able to
maintain high-speed operation, and may
completely shut down without warning,
potentially losing engine power, power
steering assist, and power brake assist,
which may increase the possibility of a
crash resulting in serious injury. WARNING: Do not remove the
coolant reservoir cap when the engine is
on or the cooling system is hot. Wait 10
minutes for the cooling system to cool
down. Cover the coolant reservoir cap with
a thick cloth to prevent the possibility of
scalding and slowly remove the cap.
Failure to follow this instruction could result
in personal injury. Your vehicle has limited engine power when
in the fail-safe mode, drive your vehicle with
caution. Your vehicle does not maintain
high-speed operation and the engine could
operate poorly.
Remember that the engine is capable of
automatically shutting down to prevent
engine damage. In this situation:
1. Pull off the road as soon as safely
possible and switch the engine off.
2. If you are a member of a roadside assistance program, we recommend that
you contact your roadside assistance
service provider.
3. If this is not possible, wait for a short period of time for the engine to cool.
4. Check the coolant level. If the coolant level is at or below the minimum mark,
add prediluted coolant immediately.
5. When the engine temperature cools, you
can re-start the engine. Have your vehicle
checked as soon as possible to minimize
engine damage.
Note: Driving your vehicle without repair
increases the chance of engine damage.
421
2022 Navigator (TB9) Canada/United States of America, enUSA, Edition date: 202109, First-Printing Maintenance
Page 429 of 646
If you disconnect or replace the battery and
your vehicle has an automatic transmission,
it must relearn its adaptive strategy. Because
of this, the transmission may shift firmly when
first driven. This is normal operation while
the transmission fully updates its operation
to optimum shift feel.
Battery Sensor Reset
When you install a new battery, reset the
battery sensor by doing the following:
1. Switch the ignition on, and leave the
engine off.
Note: Complete Steps 2 and 3 within 10
seconds.
2. Flash the high beam headlamps five times, ending with the high beams off.
3. Press and release the brake pedal three
times.
The battery warning lamp flashes three times
to confirm that the reset is successful. Battery Management System (If Equipped)
The system monitors battery conditions and
takes actions to extend battery life. If
excessive battery drain is detected, the
system temporarily disables some electrical
systems to protect the battery.
Systems included are:
• Heated rear window.
• Heated seats.
• Climate control.
• Heated steering wheel.
• Audio unit.
• Navigation system.
A message may appear in the information
display to alert you that battery protection
actions are active. This message is only for
notification that an action is taking place, and
not intended to indicate an electrical problem
or that the battery requires replacement. After battery replacement, or in some cases
after charging the battery with an external
charger, the battery management system
requires eight hours of vehicle sleep time to
relearn the battery state of charge. During
this time, your vehicle must remain fully
locked with the ignition switched off.
Note:
Prior to relearning the battery state of
charge, the battery management system
may temporarily disable some electrical
systems.
Electrical Accessory Installation
To make sure the battery management
system works correctly, do not connect an
electrical device ground connection directly
to the battery negative post. This can cause
inaccurate measurements of the battery
condition and potential incorrect system
operation.
Note: If you add electrical accessories or
components to the vehicle, it may adversely
affect battery performance and durability.
This may also affect the performance of
other electrical systems in the vehicle.
425
2022 Navigator (TB9) Canada/United States of America, enUSA, Edition date: 202109, First-Printing Maintenance
Page 430 of 646
Remove and Reinstall the Battery
Install a battery approved for use by our
specifications. See Capacities and
Specifications (page 469).
To disconnect or remove the battery, do the
following:
1. Apply the parking brake and switch the ignition off.
2. Switch all electrical equipment off, for example lights and radio.
3. Wait a minimum of two minutes before disconnecting the battery.
Note: The engine management system has
a power hold function and remains powered
for a period of time after you switch the
ignition off. This is to allow the system to
store diagnostic and adaptive tables.
Disconnecting the battery without waiting
can cause damage not covered by the
vehicle warranty.
4. Disconnect the negative battery cable terminal.
5. Disconnect the positive battery cable terminal. 6. Remove the battery securing clamp.
7. Remove the battery.
8.
To install, reverse the removal procedure.
Note: Before reconnecting the battery, make
sure the ignition remains switched off.
Note: Make sure to fully tighten the battery
cables.
If you disconnect or replace the vehicle
battery, you must reset the following
features:
• Window bounce-back.
See Opening and
Closing the Windows (page 133).
• Clock Settings.
• Pre-set radio stations.
Battery Disposal Make sure that you dispose of old
batteries in an environmentally
friendly way. Seek advice from
your local authority about recycling old
batteries. ADJUSTING THE HEADLAMPS
Vertical Aim Adjustment
The headlamps on your vehicle are properly
aimed at the assembly plant. If your vehicle
has been in an accident, contact an
authorized dealer to check and realign your
headlamps.
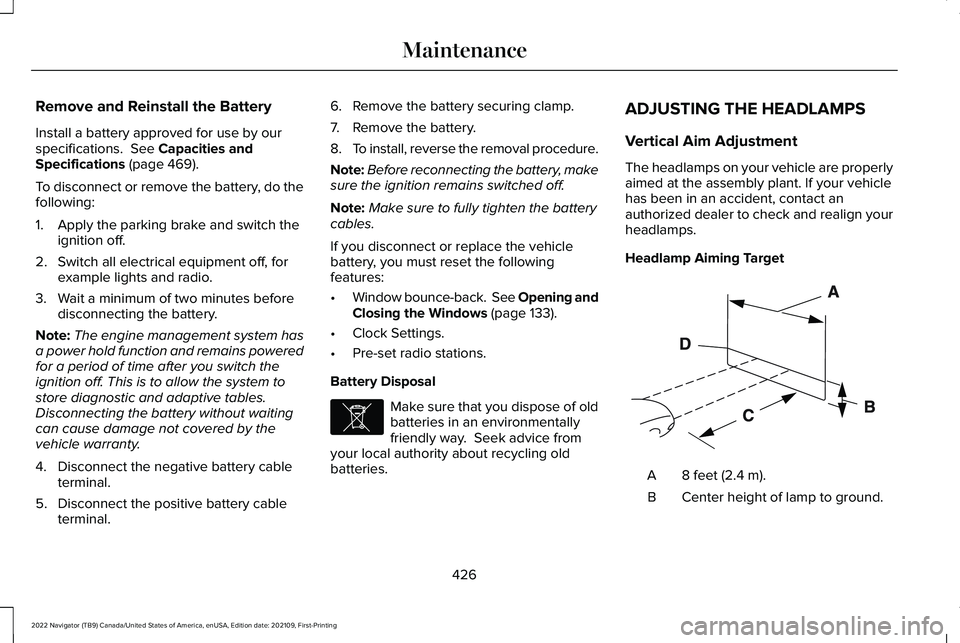
Headlamp Aiming Target
8 feet (2.4 m).
A
Center height of lamp to ground.
B
426
2022 Navigator (TB9) Canada/United States of America, enUSA, Edition date: 202109, First-Printing MaintenanceE107998 E142592
Page 440 of 646
Hybrid Battery Systems
We recommend the following actions for your
vehicle:
•
When storing your vehicle for greater
than 30 days the state of charge should
be approximately 50%. Additionally we
recommend disconnecting the 12V
battery which will reduce system loads
on the HV battery.
12 Volt Battery
• Check and recharge as necessary. Keep
connections clean.
Note: It is necessary to reset memory
features if you disconnect the battery cables.
Brakes
Make sure the brakes and parking brake
release fully.
Note: If you intend on parking your vehicle
for an extended period after cleaning the
wheels with a wheel cleaner, drive your
vehicle for a few minutes before doing so to
reduce the risk of increased corrosion of the
brake discs, brake pads and linings. Tires
•
Maintain recommended air pressure.
Note: If you intend on parking your vehicle
for an extended period after cleaning the
wheels with a wheel cleaner, drive your
vehicle for a few minutes before doing so.
This reduces the risk of corrosion of the
brake discs, brake pads and linings.
REMOVING YOUR VEHICLE FROM
STORAGE
When your vehicle is ready to come out of
storage, do the following:
• We recommend that you change the
engine oil before you use your vehicle
again.
• Wash your vehicle to remove any dirt or
grease film build-up on window surfaces.
• Check windshield wipers for any
deterioration.
• Check under the hood for any foreign
material that may have collected during
storage such as mice or squirrel nests. •
Check the exhaust for any foreign
material that may have collected during
storage.
• Check tire pressures and set tire inflation
per the Tire Label.
• Check brake pedal operation. Drive your
vehicle 15 ft (4.5 m) back and forth to
remove rust build-up.
• Check fluid levels (including coolant, oil
and gas) to make sure there are no leaks,
and fluids are at recommended levels.
• If you remove the battery, clean the
battery cable ends and check for
damage.
Contact an authorized dealer if you have any
concerns or issues.
436
2022 Navigator (TB9) Canada/United States of America, enUSA, Edition date: 202109, First-Printing Storing Your Vehicle
Page 455 of 646
If you feel a sudden vibration or ride
disturbance while driving, or you suspect
your tire or vehicle has been damaged,
immediately reduce your speed. Drive
with caution until you can safely pull off
the road. Stop and inspect the tires for
damage. If a tire is under-inflated or
damaged, deflate it, remove the wheel
and replace it with your spare tire and
wheel. If you cannot detect a cause,
have the vehicle towed to the nearest
repair facility or tire dealer to have the
vehicle inspected.
Tire and Wheel Alignment
A bad jolt from hitting a curb or pothole
can cause the front end of your vehicle
to become misaligned or cause damage
to your tires. If your vehicle seems to
pull to one side when you are driving,
the wheels could be out of alignment.
Have an authorized dealer check the
wheel alignment periodically.
Wheel misalignment in the front or the
rear can cause uneven and rapid
treadwear of your tires and should be
corrected by an authorized dealer.
INSPECTING THE WHEEL VALVE
STEMS
Check the valve stems for holes, cracks,
or cuts that could permit air leakage.
TIRE ROTATION
WARNING: If the tire label shows
different tire pressures for the front
and rear tires and the vehicle has a
tire pressure monitoring system, then
you need to update the settings for
the system sensors. Always perform
the system reset procedure after tire
rotation. If you do not reset the system,
it may not provide a low tire pressure
warning when necessary.
Rotating your tires at the recommended
interval will help your tires wear more
evenly, providing better tire performance
and longer tire life. Note:
If your tires show any uneven
wear have the alignment checked by
an authorized dealer before rotating
tires.
Note: If you have a dissimilar spare
wheel and tire assembly, it is intended
for temporary use only and should not
be used in a tire rotation.
Note: After having your tires rotated,
inflation pressure must be checked and
adjusted to the vehicle requirements.
Tire Rotation Diagram
Follow the diagram indicating the correct
tire locations for rotating the tires.
451
2022 Navigator (TB9) Canada/United States of America, enUSA, Edition date: 202109, First-Printing Tire Care
Page 459 of 646
TIRE PRESSURE MONITORING
SYSTEM LIMITATIONS
When the outside temperature drops
significantly, the tire pressure could decrease
and activate the low tire pressure warning
lamp.
The warning lamp could also illuminate when
you use a spare wheel, or tire sealant from
the inflator kit.
Note:
Regularly checking the vehicle tire
pressures can reduce the possibility for the
warning lamp to illuminate due to outside
air temperature changes.
Note: After you inflate the tires to the
recommended pressure it could take up to
two minutes of driving over 20 mph (32 km/h)
for the warning indicator to turn off. VIEWING THE TIRE PRESSURES
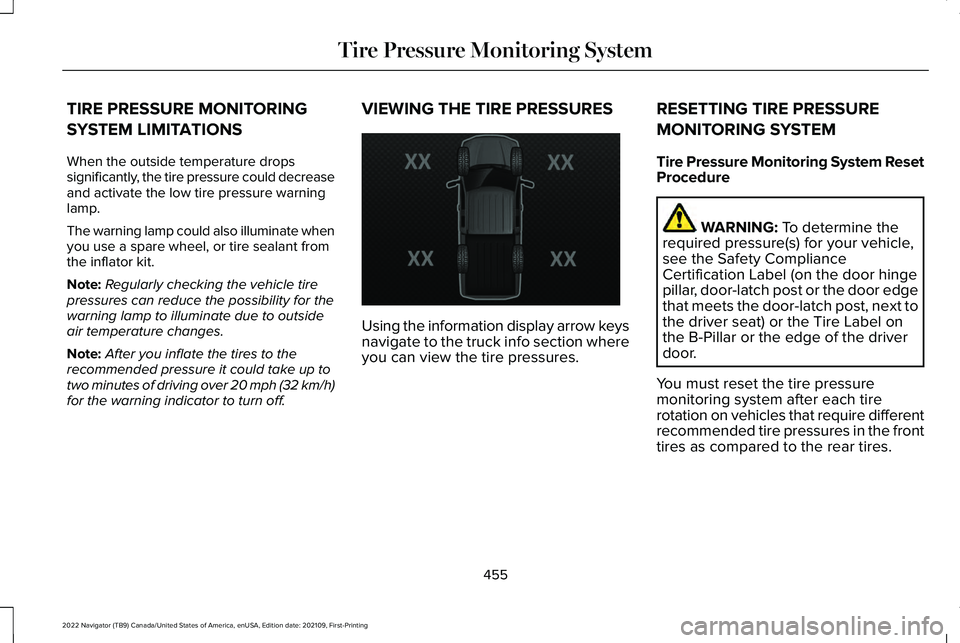
Using the information display arrow keys
navigate to the truck info section where
you can view the tire pressures.
RESETTING TIRE PRESSURE
MONITORING SYSTEM
Tire Pressure Monitoring System Reset
Procedure WARNING: To determine the
required pressure(s) for your vehicle,
see the Safety Compliance
Certification Label (on the door hinge
pillar, door-latch post or the door edge
that meets the door-latch post, next to
the driver seat) or the Tire Label on
the B-Pillar or the edge of the driver
door.
You must reset the tire pressure
monitoring system after each tire
rotation on vehicles that require different
recommended tire pressures in the front
tires as compared to the rear tires.
455
2022 Navigator (TB9) Canada/United States of America, enUSA, Edition date: 202109, First-Printing Tire Pressure Monitoring SystemE224333
Page 460 of 646
Note:
To reduce the chances of
interference from another vehicle,
perform the system reset procedure at
least three feet, one meter, away from
another vehicle undergoing the system
reset procedure at the same time.
Note: Do not wait more than two
minutes between resetting each tire
sensor or the system can time-out and
you need to repeat the entire procedure
on all four wheels.
1. Drive the vehicle above 20 mph
(32 km/h) for at least two minutes,
then park in a safe location where
you can easily get to all four tires and
have access to an air pump.
2. Switch the ignition off.
3. Switch the ignition on but do not start
the engine.
4. Switch the hazard flashers on then off three times. Note:
You must accomplish this within
10 seconds. If you successfully enter the
reset mode, the horn sounds once, the
system indicator flashes and a message
shows in the information display.
Note: If the system does not enter reset
mode, try again starting at Step 2. If
after repeated attempts to enter the
reset mode, the horn does not sound,
the system indicator does not flash and
no message shows in the information
display, contact your authorized dealer.
5. Remove the valve cap from the valve
stem on the left front tire. Decrease
the air pressure until the horn
sounds.
Note: The single horn tone confirms that
the sensor identification code has been
learned by the module for this position.
If the horn sounds twice, the reset
procedure was unsuccessful, and you
must repeat it.
6. Remove the valve cap from the valve
stem on the right front tire. Decrease
the air pressure until the horn
sounds. 7.
Repeat the previous step on the right
rear tire and then on the left rear tire.
8. Switch the ignition off.
Note: If the horn sounds twice again
after switching the ignition off, and
repeating the procedure, contact your
authorized dealer and have your vehicle
checked as soon as possible.
9. Set all four tires to the recommended
air pressure as indicated on the
Safety Compliance Certification
Label.
Trailer Tire Pressure Monitoring
System
(If Equipped)
Note: Additional equipment may be
required for your vehicle to support
trailer tire pressure and temperature
monitoring. See your authorized dealer
for more information.
Note: The trailer tire pressure
monitoring system is not a substitute for
proper tire maintenance. It is your
responsibility to maintain correct tire
pressures at all times.
456
2022 Navigator (TB9) Canada/United States of America, enUSA, Edition date: 202109, First-Printing Tire Pressure Monitoring System
Page 461 of 646
Note:
If a trailer tire is repaired, replaced
or broken down for service, the screw
and valve on the trailer tire pressure
sensor should be replaced. See your
authorized dealer for details. The trailer tire pressure monitoring
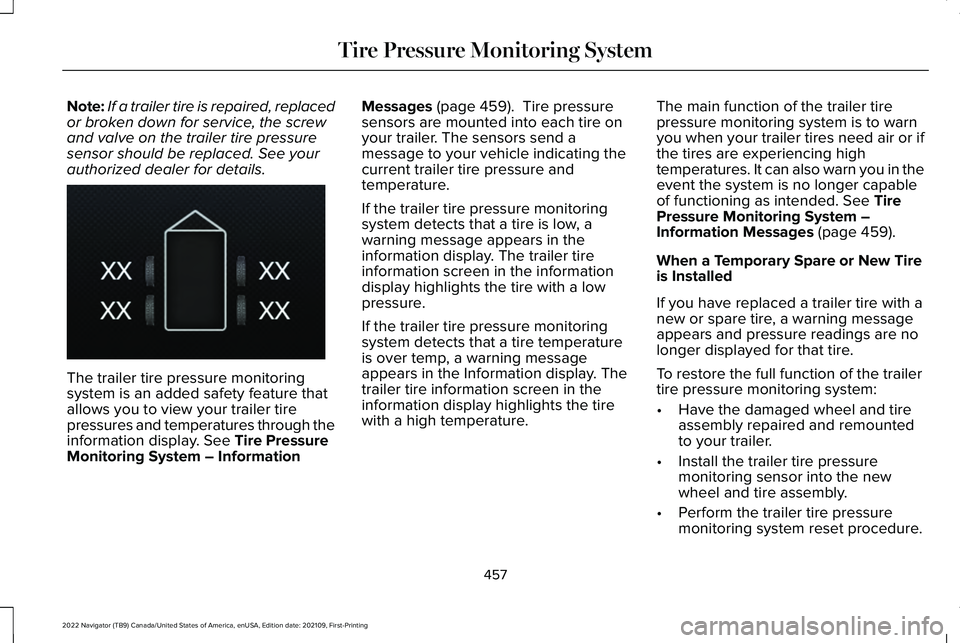
system is an added safety feature that
allows you to view your trailer tire
pressures and temperatures through the
information display. See Tire Pressure
Monitoring System – Information Messages
(page 459). Tire pressure
sensors are mounted into each tire on
your trailer. The sensors send a
message to your vehicle indicating the
current trailer tire pressure and
temperature.
If the trailer tire pressure monitoring
system detects that a tire is low, a
warning message appears in the
information display. The trailer tire
information screen in the information
display highlights the tire with a low
pressure.
If the trailer tire pressure monitoring
system detects that a tire temperature
is over temp, a warning message
appears in the Information display. The
trailer tire information screen in the
information display highlights the tire
with a high temperature. The main function of the trailer tire
pressure monitoring system is to warn
you when your trailer tires need air or if
the tires are experiencing high
temperatures. It can also warn you in the
event the system is no longer capable
of functioning as intended.
See Tire
Pressure Monitoring System –
Information Messages
(page 459).
When a Temporary Spare or New Tire
is Installed
If you have replaced a trailer tire with a
new or spare tire, a warning message
appears and pressure readings are no
longer displayed for that tire.
To restore the full function of the trailer
tire pressure monitoring system:
• Have the damaged wheel and tire
assembly repaired and remounted
to your trailer.
• Install the trailer tire pressure
monitoring sensor into the new
wheel and tire assembly.
• Perform the trailer tire pressure
monitoring system reset procedure.
457
2022 Navigator (TB9) Canada/United States of America, enUSA, Edition date: 202109, First-Printing Tire Pressure Monitoring SystemE235807
Page 462 of 646
Trailer Tire Pressure Monitoring
System Reset Procedure
Note:
You need to perform the tire
pressure monitoring system reset
procedure after each tire rotation, or
when a new trailer tire pressure sensor
is installed into a trailer tire. The trailer tire pressure monitoring
system can be reset through the menu
in the information display. See Tire
Pressure Monitoring System –
Information Messages
(page 459).
Performing the trailer setup process also
resets the trailer tire pressure monitoring
system. TIRE PRESSURE MONITORING
SYSTEM – TROUBLESHOOTING
TIRE PRESSURE MONITORING
SYSTEM – WARNING LAMPS The low tire pressure warning lamp
has combined functions, as it
warns you when your tires need
air, and when the system is no longer
capable of functioning as intended. Action Required
Possible Cause
Warning Lamp
After inflating your tires to the manufacturer’s recommended
pressure as shown on the tire label, on the edge of driver door
or the B-pillar, drive your vehicle for at least two minutes over
20 mph (32 km/h)
before the light turns off.
One or more tires are significantly under
inflated
Solid warning lamp
Repair the damaged road wheel and tire and refit it to your vehicle
to restore operation of the system.
Temporary spare wheel in use
Solid warning lamp or flashing
warning lamp
If the tires are inflated to the recommended tire pressures and
the temporary spare wheel is not in use, the system detected a
fault that requires service. Have your vehicle checked as soon
as possible.
Tire pressure monitoring system
malfunction
458
2022 Navigator (TB9) Canada/United States of America, enUSA, Edition date: 202109, First-Printing Tire Pressure Monitoring System
Page 490 of 646
CREATING A VEHICLE WI-FI
HOTSPOT
You can create a Wi-Fi hotspot in your
vehicle and allow devices to connect to it for
access to the Internet.
Select the settings option on the
feature bar.
1. Press Vehicle Hotspot.
Note: The vehicle hotspot default setting is
on.
2. Press
Settings.
3. Press
Edit.
4. Press
Hotspot visibility.
Note: The hotspot visibility default setting is
on.
Finding the Wi-Fi Hotspot Name and
Password Select the settings option on the
feature bar.
1. Press
Vehicle Hotspot. 2. Press
Settings.
Note: The network name is the hotspot
name.
3. Press
View Password.
Connecting a Device to the Wi-Fi
Hotspot
1. On your device, switch Wi-Fi on and select the hotspot from the list of
available Wi-Fi networks.
2. When prompted, enter the password.
Purchasing a Data Plan
1. Connect a device to the hotspot.
Note: The vehicle network carrier’ s portal
opens on your device.
2. If the portal does not open on your device, open a website and it redirects
to the vehicle network carrier’ s portal.
Note: Secure websites do not redirect.
3. Follow the instructions on the carrier portal to purchase a plan. Note:
If you have an active plan, the system
does not redirect to the vehicle network
carrier’ s portal when you connect a device.
Visit the vehicle network carrier’ s website to
purchase more data.
Note: If data usage information is available
in the vehicle hotspot menu, it is
approximate.
Note: If you carry out a master reset, the
system does not remove your vehicle from
your vehicle network carrier’ s account. To
remove your vehicle from the account,
contact your vehicle network carrier.
Note: The vehicle network carrier provides
Vehicle Hotspot services, subject to your
vehicle network carrier agreement, coverage
and availability.
CHANGING THE VEHICLE WI-FI
HOTSPOT NAME OR PASSWORD Select the settings option on the
feature bar.
1. Press
Vehicle Hotspot.
486
2022 Navigator (TB9) Canada/United States of America, enUSA, Edition date: 202109, First-Printing Vehicle Wi-Fi HotspotE280315 E280315 E280315