set clock LINCOLN NAVIGATOR 2023 Owners Manual
[x] Cancel search | Manufacturer: LINCOLN, Model Year: 2023, Model line: NAVIGATOR, Model: LINCOLN NAVIGATOR 2023Pages: 660, PDF Size: 14.04 MB
Page 18 of 660
Motorcraft Parts...........................................468
Engine Oil Capacity and Specification......................................................................469
Cooling System Capacity and Specification.......................................................................471
Fuel Tank Capacity......................................473
Air Conditioning System Capacity andSpecification.............................................474
Washer Fluid Specification.......................475
Brake Fluid Specification...........................475
Transfer Case Fluid Capacity andSpecification.............................................477
Front Axle Fluid Capacity and Specification......................................................................478
Rear Axle Fluid Capacity and Specification......................................................................479
Vehicle Identification
Vehicle Identification Number.................480
Connected Vehicle
What Is a Connected Vehicle....................481
Connected Vehicle Requirements...........481
Connected Vehicle Limitations.................481
Connecting the Vehicle to a MobileNetwork......................................................481
Connecting the Vehicle to a Wi-Fi Network......................................................................482
Connected Vehicle – Troubleshooting......................................................................482
Vehicle Wi-Fi Hotspot
Creating a Vehicle Wi-Fi Hotspot............484
Changing the Vehicle Wi-Fi Hotspot Nameor Password..............................................484
Vehicle Wi-Fi Hotspot – Troubleshooting......................................................................485
Audio System
Audio System Precautions.......................486
Identifying the Audio Unit.........................486
Switching the Audio Unit On and Off.....486
Selecting the Audio Source.....................486
Playing or Pausing the Audio Source.....486
Adjusting the Volume.................................487
Switching Shuffle Mode On and Off.......487
Switching Repeat Mode On and Off......487
Setting a Memory Preset...........................487
Muting the Audio.........................................487
Adjusting the Sound Settings..................487
Setting the Clock and Date......................488
AM/FM Radio................................................488
Switching the Display On and Off...........489
Digital Radio.................................................489
Satellite Radio...............................................491
Audio System – Troubleshooting...........493
Rear Passenger Audio Controls
Identifying the Rear Passenger AudioControls.....................................................497
Switching the Rear Passenger AudioControls On and Off...............................497
Selecting the Audio Source......................497
Playing and Pausing the Audio Source......................................................................497
Adjusting the Volume.................................497
Switching Shuffle Mode On and Off.......497
Switching Repeat Mode On and Off......497
Changing the Radio Station......................497
14
2023 Navigator (TB9) Canada/United States of America, enUSA, Edition date: 202207, DOMTable of Contents
Page 55 of 660
If the booster seat slides on the vehicle seatupon which it is being used, placing arubberized mesh sold as shelf or carpet linerunder the booster seat may improve thiscondition. Do not use any item thicker thanthis under the booster seat. Check with thebooster seat manufacturer's instructions.
CHILD SAFETY LOCKS
WARNING: You cannot open the reardoors from inside if you have put the childsafety locks on.
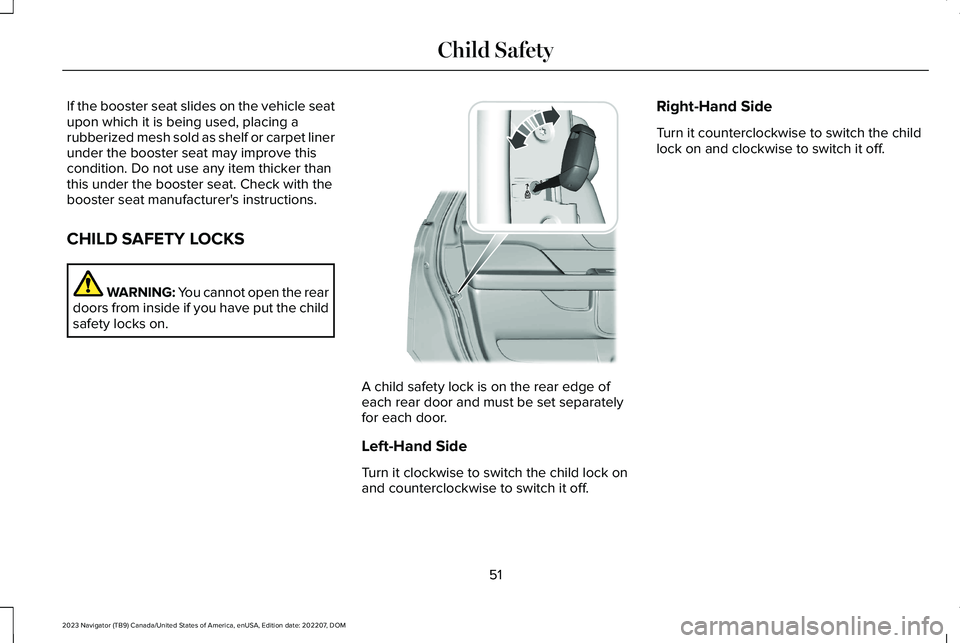
A child safety lock is on the rear edge ofeach rear door and must be set separatelyfor each door.
Left-Hand Side
Turn it clockwise to switch the child lock onand counterclockwise to switch it off.
Right-Hand Side
Turn it counterclockwise to switch the childlock on and clockwise to switch it off.
51
2023 Navigator (TB9) Canada/United States of America, enUSA, Edition date: 202207, DOMChild Safety E249891
Page 370 of 660
SWITCHING TRAILER BACKUP
ASSISTANCE ON AND OFF
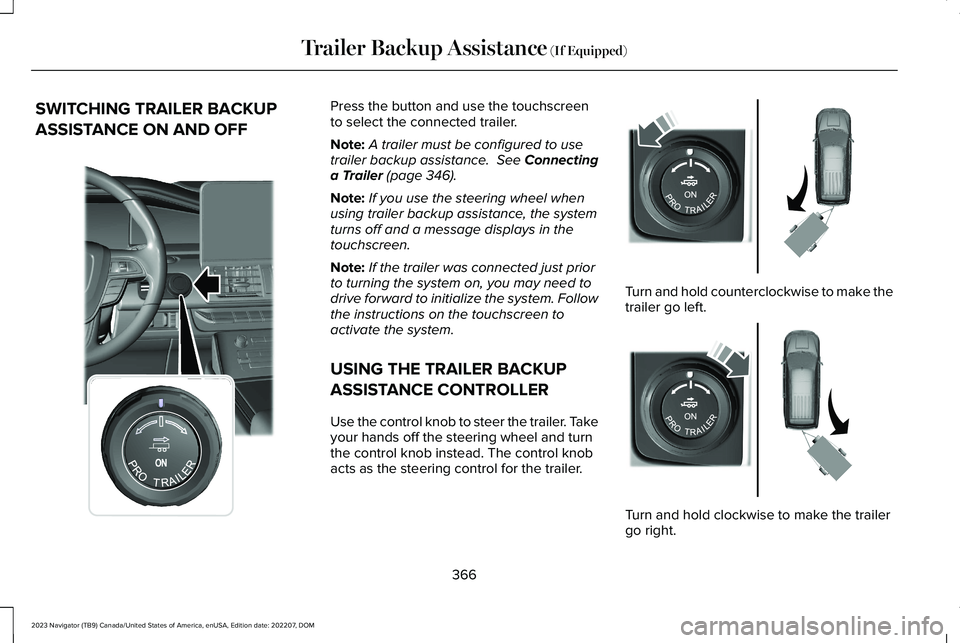
Press the button and use the touchscreento select the connected trailer.
Note:A trailer must be configured to usetrailer backup assistance. See Connectinga Trailer (page 346).
Note:If you use the steering wheel whenusing trailer backup assistance, the systemturns off and a message displays in thetouchscreen.
Note:If the trailer was connected just priorto turning the system on, you may need todrive forward to initialize the system. Followthe instructions on the touchscreen toactivate the system.
USING THE TRAILER BACKUP
ASSISTANCE CONTROLLER
Use the control knob to steer the trailer. Takeyour hands off the steering wheel and turnthe control knob instead. The control knobacts as the steering control for the trailer.
Turn and hold counterclockwise to make thetrailer go left.
Turn and hold clockwise to make the trailergo right.
366
2023 Navigator (TB9) Canada/United States of America, enUSA, Edition date: 202207, DOMTrailer Backup Assistance (If Equipped)E356842 E349262 E349263
Page 422 of 660
2.Remove the engine oil filler cap.
3.Add engine oil that meets ourspecifications. See Capacities andSpecifications (page 467).
4.Reinstall the engine oil filler cap. Turn itclockwise until you feel a strongresistance.
Note: Do not add oil further than themaximum mark. Oil levels above themaximum mark may cause engine damage.
Note:Immediately soak up any oil spillagewith an absorbent cloth.
RESETTING THE INTELLIGENT OIL LIFEMONITOR
Depending on your cluster, there are twopaths to reset the engine oil changereminder.
Path 1
1.Press the Menu button on the steeringwheel to enter the information displaymain menu.
2.Select Settings.
3.Select Vehicle Maintenance.
4.Select Oil Life.
5.Press and hold the OK button until thesystem reset confirmation appears.
Path 2
1.Press the Menu button on the steeringwheel to enter the information displaymain menu.
2.Select Truck Info.
3.Select Engine Information.
4.Press and hold the OK button until thesystem reset confirmation appears.
ENGINE OIL CAPACITY ANDSPECIFICATION
For filling information, please refer to theCapacities and Specifications section of yourowner's manual. See Engine Oil Capacityand Specification (page 469).
CHECKING THE COOLANT
When the engine is cold, check theconcentration and level of the coolant at theintervals listed in the scheduled maintenanceinformation. See Scheduled Maintenance(page 529).
Note:Make sure that the coolant level isbetween the minimum and maximum markson the coolant reservoir.
Note: Coolant expands when it is hot. Thelevel may extend beyond the MAX mark.
If the coolant level is at or below theminimum mark, add prediluted coolantimmediately.
Maintain coolant concentration within 48%to 50%, which equates to a freeze pointbetween -29°F (-34°C) and -35°F (-37°C).Coolant concentration should be checkedusing a refractometer. We do not recommendthe use of hydrometers or coolant test stripsfor measuring coolant concentration.
418
2023 Navigator (TB9) Canada/United States of America, enUSA, Edition date: 202207, DOMMaintenance
Page 424 of 660
3.Replace the coolant reservoir cap. Turnthe cap clockwise until it contacts thehard stop.
4.Check the coolant level in the coolantreservoir the next few times you driveyour vehicle. If necessary, repeat step 2.
If you have to add more than 1.1 qt (1 L) ofengine coolant per month, have your vehiclechecked as soon as possible. Operating anengine with a low level of coolant can resultin engine overheating and possible enginedamage.
In case of emergency, you can add a largeamount of water without engine coolant inorder to reach a vehicle service location.Service your vehicle as soon as possible.
Water alone, without engine coolant, cancause engine damage from corrosion,overheating or freezing.
Do not use the following as a coolantsubstitute, as they can cause engine damagefrom overheating or freezing:
•Alcohol.
•Methanol.
•Brine.
•Any coolant mixed with alcohol ormethanol antifreeze.
Do not add extra inhibitors or additives tothe coolant. These can be harmful andcompromise the corrosion protection of thecoolant.
Severe Climates
If you drive in extremely cold climates, youmay need to increase the coolantconcentration above 50%.
Note:A coolant concentration of 60%provides improved freeze point protection.Coolant concentrations above 60% decreasethe overheat protection characteristics ofthe coolant and could cause enginedamage.
If you drive in extremely hot climates, youmay need to decrease the coolantconcentration to 40%.
Note:A coolant concentration of 40%provides improved overheat protection.Coolant concentrations below 40% decreasethe overheat and corrosion protectioncharacteristics of the coolant and couldcause engine damage.
Coolant Change
WARNING: Do not dispose of coolantin the household refuse or the publicsewage system. Use an authorized wastedisposal facility.
Change the coolant at specific mileageintervals. Refer to the scheduledmaintenance information. See NormalScheduled Maintenance (page 533).
Note:Dispose of used coolant in theappropriate manner.
Follow your community's regulations andstandards for recycling and disposing ofautomotive fluids.
420
2023 Navigator (TB9) Canada/United States of America, enUSA, Edition date: 202207, DOMMaintenance
Page 430 of 660
After battery replacement, or in some casesafter charging the battery with an externalcharger, the battery management systemrequires eight hours of vehicle sleep time torelearn the battery state of charge. Duringthis time, your vehicle must remain fullylocked with the ignition switched off.
Note:Prior to relearning the battery state ofcharge, the battery management systemmay temporarily disable some electricalsystems.
Electrical Accessory Installation
To make sure the battery managementsystem works correctly, do not connect anelectrical device ground connection directlyto the battery negative post. This can causeinaccurate measurements of the batterycondition and potential incorrect systemoperation.
Note:If you add electrical accessories orcomponents to the vehicle, it may adverselyaffect battery performance and durability.This may also affect the performance ofother electrical systems in the vehicle.
Remove and Reinstall the Battery
Install a battery approved for use by ourspecifications. See Capacities andSpecifications (page 467).
To disconnect or remove the battery, do thefollowing:
1.Apply the parking brake and switch theignition off.
2.Switch all electrical equipment off, forexample lights and radio.
3.Wait a minimum of two minutes beforedisconnecting the battery.
Note:The engine management system hasa power hold function and remains poweredfor a period of time after you switch theignition off. This is to allow the system tostore diagnostic and adaptive tables.Disconnecting the battery without waitingcan cause damage not covered by thevehicle warranty.
4.Disconnect the negative battery cableterminal.
5.Disconnect the positive battery cableterminal.
6.Remove the battery securing clamp.
7.Remove the battery.
8.To install, reverse the removal procedure.
Note:Before reconnecting the battery, makesure the ignition remains switched off.
Note:Make sure to fully tighten the batterycables.
If you disconnect or replace the vehiclebattery, you must reset the followingfeatures:
•Window bounce-back. See Opening andClosing the Windows (page 134).
•Clock Settings.
•Pre-set radio stations.
Battery Disposal
Make sure that you dispose of oldbatteries in an environmentallyfriendly way. Seek advice fromyour local authority about recycling oldbatteries.
426
2023 Navigator (TB9) Canada/United States of America, enUSA, Edition date: 202207, DOMMaintenanceE107998
Page 465 of 660
WARNING: To help prevent yourvehicle from moving when changing awheel, shift the transmission into park (P),set the parking brake and use anappropriate block or wheel chock tosecure the wheel diagonally opposite tothe wheel being changed. For example,when changing the front left wheel, placean appropriate block or wheel chock onthe right rear wheel.
WARNING: Only use the jackprovided as original equipment with yourvehicle.
WARNING: Switch off the runningboards before jacking or placing any objectunder your vehicle. Never place your handbetween the extended running board andyour vehicle. A moving running board maycause injury.
WARNING: Only use the spare wheelcarrier to stow wheels provided with yourvehicle.
WARNING: Ensure screwthread isadequately lubricated before use.
WARNING: Switch the ignition offand apply the parking brake. If your vehiclehas a manual transmission, shift into firstor reverse gear. If your vehicle has anautomatic transmission, shift into park (P).
WARNING: Only use the specifiedjacking points. If you use any otherlocations you could damage vehiclecomponents, such as brake lines.
WARNING: Do not attempt to changea tire on the side of the vehicle close tomoving traffic. Pull far enough off the roadto not obstruct the flow of traffic and avoidthe danger of being hit when operating thejack or changing the wheel.
1.Park the vehicle on firm, level ground andactivate the hazard flashers.
2.Apply the parking brake, place thetransmission in park (P) and switch theignition off.
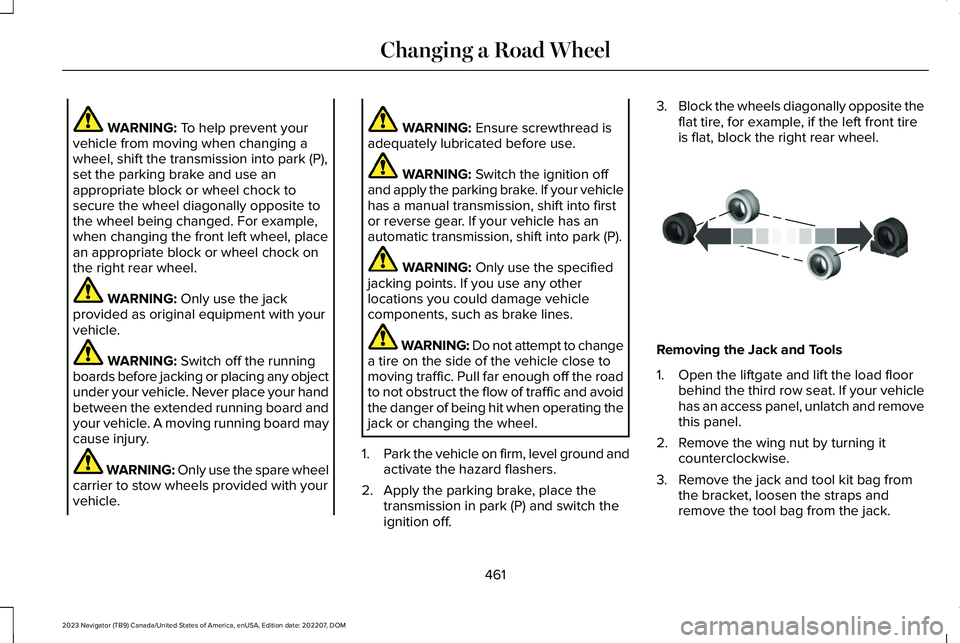
3.Block the wheels diagonally opposite theflat tire, for example, if the left front tireis flat, block the right rear wheel.
Removing the Jack and Tools
1.Open the liftgate and lift the load floorbehind the third row seat. If your vehiclehas an access panel, unlatch and removethis panel.
2.Remove the wing nut by turning itcounterclockwise.
3.Remove the jack and tool kit bag fromthe bracket, loosen the straps andremove the tool bag from the jack.
461
2023 Navigator (TB9) Canada/United States of America, enUSA, Edition date: 202207, DOMChanging a Road WheelE175447
Page 468 of 660
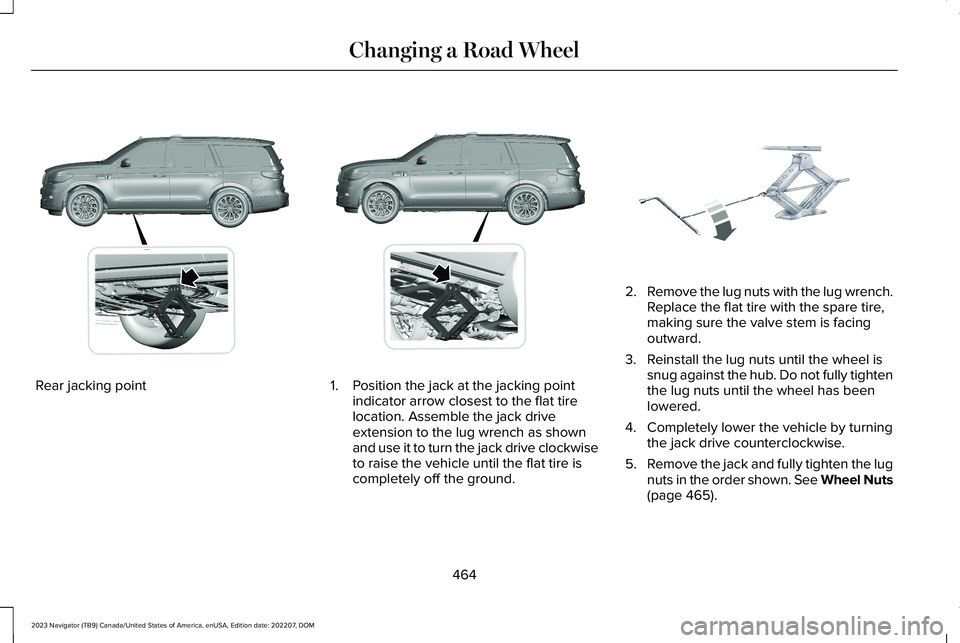
Rear jacking point1.Position the jack at the jacking pointindicator arrow closest to the flat tirelocation. Assemble the jack driveextension to the lug wrench as shownand use it to turn the jack drive clockwiseto raise the vehicle until the flat tire iscompletely off the ground.
2.Remove the lug nuts with the lug wrench.Replace the flat tire with the spare tire,making sure the valve stem is facingoutward.
3.Reinstall the lug nuts until the wheel issnug against the hub. Do not fully tightenthe lug nuts until the wheel has beenlowered.
4.Completely lower the vehicle by turningthe jack drive counterclockwise.
5.Remove the jack and fully tighten the lugnuts in the order shown. See Wheel Nuts(page 465).
464
2023 Navigator (TB9) Canada/United States of America, enUSA, Edition date: 202207, DOMChanging a Road WheelE360356 E360357 E325278
Page 492 of 660
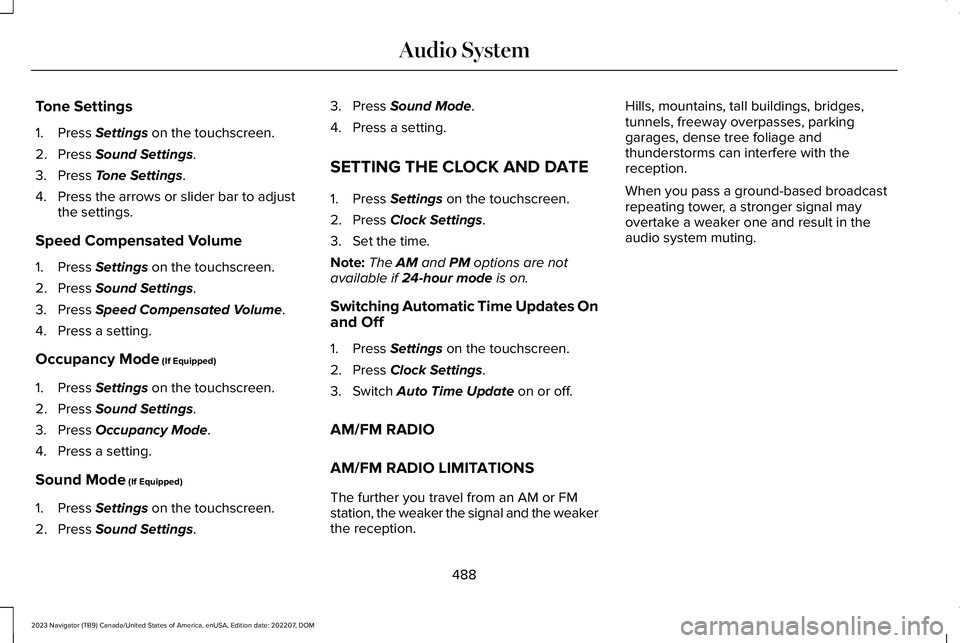
Tone Settings
1.Press Settings on the touchscreen.
2.Press Sound Settings.
3.Press Tone Settings.
4.Press the arrows or slider bar to adjustthe settings.
Speed Compensated Volume
1.Press Settings on the touchscreen.
2.Press Sound Settings.
3.Press Speed Compensated Volume.
4.Press a setting.
Occupancy Mode (If Equipped)
1.Press Settings on the touchscreen.
2.Press Sound Settings.
3.Press Occupancy Mode.
4.Press a setting.
Sound Mode (If Equipped)
1.Press Settings on the touchscreen.
2.Press Sound Settings.
3.Press Sound Mode.
4.Press a setting.
SETTING THE CLOCK AND DATE
1.Press Settings on the touchscreen.
2.Press Clock Settings.
3.Set the time.
Note:The AM and PM options are notavailable if 24-hour mode is on.
Switching Automatic Time Updates Onand Off
1.Press Settings on the touchscreen.
2.Press Clock Settings.
3.Switch Auto Time Update on or off.
AM/FM RADIO
AM/FM RADIO LIMITATIONS
The further you travel from an AM or FMstation, the weaker the signal and the weakerthe reception.
Hills, mountains, tall buildings, bridges,tunnels, freeway overpasses, parkinggarages, dense tree foliage andthunderstorms can interfere with thereception.
When you pass a ground-based broadcastrepeating tower, a stronger signal mayovertake a weaker one and result in theaudio system muting.
488
2023 Navigator (TB9) Canada/United States of America, enUSA, Edition date: 202207, DOMAudio System
Page 652 of 660
Sending and Receiving a TextMessage......................................................509Sensitive Locking Mode................................54How Does Sensitive Locking ModeWork.....................................................................54What is Sensitive Locking Mode.......................54
Service Data.....................................................25Setting a Destination....................................518Setting a Destination Using a Point ofInterest...............................................................518Setting a Destination Using a PredictiveDestination.......................................................518Setting a Destination Using a RecentDestination.......................................................518Setting a Destination Using a SavedDestination.......................................................518Setting a Destination Using the MapScreen...............................................................518Setting a Destination Using the Text EntryScreen...............................................................518
Setting a Memory Preset............................487Settings Data...................................................26Setting the Adaptive Cruise ControlGap................................................................275Setting the Adaptive Cruise ControlSpeed............................................................274Setting the Blower Motor Speed..............160Setting the Clock and Date.......................488
Setting the Hill Descent Speed.................251Setting the Liftgate Opening Height........100Setting the Speed Sign Recognition SpeedTolerance.....................................................333Setting the Speed Sign Recognition SpeedWarning........................................................333Setting the Temperature.............................160Setting Up the Trailer Backup Assistancefor a Conventional Trailer........................363Applying the Trailer Reversing AidSticker...............................................................364Calibrating the System......................................365Configuring the Trailer......................................363
Setting Up Trailer Reverse Guidance for aConventional Trailer..................................375Applying the Trailer Reverse AidSticker...............................................................376Calibrating the System......................................377Configuring the Trailer.......................................375
Shifting Your Vehicle Into Gear..................221Side Parking Aid...........................................258Locating the Side Parking Aid Sensors........259Side Parking Aid Audible Warnings..............259Side Parking Aid Limitations...........................258What is the Side Parking Aid...........................258
Signing Into Your Account.........................503Sitting in the Correct Position....................167Software Update Indicators........................521
Software Update Settings.........................520Software UpdateSee: Software Update Settings......................520See: Vehicle Software Updates.....................520
Sounding the Panic Alarm............................73Special Operating Conditions ScheduledMaintenance...............................................537Speedometer..................................................143Speed Sign Recognition Indicators.........333Speed Sign Recognition Limitations.......332Speed Sign RecognitionPrecautions.................................................332Speed Sign Recognition.............................332Speed Sign Recognition –Troubleshooting.............................................334
Speed Sign Recognition –Troubleshooting.........................................334Speed Sign Recognition – Frequently AskedQuestions.........................................................335Speed Sign Recognition – InformationMessages.........................................................334
Stability Control Indicator...........................249Stability Control.............................................247Starting and Stopping the Engine –Precautions..................................................201Starting and Stopping the Engine.............201Automatic Engine Stop.....................................204Engine Block Heater.........................................203
648
2023 Navigator (TB9) Canada/United States of America, enUSA, Edition date: 202207, DOMIndex