LINCOLN TOWN CAR 1997 Workshop Manual
Manufacturer: LINCOLN, Model Year: 1997, Model line: TOWN CAR, Model: LINCOLN TOWN CAR 1997Pages: 305, PDF Size: 2.68 MB
Page 51 of 305

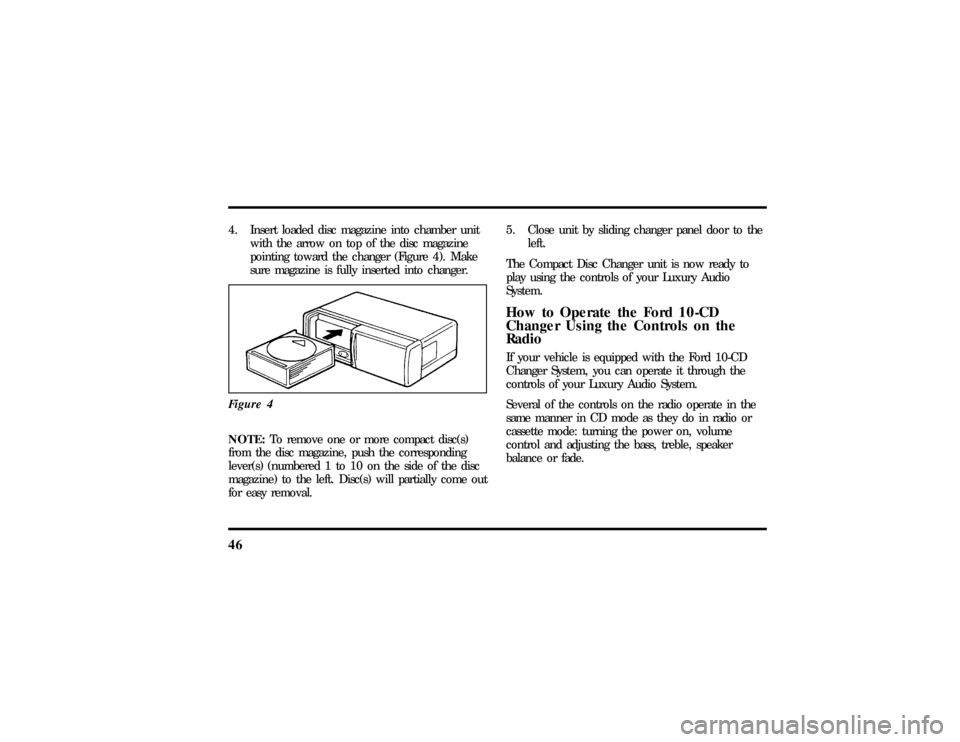
464. Insert loaded disc magazine into chamber unit
with the arrow on top of the disc magazine
pointing toward the changer (Figure 4). Make
sure magazine is fully inserted into changer.
Figure 4NOTE:To remove one or more compact disc(s)
from the disc magazine, push the corresponding
lever(s) (numbered 1 to 10 on the side of the disc
magazine) to the left. Disc(s) will partially come out
for easy removal.5. Close unit by sliding changer panel door to the
left.
The Compact Disc Changer unit is now ready to
play using the controls of your Luxury Audio
System.
How to Operate the Ford 10-CD
Changer Using the Controls on the
RadioIf your vehicle is equipped with the Ford 10-CD
Changer System, you can operate it through the
controls of your Luxury Audio System.
Several of the controls on the radio operate in the
same manner in CD mode as they do in radio or
cassette mode: turning the power on, volume
control and adjusting the bass, treble, speaker
balance or fade.
File:04fnast.ex
Update:Thu Jun 20 15:13:21 1996
Page 52 of 305

47
How to begin CD Changer playNOTE:Radio power must be on to operate the
Compact Disc Changer.
Push the ªCDº button to begin CD play. The
10-CD Changer will automatically begin playing the
first track (selection) of the first disc loaded in the
unit. The display will indicate CD-## for disc
number and TRK-## for track number.How to change the disc being playedWhen in the CD mode, you can change discs by
pressing the ªTUNE DISCSº button. Play will begin
on the first track of the selected disc.
Pressing the right (
a) side of the button will select
the next disc. Pressing the left (
b) side of the
button will select the previous disc.If either button is pressed and held, the CD
Changer will continue fast-forwarding or reversing
through the discs in the disc magazine. During
these functions, the display will indicate the disc
number.
How to change the track being playedPress the right (
a) side of the ªSEEKº button to
seek forward to the next track of current disc. If
the button is held and the last track is reached, the
disc changer will automatically begin playing the
last track of the current disc. After the last track
has been completed, the disc changer advances to
the next disc and begins play of track 1. The
display indicates the track number while seeking.
Press the left (
b) side of the ªSEEKº button to
seek in reverse to the previous track on the current
disc.
Pressing the ªFFº button will fast forward through
the current track. Pressing the ªREWº button will
rewind through the current track.
File:04fnast.ex
Update:Thu Jun 20 15:13:21 1996
Page 53 of 305

48Operating the CD Compression featureThe compression feature will bring soft and loud
passages closer together for a more consistent
listening level.
To turn the compression on, press the light above
the ªkCOMPº button. When on, the ªk
COMPº button will illuminate. Press the button
again to turn off.Operating the Shuffle featureThe shuffle feature on your CD player allows you to
listen to your disc selections in a different order.
When this feature is activated, your CD player will
randomly select and play tracks on the disc.
Press the ªSHUFFLEº button to turn on, press it
again to turn off. When on, the light above the
ªSHUFFLEº button will illuminate.
Operating the ªSCANº functionPress the ªSCANº button to enter the scan mode.
The CD player will begin scanning the disc,
stopping on each listenable track for approximately
an eight second sampling. This continues until you
press the ªSCANº button a second time.Operating the Shuffle and Scan features
simultaneouslyBoth the shuffle and scan features can be activated
simultaneously. In this mode, the player will
randomly pick a selection and play the first eight
seconds. This process is continued until either the
ªSCANº button or ªSHUFFLEº button is pressed a
second time.
File:04fnast.ex
Update:Thu Jun 20 15:13:21 1996
Page 54 of 305

49
WARNING
Thelase rbea muse din thecompact
Page 55 of 305

50CD Error MessagesYour system is equipped to diagnose certain
problems you may experience. The error codes are:
ÐCD E1Ð Mechanism error.
ÐCD E2Ð Focus error.
ÐBAD CDÐ Disc unreadable.
ÐTOO HOTÐ Mechanism over167ÊFarenheit
(75ÊC),allow to cool before playing.
ÐNO CDÐ Empty slot or magazine.
ÐNO DJÐ CD Changer not connected or not
communicating.Common Operating Conditions of the
CD PlayerThe following information is designed to help you
recognize typical situations that could be mistakenly
interpreted as mechanical malfunctions of the disc
player.
q
A disc is already loaded.
q
The disc is inserted with the label surface
downward.
q
The disc is dusty or defective.
q
The player's internal temperature is above
167ÊF (75ÊC).Allow the player to cool off
before operating.
q
Different manufacturers of compact discs may
produce discs with different dimensions or
tolerances, some of which may not be within
industry standards or in accordance with the
CD format. Because of this, a new disc that is
free of dust and scratches could be defective
and may not play on your Ford Compact Disc
Player.
File:04fnast.ex
Update:Thu Jun 20 15:13:21 1996
Page 56 of 305

51
If play does not begin after the CD button is
pushed:q
The radio is not on.
q
The unit is in the stop mode.
q
Moisture may have condensed on the lenses
within the unit. If this occurs, remove the disc
and wait approximately an hour until the
moisture evaporates.
If the sound skips:
q
Badly scratched discs or extremely rough roads
will cause the sound to skip. Skipping will not
damage the disc player or scratch the discs.
Common Radio Reception
ConditionsSeveral conditions prevent FM reception from being
completely clear and noise-free, such as the
following:
Distance/StrengthThe strength of the FM signal is directly related to
the distance the signal must travel. The listenable
range of an average FM signal is approximately 24
miles (40 km). Beyond this distance, the radio is
operating in a ªfringeº area and the signal becomes
weaker. Also, ªSignal Modulationº is used by some
stations to increase their ªloudnessº relative to other
stations. The difference in loudness can be a result
of signal modulation as well as signal strength.TerrainThe terrain (hilly, mountainous, tall buildings) of the
area over which the signal travels may prevent the
FM signal from being noise-free.
If there is a building or large structure between the
antenna and station, some of the signal ªbendsº
around the building, but certain spots receive almost
no signal. Moving out of the ªshadowº of the
structure will allow the station to return to normal.
File:04fnast.ex
Update:Thu Jun 20 15:13:21 1996
Page 57 of 305

52When the radio waves are reflected off objects or
structures, the reflected signal cancels the normal
signal, causing the antenna to pick up noise and
distortion. Cancellation effects are most prominent
in metropolitan areas, but also can become quite
severe in hilly terrain and depressed roadways.
To minimize these conditions, a stereo/mono blend
circuit has been incorporated into this system. This
feature automatically switches a weak stereo signal
to a clearer monaural signal, which improves the
quality of reception.
Several sources of static are normal conditions on
AM frequencies. These can be caused by power
lines, electric fences, traffic lights and
thunderstorms.
Another reception phenomenon isStrong Signal
Capture and Overload. This can occur when
listening to a weak station and when passing
another broadcast tower. The close station may
capture the more distant station, although thedisplayed frequency does not change. While passing
the tower, the station may switch back and forth a
few times before returning to the original station.
When several broadcast towers are present
(common in metropolitan areas), several stations
may overload the receiver, resulting in considerable
station changing, mixing and distortion.
Automatic gain control circuitry for both AM and
FM bands has been incorporated into this system to
reduce strong signal capture and overload.
All About Radio FrequenciesThe Federal Communications Commission (FCC)
and the Canadian Radio Telecommunications
Commission (CRTC) establish the frequencies that
AM and FM radio stations may use for their
broadcasts. The allowable frequencies are, AM: 530,
540...1600, 1610 kHz in 10 kHz steps; FM: 87.9,
88.1...107.7, 107.9 MHz in 0.2 MHz steps.
File:04fnast.ex
Update:Thu Jun 20 15:13:21 1996
Page 58 of 305

53
Not all frequencies will be assigned to a given area.
This radio will tune to each of these frequencies
using manual tune and no fine tuning is necessary
as radio stations may not use other frequencies.
Some FM radio stations advertise a ªrounded-offº
frequency which is not the frequency they actually
broadcast on. For example, a radio station that is
assigned a frequency of 98.7 MHz may call itself
ªRadio 99º even though 99.0 MHz is not an
allowable FM broadcast frequency.
Important Warranty and Service
InformationAbout Your WarrantyYour sound system is warranted for four years or
50,000 miles (whichever occurs first). Consult your
vehicle warranty booklet for further information.Servicing Your Audio SystemAt Ford, we stand behind our audio systems with a
comprehensive service and repair program. If
anything should go wrong with your Ford audio
system, return to your dealer for service. There is a
nationwide network of qualified Ford authorized
repair centers to assist you.
File:04fnast.ex
Update:Thu Jun 20 15:13:21 1996
Page 59 of 305

55
Controls and FeaturesThe Climate Control SystemElectronic Automatic Temperature
Control SystemThe Electronic Automatic Temperature Control
(EATC) module is located at the center of the
instrument panel and operates only when the key is
in the ON position.The EATC feature maintains the temperature you
select and automatically controls the airflow for
your comfort. It also allows you to override the
automatic operation with manual override buttons.
File:05fncft.ex
Update:Mon Jun 17 13:49:49 1996
Page 60 of 305

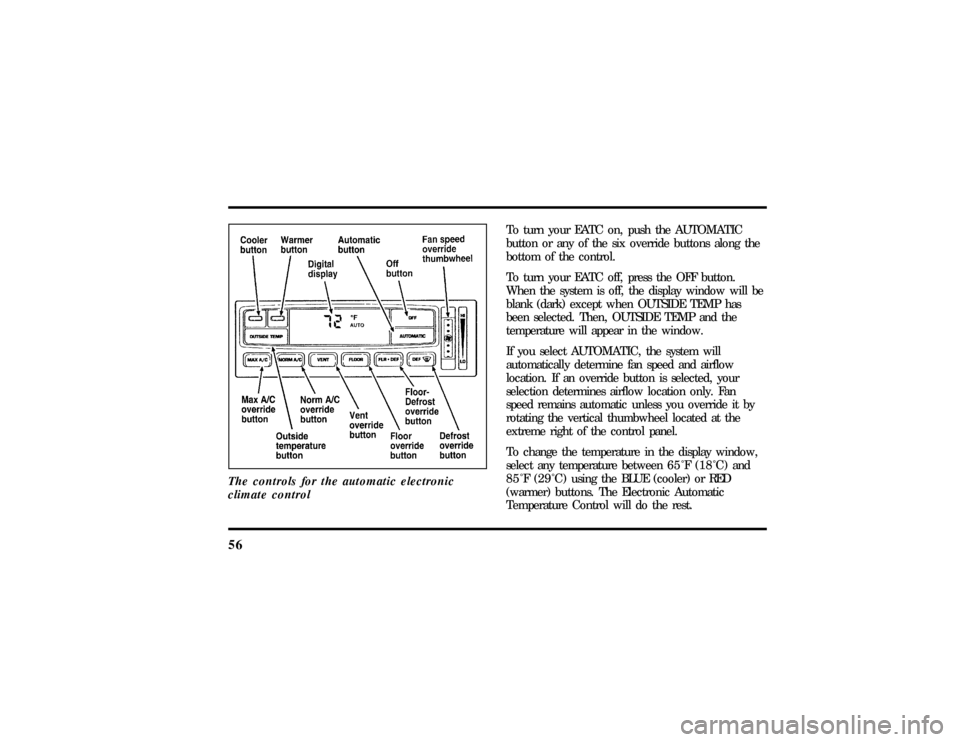
56The controls for the automatic electronic
climate control
To turn your EATC on, push the AUTOMATIC
button or any of the six override buttons along the
bottom of the control.
To turn your EATC off, press the OFF button.
When the system is off, the display window will be
blank (dark) except when OUTSIDE TEMP has
been selected. Then, OUTSIDE TEMP and the
temperature will appear in the window.
If you select AUTOMATIC, the system will
automatically determine fan speed and airflow
location. If an override button is selected, your
selection determines airflow location only. Fan
speed remains automatic unless you override it by
rotating the vertical thumbwheel located at the
extreme right of the control panel.
To change the temperature in the display window,
select any temperature between65ÊF(18ÊC) and
85ÊF(29ÊC)using the BLUE (cooler) or RED
(warmer) buttons. The Electronic Automatic
Temperature Control will do the rest.
File:05fncft.ex
Update:Mon Jun 17 13:49:49 1996