warning LUCID AIR 2022 Manual PDF
[x] Cancel search | Manufacturer: LUCID, Model Year: 2022, Model line: AIR, Model: LUCID AIR 2022Pages: 241, PDF Size: 5.15 MB
Page 178 of 241

CAUTION: Do not use statically-
charged materials (such as a cloth
that was recently machine-washed
and dried) on the displays.CAUTION: Do not use cleansers (such
as glass cleaner) to clean displays.
Display screens should only be cleaned using
a soft, lint-free cloth designed for cleaning
screens and monitors.
Before cleaning the display screens, use the
Pilot Panel to enable screen cleaning mode
to prevent accidental operation of vehicle
controls. Select
> Displays > Displays
& Accessibility > SCREEN CLEANING MODE.
Airbags
WARNING: Airbag covers should only
be cleaned using a slightly dampened
cloth or cleaning wipe. Water or any
other liquid entering into an airbag
or its associated electrical wiring may
cause the airbags to deploy or not
function properly in an accident.WARNING: Any damage or cracks on
an airbag cover should be referred to a
Lucid Service Center for inspection.
Seats
WARNING: Never use steam or
upholstery cleaners on the seats,
or any cleaning method that would
saturate the seat with liquid. This can
damage the occupancy weight sensor
in the seat, which in turn can affect
the operation of the airbag system and
result in serious injury or death.
For cloth seats:
-If necessary, gently vacuum the seats
first to remove any loose dust, dirt, or
debris.
- Use a soft, colorless cloth moistened
with warm water and (if necessary) non- detergent soap. Wipe gently in a circular
motion. Allow the seats to air dry after
cleaning.
For leather and artificial leather seats:
-To clean, use a soft, colorless cloth
moistened only with warm water. Do
not use polishes, oils, cleaning fluids,
solvents, or detergents.
- Avoid vacuuming. Instead, use your
moistened cleaning cloth to gently
remove any loose particles.
- Application of a leather conditioner is
not necessary to maintain the original
condition of the seats.
Seat beltsWARNING: Never allow any substance
to enter a seat belt mechanism,
as this can negatively affect its
performance in an impact.
Extend the seat belt and clean using a cloth
moistened only with water. Do not use any
type of detergent or chemical cleaning agent.
Allow the belts to air dry while extended, away
from direct sunlight if possible.
Chrome and metal surfaces
Do not use abrasive cleansers, rough cloths,
or polish, as these materials can damage the
finish of these surfaces.
Plastic materials
WARNING: Do not use polish or wax
cleaner on the upper surfaces of the dashboard. Polished surfaces are
reflective and may interfere with the
driver
Page 179 of 241

cleanser. Spot-test any cleansers first to
ensure they will not leave stains. Dry the mat
thoroughly before reinstalling.
Floor MatsWARNING: Loose or improperly fitted
floor mats could interfere with the
operation of the foot pedals, which
could lead to loss of vehicle control
and a collision.WARNING: Do not place additional
floor mats over the existing ones.WARNING: Always install floor mats
with the correct side facing up. Do not
turn them over.
Using genuine Lucid floor mats can extend
the life of your vehicle
Page 180 of 241

Parts and Accessories
Parts, Accessories, and ModificationsWARNING: Lucid does not
recommend installing non-approved
parts and accessories or performing
non-approved vehicle modifications.
Doing so can negatively affect your
vehicle
Page 181 of 241
Vehicle Lifting Points
Lifting the VehicleWARNING: Never raise the vehicle
when the charging cable is connected,
even if charging is not in progress.
Always disconnect the charging
cable before raising the vehicle. See
Disconnecting the Charging Cable on
page 149.WARNING: Do not work on an
incorrectly supported vehicle. Doing
so can cause serious damage, bodily
injury, or death.
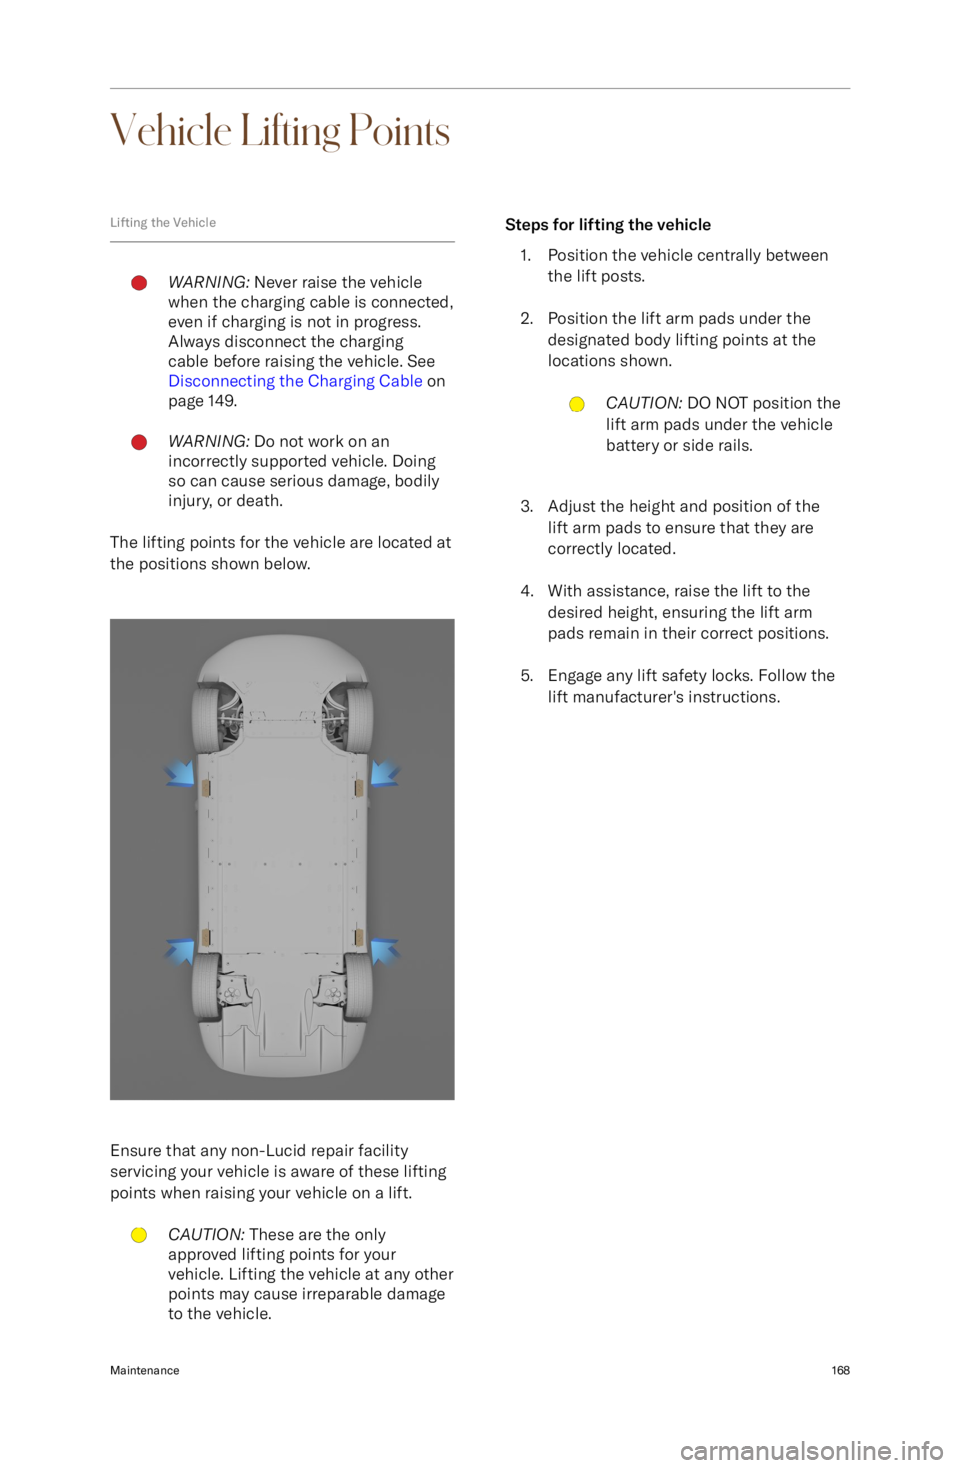
The lifting points for the vehicle are located at
the positions shown below.
Ensure that any non-Lucid repair facility servicing your vehicle is aware of these lifting
points when raising your vehicle on a lift.
CAUTION: These are the only
approved lifting points for your
vehicle. Lifting the vehicle at any other
points may cause irreparable damage
to the vehicle.Steps for lifting the vehicle
1. Position the vehicle centrally between the lift posts.
2. Position the lift arm pads under the designated body lifting points at thelocations shown.CAUTION: DO NOT position the
lift arm pads under the vehicle
battery or side rails.
3. Adjust the height and position of the lift arm pads to ensure that they are
correctly located.
4. With assistance, raise the lift to the desired height, ensuring the lift arm
pads remain in their correct positions.
5. Engage any lift safety locks. Follow the lift manufacturer
Page 189 of 241
Tire Care and Maintenance
Inspecting and Maintaining TiresWARNING: The tires should be
regularly checked for wear and to
make sure that there are no cuts,
bulges, or exposure of the ply/cord
structure. Do not drive with tires that
are worn, damaged, or inflated to
the incorrect pressure. Driving under
any of these conditions could lead to
collision due to tire failure and/or loss
of control and result in serious injury
or death to the occupants or others.
Always consider tire conditions when driving,
and regularly inspect the tread and sidewalls for any sign of distortion (bulges), cuts, or
wear.
Good driving practice will improve the
mileage you obtain from your tires and avoid
unnecessary damage.
-Always ensure that the tire pressures
are correctly adjusted.
- Always observe the posted speed limits
and advisory speeds.
- Avoid pulling away quickly or hard
acceleration.
- Avoid making fast turns or braking
sharply.
- Avoid potholes and objects on the road.
- Do not run over curbs or hit the tire
against the curb when parking.
CAUTION: Avoid contaminating tires
with vehicle fluids that can cause
damage.
Tire wear
WARNING: The tire wear indicators
show the minimum tread depth
recommended by the tire
manufacturer. Tires that have worn
to this point will have reduced
grip and poor water displacement
characteristics.
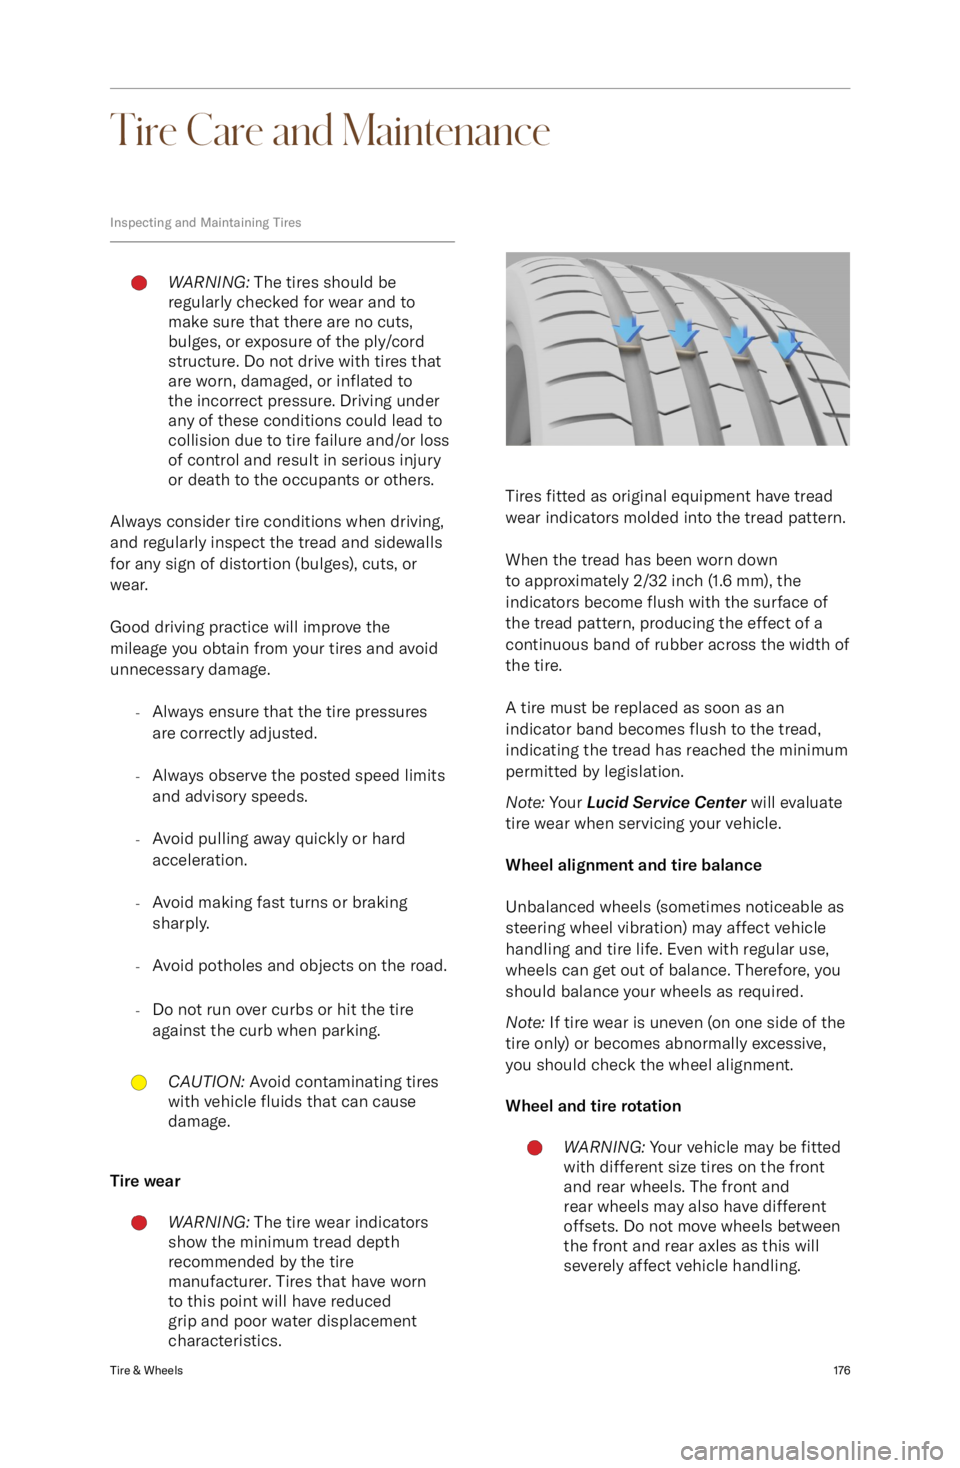
Tires fitted as original equipment have tread
wear indicators molded into the tread pattern.
When the tread has been worn down
to approximately 2/32 inch (1.6 mm), the
indicators become flush with the surface of
the tread pattern, producing the effect of a
continuous band of rubber across the width of
the tire.
A tire must be replaced as soon as an
indicator band becomes flush to the tread,
indicating the tread has reached the minimum
permitted by legislation.
Note: Your Lucid Service Center will evaluate
tire wear when servicing your vehicle.
Wheel alignment and tire balance
Unbalanced wheels (sometimes noticeable as
steering wheel vibration) may affect vehicle
handling and tire life. Even with regular use,
wheels can get out of balance. Therefore, you
should balance your wheels as required.
Note: If tire wear is uneven (on one side of the
tire only) or becomes abnormally excessive, you should check the wheel alignment.
Wheel and tire rotation
WARNING: Your vehicle may be fitted
with different size tires on the front and rear wheels. The front and
rear wheels may also have different
offsets. Do not move wheels between
the front and rear axles as this will
severely affect vehicle handling.Tire & Wheels176
Page 190 of 241
Lucid does not recommend moving the
wheels between the front and rear axles, or
from side to side on the same axle pair.
Punctured tiresWARNING: Do not drive the vehicle
with a punctured tire. Even if the
punctured tire has not deflated, it is
unsafe to use as the tire may deflate
suddenly at any time.
Your vehicle is fitted with tubeless tires, which
may not leak when penetrated, provided the
object remains in the tire.
If, however, you feel a sudden vibration or ride
disturbance while driving, or you suspect your
tire or vehicle has been damaged, immediately
reduce your speed. Drive slowly while avoiding
heavy braking or sharp steering, and when
safe to do so, stop the vehicle.
Inspect the tires for damage. If a tire is under-
inflated and does not appear to have any
damage to the sidewall, try to repair using a
tire repair kit. If you cannot detect the cause
or the tire is too heavily damaged, have the
vehicle recovered to a tire repair center, or a Lucid Service Center to have the vehicle
inspected.
A puncture will eventually cause the tire to
lose pressure, which is why frequent checking
of tire pressures is important. Punctured or
damaged tires must be permanently repaired or replaced as soon as possible.
Age degradation
Tires degrade over time due to the effects of
ultraviolet light, extreme temperatures, high
loads, and environmental conditions. It is recommended that tires are replaced every
six years, but may require replacement more
frequently.
Maintaining Tire Pressures
WARNING: Use a gauge to check tire
pressures when COLD. Under-inflation
is the most common cause of tire
failures and may result in severe
tire cracking, tread separation, or
“blowout,” with an unexpected loss of
vehicle control and increased risk of
injury.Each tire should be checked monthly and
inflated to the pressure recommended on the
vehicle placard or tire inflation pressure label.
(If your vehicle has tires of a different size than the size indicated on the vehicle placard
or tire inflation pressure label, you should
determine the proper tire inflation pressure for
those tires).
Driving on a significantly under-inflated tire
causes the tire to overheat and can lead
to tire failure. Under-inflation also reduces
battery range and tire tread life, and may
affect the vehicle
Page 191 of 241

To view current tire pressures on the Pilot
Panel. Select
> Vehicle > Tire
Pressure.
Note: Tire pressure is shown once the vehicle
is driven over 13 mph (21 km/h).
If it is necessary to check the tires when they
are warm, you should expect the pressures to
have increased. Do not reduce the pressure of warm tires in an attempt to match the
recommended cold tire pressures.
To view the recommended COLD tire
pressures for your vehicle, select the
RECOMMENDED tab. Always inflate your tires
to the pressures recommended by Lucid, even
if it is different from the maximum inflation
pressure information found on the tire itself.
Adjusting tire pressure
To check and adjust tire pressure: 1. Remove the cap from the valve, then firmly press the tire gauge onto the valve
and measure the pressure.
2. If required, add air to reach the required pressure.
3. Check the pressure by removing the tire gauge and then re-attaching it. Failure
to remove and re-attach the gauge to
the valve could cause the gauge to show
an incorrect reading.
4. If the tire pressure is too high, remove the gauge and release air from the tireby pressing on the metal stem in the
center of the valve. Refit the gauge to
the valve and check the pressure.
5. Repeat the process of adding or removing air as required until the correct
tire pressure is reached.
6. Refit the valve cap.
Tire valves
Keep the valve caps screwed down firmly to
prevent water or dirt from entering the valve.
Check the valves for leaks when checking the tire pressures.
Flat spots
If the vehicle is stationary for a long period when the ambient temperature is high, the
tires may form flat spots. When the vehicle is
driven, these flat spots will cause a vibration
that will steadily disappear as the tires warm
up and regain their original shape.
Tire pressures during long-term storage
Inflate tires to the maximum pressure as
indicated on the tire wall to minimize flat
spots during storage.WARNING: The tire pressures must be
reduced to the correct pressure before
the vehicle is driven.
Tire pressures at high speeds
CAUTION: Vehicle speed is capped
depending on the trim level. Operating
your vehicle at speeds over the speed
limit is not recommended. Customer is
responsible for obeying all traffic laws.
If operating the vehicle above 155mph (250
km/h) , temporarily inflate the tire to a cold
inflation pressure according to the table
below. If the conditions in the table below are
met, then all axle loads up to Front Gross Axle
Weight Rating and Rear Gross Axle Weight
Rating are acceptable.
Tire SizeSpeeds below
155mph (250
km/h)Speeds above
155mph (250
km/h)245/45R1949 psi (340
kPa)49 psi (340
kPa)245/40R2042 psi (290
kPa)45 psi (310
kPa)265/40R2042 psi (290
kPa)45 psi (310
kPa)245/35R2142 psi (290
kPa)45 psi (310
kPa)265/35R2142 psi (290
kPa)45 psi (310
kPa)
Note: Track or competition use of the vehicle
is not covered under the Lucid New Vehicle
Limited Warranty, and is not recommended.
Tire & Wheels178
Page 192 of 241
Replacing Tires and WheelsWARNING: For your safety, it is
recommended that only wheels
and tires that match the original
specification are used on the vehicle.
Specifications for approved winter
tires are available by contacting your
Lucid Service Center.WARNING: Operation of the Tire
Pressure Monitoring System (TPMS)
may be affected if the tires are
replaced with a different specification
from the originals.
Wheel rims and tires are matched to suit
the handling characteristics of the vehicle.
Always check that replacement tires comply
with the original specification. If tires other
than those specified are used, ensure that
the load and speed ratings (shown on the tire
side wall) equal or exceed those of the original
specification.
Ideally, tires should be replaced as sets of
four. If this is not possible, replace the tires
in pairs (front and rear). When replacng tires,
the wheels should be balanced and alignment
checked.
Asymmetric tires
WARNING: Vehicle traction and
handling will be seriously impaired if
the tires are incorrectly installed on
the wheels.
Your vehicle is equipped with Asymmetric
tires that have different tread patterns on
the outer and inner edge of the tire. On the
outside edge, the tread pattern exhibits large
tread blocks that are designed to provide
dry traction and handling thanks to a larger
contact area with the road.
On the inside edge, the tread block is smaller
to provide better wet grip. An increased
number of grooves helps disperse water on wet roads and reduce the risk of aquaplaning.
This means the tire is built to provide great
performance in both wet and dry conditions.
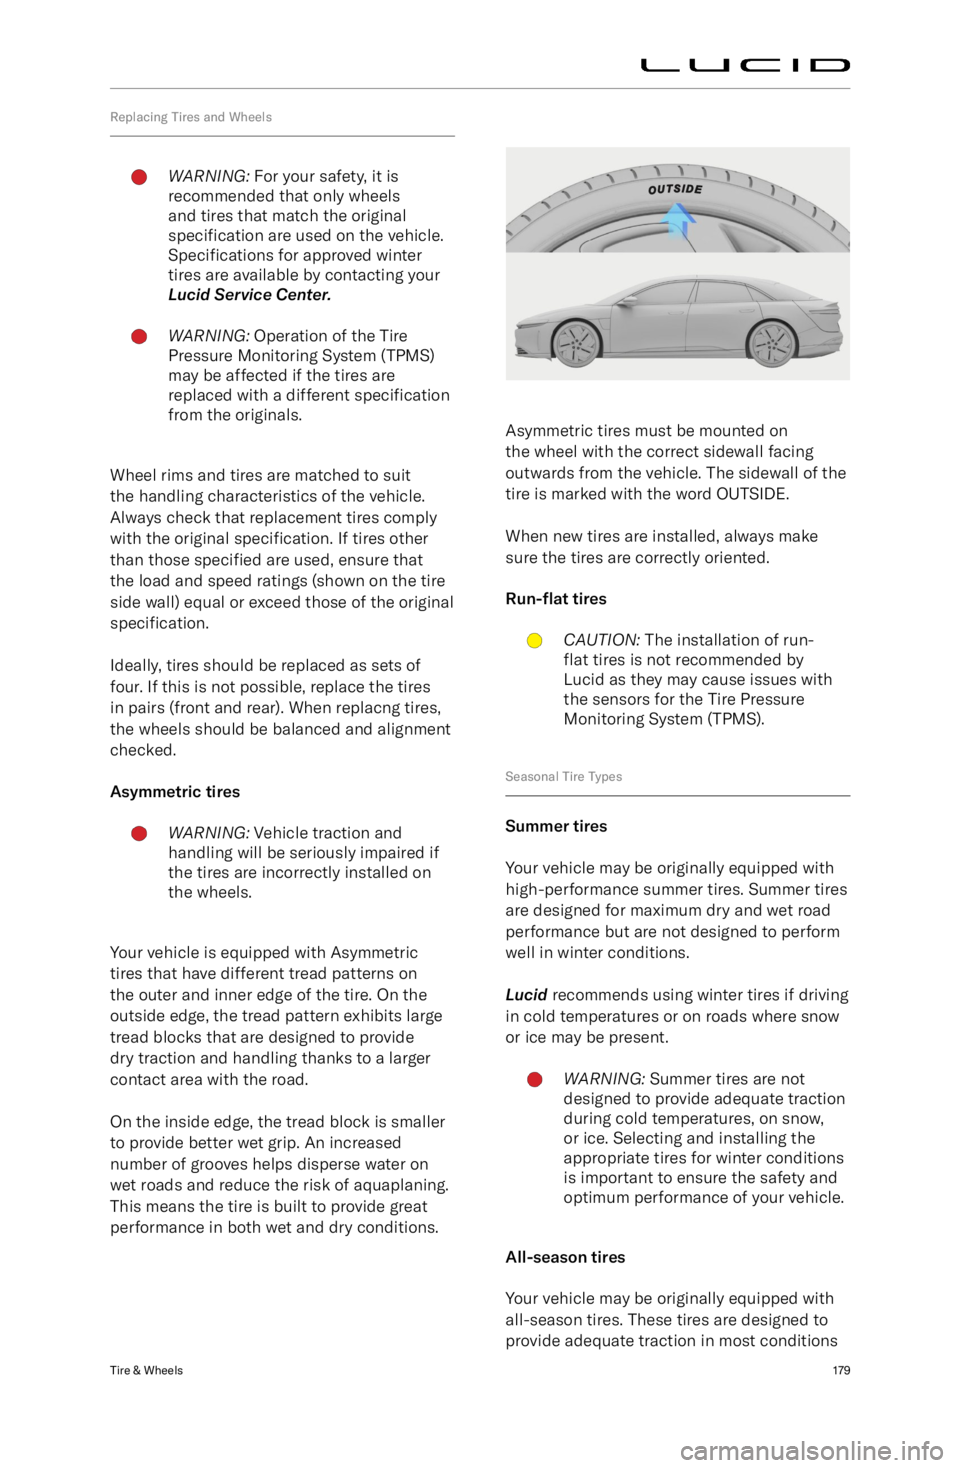
Asymmetric tires must be mounted on
the wheel with the correct sidewall facing
outwards from the vehicle. The sidewall of the
tire is marked with the word OUTSIDE.
When new tires are installed, always make
sure the tires are correctly oriented.
Run-
Page 193 of 241

year-round, but may not provide the same
level of traction as winter tires in snowy or icy
conditions. All-season tires can be identified
by ALL SEASON and/or M+S (mud and snow)
on the tire sidewall.
Winter tiresWARNING: Always follow the tire
manufacturer
Page 194 of 241
Tire Pressure Monitoring System
Tire Pressure Monitoring System (TPMS)WARNING: The TPMS is not a
substitute for manually checking tire
pressures. The TPMS only provides a
tire pressure warning and does not re-
inflate the tires.WARNING: The TPMS cannot register
damage to a tire. Regularly check the
condition of your tires.WARNING: Using liquid or aerosol tire
sealants may cause a malfunction of
tire pressure sensors.
The TPMS monitors the pressure of the
tires using sensors located in each wheel.
In-vehicle sensors receive TMPS data using
Radio Frequency (RF) signals.
Note: Installing accessories that are not
approved by Lucid may interfere with the
TPMS system.
Tire pressure warnings are displayed
on the Cockpit Panel using an
amber warning indicator. A warning
chime will sound, and a warning
message will display to alert you to a problem.
The tire pressure warning indicator will
illuminate if a tire is under-inflated.
If the tire pressure warning indicator
illuminates, stop and check your tires as soon as possible and inflate them to the correct
pressure. If the tire pressure warning occurs
frequently, the cause must be determined and rectified.
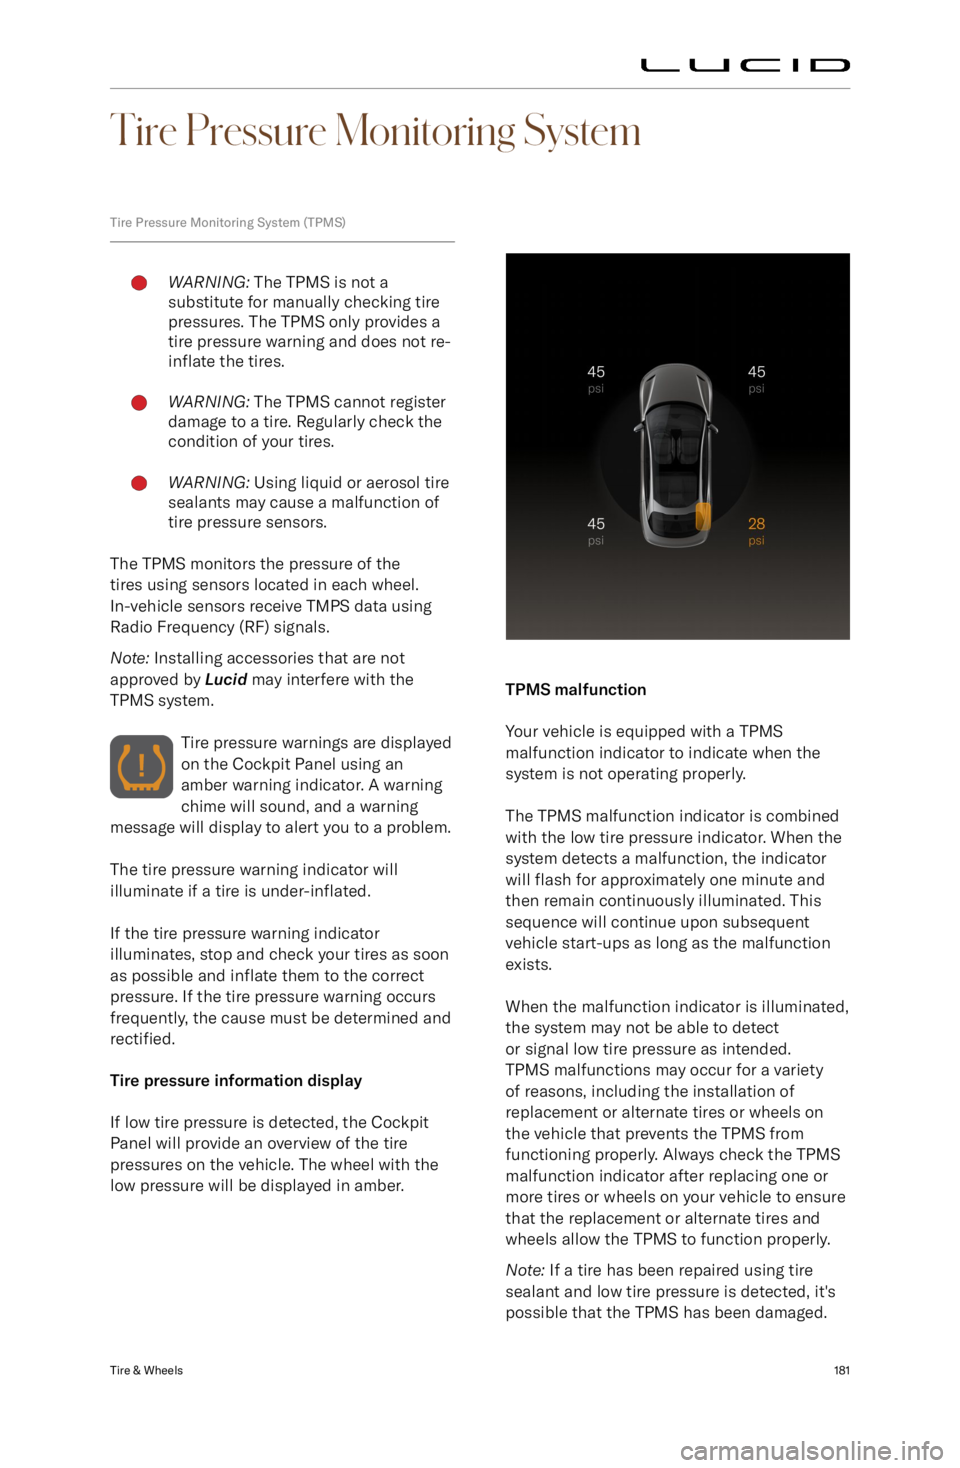
Tire pressure information display
If low tire pressure is detected, the Cockpit
Panel will provide an overview of the tire
pressures on the vehicle. The wheel with the low pressure will be displayed in amber.
TPMS malfunction
Your vehicle is equipped with a TPMS
malfunction indicator to indicate when the system is not operating properly.
The TPMS malfunction indicator is combined
with the low tire pressure indicator. When the system detects a malfunction, the indicatorwill flash for approximately one minute and
then remain continuously illuminated. This
sequence will continue upon subsequent
vehicle start-ups as long as the malfunction
exists.
When the malfunction indicator is illuminated,
the system may not be able to detect
or signal low tire pressure as intended.
TPMS malfunctions may occur for a variety
of reasons, including the installation of
replacement or alternate tires or wheels on
the vehicle that prevents the TPMS from
functioning properly. Always check the TPMS
malfunction indicator after replacing one or
more tires or wheels on your vehicle to ensure that the replacement or alternate tires and
wheels allow the TPMS to function properly.
Note: If a tire has been repaired using tire
sealant and low tire pressure is detected, it