LUCID AIR 2023 Owners Manual
Manufacturer: LUCID, Model Year: 2023, Model line: AIR, Model: LUCID AIR 2023Pages: 241, PDF Size: 5.15 MB
Page 191 of 241

To view current tire pressures on the Pilot
Panel. Select
> Vehicle > Tire
Pressure.
Note: Tire pressure is shown once the vehicle
is driven over 13 mph (21 km/h).
If it is necessary to check the tires when they
are warm, you should expect the pressures to
have increased. Do not reduce the pressure of warm tires in an attempt to match the
recommended cold tire pressures.
To view the recommended COLD tire
pressures for your vehicle, select the
RECOMMENDED tab. Always inflate your tires
to the pressures recommended by Lucid, even
if it is different from the maximum inflation
pressure information found on the tire itself.
Adjusting tire pressure
To check and adjust tire pressure: 1. Remove the cap from the valve, then firmly press the tire gauge onto the valve
and measure the pressure.
2. If required, add air to reach the required pressure.
3. Check the pressure by removing the tire gauge and then re-attaching it. Failure
to remove and re-attach the gauge to
the valve could cause the gauge to show
an incorrect reading.
4. If the tire pressure is too high, remove the gauge and release air from the tireby pressing on the metal stem in the
center of the valve. Refit the gauge to
the valve and check the pressure.
5. Repeat the process of adding or removing air as required until the correct
tire pressure is reached.
6. Refit the valve cap.
Tire valves
Keep the valve caps screwed down firmly to
prevent water or dirt from entering the valve.
Check the valves for leaks when checking the tire pressures.
Flat spots
If the vehicle is stationary for a long period when the ambient temperature is high, the
tires may form flat spots. When the vehicle is
driven, these flat spots will cause a vibration
that will steadily disappear as the tires warm
up and regain their original shape.
Tire pressures during long-term storage
Inflate tires to the maximum pressure as
indicated on the tire wall to minimize flat
spots during storage.WARNING: The tire pressures must be
reduced to the correct pressure before
the vehicle is driven.
Tire pressures at high speeds
CAUTION: Vehicle speed is capped
depending on the trim level. Operating
your vehicle at speeds over the speed
limit is not recommended. Customer is
responsible for obeying all traffic laws.
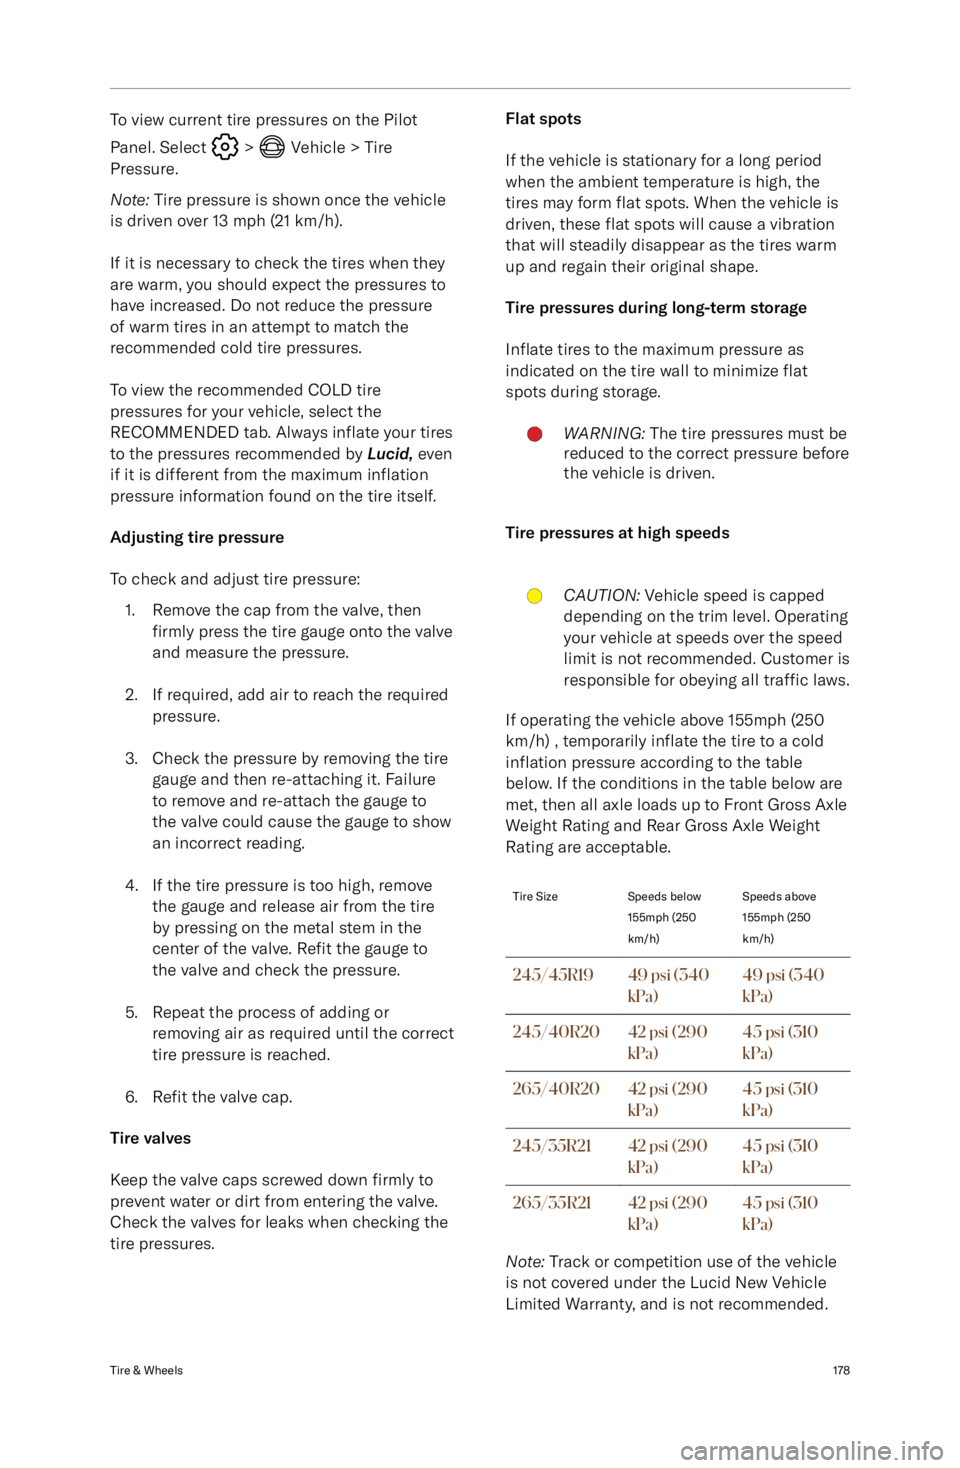
If operating the vehicle above 155mph (250
km/h) , temporarily inflate the tire to a cold
inflation pressure according to the table
below. If the conditions in the table below are
met, then all axle loads up to Front Gross Axle
Weight Rating and Rear Gross Axle Weight
Rating are acceptable.
Tire SizeSpeeds below
155mph (250
km/h)Speeds above
155mph (250
km/h)245/45R1949 psi (340
kPa)49 psi (340
kPa)245/40R2042 psi (290
kPa)45 psi (310
kPa)265/40R2042 psi (290
kPa)45 psi (310
kPa)245/35R2142 psi (290
kPa)45 psi (310
kPa)265/35R2142 psi (290
kPa)45 psi (310
kPa)
Note: Track or competition use of the vehicle
is not covered under the Lucid New Vehicle
Limited Warranty, and is not recommended.
Tire & Wheels178
Page 192 of 241

Replacing Tires and WheelsWARNING: For your safety, it is
recommended that only wheels
and tires that match the original
specification are used on the vehicle.
Specifications for approved winter
tires are available by contacting your
Lucid Service Center.WARNING: Operation of the Tire
Pressure Monitoring System (TPMS)
may be affected if the tires are
replaced with a different specification
from the originals.
Wheel rims and tires are matched to suit
the handling characteristics of the vehicle.
Always check that replacement tires comply
with the original specification. If tires other
than those specified are used, ensure that
the load and speed ratings (shown on the tire
side wall) equal or exceed those of the original
specification.
Ideally, tires should be replaced as sets of
four. If this is not possible, replace the tires
in pairs (front and rear). When replacng tires,
the wheels should be balanced and alignment
checked.
Asymmetric tires
WARNING: Vehicle traction and
handling will be seriously impaired if
the tires are incorrectly installed on
the wheels.
Your vehicle is equipped with Asymmetric
tires that have different tread patterns on
the outer and inner edge of the tire. On the
outside edge, the tread pattern exhibits large
tread blocks that are designed to provide
dry traction and handling thanks to a larger
contact area with the road.
On the inside edge, the tread block is smaller
to provide better wet grip. An increased
number of grooves helps disperse water on wet roads and reduce the risk of aquaplaning.
This means the tire is built to provide great
performance in both wet and dry conditions.
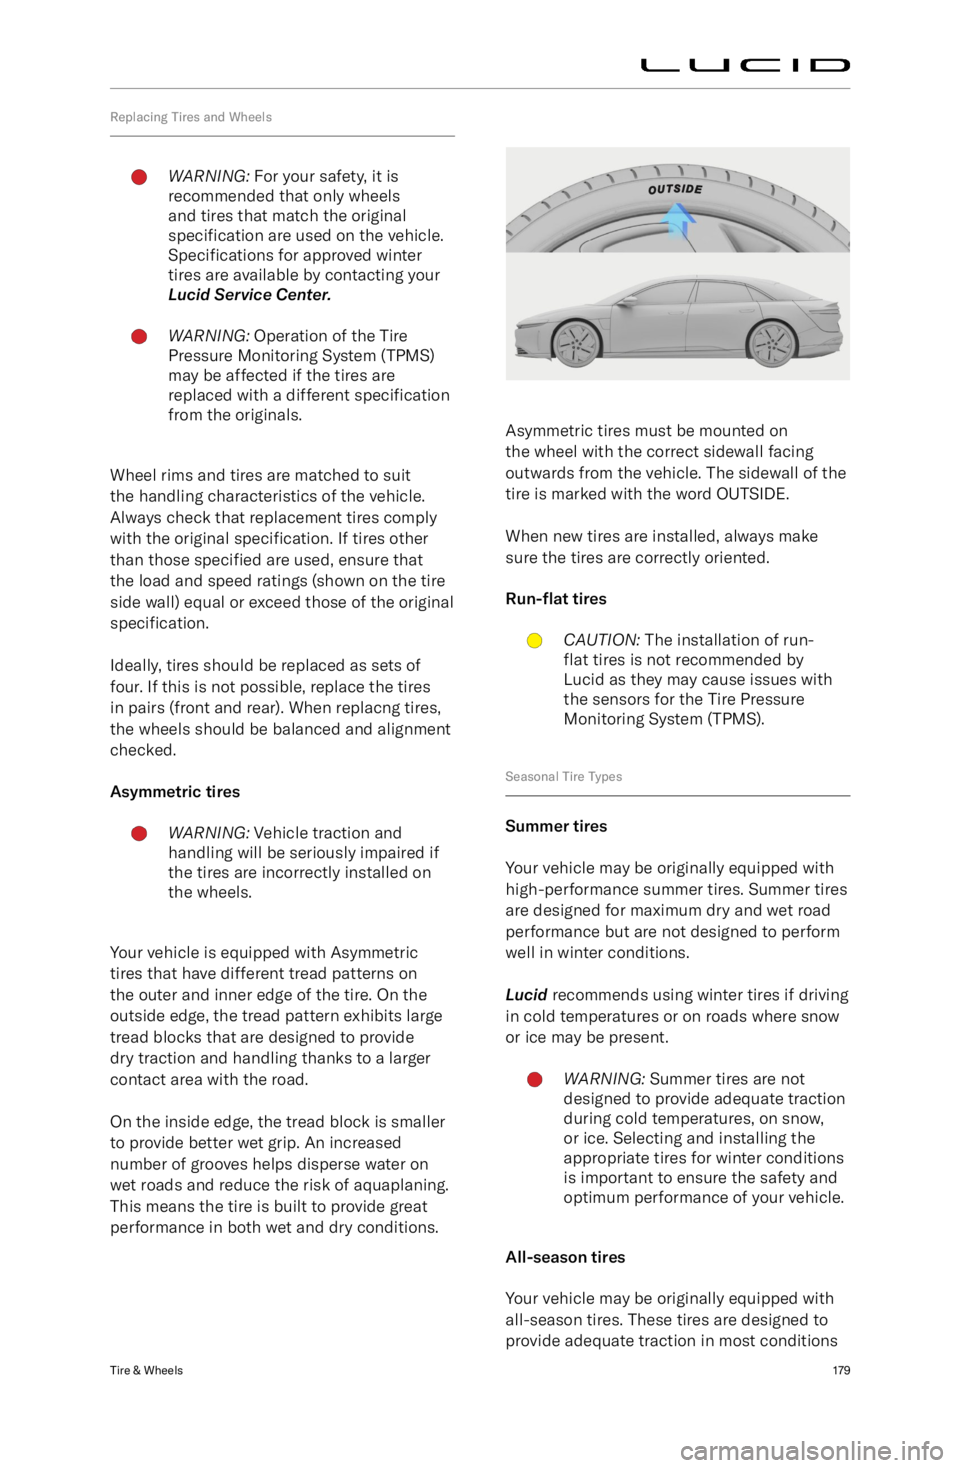
Asymmetric tires must be mounted on
the wheel with the correct sidewall facing
outwards from the vehicle. The sidewall of the
tire is marked with the word OUTSIDE.
When new tires are installed, always make
sure the tires are correctly oriented.
Run-
Page 193 of 241

year-round, but may not provide the same
level of traction as winter tires in snowy or icy
conditions. All-season tires can be identified
by ALL SEASON and/or M+S (mud and snow)
on the tire sidewall.
Winter tiresWARNING: Always follow the tire
manufacturer
Page 194 of 241

Tire Pressure Monitoring System
Tire Pressure Monitoring System (TPMS)WARNING: The TPMS is not a
substitute for manually checking tire
pressures. The TPMS only provides a
tire pressure warning and does not re-
inflate the tires.WARNING: The TPMS cannot register
damage to a tire. Regularly check the
condition of your tires.WARNING: Using liquid or aerosol tire
sealants may cause a malfunction of
tire pressure sensors.
The TPMS monitors the pressure of the
tires using sensors located in each wheel.
In-vehicle sensors receive TMPS data using
Radio Frequency (RF) signals.
Note: Installing accessories that are not
approved by Lucid may interfere with the
TPMS system.
Tire pressure warnings are displayed
on the Cockpit Panel using an
amber warning indicator. A warning
chime will sound, and a warning
message will display to alert you to a problem.
The tire pressure warning indicator will
illuminate if a tire is under-inflated.
If the tire pressure warning indicator
illuminates, stop and check your tires as soon as possible and inflate them to the correct
pressure. If the tire pressure warning occurs
frequently, the cause must be determined and rectified.
Tire pressure information display
If low tire pressure is detected, the Cockpit
Panel will provide an overview of the tire
pressures on the vehicle. The wheel with the low pressure will be displayed in amber.
TPMS malfunction
Your vehicle is equipped with a TPMS
malfunction indicator to indicate when the system is not operating properly.
The TPMS malfunction indicator is combined
with the low tire pressure indicator. When the system detects a malfunction, the indicatorwill flash for approximately one minute and
then remain continuously illuminated. This
sequence will continue upon subsequent
vehicle start-ups as long as the malfunction
exists.
When the malfunction indicator is illuminated,
the system may not be able to detect
or signal low tire pressure as intended.
TPMS malfunctions may occur for a variety
of reasons, including the installation of
replacement or alternate tires or wheels on
the vehicle that prevents the TPMS from
functioning properly. Always check the TPMS
malfunction indicator after replacing one or
more tires or wheels on your vehicle to ensure that the replacement or alternate tires and
wheels allow the TPMS to function properly.
Note: If a tire has been repaired using tire
sealant and low tire pressure is detected, it
Page 195 of 241

Contact a Lucid Service Center to have the
issue rectified as soon as possible.
Tire pressure correction
The tire pressure indicator light does not
automatically turn off when the tire pressure
is adjusted for all four tires.
After the tires are inflated to the correct
pressures, drive your vehicle over 18 mph
(30 km/h) to activate the Tire Pressure
Monitoring System (TPMS) and turn off the
low tire pressure indicator light.
Tire changing
Always have your tires serviced or changed by
a qualified technician.
Care must be taken to avoid contact between
the bead of the tire and the sensor during removal and refitting of the tire, otherwise
the sensor may become damaged and/or inoperable.
Replacing a tire pressure sensor
If you experience frequent low tire pressure warnings and the tire pressures are correct,
contact Lucid Service Center to determine if
a tire pressure sensor requires replacement.
Note: If a non-Lucid Service Center has
replaced a tire pressure sensor, it may not
work until it has been programmed to the
vehicle by Lucid.Tire & Wheels182
Page 196 of 241

Vehicle Loading
Loading the VehicleWARNING: Overloading the vehicle
has an adverse effect on braking and
handling characteristics, which can compromise your safety or damage
the vehicle.
It is important to understand the maximum
weight rating for your vehicle and how much
weight your vehicle can safely carry.
See the vehicle certification label located on
the driver side front door jamb, by the front
wheel, for the maximum load for your vehicle
Page 197 of 241

Example load limit calculations
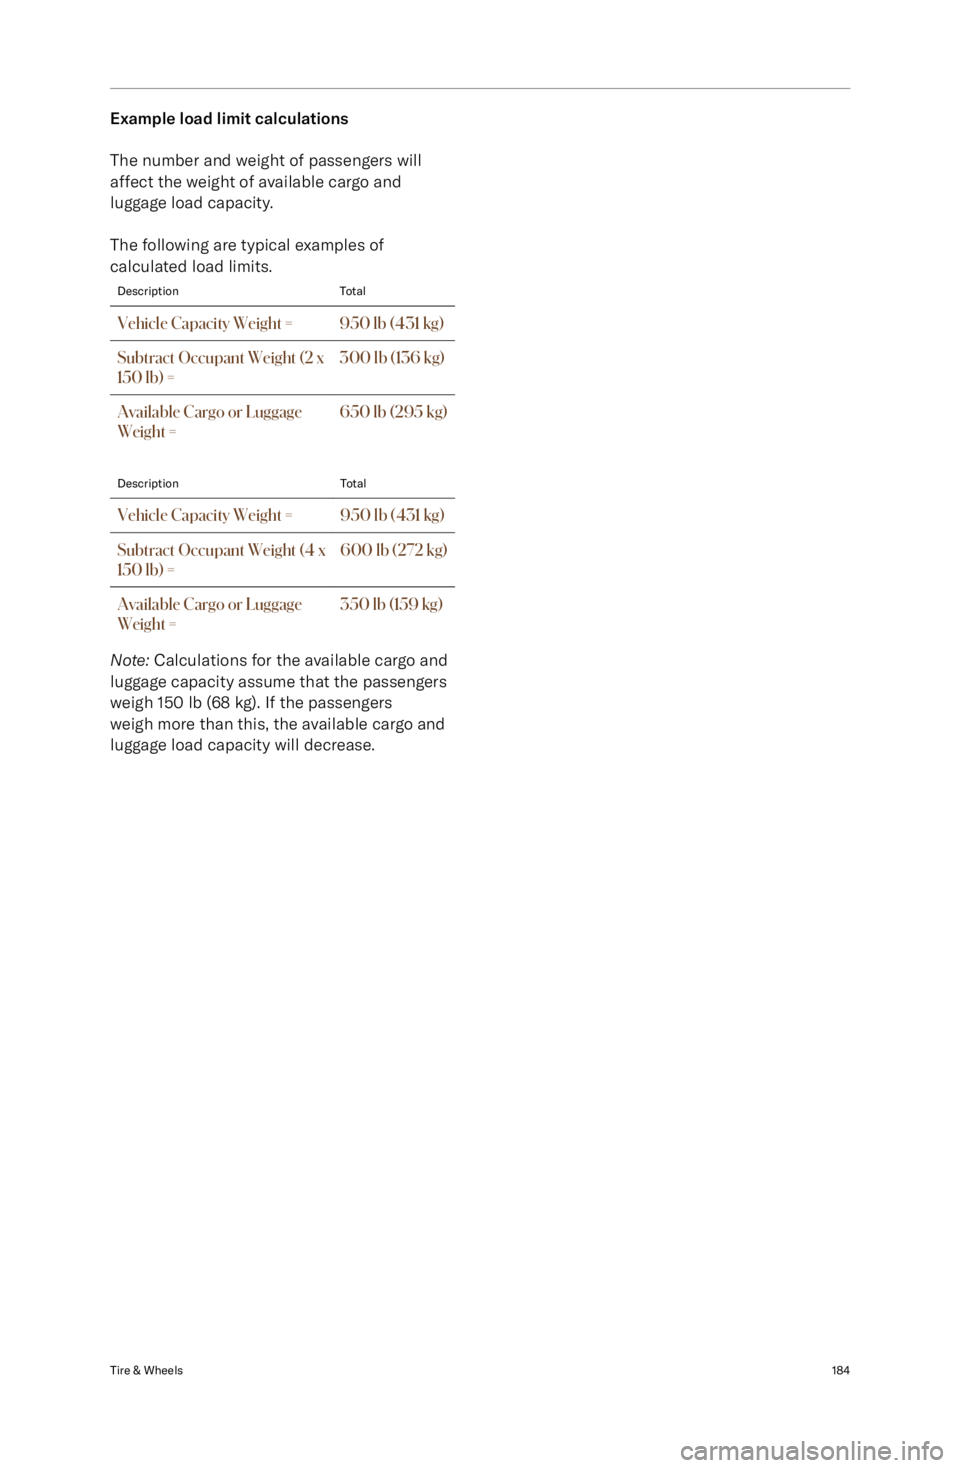
The number and weight of passengers will
affect the weight of available cargo and
luggage load capacity.
The following are typical examples of
calculated load limits.DescriptionTotalVehicle Capacity Weight =950 lb (431 kg)Subtract Occupant Weight (2 x
150 lb) =300 lb (136 kg)Available Cargo or Luggage
Weight =650 lb (295 kg)DescriptionTotalVehicle Capacity Weight =950 lb (431 kg)Subtract Occupant Weight (4 x
150 lb) =600 lb (272 kg)Available Cargo or Luggage
Weight =350 lb (159 kg)
Note: Calculations for the available cargo and
luggage capacity assume that the passengers
weigh 150 lb (68 kg). If the passengers
weigh more than this, the available cargo and
luggage load capacity will decrease.
Tire & Wheels184
Page 198 of 241

11
Technical Data
Technical Data185
Page 199 of 241

Vehicle Dimensions and Weights
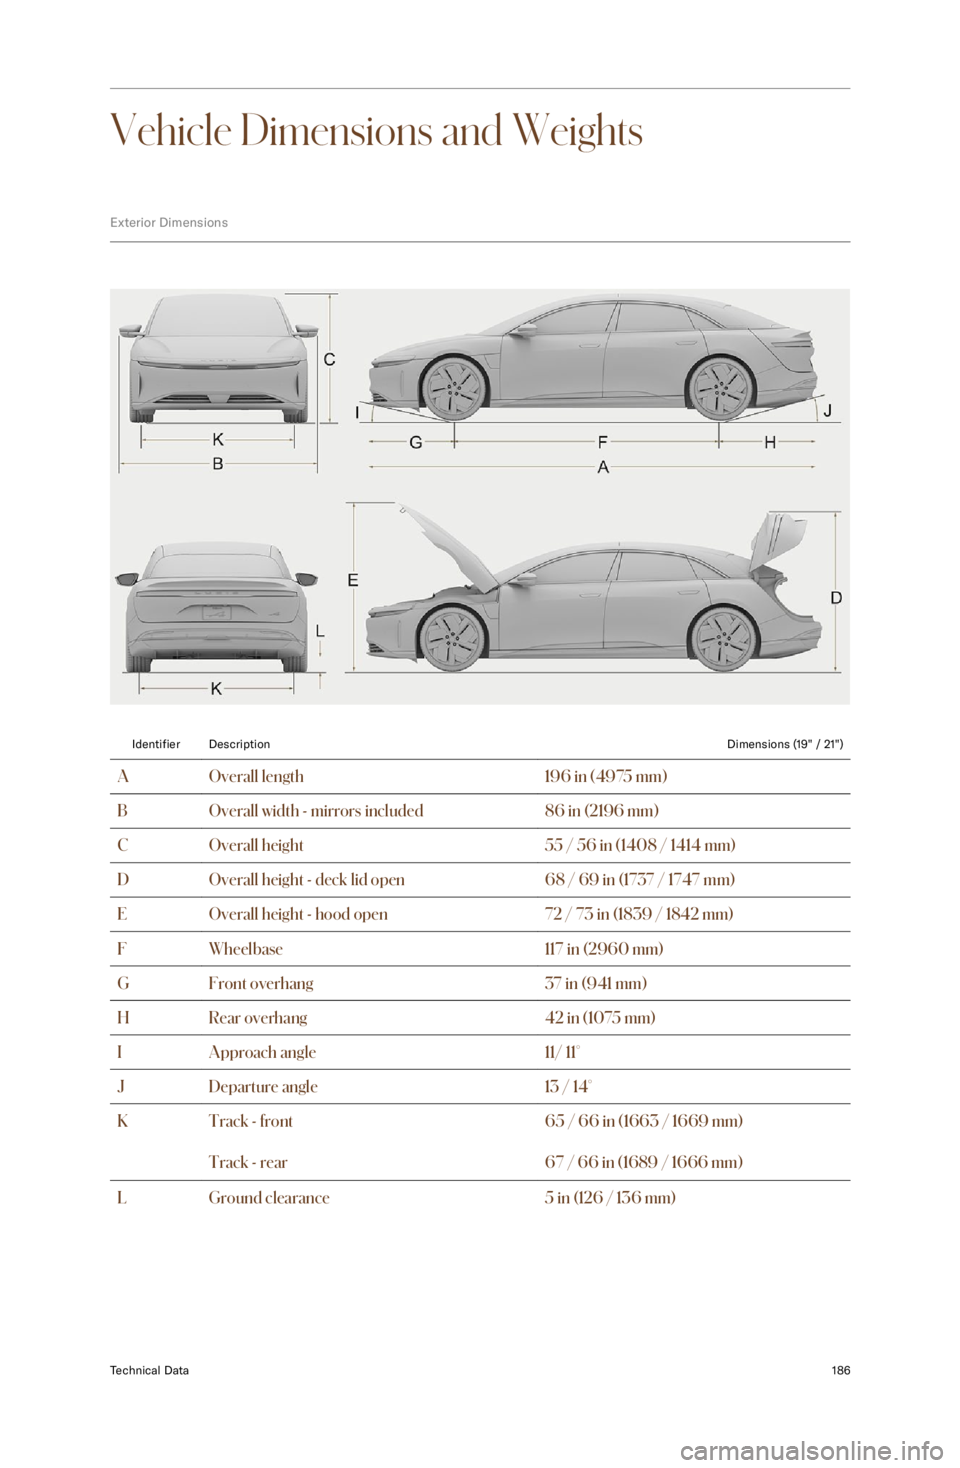
Exterior DimensionsIdentifierDescriptionDimensions (19" / 21")AOverall length196 in (4975 mm)BOverall width - mirrors included86 in (2196 mm)COverall height55 / 56 in (1408 / 1414 mm)DOverall height - deck lid open68 / 69 in (1737 / 1747 mm)EOverall height - hood open72 / 73 in (1839 / 1842 mm)FWheelbase117 in (2960 mm)GFront overhang37 in (941 mm)HRear overhang42 in (1075 mm)IApproach angle11/ 11
Page 200 of 241

Vehicle WeightsCurb Weight* (19"/ 21")5203 lbs (2360 kg) / 5236 lbs (2375 kg)Gross Vehicle Weight Rating (GVWR)6283 lbs (2850 kg)Gross Axle Weight Rating (GAWR) - Front3153 lbs (1430 kg)Gross Axle Weight Rating (GAWR) - Rear3197 lbs (1450 kg)Trailer towingNot permissible
*Curb Weight = Weight of vehicle with correct fluid levels, no occupants, and no cargo
Technical Data187