ECU MASERATI GHIBLI 2019 User Guide
[x] Cancel search | Manufacturer: MASERATI, Model Year: 2019, Model line: GHIBLI, Model: MASERATI GHIBLI 2019Pages: 384, PDF Size: 13.33 MB
Page 43 of 384
Doors Locking WARNING!
• For personal security and safety,
always lock the vehicle doors before
you drive as well as when parking
and leaving the vehicle unattended.
• When leaving the vehicle, always
remove the key fob RKE transmitter
and lock your vehicle.
• Never leave children alone in a
vehicle, or with access to an
unlocked vehicle.
• Do not allow children to be in a
vehicle unattended. A child or
others could be seriously or fatally
injured. Children must not touch the
parking brake trigger, brake pedal or
the shift lever.
• Do not leave the key fob in or near
the vehicle, and do not leave
ignition switch in the ACC or RUN
mode.
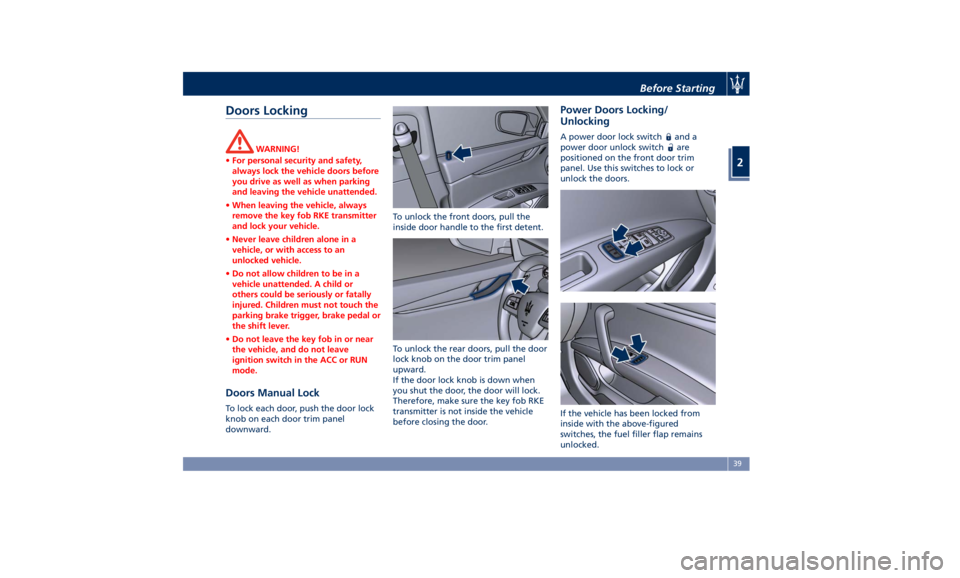
Doors Manual Lock To lock each door, push the door lock
knob on each door trim panel
downward. To unlock the front doors, pull the
inside door handle to the first detent.
To unlock the rear doors, pull the door
lock knob on the door trim panel
upward.
If the door lock knob is down when
you shut the door, the door will lock.
Therefore, make sure the key fob RKE
transmitter is not inside the vehicle
before closing the door. Power Doors Locking/
Unlocking A power door lock switch and a
power door unlock switch
are
positioned on the front door trim
panel. Use this switches to lock or
unlock the doors.
If the vehicle has been locked from
inside with the above-figured
switches, the fuel filler flap remains
unlocked.Before Starting
2
39
Page 58 of 384
Trunk Safety WARNING!
Do not allow children to have access
to the trunk. Always close the trunk
lid when your vehicle is unattended.
Once in the trunk, young children may
not be able to escape. If trapped in the
trunk, children can die from
suffocation or heat stroke.
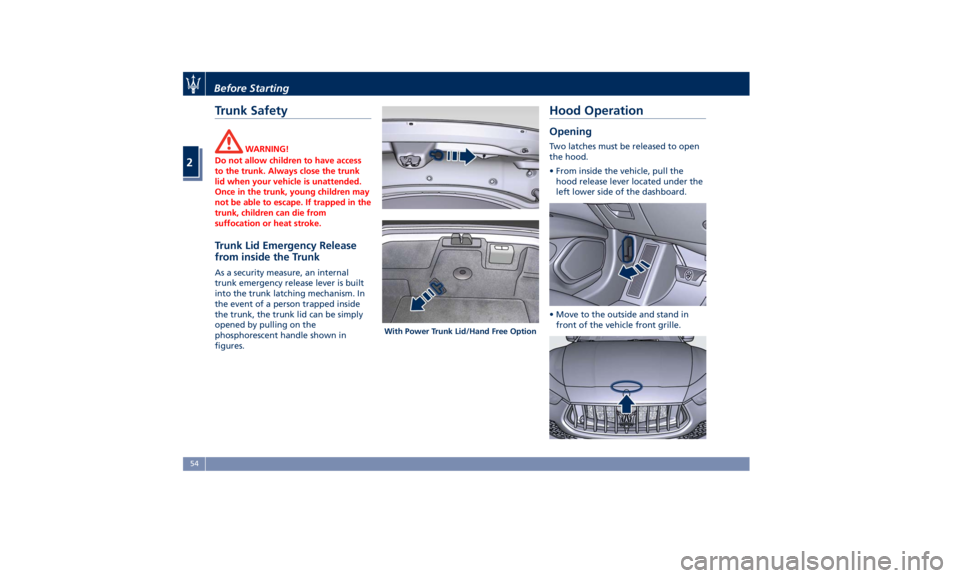
Trunk Lid Emergency Release
from inside the Trunk As a security measure, an internal
trunk emergency release lever is built
into the trunk latching mechanism. In
the event of a person trapped inside
the trunk, the trunk lid can be simply
opened by pulling on the
phosphorescent handle shown in
figures. Hood Operation Opening Two latches must be released to open
the hood.
• From inside the vehicle, pull the
hood release lever located under the
left lower side of the dashboard.
• Move to the outside and stand in
front of the vehicle front grille.With Power Trunk Lid/Hand Free OptionBefore Starting
2
54
Page 59 of 384
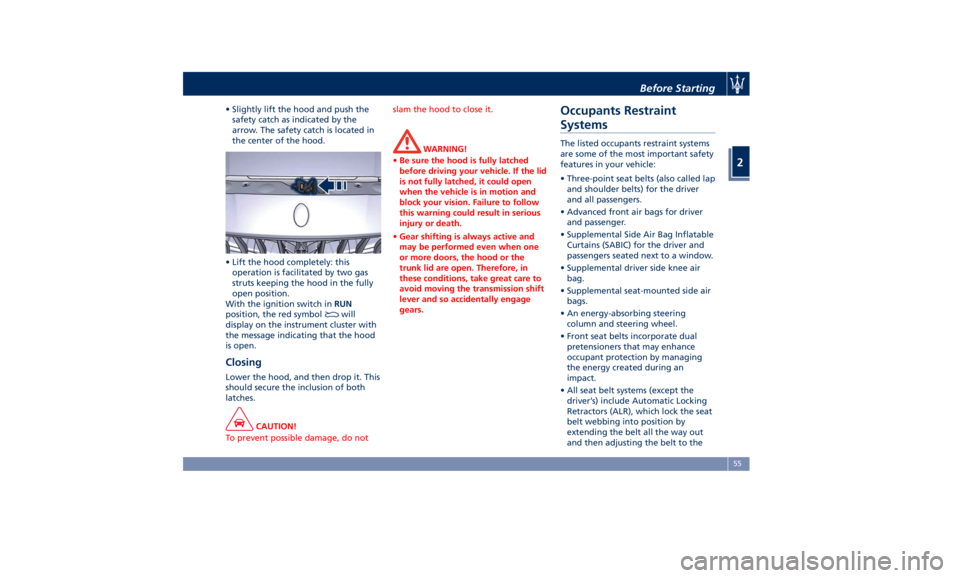
• Slightly lift the hood and push the
safety catch as indicated by the
arrow. The safety catch is located in
the center of the hood.
• Lift the hood completely: this
operation is facilitated by two gas
struts keeping the hood in the fully
open position.
With the ignition switch in RUN
position, the red symbol
will
display on the instrument cluster with
the message indicating that the hood
is open.
Closing Lower the hood, and then drop it. This
should secure the inclusion of both
latches.
CAUTION!
To prevent possible damage, do not slam the hood to close it.
WARNING!
• Be sure the hood is fully latched
before driving your vehicle. If the lid
is not fully latched, it could open
when the vehicle is in motion and
block your vision. Failure to follow
this warning could result in serious
injury or death.
• Gear shifting is always active and
may be performed even when one
or more doors, the hood or the
trunk lid are open. Therefore, in
these conditions, take great care to
avoid moving the transmission shift
lever and so accidentally engage
gears.Occupants Restraint
Systems The listed occupants restraint systems
are some of the most important safety
features in your vehicle:
• Three-point seat belts (also called lap
and shoulder belts) for the driver
and all passengers.
• Advanced front air bags for driver
and passenger.
• Supplemental Side Air Bag Inflatable
Curtains (SABIC) for the driver and
passengers seated next to a window.
• Supplemental driver side knee air
bag.
• Supplemental seat-mounted side air
bags.
• An energy-absorbing steering
column and steering wheel.
• Front seat belts incorporate dual
pretensioners that may enhance
occupant protection by managing
the energy created during an
impact.
• All seat belt systems (except the
driver’s) include Automatic Locking
Retractors (ALR), which lock the seat
belt webbing into position by
extending the belt all the way out
and then adjusting the belt to theBefore Starting
2
55
Page 60 of 384
desired length to restrain a child seat
or secure a large item in a seat.
Please pay close attention to the
information in this section. It tells you
how to use your restraint system
properly, to keep you and your
passengers as safe as possible.
If you are carrying children too small
for adult-sized seat belts, the seat belts
or the Lower Anchors and Tether for
CHildren (LATCH) feature also can be
used to hold infant and child restraint
systems. For more information on
LATCH, refer to “Lower Anchors and
Tether for CHildren (LATCH)” in this
section.
WARNING!
To help provide maximum protection,
you are advised to keep the seatback
in the most upright position possible
and the seat belt close to your chest
and pelvis. If the seat belt is loose, in
the event of an accident you could
move too far forward and could be
injured. Travelling with the seatback
too far reclined could also be
dangerous: even if the seat belts are
fastened, they may not work correctly.
In fact, the belt itself may not be close
enough to your body and, if it is in
front of you, it could cause neck wounds or other injuries in an
accident. Additionally, in an accident,
the lower section of the belt could
press against the upper part of your
stomach rather than the pelvic area,
causing serious internal injuries.
NOTE:
The
advanced air
bags have a multi
stage inflator. This allows the air bag
to have different stages of inflation
based on the severity and type of
collision.
Here are some simple steps you can
take to minimize the risk of harm from
a deploying air bag:
• Children 12 years old and under
should always ride buckled up in a
rear seat.
WARNING!
Infants in rear facing child restraints
should never ride in the front seat of a
vehicle with a passenger Advanced
Front Air Bag. An air bag deployment
can cause severe or fatal injury to
infants in that position.
Do not use child seats or child booster
cushions/backrests in the front
passenger seat. Occupants in the front passenger seat must never sit on the
edge of the seat, leaning toward the
dashboard or otherwise sit out of
position. The occupants’ back must be
as upright as comfort allows, and
must rest against the seatback with
the seat belt properly fastened. Feet
must be on the floor (i.e. not on the
dashboard, seat or out of the
window).
Children that are not big enough to
wear
the vehicle
seat belt properly (see
“Child Restraints System” in this
section) should be secured in the rear
seat in child restraints seats or
belt-positioning booster seats. Older
children who do not use child
restraints seats or belt-positioning
booster seats should ride properly
buckled up in the rear seat. Never
allow children to slide the shoulder
belt behind them or under their arm.
The safest place for a child that has
outgrown the child safety seat is in the
rear seat using the standard seat belt
in combination with a suitable booster
seat if needed so the seat belt is
properly located on the child.
You should read the instructions
provided with your child restraint
system to make sure that you are using
it properly.Before Starting
2
56
Page 64 of 384
(Continued)
• Always make all seat belt height
adjustments when the vehicle is
stationary.
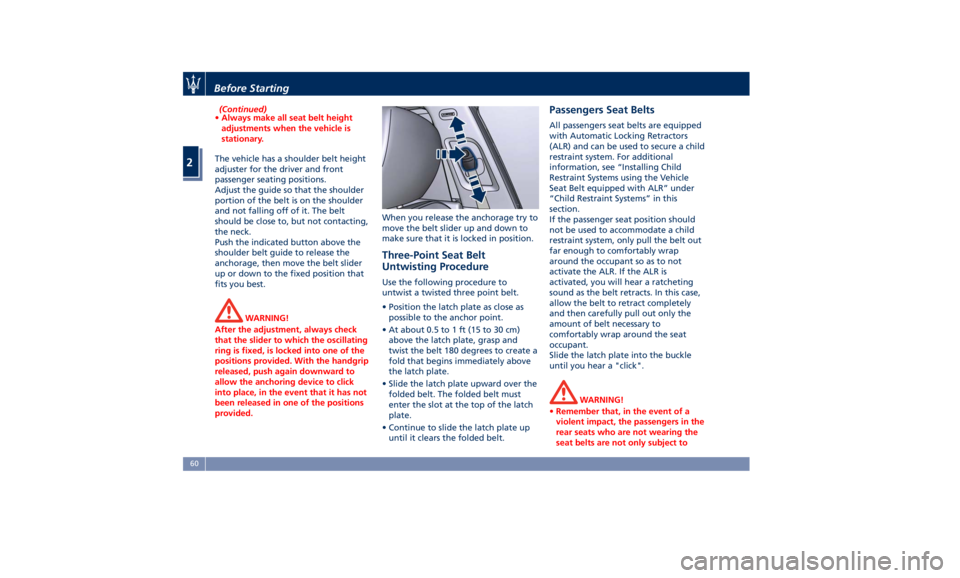
The vehicle has a shoulder belt height
adjuster
for the driver and front
passenger seating positions.
Adjust the guide so that the shoulder
portion of the belt is on the shoulder
and not falling off of it. The belt
should be close to, but not contacting,
the neck.
Push the indicated button above the
shoulder belt guide to release the
anchorage, then move the belt slider
up or down to the fixed position that
fits you best.
WARNING!
After the adjustment, always check
that the slider to which the oscillating
ring is fixed, is locked into one of the
positions provided. With the handgrip
released, push again downward to
allow the anchoring device to click
into place, in the event that it has not
been released in one of the positions
provided. When you release the anchorage try to
move
the belt slider up and down to
make sure that it is locked in position.
Three-Point Seat Belt
Untwisting Procedure Use the following procedure to
untwist a twisted three point belt.
• Position the latch plate as close as
possible to the anchor point.
• At about 0.5 to 1 ft (15 to 30 cm)
above the latch plate, grasp and
twist the belt 180 degrees to create a
fold that begins immediately above
the latch plate.
• Slide the latch plate upward over the
folded belt. The folded belt must
enter the slot at the top of the latch
plate.
• Continue to slide the latch plate up
until it clears the folded belt. Passengers Seat Belts All passengers seat belts are equipped
with Automatic Locking Retractors
(ALR) and can be used to secure a child
restraint system. For additional
information, see “Installing Child
Restraint Systems using the Vehicle
Seat Belt equipped with ALR” under
“Child Restraint Systems” in this
section.
If the passenger seat position should
not be used to accommodate a child
restraint system, only pull the belt out
far enough to comfortably wrap
around the occupant so as to not
activate the ALR. If the ALR is
activated, you will hear a ratcheting
sound as the belt retracts. In this case,
allow the belt to retract completely
and then carefully pull out only the
amount of belt necessary to
comfortably wrap around the seat
occupant.
Slide the latch plate into the buckle
until you hear a "click".
WARNING!
• Remember that, in the event of a
violent impact, the passengers in the
rear seats who are not wearing the
seat belts are not only subject toBefore Starting
2
60
Page 67 of 384
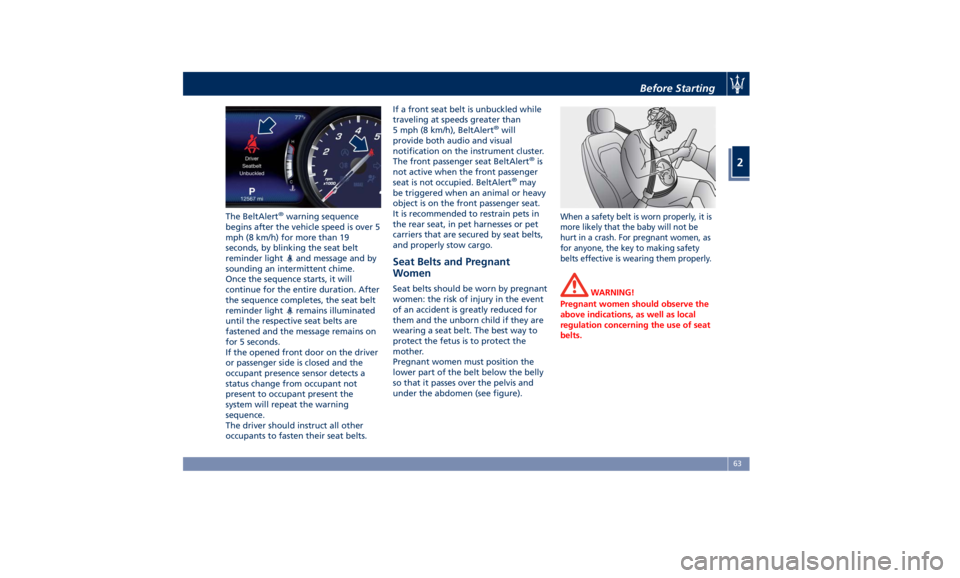
The BeltAlert ®
warning sequence
begins after the vehicle speed is over 5
mph (8 km/h) for more than 19
seconds, by blinking the seat belt
reminder light
and message and by
sounding an intermittent chime.
Once the sequence starts, it will
continue for the entire duration. After
the sequence completes, the seat belt
reminder light
remains illuminated
until the respective seat belts are
fastened and the message remains on
for 5 seconds.
If the opened front door on the driver
or passenger side is closed and the
occupant presence sensor detects a
status change from occupant not
present to occupant present the
system will repeat the warning
sequence.
The driver should instruct all other
occupants to fasten their seat belts. If a front seat belt is unbuckled while
traveling at speeds greater than
5 mph (8 km/h), BeltAlert ®
will
provide both audio and visual
notification on the instrument cluster.
The front passenger seat BeltAlert ®
is
not active when the front passenger
seat is not occupied. BeltAlert ®
may
be triggered when an animal or heavy
object is on the front passenger seat.
It is recommended to restrain pets in
the rear seat, in pet harnesses or pet
carriers that are secured by seat belts,
and properly stow cargo.
Seat Belts and Pregnant
Women Seat belts should be worn by pregnant
women: the risk of injury in the event
of an accident is greatly reduced for
them and the unborn child if they are
wearing a seat belt. The best way to
protect the fetus is to protect the
mother.
Pregnant women must position the
lower part of the belt below the belly
so that it passes over the pelvis and
under the abdomen (see figure). When a safety belt is worn properly, it is
more likely that the baby will not be
hurt in a crash. For pregnant women, as
for anyone, the key to making safety
belts effective is wearing them properly.
WARNING!
Pregnant women should observe the
above indications, as well as local
regulation concerning the use of seat
belts.Before Starting
2
63
Page 76 of 384
NOTE:
EDR data are recorded by your vehicle
only if a non-trivial crash situation
occurs; no data are recorded by the
EDR under normal driving conditions
and no personal data (e.g., name,
gender, age, and crash location) are
recorded. However, other parties, such
as law enforcement, could combine
the EDR data with the type of
personally identifying data routinely
acquired during a crash investigation.
To read data recorded by an EDR,
special equipment is required, and
access to the vehicle or the EDR is
needed.
In addition to the vehicle
manufacturer, other parties, such as
law enforcement, that have the special
equipment, can read the information
if they have access to vehicle or the
EDR. Child Restraint Systems NOTE:
A child restraint system can help
protect a child in a vehicle so ensure
that the child restraint selected has a
certification label applicable to FMVSS
213 in the U.S., or CMVSS 213 in
Canada.
Everyone in your vehicle must be
buckled up all the time, including
babies and children. Every state in the
United States and all Canadian
provinces require that small children
ride in proper restraint systems. Please
be reminded that you can be
prosecuted for ignoring this law.
Children 12 years or younger should
ride properly buckled up in a rear seat,
if available. According to crash
statistics, children are safer when
properly restrained in the rear seats
rather than in the front.
WARNING!
In a collision, an unrestrained child,
even a baby, can become a projectile
inside the vehicle. The force required
to hold even an infant on your lap
could become so great that you could not hold the child, no matter how
strong you are. The child and others
could be badly injured or killed. Any
child riding in your vehicle should
always be in a proper restraint system
suitable for the child’s size.
There are different sizes and types of
restraint
systems for children from
newborn size to the child almost large
enough for an adult safety belt.
Always refer to the manual provided
with child seat to ensure it is the
proper type according the travelling
child. Use the restraint system that is
correct for your child.
Infants and Child Restraints Safety experts recommend that
children ride rearwardfacing in the
vehicle until they are two years old or
until they reach either the height or
weight limit of their rear facing child
seat.
Two types of child restraint systems
can be used rearward-facing: infant
carriers and convertible child seats.
The infant carrier is only used
rearward-facing in the vehicle. It is
recommended for children from birth
until they reach the weight or height
limit of the infant carrier.Before Starting
2
72
Page 78 of 384
NOTE:
For additional information, refer to
"http://www.safercar.gov/parents/
index.htm"
www.safercar.gov/parents/index.htm
or call 1-888-327-4236.
Canadian residents should refer to
Transport Canada’s website for
additional information:
http://www.tc.gc.ca/eng/motorvehicle
safety/safedrivers-childsafety-index-
53.htm
WARNING!
• Improper installation can lead to
failure of an infant or child restraint.
It could come loose in a collision. The
child could be badly injured or killed.
Follow the restraint manufacturer’s
directions exactly when installing an
infant or child restraint.
• A rearward-facing child restraint
should only be used in a rear seat. A
rearward-facing child restraint in the
front seat may be struck by a
deploying passenger air bag, which
may cause severe or fatal injury to
the infant. Here are some tips on getting
the most out of your child
restraint • Before buying any restraint system,
make sure that it has a label
certifying that it meets all applicable
Safety Standards. Maserati also
recommends that you make sure that
you can install the child restraint in
the vehicle where you will use it
before you buy it.
• The restraint system must be
appropriate for your child’s weight
and height.
• Check the label on the restraint
system for weight and height limits.
• Carefully follow the instructions that
come with the restraint system.
• If installed improperly, it may not
work when needed.
• Fit the child into the seat according
to the child restraint manufacturer’s
directions.
WARNING!
When your child restraint system is
not in use, secure it in the vehicle with
the seat belt or remove it from the
vehicle. Do not leave it loose in the
vehicle. In a sudden stop or accident, it could strike the occupants or
seatbacks and cause serious personal
injury.
Installing Child Restraint
Systems using the Vehicle Seat
Belt equipped with ALR Child restraint systems are designed to
be secured in vehicle seats by lap belts
or the lap belt portion of a
lap/shoulder belt.
All the passenger seat belts are
equipped with an Automatic Locking
Retractor (ALR) to secure child
protection through a Child Restraint
System (CRS). These types of seat belts
are designed to keep the lap portion
of the seat belt tight around the child
restraint seat avoiding to use a locking
clip.
The ALR will make a ratcheting noise if
the entire belt is pulled out of the
retractor in order to enable the belt to
retract subsequently. For additional
information on ALR, see “Using Seat
Belt in Automatic Locking Retractor
(ALR) Mode” in “Occupants Restraint
Systems” in this section.
To install a Child Restraint System with
ALR, pull enough of the belt out of the
retractor leading it through the belt
path of the protection device. Slide theBefore Starting
2
74
Page 79 of 384
latch into the buckle until it clicks,
then remove the entire safety belt
from the retractor in order to
rewound. While rewinding a click will
indicate the safety belt is now in
Automatic Locking mode.
Exert then a traction on the exceeded
lap section of the belt in order to
tighten it around the child restraint
seat. All seat belts will loosen over
time, it is therefore necessary to check
them periodically and set them
properly.
Lower Anchors and Tether for
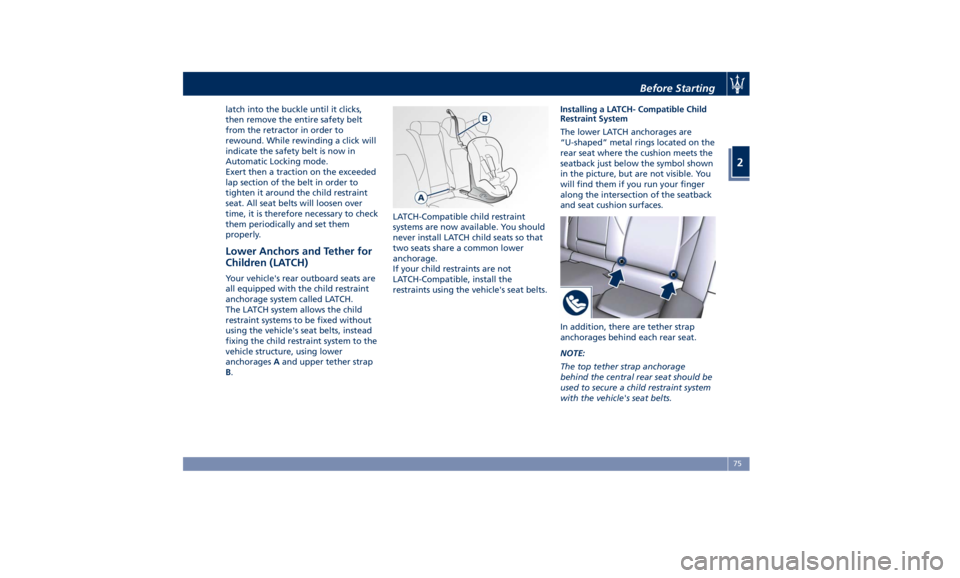
Children (LATCH) Your vehicle's rear outboard seats are
all equipped with the child restraint
anchorage system called LATCH.
The LATCH system allows the child
restraint systems to be fixed without
using the vehicle's seat belts, instead
fixing the child restraint system to the
vehicle structure, using lower
anchorages A and upper tether strap
B . LATCH-Compatible child restraint
systems are now available. You should
never install LATCH child seats so that
two seats share a common lower
anchorage.
If your child restraints are not
LATCH-Compatible, install the
restraints using the vehicle's seat belts. Installing a LATCH- Compatible Child
Restraint System
The lower LATCH anchorages are
“U-shaped” metal rings located on the
rear seat where the cushion meets the
seatback just below the symbol shown
in the picture, but are not visible. You
will find them if you run your finger
along the intersection of the seatback
and seat cushion surfaces.
In addition, there are tether strap
anchorages behind each rear seat.
NOTE:
The top tether strap anchorage
behind the central rear seat should be
used to secure a child restraint system
with the vehicle's seat belts.Before Starting
2
75
Page 80 of 384
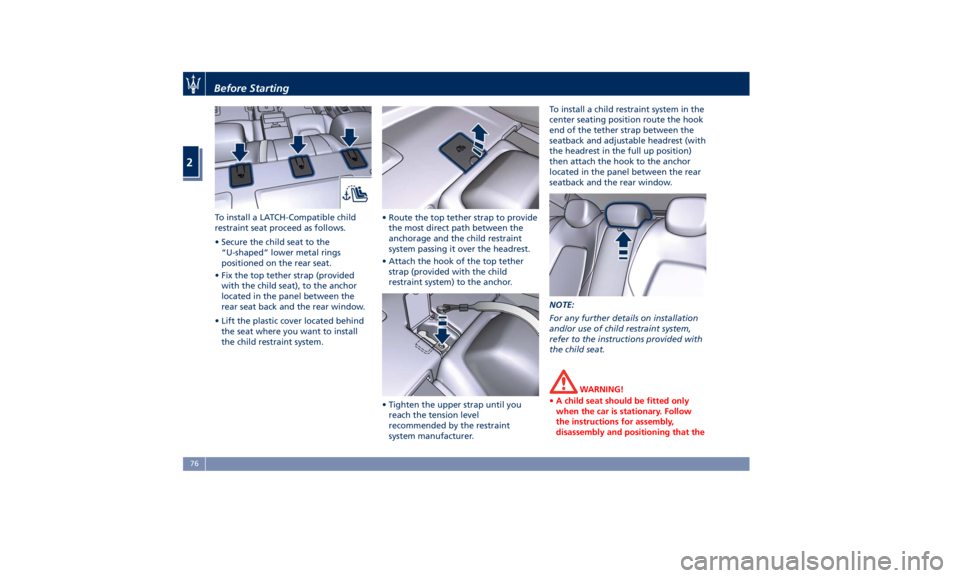
To install a LATCH-Compatible child
restraint seat proceed as follows.
• Secure the child seat to the
“U-shaped” lower metal rings
positioned on the rear seat.
• Fix the top tether strap (provided
with the child seat), to the anchor
located in the panel between the
rear seat back and the rear window.
• Lift the plastic cover located behind
the seat where you want to install
the child restraint system. • Route the top tether strap to provide
the most direct path between the
anchorage and the child restraint
system passing it over the headrest.
• Attach the hook of the top tether
strap (provided with the child
restraint system) to the anchor.
• Tighten the upper strap until you
reach the tension level
recommended by the restraint
system manufacturer. To install a child restraint system in the
center seating position route the hook
end of the tether strap between the
seatback and adjustable headrest (with
the headrest in the full up position)
then attach the hook to the anchor
located in the panel between the rear
seatback and the rear window.
NOTE:
For any further details on installation
and/or use of child restraint system,
refer to the instructions provided with
the child seat.
WARNING!
• A child seat should be fitted only
when the car is stationary. Follow
the instructions for assembly,
disassembly and positioning that theBefore Starting
2
76