MASERATI LEVANTE 2019 Owners Manual
Manufacturer: MASERATI, Model Year: 2019, Model line: LEVANTE, Model: MASERATI LEVANTE 2019Pages: 436, PDF Size: 15.24 MB
Page 391 of 436
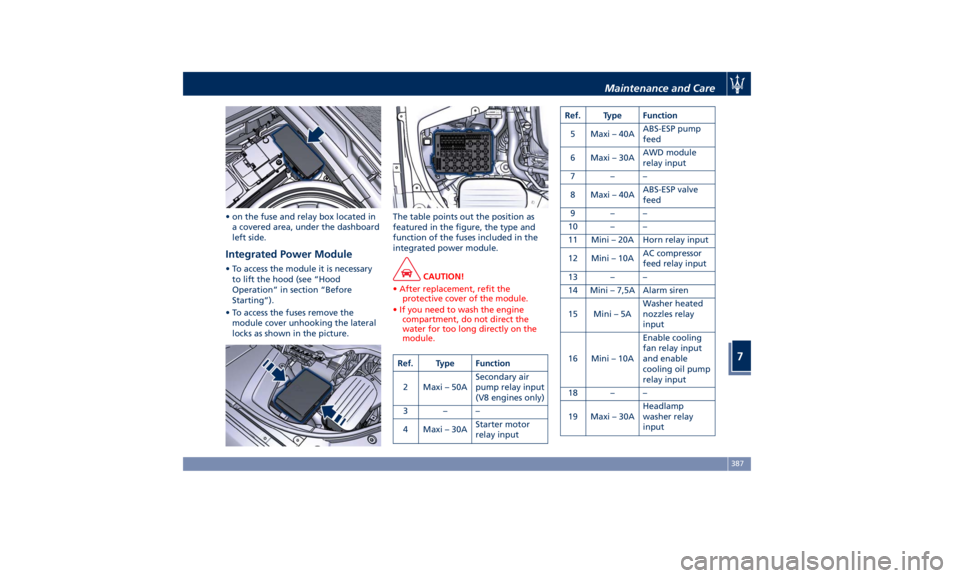
• on the fuse and relay box located in
a covered area, under the dashboard
left side.
Integrated Power Module • To access the module it is necessary
to lift the hood (see “Hood
Operation” in section “Before
Starting”).
• To access the fuses remove the
module cover unhooking the lateral
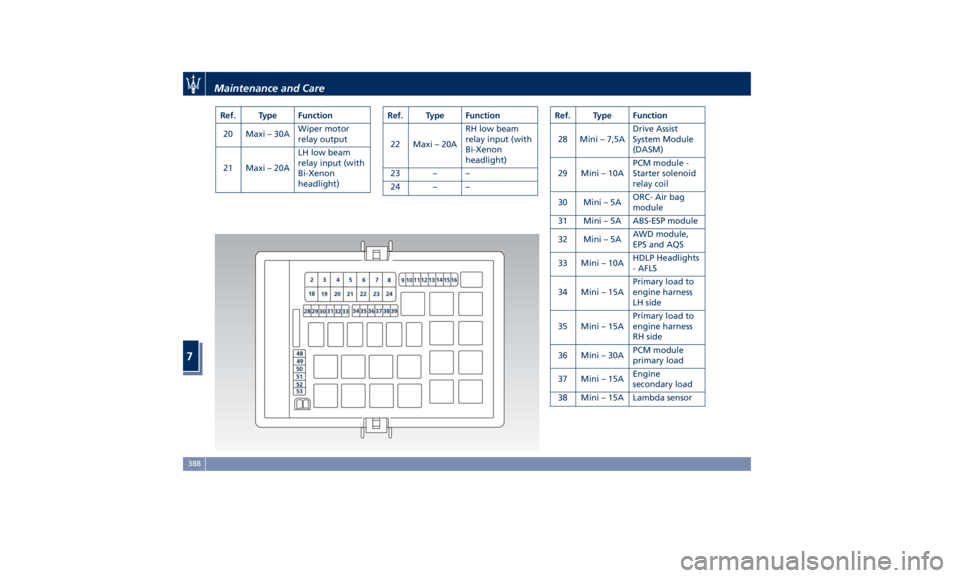
locks as shown in the picture. The table points out the position as
featured in the figure, the type and
function of the fuses included in the
integrated power module.
CAUTION!
• After replacement, refit the
protective cover of the module.
• If you need to wash the engine
compartment, do not direct the
water for too long directly on the
module.
Ref. Type Function
2 Maxi – 50A Secondary air
pump relay input
(V8 engines only)
3––
4 Maxi – 30A Starter motor
relay input Ref. Type Function
5 Maxi – 40A ABS-ESP pump
feed
6 Maxi – 30A AWD module
relay input
7––
8 Maxi – 40A ABS-ESP valve
feed
9––
10 – –
11 Mini – 20A Horn relay input
12 Mini – 10A AC compressor
feed relay input
13 – –
14 Mini – 7,5A Alarm siren
15 Mini – 5A Washer heated
nozzles relay
input
16 Mini – 10A Enable cooling
fan relay input
and enable
cooling oil pump
relay input
18 – –
19 Maxi – 30A Headlamp
washer relay
inputMaintenance and Care
7
387
Page 392 of 436
Ref. Type Function
20 Maxi – 30A Wiper motor
relay output
21 Maxi – 20A LH low beam
relay input (with
Bi-Xenon
headlight) Ref. Type Function
22 Maxi – 20A RH low beam
relay input (with
Bi-Xenon
headlight)
23 – –
24 – – Ref. Type Function
28 Mini – 7,5A Drive Assist
System Module
(DASM)
29 Mini – 10A PCM module -
Starter solenoid
relay coil
30 Mini – 5A ORC- Air bag
module
31 Mini – 5A ABS-ESP module
32 Mini – 5A AWD module,
EPS and AQS
33 Mini – 10A HDLP Headlights
- AFLS
34 Mini – 15A Primary load to
engine harness
LH side
35 Mini – 15A Primary load to
engine harness
RH side
36 Mini – 30A PCM module
primary load
37 Mini – 15A Engine
secondary load
38 Mini – 15A Lambda sensorMaintenance and Care
7
388
Page 393 of 436
Ref. Type Function
39 Mini – 7,5A Flow meters,
tank lackage,
canister, exhaust
by-pass valve
relay coil and air
shutter
48 – –
49 Mini – 10A Pedal brake
switch-TCM
module
50 Mini – 15A +30 PCM module
51 Mini – 30A Fuel pump relay
input
52 Mini – 5A Starter solenoid
signal for PCM
and voltage
stabilizer
53 Mini – 10A AWD module
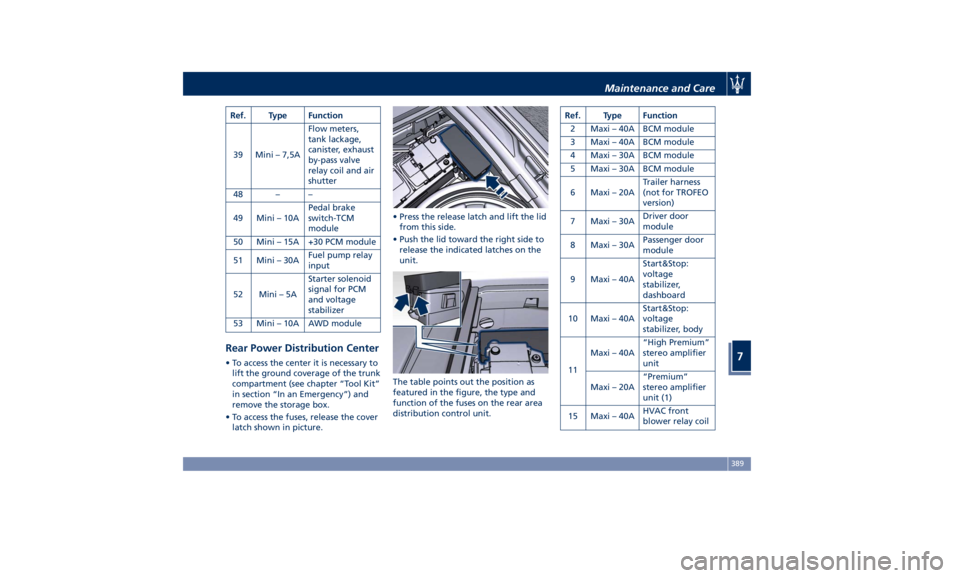
Rear Power Distribution Center • To access the center it is necessary to
lift the ground coverage of the trunk
compartment (see chapter “Tool Kit”
in section “In an Emergency”) and
remove the storage box.
• To access the fuses, release the cover
latch shown in picture. • Press the release latch and lift the lid
from this side.
• Push the lid toward the right side to
release the indicated latches on the
unit.
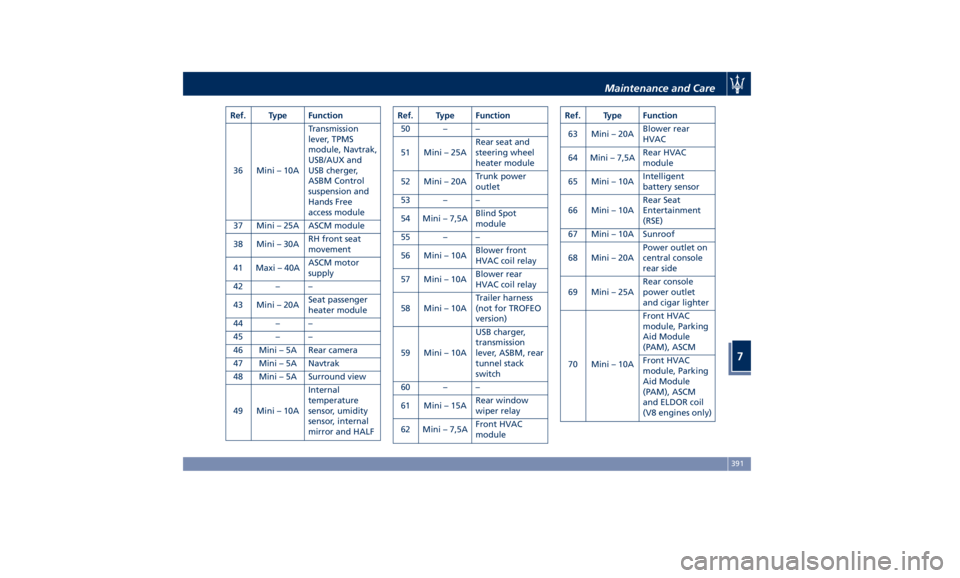
The table points out the position as
featured in the figure, the type and
function of the fuses on the rear area
distribution control unit. Ref. Type Function
2 Maxi – 40A BCM module
3 Maxi – 40A BCM module
4 Maxi – 30A BCM module
5 Maxi – 30A BCM module
6 Maxi – 20A Trailer harness
(not for TROFEO
version)
7 Maxi – 30A Driver door
module
8 Maxi – 30A Passenger door
module
9 Maxi – 40A Start&Stop:
voltage
stabilizer,
dashboard
10 Maxi – 40A Start&Stop:
voltage
stabilizer, body
11 Maxi – 40A “High Premium”
stereo amplifier
unit
Maxi – 20A “Premium”
stereo amplifier
unit (1)
15 Maxi – 40A HVAC front
blower relay coilMaintenance and Care
7
389
Page 394 of 436

Ref. Type Function
16 Maxi – 40A Rear window
defrost relay coil
(HVAC module)
17 Maxi – 30A Rear LH door
module
18 Maxi – 30A Rear RH door
module Ref. Type Function
19 Maxi – 25A Power liftgate
module
20 Maxi – 20A “Premium”
stereo amplifier
unit (2)
21 Maxi – 40A ELDOR coil (V8
engines only) Ref. Type Function
22 Mini – 7,5A Rear HVAC
module
23 Mini – 10A Fuel door relay
and RF Hub
module
24 Mini – 10A ITM module,
ceiling light unit
(front and rear),
rain/lights sensor
25 Mini – 25A Sunroof module
26 – –
27 – –
31 Mini – 30A LH front seat
movement
32 Mini – 15A Trailer module
LH side (not for
TROFEO version)
33 Mini – 15A Trailer module
RH side (not for
TROFEO version)
34 Mini – 20A Soft Door Close
latch
35 Mini – 20A Rear doors
sunshadeMaintenance and Care
7
390
Page 395 of 436
Ref. Type Function
36 Mini – 10A Transmission
lever, TPMS
module, Navtrak,
USB/AUX and
USB cherger,
ASBM Control
suspension and
Hands Free
access module
37 Mini – 25A ASCM module
38 Mini – 30A RH front seat
movement
41 Maxi – 40A ASCM motor
supply
42 – –
43 Mini – 20A Seat passenger
heater module
44 – –
45 – –
46 Mini – 5A Rear camera
47 Mini – 5A Navtrak
48 Mini – 5A Surround view
49 Mini – 10A Internal
temperature
sensor, umidity
sensor, internal
mirror and HALF Ref. Type Function
50 – –
51 Mini – 25A Rear seat and
steering wheel
heater module
52 Mini – 20A Trunk power
outlet
53 – –
54 Mini – 7,5A Blind Spot
module
55 – –
56 Mini – 10A Blower front
HVAC coil relay
57 Mini – 10A Blower rear
HVAC coil relay
58 Mini – 10A Trailer harness
(not for TROFEO
version)
59 Mini – 10A USB charger,
transmission
lever, ASBM, rear
tunnel stack
switch
60 – –
61 Mini – 15A Rear window
wiper relay
62 Mini – 7,5A Front HVAC
module Ref. Type Function
63 Mini – 20A Blower rear
HVAC
64 Mini – 7,5A Rear HVAC
module
65 Mini – 10A Intelligent
battery sensor
66 Mini – 10A Rear Seat
Entertainment
(RSE)
67 Mini – 10A Sunroof
68 Mini – 20A Power outlet on
central console
rear side
69 Mini – 25A Rear console
power outlet
and cigar lighter
70 Mini – 10A Front HVAC
module, Parking
Aid Module
(PAM), ASCM
Front HVAC
module, Parking
Aid Module
(PAM), ASCM
and ELDOR coil
(V8 engines only)Maintenance and Care
7
391
Page 396 of 436
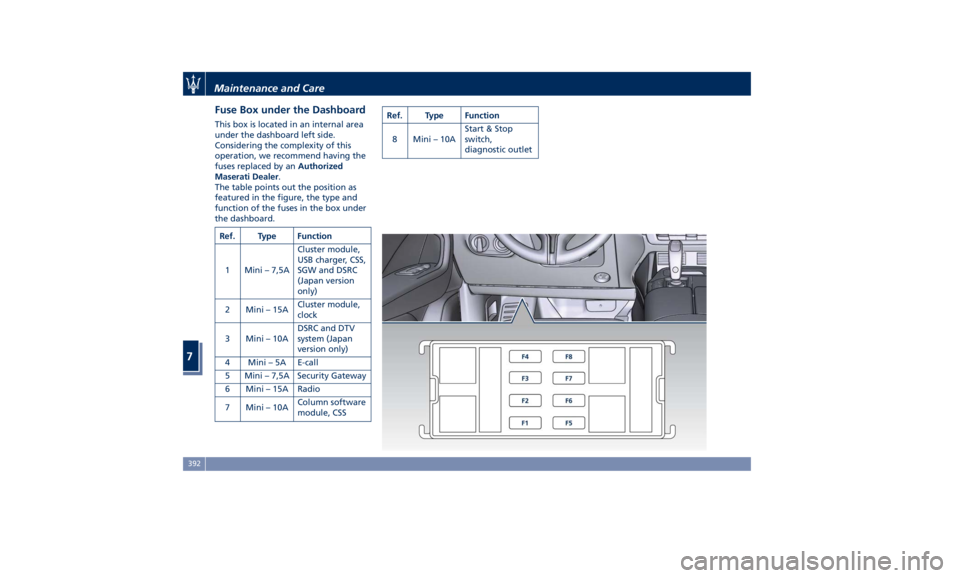
Fuse Box under the Dashboard This box is located in an internal area
under the dashboard left side.
Considering the complexity of this
operation, we recommend having the
fuses replaced by an Authorized
Maserati Dealer .
The table points out the position as
featured in the figure, the type and
function of the fuses in the box under
the dashboard.
Ref. Type Function
1 Mini – 7,5A Cluster module,
USB charger, CSS,
SGW and DSRC
(Japan version
only)
2 Mini – 15A Cluster module,
clock
3 Mini – 10A DSRC and DTV
system (Japan
version only)
4 Mini – 5A E-call
5 Mini – 7,5A Security Gateway
6 Mini – 15A Radio
7 Mini – 10A Column software
module, CSS Ref. Type Function
8 Mini – 10A Start & Stop
switch,
diagnostic outlet
Maintenance and Care
7
392
Page 397 of 436
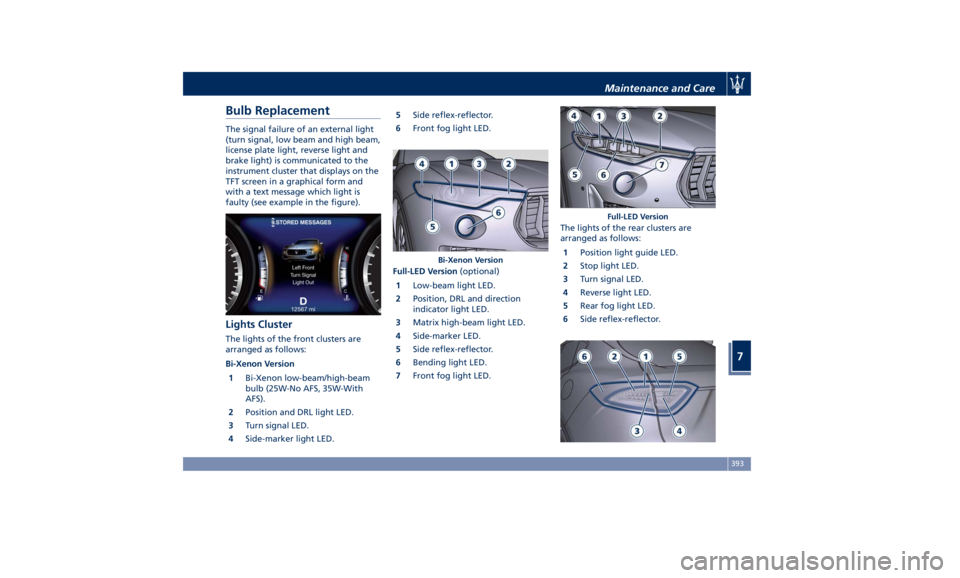
Bulb Replacement The signal failure of an external light
(turn signal, low beam and high beam,
license plate light, reverse light and
brake light) is communicated to the
instrument cluster that displays on the
TFT screen in a graphical form and
with a text message which light is
faulty (see example in the figure).
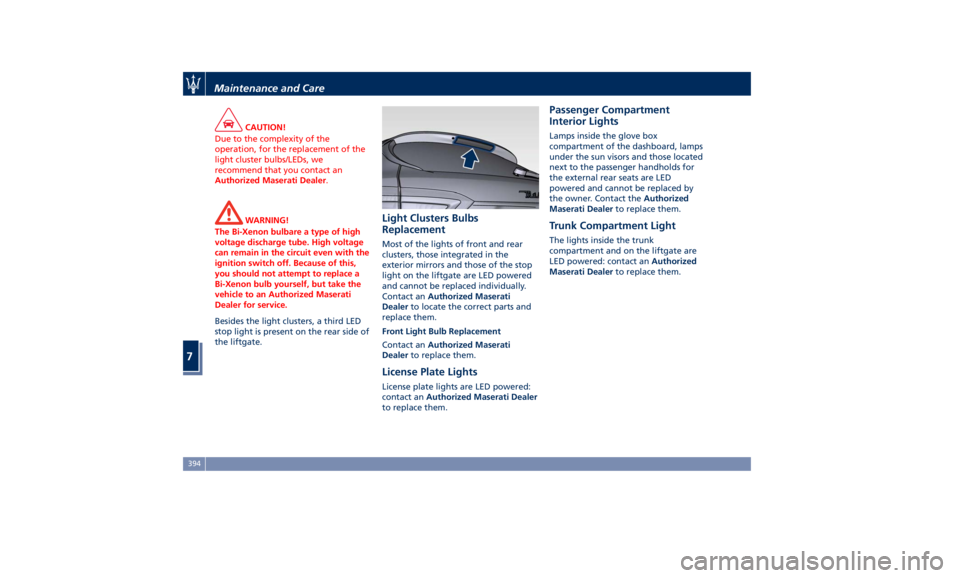
Lights Cluster The lights of the front clusters are
arranged as follows:
Bi-Xenon Version
1 Bi-Xenon low-beam/high-beam
bulb (25W-No AFS, 35W-With
AFS).
2 Position and DRL light LED.
3 Turn signal LED.
4 Side-marker light LED. 5 Side reflex-reflector.
6 Front fog light LED.
Full-LED Version (optional)
1 Low-beam light LED.
2 Position, DRL and direction
indicator light LED.
3 Matrix high-beam light LED.
4 Side-marker LED.
5 Side reflex-reflector.
6 Bending light LED.
7 Front fog light LED. The lights of the rear clusters are
arranged as follows:
1 Position light guide LED.
2 Stop light LED.
3 Turn signal LED.
4 Reverse light LED.
5 Rear fog light LED.
6 Side reflex-reflector.Bi-Xenon Version Full-LED VersionMaintenance and Care
7
393
Page 398 of 436
CAUTION!
Due to the complexity of the
operation, for the replacement of the
light cluster bulbs/LEDs, we
recommend that you contact an
Authorized Maserati Dealer .
WARNING!
The Bi-Xenon bulbare a type of high
voltage discharge tube. High voltage
can remain in the circuit even with the
ignition switch off. Because of this,
you should not attempt to replace a
Bi-Xenon bulb yourself, but take the
vehicle to an Authorized Maserati
Dealer for service.
Besides the light clusters, a third LED
stop
light is present on the rear side of
the liftgate. Light Clusters Bulbs
Replacement Most of the lights of front and rear
clusters, those integrated in the
exterior mirrors and those of the stop
light on the liftgate are LED powered
and cannot be replaced individually.
Contact an Authorized Maserati
Dealer to locate the correct parts and
replace them.
Front Light Bulb Replacement
Contact an Authorized Maserati
Dealer to replace them.
License Plate Lights License plate lights are LED powered:
contact an Authorized Maserati Dealer
to replace them. Passenger Compartment
Interior Lights Lamps inside the glove box
compartment of the dashboard, lamps
under the sun visors and those located
next to the passenger handholds for
the external rear seats are LED
powered and cannot be replaced by
the owner. Contact the Authorized
Maserati Dealer to replace them.
Trunk Compartment Light The lights inside the trunk
compartment and on the liftgate are
LED powered: contact an Authorized
Maserati Dealer to replace them.Maintenance and Care
7
394
Page 399 of 436
A/C System Maintenance For the best performance, the air
conditioning system should be
checked and serviced by an
Authorized Maserati Dealer at the
beginning of the warm season.
This service should include cleaning of
the condenser, check of the drive belt
tension and a performance test.
During the winter, the air conditioning
system should be operated at least
once a month for about 10 minutes.
CAUTION!
Do not use chemical flushes in your air
conditioning system as the chemicals
can damage your air conditioning
components. Such damage is not
covered by the New Vehicle Limited
Warranty.
WARNING!
California Proposition 65
Operating, servicing and maintaining
a passenger vehicle or off-road vehicle
can expose you to chemicals including
such as, engine exhaust, carbon
monoxide, phthalates and lead, that
which are known to the State of California to cause cancer and birth
defects or other reproductive harm. To
minimize exposure, avoid breathing
exhaust, do not idle the engine except
as necessary, service your vehicle in a
well-ventilated area and wear gloves
or wash your hands frequently when
servicing your vehicle. For more
information go to:
www.P65Warnings.ca.gov/passenger-
vehicle
WARNING!
• Use only refrigerants and
compressor lubricants approved by
the manufacturer for your air
conditioning system. Some
unapproved refrigerants are
flammable and can explode, causing
injuries. Other unapproved
refrigerants or lubricants can cause
the system to fail, requiring costly
repairs.
• The air conditioning system contains
refrigerant under high pressure. To
avoid risk of personal injury or
damage to the system, adding
refrigerant or any repair requiring
lines to be disconnected should be
done by an Authorized Maserati Dealer.
Periodically remove any leaves and
insects
that may build
up and obstruct
the inlet of external air in the air
conditioning system through the grille
present underneath the rear part of
the hood.
To access the grille, lift the hood as
described in “Hood Operation” in
section “Before Starting”.Maintenance and Care
7
395
Page 400 of 436
Wheels Maintenance Tires Maintenance CAUTION!
To obtain the best performances and
the longest mileage from the tires,
take the following precautions during
the first 310 mi (500 km):
• do not drive at the vehicle’s
maximum speed;
• drive at low speed on curves;
• avoid sudden steering;
• avoid sudden braking;
• avoid sudden acceleration;
• do not drive at high speeds for too
long.
The tires inflation pressure must
correspond
to the prescribed values
(see the chapter “Tire Inflation
Pressure” in section “Features and
Specifications”) and should be checked
only when the tires have cooled down.
In fact, the pressure increases as the
tire temperature progressively
increases.
Never reduce the pressure if tires are
hot (see “Tires – General Information”
chapter in section “Driving”). Insufficient tire inflating pressure can
cause tire overheating and possible
internal damage.
CAUTION!
After inspecting or adjusting the tire
pressure, always reinstall the valve
stem cap. This will prevent moisture
and dirt from entering the valve stem,
which could damage it.
Impacts with curbs, holes, and
obstacles
in the road, and prolonged
trips on rough roads or off-road trails
can cause tire damage which may not
be visible to the naked eye.
Check your tires regularly for any signs
of damage (e.g. scratches, cuts, cracks,
bulges, etc.). If sharp objects penetrate
the tires, they can cause structural
damage which is only visible when the
tire is removed.
In any case, any possible damage must
be inspected by an experienced
technician, as it may seriously reduce
the tire life.
Remember that tires deteriorate with
time, even if used little or not at all.
Cracks in the tire tread and sides,
alongside possible bulging, are a sign
of deterioration. WARNING!
• Check the inflating pressure of the
tires when cold, at least every two
weeks and before long trips.
• Have old tires inspected by an
experienced technician, to make sure
they can still be used safely. If the
same tire has been on your vehicle
for 4 or 5 years, have it inspected
anyway by an experienced
technician.
• Never fit tires of uncertain origin.
• “Directional” tires have an arrow on
their side showing the rolling
direction. To keep the best
performance when replacing a tire,
make sure that the rolling direction
corresponds to the one shown by
the arrow.
• During the tire life, the rolling
direction used for the first fitting
should always be observed, also in
case of “nondirectional” tires.
• Check the depth of the tire tread at
regular intervals. The minimum
allowed value is 0.06 in (1.6 mm) at
that point the wear indicators on the
tire will be visible (see “Tires –
General Information” in sectionMaintenance and Care
7
396