steering wheel MASERATI QUATTROPORTE 2019 Owner's Guide
[x] Cancel search | Manufacturer: MASERATI, Model Year: 2019, Model line: QUATTROPORTE, Model: MASERATI QUATTROPORTE 2019Pages: 396, PDF Size: 13.9 MB
Page 225 of 396
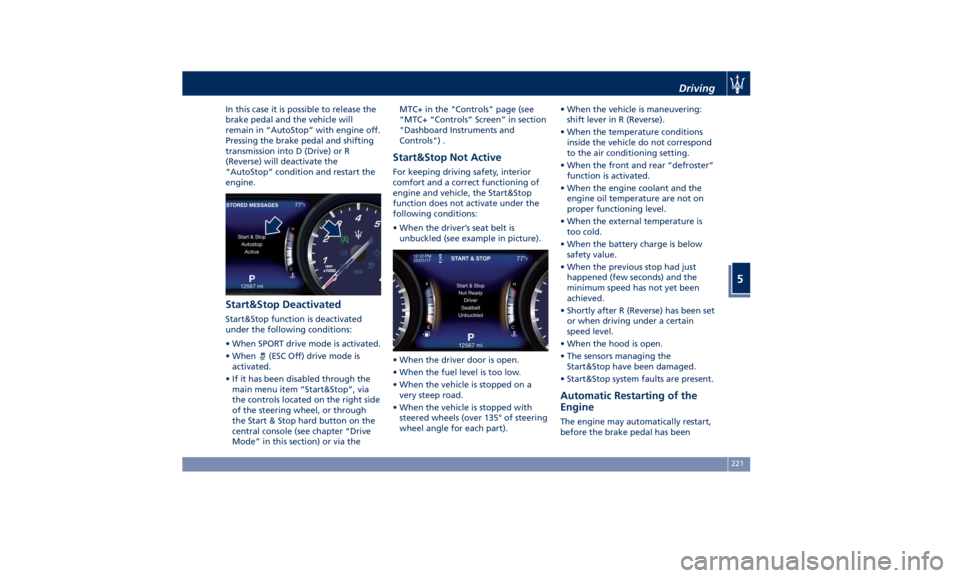
In this case it is possible to release the
brake pedal and the vehicle will
remain in “AutoStop” with engine off.
Pressing the brake pedal and shifting
transmission into D (Drive) or R
(Reverse) will deactivate the
“AutoStop” condition and restart the
engine.
Start&Stop Deactivated Start&Stop function is deactivated
under the following conditions:
• When SPORT drive mode is activated.
• When
(ESC Off) drive mode is
activated.
• If it has been disabled through the
main menu item “Start&Stop”, via
the controls located on the right side
of the steering wheel, or through
the Start & Stop hard button on the
central console (see chapter “Drive
Mode” in this section) or via the MTC+ in the "Controls" page (see
“MTC+ “Controls” Screen” in section
"Dashboard Instruments and
Controls") .
Start&Stop Not Active For keeping driving safety, interior
comfort and a correct functioning of
engine and vehicle, the Start&Stop
function does not activate under the
following conditions:
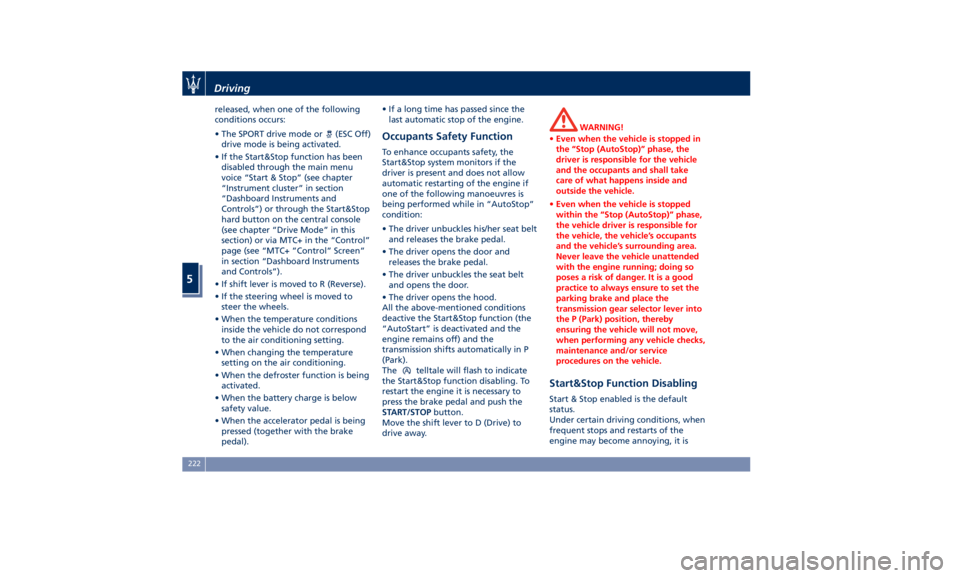
• When the driver’s seat belt is
unbuckled (see example in picture).
• When the driver door is open.
• When the fuel level is too low.
• When the vehicle is stopped on a
very steep road.
• When the vehicle is stopped with
steered wheels (over 135° of steering
wheel angle for each part). • When the vehicle is maneuvering:
shift lever in R (Reverse).
• When the temperature conditions
inside the vehicle do not correspond
to the air conditioning setting.
• When the front and rear “defroster”
function is activated.
• When the engine coolant and the
engine oil temperature are not on
proper functioning level.
• When the external temperature is
too cold.
• When the battery charge is below
safety value.
• When the previous stop had just
happened (few seconds) and the
minimum speed has not yet been
achieved.
• Shortly after R (Reverse) has been set
or when driving under a certain
speed level.
• When the hood is open.
• The sensors managing the
Start&Stop have been damaged.
• Start&Stop system faults are present.
Automatic Restarting of the
Engine The engine may automatically restart,
before the brake pedal has beenDriving
5
221
Page 226 of 396
released, when one of the following
conditions occurs:
• The SPORT drive mode or (ESC Off)
drive mode is being activated.
• If the Start&Stop function has been
disabled through the main menu
voice “Start & Stop” (see chapter
“Instrument cluster” in section
“Dashboard Instruments and
Controls”) or through the Start&Stop
hard button on the central console
(see chapter “Drive Mode” in this
section) or via MTC+ in the “Control”
page (see “MTC+ ”Control” Screen”
in section “Dashboard Instruments
and Controls”).
• If shift lever is moved to R (Reverse).
• If the steering wheel is moved to
steer the wheels.
• When the temperature conditions
inside the vehicle do not correspond
to the air conditioning setting.
• When changing the temperature
setting on the air conditioning.
• When the defroster function is being
activated.
• When the battery charge is below
safety value.
• When the accelerator pedal is being
pressed (together with the brake
pedal). • If a long time has passed since the
last automatic stop of the engine.
Occupants Safety Function To enhance occupants safety, the
Start&Stop system monitors if the
driver is present and does not allow
automatic restarting of the engine if
one of the following manoeuvres is
being performed while in “AutoStop”
condition:
• The driver unbuckles his/her seat belt
and releases the brake pedal.
• The driver opens the door and
releases the brake pedal.
• The driver unbuckles the seat belt
and opens the door.
• The driver opens the hood.
All the above-mentioned conditions
deactive the Start&Stop function (the
“AutoStart” is deactivated and the
engine remains off) and the
transmission shifts automatically in P
(Park).
The
telltale will flash to indicate
the Start&Stop function disabling. To
restart the engine it is necessary to
press the brake pedal and push the
START/STOP button.
Move the shift lever to D (Drive) to
drive away. WARNING!
• Even when the vehicle is stopped in
the “Stop (AutoStop)” phase, the
driver is responsible for the vehicle
and the occupants and shall take
care of what happens inside and
outside the vehicle.
• Even when the vehicle is stopped
within the “Stop (AutoStop)” phase,
the vehicle driver is responsible for
the vehicle, the vehicle’s occupants
and the vehicle’s surrounding area.
Never leave the vehicle unattended
with the engine running; doing so
poses a risk of danger. It is a good
practice to always ensure to set the
parking brake and place the
transmission gear selector lever into
the P (Park) position, thereby
ensuring the vehicle will not move,
when performing any vehicle checks,
maintenance and/or service
procedures on the vehicle.
Start&Stop Function Disabling Start & Stop enabled is the default
status.
Under certain driving conditions, when
frequent stops and restarts of the
engine may become annoying, it isDriving
5
222
Page 234 of 396
paragraph); to return to “D”
position, move the shift lever to the
right. It is possible to shift from D
(Drive) mode to M +/- (Manual) mode
regardless of car speed.
• When in D (Drive) mode, using the
paddles behind the steering wheel (if
equipped), will cause the system to
enter a temporary function and
enable the manual shift mode. This
range is indicated with the symbols
“+/-” above and below “D” letter on
the gear range field of the display.
The system will then switch back to
automatic mode according to time
elapsed in “temporary” mode and
driving conditions.
At extremely cold temperatures (-23°F /
-30°C or below), transmission may be
affected by the low temperature of
the engine and transmission. Normal
operation will resume once the
transmission temperature has risen to
a normal level.
M +/- (Manual)
This mode is obtained by moving the
shift lever to the left in “M +/-“
position.
In this mode, the transmission interacts
with the driver in order to allow
manual shift and ensure increased
control of the vehicle. The current mode allows the transmission system
to optimise the engine brake action,
remove undesired shifting into higher
and lower gears and improve the
overall performance of the vehicle.
This mode allows you to move the shift
lever step by step forward “–“ or
backward “+” without pressing the
unlock button. The current
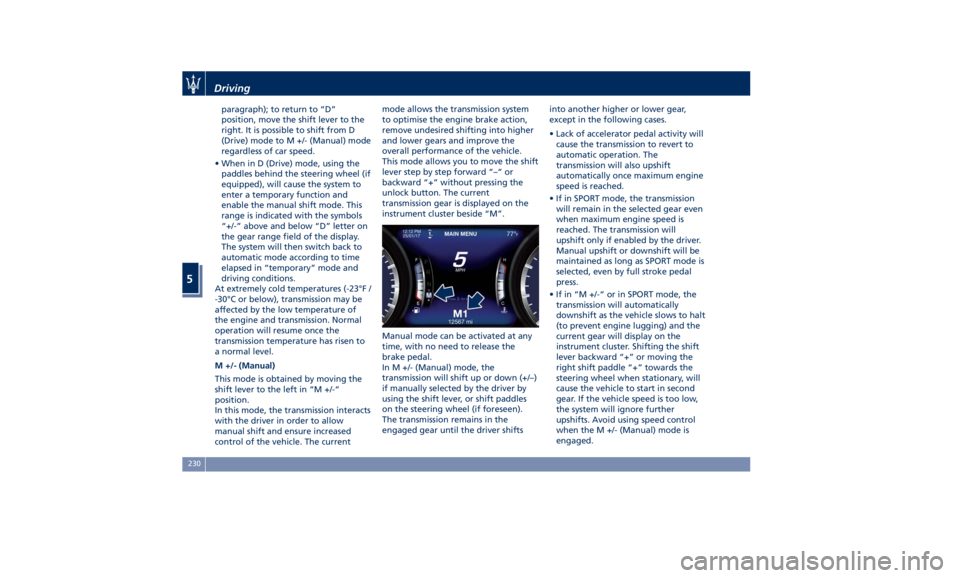
transmission gear is displayed on the
instrument cluster beside “M”.
Manual mode can be activated at any
time, with no need to release the
brake pedal.
In M +/- (Manual) mode, the
transmission will shift up or down (+/–)
if manually selected by the driver by
using the shift lever, or shift paddles
on the steering wheel (if foreseen).
The transmission remains in the
engaged gear until the driver shifts into another higher or lower gear,
except in the following cases.
• Lack of accelerator pedal activity will
cause the transmission to revert to
automatic operation. The
transmission will also upshift
automatically once maximum engine
speed is reached.
• If in SPORT mode, the transmission
will remain in the selected gear even
when maximum engine speed is
reached. The transmission will
upshift only if enabled by the driver.
Manual upshift or downshift will be
maintained as long as SPORT mode is
selected, even by full stroke pedal
press.
• If in “M +/-“ or in SPORT mode, the
transmission will automatically
downshift as the vehicle slows to halt
(to prevent engine lugging) and the
current gear will display on the
instrument cluster. Shifting the shift
lever backward “+” or moving the
right shift paddle “+” towards the
steering wheel when stationary, will
cause the vehicle to start in second
gear. If the vehicle speed is too low,
the system will ignore further
upshifts. Avoid using speed control
when the M +/- (Manual) mode is
engaged.Driving
5
230
Page 235 of 396
When the car stops in M +/- (Manual)
mode, the transmission automatically
moves the shift lever and inserts P
(Park).
If you enter the I.C.E. drive mode
when the gearshift is in “M +/-”
position, the system activates the
automatic return of the shift lever in D
(Drive) mode.
Shift Paddles
The driver can change gears with the
shift paddles behind the steering
wheel when in D (Drive) and M +/-
(Manual) mode.
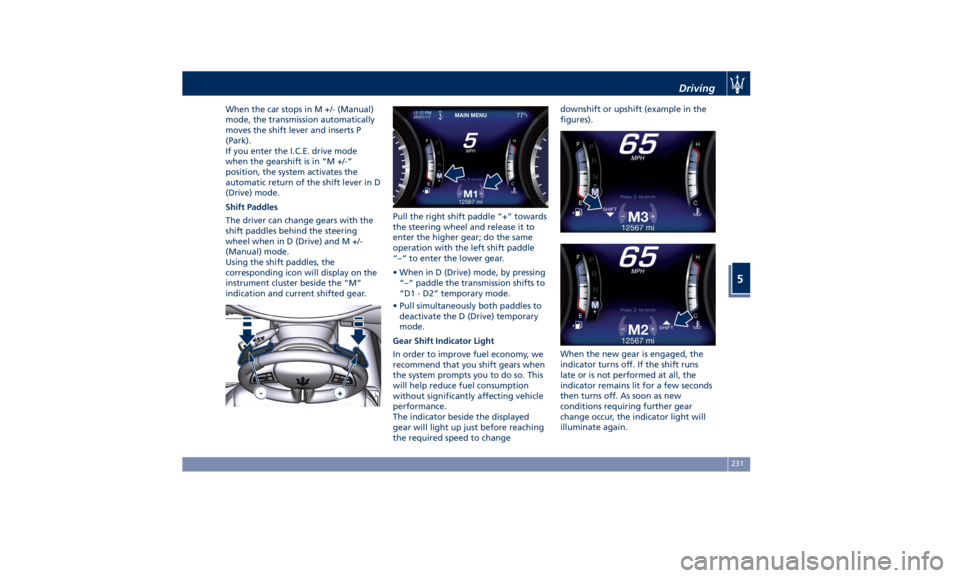
Using the shift paddles, the
corresponding icon will display on the
instrument cluster beside the “M”
indication and current shifted gear. Pull the right shift paddle “+” towards
the steering wheel and release it to
enter the higher gear; do the same
operation with the left shift paddle
“–“ to enter the lower gear.
• When in D (Drive) mode, by pressing
“–“ paddle the transmission shifts to
“D1 - D2” temporary mode.
• Pull simultaneously both paddles to
deactivate the D (Drive) temporary
mode.
Gear Shift Indicator Light
In order to improve fuel economy, we
recommend that you shift gears when
the system prompts you to do so. This
will help reduce fuel consumption
without significantly affecting vehicle
performance.
The indicator beside the displayed
gear will light up just before reaching
the required speed to change downshift or upshift (example in the
figures).
When the new gear is engaged, the
indicator turns off. If the shift runs
late or is not performed at all, the
indicator remains lit for a few seconds
then turns off. As soon as new
conditions requiring further gear
change occur, the indicator light will
illuminate again.Driving
5
231
Page 238 of 396
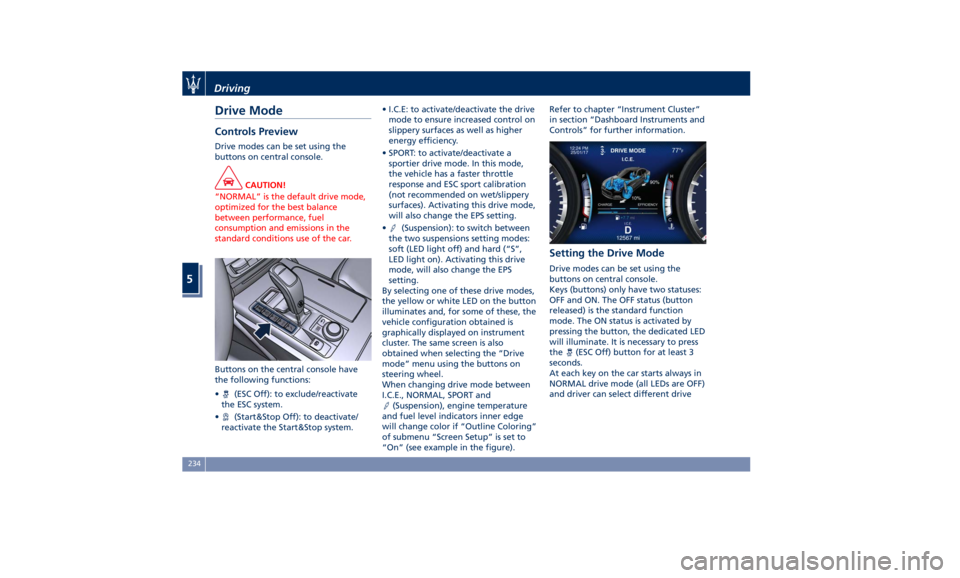
Drive Mode Controls Preview Drive modes can be set using the
buttons on central console.
CAUTION!
“NORMAL” is the default drive mode,
optimized for the best balance
between performance, fuel
consumption and emissions in the
standard conditions use of the car.
Buttons on the central console have
the
following functions:
•
(ESC Off): to exclude/reactivate
the ESC system.
•
(Start&Stop Off): to deactivate/
reactivate the Start&Stop system. • I.C.E: to activate/deactivate the drive
mode to ensure increased control on
slippery surfaces as well as higher
energy efficiency.
• SPORT: to activate/deactivate a
sportier drive mode. In this mode,
the vehicle has a faster throttle
response and ESC sport calibration
(not recommended on wet/slippery
surfaces). Activating this drive mode,
will also change the EPS setting.
•
(Suspension): to switch between
the two suspensions setting modes:
soft (LED light off) and hard (“S”,
LED light on). Activating this drive
mode, will also change the EPS
setting.
By selecting one of these drive modes,
the yellow or white LED on the button
illuminates and, for some of these, the
vehicle configuration obtained is
graphically displayed on instrument
cluster. The same screen is also
obtained when selecting the “Drive
mode” menu using the buttons on
steering wheel.
When changing drive mode between
I.C.E., NORMAL, SPORT and
(Suspension), engine temperature
and fuel level indicators inner edge
will change color if “Outline Coloring”
of submenu “Screen Setup” is set to
“On” (see example in the figure). Refer to chapter “Instrument Cluster”
in section “Dashboard Instruments and
Controls” for further information.
Setting the Drive Mode Drive modes can be set using the
buttons on central console.
Keys (buttons) only have two statuses:
OFF and ON. The OFF status (button
released) is the standard function
mode. The ON status is activated by
pressing the button, the dedicated LED
will illuminate. It is necessary to press
the
(ESC Off) button for at least 3
seconds.
At each key on the car starts always in
NORMAL drive mode (all LEDs are OFF)
and driver can select different driveDriving
5
234
Page 244 of 396
corresponding button once: the yellow
LED on the button will turn on.
To reactivate the Start&Stop function,
press the same button again: the LED
will turn off.
Activate/Deactivate I.C.E., SPORT and
(Suspension) Drive Mode
To activate one of these drive mode,
press the corresponding button once:
the white LED on the button will turn
on.
To disable the drive mode activated,
press the same button again: the LED
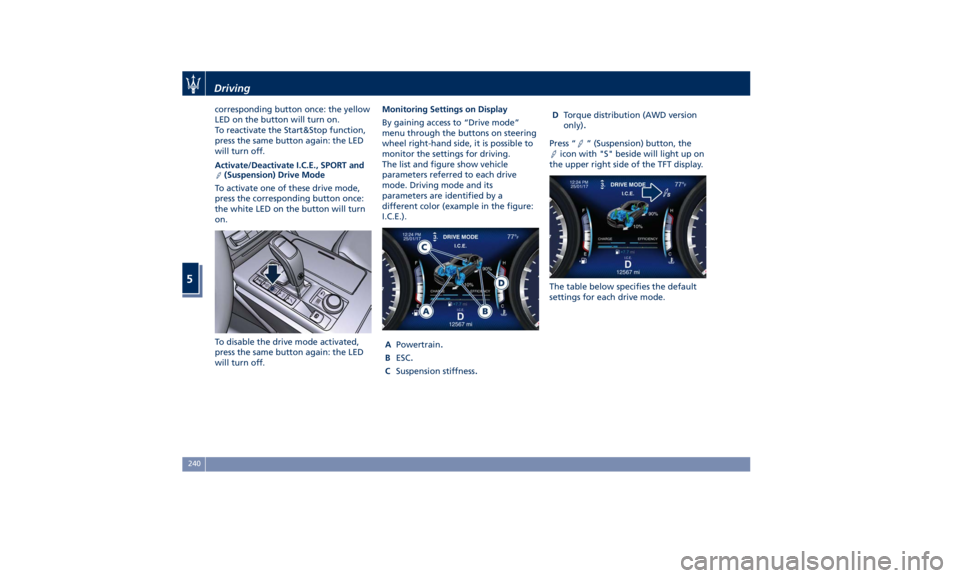
will turn off. Monitoring Settings on Display
By gaining access to “Drive mode”
menu through the buttons on steering
wheel right-hand side, it is possible to
monitor the settings for driving.
The list and figure show vehicle
parameters referred to each drive
mode. Driving mode and its
parameters are identified by a
different color (example in the figure:
I.C.E.).
A Powertrain
. B ESC
. C Suspension stiffness
. D Torque distribution (AWD version
only)
. Press “ ” (Suspension) button, the
icon with "S" beside will light up on
the upper right side of the TFT display.
The table below specifies the default
settings for each drive mode.Driving
5
240
Page 249 of 396
• It is advisable to keep the "Auto
Apply" function always active (On)
so that the vehicle is properly
secured with electric parking brake.
Deactivating Automatic
Operation The automatic engagement function
can be deactivated/reactivated by
selecting the menu item “Vehicle
settings” through the switch on the
right side of the steering wheel (refer
to “Instrument Cluster” in section
“Dashboard Instruments and
Controls”.)
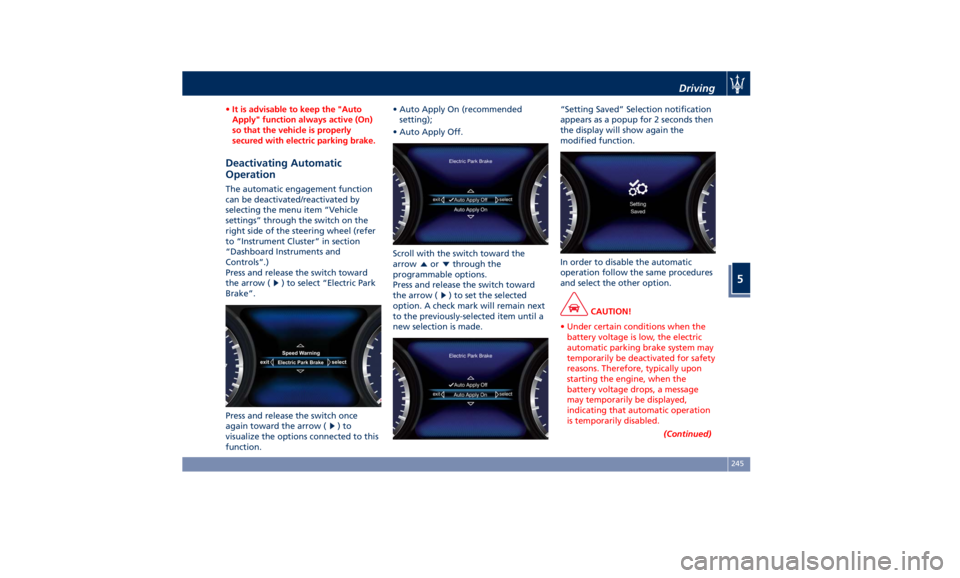
Press and release the switch toward
the arrow (
) to select “Electric Park
Brake”.
Press and release the switch once
again toward the arrow ( )to
visualize the options connected to this
function. • Auto Apply On (recommended
setting);
• Auto Apply Off.
Scroll with the switch toward the
arrow
or through the
programmable options.
Press and release the switch toward
the arrow (
) to set the selected
option. A check mark will remain next
to the previously-selected item until a
new selection is made. “Setting Saved” Selection notification
appears as a popup for 2 seconds then
the display will show again the
modified function.
In order to disable the automatic
operation follow the same procedures
and select the other option.
CAUTION!
• Under certain conditions when the
battery voltage is low, the electric
automatic parking brake system may
temporarily be deactivated for safety
reasons. Therefore, typically upon
starting the engine, when the
battery voltage drops, a message
may temporarily be displayed,
indicating that automatic operation
is temporarily disabled.
(Continued)Driving
5
245
Page 252 of 396
Brake and Stability Control
System The vehicle is equipped with an
Electronic Stability Control System
(ESC), which helps to maintain
directional control in the event of loss
of grip of the tires. The system is able
to detect potentially dangerous
situations for the stability of the
vehicle and automatically sets the
brakes on all four wheels in a
differentiated manner, in order to
provide a torque settlement of the
vehicle.
ESC includes the following subsystems:
• ABS (Anti-lock Braking System);
• EBD (Electronic Brake-force
Distribution);
• TCS (Traction Control System);
• BAS (Brake Assist System);
• BTO (Brake Throttle Override);
• HSA (Hill Start Assist).
WARNING!
• These systems cannot prevent the
natural laws of physics from
affecting the vehicle, nor can they
increase traction, braking or steering
efficiency beyond that afforded by the condition of the vehicle brakes
and tires.
• These systems cannot prevent
collisions, including those resulting
from excessive speed in turns,
following another vehicle too
closely, or hydroplaning.
• The capabilities of a vehicle
equipped with these systems must
never be exploited in a reckless or
dangerous manner that could
jeopardize the driver’s and the
passenger’s safety or the safety of
others.
Electronic Stability Control
(ESC) This system enhances directional
control and stability of the vehicle
under various driving conditions. The
ESC corrects over steering and under
steering of the vehicle by applying the
brake to the appropriate wheel.
Engine power may also be reduced to
assist in counteracting the conditions
of instability and maintain the right
direction. The system is also able to
reduce the engine power.
Through sensors fitted on the vehicle,
the ESC system detects the driver’s
chosen direction comparing it to the
one maintained while running. In case of discrepancy between the required
trajectory and the current one, the ESC
system brakes the appropriate wheel
to counteract over or under steering.
• Oversteer - when the vehicle is
turning more than appropriate for
the steering wheel position.
• Understeer - when the vehicle is
turning less than appropriate for the
steering wheel position.
The ESC system has two available
operating modes:
ESC on
This is the normal ESC operating mode.
At each start-up of the vehicle, the ESC
system is set in this mode and should
be used for most driving conditions.
The ESC should only be turned off for
specific reasons as pointed out in the
following paragraphs.
ESC off
The “ESC off” mode is aimed for a
more spirited driving experience but
also purposeful for driving in deep
snow, sand, or gravel. The current
mode disables the TCS portion of the
ESC and raises the threshold for ESC
activation, allowing higher wheel spin
than normally granted by the ESC
system. The
(ESC OFF) button is
fitted beside the gear shift lever: toDriving
5
248
Page 258 of 396
Electronic Cruise Control The electronic Cruise Control (CC)
enables the driver to maintain the
desired vehicle speed without pressing
the accelerator pedal, reducing driving
fatigue on highways, especially long
trips, as the set speed is automatically
maintained. A firm press on the
accelerator pedal or the braking pedal
will temporarily deactivate the cruise
control function.
CAUTION!
The device can only be switched on at
speeds exceeding 18 mph (30 km/h)
and it switches off automatically when
the brake pedal or the accelerator
pedal is pressed.
WARNING!
The Cruise Control function must only
be activated when traffic and the
route permit a constant speed to be
maintained safely for a sufficiently
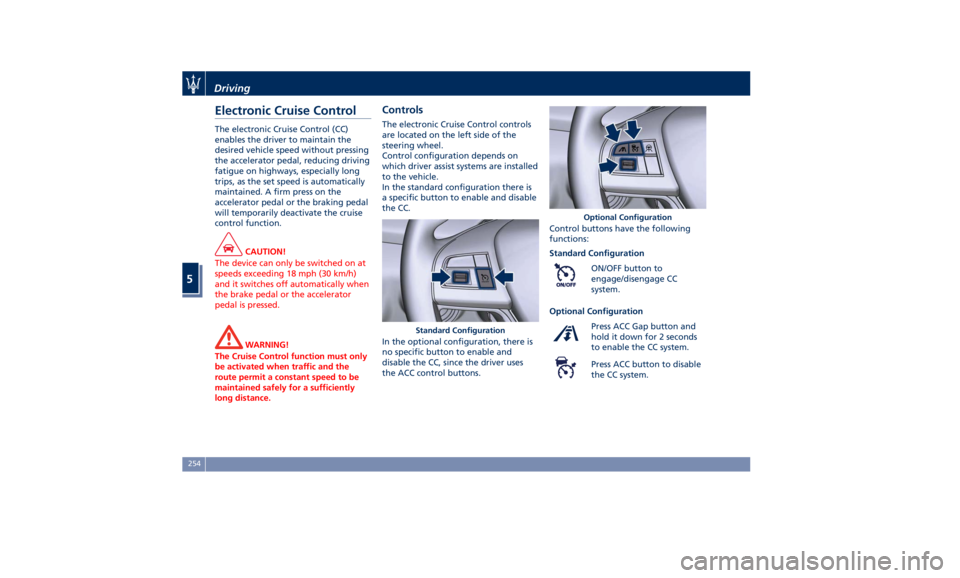
long distance. Controls The electronic Cruise Control controls
are located on the left side of the
steering wheel.
Control configuration depends on
which driver assist systems are installed
to the vehicle.
In the standard configuration there is
a specific button to enable and disable
the CC.
In the optional configuration, there is
no specific button to enable and
disable the CC, since the driver uses
the ACC control buttons. Control buttons have the following
functions:
Standard Configuration
ON/OFF button to
engage/disengage CC
system.
Optional Configuration
Press ACC Gap button and
hold it down for 2 seconds
to enable the CC system.
Press ACC button to disable
the CC system.Standard Configuration Optional ConfigurationDriving
5
254
Page 263 of 396
could cause an incorrect assessment
of the required safety distance.
It is recommended to disable the ACC
system in the following instances:
• When driving in the fog, heavy rain,
heavy snow, slush, heavy traffic and
similar complex situations such as
highway construction zones.
• When entering a junction lane or a
slip road to leave the highway; when
driving on narrow, icy, snowy,
slippery roads, or on steep uphill and
downhill roads.
• When circumstances do not allow to
drive safely at constant speed.
Displayed information Adaptive Cruise Control (ACC)
condition, as well as the LKA and HAS
status, is displayed on instrument
cluster after selecting “Driver Assist”
menu (see paragraph “TFT Display:
Menus and Settings" under
“Instrument Cluster” in section
“Dashboard Instruments and
Controls”).
Displayed information depends on
system status: ready, set, temporarily
cancelled or override.
Apart from the image at the center of
the display, CC, ACC, LKA and HAS
systems status is represented by icons at the top left and right. These icons
remain displayed even when exiting
the "Driver Assist" screen.
The vehicle(s) and horizontal bars
represent the ACC status as ready
(white) or with sensed vehicle ahead
(green); the white, grey or yellow lines
represent the LKA and HAS systems.
The ACC screen can be displayed any
time driver changes system status or
settings. After 5 seconds of ACC
inactivity, the display goes back to last
screen.
ACC Controls and Activation
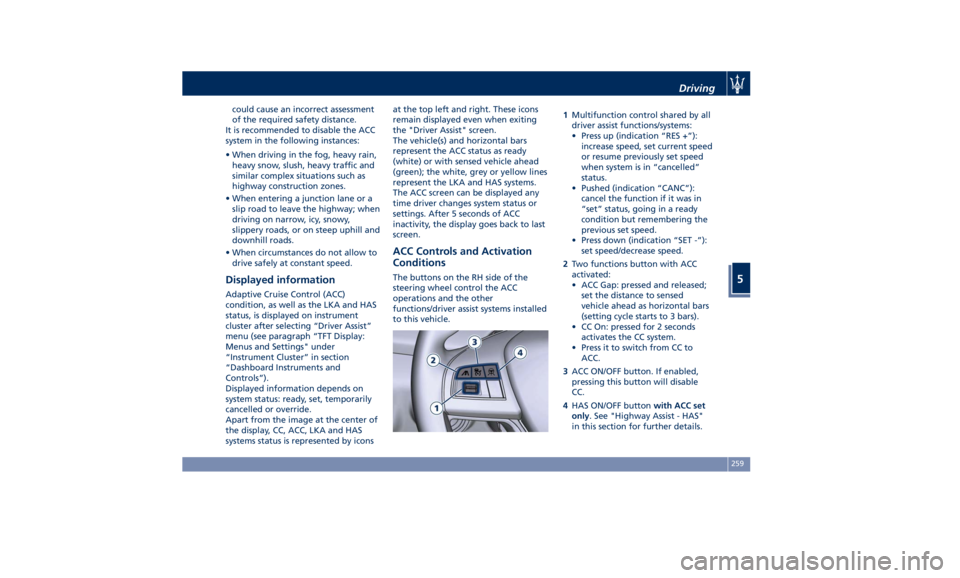
Conditions The buttons on the RH side of the
steering wheel control the ACC
operations and the other
functions/driver assist systems installed
to this vehicle. 1 Multifunction control shared by all
driver assist functions/systems:
• Press up (indication “RES +”):
increase speed, set current speed
or resume previously set speed
when system is in “cancelled”
status.
• Pushed (indication “CANC”):
cancel the function if it was in
“set” status, going in a ready
condition but remembering the
previous set speed.
• Press down (indication “SET -”):
set speed/decrease speed.
2 Two functions button with ACC
activated:
• ACC Gap: pressed and released;
set the distance to sensed
vehicle ahead as horizontal bars
(setting cycle starts to 3 bars).
• CC On: pressed for 2 seconds
activates the CC system.
• Press it to switch from CC to
ACC.
3 ACC ON/OFF button. If enabled,
pressing this button will disable
CC.
4 HAS ON/OFF button with ACC set
only . See "Highway Assist - HAS"
in this section for further details.Driving
5
259