engine oil MAZDA 6 2002 Workshop Manual Suplement
[x] Cancel search | Manufacturer: MAZDA, Model Year: 2002, Model line: 6, Model: MAZDA 6 2002Pages: 909, PDF Size: 17.16 MB
Page 638 of 909
M–8
ELECTRONIC 4WD CONTROL SYSTEM
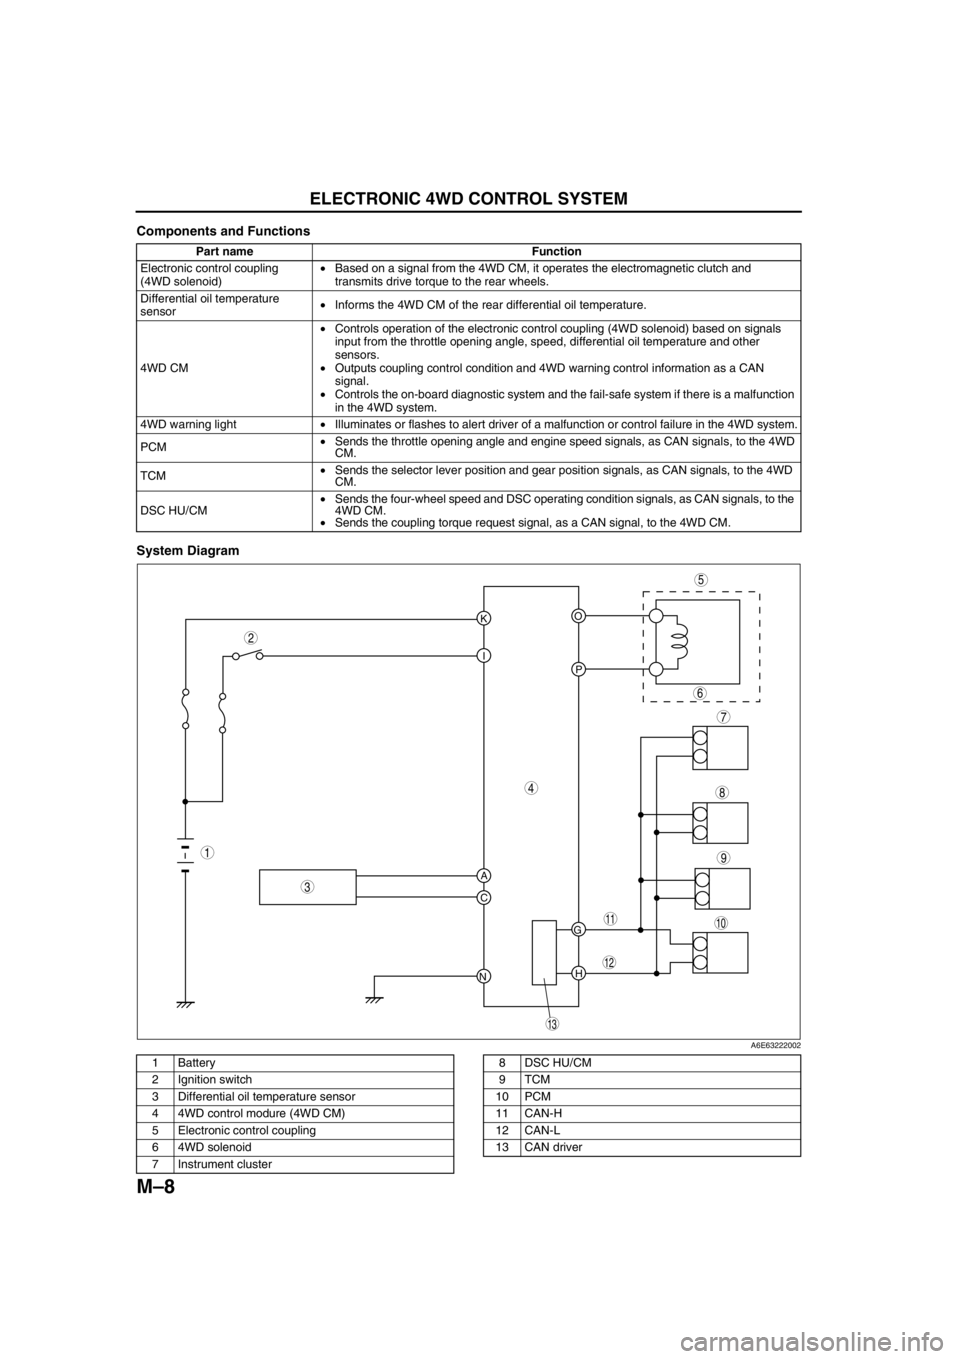
Components and Functions
System Diagram
.
Part name Function
Electronic control coupling
(4WD solenoid)•Based on a signal from the 4WD CM, it operates the electromagnetic clutch and
transmits drive torque to the rear wheels.
Differential oil temperature
sensor•Informs the 4WD CM of the rear differential oil temperature.
4WD CM•Controls operation of the electronic control coupling (4WD solenoid) based on signals
input from the throttle opening angle, speed, differential oil temperature and other
sensors.
•Outputs coupling control condition and 4WD warning control information as a CAN
signal.
•Controls the on-board diagnostic system and the fail-safe system if there is a malfunction
in the 4WD system.
4WD warning light•Illuminates or flashes to alert driver of a malfunction or control failure in the 4WD system.
PCM•Sends the throttle opening angle and engine speed signals, as CAN signals, to the 4WD
CM.
TCM•Sends the selector lever position and gear position signals, as CAN signals, to the 4WD
CM.
DSC HU/CM•Sends the four-wheel speed and DSC operating condition signals, as CAN signals, to the
4WD CM.
•Sends the coupling torque request signal, as a CAN signal, to the 4WD CM.
KO
P I
A
C
NH G
9
8
7
5
4
3
10
13
11
12
6
1
2
A6E63222002
1 Battery
2 Ignition switch
3 Differential oil temperature sensor
4 4WD control modure (4WD CM)
5 Electronic control coupling
6 4WD solenoid
7 Instrument cluster8 DSC HU/CM
9TCM
10 PCM
11 CAN-H
12 CAN-L
13 CAN driver
Page 644 of 909
M–14
ELECTRONIC 4WD CONTROL SYSTEM
End Of Sie4WD SYSTEM CONTROLA6E632227100206Outline
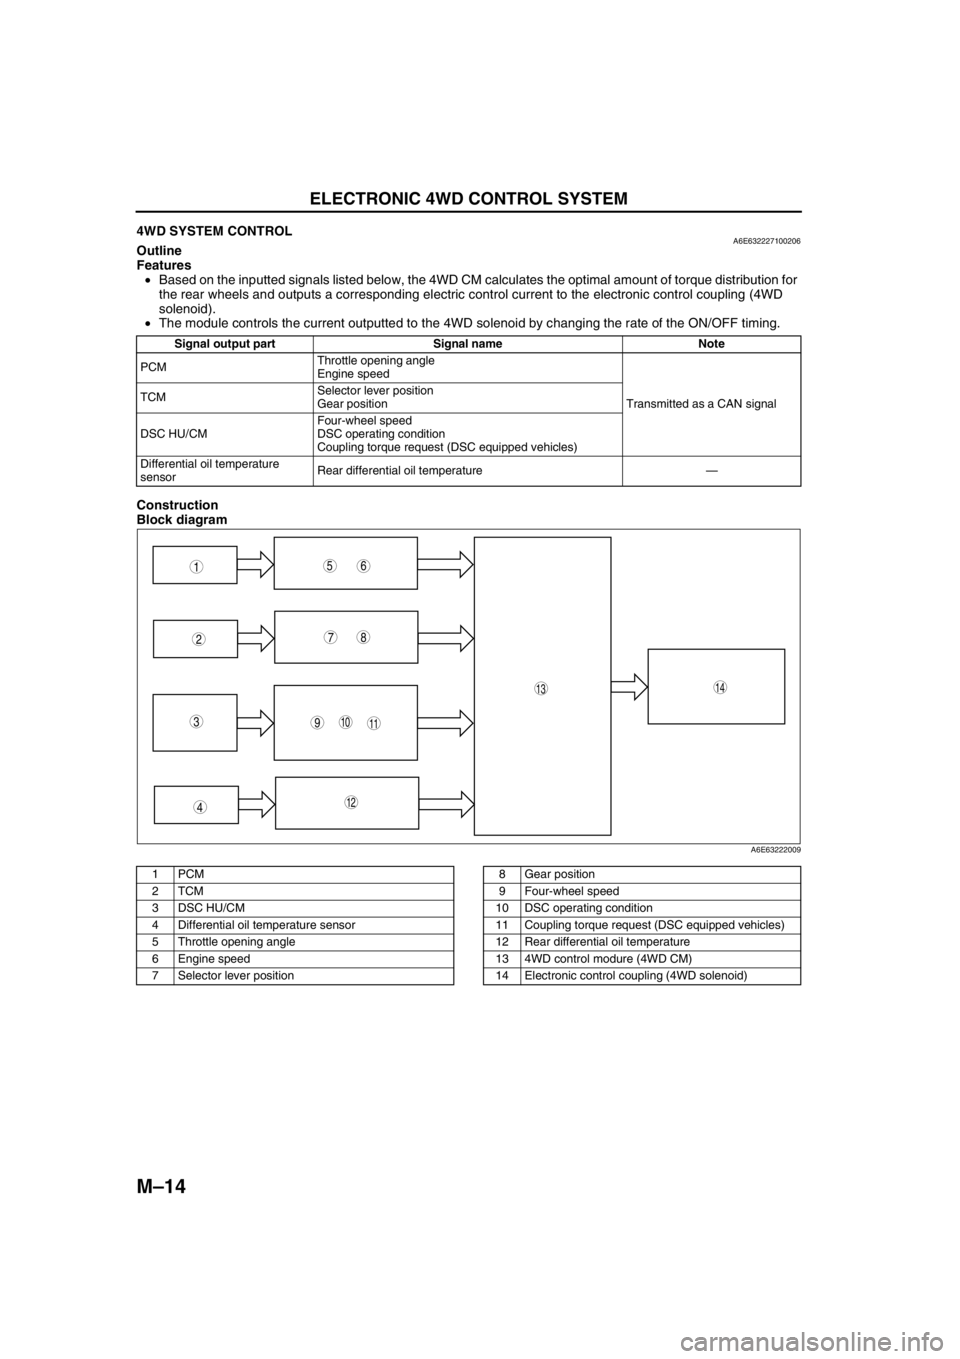
Features
•Based on the inputted signals listed below, the 4WD CM calculates the optimal amount of torque distribution for
the rear wheels and outputs a corresponding electric control current to the electronic control coupling (4WD
solenoid).
•The module controls the current outputted to the 4WD solenoid by changing the rate of the ON/OFF timing.
Construction
Block diagram
.
Signal output part Signal name Note
PCMThrottle opening angle
Engine speed
Transmitted as a CAN signal TCMSelector lever position
Gear position
DSC HU/CMFour-wheel speed
DSC operating condition
Coupling torque request (DSC equipped vehicles)
Differential oil temperature
sensorRear differential oil temperature—
9
87
5
4
310
1413
11
12
61
2
A6E63222009
1PCM
2TCM
3 DSC HU/CM
4 Differential oil temperature sensor
5 Throttle opening angle
6 Engine speed
7 Selector lever position8 Gear position
9 Four-wheel speed
10 DSC operating condition
11 Coupling torque request (DSC equipped vehicles)
12 Rear differential oil temperature
13 4WD control modure (4WD CM)
14 Electronic control coupling (4WD solenoid)
Page 645 of 909
ELECTRONIC 4WD CONTROL SYSTEM
M–15
M
Operation
Normal control
•When starting off or accelerating during straight-ahead driving, torque transmitted to the rear wheels is
optimally controlled to ensure sufficient acceleration performance. Due to this, standing-start and acceleration
performance is improved.
•Also, in order to improve fuel economy when driving at a stable, consistent speed, torque transmitted to the
rear wheels is damped, and rear-wheel drive is controlled to maintain it close to that of the front wheels.
Tight cornering control
•When the 4WD CM determines, based on the four-wheel speed signal, that the vehicle is in tight cornering, it
reduces the torque transmitted to the rear wheels to avoid tight corner braking characteristics.
Integrated DSC control
•If a signal from the DSC HU/CM input to the 4WD CM indicates that ABS control is activated, the module
controls the torque transmitted to the rear wheels to prevent undue influence on ABS control.
•Also, when a coupling torque request signal is received from the DSC HU/CM, the module controls the torque
transmitted to the rear wheels to match the amount of requested torque.
Other control
•In case the rear differential oil temperature exceeds the specified amount, or when there is an unusually large
variation in the rotation speed of the front and rear wheels (ex. when trying to get unstuck), control is
temporarily suspended in order to protect the 4WD system. When this occurs the 4WD warning light flashes to
indicate the situation to the driver.
End Of Sie
CONTROLLER AREA NETWORK (CAN)A6E632227100207Outline
•The 4WD CM transmits/receives information using the CAN system. See Section T for detailed information
regarding the CAN system.
Operation
Transmitted information
•Coupling torque
•4WD system operating condition (warning light information)
Received information
•Four-wheel speed
•Throttle opening angle
•Engine speed
•ABS/DSC operating condition
•Gear position
•Selector lever position
•Coupling torque request
End Of Sie
Page 647 of 909
ELECTRONIC 4WD CONTROL SYSTEM
M–17
M
Memory function
•This function stores DTCs for malfunctions of the input/output signal systems as determined by the failure
detection function. Once a DTC is stored, it is not cleared even if the input/output signal system malfunction
returns to normal when the ignition key is turned to the LOCK position (engine OFF).
•Since DTCs are stored in the non-volatile memory inside the 4WD CM, they are not cleared even if the battery
is disconnected. Therefore, it is necessary to clear the memory when maintenance has been completed. For
clearing DTCs, refer to the procedures in the Workshop Manual.
•When inspecting DTCs using a WDS or equivalent, only one memory stored DTC at a time can be displayed.
Therefore, when multiple DTCs have been stored, it is necessary to inspect for DTCs again after repairing and
clearing the present DTC to ensure that there are no more DTCs present in the memory.
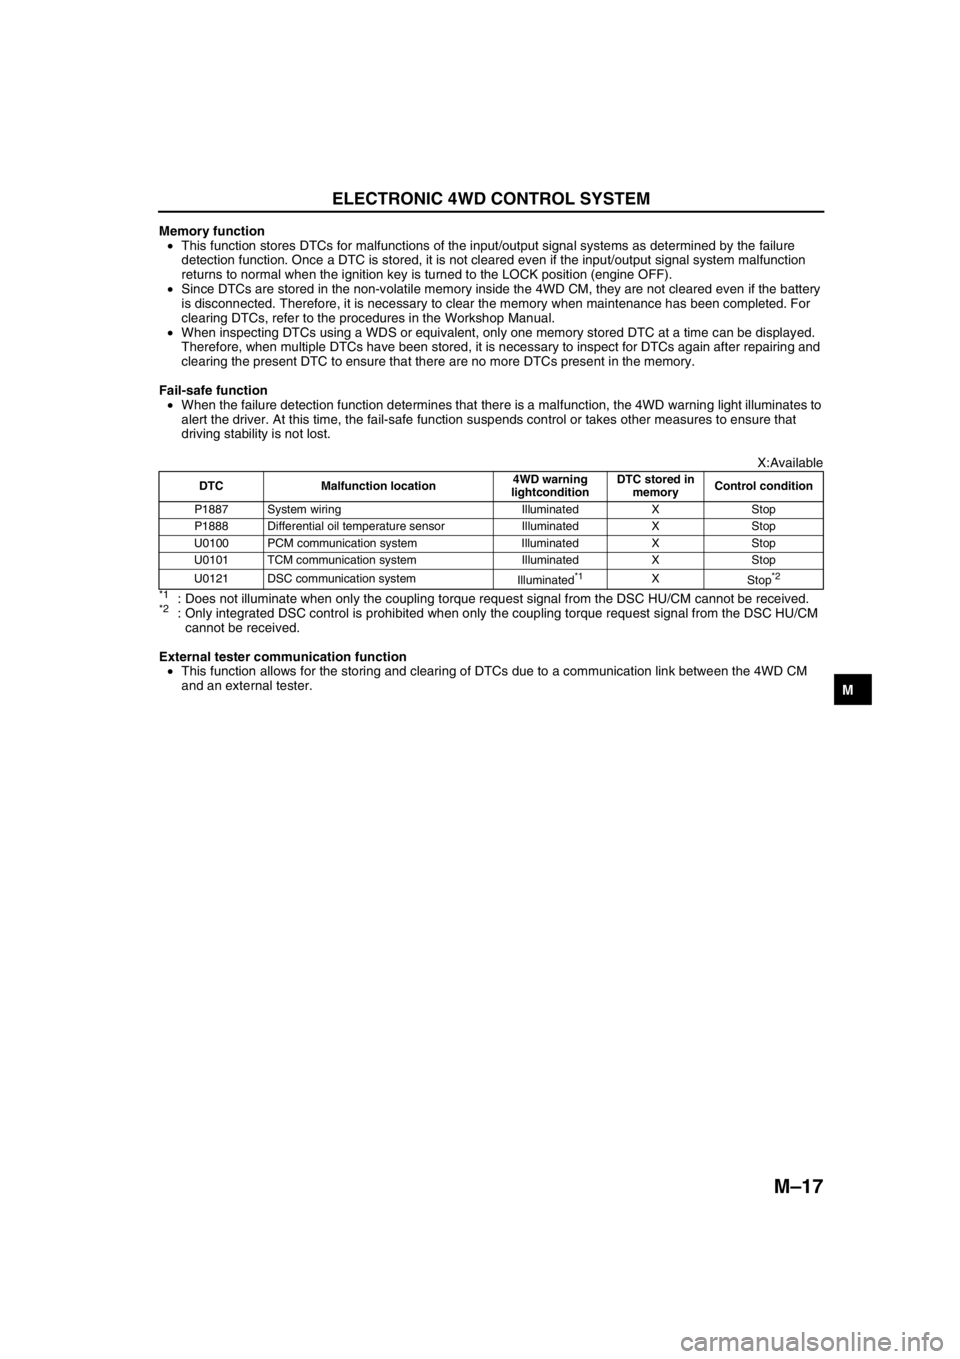
Fail-safe function
•When the failure detection function determines that there is a malfunction, the 4WD warning light illuminates to
alert the driver. At this time, the fail-safe function suspends control or takes other measures to ensure that
driving stability is not lost.
X:Available
*1: Does not illuminate when only the coupling torque request signal from the DSC HU/CM cannot be received.*2: Only integrated DSC control is prohibited when only the coupling torque request signal from the DSC HU/CM
cannot be received.
External tester communication function
•This function allows for the storing and clearing of DTCs due to a communication link between the 4WD CM
and an external tester.
End Of Sie
DTC Malfunction location4WD warning
lightconditionDTC stored in
memoryControl condition
P1887 System wiring Illuminated X Stop
P1888 Differential oil temperature sensor Illuminated X Stop
U0100 PCM communication system Illuminated X Stop
U0101 TCM communication system Illuminated X Stop
U0121 DSC communication system
Illuminated
*1X
Stop*2
Page 651 of 909
GENERAL PROCEDURES
M–21
M
PRECAUTION (FRONT AND REAR AXLE)A6E631001018201Wheel and Tire Removal/Installation
1. The removal and installation procedures for the wheels and tires are not mentioned in this section. When a
wheel is removed, tighten it to 88—118 N·m {9.0—12.0 kgf·m, 65.0—87.0 ft·lbf}
Brake Line Disconnection/Connection
Caution
•Brake fluid will damage painted surfaces. If brake fluid gets on a painted surface, wipe it off
immediately.
1. Tighten the brake pipe flare nut using the SST (49 0259 770B). Be sure to modify the brake pipe flare nut
tightening torque to allow for use of a torque wrench-SST combination.
2. If any brake line has been disconnected any time during the procedure, add brake fluid, bleed the brakes, and
inspect for leakage after the procedure has been completed.
Suspension Arm Removal/Installation
1. Tighten any part of the suspension that uses rubber bushings only after vehicle has been lowered and
unloaded.
Note
•Unloaded: Fuel tank is full. Engine coolant and engine oil are at specified level. Spare tire, jack, and tools
are in designated position.
Connector Disconnection
1. Disconnect the negative (-) battery cable before disconnecting connectors.
Electronic Control 4WD System Parts
1. After servicing the electronic control 4WD system parts, verify that no DTC has been stored. Clear any DTCs
remaining in the memory.
End Of Sie
GENERAL PROCEDURES
Page 683 of 909
REAR DIFFERENTIAL
M–53
M
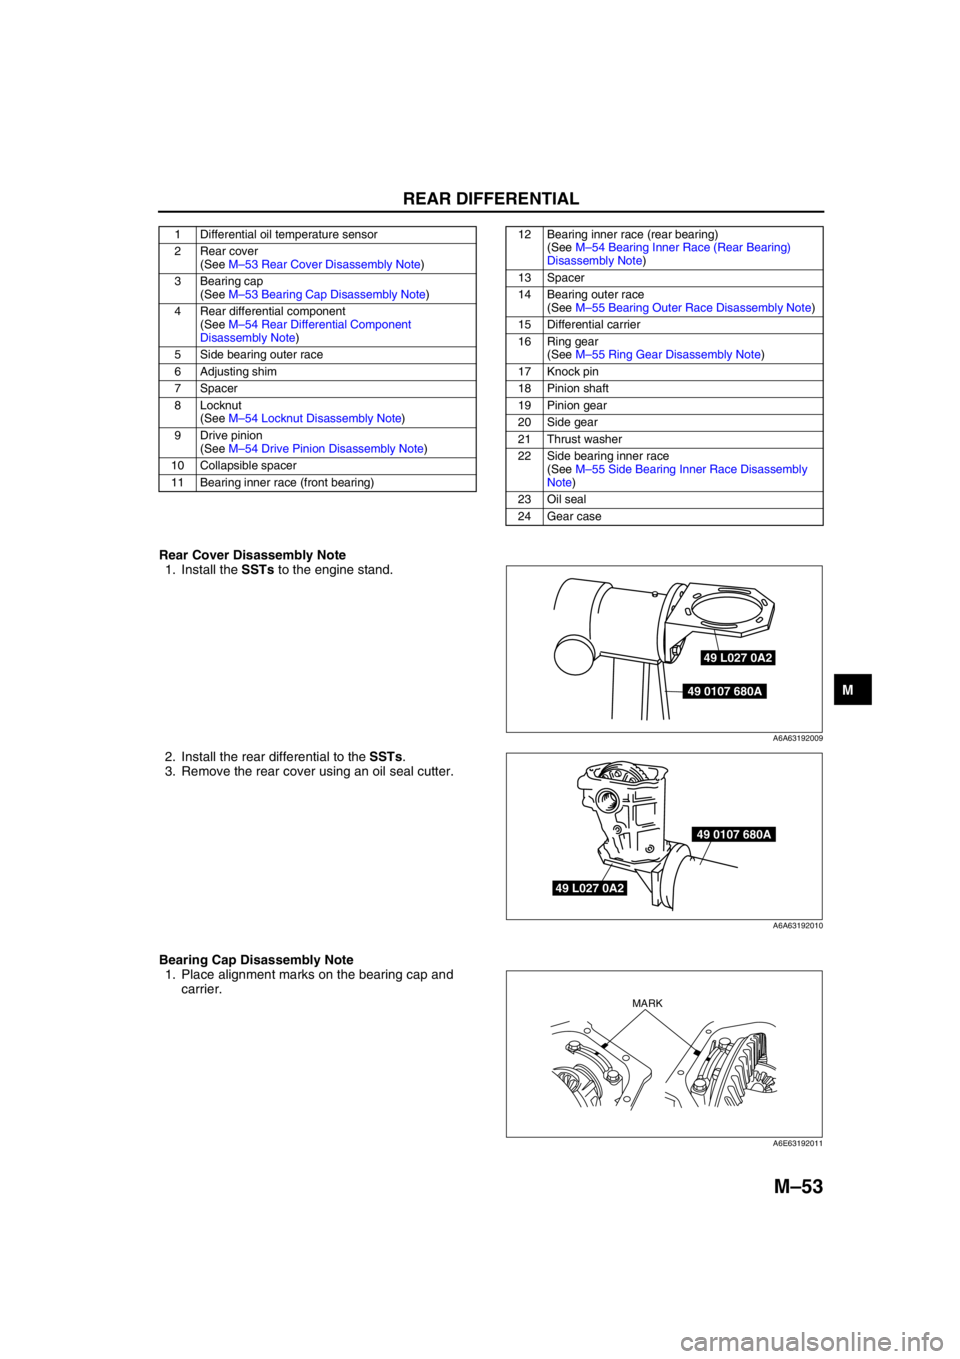
Rear Cover Disassembly Note
1. Install the SSTs to the engine stand.
2. Install the rear differential to the SSTs.
3. Remove the rear cover using an oil seal cutter.
Bearing Cap Disassembly Note
1. Place alignment marks on the bearing cap and
carrier.
1 Differential oil temperature sensor
2 Rear cover
(See M–53 Rear Cover Disassembly Note)
3 Bearing cap
(See M–53 Bearing Cap Disassembly Note)
4 Rear differential component
(See M–54 Rear Differential Component
Disassembly Note)
5 Side bearing outer race
6 Adjusting shim
7Spacer
8 Locknut
(See M–54 Locknut Disassembly Note)
9 Drive pinion
(See M–54 Drive Pinion Disassembly Note)
10 Collapsible spacer
11 Bearing inner race (front bearing)12 Bearing inner race (rear bearing)
(See M–54 Bearing Inner Race (Rear Bearing)
Disassembly Note)
13 Spacer
14 Bearing outer race
(See M–55 Bearing Outer Race Disassembly Note)
15 Differential carrier
16 Ring gear
(See M–55 Ring Gear Disassembly Note)
17 Knock pin
18 Pinion shaft
19 Pinion gear
20 Side gear
21 Thrust washer
22 Side bearing inner race
(See M–55 Side Bearing Inner Race Disassembly
Note)
23 Oil seal
24 Gear case
49 L027 0A2
49 0107 680A
A6A63192009
49 L027 0A2
49 0107 680A
A6A63192010
MARK
A6E63192011
Page 686 of 909
M–56
REAR DIFFERENTIAL
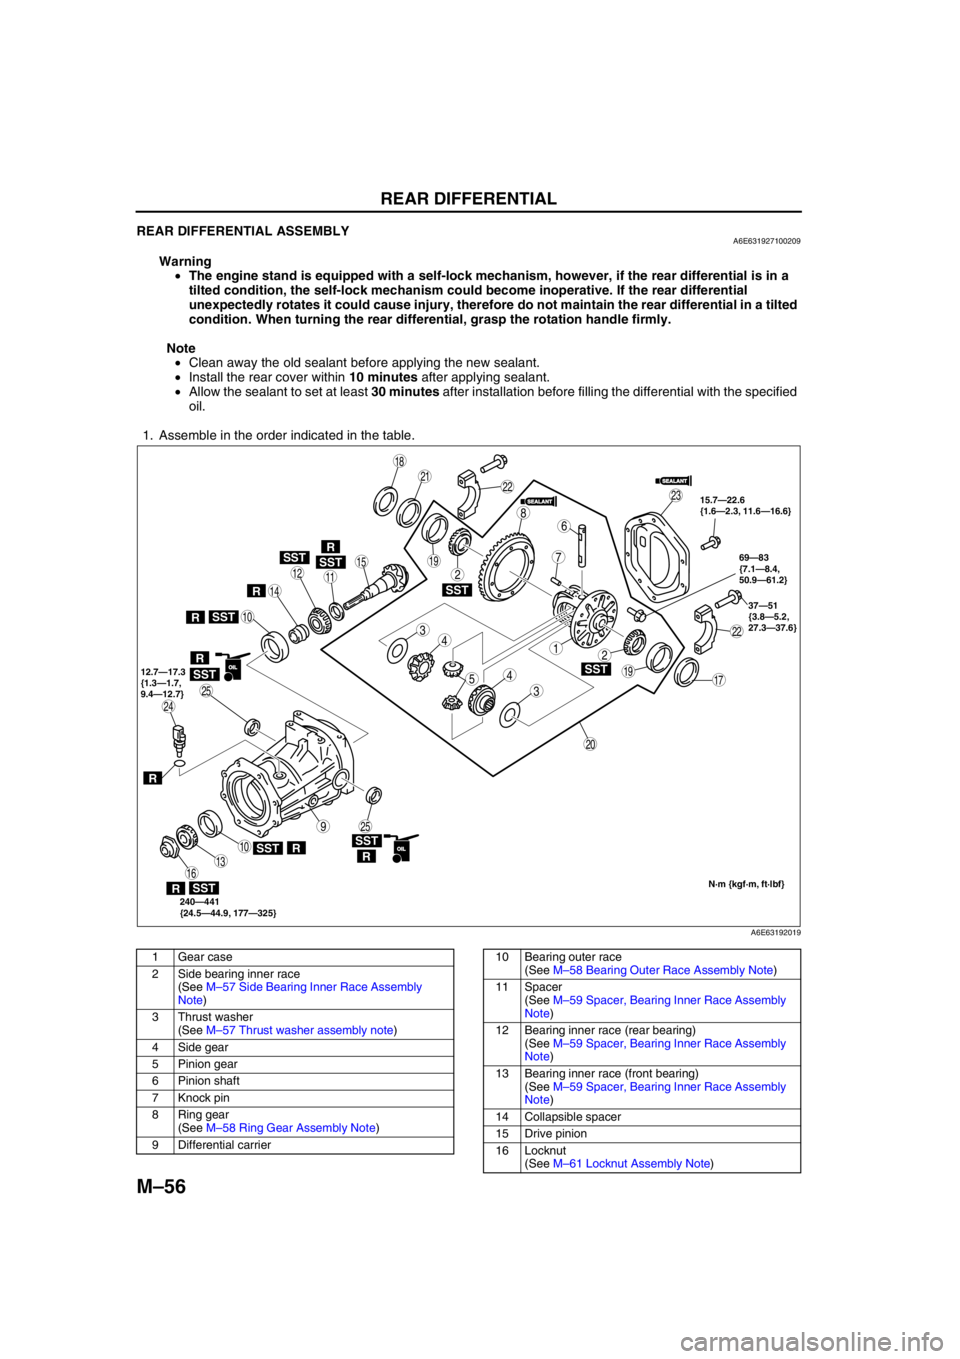
REAR DIFFERENTIAL ASSEMBLYA6E631927100209
Warning
•The engine stand is equipped with a self-lock mechanism, however, if the rear differential is in a
tilted condition, the self-lock mechanism could become inoperative. If the rear differential
unexpectedly rotates it could cause injury, therefore do not maintain the rear differential in a tilted
condition. When turning the rear differential, grasp the rotation handle firmly.
Note
•Clean away the old sealant before applying the new sealant.
•Install the rear cover within 10 minutes after applying sealant.
•Allow the sealant to set at least 30 minutes after installation before filling the differential with the specified
oil.
1. Assemble in the order indicated in the table.
.
SST
SST
SST
SSTSST
SST
SST
9
8
7
54
4
3
3
12
2
10
10
19
19
18
17
15
16
14
13
1112
20
25
25
24
23
21
22
22
R
SST
R
R
R
SSTR
RR
6
SEALANTSEALANT
SEALANTSEALANT
OILOIL
OILOIL
15.7—22.6
{1.6—2.3, 11.6—16.6}
37—51
{3.8—5.2,
27.3—37.6}
240—441
{24.5—44.9, 177—325} 12.7—17.3
{1.3—1.7,
9.4—12.7}69—83
{7.1—8.4,
50.9—61.2}
N·m {kgf·m, ft·lbf}
R
A6E63192019
1 Gear case
2 Side bearing inner race
(See M–57 Side Bearing Inner Race Assembly
Note)
3 Thrust washer
(See M–57 Thrust washer assembly note)
4 Side gear
5 Pinion gear
6Pinion shaft
7 Knock pin
8 Ring gear
(See M–58 Ring Gear Assembly Note)
9 Differential carrier10 Bearing outer race
(See M–58 Bearing Outer Race Assembly Note)
11 Spacer
(See M–59 Spacer, Bearing Inner Race Assembly
Note)
12 Bearing inner race (rear bearing)
(See M–59 Spacer, Bearing Inner Race Assembly
Note)
13 Bearing inner race (front bearing)
(See M–59 Spacer, Bearing Inner Race Assembly
Note)
14 Collapsible spacer
15 Drive pinion
16 Locknut
(See M–61 Locknut Assembly Note)
Page 699 of 909
ELECTRONIC 4WD CONTROL SYSTEM
M–69
M
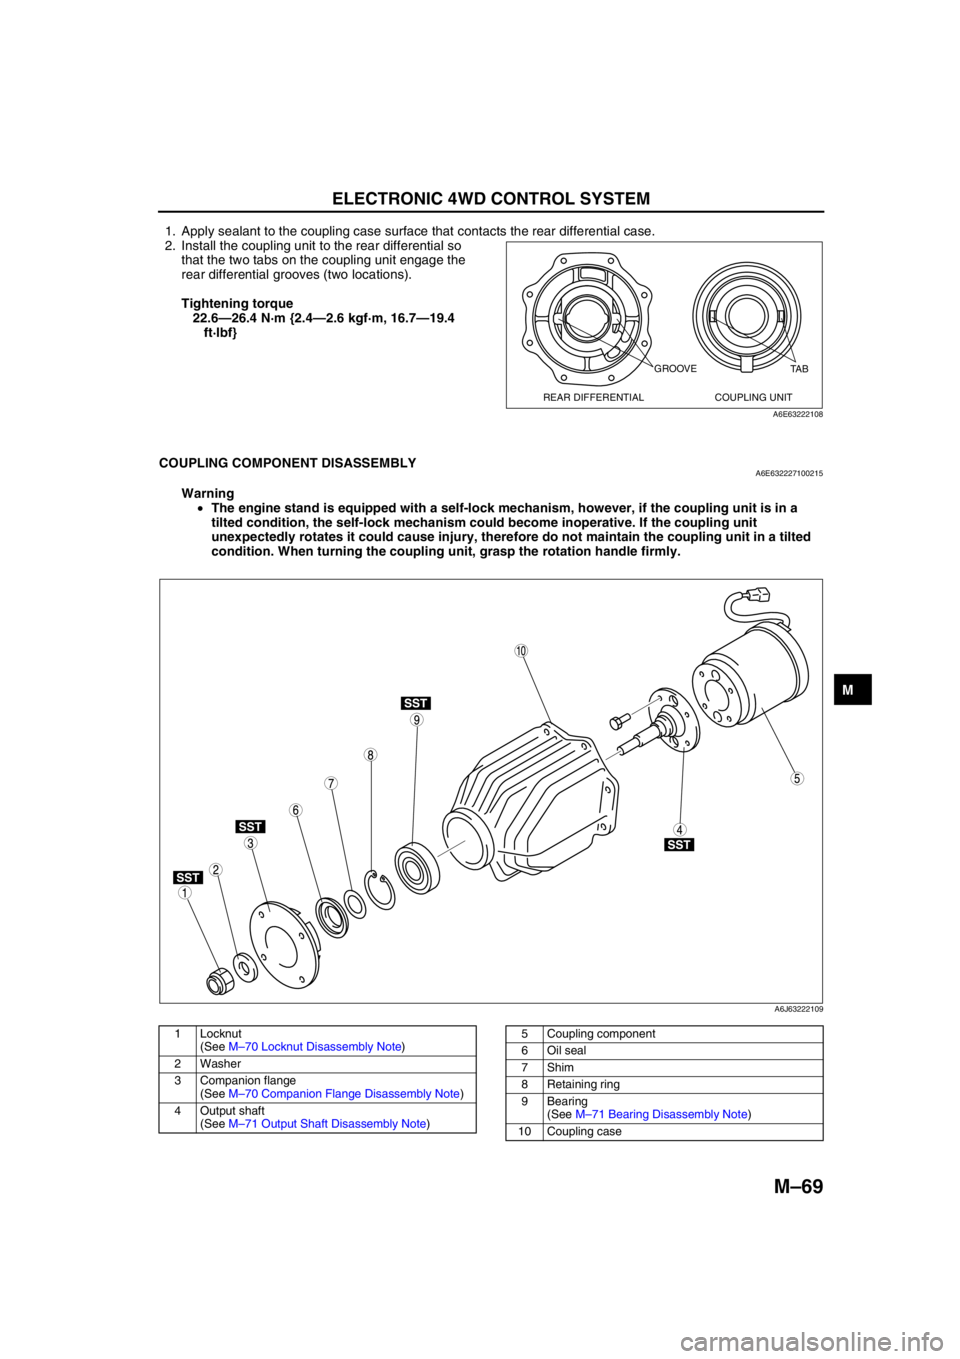
1. Apply sealant to the coupling case surface that contacts the rear differential case.
2. Install the coupling unit to the rear differential so
that the two tabs on the coupling unit engage the
rear differential grooves (two locations).
Tightening torque
22.6—26.4 N·m {2.4—2.6 kgf·m, 16.7—19.4
ft·lbf}
End Of Sie
COUPLING COMPONENT DISASSEMBLYA6E632227100215
Warning
•The engine stand is equipped with a self-lock mechanism, however, if the coupling unit is in a
tilted condition, the self-lock mechanism could become inoperative. If the coupling unit
unexpectedly rotates it could cause injury, therefore do not maintain the coupling unit in a tilted
condition. When turning the coupling unit, grasp the rotation handle firmly.
.
GROOVE
REAR DIFFERENTIAL COUPLING UNITTA B
A6E63222108
SST
SST
SST
SST
9
8
75
4
3
1
2
10
6
A6J63222109
1 Locknut
(See M–70 Locknut Disassembly Note)
2Washer
3 Companion flange
(See M–70 Companion Flange Disassembly Note)
4 Output shaft
(See M–71 Output Shaft Disassembly Note)5 Coupling component
6Oil seal
7Shim
8 Retaining ring
9 Bearing
(See M–71 Bearing Disassembly Note)
10 Coupling case
Page 702 of 909
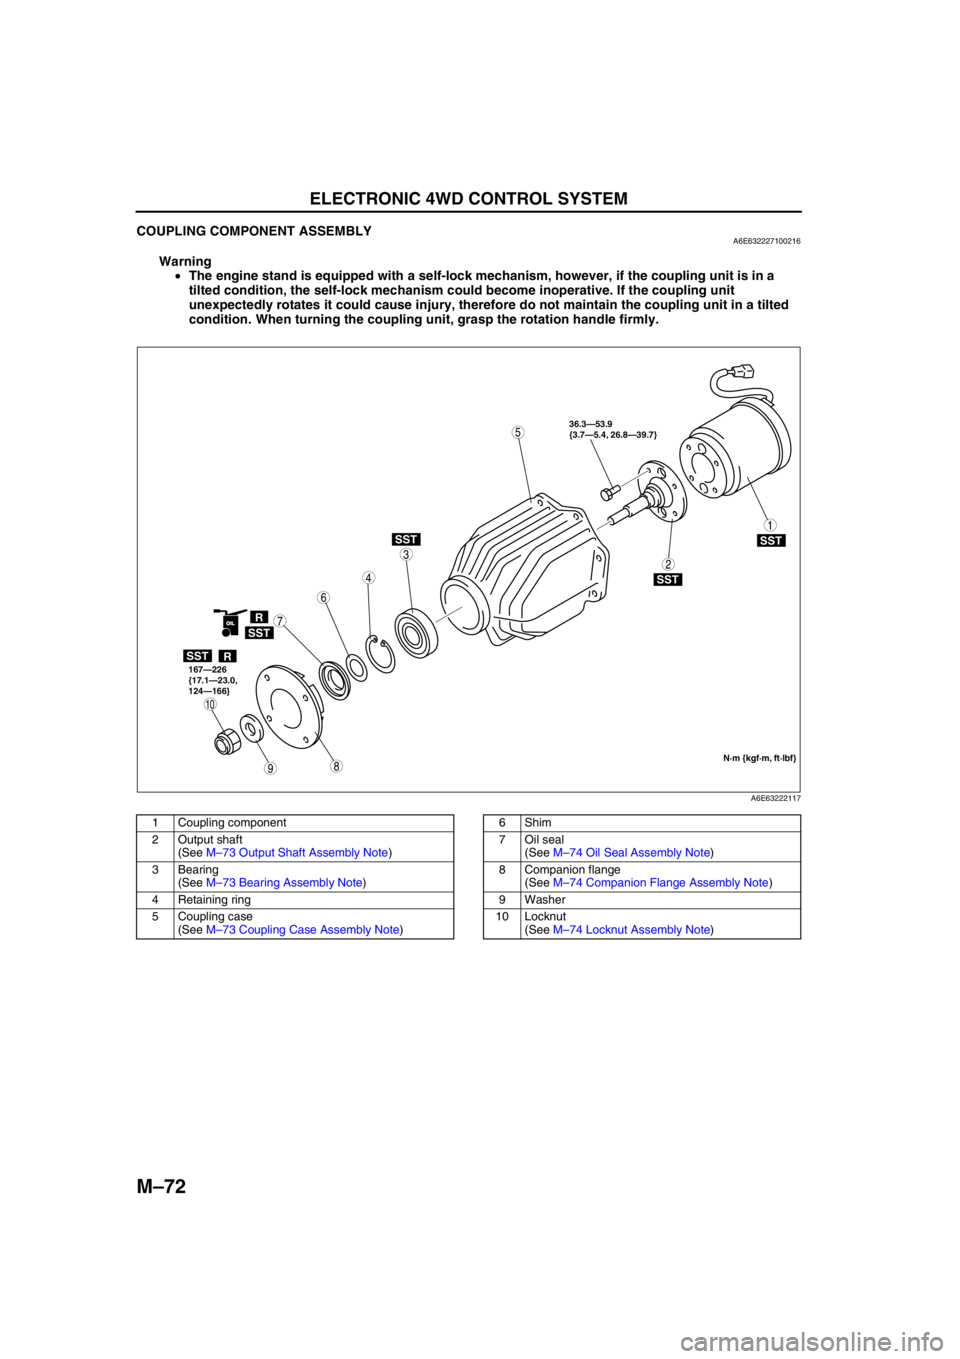
M–72
ELECTRONIC 4WD CONTROL SYSTEM
COUPLING COMPONENT ASSEMBLYA6E632227100216
Warning
•The engine stand is equipped with a self-lock mechanism, however, if the coupling unit is in a
tilted condition, the self-lock mechanism could become inoperative. If the coupling unit
unexpectedly rotates it could cause injury, therefore do not maintain the coupling unit in a tilted
condition. When turning the coupling unit, grasp the rotation handle firmly.
.
98
7
5
4
3
1
2
10
6
SST
SST
R
SST
SST
SST
R
OIL
36.3—53.9
{3.7—5.4, 26.8—39.7}
167—226
{17.1—23.0,
124—166}
N·m {kgf·m, ft·lbf}
A6E63222117
1 Coupling component
2 Output shaft
(See M–73 Output Shaft Assembly Note)
3 Bearing
(See M–73 Bearing Assembly Note)
4 Retaining ring
5 Coupling case
(See M–73 Coupling Case Assembly Note)6Shim
7 Oil seal
(See M–74 Oil Seal Assembly Note)
8 Companion flange
(See M–74 Companion Flange Assembly Note)
9Washer
10 Locknut
(See M–74 Locknut Assembly Note)
Page 710 of 909
M–80
ON-BOARD DIAGNOSTIC
End Of Sie
DTC U0100A6E637027100205
Diagnostic Procedure
•Inspect according to the diagnostic procedure in Section T. (See T–39 MULTIPLEX COMMUNICATION
SYSTEM.)
End Of Sie
DTC U0101A6E637027100206
Diagnostic Procedure
•Inspect according to the diagnostic procedure in Section T. (See T–39 MULTIPLEX COMMUNICATION
SYSTEM.)
End Of Sie
DTC U0121A6E637027100207
Diagnostic Procedure
•Inspect according to the diagnostic procedure in Section T. (See T–39 MULTIPLEX COMMUNICATION
SYSTEM.)
End Of Sie
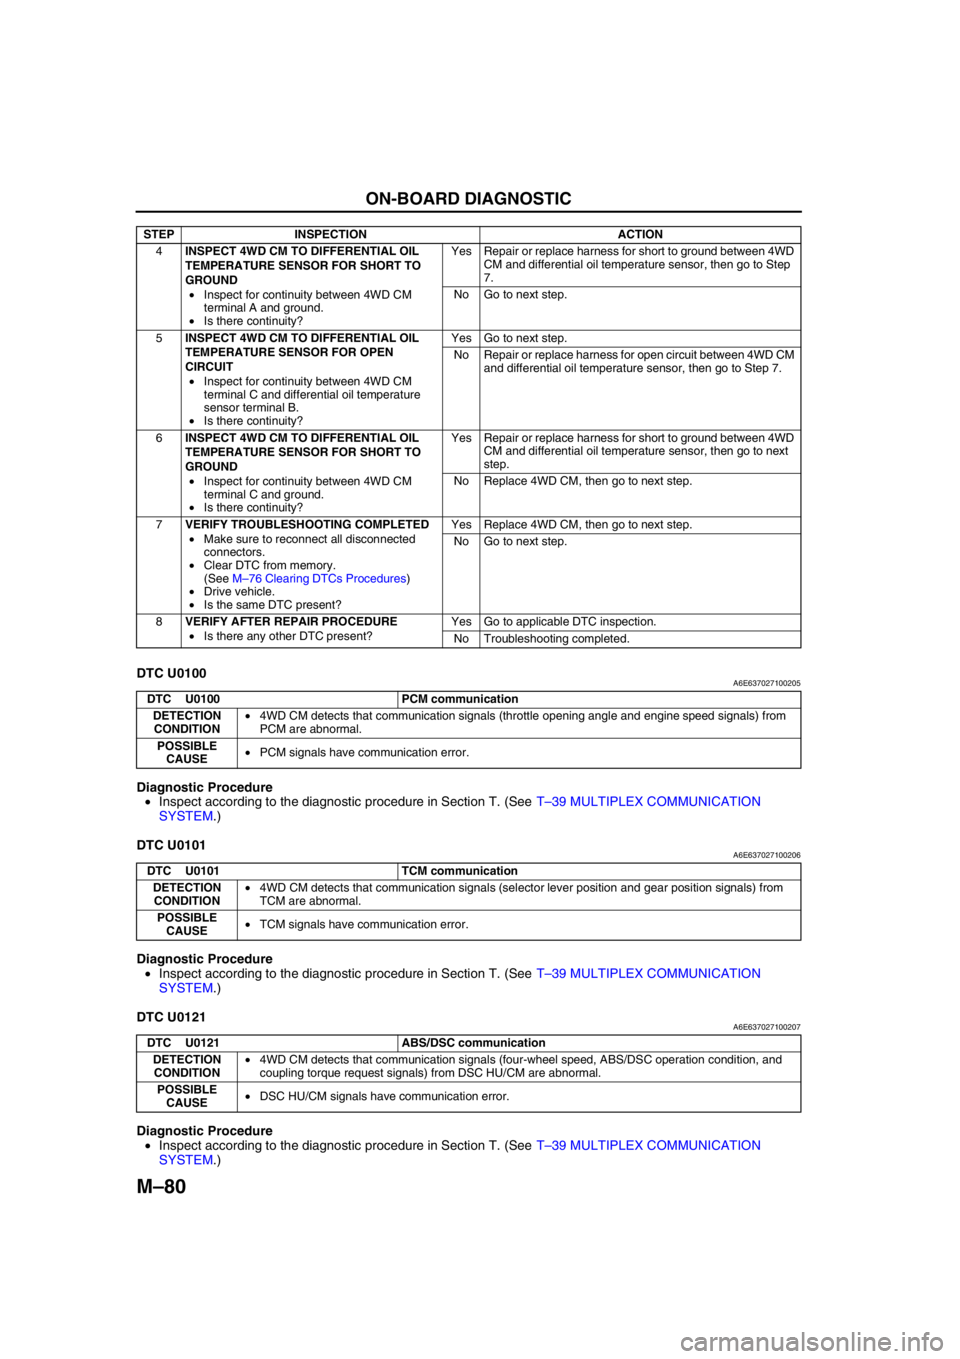
4INSPECT 4WD CM TO DIFFERENTIAL OIL
TEMPERATURE SENSOR FOR SHORT TO
GROUND
•Inspect for continuity between 4WD CM
terminal A and ground.
•Is there continuity?Yes Repair or replace harness for short to ground between 4WD
CM and differential oil temperature sensor, then go to Step
7.
No Go to next step.
5INSPECT 4WD CM TO DIFFERENTIAL OIL
TEMPERATURE SENSOR FOR OPEN
CIRCUIT
•Inspect for continuity between 4WD CM
terminal C and differential oil temperature
sensor terminal B.
•Is there continuity?Yes Go to next step.
No Repair or replace harness for open circuit between 4WD CM
and differential oil temperature sensor, then go to Step 7.
6INSPECT 4WD CM TO DIFFERENTIAL OIL
TEMPERATURE SENSOR FOR SHORT TO
GROUND
•Inspect for continuity between 4WD CM
terminal C and ground.
•Is there continuity?Yes Repair or replace harness for short to ground between 4WD
CM and differential oil temperature sensor, then go to next
step.
No Replace 4WD CM, then go to next step.
7VERIFY TROUBLESHOOTING COMPLETED
•Make sure to reconnect all disconnected
connectors.
•Clear DTC from memory.
(See M–76 Clearing DTCs Procedures)
•Drive vehicle.
•Is the same DTC present?Yes Replace 4WD CM, then go to next step.
No Go to next step.
8VERIFY AFTER REPAIR PROCEDURE
•Is there any other DTC present?Yes Go to applicable DTC inspection.
No Troubleshooting completed. STEP INSPECTION ACTION
DTC U0100 PCM communication
DETECTION
CONDITION•4WD CM detects that communication signals (throttle opening angle and engine speed signals) from
PCM are abnormal.
POSSIBLE
CAUSE•PCM signals have communication error.
DTC U0101 TCM communication
DETECTION
CONDITION•4WD CM detects that communication signals (selector lever position and gear position signals) from
TCM are abnormal.
POSSIBLE
CAUSE•TCM signals have communication error.
DTC U0121 ABS/DSC communication
DETECTION
CONDITION•4WD CM detects that communication signals (four-wheel speed, ABS/DSC operation condition, and
coupling torque request signals) from DSC HU/CM are abnormal.
POSSIBLE
CAUSE•DSC HU/CM signals have communication error.