air condition MAZDA 6 2002 Suplement User Guide
[x] Cancel search | Manufacturer: MAZDA, Model Year: 2002, Model line: 6, Model: MAZDA 6 2002Pages: 909, PDF Size: 17.16 MB
Page 19 of 909

SCHEDULED MAINTENANCE
GI–15
GI
For GCC
Applied VIN (assumed):
JM7 GG323✻✻
✻✻✻✻ ✻✻
# 128767-, JM7 GG423✻✻
✻✻✻✻ ✻✻
# 128767-, JM7 GG343✻✻
✻✻✻✻ ✻✻
# 128767-
JM7 GG443✻✻
✻✻✻✻ ✻✻
# 128767-, JM7 GG32F✻✻
✻✻✻✻ ✻✻
# 128767-, JM7 GG42F✻✻
✻✻✻✻ ✻✻
# 128767-
JM7 GG34F✻
✻✻ ✻✻
✻✻ ✻
# 128767-, JM7 GG44F✻
✻✻ ✻✻
✻✻ ✻
# 128767-, JM7 GY49F✻✻
✻✻✻✻ ✻✻
# 101432-
JM7 GY39F✻✻
✻✻✻✻ ✻✻
# 101432-, JM7 GY49F✻
✻✻ ✻
0# 101432-, JM7 GY39F✻
✻✻ ✻
0# 101432-
Chart symbols:
I : Inspect and clean, repair, adjust, or replace if necessary.
R : Replace
T:Tighten
C : Clean
Remarks:
•The ignition and fuel systems are highly important to the emission control system and to efficient engine operation. All
inspections and adjustments must be made by an Authorized Mazda Dealer.
•After the prescribed period, continue to follow the described maintenance at the recommended intervals.
•Refer below for a description of items marked* in the maintenance chart.
*1: If the vehicle is operated under any of the following conditions, change the engine oil and oil filter more often than
recommended intervals.
a. Driving in dusty conditions.
b. Extended periods of idling or low speed operation.
c. Driving for long period in cold temperatures or driving regularly at short distance only.
*2: Also inspect and adjust the power steering and air conditioner drive belts, if installed.
*3: If the brakes are used extensively (for example, continuous hard driving or mountain driving) or if the vehicle is
operated in extremely humid climates, change the brake fluid annually.
*4: If the vehicle is operated in very dusty or sandy areas, clean and if necessary, replace the air cleaner element more
often than the recommended intervals.
*5: This is a full function check of electrical systems such as lights, wiper and washer systems (including wiper blades),
and power windows.
*6: If the vehicle is operated under any of the following conditions, change the rear differential oil
every 45,000 km (27,000 miles).
a. Towing a trailer or using a car - top carrier
b. Driving in dusty, sandy or wet condition
c. Extended periods of idling or low speed operation
d. Repeated short trips of less than 16 km (10 miles)
*7: If this component has been submerged in water, the oil should be changed.
Maintenance ItemMaintenance Interval (Number of months or km (miles), whichever comes first)
Months 6 121824303642485460667278849096
×1000 km
10 20 30 40 50 60 70 80 90 100 110 120 130 140 150 160
×1000 miles6.25 12.5 18.75 25 31.25 37.5 43.75 50 56.25 62.5 68.75 75 81.25 87.5 93.75 100
ENGINE
Engine valve clearance Unleaded fuel Audible inspect every 120,000 km (75,000 miles), if noisy, adjust
leaded fuel I I I I
Drive belts *2IIIIIIIIIIIIIIII
Engine oil *1RRRRRRRRRRRRRRRR
Engine oil filter *1RRRRRRRRRRRRRRRR
COOLING SYSTEM
Cooling system IIIIIIII
Engine coolant Replace every 2 years
FUEL SYSTEM
Air cleaner element *4CCRCCRCC
Fuel filter R R R R
Fuel lines and hoses IIIIIIII
IGNITION SYSTEM
Spark plugs Unleaded fuel Replace every 100,000 km (62,500 miles)
Leaded fuel IIIIIIII
EMISSION CONTROL SYSTEM
Idle mixture (leaded fuel) IIIIIIII
Page 20 of 909

GI–16
SCHEDULED MAINTENANCE
Evaporative system (if installed) IIIIIIII
ELECTRICAL SYSTEM
Battery electrolyte level and specific gravity IIIIIIII
All electrical system *5IIIIIIII
CHASSIS AND BODY
Brake lines, hoses and connections IIIIIIII
Brake fluid *3IIIRIIIRIIIRIIIR
Parking brake IIIIIIIIIIIIIIII
Power brake unit and hoses IIIIIIII
Disc brakes IIIIIIIIIIIIIIII
Power steering fluid, lines, hoses, and connections I I I I I I I I I I I I I I I I
Steering operation and linkages IIIIIIII
Manual transaxle oilR
Automatic transaxle fluid level IIIIIIII
Rear differential oil (for 4WD)
*6*7
Transfer oil (for 4WD)
*7
Front and rear suspension and ball joints I I I I
Driveshaft dust boots I I I I
Bolts and nuts on chassis and body TTTTTTTT
Exhaust system and heat shields Inspect every 80,000 km (50,000 miles)
Cabin air filter (if installed) RRRRRRRR
Body condition
(for rust, corrosion and perforation)Inspect annually
Tyres (including spare tyre)
(with inflation pressure adjustment)IIIIIIII Maintenance ItemMaintenance Interval (Number of months or km (miles), whichever comes first)
Months 6 121824303642485460667278849096
×1000 km
10 20 30 40 50 60 70 80 90 100 110 120 130 140 150 160
×1000 miles6.25 12.5 18.75 25 31.25 37.5 43.75 50 56.25 62.5 68.75 75 81.25 87.5 93.75 100
Page 21 of 909

SCHEDULED MAINTENANCE
GI–17
GI
Scheduled Maintenance Service (Specific Work Required)
•The specific work required for each maintenance item is listed in the following table. (Please refer to the section
applicable to the model serviced.)
For Europe (L.H.D. U.K.)
Bold frames: New item
Maintenance Item Specific Work Required
ENGINE
Engine valve clearance Measure clearance
Drive beltsInspect for wear, cracks and fraying, and check tension.
Replace drive belt.
Engine timing belt Replace engine timing belt.
Engine oil Replace engine oil and inspect for leakage.
Oil filter Replace oil filter and inspect for leakage.
COOLING SYSTEM
Cooling system
(including coolant level adjustment)Check coolant level and quality, and inspect for leakage.
Engine coolant Replace coolant.
FUEL SYSTEM
Air cleaner elementInspect for dirt, oil and damage.
Clean air cleaner element (by blowing air).
Replace air cleaner element.
Fuel filter Replace fuel filter.
Fuel lines and hoses Inspect for cracks, leakage and loose connection.
Fuel injection system (for MZR-CD (RF Turbo)) Update to injection amount correction with WDS. (see W/M)
IGNITION SYSTEM (FOR GASOLINE)
Spark plugsInspect for wear, damage, carbon, high-tension lead condition and measure
plug gap.
Replace spark plugs.
EMISSION CONTROL SYSTEM
Evaporative system (for gasoline)Check system operation (see W/M), vapor lines, vacuum fitting hoses and
connection.
E.G.R. system (MZR-CR (RF Turbo))Check system operation (see W/M), vacuum fitting hoses and connection.
Update to MAF correction for E.G.R control with WDS. (see W/M)
ELECTRICAL SYSTEM
Battery electrolyte level and specific gravity Check level and specific gravity.
CHASSIS AND BODY
Brake fluidCheck fluid level and inspect for leakage.
Replace brake fluid.
Brake lines, hoses and connectionsInspect for cracks, damage, chafing, corrosion, scars, swelling and fluid
leakage.
Parking brake Check lever stroke.
Power brake unit and hosesCheck vacuum lines, connections and check valve for improper attachment,
air tightness, cracks chafing and deterioration.
Disc brakesTest for judder and noise. Inspect caliper for correct operation and fluid
leakage, brake pads for wear. Check disc plate condition and thickness.
Power steering fluid and linesCheck fluid level and lines for improper attachment, leakage, cracks,
damage, loose connections, chafing and deterioration.
Power steering fluid Check fluid level.
Power steering system and hosesCheck lines for improper attachment, leakage, cracks, damage, loose
connections, chafing and deterioration.
Steering operation and gear housingCheck that the steering wheel has the specified play. Be sure to check for
changes, such as excessive play, hard steering or strange noises.
Check gear housing and boots for looseness, damage and grease/gear oil
leakage.
Steering linkages tie rod ends and armsCheck ball joint, dust cover and other components for looseness, wear,
damage and grease leakage.
Front and rear suspension and ball joints Inspect for grease leakage, cracks, damage and looseness.
Manual transmission/transaxle oilCheck oil level and inspect for leakage.
Replace manual transmission/transaxle oil.
Automatic transmission/transaxle fluid level Check fluid level.
Page 22 of 909

GI–18
SCHEDULED MAINTENANCE
End Of Sie
Rear differential oilCheck oil level and inspect for leakage.
Replace rear differential oil.
Transfer oil (for 4×4)Check oil level and inspect for leakage.
Replace transfer oil.
Driveshaft dust boots Inspect for grease leakage, cracks, damage and looseness.
Body condition
(for rust, corrosion and perforation)Inspect body surface for paint damage, rust, corrosion and perforation.
Exhaust system and heat shields Inspect for damage, corrosion, looseness of connections and gas leakage.
Tires
(including spare tire)
(with inflation pressure adjustment)Check air pressure and inspect tires for tread wear, damage and cracks;
and wheels for damage and corrosion.
AIR CONDITIONER SYSTEM (IF EQUIPPED)
Cabin air filter Replace cabin air filter.Maintenance Item Specific Work Required
Page 72 of 909
D–8
ENGINE OIL
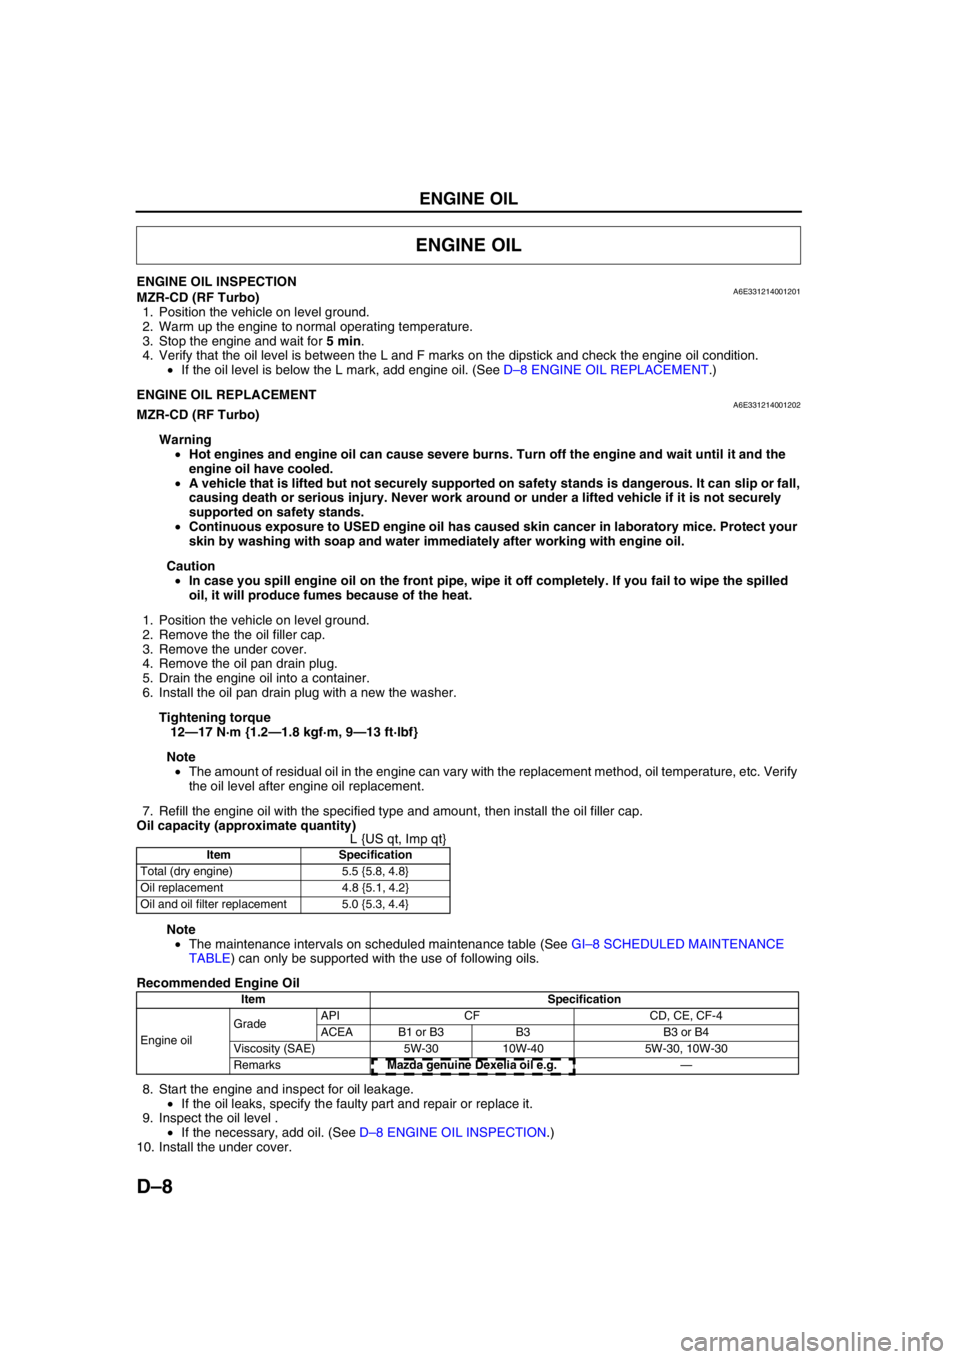
ENGINE OIL INSPECTIONA6E331214001201MZR-CD (RF Turbo)
1. Position the vehicle on level ground.
2. Warm up the engine to normal operating temperature.
3. Stop the engine and wait for 5 min.
4. Verify that the oil level is between the L and F marks on the dipstick and check the engine oil condition.
•If the oil level is below the L mark, add engine oil. (See D–8 ENGINE OIL REPLACEMENT.)
End Of SieENGINE OIL REPLACEMENTA6E331214001202MZR-CD (RF Turbo)
Warning
•Hot engines and engine oil can cause severe burns. Turn off the engine and wait until it and the
engine oil have cooled.
•A vehicle that is lifted but not securely supported on safety stands is dangerous. It can slip or fall,
causing death or serious injury. Never work around or under a lifted vehicle if it is not securely
supported on safety stands.
•Continuous exposure to USED engine oil has caused skin cancer in laboratory mice. Protect your
skin by washing with soap and water immediately after working with engine oil.
Caution
•In case you spill engine oil on the front pipe, wipe it off completely. If you fail to wipe the spilled
oil, it will produce fumes because of the heat.
1. Position the vehicle on level ground.
2. Remove the the oil filler cap.
3. Remove the under cover.
4. Remove the oil pan drain plug.
5. Drain the engine oil into a container.
6. Install the oil pan drain plug with a new the washer.
Tightening torque
12—17 N·m {1.2—1.8 kgf·m, 9—13 ft·lbf}
Note
•The amount of residual oil in the engine can vary with the replacement method, oil temperature, etc. Verify
the oil level after engine oil replacement.
7. Refill the engine oil with the specified type and amount, then install the oil filler cap.
Oil capacity (approximate quantity)
L {US qt, Imp qt}
Note
•The maintenance intervals on scheduled maintenance table (See GI–8 SCHEDULED MAINTENANCE
TABLE) can only be supported with the use of following oils.
Recommended Engine Oil
8. Start the engine and inspect for oil leakage.
•If the oil leaks, specify the faulty part and repair or replace it.
9. Inspect the oil level .
•If the necessary, add oil. (See D–8 ENGINE OIL INSPECTION.)
10. Install the under cover.
End Of Sie
ENGINE OIL
Item Specification
Total (dry engine) 5.5 {5.8, 4.8}
Oil replacement 4.8 {5.1, 4.2}
Oil and oil filter replacement 5.0 {5.3, 4.4}
Item Specification
Engine oil GradeAPI CF CD, CE, CF-4
ACEA B1 or B3 B3 B3 or B4
Viscosity (SAE) 5W-30 10W-40 5W-30, 10W-30
RemarksMazda genuine Dexelia oil e.g. —
Page 109 of 909
CONTROL SYSTEM
F1–21
F1
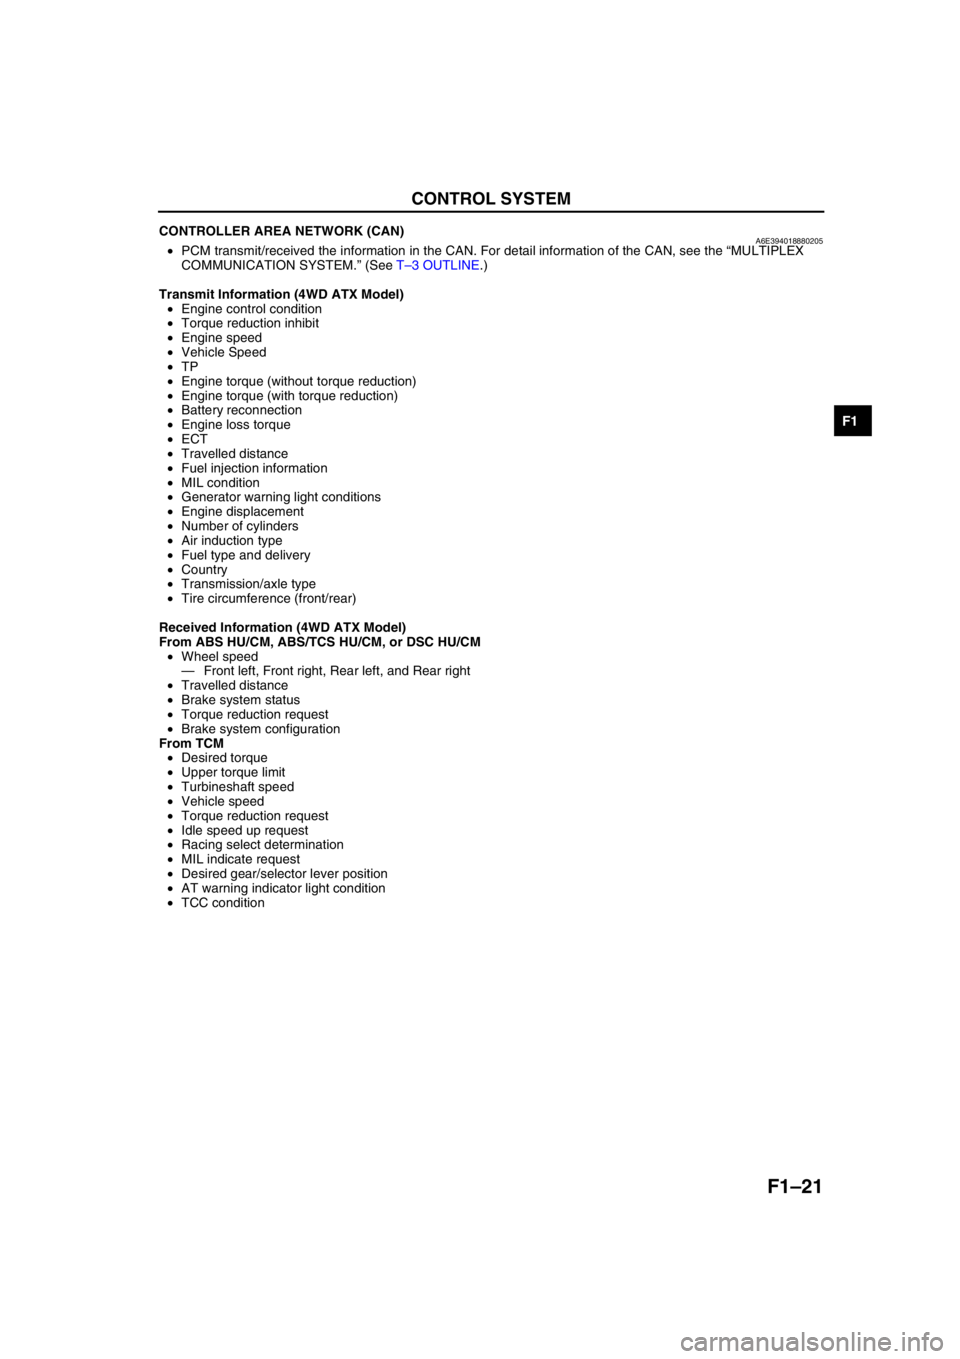
CONTROLLER AREA NETWORK (CAN)A6E394018880205•PCM transmit/received the information in the CAN. For detail information of the CAN, see the “MULTIPLEX
COMMUNICATION SYSTEM.” (See T–3 OUTLINE.)
Transmit Information (4WD ATX Model)
•Engine control condition
•Torque reduction inhibit
•Engine speed
•Vehicle Speed
•TP
•Engine torque (without torque reduction)
•Engine torque (with torque reduction)
•Battery reconnection
•Engine loss torque
•ECT
•Travelled distance
•Fuel injection information
•MIL condition
•Generator warning light conditions
•Engine displacement
•Number of cylinders
•Air induction type
•Fuel type and delivery
•Country
•Transmission/axle type
•Tire circumference (front/rear)
Received Information (4WD ATX Model)
From ABS HU/CM, ABS/TCS HU/CM, or DSC HU/CM
•Wheel speed
—Front left, Front right, Rear left, and Rear right
•Travelled distance
•Brake system status
•Torque reduction request
•Brake system configuration
From TCM
•Desired torque
•Upper torque limit
•Turbineshaft speed
•Vehicle speed
•Torque reduction request
•Idle speed up request
•Racing select determination
•MIL indicate request
•Desired gear/selector lever position
•AT warning indicator light condition
•TCC condition
End Of Sie
Page 123 of 909
CONTROL SYSTEM
F1–35
F1
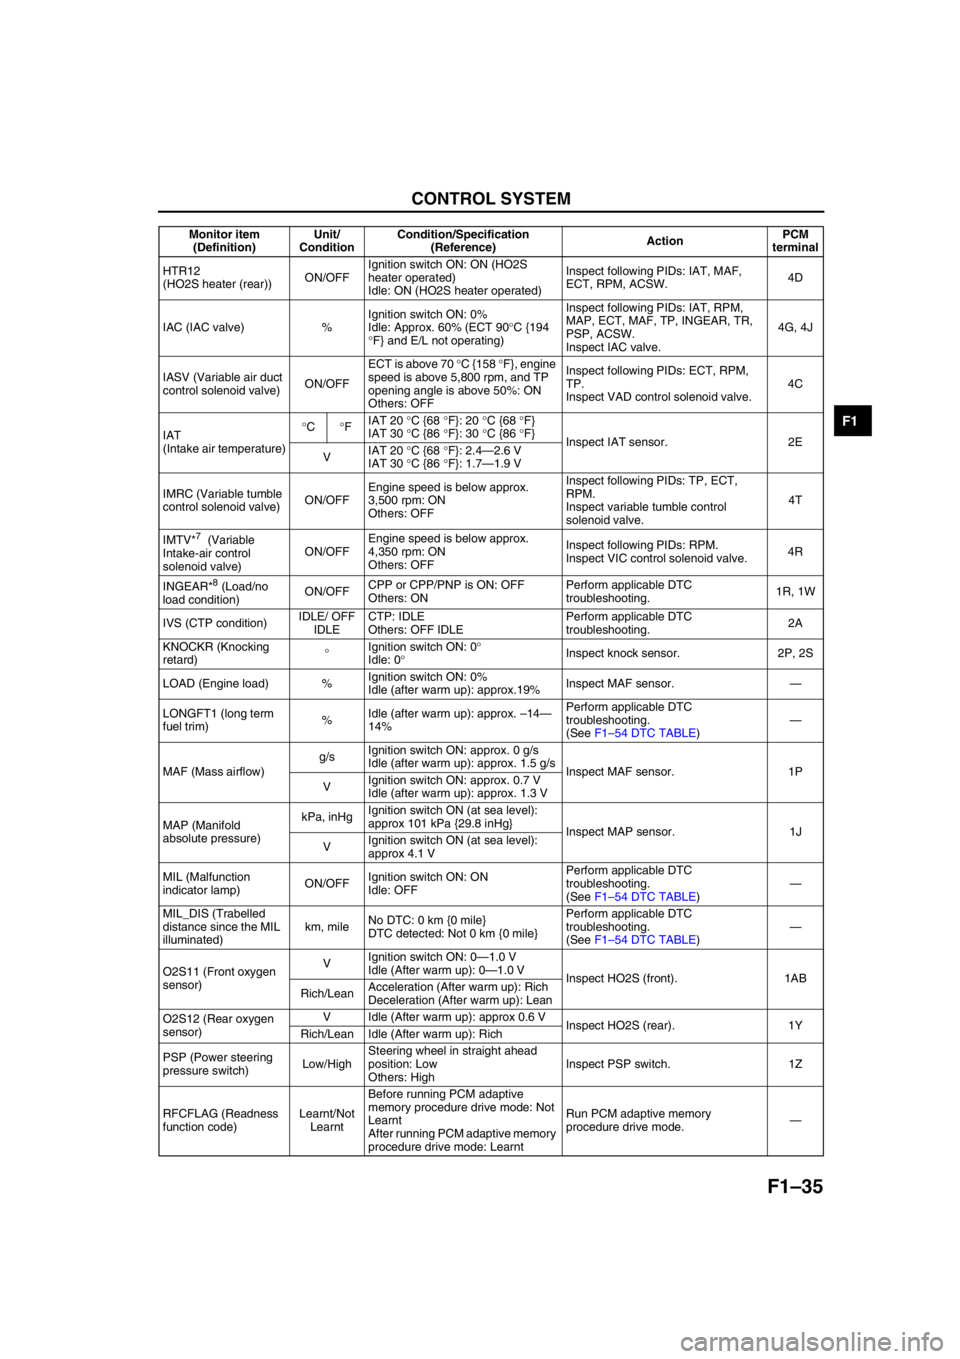
HTR12
(HO2S heater (rear))ON/OFFIgnition switch ON: ON (HO2S
heater operated)
Idle: ON (HO2S heater operated)Inspect following PIDs: IAT, MAF,
ECT, RPM, ACSW.4D
IAC (IAC valve) %Ignition switch ON: 0%
Idle: Approx. 60% (ECT 90°C {194
°F} and E/L not operating) Inspect following PIDs: IAT, RPM,
MAP, ECT, MAF, TP, INGEAR, TR,
PSP, ACSW.
Inspect IAC valve.4G, 4J
IASV (Variable air duct
control solenoid valve)ON/OFFECT is above 70 °C {158 °F}, engine
speed is above 5,800 rpm, and TP
opening angle is above 50%: ON
Others: OFFInspect following PIDs: ECT, RPM,
TP.
Inspect VAD control solenoid valve.4C
IAT
(Intake air temperature)°C°FIAT 20 °C {68 °F}: 20 °C {68 °F}
IAT 30 °C {86 °F}: 30 °C {86 °F}
Inspect IAT sensor. 2E
VIAT 20 °C {68 °F}: 2.4—2.6 V
IAT 30 °C {86 °F}: 1.7—1.9 V
IMRC (Variable tumble
control solenoid valve)ON/OFFEngine speed is below approx.
3,500 rpm: ON
Others: OFFInspect following PIDs: TP, ECT,
RPM.
Inspect variable tumble control
solenoid valve.4T
IMTV*
7 (Variable
Intake-air control
solenoid valve)ON/OFFEngine speed is below approx.
4,350 rpm: ON
Others: OFFInspect following PIDs: RPM.
Inspect VIC control solenoid valve.4R
INGEAR*
8 (Load/no
load condition)ON/OFFCPP or CPP/PNP is ON: OFF
Others: ONPerform applicable DTC
troubleshooting.1R, 1W
IVS (CTP condition)IDLE/ OFF
IDLECTP: IDLE
Others: OFF IDLEPerform applicable DTC
troubleshooting.2A
KNOCKR (Knocking
retard)°Ignition switch ON: 0°
Idle: 0°Inspect knock sensor. 2P, 2S
LOAD (Engine load) %Ignition switch ON: 0%
Idle (after warm up): approx.19%Inspect MAF sensor.—
LONGFT1 (long term
fuel trim)%Idle (after warm up): approx. –14—
14%Perform applicable DTC
troubleshooting.
(See F1–54 DTC TABLE)—
MAF (Mass airflow)g/sIgnition switch ON: approx. 0 g/s
Idle (after warm up): approx. 1.5 g/s
Inspect MAF sensor. 1P
VIgnition switch ON: approx. 0.7 V
Idle (after warm up): approx. 1.3 V
MAP (Manifold
absolute pressure)kPa, inHgIgnition switch ON (at sea level):
approx 101 kPa {29.8 inHg}
Inspect MAP sensor. 1J
VIgnition switch ON (at sea level):
approx 4.1 V
MIL (Malfunction
indicator lamp)ON/OFFIgnition switch ON: ON
Idle: OFFPerform applicable DTC
troubleshooting.
(See F1–54 DTC TABLE)—
MIL_DIS (Trabelled
distance since the MIL
illuminated)km, mileNo DTC: 0 km {0 mile}
DTC detected: Not 0 km {0 mile}Perform applicable DTC
troubleshooting.
(See F1–54 DTC TABLE)—
O2S11 (Front oxygen
sensor)VIgnition switch ON: 0—1.0 V
Idle (After warm up): 0—1.0 V
Inspect HO2S (front). 1AB
Rich/LeanAcceleration (After warm up): Rich
Deceleration (After warm up): Lean
O2S12 (Rear oxygen
sensor)V Idle (After warm up): approx 0.6 V
Inspect HO2S (rear). 1Y
Rich/Lean Idle (After warm up): Rich
PSP (Power steering
pressure switch)Low/HighSteering wheel in straight ahead
position: Low
Others: HighInspect PSP switch. 1Z
RFCFLAG (Readness
function code)Learnt/Not
LearntBefore running PCM adaptive
memory procedure drive mode: Not
Learnt
After running PCM adaptive memory
procedure drive mode: LearntRun PCM adaptive memory
procedure drive mode.— Monitor item
(Definition)Unit/
ConditionCondition/Specification
(Reference)ActionPCM
terminal
Page 139 of 909

ON-BOARD DIAGNOSTIC
F1–51
F1
P0112 IAT circuit low input ON 1 CCM×
P0113 IAT circuit high input ON 1 CCM×
P0117 ECT circuit low input ON 1 CCM×
P0118 ECT circuit high input ON 1 CCM×
P0121 TP stuck closed ON 2 CCM×
P0122 TP circuit low input ON 1 CCM×
P0123 TP circuit high input ON 1 CCM×
P0125 Excessive time to enter closed loop fuel control ON 2 CCM×
P0131 Front HO2S no inversion (stuck low) ON 2 CCM×
P0132 Front HO2S no inversion (stuck high) ON 2 CCM×
P0133 Front HO2S circuit malfunction ON 2O
2 sensor
×
P0134 Front HO2S circuit no activity detected ON 2 CCM×
P0138 Rear HO2S circuit high input ON 2 CCM×
P0140 Rear HO2S circuit no activity detected ON 2 CCM×
P0171 Fuel trim system too lean ON 2 Fuel×
P0172 Fuel trim system too rich ON 2 Fuel×
P0300 Random misfire detected Flash / ON 1 or 2 Misfire×
P0301 Cylinder No.1 misfire detected Flash / ON 1 or 2 Misfire×
P0302 Cylinder No.2 misfire detected Flash / ON 1 or 2 Misfire×
P0303 Cylinder No.3 misfire detected Flash / ON 1 or 2 Misfire×
P0304 Cylinder No.4 misfire detected Flash / ON 1 or 2 Misfire×
P0327 Knock sensor circuit low input ON 1 CCM×
P0328 Knock sensor circuit high input ON 1 CCM×
P0335 CKP sensor circuit malfunction ON 1 CCM×
P0340 CMP sensor circuit malfunction ON 1 CCM×
P0403 EGR valve motor coils open or short ON 2 CCM×
P0420 Catalyst system efficiency below threshold ON 2 Catalyst×
P0443Evaporative emission control system purge control
valve circuit malfunctionON 2 CCM×
P0480 Fan relay control circuit malfunction OFF 2 Other×
P0500 Vehicle speed sensor (VSS) circuit malfunction ON 2 CCM×
P0505 Idle control system malfunction OFF—Other—
P0506 Idle control system RPM lower than expected ON 2 CCM×
P0507 Idle control system RPM higher than expected ON 2 CCM×
P0511 Idle control system circuit malfunction ON 1 CCM×
P0550 PSP switch circuit malfunction ON 2 CCM×
P0602 PCM programming error ON 1 CCM×
P0610 Control module vehicle options error ON 1 CCM×
P0661 VIS control circuit low input OFF 2 Other×
P0662 VIS control circuit high input OFF 2 Other×
P0703 Brake switch input malfunction ON 2 CCM×
P0704 Clutch switch input malfunction ON 2 CCM×
P0850 Neutral switch input malfunction ON 2 CCM×
P1410 Variable air duct valve circuit malfunction OFF 2 Other×
P1562 PCM +BB voltage low ON 1 CCM×
P2006 Variable tumble control shutter valve stuck closed ON 2 CCM×
P2009 Variable tumble control solenoid circuit low input ON 2 CCM×
P2010 Variable tumble control solenoid circuit high input ON 2 CCM×
P2228 BARO sensor circuit low input ON 1 CCM×
P2229 BARO sensor circuit high input ON 1 CCM×
P2502 Generator output voltage signal no electricity OFF 1 Other—
P2503 Battery overcharge OFF 1 Other—
P2504 Generator terminal B circuit open OFF 1 Other—
U0073 CAN bus off OFF 1 Other— DTC No. Condition MIL DC Monitor itemMemory
function
Page 140 of 909
F1–52
ON-BOARD DIAGNOSTIC
End Of Sie
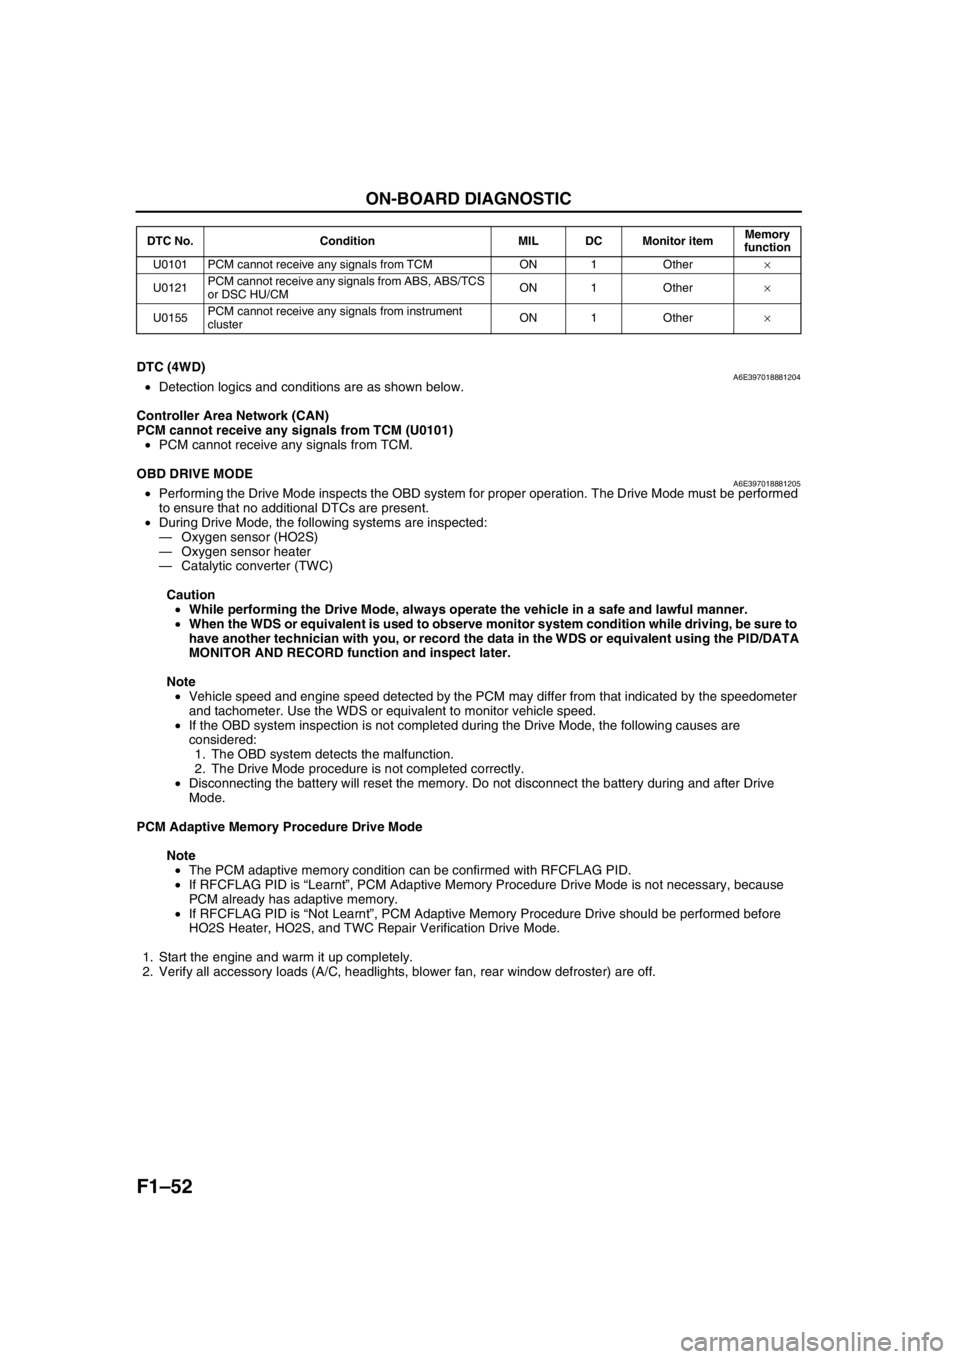
DTC (4WD)A6E397018881204•Detection logics and conditions are as shown below.
Controller Area Network (CAN)
PCM cannot receive any signals from TCM (U0101)
•PCM cannot receive any signals from TCM.
End Of Sie
OBD DRIVE MODEA6E397018881205•Performing the Drive Mode inspects the OBD system for proper operation. The Drive Mode must be performed
to ensure that no additional DTCs are present.
•During Drive Mode, the following systems are inspected:
—Oxygen sensor (HO2S)
—Oxygen sensor heater
—Catalytic converter (TWC)
Caution
•While performing the Drive Mode, always operate the vehicle in a safe and lawful manner.
•When the WDS or equivalent is used to observe monitor system condition while driving, be sure to
have another technician with you, or record the data in the WDS or equivalent using the PID/DATA
MONITOR AND RECORD function and inspect later.
Note
•Vehicle speed and engine speed detected by the PCM may differ from that indicated by the speedometer
and tachometer. Use the WDS or equivalent to monitor vehicle speed.
•If the OBD system inspection is not completed during the Drive Mode, the following causes are
considered:
1. The OBD system detects the malfunction.
2. The Drive Mode procedure is not completed correctly.
•Disconnecting the battery will reset the memory. Do not disconnect the battery during and after Drive
Mode.
PCM Adaptive Memory Procedure Drive Mode
Note
•The PCM adaptive memory condition can be confirmed with RFCFLAG PID.
•If RFCFLAG PID is “Learnt”, PCM Adaptive Memory Procedure Drive Mode is not necessary, because
PCM already has adaptive memory.
•If RFCFLAG PID is “Not Learnt”, PCM Adaptive Memory Procedure Drive should be performed before
HO2S Heater, HO2S, and TWC Repair Verification Drive Mode.
1. Start the engine and warm it up completely.
2. Verify all accessory loads (A/C, headlights, blower fan, rear window defroster) are off.
U0101 PCM cannot receive any signals from TCM ON 1 Other×
U0121PCM cannot receive any signals from ABS, ABS/TCS
or DSC HU/CMON 1 Other×
U0155PCM cannot receive any signals from instrument
clusterON 1 Other× DTC No. Condition MIL DC Monitor itemMemory
function
Page 141 of 909
ON-BOARD DIAGNOSTIC
F1–53
F1
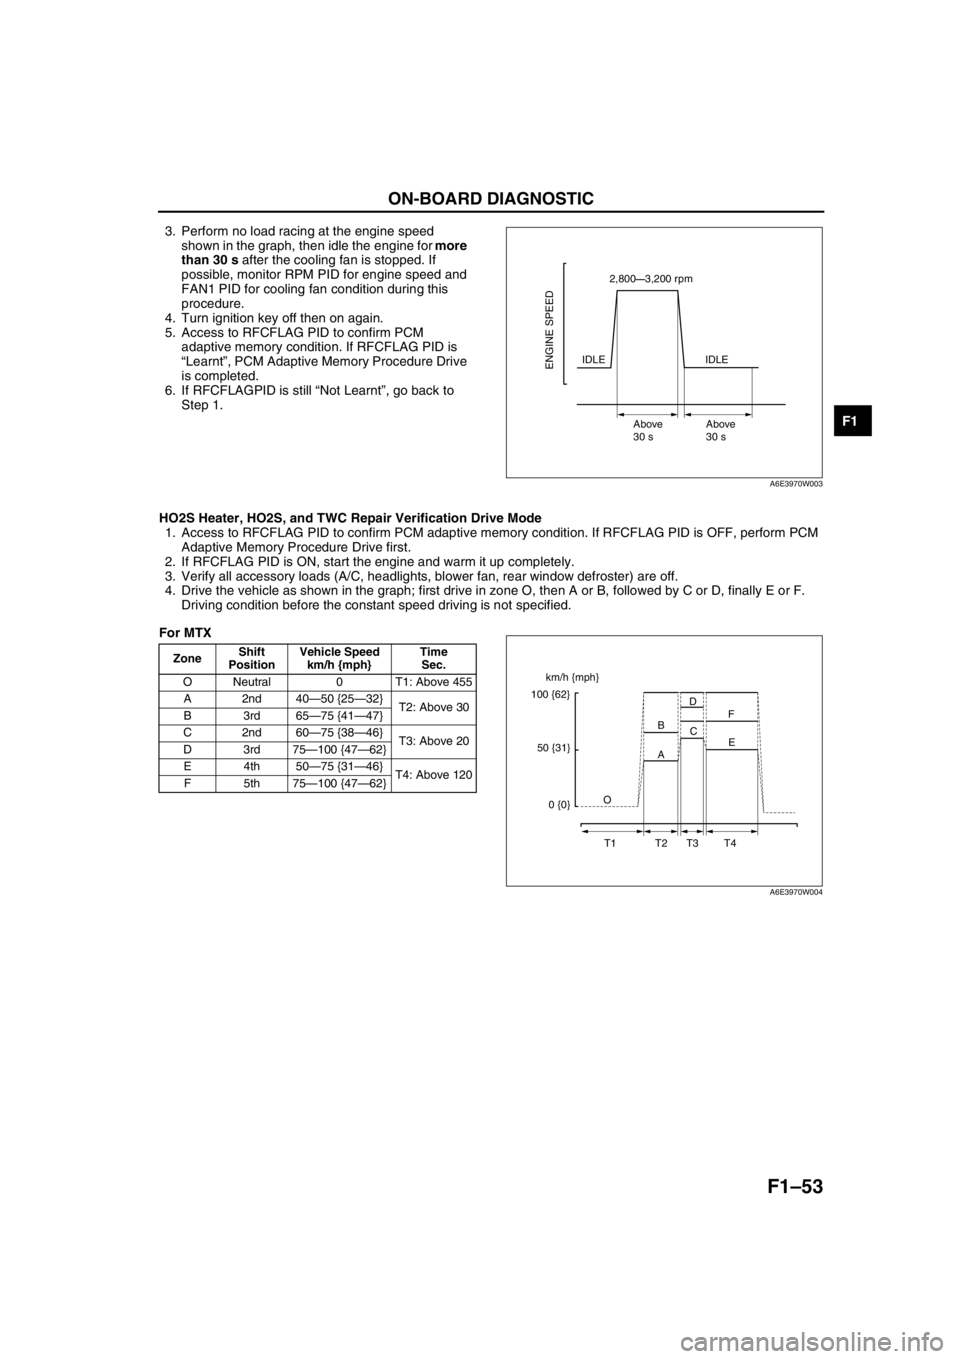
3. Perform no load racing at the engine speed
shown in the graph, then idle the engine for more
than 30 s after the cooling fan is stopped. If
possible, monitor RPM PID for engine speed and
FAN1 PID for cooling fan condition during this
procedure.
4. Turn ignition key off then on again.
5. Access to RFCFLAG PID to confirm PCM
adaptive memory condition. If RFCFLAG PID is
“Learnt”, PCM Adaptive Memory Procedure Drive
is completed.
6. If RFCFLAGPID is still “Not Learnt”, go back to
Step 1.
HO2S Heater, HO2S, and TWC Repair Verification Drive Mode
1. Access to RFCFLAG PID to confirm PCM adaptive memory condition. If RFCFLAG PID is OFF, perform PCM
Adaptive Memory Procedure Drive first.
2. If RFCFLAG PID is ON, start the engine and warm it up completely.
3. Verify all accessory loads (A/C, headlights, blower fan, rear window defroster) are off.
4. Drive the vehicle as shown in the graph; first drive in zone O, then A or B, followed by C or D, finally E or F.
Driving condition before the constant speed driving is not specified.
For MTX
2,800—3,200 rpm
IDLE
Above
30 sAbove
30 s
ENGINE SPEEDIDLE
A6E3970W003
ZoneShift
PositionVehicle Speed
km/h {mph}Time
Sec.
O Neutral 0 T1: Above 455
A2nd40—50 {25—32}
T2: Above 30
B3rd65—75 {41—47}
C2nd60—75 {38—46}
T3: Above 20
D3rd75—100 {47—62}
E4th50—75 {31—46}
T4: Above 120
F5th75—100 {47—62}
km/h {mph}
100 {62}
50 {31}
0 {0}O
T1 T2 T3 T4A BD
C
E F
A6E3970W004