clutch MAZDA 6 2002 Workshop Manual Suplement
[x] Cancel search | Manufacturer: MAZDA, Model Year: 2002, Model line: 6, Model: MAZDA 6 2002Pages: 909, PDF Size: 17.16 MB
Page 1 of 909
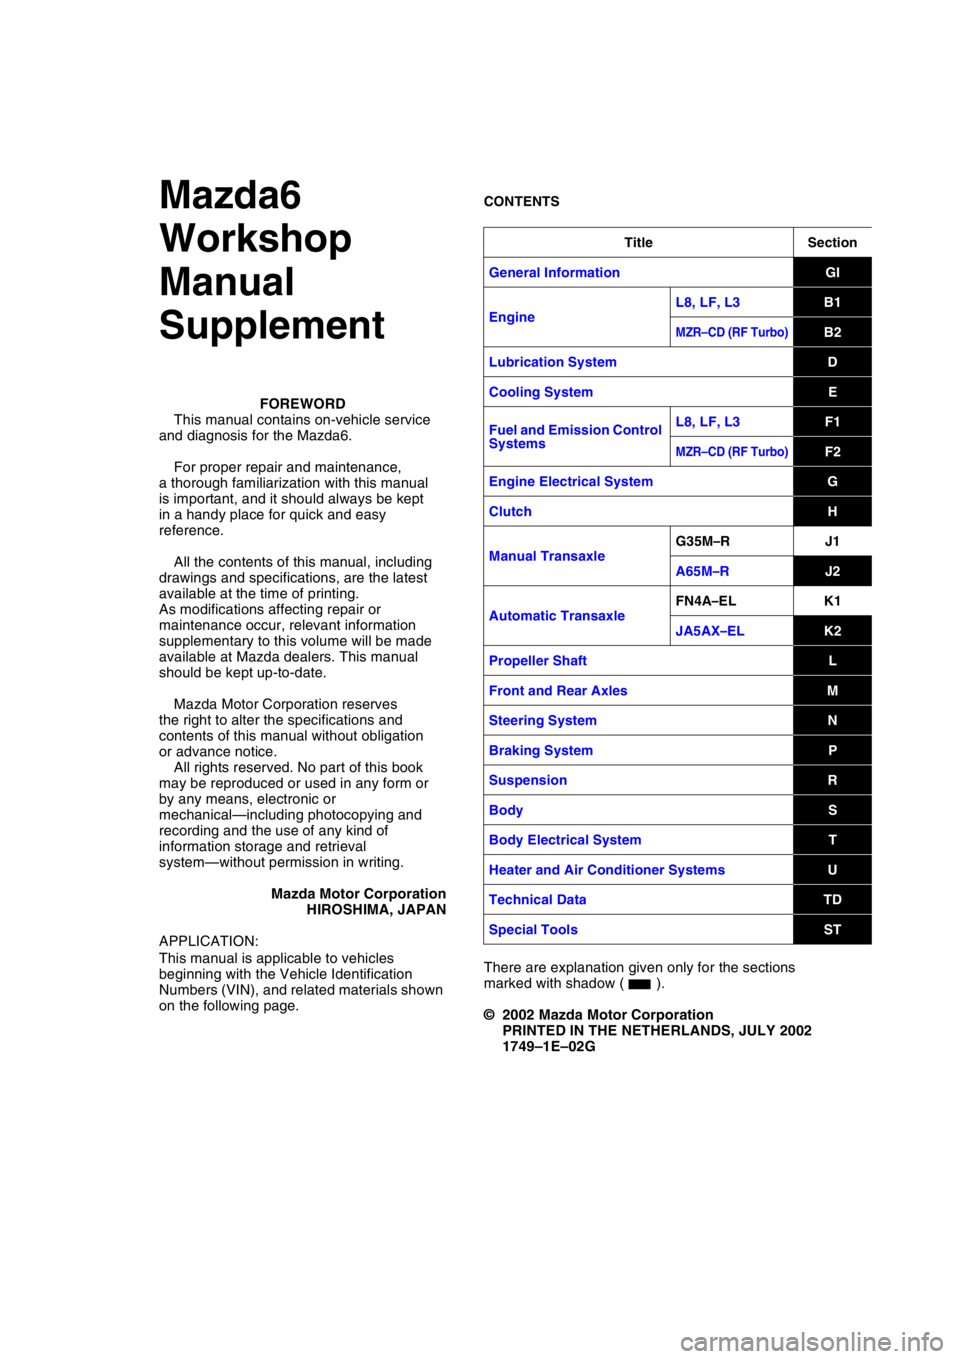
CONTENTSMazda6
Workshop
Manual
Supplement
FOREWORD
This manual contains on-vehicle service
and diagnosis for the Mazda6.
For proper repair and maintenance,
a thorough familiarization with this manual
is important, and it should always be kept
in a handy place for quick and easy
reference.
All the contents of this manual, including
drawings and specifications, are the latest
available at the time of printing.
As modifications affecting repair or
maintenance occur, relevant information
supplementary to this volume will be made
available at Mazda dealers. This manual
should be kept up-to-date.
Mazda Motor Corporation reserves
the right to alter the specifications and
contents of this manual without obligation
or advance notice.
All rights reserved. No part of this book
may be reproduced or used in any form or
by any means, electronic or
mechanical—including photocopying and
recording and the use of any kind of
information storage and retrieval
system—without permission in writing.
Mazda Motor Corporation
HIROSHIMA, JAPAN
APPLICATION:
This manual is applicable to vehicles
beginning with the Vehicle Identification
Numbers (VIN), and related materials shown
on the following page.There are explanation given only for the sections
marked with shadow ( ).
© 2002 Mazda Motor Corporation
PRINTED IN THE NETHERLANDS, JULY 2002
1749–1E–02G
Title Section
General Information
GI
EngineL8, LF, L3
B1
MZR–CD (RF Turbo)B2
Lubrication System
D
Cooling System
E
Fuel and Emission Control
SystemsL8, LF, L3
F1
MZR–CD (RF Turbo)F2
Engine Electrical System
G
Clutch
H
Manual TransaxleG35M
–RJ1
A65M
–RJ2
Automatic TransaxleFN4A
–ELK1
JA5AX
–ELK2
Propeller Shaft
L
Front and Rear Axles
M
Steering System
N
Braking System
P
Suspension
R
Body
S
Body Electrical System
T
Heater and Air Conditioner Systems
U
Technical Data
TD
Special Tools
ST
Page 7 of 909

GI–4
FUNDAMENTAL PROCEDURES
DYNAMOMETERA6E2014000042174WD testing/servicing
•Brake tester
Caution
•
To ensure the stability of the drag force of the viscous coupling always perform a brake test after
using the dynamometer or speed meter tester.
Note
•If there is a great amount of brake drag, it is probably due to the viscosity of the viscous coupling or the
center differential (RBC). To remove the influence of the coupling, jack up all four wheels of the vehicle
and verify that each wheel can be rotated freely by hand.
•Chassis dynamometer/speed meter tester
Caution
•
The vehicle may sway or surge forward when on the dynamometer. To prevent possible vehicle
movement, firmly secure it in place using steel retainers (chain, wire or similar) attached to the
front and rear towing hooks or to the tie down hooks.
•
Do not pop the clutch.
•
Do not accelerate suddenly.
Note
•The dynamometer/speed meter tester has two setting modes: propeller shaft removed mode and free
roller mode. After placing the vehicle on the tester and setting the wheels on the free rollers, start the
engine. For MTX vehicles, set the shift lever into second gear and gently, at low idle speed, release the
clutch pedal. For ATX vehicles, set the selector lever to D range, and slowly accelerate.
End Of Sie
FUNDAMENTAL PROCEDURES
Page 8 of 909

NEW STANDARDS
GI–5
GINEW STANDARDS TABLEA6E202800020201•The following is a comparison of the previous standard and the new standard.
NEW STANDARDS
New Standard Previous Standard
Remark
Abbrevi-
ationNameAbbrevi-
ationName
AP Accelerator Pedal—Accelerator Pedal
ACL Air Cleaner—Air Cleaner
A/C Air Conditioning—Air Conditioning
BARO Barometric Pressure—Atmospheric Pressure
B+ Battery Positive VoltageV
BBattery Voltage
—Brake Switch—Stoplight Switch
—Calibration Resistor—Corrected Resistance #6
CMP sensor Camshaft Position Sensor—Crank Angle Sensor
CAC Charge Air Cooler—Intercooler
CLS Closed Loop System—Feedback System
CTP Closed Throttle Position—Fully Closed
—Closed Throttle Position Switch—Idle Switch
CPP Clutch Pedal Position—Clutch Position
CIS Continuous Fuel Injection System EGI Electronic Gasoline Injection System
CS sensor Control Sleeve Sensor CSP sensor Control Sleeve Position Sensor #6
CKP sensor Crankshaft Position Sensor—Crank Angle Sensor 2
DLC Data Link Connector—Diagnosis Connector
DTM Diagnostic Test Mode—Test Mode #1
DTC Diagnostic Trouble Code—Service Code(s)
DI Distributor Ignition—Spark Ignition
DLI Distributorless Ignition—Direct Ignition
EI Electronic Ignition—Electronic Spark Ignition #2
ECT Engine Coolant Temperature—Water Thermo
EM Engine Modification—Engine Modification
—Engine Speed Input Signal—Engine RPM Signal
EVAP Evaporative Emission—Evaporative Emission
EGR Exhaust Gas Recirculation—Exhaust Gas Recirculation
FC Fan Control—Fan Control
FF Flexible Fuel—Flexible Fuel
4GR Fourth Gear—Overdrive
—Fuel Pump Relay—Circuit Opening Relay #3
FSO
solenoidFuel Shut Off Solenoid FCV Fuel Cut Valve #6
GEN Generator—Alternator
GND Ground—Ground/Earth
HO2S Heated Oxygen Sensor—Oxygen Sensor With heater
IAC Idle Air Control—Idle Speed Control
—IDM Relay—Spill Valve Relay #6
—Incorrect Gear Ratio——
—Injection Pump FIP Fuel Injection Pump #6
—Input/Turbine Speed Sensor—Pulse Generator
IAT Intake Air Temperature—Intake Air Thermo
KS Knock Sensor—Knock Sensor
MIL Malfunction Indicator Lamp—Malfunction Indicator Light
MAP Manifold Absolute Pressure—Intake Air Pressure
MAF sensor Mass Air Flow Sensor—Airflow Sensor
MFI Multiport Fuel Injection—Multiport Fuel Injection
OBD On Board Diagnostic—Diagnosis/Self Diagnosis
Page 9 of 909

GI–6
NEW STANDARDS
#1 : Diagnostic trouble codes depend on the diagnostic test mode.
#2 : Controlled by the PCM
#3 : In some models, there is a fuel pump relay that controls pump speed. That relay is now called the fuel pump
relay (speed).
#4 : Device that controls engine and powertrain
#5 : Directly connected to exhaust manifold
#6 : Part name of diesel engine
End Of Sie
OL Open Loop—Open Loop
—Output Speed Sensor—Vehicle Speed Sensor 1
OC Oxidation Catalytic Converter—Catalytic Converter
O2S Oxygen Sensor—Oxygen Sensor
PNP Park/Neutral Position—Park/Neutral Range
—PCM Control Relay—Main Relay #6
PSP Power Steering Pressure—Power Steering Pressure
PCM Powertrain Control Module ECU Engine Control Unit #4
—Pressure Control Solenoid—Line Pressure Solenoid Valve
PAIR Pulsed Secondary Air Injection—Secondary Air Injection SystemPulsed
injection
—Pump Speed Sensor—NE Sensor #6
AIR Secondary Air Injection—Secondary Air Injection SystemInjection
with air
pump
SAPV Secondary Air Pulse Valve—Reed Valve
SFI Sequential Multiport Fuel Injection—Sequential Fuel Injection
—Shift Solenoid A—1–2 Shift Solenoid Valve
—Shift A Solenoid Valve
—Shift Solenoid B—2–3 Shift Solenoid Valve
—Shift B Solenoid Valve
—Shift Solenoid C—3–4 Shift Solenoid Valve
3GR Third Gear—3rd Gear
TWC Three Way Catalytic Converter—Catalytic Converter
TB Throttle Body—Throttle Body
TP sensor Throttle Position Sensor—Throttle Sensor
TCV Timer Control Valve TCV Timing Control Valve #6
TCC Torque Converter Clutch—Lockup Position
TCMTransmission (Transaxle) Control
Module—EC-AT Control Unit
—Transmission (Transaxle) Fluid
Temperature Sensor—ATF Thermosensor
TR Transmission (Transaxle) Range—Inhibitor Position
TC Turbocharger—Turbocharger
VSS Vehicle Speed Sensor—Vehicle Speed Sensor
VR Voltage Regulator—IC Regulator
VAF sensor Volume Air Flow Sensor —Airflow Meter
WU-TWCWarm Up Three Way Catalytic
Converter—Catalytic Converter #5
WOT Wide Open Throttle—Fully Open New Standard Previous Standard
Remark
Abbrevi-
ationNameAbbrevi-
ationName
Page 10 of 909
ABBREVIATIONS
GI–7
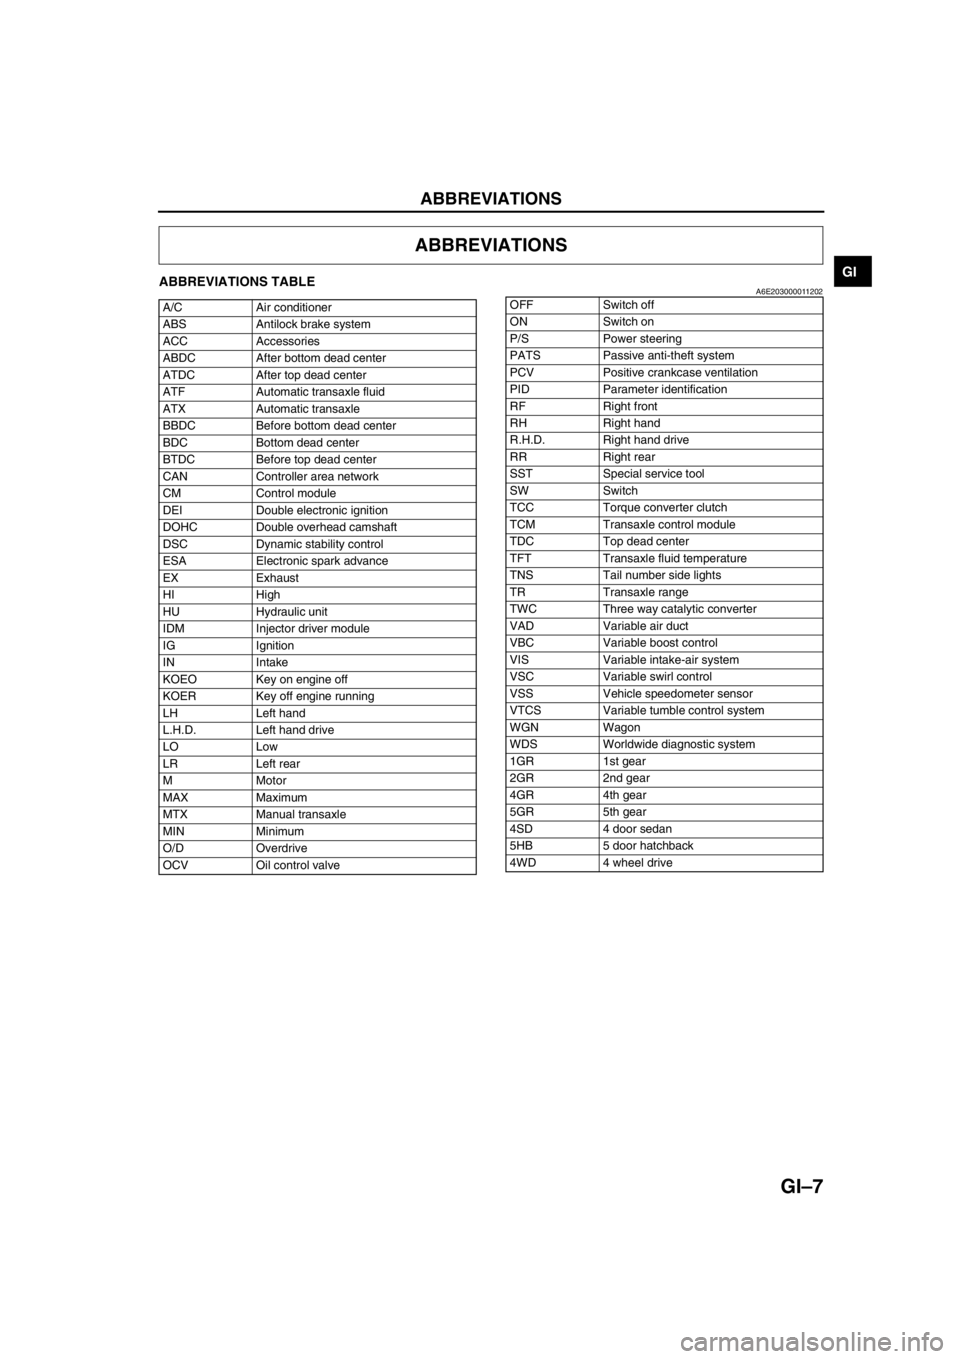
GIABBREVIATIONS TABLEA6E203000011202
End Of Sie
ABBREVIATIONS
A/C Air conditioner
ABS Antilock brake system
ACC Accessories
ABDC After bottom dead center
ATDC After top dead center
ATF Automatic transaxle fluid
ATX Automatic transaxle
BBDC Before bottom dead center
BDC Bottom dead center
BTDC Before top dead center
CAN Controller area network
CM Control module
DEI Double electronic ignition
DOHC Double overhead camshaft
DSC Dynamic stability control
ESA Electronic spark advance
EX Exhaust
HI High
HU Hydraulic unit
IDM Injector driver module
IG Ignition
IN Intake
KOEO Key on engine off
KOER Key off engine running
LH Left hand
L.H.D. Left hand drive
LO Low
LR Left rear
M Motor
MAX Maximum
MTX Manual transaxle
MIN Minimum
O/D Overdrive
OCV Oil control valveOFF Switch off
ON Switch on
P/S Power steering
PATS Passive anti-theft system
PCV Positive crankcase ventilation
PID Parameter identification
RF Right front
RH Right hand
R.H.D. Right hand drive
RR Right rear
SST Special service tool
SW Switch
TCC Torque converter clutch
TCM Transaxle control module
TDC Top dead center
TFT Transaxle fluid temperature
TNS Tail number side lights
TR Transaxle range
TWC Three way catalytic converter
VAD Variable air duct
VBC Variable boost control
VIS Variable intake-air system
VSC Variable swirl control
VSS Vehicle speedometer sensor
VTCS Variable tumble control system
WGN Wagon
WDS Worldwide diagnostic system
1GR 1st gear
2GR 2nd gear
4GR 4th gear
5GR 5th gear
4SD 4 door sedan
5HB 5 door hatchback
4WD 4 wheel drive
Page 13 of 909

GI–10
SCHEDULED MAINTENANCE
For Israel
Chart symbols:
I : Inspect and clean, repair, adjust, or replace if necessary.
R:Replace
C : Clean
Remarks:
•To ensure efficient operation of the engine and all systems related to emission control, the ignition and fuel systems must
be serviced regularly. It is strongly recommended that all servicing related to these systems be done by an authorized
Mazda Dealer.
•After the described period, continue to follow the described maintenance at the recommended intervals.
•Refer below for a description of items marked* in the maintenance chart.
*1: If the vehicle is operated under any of the following conditions, change the engine oil and oil filter every 10,000 km
(6,000 miles) or shorter.
a. Driving in dusty conditions.
b. Extended periods of idling or low speed operation.
c. Driving for long period in cold temperatures or driving regularly at short distance only.
*2: Also inspect and adjust the power steering and air conditioner drive belts, if installed.
*3: If the brakes are used extensively (for example, continuous hard driving or mountain driving) or if the vehicle is
operated in extremely humid climates, change the brake fluid annually.
*4: If the vehicle is operated in very dusty or sandy areas, clean and if necessary, replace the air cleaner element more
often than the recommended intervals.
*5: This is a full function check of electrical systems such as lights, wiper and washer systems (including wiper blades),
and power windows.
Maintenance ItemMaintenance Interval (Number of months or km (miles), whichever comes first)
Months 12 24 36 48 60 72 84 96 108 120 132 144
×1000 km 15 30 45 60 75 90 105 120 135 150 165 180
×1000 miles 9 18 27 36 45 54 63 72 81 90 99 108
ENGINE
Drive belts *2IIIIIIIIIII I
Engine oil *1RRRRRRRRRRR R
Engine oil filter *1RRRRRRRRRRR R
COOLING SYSTEM
Cooling system
(Including coolant level adjustment)IIIII I
Engine coolantReplace at first 4 years or 90,000 km (54,000 miles);
after that, every 2 years
FUEL SYSTEM
Air cleaner element *4CCCRCCCRCCC R
Fuel filter R R
Fuel lines & hoses IIIII I
IGNITION SYSTEM
Spark plugs Replace every 90,000 km (54,000 miles)
EMISSION CONTROL SYSTEM
Evaporative system I I I
E.G.R. system (if installed) I I I
ELECTRICAL SYSTEM
Battery electrolyte level & specific gravity I I I I I I I I I I I I
All electrical system *5IIIIIIIIIII I
CHASSIS & BODY
Brake & clutch pedals IIIIIIIIIII I
Brake lines, hoses & connections I I I I I I I I I I I I
Brake fluid *3IRIRIRIRIRI R
Parking brake IIIIIIIIIII I
Power brake unit & hoses IIIIIIIIIII I
Disc brakes IIIIIIIIIII I
Power steering fluid, lines, hoses, and
connectionsIIIIIIIIIII I
Page 15 of 909
SCHEDULED MAINTENANCE
GI–11–1
GI–11GE NERAL INFORMATION
End Of Sie
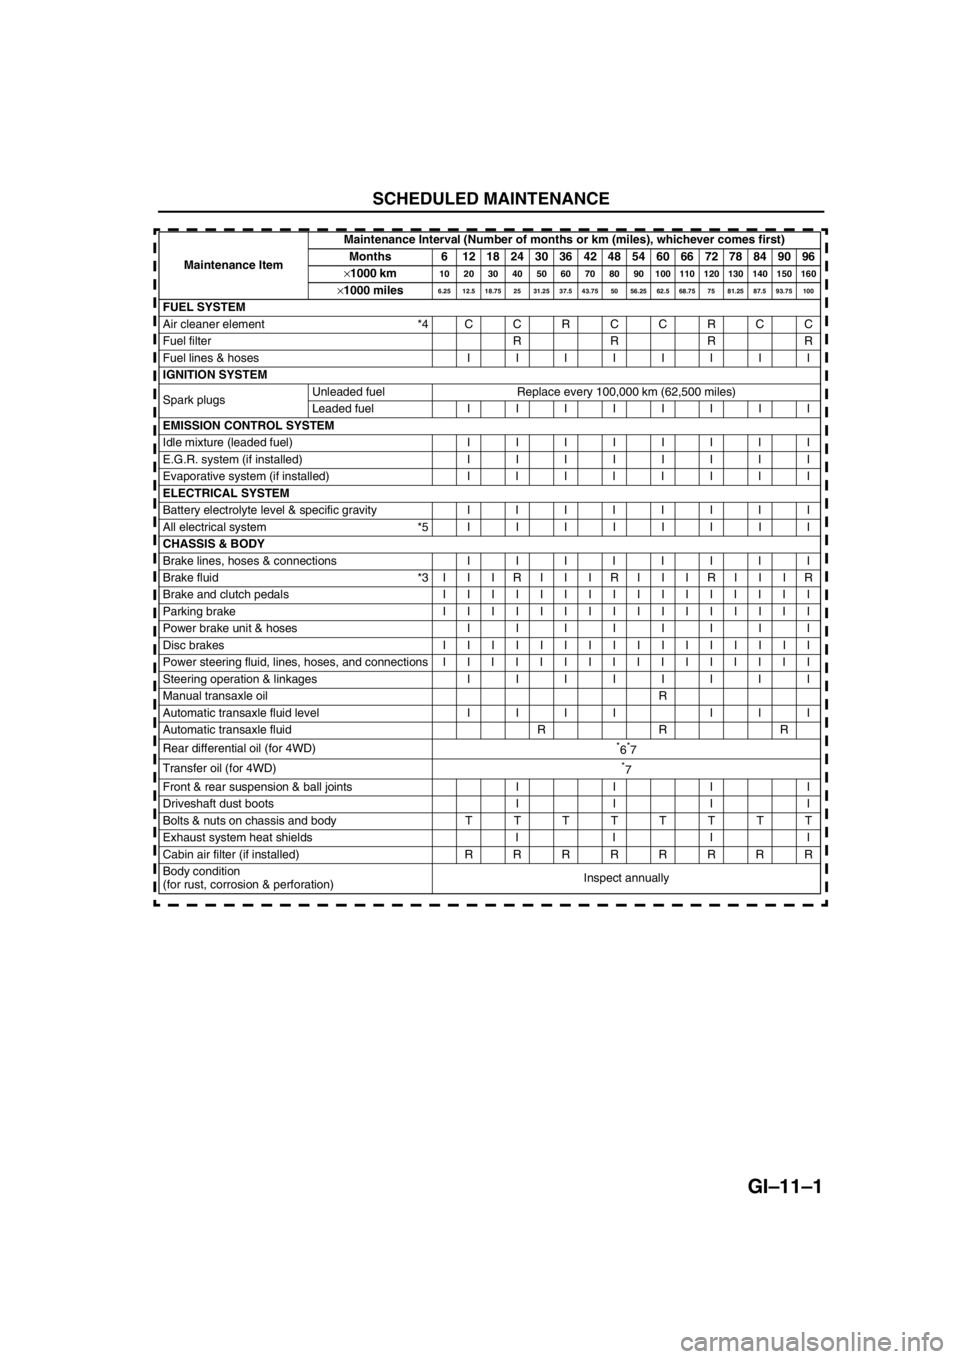
SCHEDU LED MAINTENANCE
Maintenance ItemMaintenance Interval (Number of months or km (miles), whichever comes first)
Months 6 121824303642485460667278849096
×1000 km10 20 30 40 50 60 70 80 90 100 110 120 130 140 150 160
×1000 miles6.25 12.5 18.75 25 31.25 37.5 43.75 50 56.25 62.5 68.75 75 81.25 87.5 93.75 100
FUEL SYSTEM
Air cleaner element *4CCRCCRCC
Fuel filter R R R R
Fuel lines & hoses IIIIIIII
IGNITION SYSTEM
Spark plugs Unleaded fuel Replace every 100,000 km (62,500 miles)
Leaded fuel IIIIIIII
EMISSION CONTROL SYSTEM
Idle mixture (leaded fuel) IIIIIIII
E.G.R. system (if installed) IIIIIIII
Evaporative system (if installed) IIIIIIII
ELECTRICAL SYSTEM
Battery electrolyte level & specific gravity IIIIIIII
All electrical system *5IIIIIIII
CHASSIS & BODY
Brake lines, hoses & connections IIIIIIII
Brake fluid *3 I I I R I I I R I I I R I I I R
Brake and clutch pedals IIIIIIIIIIIIIIII
Parking brake IIIIIIIIIIIIIIII
Power brake unit & hosesIIIIIIII
Disc brakes IIIIIIIIIIIIIIII
Power steering fluid, lines, hoses, and connections I I I I I I I I I I I I I I I I
Steering operation & linkages IIIIIIII
Manual transaxle oilR
Automatic transaxle fluid level IIII III
Automatic transaxle fluid R R R
Rear differential oil (for 4WD)
*6*7
Transfer oil (for 4WD)
*7
Front & rear suspension & ball joints I I I I
Driveshaft dust boots I I I I
Bolts & nuts on chassis and body TTTTTTTT
Exhaust system heat shields I I I I
Cabin air filter (if installed) RRRRRRRR
Body condition
(for rust, corrosion & perforation)Inspect annually
Page 57 of 909

B2–26
REAR OIL SEAL
REAR OIL SEAL REPLACEMENTA6E2322113992011. Remove the flywheel. (See H–5 CLUTCH UNIT REMOVAL/INSTALLATION (A65M-R manual transaxle
models).)
2. Remove in the order indicated in the table.
3. Install in the reverse order of removal.
.
Rear Oil Seal Removal Note
1. Cut the oil seal lip using a razor knife.
2. Remove the oil seal using a screwdriver protected
with a rag.
Rear Oil Seal Installation Note
1. Apply clean engine oil to the oil seal lip.
2. Push the oil seal slightly in by hand.
3. Tap the oil seal in evenly using the SST and a
hammer.
End Of Sie
REAR OIL SEAL
1 Rear oil seal
(See B2–26 Rear Oil Seal Removal Note)
(See B2–26 Rear Oil Seal Installation Note)
SST
R
OILOIL1
A6E2322W100
OIL SEAL LIP
A6E2322W101
RAG
A6E2322W102
0—0.5 mm
{0—0.019 in}
HAMMERREAR COVER
REAR OIL SEAL
49 G033 107A
A6E2322W103
Page 58 of 909
ENGINE
B2–27
B2
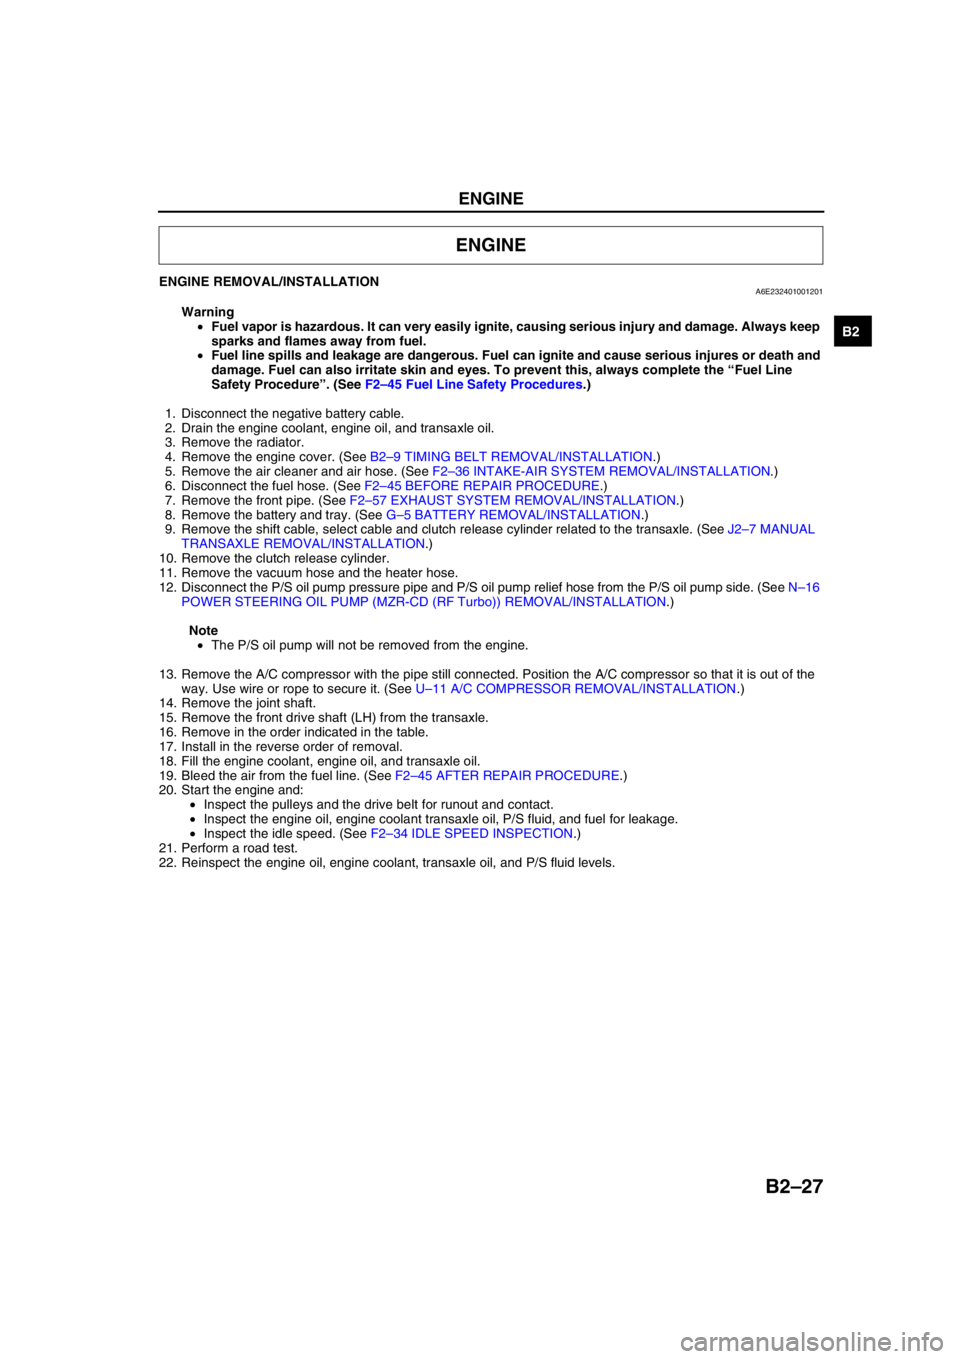
ENGINE REMOVAL/INSTALLATIONA6E232401001201
Warning
•Fuel vapor is hazardous. It can very easily ignite, causing serious injury and damage. Always keep
sparks and flames away from fuel.
•Fuel line spills and leakage are dangerous. Fuel can ignite and cause serious injures or death and
damage. Fuel can also irritate skin and eyes. To prevent this, always complete the “Fuel Line
Safety Procedure”. (See F2–45 Fuel Line Safety Procedures.)
1. Disconnect the negative battery cable.
2. Drain the engine coolant, engine oil, and transaxle oil.
3. Remove the radiator.
4. Remove the engine cover. (See B2–9 TIMING BELT REMOVAL/INSTALLATION.)
5. Remove the air cleaner and air hose. (See F2–36 INTAKE-AIR SYSTEM REMOVAL/INSTALLATION.)
6. Disconnect the fuel hose. (See F2–45 BEFORE REPAIR PROCEDURE.)
7. Remove the front pipe. (See F2–57 EXHAUST SYSTEM REMOVAL/INSTALLATION.)
8. Remove the battery and tray. (See G–5 BATTERY REMOVAL/INSTALLATION.)
9. Remove the shift cable, select cable and clutch release cylinder related to the transaxle. (See J2–7 MANUAL
TRANSAXLE REMOVAL/INSTALLATION.)
10. Remove the clutch release cylinder.
11. Remove the vacuum hose and the heater hose.
12. Disconnect the P/S oil pump pressure pipe and P/S oil pump relief hose from the P/S oil pump side. (See N–16
POWER STEERING OIL PUMP (MZR-CD (RF Turbo)) REMOVAL/INSTALLATION.)
Note
•The P/S oil pump will not be removed from the engine.
13. Remove the A/C compressor with the pipe still connected. Position the A/C compressor so that it is out of the
way. Use wire or rope to secure it. (See U–11 A/C COMPRESSOR REMOVAL/INSTALLATION.)
14. Remove the joint shaft.
15. Remove the front drive shaft (LH) from the transaxle.
16. Remove in the order indicated in the table.
17. Install in the reverse order of removal.
18. Fill the engine coolant, engine oil, and transaxle oil.
19. Bleed the air from the fuel line. (See F2–45 AFTER REPAIR PROCEDURE.)
20. Start the engine and:
•Inspect the pulleys and the drive belt for runout and contact.
•Inspect the engine oil, engine coolant transaxle oil, P/S fluid, and fuel for leakage.
•Inspect the idle speed. (See F2–34 IDLE SPEED INSPECTION.)
21. Perform a road test.
22. Reinspect the engine oil, engine coolant, transaxle oil, and P/S fluid levels.
ENGINE
Page 63 of 909
B2–32
ENGINE
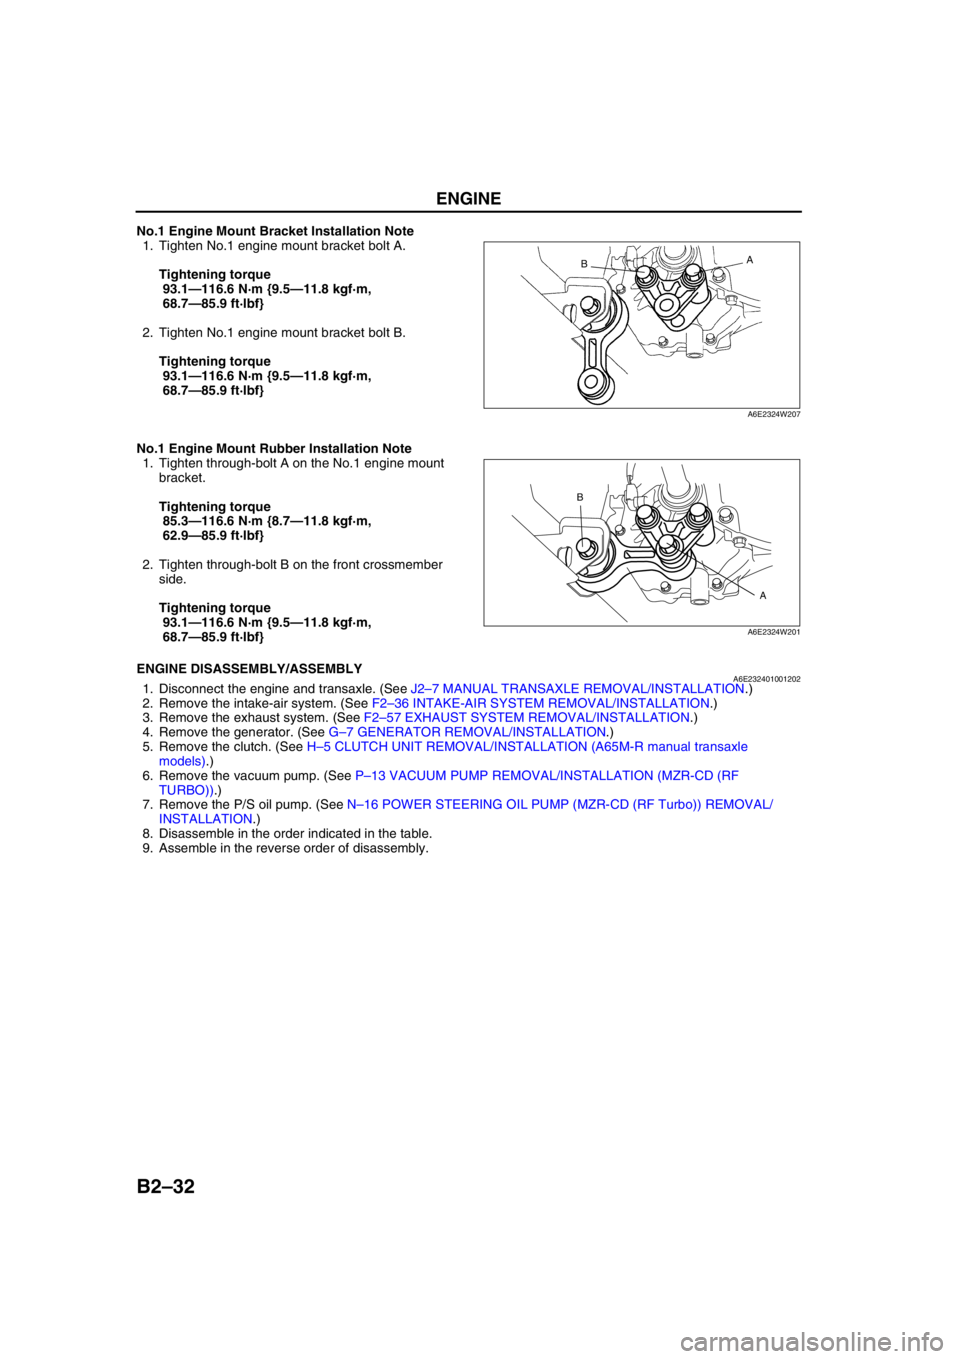
No.1 Engine Mount Bracket Installation Note
1. Tighten No.1 engine mount bracket bolt A.
Tightening torque
93.1—116.6 N·m {9.5—11.8 kgf·m,
68.7—85.9 ft·lbf}
2. Tighten No.1 engine mount bracket bolt B.
Tightening torque
93.1—116.6 N·m {9.5—11.8 kgf·m,
68.7—85.9 ft·lbf}
No.1 Engine Mount Rubber Installation Note
1. Tighten through-bolt A on the No.1 engine mount
bracket.
Tightening torque
85.3—116.6 N·m {8.7—11.8 kgf·m,
62.9—85.9 ft·lbf}
2. Tighten through-bolt B on the front crossmember
side.
Tightening torque
93.1—116.6 N·m {9.5—11.8 kgf·m,
68.7—85.9 ft·lbf}
End Of SieENGINE DISASSEMBLY/ASSEMBLYA6E2324010012021. Disconnect the engine and transaxle. (See J2–7 MANUAL TRANSAXLE REMOVAL/INSTALLATION.)
2. Remove the intake-air system. (See F2–36 INTAKE-AIR SYSTEM REMOVAL/INSTALLATION.)
3. Remove the exhaust system. (See F2–57 EXHAUST SYSTEM REMOVAL/INSTALLATION.)
4. Remove the generator. (See G–7 GENERATOR REMOVAL/INSTALLATION.)
5. Remove the clutch. (See H–5 CLUTCH UNIT REMOVAL/INSTALLATION (A65M-R manual transaxle
models).)
6. Remove the vacuum pump. (See P–13 VACUUM PUMP REMOVAL/INSTALLATION (MZR-CD (RF
TURBO)).)
7. Remove the P/S oil pump. (See N–16 POWER STEERING OIL PUMP (MZR-CD (RF Turbo)) REMOVAL/
INSTALLATION.)
8. Disassemble in the order indicated in the table.
9. Assemble in the reverse order of disassembly.
A
B
A6E2324W207
A B
A6E2324W201