service MAZDA 6 2002 Suplement User Guide
[x] Cancel search | Manufacturer: MAZDA, Model Year: 2002, Model line: 6, Model: MAZDA 6 2002Pages: 909, PDF Size: 17.16 MB
Page 26 of 909

B1–4
OUTLINE, ENGINE
SUPPLEMENTAL SERVICE INFORMATIONA6E220202000205•The following changes and/or additions have been made since publication of the Mazda6 Workshop Manual
(1730-1*-02C).
Engine
•Removal/Installation procedure for 4WD has been adopted.
End Of Sie
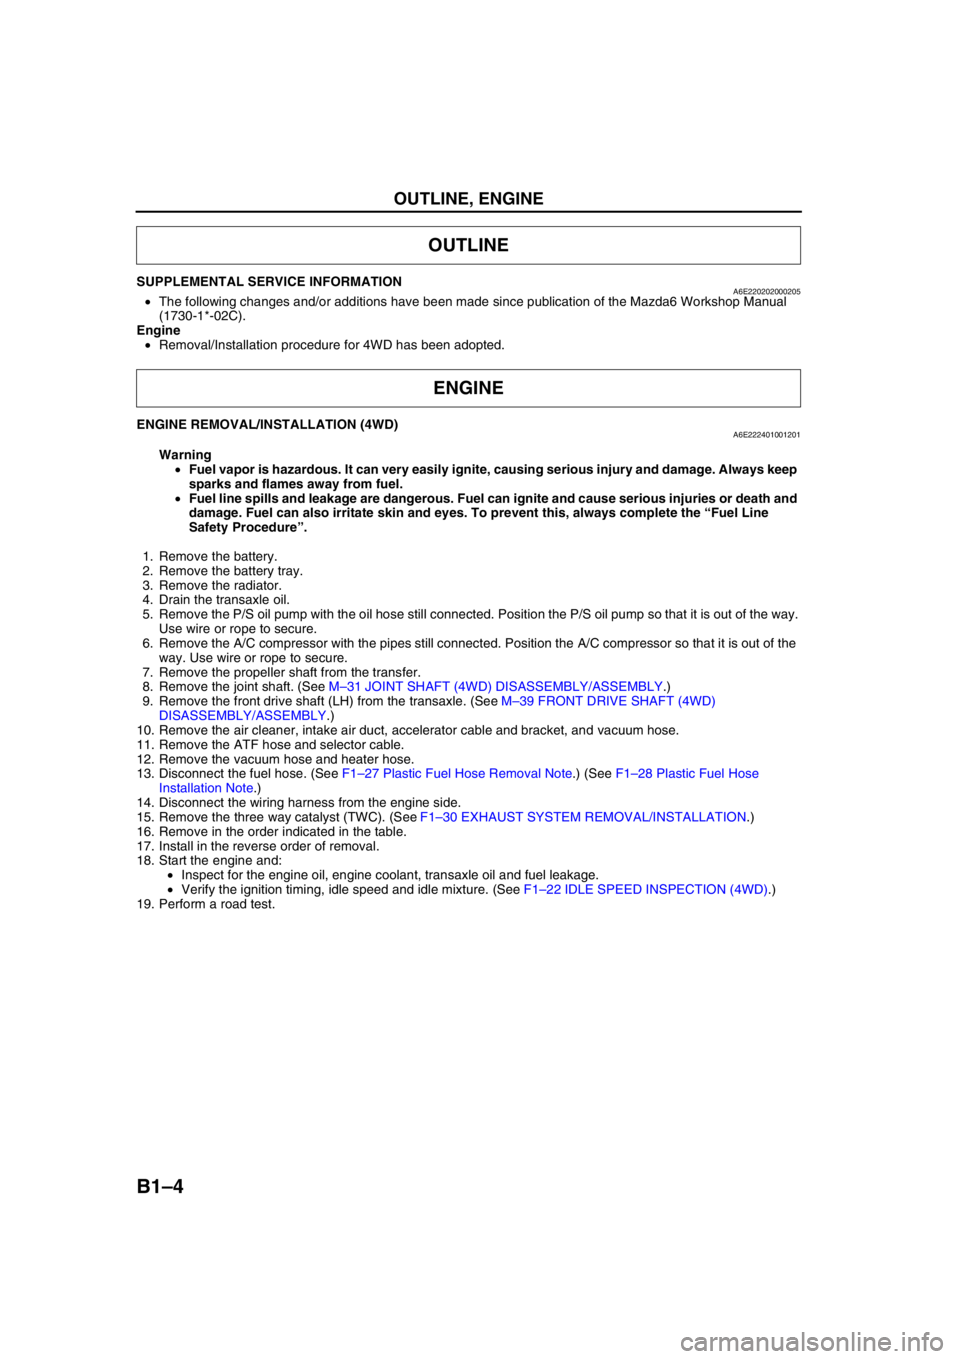
ENGINE REMOVAL/INSTALLATION (4WD)A6E222401001201
Warning
•Fuel vapor is hazardous. It can very easily ignite, causing serious injury and damage. Always keep
sparks and flames away from fuel.
•Fuel line spills and leakage are dangerous. Fuel can ignite and cause serious injuries or death and
damage. Fuel can also irritate skin and eyes. To prevent this, always complete the “Fuel Line
Safety Procedure”.
1. Remove the battery.
2. Remove the battery tray.
3. Remove the radiator.
4. Drain the transaxle oil.
5. Remove the P/S oil pump with the oil hose still connected. Position the P/S oil pump so that it is out of the way.
Use wire or rope to secure.
6. Remove the A/C compressor with the pipes still connected. Position the A/C compressor so that it is out of the
way. Use wire or rope to secure.
7. Remove the propeller shaft from the transfer.
8. Remove the joint shaft. (See M–31 JOINT SHAFT (4WD) DISASSEMBLY/ASSEMBLY.)
9. Remove the front drive shaft (LH) from the transaxle. (See M–39 FRONT DRIVE SHAFT (4WD)
DISASSEMBLY/ASSEMBLY.)
10. Remove the air cleaner, intake air duct, accelerator cable and bracket, and vacuum hose.
11. Remove the ATF hose and selector cable.
12. Remove the vacuum hose and heater hose.
13. Disconnect the fuel hose. (See F1–27 Plastic Fuel Hose Removal Note.) (See F1–28 Plastic Fuel Hose
Installation Note.)
14. Disconnect the wiring harness from the engine side.
15. Remove the three way catalyst (TWC). (See F1–30 EXHAUST SYSTEM REMOVAL/INSTALLATION.)
16. Remove in the order indicated in the table.
17. Install in the reverse order of removal.
18. Start the engine and:
•Inspect for the engine oil, engine coolant, transaxle oil and fuel leakage.
•Verify the ignition timing, idle speed and idle mixture. (See F1–22 IDLE SPEED INSPECTION (4WD).)
19. Perform a road test.
OUTLINE
ENGINE
Page 32 of 909
![MAZDA 6 2002 Suplement User Guide B2–1
B2
B2ENGINE [MZR-CD (RF Turbo)]
OUTLINE.............................................................. B2-2
OUTLINE OF CONSTRUCTION........................ B2-2
FEATURES ........................ MAZDA 6 2002 Suplement User Guide B2–1
B2
B2ENGINE [MZR-CD (RF Turbo)]
OUTLINE.............................................................. B2-2
OUTLINE OF CONSTRUCTION........................ B2-2
FEATURES ........................](/img/28/57057/w960_57057-31.png)
B2–1
B2
B2ENGINE [MZR-CD (RF Turbo)]
OUTLINE.............................................................. B2-2
OUTLINE OF CONSTRUCTION........................ B2-2
FEATURES ........................................................ B2-2
SPECIFICATIONS ............................................. B2-2
LOCATION INDEX............................................... B2-3
LOCATION INDEX ............................................. B2-3
DRIVE BELT......................................................... B2-4
DRIVE BELT INSPECTION ............................... B2-4
DRIVE BELT REPLACEMENT .......................... B2-4
DRIVE BELT AUTO TENSIONER
INSPECTION .................................................. B2-5
VALVE CLEARANCE........................................... B2-5
VALVE CLEARANCE INSPECTION.................. B2-5
VALVE CLEARANCE ADJUSTMENT ............... B2-6
COMPRESSION PRESSURE.............................. B2-8
COMPRESSION INSPECTION ......................... B2-8
TIMING BELT....................................................... B2-9
TIMING BELT REMOVAL/INSTALLATION ....... B2-9
CYLINDER HEAD GASKET............................... B2-15
CYLINDER HEAD GASKET REPLACEMENT B2-15
FRONT OIL SEAL.............................................. B2-24
FRONT OIL SEAL REPLACEMENT ................ B2-24
REAR OIL SEAL................................................ B2-26
REAR OIL SEAL REPLACEMENT .................. B2-26
ENGINE.............................................................. B2-27
ENGINE REMOVAL/INSTALLATION .............. B2-27
ENGINE DISASSEMBLY/ASSEMBLY............. B2-32 FEATURES
SERVICE
Page 33 of 909

B2–2
OUTLINE
OUTLINE OF CONSTRUCTIONA6E230202000201•MZR-CD (RF Turbo) engine is newly adopted as Mazda6 (GG, GY).
•The construction of MZR-CD (RF Turbo) engine and operation which were newly adopted for the Mazda6 (GG,
GY) are the same as the current Mazda MPV(LW) MZR-CD (RF Turbo) engine model and current Mazda 323
(BJ) RF Turbo engine model except for the following components. (See Mazda MPV Workshop Manual
Supplement 1737-1*-02C.), (See Mazda 323 Workshop Manual Supplement 1633-10-98G.)
—Engine mount
•The construction and the operation of the engine mount for the new Mazda6 (GG, GY) MZR-CD (RF Turbo)
engine model is the same as the current Mazda6 (GG). (See Mazda6 Training Manual 3359-1*-02C)
End Of Sie
FEATURESA6E230202000202Improved engine performance
•Coated pistons have been adopted.
Reduced engine noise and vibration
•An aluminium alloy oil pan upper block has been adopted.
•An eight counter weight crankshaft has been adopted.
•A crankshaft pulley cover has been adopted.
•An engine cover with insulator has been adopted.
•A pendulum type engine mount has been adopted.
Improved serviceability
•A serpentine type drive belt has been adopted.
•An auto tensioner that automatically adjusts the drive belt tension has been adopted.
Improved design
•An engine cover has been adopted.
End Of Sie
SPECIFICATIONSA6E230202000203
End Of Sie
OUTLINE
ItemSpecifications
New Mazda6 (GG, GY) Current Mazda MPV (LW)
MZR-CD (RF Turbo) MZR-CD (RF Turbo)
TypeDiesel, 4-cycle
Cylinder arrangement and number In-line, 4-cylinder
Combustion chamber Direct injection
Valve system SOHC, belt-driven, 16-valve
Displacement (ml {cc, cu in}) 1,998 {1.998, 122.9}
Bore × stroke (mm {in}) 86.0 × 86.0 {3.39 × 3.39}
Compression ratio 18.4
Compression pressure
(kPa {kgf/cm
2, psi} [rpm])3,500 {35.7, 507.7} [250]
Valve timingINOpen BTDC (°)6
Close ABDC (°)30
EXOpen BBDC (°)41
Close ATDC (°)8
Valve clearance
[engine cold]IN (mm {in}) 0.12 —0.18 {0.005—0.007} (0.15±0.03 {0.006±0.0011})
EX (mm {in}) 0.32—0.38 {0.013—0.014} (0.35±0.03 {0.014±0.0011})
Page 65 of 909

D–1
D
DLUBRICATION SYSTEM
OUTLINE................................................................ D-2
OUTLINE OF CONSTRUCTION.......................... D-2
SPECIFICATIONS ............................................... D-2
STRUCTURAL VIEW ...........................................D-4
LUBRICATION SYSTEM........................................ D-5
LUBRICATION FLOW CHART ............................ D-5
OUTLINE................................................................ D-6
SUPPLEMENTAL SERVICE INFORMATION .....D-6
LUBRICATION SYSTEM........................................ D-6
LOCATION INDEX ............................................... D-6
OIL PRESSURE INSPECTION..............................D-7
OIL PRESSURE INSPECTION............................ D-7
ENGINE OIL........................................................... D-8
ENGINE OIL INSPECTION.................................. D-8
ENGINE OIL REPLACEMENT.............................D-8
OIL FILTER............................................................. D-9
OIL FILTER REPLACEMENT ..............................D-9
OIL COOLER.......................................................... D-9
OIL COOLER REMOVAL/INSTALLATION ..........D-9
OIL PAN................................................................ D-10
OIL PAN REMOVAL/INSTALLATION................ D-10 FEATURES
SERVICE
Page 70 of 909

D–6
OUTLINE, LUBRICATION SYSTEM
SUPPLEMENTAL SERVICE INFORMATIONA6E330202000204•The following changes and/or additions have been made since publication of the Mazda6 Workshop Manual
(1730-1*-02C).
Oil pressure
•Inspection procedure has been adopted. (MZR-CD (RF Turbo) engine model)
Engine oil
•Inspection procedure has been adopted. (MZR-CD (RF Turbo) engine model)
•Replacement procedure has been adopted. (MZR-CD (RF Turbo) engine model)
Oil filter
•Replacement procedure has been adopted. (MZR-CD (RF Turbo) engine model)
Oil cooler
•Removal/Installation procedure has been adopted. (MZR-CD (RF Turbo) engine model)
Oil pan
•Removal/Installation procedure has been adopted. (MZR-CD (RF Turbo) engine model)
End Of Sie
LOCATION INDEXA6E333014100201MZR-CD (RF Turbo)
.
End Of Sie
OUTLINE
LUBRICATION SYSTEM
4
3
1
2
A6E3300W003
1 Oil pressure switch
(See D–7 OIL PRESSURE INSPECTION)
2 Oil filter
(See D–9 OIL FILTER REPLACEMENT)3 Oil cooler
(See D–9 OIL COOLER REMOVAL/
INSTALLATION)
4 Oil pan
(See D–10 OIL PAN REMOVAL/INSTALLATION)
Page 76 of 909

E–1
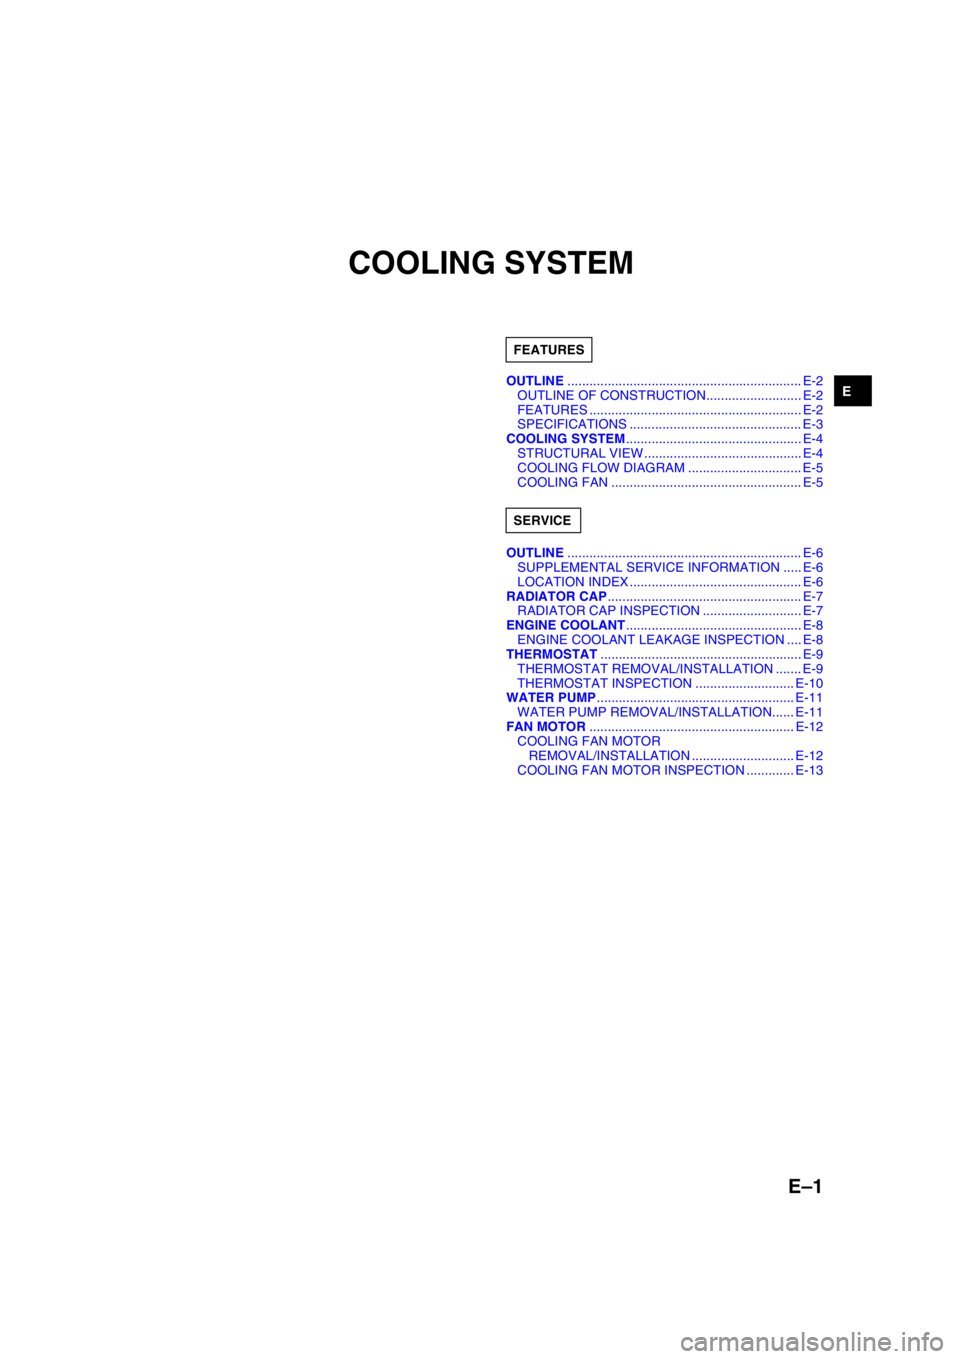
E
ECOOLING SYSTEM
OUTLINE................................................................ E-2
OUTLINE OF CONSTRUCTION.......................... E-2
FEATURES .......................................................... E-2
SPECIFICATIONS ............................................... E-3
COOLING SYSTEM................................................ E-4
STRUCTURAL VIEW ........................................... E-4
COOLING FLOW DIAGRAM ............................... E-5
COOLING FAN .................................................... E-5
OUTLINE................................................................ E-6
SUPPLEMENTAL SERVICE INFORMATION ..... E-6
LOCATION INDEX ............................................... E-6
RADIATOR CAP..................................................... E-7
RADIATOR CAP INSPECTION ........................... E-7
ENGINE COOLANT................................................ E-8
ENGINE COOLANT LEAKAGE INSPECTION .... E-8
THERMOSTAT....................................................... E-9
THERMOSTAT REMOVAL/INSTALLATION ....... E-9
THERMOSTAT INSPECTION ........................... E-10
WATER PUMP...................................................... E-11
WATER PUMP REMOVAL/INSTALLATION...... E-11
FAN MOTOR........................................................ E-12
COOLING FAN MOTOR
REMOVAL/INSTALLATION ............................ E-12
COOLING FAN MOTOR INSPECTION ............. E-13 FEATURES
SERVICE
Page 81 of 909

E–6
OUTLINE
SUPPLEMENTAL SERVICE INFORMATIONA6E360202000208•The following changes and/or additions have been made since publication of the Mazda6 Workshop Manual
(1730-1*-02C).
Radiator cap
•Inspection procedure has been added. (MZR-CD (RF Turbo) engine model)
Thermostat
•Removal/Installation procedure has been added. (MZR-CD (RF Turbo) engine model)
•Inspection procedure has been added. (MZR-CD (RF Turbo) engine model)
Water pump
•Removal/Installation procedure has been added. (MZR-CD (RF Turbo) engine model)
Fan motor
•Removal/Installation procedure has been added. (MZR-CD (RF Turbo) engine model)
•Inspection procedure has been added. (MZR-CD (RF Turbo) engine model)
End Of Sie
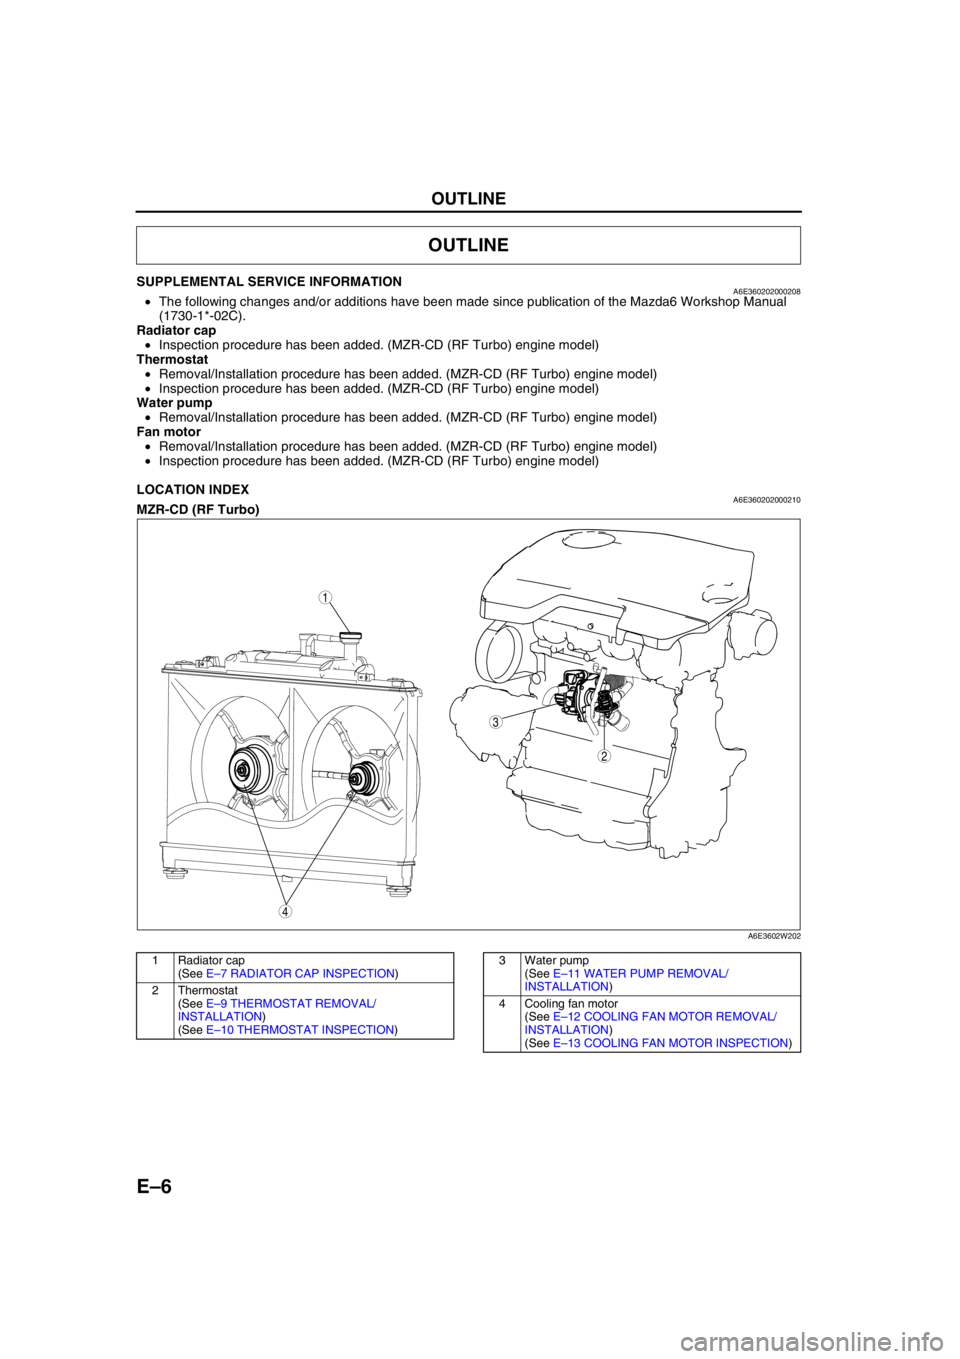
LOCATION INDEXA6E360202000210MZR-CD (RF Turbo)
.
End Of Sie
OUTLINE
4
3
1
2
A6E3602W202
1 Radiator cap
(See E–7 RADIATOR CAP INSPECTION)
2Thermostat
(See E–9 THERMOSTAT REMOVAL/
INSTALLATION)
(See E–10 THERMOSTAT INSPECTION)3 Water pump
(See E–11 WATER PUMP REMOVAL/
INSTALLATION)
4 Cooling fan motor
(See E–12 COOLING FAN MOTOR REMOVAL/
INSTALLATION)
(See E–13 COOLING FAN MOTOR INSPECTION)
Page 89 of 909
![MAZDA 6 2002 Suplement User Guide F1–1
F1
F1FUEL AND EMISSION CONTROL SYSTEM
[L8, LF, L3]
OUTLINE.............................................................. F1-2
OUTLINE OF CONSTRUCTION ....................... F1-2
FEATURES ..... MAZDA 6 2002 Suplement User Guide F1–1
F1
F1FUEL AND EMISSION CONTROL SYSTEM
[L8, LF, L3]
OUTLINE.............................................................. F1-2
OUTLINE OF CONSTRUCTION ....................... F1-2
FEATURES .....](/img/28/57057/w960_57057-88.png)
F1–1
F1
F1FUEL AND EMISSION CONTROL SYSTEM
[L8, LF, L3]
OUTLINE.............................................................. F1-2
OUTLINE OF CONSTRUCTION ....................... F1-2
FEATURES ........................................................ F1-2
SPECIFICATIONS ............................................. F1-2
CONTROL SYSTEM DIAGRAM (4WD)............. F1-3
CONTROL SYSTEM WIRING DIAGRAM
(4WD).............................................................. F1-4
FUEL SYSTEM..................................................... F1-9
OUTLINE ........................................................... F1-9
STRUCTURAL VIEW......................................... F1-9
SYSTEM DIAGRAM ........................................ F1-10
FUEL PUMP (TRANSFER).............................. F1-10
QUICK RELEASE CONNECTOR (FUEL TANK
SIDE, TRANSFER HOSE PART) ................. F1-12
EXHAUST SYSTEM........................................... F1-13
OUTLINE ......................................................... F1-13
STRUCTURAL VIEW....................................... F1-13
CONTROL SYSTEM........................................... F1-14
OUTLINE ......................................................... F1-14
STRUCTURAL VIEW (4WD) ........................... F1-16
BLOCK DIAGRAM ........................................... F1-17
CONTROL DEVICE AND CONTROL
RELATIONSHIP CHART .............................. F1-19
CONTROLLER AREA NETWORK (CAN) ....... F1-21
OUTLINE............................................................ F1-22
SUPPLEMENTAL SERVICE
INFORMATION ............................................. F1-22
ENGINE TUNE-UP............................................. F1-22
IDLE SPEED INSPECTION (4WD) ................. F1-22
FUEL SYSTEM................................................... F1-23
FUEL TANK REMOVAL/INSTALLATION ........ F1-23
FUEL PUMP UNIT
REMOVAL/INSTALLATION .......................... F1-26
FUEL HOSE (FUEL TANK SIDE,
TRANSFER HOSE PART)
REMOVAL/INSTALLATION .......................... F1-29
EXHAUST SYSTEM........................................... F1-30
EXHAUST SYSTEM
REMOVAL/INSTALLATION .......................... F1-30
CONTROL SYSTEM........................................... F1-33
PCM INSPECTION (4WD)............................... F1-33
ON-BOARD DIAGNOSTIC................................. F1-50
OUTLINE ......................................................... F1-50
CONTROL DEVICE AND MONITORING
SYSTEM RELATIONSHIP CHART .............. F1-50
DIAGNOSTIC TEST MODE (4WD) ................. F1-50
DTC (4WD) ...................................................... F1-52
OBD DRIVE MODE ......................................... F1-52
DTC TABLE ..................................................... F1-54
TROUBLESHOOTING........................................ F1-57ENGINE SYMPTOM
TROUBLESHOOTING .................................. F1-57
QUICK DIAGNOSTIC CHART ......................... F1-58
NO.14 POOR FUEL ECONOMY ..................... F1-62
NO.22 VIBRATION CONCERNS
(ENGINE) ...................................................... F1-64 FEATURES
SERVICE
Page 110 of 909

F1–22
OUTLINE, ENGINE TUNE-UP
SUPPLEMENTAL SERVICE INFORMATIONA6E390218881206•The following changes and/or additions have been made since publication of the Mazda6 Workshop Manual
(1621-10-98E).
Idle speed
•Adjustment procedure has been modified.
Fuel tank
•Removal/installation procedure has been modified.
Fuel pump unit
•Removal/installation procedure has been modified.
Quick release connector (fuel tank side, transfer hose part)
•Removal/installation procedure has been added.
Exhaust system
•Removal/installation procedure has been modified.
PCM
•Inspection procedure has been modified.
On-board diagnostic
•Inspection procedure has been modified.
Troubleshooting
•Inspection procedure has been modified.
End Of Sie
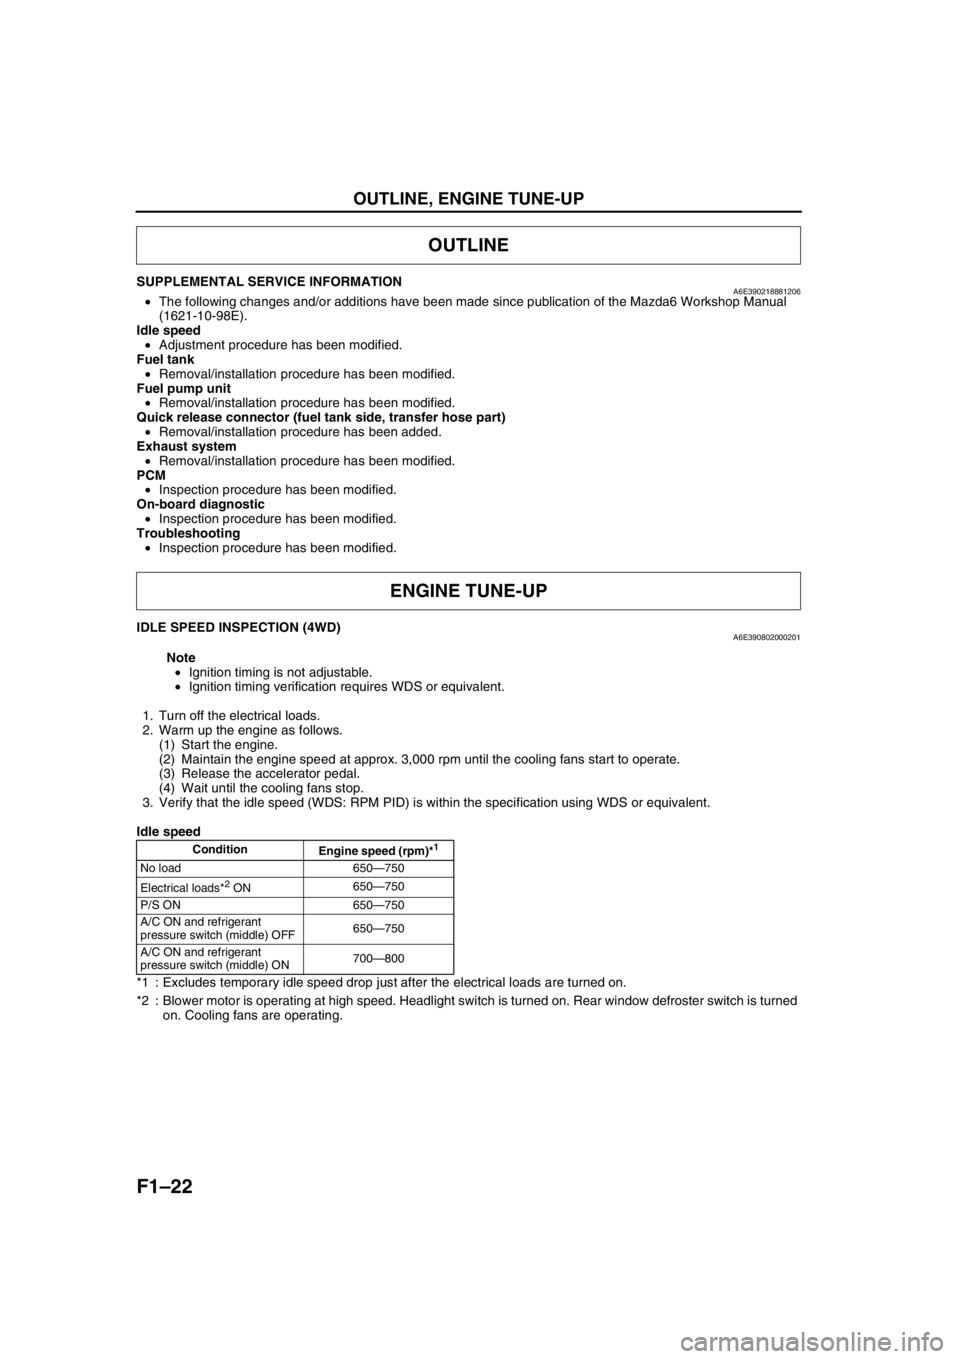
IDLE SPEED INSPECTION (4WD)A6E390802000201
Note
•Ignition timing is not adjustable.
•Ignition timing verification requires WDS or equivalent.
1. Turn off the electrical loads.
2. Warm up the engine as follows.
(1) Start the engine.
(2) Maintain the engine speed at approx. 3,000 rpm until the cooling fans start to operate.
(3) Release the accelerator pedal.
(4) Wait until the cooling fans stop.
3. Verify that the idle speed (WDS: RPM PID) is within the specification using WDS or equivalent.
Idle speed
*1 : Excludes temporary idle speed drop just after the electrical loads are turned on.
*2 : Blower motor is operating at high speed. Headlight switch is turned on. Rear window defroster switch is turned
on. Cooling fans are operating.
End Of Sie
OUTLINE
ENGINE TUNE-UP
Condition
Engine speed (rpm)*1
No load 650—750
Electrical loads*
2 ON650—750
P/S ON 650—750
A/C ON and refrigerant
pressure switch (middle) OFF650—750
A/C ON and refrigerant
pressure switch (middle) ON700—800
Page 111 of 909

FUEL SYSTEM
F1–23
F1
FUEL TANK REMOVAL/INSTALLATIONA6E391242110201
Warning
•Repairing a fuel tank that has not been properly steam cleaned can be dangerous. Explosion or
fire may cause death or serious injury. Always properly steam clean a fuel tank before repairing it.
•Fuel line spills and leakage are dangerous. Fuel can ignite and cause serious injuries or death and
damage. Fuel can also irritate skin and eyes. To prevent this, do not damage the sealing surface of
the fuel pump unit when removing or installing.
Caution
•Disconnecting/connecting the quick release connector without cleaning it may possibly cause
damage to the fuel pipe and quick release connector. Always clean the quick release connector
joint area before disconnecting/connecting using a cloth or soft brush, and make sure that it is
free of foreign material.
1. Level the vehicle.
2. Complete the “BEFORE REPAIR PROCEDURE”.
3. Disconnect the negative battery cable.
4. Remove the fuel pump unit. (See F1–26 FUEL PUMP UNIT REMOVAL/INSTALLATION.)
5. Remove the fuel gauge sender sub-unit. (See T–27 Fuel Gauge Sender Sub-Unit.)
6. Siphon the fuel from the service hole.
7. Remove the presilencer. (See F1–30 EXHAUST SYSTEM REMOVAL/INSTALLATION.)
8. Remove the TWC. (See F1–30 EXHAUST SYSTEM REMOVAL/INSTALLATION.)
9. Remove the propeller shaft. (See L–5 PROPELLER SHAFT REMOVAL/INSTALLATION.)
FUEL SYSTEM