steering wheel MAZDA 6 2002 Suplement User Guide
[x] Cancel search | Manufacturer: MAZDA, Model Year: 2002, Model line: 6, Model: MAZDA 6 2002Pages: 909, PDF Size: 17.16 MB
Page 721 of 909

ENGINE SPEED SENSING POWER STEERING
N–7
N
Fluid Pressure Inspection
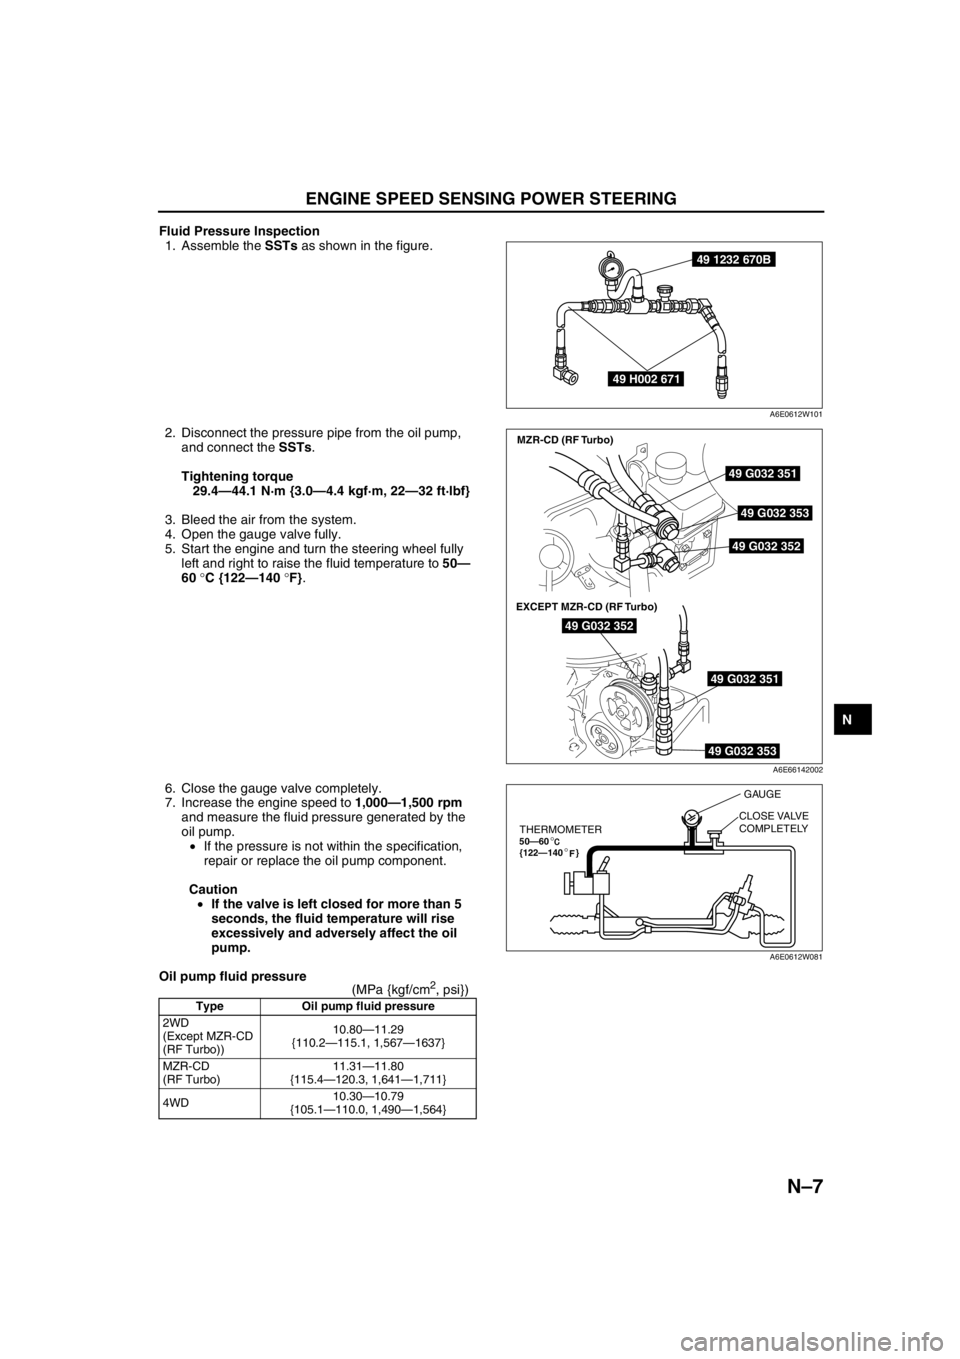
1. Assemble the SSTs as shown in the figure.
2. Disconnect the pressure pipe from the oil pump,
and connect the SSTs.
Tightening torque
29.4—44.1 N·m {3.0—4.4 kgf·m, 22—32 ft·lbf}
3. Bleed the air from the system.
4. Open the gauge valve fully.
5. Start the engine and turn the steering wheel fully
left and right to raise the fluid temperature to 50—
60 °C {122—140 °F}.
6. Close the gauge valve completely.
7. Increase the engine speed to 1,000—1,500 rpm
and measure the fluid pressure generated by the
oil pump.
•If the pressure is not within the specification,
repair or replace the oil pump component.
Caution
•If the valve is left closed for more than 5
seconds, the fluid temperature will rise
excessively and adversely affect the oil
pump.
Oil pump fluid pressure
(MPa {kgf/cm
2, psi})
Type Oil pump fluid pressure
2WD
(Except MZR-CD
(RF Turbo))10.80—11.29
{110.2—115.1, 1,567—1637}
MZR-CD
(RF Turbo)11.31—11.80
{115.4—120.3, 1,641—1,711}
4WD10.30—10.79
{105.1—110.0, 1,490—1,564}
49 1232 670B
49 H002 671
A6E0612W101
49 G032 351
49 G032 353
49 G032 352
49 G032 352
49 G032 351
49 G032 353
MZR-CD (RF Turbo)
EXCEPT MZR-CD (RF Turbo)
A6E66142002
THERMOMETER50—60
{122—140 }°
°F
GAUGE
CLOSE VALVE
COMPLETELY
A6E0612W081
Page 722 of 909

N–8
ENGINE SPEED SENSING POWER STEERING
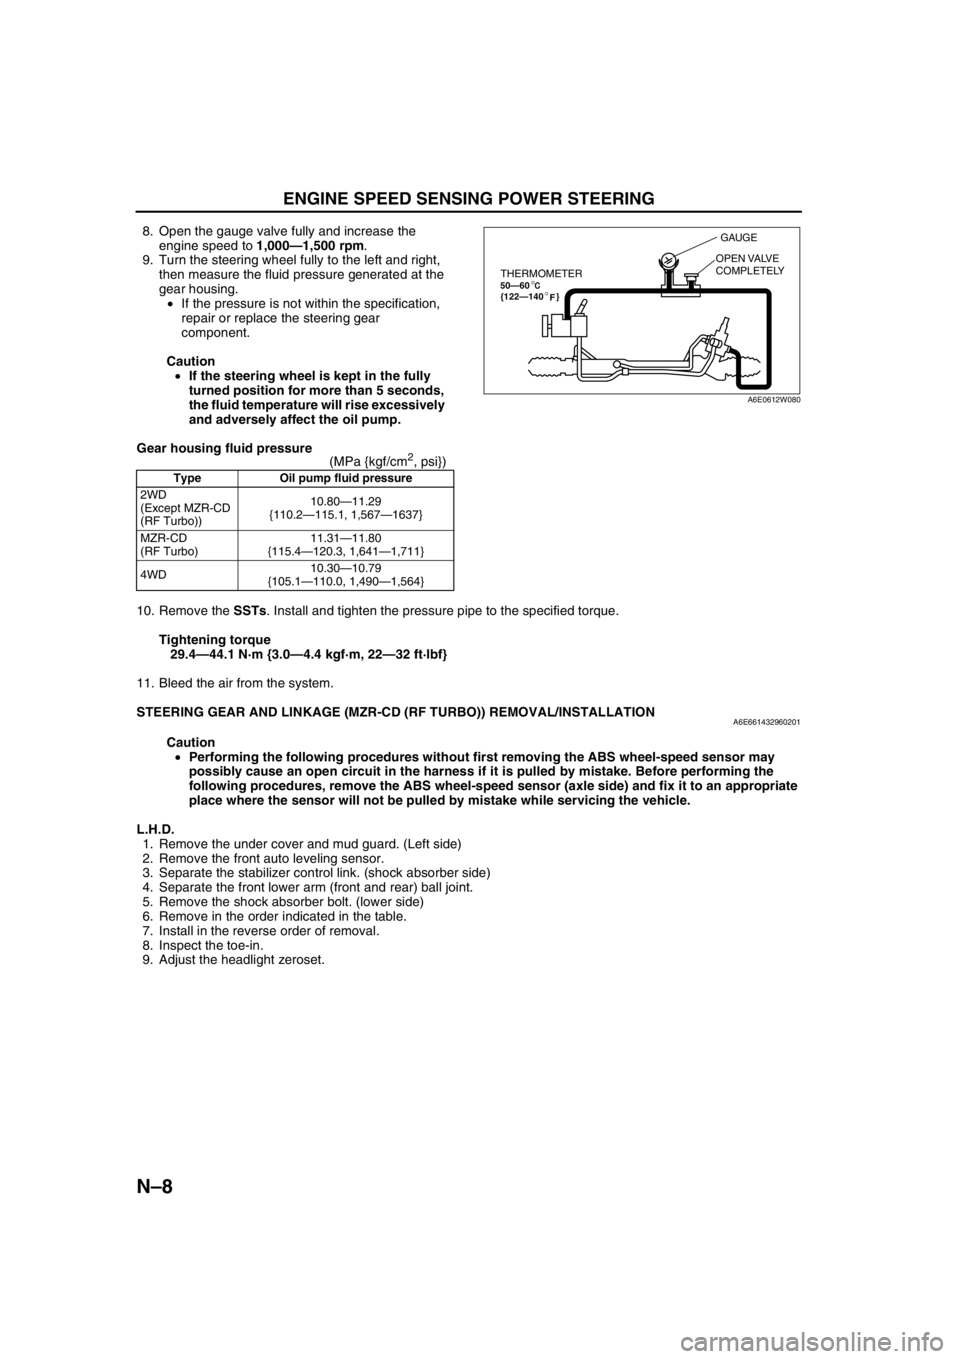
8. Open the gauge valve fully and increase the
engine speed to 1,000—1,500 rpm.
9. Turn the steering wheel fully to the left and right,
then measure the fluid pressure generated at the
gear housing.
•If the pressure is not within the specification,
repair or replace the steering gear
component.
Caution
•If the steering wheel is kept in the fully
turned position for more than 5 seconds,
the fluid temperature will rise excessively
and adversely affect the oil pump.
Gear housing fluid pressure
(MPa {kgf/cm
2, psi})
10. Remove the SSTs. Install and tighten the pressure pipe to the specified torque.
Tightening torque
29.4—44.1 N·m {3.0—4.4 kgf·m, 22—32 ft·lbf}
11. Bleed the air from the system.
End Of Sie
STEERING GEAR AND LINKAGE (MZR-CD (RF TURBO)) REMOVAL/INSTALLATIONA6E661432960201
Caution
•Performing the following procedures without first removing the ABS wheel-speed sensor may
possibly cause an open circuit in the harness if it is pulled by mistake. Before performing the
following procedures, remove the ABS wheel-speed sensor (axle side) and fix it to an appropriate
place where the sensor will not be pulled by mistake while servicing the vehicle.
L.H.D.
1. Remove the under cover and mud guard. (Left side)
2. Remove the front auto leveling sensor.
3. Separate the stabilizer control link. (shock absorber side)
4. Separate the front lower arm (front and rear) ball joint.
5. Remove the shock absorber bolt. (lower side)
6. Remove in the order indicated in the table.
7. Install in the reverse order of removal.
8. Inspect the toe-in.
9. Adjust the headlight zeroset.
Type Oil pump fluid pressure
2WD
(Except MZR-CD
(RF Turbo))10.80—11.29
{110.2—115.1, 1,567—1637}
MZR-CD
(RF Turbo)11.31—11.80
{115.4—120.3, 1,641—1,711}
4WD10.30—10.79
{105.1—110.0, 1,490—1,564}
THERMOMETER50—60
{122—140 }°
°F
GAUGE
OPEN VALVE
COMPLETELY
A6E0612W080
Page 727 of 909

ENGINE SPEED SENSING POWER STEERING
N–13
N
STEERING GEAR AND LINKAGE (4WD) REMOVAL/INSTALLATIONA6E661432960202
Caution
•Performing the following procedures without first removing the ABS wheel-speed sensor may
possibly cause an open circuit in the harness if it is pulled by mistake. Before performing the
following procedures, remove the ABS wheel-speed sensor (axle side) and fix it to an appropriate
place where the sensor will not be pulled by mistake while servicing the vehicle.
1. Remove the under cover and mud guard. (Left side)
2. Remove the front auto leveling sensor.
3. Separate the stabilizer control link. (shock absorber side)
4. Separate the front lower arm (front and rear) ball joint.
5. Remove the shock absorber bolt. (lower side)
6. Remove in the order indicated in the table.
7. Install in the reverse order of removal.
8. Inspect the toe-in.
9. Adjust the headlight zeroset.
Page 739 of 909

P–6
DYNAMIC STABILITY CONTROL
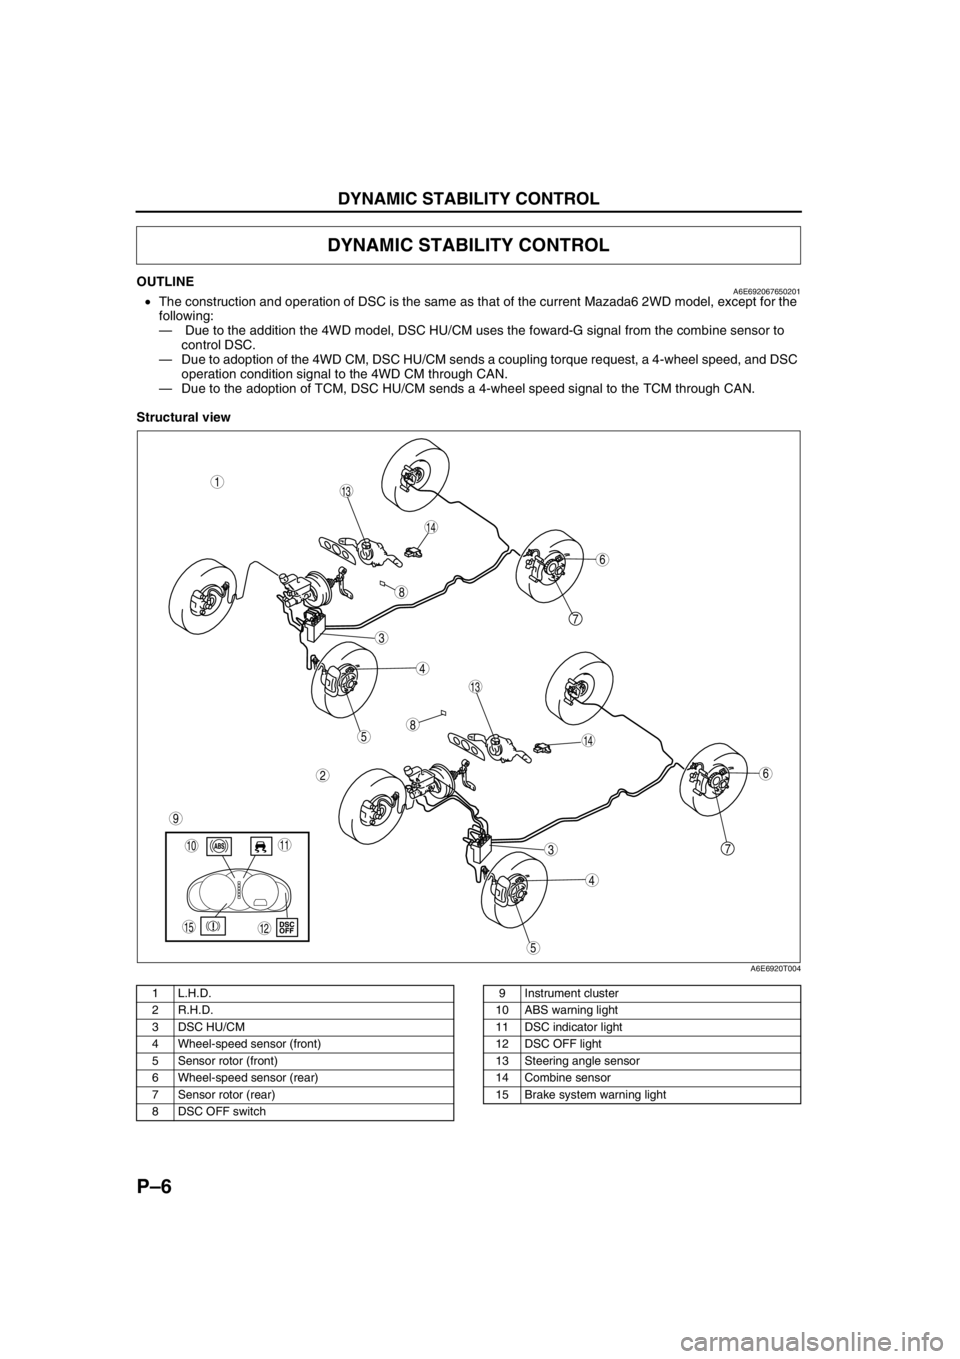
OUTLINEA6E692067650201•The construction and operation of DSC is the same as that of the current Mazada6 2WD model, except for the
following:
— Due to the addition the 4WD model, DSC HU/CM uses the foward-G signal from the combine sensor to
control DSC.
—Due to adoption of the 4WD CM, DSC HU/CM sends a coupling torque request, a 4-wheel speed, and DSC
operation condition signal to the 4WD CM through CAN.
—Due to the adoption of TCM, DSC HU/CM sends a 4-wheel speed signal to the TCM through CAN.
Structural view
.
DYNAMIC STABILITY CONTROL
7
5
4
3
1
2
14
13
6
13
12
5
4
3
7
6
1011
9
14
8
8
15
A6E6920T004
1 L.H.D.
2 R.H.D.
3 DSC HU/CM
4 Wheel-speed sensor (front)
5 Sensor rotor (front)
6 Wheel-speed sensor (rear)
7 Sensor rotor (rear)
8 DSC OFF switch9 Instrument cluster
10 ABS warning light
11 DSC indicator light
12 DSC OFF light
13 Steering angle sensor
14 Combine sensor
15 Brake system warning light
Page 740 of 909

DYNAMIC STABILITY CONTROL
P–7
P
Wiring Diagram
.
9
RF
FL
RR
RL
PCM
G
E
M
I
F
K
H
Q
NJ
P
S
T
V
O
Y
X
W
U
R
L
Z
AC
D
B
AG
AF
AE
AC
AA
AB
C
F
D
A
B
EDSC HU/CM
A
B
C
D
F
1
3
2
8
7
5
4
6
9
9
9
10
11
13
12
15
14
18
17
16
1920
2122
24
23
A6E6921W203
1 IG switch
2SUS 15A fuse
3 ABS 60 A fuse
4 Meter
5 ABS warning light
6 Brake system warning light
7 DSC OFF light
8 DSC indicator light
9CAN driver
10 Battery
11 Cruise actuator
12 DSC OFF switch13 DLC-2
14 CAN-H
15 CAN-L
16 Wheel-speed sensor
17 Combine sensor
18 Steering angle sensor
19 Brake switch
20 Brake light
21 Back-up light switch (MTX only)
22 Back-up light (MTX only)
23 Audio unit, Wiper and washer switch, Car-navigation
unit, Auto leveling control unit
24 TCM, 4WD CM
Page 751 of 909

P–18
DYNAMIC STABILITY CONTROL
K
HRR wheel-speedRR wheel-
speed sensorVehicle is stopped 0 (AC)
•Inspect related harness
•Inspect wheel-speed
sensor •Inspect using the wave profile.
(See P–19 Inspection Using An
Oscilloscope (Reference))
M
IRF wheel-speedRF wheel-
speed sensorVehicle is stopped 0 (AC)
•Inspect related harness
•Inspect wheel-speed
sensor •Inspect using the wave profile.
(See P–19 Inspection Using An
Oscilloscope (Reference))
Q
NLR wheel-speedLR wheel-speed
sensorVehicle is stopped 0 (AC)
•Inspect related harness
•Inspect wheel-speed
sensor •Inspect using the wave profile.
(See P–19 Inspection Using An
Oscilloscope (Reference))
G Battery (IG) Ignition switch Ignition switch ON B+•Inspect related harness
•Inspect ignition switch
L Brake switch Brake switchWhen brake pedal is
depressed10—14•Inspect related harness
•Inspect brake switch
OLateral-G
(lateral-G signal)Combine
sensorVehicle is stopped 2.2—2.8
•Inspect related harness
•Inspect combine sensor Left corneringFluctuation
between
2.5—4.0 V
Right corneringFluctuation
between
1.0—2.5 V
PCombine sensor
power outputCombine
sensorIgnition switch ON 4.75—5.25•Inspect related harness
•Inspect combine sensor
RSteering angle
(ground)Steering angle
sensor—Below 1.0•Inspect related harness
•Inspect steering angle
sensor
S Combine sensorCombine
sensor—3.5—5.0•Inspect related harness
•Inspect combine sensor
TYaw rate
(yaw rate signal)Combine
sensorVehicle is stopped 2.2—2.8
•Inspect related harness
•Inspect yaw rate sensor Right corneringFluctuation
between
2.5—4.62 V
Left corneringFluctuation
between
2.5—0.33 V
USteering angle
(neutral signal)Steering angle
sensorSteering position:
center position 25°—29°Below 1.0•Inspect related harness
•Inspect steering angle
sensor
Except above condition Approx. 4
VForward-G
(forward-G signal)Combine
sensorVehicle is stopped 2.2—2.8
•Inspect related harness
•Inspect combine sensor AccelerationFluctuation
between
2.5—4.0 V
Deceleration Fluctuation
between
1.0—2.5 V
WSteering angle
(steering angle
signal 2)Steering angle
sensor•Inspect using the wave profile.
(See P–19 Inspection Using An
Oscilloscope (Reference))•Inspect related harness
•Inspect steering angle
sensor
XSteering angle
(steering angle
signal 1)Steering angle
sensor•Inspect using the wave profile.
(See P–19 Inspection Using An
Oscilloscope (Reference))•Inspect related harness
•Inspect steering angle
sensor
YCombine sensor
(ground)Combine
sensor—Below 1.0•Inspect related harness
•Inspect combine sensor
AA DSC OFF switchDSC OFF
switchWhen switch is pressed Below 1.0
•Inspect related harness
•Inspect DSC OFF switch
When switch is not pressed B+
AB OBDKLN terminal of
DLC-2It cannot be determined with terminal
voltage whether the condition is good or bad
because advanced function diagnostic
output is performed with serial
communication. Inspect with service codes.•Inspect related harness
•Inspect DSC HU/CM Terminal Signal Connected to Test condition Voltage (V) Action
Page 752 of 909

DYNAMIC STABILITY CONTROL
P–19
P
*: Used for vehicle manufacturing, not used for DSC.
Inspection Using An Oscilloscope (Reference)
Steering angle (steering angle signal 1 and 2)
•DSC HU/CM terminal:
Steering angle signal 2: W (+) — R (-)
Steering angle signal 1: X (+) — R (-)
•Oscilloscope setting:
1 V/DIV (Y), 25 ms/DIV (X), DC range
•Vehicle condition: Rotating steering wheel at one
revolution per second
Note
•As steering wheel rotation speed increases,
period of wave shortens.
•As for shape of steering angle signals 1 and
2, the phase is different.
Wheel speed
•DSC HU/CM terminal:
RF: M (+) — I (-)
RR: K (+) — H (-)
LF: F (+) — J (-)
LR: Q (+) — N (-)
•Oscilloscope setting:
1 V/DIV (Y), 2 ms/DIV (X), AC range
•Vehicle condition: Driving 30 km/h (18.6 mph)
Note
•As vehicle speed increases, period of wave
shortens.
•If there is malfunctioning in the sensor rotor,
wave profile warps.
ACAuto cruise set
signal outputAuto cruise unitWhen auto cruise is ON Below 1.0
•Inspect related harness
•Inspect DSC HU/CM
When auto cruise is OFF B+
AD—— — — —
AEVehicle speed
output•Audio unit
•Wiper and
washer
switch
•Car-navigatio
n unit
•Auto
leveling
control unit
•Cruise
actuatorVehicle is stopped 0
•Inspect related harness
•Inspect front wheel-speed
sensor •Inspect using the wave profile.
(See P–19 Inspection Using An
Oscilloscope (Reference))
AF CAN-L——No need to
check—
AG CAN-H——No need to
check—
AH—— — — — Terminal Signal Connected to Test condition Voltage (V) Action
0 V
A6E6921W014
0 V
A6E6921W013
Page 757 of 909

P–24
ON-BOARD DIAGNOSTIC
ABSRF_I
(Right front ABS pressure
retention solenoid valve output
state)ON/OFF•During ABS control: ON/
OFF
(solenoid valve is activated/
deactivated)
•Not ABS control: OFF
(solenoid valve is
deactivated)Internal fault of ABS
(ABS/TCS) or DSC
HU/CM. Replace ABS
(ABS/TCS) or DSC
HU/CM.—
ABSLF_I
(Left front ABS pressure
retention solenoid valve output
state)ON/OFF•During ABS control: ON/
OFF
(solenoid valve is activated/
deactivated)
•Not ABS control: OFF
(solenoid valve is
deactivated)Internal fault of ABS
(ABS/TCS) or DSC
HU/CM. Replace ABS
(ABS/TCS) or DSC
HU/CM.—
ABSVLVRLY
(Fail-safe relay output state)ON/OFF•Fail-safe relay is
activated: ON
•Fail-safe relay is
deactivated: OFFInspect ABS (ABS/
TCS) or DSC HU/CM.
—
ABSPMPRLY
(Motor relay output state)ON/OFF•Motor relay is activated: ON
•Motor relay is deactivated:
OFFInspect ABS (ABS/
TCS) or DSC HU/CM.—
SWA POS (with DSC only)
(Steering angle sensor input)ANGLE•Steering wheel is in neutral
position: 0 DEG
•Steering wheel is turned to
left: Changes between
0 DEG and -1,638.40 DEG
•Steering wheel is turned to
right: Changes between
0 DEG and 1,638.35 DEGInspect steering angle
sensor.
R, U, W, X
LF_WSPD
(Left front wheel-speed sensor
input)SPEED•Vehicle is stopped: 0 KPH
{0 MPH}
•Vehicle is driving: Indicates
vehicle speedInspect wheel-speed
sensor/sensor rotor.ABS (ABS/
TCS): E, I
DSC: F, J
RF_WSPD
(Right front wheel-speed
sensor input)SPEED•Vehicle is stopped: 0 KPH
{0 MPH}
•Vehicle is driving: Indicates
vehicle speedInspect wheel-speed
sensor/sensor rotor.ABS (ABS/
TCS): D, G
DSC: I, M
LR_WSPD
(Left rear wheel-speed sensor
input)SPEED•Vehicle is stopped: 0 KPH
{0 MPH}
•Vehicle is driving: Indicates
vehicle speedInspect wheel-speed
sensor/sensor rotor.ABS (ABS/
TCS): C, F
DSC: N, Q
RR_WSPD
(Right rear wheel-speed
sensor input)SPEED•Vehicle is stopped: 0 KPH
{0 MPH}
•Vehicle is driving: Indicates
vehicle speedInspect wheel-speed
sensor/sensor rotor.ABS (ABS/
TCS): A, B
DSC: H, K
LAT ACC (with DSC only)
(Lateral-G sensor input)ACCELERATION•Vehicle is stopped or driving
straight: 0 G
•Cornering to left: Changes
between 0 G and 1.27 G
•Cornering to right: Changes
between 0 G and -1.28 GInspect ABS wheel-
speed sensor/sensor
rotor.
O
YAW_RATE (with DSC only)
(Yaw rate sensor input)ACCELERATION•Vehicle is stopped or driving
straight: 0 DG/S
•Cornering to left: Changes
between 0 DG/S and 127
DG/S
•Cornering to right: Changes
between 0 DG/S and -128
DG/SInspect combine
sensor.
T
MCYLI P (with DSC only)
(Brake fluid pressure sensor
input)PRESSURE•Brake pedal is released:
0 MPa
•Brake pedal is depressed:
Changes between 0 MPa
and 25.5 MPaInspect DSC HU/CM.
— PID Name
(Definition)Unit/Condition Condition/Specification ActionABS (ABS/
TCS) HU/CM or
DSC HU/CM
terminal
Page 765 of 909

OUTLINE
R–3
R
SPECIFICATIONSA6E740201013203
*1: Engine coolant and engine oil are at specified level. Fuel is full. Spare tire, jack and tools are in designated position.
*
2: Difference between left and right must not exceed 1 °30'.*3: Distance between wheel center and fender brim is following. 4SD and 5HB front: 402 mm {15.82 in} (reference
value) 4SD and 5HB rear: 401 mm {15.78 in} (reference value), WGN (2WD) front: 405 mm {15.94 in}
(reference value) WGN (2WD) rear: 407 mm {16.02 in} (reference value)
Bold frames: New specifications
End Of Sie
Item Specification
New Mazda6 Current
Mazda6
GG (4SD, 5HB) GY (WGN 2WD) GY (WGN 4WD) GG (4SD, 5HB)
Engine type LF, MZR-CD
(RF Turbo) L8, LF, L3,
MZR-CD (RF Turbo) L3 L8, LF, L3
Fr o nt
suspension Type High-mount double wishbone (with double-pivoted lower arm(s))
Spring type Coil spring
Shock absorber type
Cylindrical, double-acting
(Low-pressure gas charged with rebound spring)
Stabilizer Type Torsion bar
Diameter (mm {in}) 23 {0.91}
Wheel
alignment
(Unloaded)*
1
Total toe-in (mm {in}) Tire: 2
±4 {0.08 ±0.16}, Rim inner: 1 ±3 {0.04 ±0.12}
(degree) 0 °11 ′±0°22 ′
Maximum
steering
angle inner
18 inch wheel specification vehicles: 36
°±3°
Except for above: 39 °±3°
outer 18 inch wheel specification vehicles: 30
°±3°
Except for above: 31 °±3°
Caster
angle*
2
(reference
value) normal 3
°47 ′±1° 3°40 ′±1° 3°35 ′±1° 3°47 ′±1°
elevated*33 °42' ±1° 3°35 ′±1° —3 °42' ±1 °
Camber
angle*
2
(reference
value) normal –0
°17 ′±1° –0°15 ′±1° –0°08 ′±1° –0°17 ′±1°
elevated*3–0 °10' ±1° –0°08 ′±1° —–0 °10' ±1°
Steering
axis
inclination
(reference
value) normal 5
°28 ′ 5°24 ′ 5°16 ′ 5°28 ′
elevated
*35 °18' 5 °16 ′ —5 °18'
Rear
suspension Type E-type multi-link
Spring type Coil spring
Stabilizer
Type Torsion bar
Diameter (mm {in})
4SD: 19 {0.75}
5HB: 18 {0.71}18 {0.71} 21 {0.83}
4SD: 19 {0.75}
5HB: 18 {0.71}
Shock absorber type Cylindrical,
double-acting
(Low-pressure gas charged) Cylindrical,
double-acting
(Low-pressure gas charged)/
(High-pressure
gas charged) Cylindrical,
double-acting
(High-pressure gas charged) Cylindrical,
double-acting
(Low-pressure gas charged)
Wheel
alignment
(Unloaded)*
1
Total toe-in (mm {in}) Tire: 2
±4 {0.08 ±0.16}, Rim inner: 1 ±3 {0.04 ±0.12}
(degree) 0 °11 ′±0°22 ′
Camber
angle*
2
normal –1 °13 ′±1° –1°06 ′±1° –1°03 ′±1° –1°13 ′±1°
elevated
*3–1 °05 ′±1° –0°58 ′±1° —–1 °05 ′±1°
Thrust angle (degree) 0 °±0°48 ′
Page 770 of 909

R–8
WHEEL ALIGNMENT
FRONT WHEEL ALIGNMENT (WGN)A6E741201015201Specification (Unloaded)*1
2WD
*
1: Engine coolant and engine oil are at specified level. Spare tire, jack and tools are in designated position.
*2: Difference between left and right must not exceed 1 °30'.*3: Distance between wheel center and fender brim is 405 mm {15.94 in} (reference value).
4WD
*
1: Engine coolant and engine oil are at specified level. Spare tire, jack and tools are in designated position.
*2: Difference between left and right must not exceed 1 °30'.
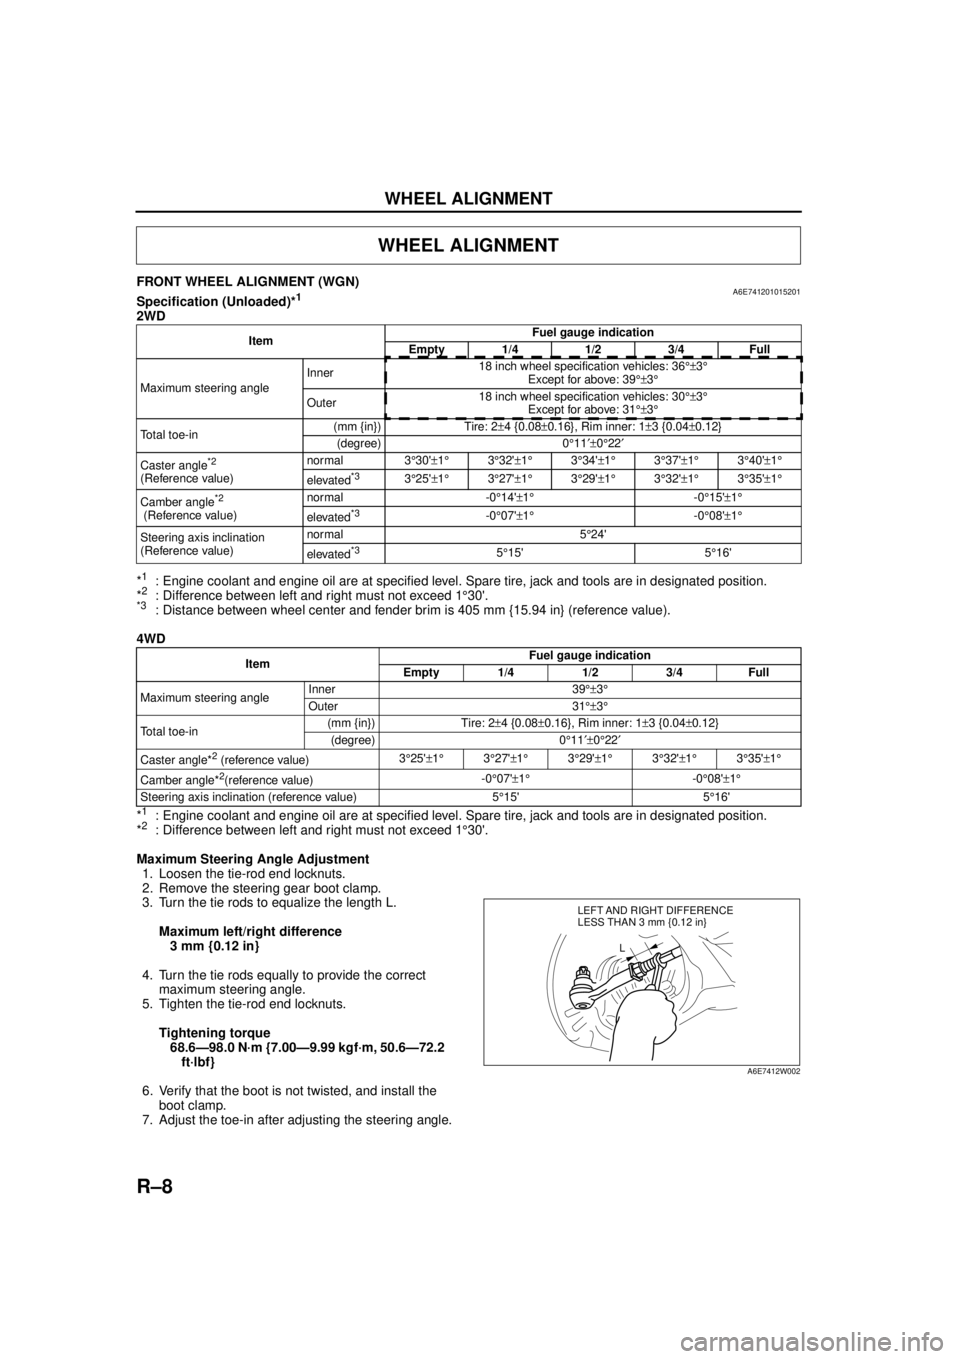
Maximum Steering Angle Adjustment 1. Loosen the tie-rod end locknuts.
2. Remove the steering gear boot clamp.
3. Turn the tie rods to equalize the length L.
Maximum left/right difference3 mm {0.12 in}
4. Turn the tie rods equally to provide the correct maximum steering angle.
5. Tighten the tie-rod end locknuts.
Tightening torque68.6—98.0 N·m {7.00—9.99 kgf·m, 50.6—72.2 ft·lbf}
6. Verify that the boot is not twisted, and install the boot clamp.
7. Adjust the toe-in after adjusting the steering angle.
WHEEL ALIGNMENT
Item Fuel gauge indication
Empty 1/4 1/2 3/4 Full
Maximum steering angle Inner
18 inch wheel specification vehicles: 36
°±3°
Except for above: 39 °±3°
Outer 18 inch wheel specification vehicles: 30
°±3°
Except for above: 31 °±3°
Total toe-in (mm {in}) Tire: 2
±4 {0.08 ±0.16}, Rim inner: 1 ±3 {0.04 ±0.12}
(degree) 0 °11 ′±0°22 ′
Caster angle
*2
(Reference value) normal 3
°30' ±1 ° 3°32' ±1 ° 3°34' ±1° 3°37' ±1° 3°40' ±1 °
elevated*33 °25' ±1 ° 3°27' ±1 ° 3°29' ±1° 3°32' ±1° 3°35' ±1 °
Camber angle
*2
(Reference value) normal -0
°14' ±1 ° -0°15' ±1°
elevated*3-0 °07' ±1 ° -0°08' ±1°
Steering axis inclination
(Reference value) normal 5
°24'
elevated
*35 °15' 5 °16'
Item Fuel gauge indication
Empty 1/4 1/2 3/4 Full
Maximum steering angle Inner 39
°±3°
Outer 31 °±3°
Total toe-in (mm {in}) Tire: 2
±4 {0.08 ±0.16}, Rim inner: 1 ±3 {0.04 ±0.12}
(degree) 0 °11 ′±0°22 ′
Caster angle*
2 (reference value) 3
°25' ±1 ° 3°27' ±1 ° 3°29' ±1 ° 3°32' ±1 ° 3°35' ±1 °
Camber angle*
2(reference value) -0
°07' ±1 ° -0°08' ±1°
Steering axis inclination (reference value) 5 °15' 5 °16'
LEFT AND RIGHT DIFFERENCE
L
LESS THAN 3 mm {0.12 in}
A6E7412W002