coolant level MAZDA 6 2002 Suplement Owner's Manual
[x] Cancel search | Manufacturer: MAZDA, Model Year: 2002, Model line: 6, Model: MAZDA 6 2002Pages: 909, PDF Size: 17.16 MB
Page 523 of 909
K2–108
AUTOMATIC TRANSAXLE
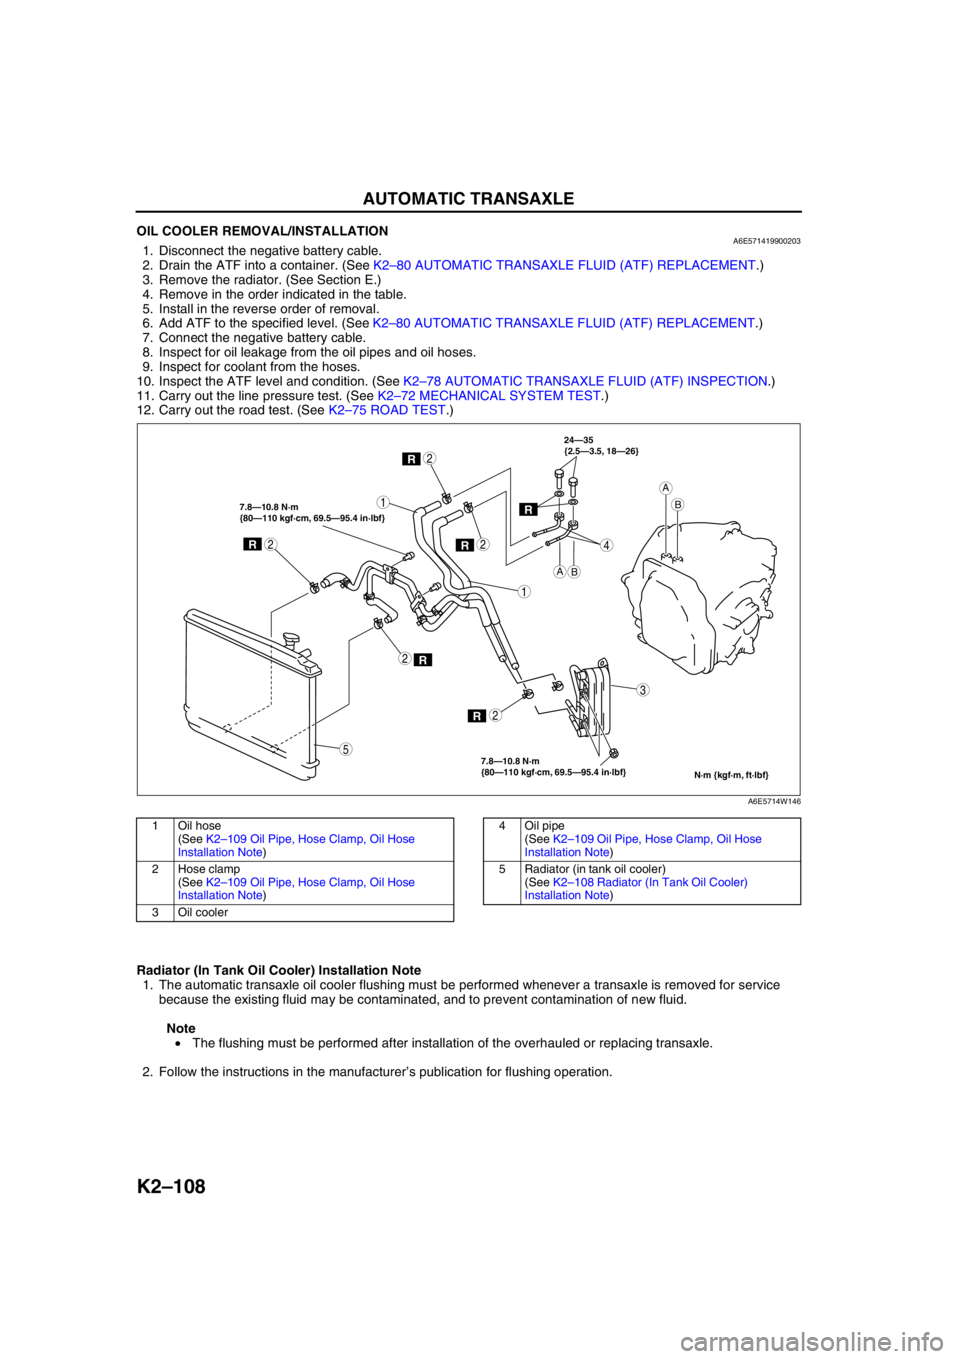
OIL COOLER REMOVAL/INSTALLATIONA6E5714199002031. Disconnect the negative battery cable.
2. Drain the ATF into a container. (See K2–80 AUTOMATIC TRANSAXLE FLUID (ATF) REPLACEMENT.)
3. Remove the radiator. (See Section E.)
4. Remove in the order indicated in the table.
5. Install in the reverse order of removal.
6. Add ATF to the specified level. (See K2–80 AUTOMATIC TRANSAXLE FLUID (ATF) REPLACEMENT.)
7. Connect the negative battery cable.
8. Inspect for oil leakage from the oil pipes and oil hoses.
9. Inspect for coolant from the hoses.
10. Inspect the ATF level and condition. (See K2–78 AUTOMATIC TRANSAXLE FLUID (ATF) INSPECTION.)
11. Carry out the line pressure test. (See K2–72 MECHANICAL SYSTEM TEST.)
12. Carry out the road test. (See K2–75 ROAD TEST.)
.
Radiator (In Tank Oil Cooler) Installation Note
1. The automatic transaxle oil cooler flushing must be performed whenever a transaxle is removed for service
because the existing fluid may be contaminated, and to prevent contamination of new fluid.
Note
• The flushing must be performed after installation of the overhauled or replacing transaxle.
2. Follow the instructions in the manufacturer’s publication for flushing operation.
R
R
1
2
1
3
4
2
R2
R2
R
7.8—10.8 N·m
{80—110 kgf·cm, 69.5—95.4 in·lbf} 7.8—10.8 N·m
{80—110 kgf·cm, 69.5—95.4 in·lbf}24—35
{2.5—3.5, 18—26}
2
5
AB
A
B
N·m {kgf·m, ft·lbf}
R
A6E5714W146
1Oil hose
(See K2–109 Oil Pipe, Hose Clamp, Oil Hose
Installation Note)
2 Hose clamp
(See K2–109 Oil Pipe, Hose Clamp, Oil Hose
Installation Note)
3Oil cooler4 Oil pipe
(See K2–109 Oil Pipe, Hose Clamp, Oil Hose
Installation Note)
5 Radiator (in tank oil cooler)
(See K2–108 Radiator (In Tank Oil Cooler)
Installation Note)
Page 614 of 909
TROUBLESHOOTING
K2–199
K2
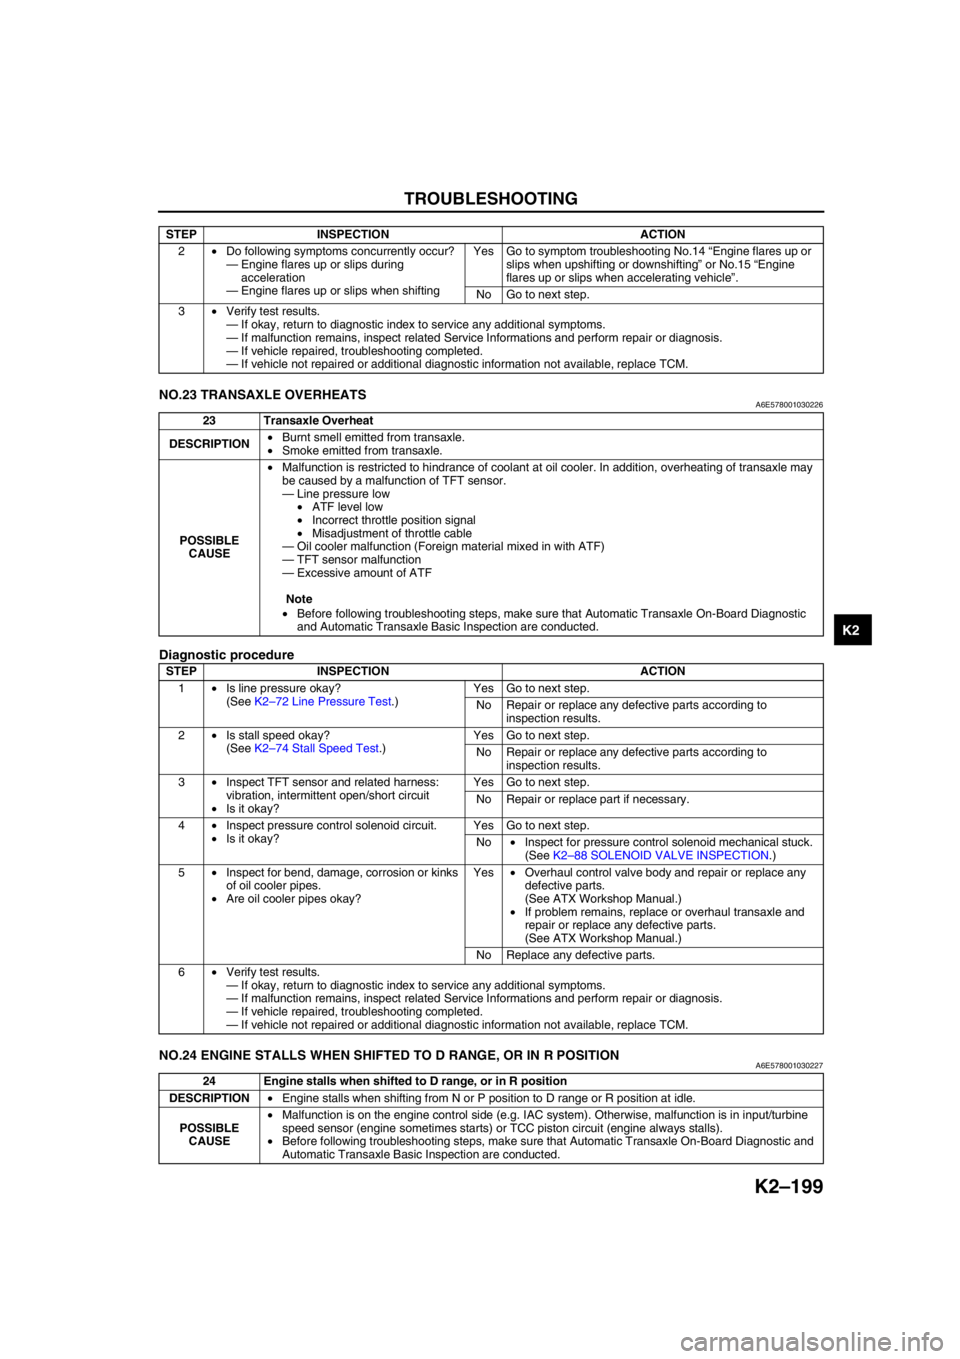
End Of SieNO.23 TRANSAXLE OVERHEATSA6E578001030226
Diagnostic procedure
End Of SieNO.24 ENGINE STALLS WHEN SHIFTED TO D RANGE, OR IN R POSITIONA6E578001030227
2•Do following symptoms concurrently occur?
—Engine flares up or slips during
acceleration
—Engine flares up or slips when shiftingYes Go to symptom troubleshooting No.14 “Engine flares up or
slips when upshifting or downshifting” or No.15 “Engine
flares up or slips when accelerating vehicle”.
No Go to next step.
3•Verify test results.
—If okay, return to diagnostic index to service any additional symptoms.
—If malfunction remains, inspect related Service Informations and perform repair or diagnosis.
—If vehicle repaired, troubleshooting completed.
—If vehicle not repaired or additional diagnostic information not available, replace TCM. STEP INSPECTION ACTION
23 Transaxle Overheat
DESCRIPTION•Burnt smell emitted from transaxle.
•Smoke emitted from transaxle.
POSSIBLE
CAUSE•Malfunction is restricted to hindrance of coolant at oil cooler. In addition, overheating of transaxle may
be caused by a malfunction of TFT sensor.
—Line pressure low
•ATF level low
•Incorrect throttle position signal
•Misadjustment of throttle cable
—Oil cooler malfunction (Foreign material mixed in with ATF)
—TFT sensor malfunction
—Excessive amount of ATF
Note
•Before following troubleshooting steps, make sure that Automatic Transaxle On-Board Diagnostic
and Automatic Transaxle Basic Inspection are conducted.
STEP INSPECTION ACTION
1•Is line pressure okay?
(See K2–72 Line Pressure Test.)Yes Go to next step.
No Repair or replace any defective parts according to
inspection results.
2•Is stall speed okay?
(See K2–74 Stall Speed Test.)Yes Go to next step.
No Repair or replace any defective parts according to
inspection results.
3•Inspect TFT sensor and related harness:
vibration, intermittent open/short circuit
•Is it okay?Yes Go to next step.
No Repair or replace part if necessary.
4•Inspect pressure control solenoid circuit.
•Is it okay?Yes Go to next step.
No•Inspect for pressure control solenoid mechanical stuck.
(See K2–88 SOLENOID VALVE INSPECTION.)
5•Inspect for bend, damage, corrosion or kinks
of oil cooler pipes.
•Are oil cooler pipes okay?Yes•Overhaul control valve body and repair or replace any
defective parts.
(See ATX Workshop Manual.)
•If problem remains, replace or overhaul transaxle and
repair or replace any defective parts.
(See ATX Workshop Manual.)
No Replace any defective parts.
6•Verify test results.
—If okay, return to diagnostic index to service any additional symptoms.
—If malfunction remains, inspect related Service Informations and perform repair or diagnosis.
—If vehicle repaired, troubleshooting completed.
—If vehicle not repaired or additional diagnostic information not available, replace TCM.
24 Engine stalls when shifted to D range, or in R position
DESCRIPTION•Engine stalls when shifting from N or P position to D range or R position at idle.
POSSIBLE
CAUSE•Malfunction is on the engine control side (e.g. IAC system). Otherwise, malfunction is in input/turbine
speed sensor (engine sometimes starts) or TCC piston circuit (engine always stalls).
•Before following troubleshooting steps, make sure that Automatic Transaxle On-Board Diagnostic and
Automatic Transaxle Basic Inspection are conducted.
Page 651 of 909
GENERAL PROCEDURES
M–21
M
PRECAUTION (FRONT AND REAR AXLE)A6E631001018201Wheel and Tire Removal/Installation
1. The removal and installation procedures for the wheels and tires are not mentioned in this section. When a
wheel is removed, tighten it to 88—118 N·m {9.0—12.0 kgf·m, 65.0—87.0 ft·lbf}
Brake Line Disconnection/Connection
Caution
•Brake fluid will damage painted surfaces. If brake fluid gets on a painted surface, wipe it off
immediately.
1. Tighten the brake pipe flare nut using the SST (49 0259 770B). Be sure to modify the brake pipe flare nut
tightening torque to allow for use of a torque wrench-SST combination.
2. If any brake line has been disconnected any time during the procedure, add brake fluid, bleed the brakes, and
inspect for leakage after the procedure has been completed.
Suspension Arm Removal/Installation
1. Tighten any part of the suspension that uses rubber bushings only after vehicle has been lowered and
unloaded.
Note
•Unloaded: Fuel tank is full. Engine coolant and engine oil are at specified level. Spare tire, jack, and tools
are in designated position.
Connector Disconnection
1. Disconnect the negative (-) battery cable before disconnecting connectors.
Electronic Control 4WD System Parts
1. After servicing the electronic control 4WD system parts, verify that no DTC has been stored. Clear any DTCs
remaining in the memory.
End Of Sie
GENERAL PROCEDURES
Page 765 of 909

OUTLINE
R–3
R
SPECIFICATIONSA6E740201013203
*1: Engine coolant and engine oil are at specified level. Fuel is full. Spare tire, jack and tools are in designated position.
*
2: Difference between left and right must not exceed 1 °30'.*3: Distance between wheel center and fender brim is following. 4SD and 5HB front: 402 mm {15.82 in} (reference
value) 4SD and 5HB rear: 401 mm {15.78 in} (reference value), WGN (2WD) front: 405 mm {15.94 in}
(reference value) WGN (2WD) rear: 407 mm {16.02 in} (reference value)
Bold frames: New specifications
End Of Sie
Item Specification
New Mazda6 Current
Mazda6
GG (4SD, 5HB) GY (WGN 2WD) GY (WGN 4WD) GG (4SD, 5HB)
Engine type LF, MZR-CD
(RF Turbo) L8, LF, L3,
MZR-CD (RF Turbo) L3 L8, LF, L3
Fr o nt
suspension Type High-mount double wishbone (with double-pivoted lower arm(s))
Spring type Coil spring
Shock absorber type
Cylindrical, double-acting
(Low-pressure gas charged with rebound spring)
Stabilizer Type Torsion bar
Diameter (mm {in}) 23 {0.91}
Wheel
alignment
(Unloaded)*
1
Total toe-in (mm {in}) Tire: 2
±4 {0.08 ±0.16}, Rim inner: 1 ±3 {0.04 ±0.12}
(degree) 0 °11 ′±0°22 ′
Maximum
steering
angle inner
18 inch wheel specification vehicles: 36
°±3°
Except for above: 39 °±3°
outer 18 inch wheel specification vehicles: 30
°±3°
Except for above: 31 °±3°
Caster
angle*
2
(reference
value) normal 3
°47 ′±1° 3°40 ′±1° 3°35 ′±1° 3°47 ′±1°
elevated*33 °42' ±1° 3°35 ′±1° —3 °42' ±1 °
Camber
angle*
2
(reference
value) normal –0
°17 ′±1° –0°15 ′±1° –0°08 ′±1° –0°17 ′±1°
elevated*3–0 °10' ±1° –0°08 ′±1° —–0 °10' ±1°
Steering
axis
inclination
(reference
value) normal 5
°28 ′ 5°24 ′ 5°16 ′ 5°28 ′
elevated
*35 °18' 5 °16 ′ —5 °18'
Rear
suspension Type E-type multi-link
Spring type Coil spring
Stabilizer
Type Torsion bar
Diameter (mm {in})
4SD: 19 {0.75}
5HB: 18 {0.71}18 {0.71} 21 {0.83}
4SD: 19 {0.75}
5HB: 18 {0.71}
Shock absorber type Cylindrical,
double-acting
(Low-pressure gas charged) Cylindrical,
double-acting
(Low-pressure gas charged)/
(High-pressure
gas charged) Cylindrical,
double-acting
(High-pressure gas charged) Cylindrical,
double-acting
(Low-pressure gas charged)
Wheel
alignment
(Unloaded)*
1
Total toe-in (mm {in}) Tire: 2
±4 {0.08 ±0.16}, Rim inner: 1 ±3 {0.04 ±0.12}
(degree) 0 °11 ′±0°22 ′
Camber
angle*
2
normal –1 °13 ′±1° –1°06 ′±1° –1°03 ′±1° –1°13 ′±1°
elevated
*3–1 °05 ′±1° –0°58 ′±1° —–1 °05 ′±1°
Thrust angle (degree) 0 °±0°48 ′
Page 767 of 909
REAR SUSPENSION
R–5
R
SUSPENSION CONTROL SYSTEMA6E741601013201Outline
•The self-leveling suspension is a system that adjusts the vehicle height according the amount of vehicle load.
This system will raise the rear of a vehicle, lowered due to a load placed on it, to the designated load level
* after
the vehicle has been driven a certain distance.
•The vehicle height adjustment is performed using a gas-pressurized pump function built into the rear shock
absorber.
•For the vehicle height to return to the designated load level, the vehicle must be driven approx. 5—6 km {3.1—
3.7 miles} in city driving conditions. (Distance will vary due to load and road conditions.)
•A load amount of approx. 140—300 kg {308—660 lb} at the rear axle will cause the vehicle height to be raised,
and any weight over that will prevent the vehicle from returning to the designated load level.
*: Designated load level is defined as the level at which the vehicle is with: a full fuel tank; engine coolant and oil at
specified levels; spare tire, jack and tools in designated positions; and four people, weighing 55 kg {121 lb} each,
riding in the vehicle.
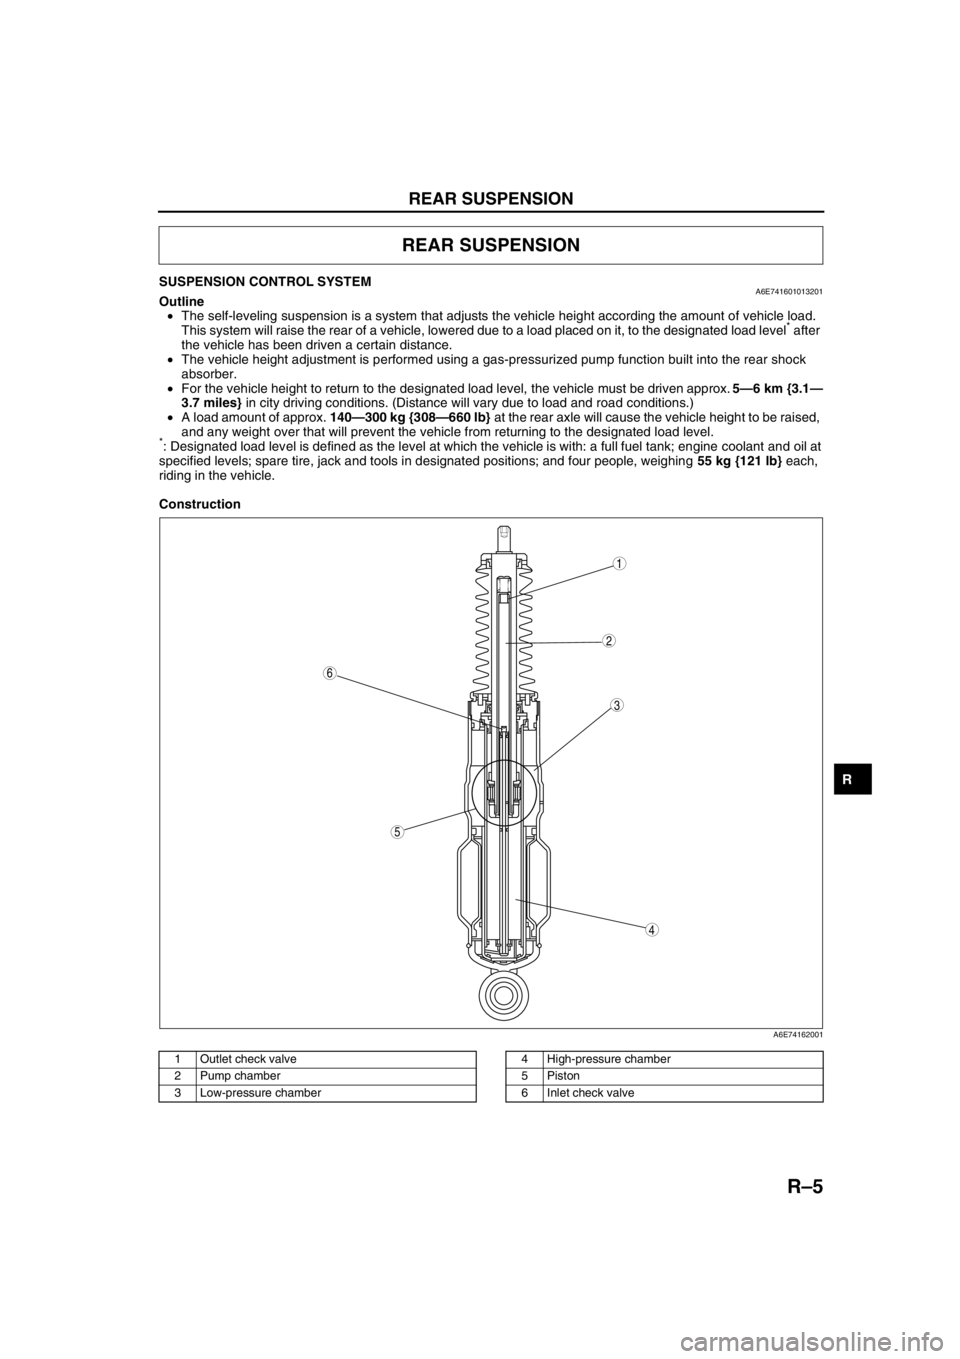
Construction
.
REAR SUSPENSION
5
4
3
6
1
2
A6E74162001
1 Outlet check valve
2 Pump chamber
3 Low-pressure chamber4 High-pressure chamber
5Piston
6 Inlet check valve
Page 770 of 909
R–8
WHEEL ALIGNMENT
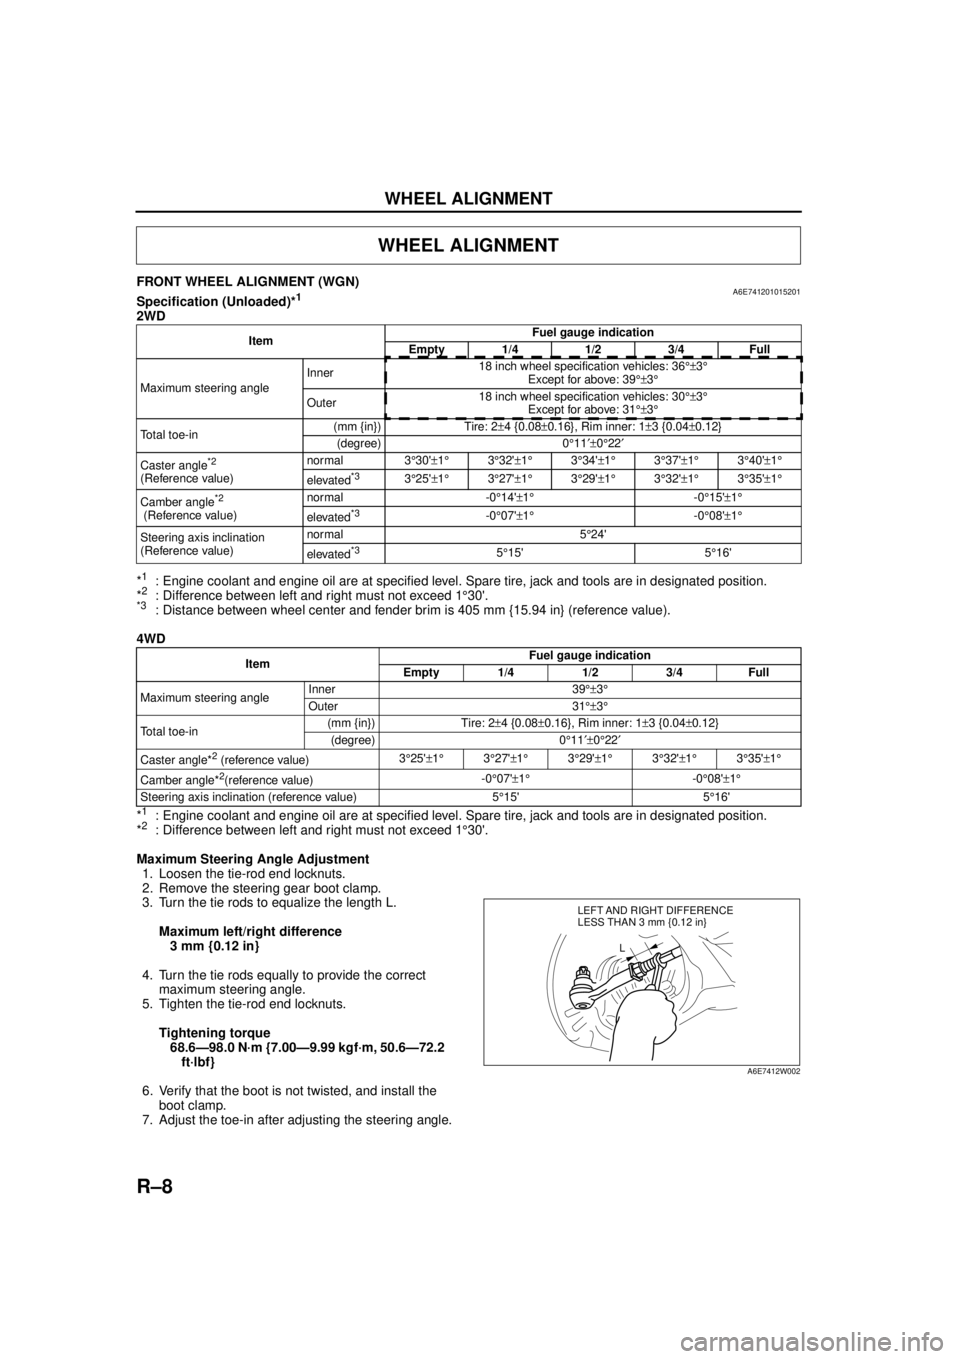
FRONT WHEEL ALIGNMENT (WGN)A6E741201015201Specification (Unloaded)*1
2WD
*
1: Engine coolant and engine oil are at specified level. Spare tire, jack and tools are in designated position.
*2: Difference between left and right must not exceed 1 °30'.*3: Distance between wheel center and fender brim is 405 mm {15.94 in} (reference value).
4WD
*
1: Engine coolant and engine oil are at specified level. Spare tire, jack and tools are in designated position.
*2: Difference between left and right must not exceed 1 °30'.
Maximum Steering Angle Adjustment 1. Loosen the tie-rod end locknuts.
2. Remove the steering gear boot clamp.
3. Turn the tie rods to equalize the length L.
Maximum left/right difference3 mm {0.12 in}
4. Turn the tie rods equally to provide the correct maximum steering angle.
5. Tighten the tie-rod end locknuts.
Tightening torque68.6—98.0 N·m {7.00—9.99 kgf·m, 50.6—72.2 ft·lbf}
6. Verify that the boot is not twisted, and install the boot clamp.
7. Adjust the toe-in after adjusting the steering angle.
WHEEL ALIGNMENT
Item Fuel gauge indication
Empty 1/4 1/2 3/4 Full
Maximum steering angle Inner
18 inch wheel specification vehicles: 36
°±3°
Except for above: 39 °±3°
Outer 18 inch wheel specification vehicles: 30
°±3°
Except for above: 31 °±3°
Total toe-in (mm {in}) Tire: 2
±4 {0.08 ±0.16}, Rim inner: 1 ±3 {0.04 ±0.12}
(degree) 0 °11 ′±0°22 ′
Caster angle
*2
(Reference value) normal 3
°30' ±1 ° 3°32' ±1 ° 3°34' ±1° 3°37' ±1° 3°40' ±1 °
elevated*33 °25' ±1 ° 3°27' ±1 ° 3°29' ±1° 3°32' ±1° 3°35' ±1 °
Camber angle
*2
(Reference value) normal -0
°14' ±1 ° -0°15' ±1°
elevated*3-0 °07' ±1 ° -0°08' ±1°
Steering axis inclination
(Reference value) normal 5
°24'
elevated
*35 °15' 5 °16'
Item Fuel gauge indication
Empty 1/4 1/2 3/4 Full
Maximum steering angle Inner 39
°±3°
Outer 31 °±3°
Total toe-in (mm {in}) Tire: 2
±4 {0.08 ±0.16}, Rim inner: 1 ±3 {0.04 ±0.12}
(degree) 0 °11 ′±0°22 ′
Caster angle*
2 (reference value) 3
°25' ±1 ° 3°27' ±1 ° 3°29' ±1 ° 3°32' ±1 ° 3°35' ±1 °
Camber angle*
2(reference value) -0
°07' ±1 ° -0°08' ±1°
Steering axis inclination (reference value) 5 °15' 5 °16'
LEFT AND RIGHT DIFFERENCE
L
LESS THAN 3 mm {0.12 in}
A6E7412W002
Page 771 of 909
WHEEL ALIGNMENT
R–9
R
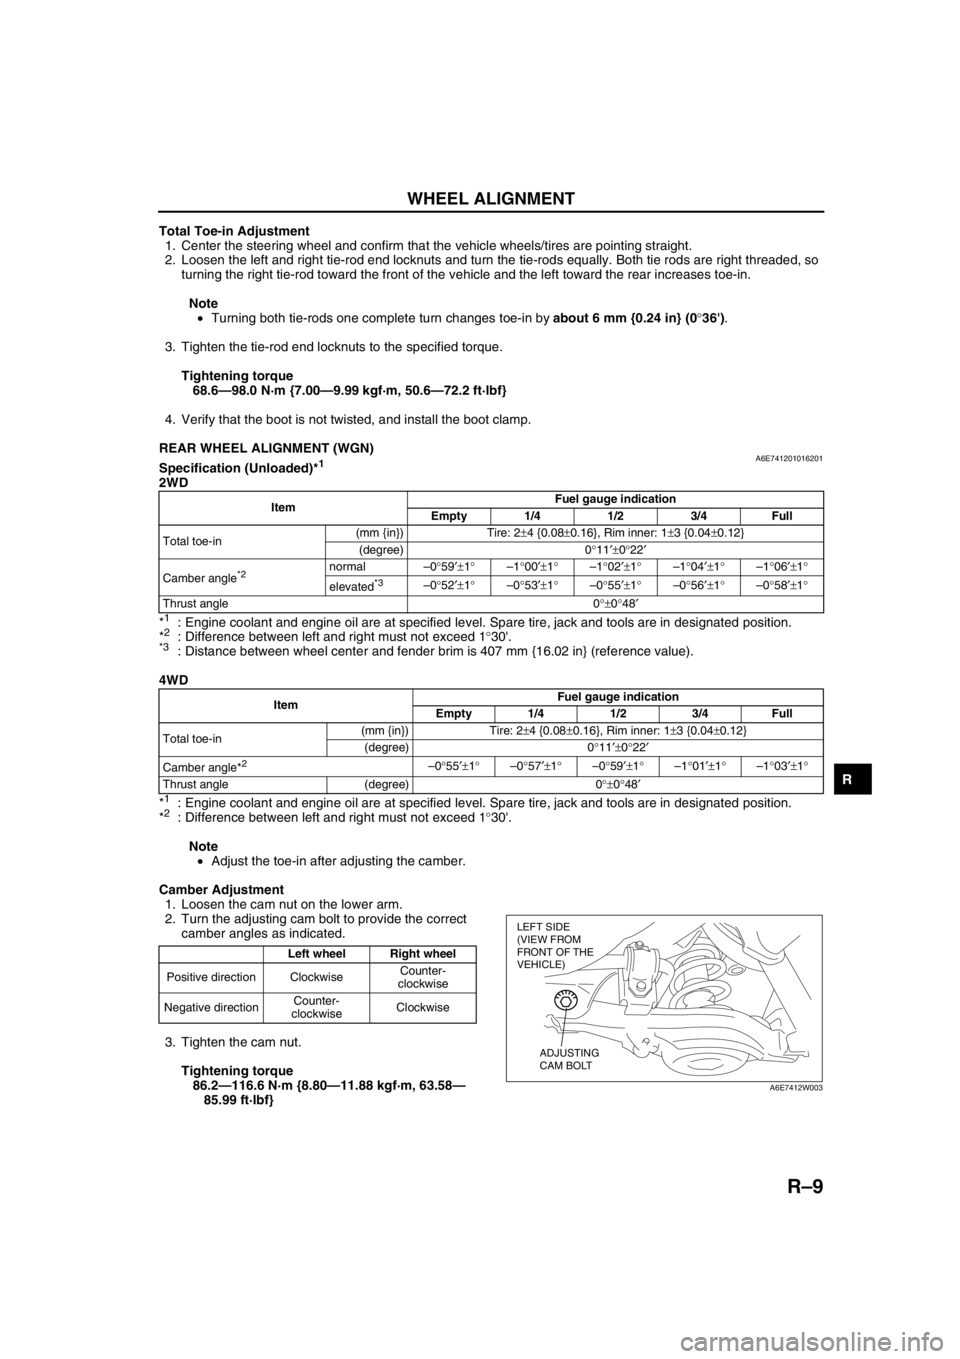
Total Toe-in Adjustment
1. Center the steering wheel and confirm that the vehicle wheels/tires are pointing straight.
2. Loosen the left and right tie-rod end locknuts and turn the tie-rods equally. Both tie rods are right threaded, so
turning the right tie-rod toward the front of the vehicle and the left toward the rear increases toe-in.
Note
•Turning both tie-rods one complete turn changes toe-in by about 6 mm {0.24 in} (0°36').
3. Tighten the tie-rod end locknuts to the specified torque.
Tightening torque
68.6—98.0 N·m {7.00—9.99 kgf·m, 50.6—72.2 ft·lbf}
4. Verify that the boot is not twisted, and install the boot clamp.
End Of Sie
REAR WHEEL ALIGNMENT (WGN)A6E741201016201Specification (Unloaded)*1
2WD
*
1: Engine coolant and engine oil are at specified level. Spare tire, jack and tools are in designated position.
*2: Difference between left and right must not exceed 1°30'.*3: Distance between wheel center and fender brim is 407 mm {16.02 in} (reference value).
4WD
*
1: Engine coolant and engine oil are at specified level. Spare tire, jack and tools are in designated position.
*2: Difference between left and right must not exceed 1°30'.
Note
•Adjust the toe-in after adjusting the camber.
Camber Adjustment
1. Loosen the cam nut on the lower arm.
2. Turn the adjusting cam bolt to provide the correct
camber angles as indicated.
3. Tighten the cam nut.
Tightening torque
86.2—116.6 N·m {8.80—11.88 kgf·m, 63.58—
85.99 ft·lbf}
ItemFuel gauge indication
Empty 1/4 1/2 3/4 Full
Total toe-in(mm {in}) Tire: 2±4 {0.08±0.16}, Rim inner: 1±3 {0.04±0.12}
(degree) 0°11′±0°22′
Camber angle
*2 normal–0°59′±1°–1°00′±1°–1°02′±1°–1°04′±1°–1°06′±1°
elevated
*3–0°52′±1°–0°53′±1°–0°55′±1°–0°56′±1°–0°58′±1°
Thrust angle 0°±0°48′
ItemFuel gauge indication
Empty 1/4 1/2 3/4 Full
Total toe-in(mm {in}) Tire: 2±4 {0.08±0.16}, Rim inner: 1±3 {0.04±0.12}
(degree) 0°11′±0°22′
Camber angle*
2 –0°55′±1°–0°57′±1°–0°59′±1°–1°01′±1°–1°03′±1°
Thrust angle (degree) 0°±0°48′
Left wheel Right wheel
Positive direction ClockwiseCounter-
clockwise
Negative directionCounter-
clockwiseClockwise
LEFT SIDE
(VIEW FROM
FRONT OF THE
VEHICLE)
ADJUSTING
CAM BOLT
A6E7412W003
Page 899 of 909

TECHNICAL DATA
TD–7
TD
BRAKING SYSTEMA6E931001020201
End Of Sie
SUSPENSIONA6E931001013201Suspension
WGN (2WD)
*1: Engine coolant and engine oil are at specified level. Spare tire, jack, and tools are in designated position. Adjust to the median when carrying out wheel alignment.
*2: Difference between left and right must not exceed 1 ° 30 ′.*3: Distance between wheel center and fender brim is following. Front: 405 mm {15.94 in} (reference value) Rear:
407 mm {16.02 in} (reference value)
WGN (4WD)
*1: Engine coolant and engine oil are at specified level. Spare tire, jack, and tools are in designated position. Adjust to the median when carrying out wheel alignment.
*2: Difference between left and right must not exceed 1 ° 30 ′.
Item Specification
CONVENTIONAL BRAKE SYSTEM
Front disc
brake Minimum disc pad
thickness
(mm {in})L8, LF (GCC specs.): 22 mm {0.87 in}
LF (European (L.H.D. U.K.) specs.), L3, MZR-CD (RF Turbo):
23 mm {0.91 in}
Minimum disc plate
thickness (mm {in})L8, LF (GCC specs.): 22.8 mm {0.90 in}
LF (European (L.H.D. U.K.) specs.), L3, MZR-CD (RF Turbo): 23.8 mm {0.94 in}
Item Fuel gauge indication
Empty 1/4 1/2 3/4 Full
Fr o nt wh ee l
alignment
(Unloaded)
*1
Maximum steering
angle Inner
18 inch wheel specification vehicles: 36
°±3°
Except for above: 39 °±3°
Outer 18 inch wheel specification vehicles: 30
°±3°
Except for above: 31 °±3°
Total toe-in (mm {in}) Tire: 2
±4 {0.08 ±0.16}, Rim inner: 1 ±3 {0.04 ±0.12}
(degree) 0 °11 ′±0°22 ′
Caster angle
*2
(Reference value) normal 3
°30' ±1 ° 3°32' ±1 ° 3°34' ±1 ° 3°37' ±1 ° 3°40' ±1°
elevated*33 °25' ±1 ° 3°27' ±1 ° 3°29' ±1 ° 3°32' ±1 ° 3°35' ±1°
Camber angle
*2
(Reference value) normal –0
°14' ±1 ° –0°15' ±1°
elevated*3–0 °07' ±1 ° –0°08' ±1°
Steering axis inclination
(Reference value) normal 5
°24'
elevated
*35 °15' 5 °16'
Rear wheel
alignment
(Unloaded)
*1
Total toe-in (mm {in}) Tire: 2
±4 {0.08 ±0.16}, Rim inner: 1 ±3 {0.04 ±0.12}
(degree) 0 °11 ′±0°22 ′
Camber angle
*2 normal –0 °59 ′±1° –1°00 ′±1° –1°02 ′±1° –1°04 ′±1° –1°06 ′±1°
elevated
*3–0 °52 ′±1° –0°53 ′±1° –0°55 ′±1° –0°56 ′±1° –0°58 ′±1°
Thrust angle 0 °±0°48 ′
Item Fuel gauge indication
Empty 1/4 1/2 3/4 Full
Fr o nt wh ee l
alignment
(Unloaded)
*1
Maximum steering
angle Inner 39
°±3°
Outer 31 °±3°
Total toe-in (mm {in}) Tire: 2
±4 {0.08 ±0.16}, Rim inner: 1 ±3 {0.04 ±0.12}
(degree) 0 °11 ′±0°22 ′
Caster angle
*2 (Reference value) 3
°25' ±1 ° 3°27' ±1 ° 3°29' ±1 ° 3°32' ±1 ° 3°35' ±1°
Camber angle
*2 (Reference value) –0
°07' ±1 ° –0°08' ±1°
Steering axis inclination
(Reference value) 5
°15' 5 °16'
Rear wheel
alignment
(Unloaded)
*1
Total toe-in (mm {in}) Tire: 2
±4 {0.08 ±0.16}, Rim inner: 1 ±3 {0.04 ±0.12}
(degree) 0 °11 ′±0°22 ′
Camber angle
*2 –0 °55 ′±1° –0°57 ′±1° –0°59 ′±1° –1°01 ′±1° –1°03 ′±1°
Thrust angle 0 °±0°48 ′