fuel filter MAZDA 626 1987 Owner's Manual
[x] Cancel search | Manufacturer: MAZDA, Model Year: 1987, Model line: 626, Model: MAZDA 626 1987Pages: 1865, PDF Size: 94.35 MB
Page 468 of 1865

4B OUTLINE
SPECIFICATIONS
Item Specification
Idle speed rpm MTX: 800 +5„° (Neutral), ATX: 900 +5S
(P
range)
Throttle body
Type Horizontal draft (1 -barrel)
Throat diameter mm (in) 50 (2.0)
Air flow meter
E2-VS More than
20
E2-VC 100-300
Resistor
Q
E2-VB 200—400 Resistor
Q
E2-THA -20°C
(
—4°F) 13,600-18,400 20°C
(
68°F) 2,210-2,690 60°C (140°F)
493- 667
Air cleaner
Element type Oil permeated
Fuel pump
Type Impeller
(in
tank)
Output pressure kPa (kg/cm2,
psi)
441-588 (4.5-6.0, 64—85)
Feeding capacity cc (cu in)/10 sec. 220 (13.4) minmum
Fuel filter
Type Low pressure side Nylon element Type High pressure side Paper element
Pressure regulator
Type Diaphragm
Regulating pressure kPa (kg/cm2,
psi)
235-275 (2.4—2.8, 34—40)
Injector
TvDe
Hiqh-ohmic
Type
of
drive Voltage
Resistance
fi
12-16
Injection amount cc (cu
in) 15
seconds 38—53 (2.3-3.2)
Fuel tank
Capacity liters (US gal, Imp gal) 60 (15.9, 13.2)
Fuel
Soecification Unleaded reaular
76G04B-506
4B—6
Page 469 of 1865

TROUBLESHOOTING GUIDE 4B
TROUBLESHOOTING GUIDE
This troubleshooting guide shows the malfunction numbers and the symptoms of various failures.
Perform troubleshooting as described below.
Possible cause
Symptom
Input sensors and switches
o>
C
0
Jh c 01
4B-14
a> 4)
E
o
4B-1S
o in c « m o E k_ 0) c.
0 <0 £
4B-16
o CO c a> 0) o E
a>
.x
co
4B-17
o 10 c a) co
4B-18
o in c a> (0
o> o> a>
a) £ a VI o E
4B-19
0 <0 c a> 0) c a> 01
S? o
4B-20
E a> in (0
o 10 A •o 0) 0> u.
4B-21
Output solenoid valves
o «
3 O) 0)
0) 0) 01
0> > 10 >
•o o c V o tt)
4B-22
0)
OI
0> > CO >
TJ
O c 0> o CO
4B-23
oc O u
o> > 75 >
•o o c a> o 05
4B-23
0 a. 3 1
2
0) > (0 >
"D O
o 0> in in a a >. £
4B-23
ffl a 3 • a>
2
a> > 10 >
"O o c a> o
CO Q. >. JO
4B-24
Fault Indicated by SST
Code No. 01 08 09 10 12 14 15 17 25 26 28 34 35
Hard start or won't start
(Cranks OK)
Engine stalls
Rough
idle
While warming up
After warming up
While warming up
After warming up
High idle speed after
warming up
TROUBLESHOOTING PROCEDURE
Note
Step 1 under symptom is to quickly determine what system or unit may be at fault by use of the SST. (Self-Diagnosis Checker 49 H018 9A1)
1st:
Check input sensors and output solenoid valves with the
SST.
(Refer
to
page 4B—10.)
2nd:
Check other switches with the
SST.
(Refer
to
page 4B—26.)
3rd:
Check the following items:
11
Poor acceleration, hesita-
tion or lack of power
Runs rough on deceleration
Afterburn in exhaust system
Poor fuel consumption
Engine stalls or rough after hot starting
Electrical system
1) Battery condition
2) Fuses
Fuel system
1) Fuel level 2) Fuel leakage
3) Fuel filter 4) Idle speed
Engine
1) Compression 2) Overheating
Ignition system
1) Ignition spark 2) Ignition timing
Intake air system
1)
Air
cleaner element 2) Vacuum
or air
leakage 3) Vacuum hose routing
4) Accelerator cable
Others
1) Clutch slippage 2) Brake dragging
Fails emission test 4th:
Check Fuel and Emission Control Systems. (Refer
to
page 4B—8.)
76G04B-003
4B—7
Page 492 of 1865

4B INTAKE AIR SYSTEM
INTAKE AIR SYSTEM
76G04B-036
This system controls the air required by the engine for operation. The system consists of the air duct,
air cleaner, air flow meter, throttle body, dynamic chamber, and intake manifold.
COMPONENT DESCRIPTIONS
Component Function Remarks
Air cleaner
Filters
air
into throttle body
Air flow meter
Detects amount
of
intake air;
sends signal
to
engine control unit Intake
air
thermo sensor and fuel pump
switch are integrated
Throttle body
Controls intake
air
quantity Integrated throttle sensor and idle switch
76G04B-037
4B—30
Page 504 of 1865
4B FUEL SYSTEM
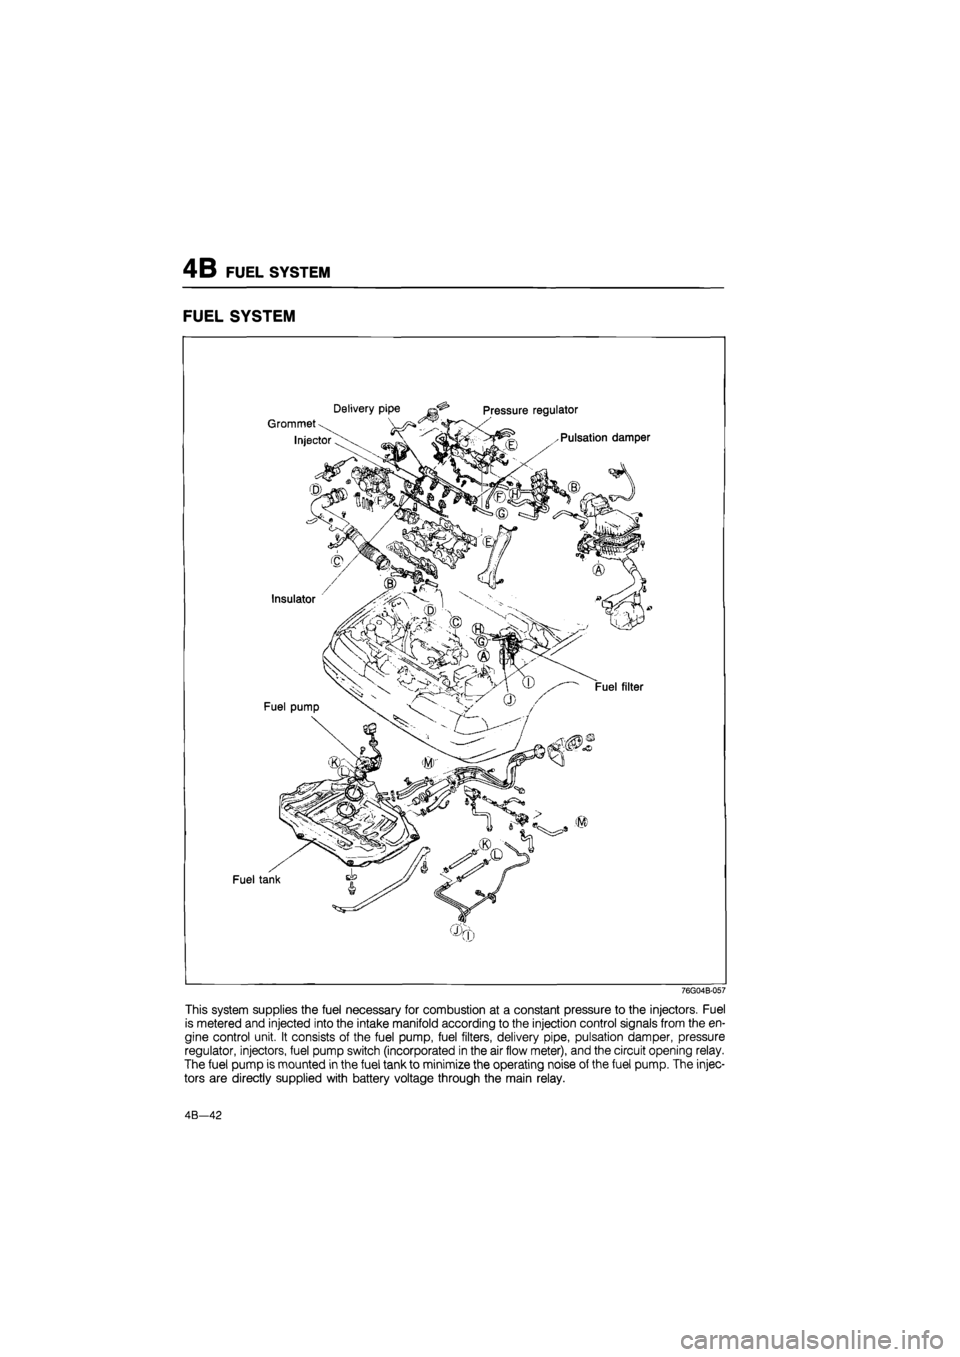
FUEL SYSTEM
76G04B-057
This system supplies the fuel necessary for combustion at a constant pressure to the injectors. Fuel
is metered and injected into the intake manifold according to the injection control signals from the en-
gine control unit. It consists of the fuel pump, fuel filters, delivery pipe, pulsation damper, pressure
regulator, injectors, fuel pump switch (incorporated in the air flow meter), and the circuit opening relay.
The fuel pump is mounted in the fuel tank to minimize the operating noise of the fuel pump. The injec-
tors are directly supplied with battery voltage through the main relay.
4B—42
Page 505 of 1865
FUEL SYSTEM 4B
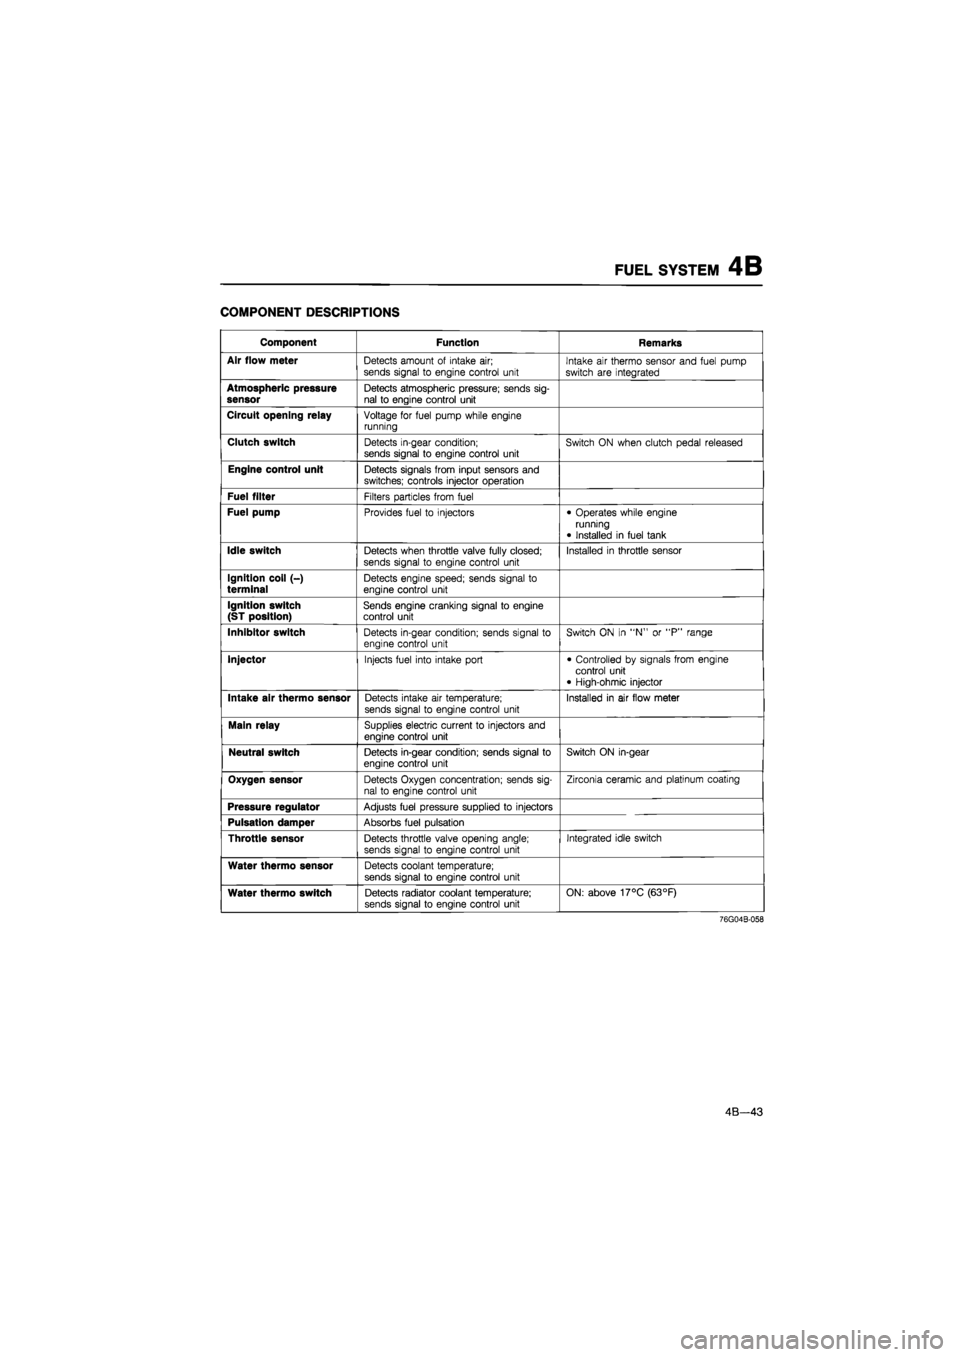
COMPONENT DESCRIPTIONS
Component Function Remarks
Air flow meter
Detects amount
of
intake
air;
sends signal
to
engine control unit Intake
air
thermo sensor and fuel pump
switch
are
integrated
Atmospheric pressure sensor
Detects atmospheric pressure; sends sig-nal
to
engine control unit
Circuit opening relay
Voltage
for
fuel pump while engine running
Clutch switch
Detects in-gear condition; sends signal
to
engine control unit Switch
ON
when clutch pedal released
Engine control unit
Detects signals from input sensors and switches; controls injector operation
Fuel filter
Filters particles from fuel
Fuel pump
Provides fuel
to
injectors • Operates while engine running
• Installed
in
fuel tank
Idle switch
Detects when throttle valve fully closed;
sends signal
to
engine control unit
Installed
in
throttle sensor
Ignition coil (-) terminal
Detects engine speed; sends signal
to
engine control unit
Ignition switch (ST position)
Sends engine cranking signal
to
engine control unit
Inhibitor switch
Detects in-gear condition; sends signal
to
engine control unit
Switch
ON in "N" or "P"
range
Injector
Injects fuel into intake port • Controlled
by
signals from engine control unit • High-ohmic injector
Intake air thermo sensor
Detects intake
air
temperature;
sends signal
to
engine control unit Installed
in air
flow meter
Main relay
Supplies electric current
to
injectors and engine control unit
Neutral switch
Detects in-gear condition; sends signal
to
engine control unit
Switch
ON
in-gear
Oxygen sensor
Detects Oxygen concentration; sends sig-nal
to
engine control unit
Zirconia ceramic and platinum coating
Pressure regulator
Adjusts fuel pressure supplied
to
injectors
Pulsation damper
Absorbs fuel pulsation
Throttle sensor
Detects throttle valve opening angle; sends signal
to
engine control unit
Integrated idle switch
Water thermo sensor
Detects coolant temperature;
sends signal
to
engine control unit
Water thermo switch
Detects radiator coolant temperature; sends signal
to
engine control unit ON: above 17°C (63°F)
76G04B-058
4B—43
Page 509 of 1865
FUEL SYSTEM 4B
Pressure .
regulator ^^ \ To multi-pressure tester
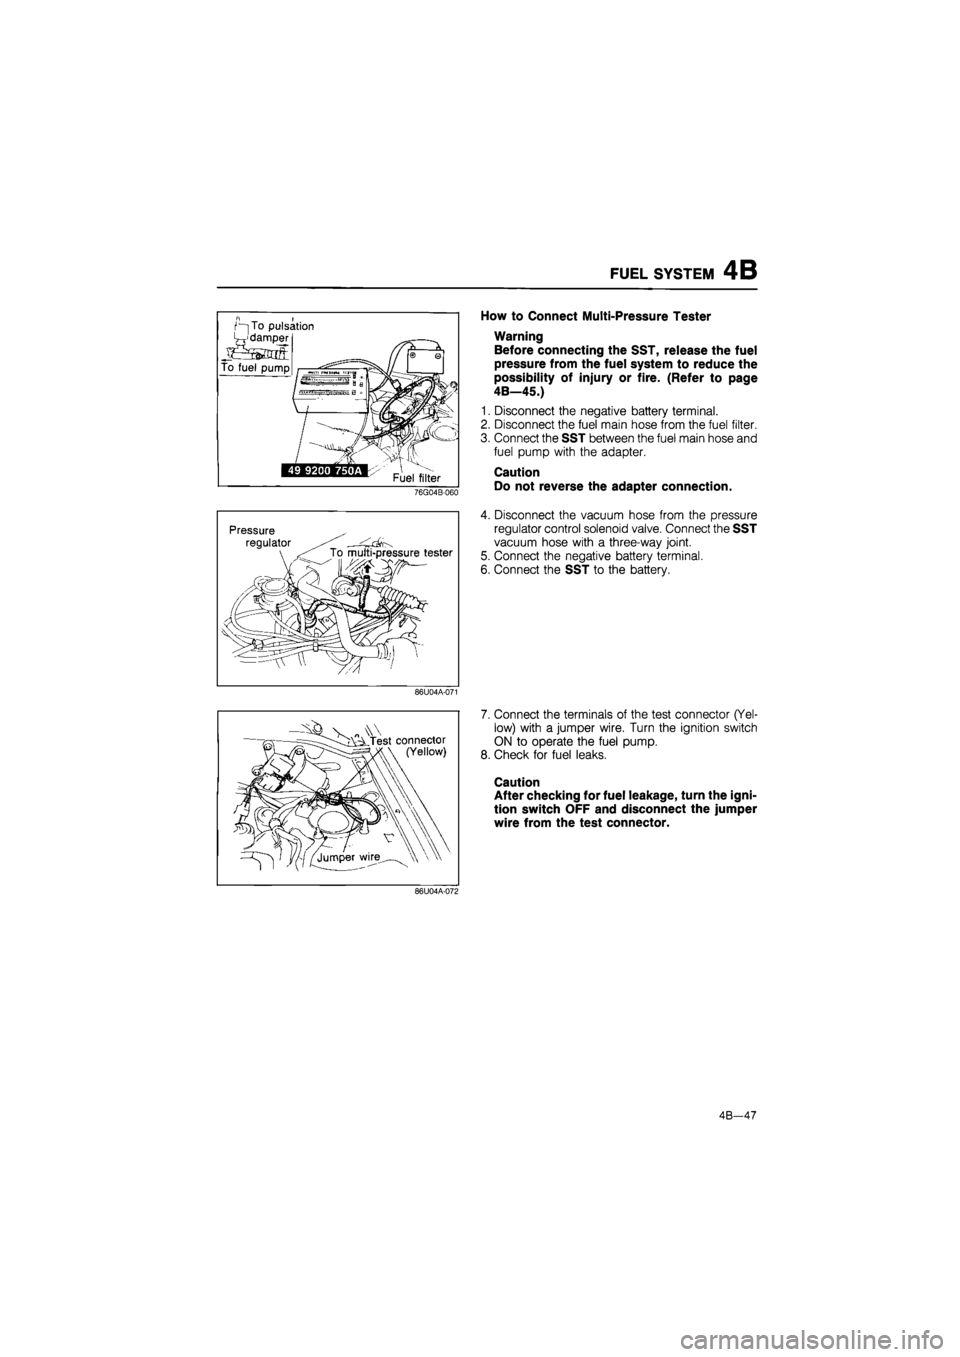
How to Connect Multi-Pressure Tester
Warning
Before connecting the SST, release the fuel
pressure from the fuel system to reduce the
possibility of injury or fire. (Refer to page
4B—45.)
1. Disconnect the negative battery terminal.
2. Disconnect the fuel main hose from the fuel filter.
3. Connect the SST between the fuel main hose and
fuel pump with the adapter.
Caution
Do not reverse the adapter connection.
4. Disconnect the vacuum hose from the pressure
regulator control solenoid valve. Connect the SST
vacuum hose with a three-way joint.
5. Connect the negative battery terminal.
6. Connect the SST to the battery.
86U04A-071
v *
- i\zLTest connector (Yellow)
7. Connect the terminals of the test connector (Yel-
low) with a jumper wire. Turn the ignition switch
ON to operate the fuel pump.
8. Check for fuel leaks.
Caution
After checking for fuel leakage, turn the igni-
tion switch OFF and disconnect the jumper
wire from the test connector.
86U04A-072
4B—47
Page 512 of 1865
4B FUEL SYSTEM
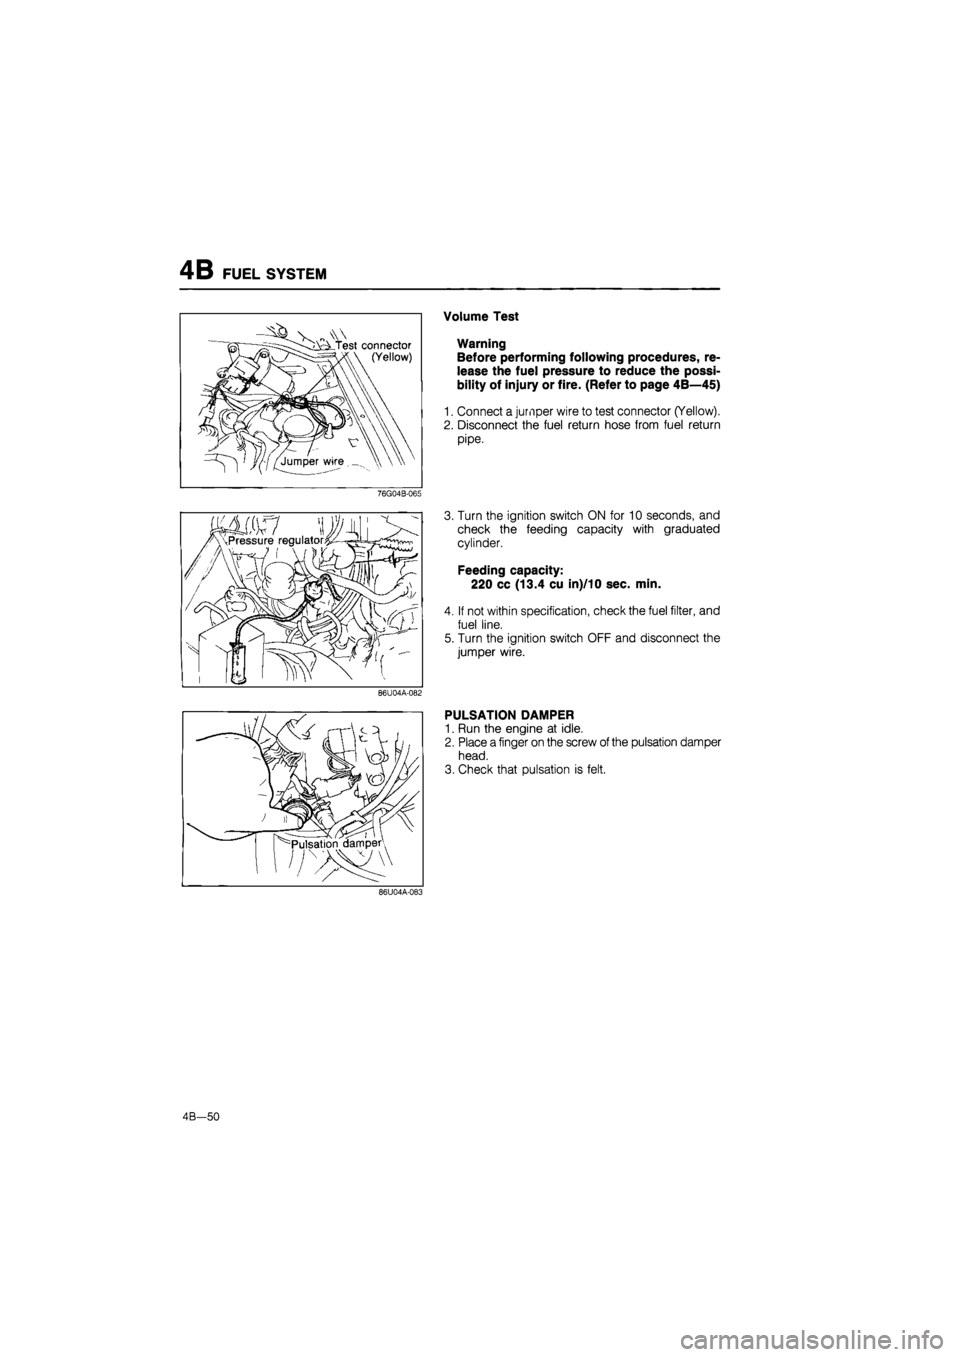
Volume Test
Warning
Before performing following procedures, re-
lease the fuel pressure to reduce the possi-
bility of injury or fire. (Refer to page 4B—45)
1. Connect a jumper wire to test connector (Yellow).
2. Disconnect the fuel return hose from fuel return
pipe.
76G04B-065
3. Turn the ignition switch ON for 10 seconds, and
check the feeding capacity with graduated
cylinder.
Feeding capacity:
220 cc (13.4 cu in)/10 sec. min.
4. If not within specification, check the fuel filter, and
fuel line.
5. Turn the ignition switch OFF and disconnect the
jumper wire.
86U04A-082
PULSATION DAMPER
1. Run the engine at idle.
2. Place a finger on the screw of the pulsation damper
head.
3. Check that pulsation is felt.
86U04A-083
4B—50
Page 518 of 1865
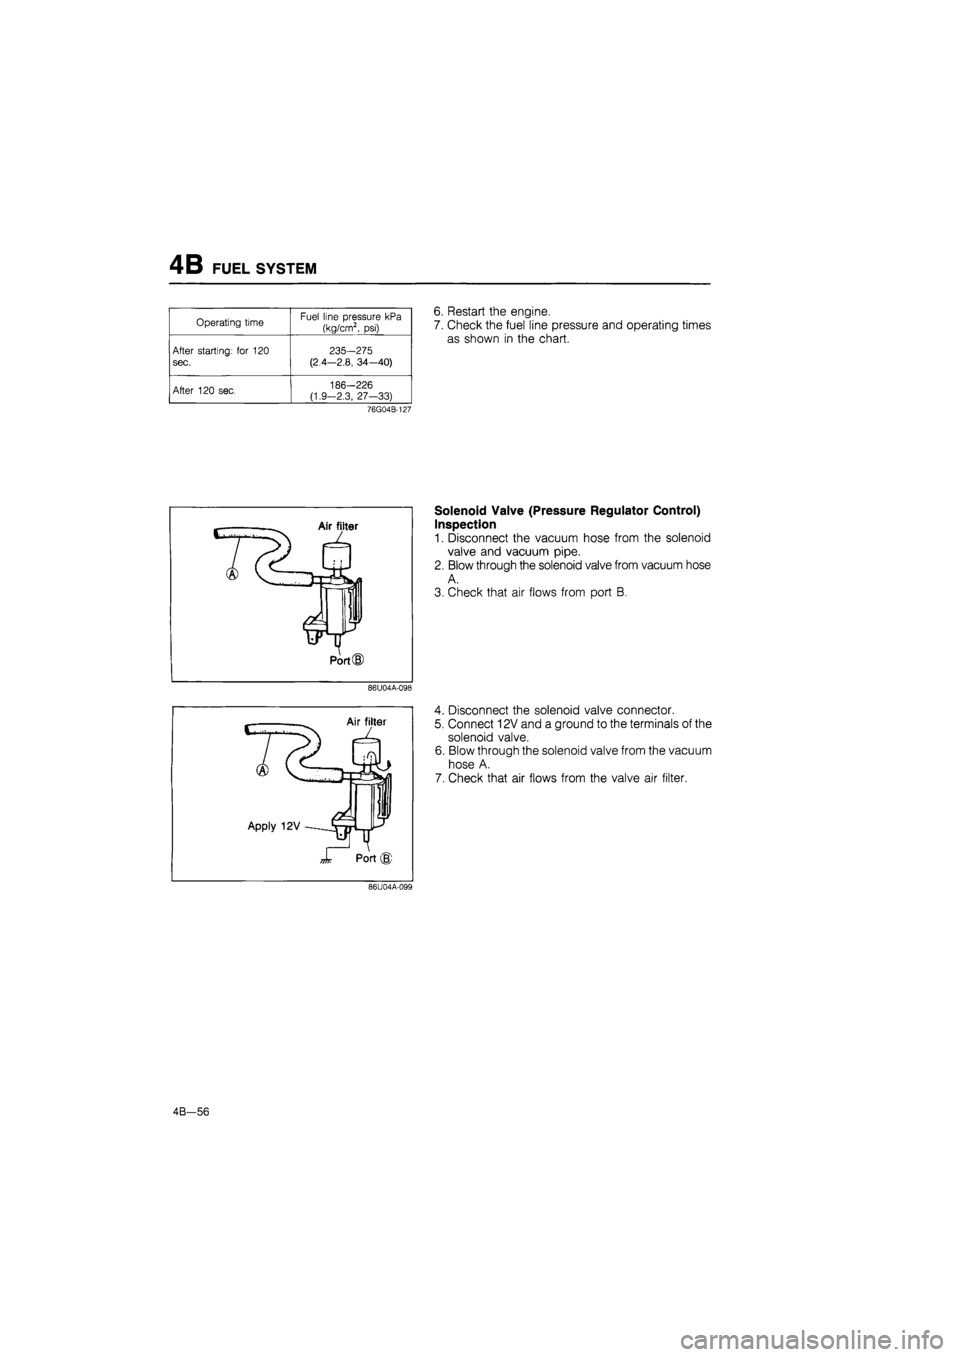
4B FUEL SYSTEM
Operating time Fuel line pressure kPa
(kg/cm2, psi)
After starting: for 120
sec.
235-275
(2.4—2.8, 34—40)
After 120 sec, 186-226 (1.9-2.3, 27-33)
6. Restart the engine.
7. Check the fuel line pressure and operating times
as shown in the chart.
76G04B-127
Solenoid Valve (Pressure Regulator Control)
Inspection
1. Disconnect the vacuum hose from the solenoid
valve and vacuum pipe.
2. Blow through the solenoid valve from vacuum hose
A.
3. Check that air flows from port B.
86U04A-098
Air filter
Apply 12V
Port (J)
4. Disconnect the solenoid valve connector.
5. Connect 12V and a ground to the terminals of the
solenoid valve.
6. Blow through the solenoid valve from the vacuum
hose A.
7. Check that air flows from the valve air filter.
86U04A-099
4B-56
Page 519 of 1865
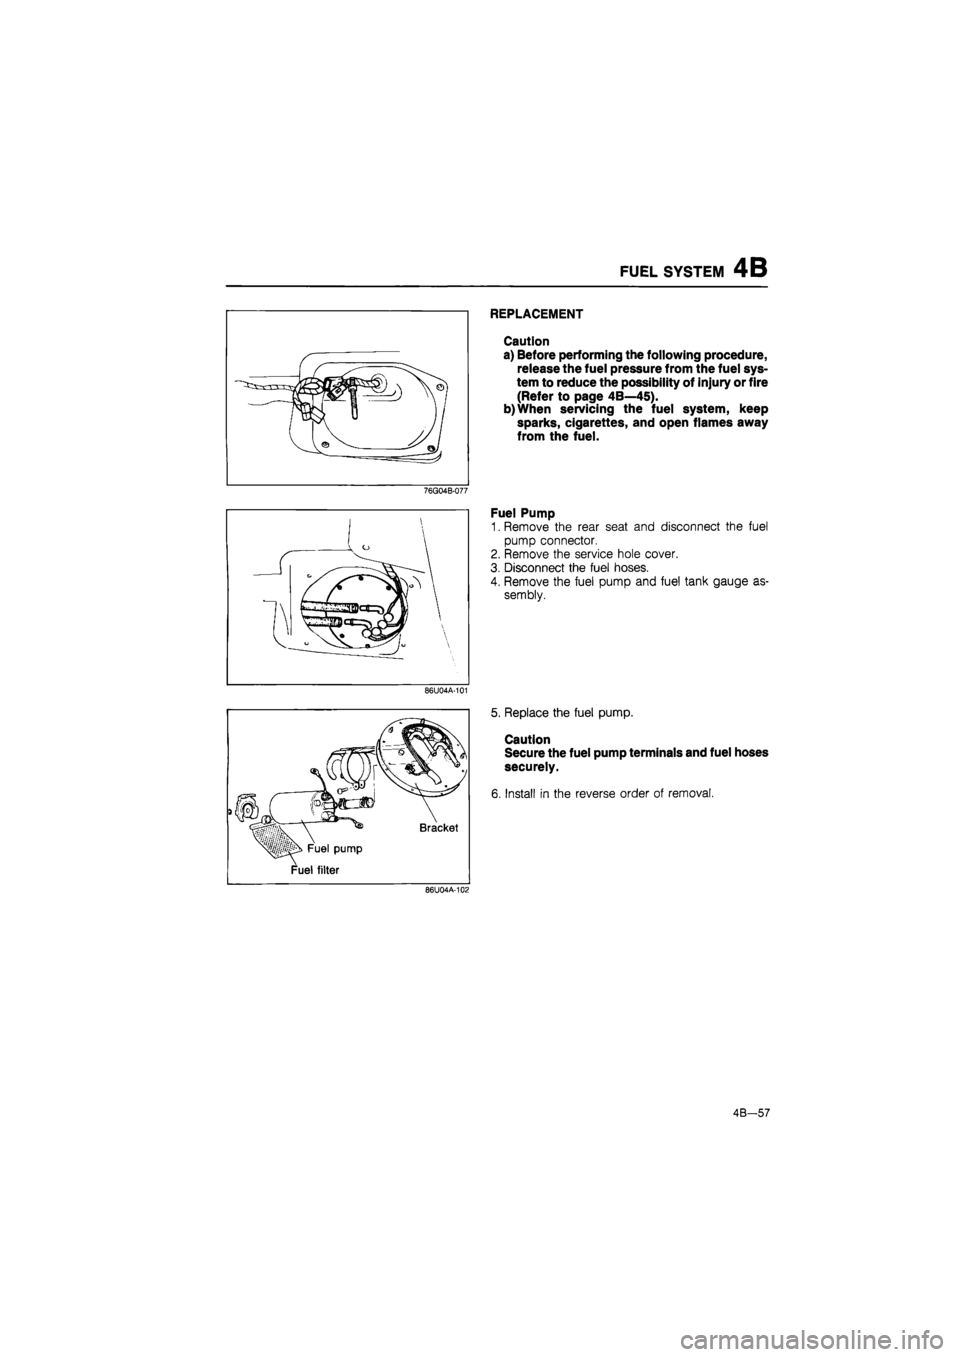
FUEL SYSTEM 4B
REPLACEMENT
Caution
a) Before performing the following procedure,
release the fuel pressure from the fuel sys-
tem to reduce the possibility of injury or fire
(Refer to page 4B—45).
b)When servicing the fuel system, keep
sparks, cigarettes, and open flames away
from the fuel.
76G04B-077
86U04A-101
M Fuel pump
Fuel filter
Bracket
86U04A-102
Fuel Pump
1. Remove the rear seat and disconnect the fuel
pump connector.
2. Remove the service hole cover.
3. Disconnect the fuel hoses.
4. Remove the fuel pump and fuel tank gauge as-
sembly.
5. Replace the fuel pump.
Caution
Secure the fuel pump terminals and fuel hoses
securely.
6. Install in the reverse order of removal.
4B—57
Page 522 of 1865

4B FUEL SYSTEM
Pressure Regulator
1. Disconnect the vacuum hose and fuel return hose.
2. Remove the pressure regulator.
3. Install in the reverse order of removal.
Tightening torque:
8—11 N-m (0.8—1.1 m-kg, 69—95 in-lb)
76G04B-084
Pulsation Damper
1. Loosen the pulsation damper and remove it.
2. Install in the reverse order of removal.
76G04B-085
^-Fuel hose
ML*? ^-Fuel pump
^silntank filter
ti* e
76G04B-086
h
tS
Is o
Sjfbj
Fuel Filter
Low pressure side
Refer to page 4B—57.
86U04A-116
High pressure side
The fuel filter must be replaced at the intervals out-
lined in the maintenance schedule.
Warning
Always work away from sparks or open
flames.
1. Disconnect the fuel hoses from the fuel filter.
2. Remove the fuel filter and the bracket.
3. Install a new filter and the bracket.
4. Connect the fuel hoses.
Note
When installing the filter, push the fuel hoses
fully onto the fuel filter and secure the hoses
with spring clamps.
4B-60