differential MAZDA MIATA 1991 Factory User Guide
[x] Cancel search | Manufacturer: MAZDA, Model Year: 1991, Model line: MIATA, Model: MAZDA MIATA 1991Pages: 392, PDF Size: 29.45 MB
Page 263 of 392

Removal (Front - B2600i & MPV 4WD)
1. Raise and support vehicle. Remove engine skid plate. Drain differential. On MPV 4WD, remove tie rod
end and lower arm. Remove front axle shafts. See AXLE SHAFTS
- FRONT article. Mark drive shaft
position, and remove drive shaft.
2. On B2600i, remove differential subframe mounting bolts and nuts. Remove differential, Remote Free
Wheel (RFW) and subframe assembly from vehicle. Remove RFW assembly from right side of
differential housing. Pull drive coupler from carrier. Remove differential carrier retaining bolts. Remove
differential carrier.
3. On MPV 4WD, remove differential housing mounting bolts and mount at end of Remote Free Wheel
(RFW) extension housing. Remove differential and extension housing from vehicle. Remove RFW
assembly from right side of differential housing. Pull drive coupler from carrier. Remove differential
carrier retaining bolts. Remove differential carrier.
Installation
To install, reverse removal procedure. See Fig. 2 or Fig. 3 . Apply Sealant (8527 77 739 ) to carrier mating
flange. Align marks made during removal. Refill differential with lubricant. Tighten all fasteners to
specification. See TORQUE SPECIFICATIONS
.
1991 Mazda MX-5 Miata
1990-91 DRIVE AXLES Differentials & Drive Axles - 929, B2200, B2600i, MX-5 Miata, MPV, Protege & RX-7
Microsoft
Sunday, July 05, 2009 2:17:01 PMPage 5 © 2005 Mitchell Repair Information Company, LLC.
Page 264 of 392

Fig. 2: Installing Front Differential (B2600i)
Courtesy of MAZDA MOTORS CORP.
1991 Mazda MX-5 Miata
1990-91 DRIVE AXLES Differentials & Drive Axles - 929, B2200, B2600i, MX-5 Miata, MPV, Protege & RX-7
Microsoft
Sunday, July 05, 2009 2:17:01 PMPage 6 © 2005 Mitchell Repair Information Company, LLC.
Page 265 of 392

Fig. 3: Installing Front Differential (MPV 4WD)
Courtesy of MAZDA MOTORS CORP.
Removal; Rear - B2200, B2600i, MPV 2WD, PROTEGE 4WD, RX7, 929
1. Raise and support vehicle. Drain differential. Mark drive axles and drive shaft positions. On B2200,
1991 Mazda MX-5 Miata
1990-91 DRIVE AXLES Differentials & Drive Axles - 929, B2200, B2600i, MX-5 Miata, MPV, Protege & RX-7
Microsoft
Sunday, July 05, 2009 2:17:01 PMPage 7 © 2005 Mitchell Repair Information Company, LLC.
Page 266 of 392

B2600i and MPV, remove brake drum and drive axles. See REAR AXLE SHAFTS & BEARINGS. On
Protege 4WD, RX7 and 929, disconnect CV joint drive axles from differential assembly and wire aside.
2. On all models, mark flanges and disconnect drive shaft. Remove ABS sensor (if equipped). On RX7,
remove rear exhaust system and differential mount on left side of pinion flange. Remove hanger mounts
and allow left side to hang down. Disconnect sublinks and remove differential.
3. On Protege 4WD and 929 models, remove differential housing assembly-to-chassis mounting bolts.
Remove differential housing assembly from vehicle. On all models, remove differential carrier-to-
housing nuts. Remove differential carrier.
Installation
To install, reverse removal procedure. Apply Sealant (8527 77 739 ) to carrier mating flange. Align marks made
during removal. Refill differential with correct type and amount of lubricant. Tighten all fasteners to
specification. See TORQUE SPECIFICATIONS
.
Fig. 4: Exploded View of Differential Assembly (RX7)
Courtesy of MAZDA MOTORS CORP.
Removal (Miata)
1. Raise and support vehicle. Drain differential. Mark flanges and remove drive shaft. Note locations and
disconnect wiring harness from Power Plant Frame (PPF). See Fig. 5
.
1991 Mazda MX-5 Miata
1990-91 DRIVE AXLES Differentials & Drive Axles - 929, B2200, B2600i, MX-5 Miata, MPV, Protege & RX-7
Microsoft
Sunday, July 05, 2009 2:17:01 PMPage 8 © 2005 Mitchell Repair Information Company, LLC.
Page 267 of 392

2. Support transmission with a jack. Remove PPF bracket from rear transmission extension housing.
Remove PPF-to-differential side bolts and pry out spacer. Remove PPF/differential mounting spacer. See
Fig. 6
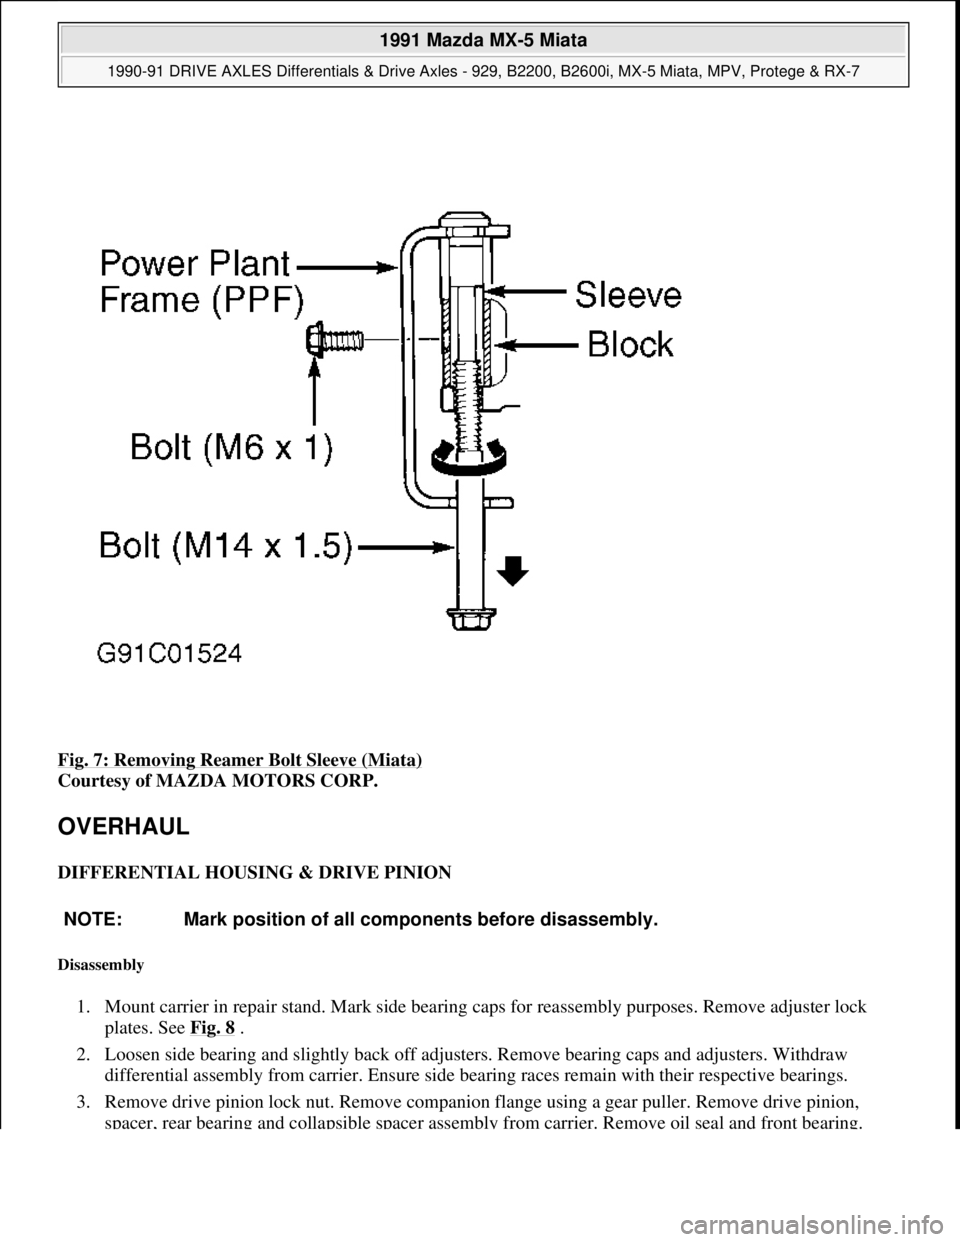
. Install metric bolt (M14 X 1.5) into sleeve. See Fig. 7 .
3. Twist bolt side-to-side while pulling bolt downward. Install a metric bolt (M6 X 1) into hole in housing
block to hold sleeve and remove long bolt (M14 X 1.5). Remove short bolt (M6 X 1).
4. Remove PPF-to-transmission side bolts and remove PPF. Mark and disconnect CV joint drive axles from
differential assembly and wire aside. Remove differential carrier-to-housing nuts. Remove differential
carrier.
INSTALLATION
1. To install, reverse removal procedure. Apply Sealant (8527 77 739 ) to carrier mating flange. Align marks
made during removal and install differential carrier. Install differential. Raise transmission until engine
and transmission are level.
2. To install Power Plant Frame (PPF), position PPF in place. Install PPF/differential mounting spacer and
tighten bolts to 27-38 ft. lbs. (37-52 N.m). Install PPF-to-transmission side mounting bolts and tighten.
3. Ensure sleeve is installed into PPF housing block. Install spacer and bolts. Ensure reamer bolt is installed
into front hole and tighten. See Fig. 6
.
4. Install transmission-to-PPF bracket. Install remaining PPF bolts and tighten all bolts to specification. See
TORQUE SPECIFICATIONS
. To complete installation, reverse removal procedure.
NOTE: On Miata, front PPF-to-differential side mounting bolt is reamer bolt, which
aligns power plant frame. See Fig. 6
.
1991 Mazda MX-5 Miata
1990-91 DRIVE AXLES Differentials & Drive Axles - 929, B2200, B2600i, MX-5 Miata, MPV, Protege & RX-7
Microsoft
Sunday, July 05, 2009 2:17:01 PMPage 9 © 2005 Mitchell Repair Information Company, LLC.
Page 268 of 392

Fig. 5: Exploded View of Differential Components (Miata)
Courtesy of MAZDA MOTORS CORP.
1991 Mazda MX-5 Miata
1990-91 DRIVE AXLES Differentials & Drive Axles - 929, B2200, B2600i, MX-5 Miata, MPV, Protege & RX-7
Microsoft
Sunday, July 05, 2009 2:17:01 PMPage 10 © 2005 Mitchell Repair Information Company, LLC.
Page 269 of 392

Fig. 6: View of Power Plant Frame Components (Miata)
Courtesy of MAZDA MOTORS CORP.
1991 Mazda MX-5 Miata
1990-91 DRIVE AXLES Differentials & Drive Axles - 929, B2200, B2600i, MX-5 Miata, MPV, Protege & RX-7
Microsoft
Sunday, July 05, 2009 2:17:01 PMPage 11 © 2005 Mitchell Repair Information Company, LLC.
Page 270 of 392

Fig. 7: Removing Reamer Bolt Sleeve (Miata)
Courtesy of MAZDA MOTORS CORP.
OVERHAUL
DIFFERENTIAL HOUSING & DRIVE PINION
Disassembly
1. Mount carrier in repair stand. Mark side bearing caps for reassembly purposes. Remove adjuster lock
plates. See Fig. 8
.
2. Loosen side bearing and slightly back off adjusters. Remove bearing caps and adjusters. Withdraw
differential assembly from carrier. Ensure side bearing races remain with their respective bearings.
3. Remove drive pinion lock nut. Remove companion flange using a gear puller. Remove drive pinion,
spacer, rear bearing and collapsible spacer assembly from carrier. Remove oil seal and front bearing.
NOTE: Mark position of all components before disassembly.
1991 Mazda MX-5 Miata
1990-91 DRIVE AXLES Differentials & Drive Axles - 929, B2200, B2600i, MX-5 Miata, MPV, Protege & RX-7
Microsoft
Sunday, July 05, 2009 2:17:01 PMPage 12 © 2005 Mitchell Repair Information Company, LLC.
Page 271 of 392

Remove bearing outer races, using a drift and hammer in slots provided on inner lip (if necessary).
Fig. 8: Exploded View of Typical Differential & Carrier Assembly
Courtesy of MAZDA MOTORS CORP.
DIFFERENTIAL ASSEMBLY & RING GEAR
Disassembly
1. Using Puller (49 0839 425C ), remove side bearings from gear case. Ensure side bearings are marked for
1991 Mazda MX-5 Miata
1990-91 DRIVE AXLES Differentials & Drive Axles - 929, B2200, B2600i, MX-5 Miata, MPV, Protege & RX-7
Microsoft
Sunday, July 05, 2009 2:17:01 PMPage 13 © 2005 Mitchell Repair Information Company, LLC.
Page 272 of 392

reassembly purposes. Separate ring gear from gear case. On standard differentials, remove knock pin.
Remove pinion shaft, pinion gears, thrust washers and side gears. See Fig. 8
.
2. On Limited Slip Differentials (LSD) models, gradually loosen attaching screws until distance between
left and right half of differential case is about 0.12" (3 mm). On all models, mark differential halves for
reassembly reference.
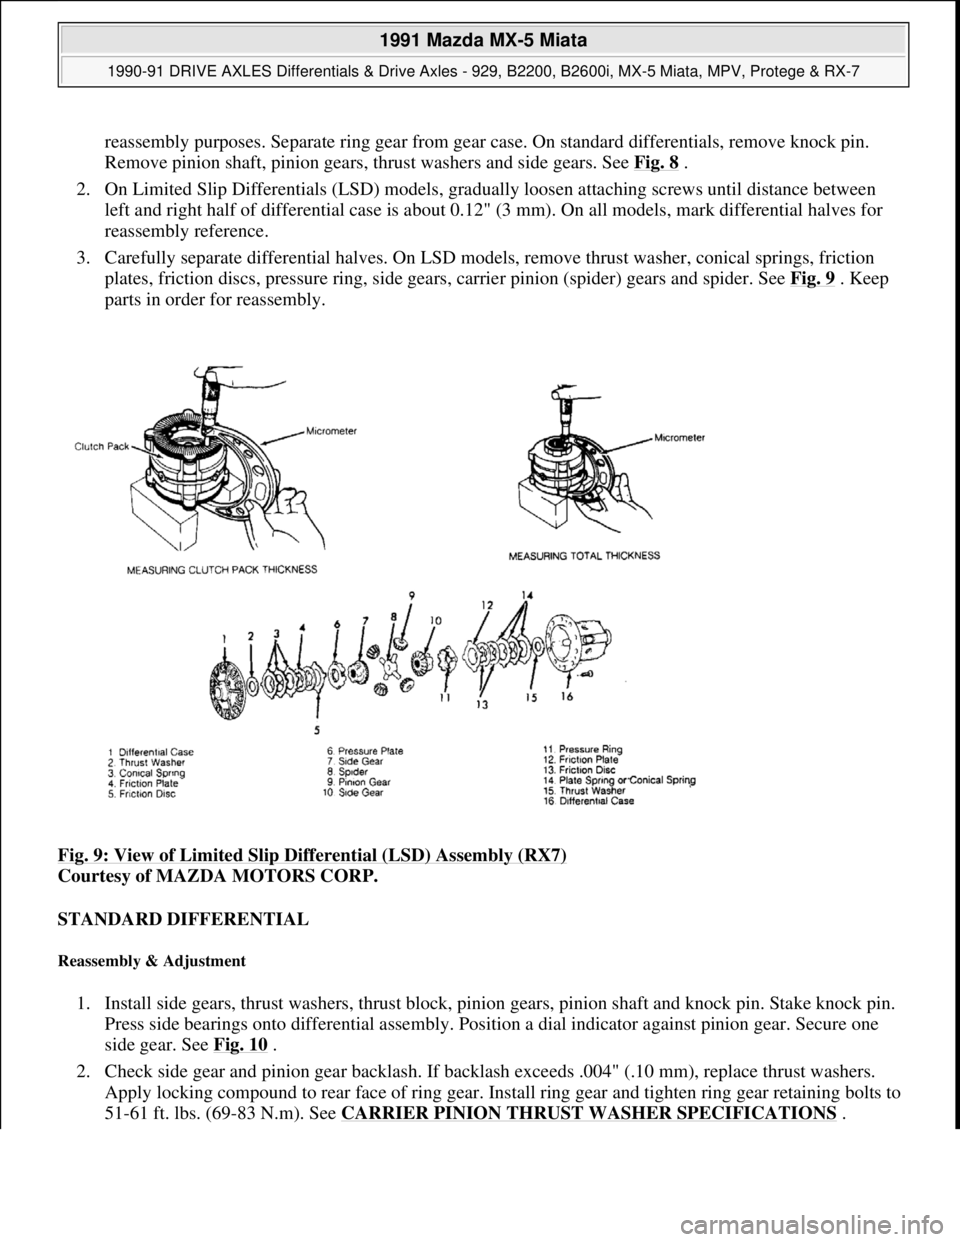
3. Carefully separate differential halves. On LSD models, remove thrust washer, conical springs, friction
plates, friction discs, pressure ring, side gears, carrier pinion (spider) gears and spider. See Fig. 9
. Keep
parts in order for reassembly.
Fig. 9: View of Limited Slip Differential (LSD) Assembly (RX7)
Courtesy of MAZDA MOTORS CORP.
STANDARD DIFFERENTIAL
Reassembly & Adjustment
1. Install side gears, thrust washers, thrust block, pinion gears, pinion shaft and knock pin. Stake knock pin.
Press side bearings onto differential assembly. Position a dial indicator against pinion gear. Secure one
side gear. See Fig. 10
.
2. Check side gear and pinion gear backlash. If backlash exceeds .004" (.10 mm), replace thrust washers.
Apply locking compound to rear face of ring gear. Install ring gear and tighten ring gear retaining bolts to
51-61 ft. lbs. (69-83 N.m). See CARRIER PINION THRUST WASHER SPECIFICATIONS
.
1991 Mazda MX-5 Miata
1990-91 DRIVE AXLES Differentials & Drive Axles - 929, B2200, B2600i, MX-5 Miata, MPV, Protege & RX-7
Microsoft
Sunday, July 05, 2009 2:17:01 PMPage 14 © 2005 Mitchell Repair Information Company, LLC.