engine MAZDA MIATA 1991 Factory User Guide
[x] Cancel search | Manufacturer: MAZDA, Model Year: 1991, Model line: MIATA, Model: MAZDA MIATA 1991Pages: 392, PDF Size: 29.45 MB
Page 251 of 392

Fig. 4: Identifying Alternator Terminals (1992 All Other Models)
Courtesy of MAZDA MOTORS CORP.
2. If output amperage is not equal to or more than amount specified in ALTERNATOR OUTPUT table,
repair or replace alternator as necessary.
3. Turn off all accessories and release brake pedal. With engine operating at 2500-3000 RPM, measure
output amperage. If output amperage is not at least 5 amps, repair or replace alternator as necessary.
4. With engine operating at 2500-3000 RPM, measure voltage between terminal "S" and ground. If reading
is not 14.1-14.7 volts, repair or replace alternator as necessar
y.
1991 Mazda MX-5 Miata
ALTERNATOR & REGULATOR 1990-92 ELECTRICAL Alternators & Regulators - Mitsubishi
Microsoft
Sunday, July 05, 2009 2:14:54 PMPage 7 © 2005 Mitchell Repair Information Company, LLC.
Page 258 of 392

1990-91 ENGINE COOLING
Cooling System Specifications - MX-5 Miata
COOLING SYSTEM SPECIFICATIONS
COOLING SYSTEM SPECIFICATIONS
ApplicationSpecification
Coolant Replacement Interval30 Months Or 30,000 Miles
Coolant Capacity6.3 qts. (6.0L)
Pressure Cap11-15 psi (0.75-1.05 kg/cm2 )
Thermostat Open Temperature
Starts
Main Valve188-193°F (86.5-89.5°C)
Sub Valve182-188°F (83.5-86.5°C)
Fully Open212°F (100°C)
Thermostat Open Lift
Main Valve0.31" (8 mm)
Sub Valve0.06" (1.5 mm)
1991 Mazda MX-5 Miata
1990-91 ENGINE COOLING Cooling System Specifications - MX-5 Miata
1991 Mazda MX-5 Miata
1990-91 ENGINE COOLING Cooling System Specifications - MX-5 Miata
Microsoft
Sunday, July 05, 2009 2:13:49 PMPage 1 © 2005 Mitchell Repair Information Company, LLC.
Microsoft
Sunday, July 05, 2009 2:13:53 PMPage 1 © 2005 Mitchell Repair Information Company, LLC.
Page 263 of 392

Removal (Front - B2600i & MPV 4WD)
1. Raise and support vehicle. Remove engine skid plate. Drain differential. On MPV 4WD, remove tie rod
end and lower arm. Remove front axle shafts. See AXLE SHAFTS
- FRONT article. Mark drive shaft
position, and remove drive shaft.
2. On B2600i, remove differential subframe mounting bolts and nuts. Remove differential, Remote Free
Wheel (RFW) and subframe assembly from vehicle. Remove RFW assembly from right side of
differential housing. Pull drive coupler from carrier. Remove differential carrier retaining bolts. Remove
differential carrier.
3. On MPV 4WD, remove differential housing mounting bolts and mount at end of Remote Free Wheel
(RFW) extension housing. Remove differential and extension housing from vehicle. Remove RFW
assembly from right side of differential housing. Pull drive coupler from carrier. Remove differential
carrier retaining bolts. Remove differential carrier.
Installation
To install, reverse removal procedure. See Fig. 2 or Fig. 3 . Apply Sealant (8527 77 739 ) to carrier mating
flange. Align marks made during removal. Refill differential with lubricant. Tighten all fasteners to
specification. See TORQUE SPECIFICATIONS
.
1991 Mazda MX-5 Miata
1990-91 DRIVE AXLES Differentials & Drive Axles - 929, B2200, B2600i, MX-5 Miata, MPV, Protege & RX-7
Microsoft
Sunday, July 05, 2009 2:17:01 PMPage 5 © 2005 Mitchell Repair Information Company, LLC.
Page 267 of 392
2. Support transmission with a jack. Remove PPF bracket from rear transmission extension housing.
Remove PPF-to-differential side bolts and pry out spacer. Remove PPF/differential mounting spacer. See
Fig. 6
. Install metric bolt (M14 X 1.5) into sleeve. See Fig. 7 .
3. Twist bolt side-to-side while pulling bolt downward. Install a metric bolt (M6 X 1) into hole in housing
block to hold sleeve and remove long bolt (M14 X 1.5). Remove short bolt (M6 X 1).
4. Remove PPF-to-transmission side bolts and remove PPF. Mark and disconnect CV joint drive axles from
differential assembly and wire aside. Remove differential carrier-to-housing nuts. Remove differential
carrier.
INSTALLATION
1. To install, reverse removal procedure. Apply Sealant (8527 77 739 ) to carrier mating flange. Align marks
made during removal and install differential carrier. Install differential. Raise transmission until engine
and transmission are level.
2. To install Power Plant Frame (PPF), position PPF in place. Install PPF/differential mounting spacer and
tighten bolts to 27-38 ft. lbs. (37-52 N.m). Install PPF-to-transmission side mounting bolts and tighten.
3. Ensure sleeve is installed into PPF housing block. Install spacer and bolts. Ensure reamer bolt is installed
into front hole and tighten. See Fig. 6
.
4. Install transmission-to-PPF bracket. Install remaining PPF bolts and tighten all bolts to specification. See
TORQUE SPECIFICATIONS
. To complete installation, reverse removal procedure.
NOTE: On Miata, front PPF-to-differential side mounting bolt is reamer bolt, which
aligns power plant frame. See Fig. 6
.
1991 Mazda MX-5 Miata
1990-91 DRIVE AXLES Differentials & Drive Axles - 929, B2200, B2600i, MX-5 Miata, MPV, Protege & RX-7
Microsoft
Sunday, July 05, 2009 2:17:01 PMPage 9 © 2005 Mitchell Repair Information Company, LLC.
Page 285 of 392

1990-93 ENGINE COOLING
Drive Belt Routing & Adjustment - MX-5 Miata
ADJUSTMENT
Fig. 1: Identifying Correct Belt Mounting
Courtesy of MAZDA MOTORS CORP.
ALTERNATOR
Loosen alternator bolts and adjust belt deflection by turning adjusting bolt. See Fig. 2
, Fig. 6 and Fig. 7 . See
ADJUSTMENT SPECIFICATIONS
. Tighten bolts to specification. See TORQUE SPECIFICATIONS. NOTE: Ensure drive belts are not worn, cracked or frayed and are correctly mounted
on pulleys. See Fig. 1
.
NOTE: If a new belt is used, adjust belt deflection at midpoint of new belt specification.
1991 Mazda MX-5 Miata
1990-93 ENGINE COOLING Drive Belt Routing & Adjustment - MX-5 Miata
1991 Mazda MX-5 Miata
1990-93 ENGINE COOLING Drive Belt Routing & Adjustment - MX-5 Miata
Microsoft
Sunday, July 05, 2009 2:14:16 PMPage 1 © 2005 Mitchell Repair Information Company, LLC.
Microsoft
Sunday, July 05, 2009 2:14:28 PMPage 1 © 2005 Mitchell Repair Information Company, LLC.
Page 286 of 392

Fig. 2: Adjusting Alternator Belt
Courtesy of MAZDA MOTORS CORP.
A/C COMPRESSOR
Loosen locknut and adjust belt deflection by turning adjusting bolt. See Fig. 3
, Fig. 6 and Fig. 7 . See
ADJUSTMENT SPECIFICATIONS
. Tighten bolts to specification. See TORQUE SPECIFICATIONS.
1991 Mazda MX-5 Miata
1990-93 ENGINE COOLING Drive Belt Routing & Adjustment - MX-5 Miata
Microsoft
Sunday, July 05, 2009 2:14:16 PMPage 2 © 2005 Mitchell Repair Information Company, LLC.
Page 287 of 392
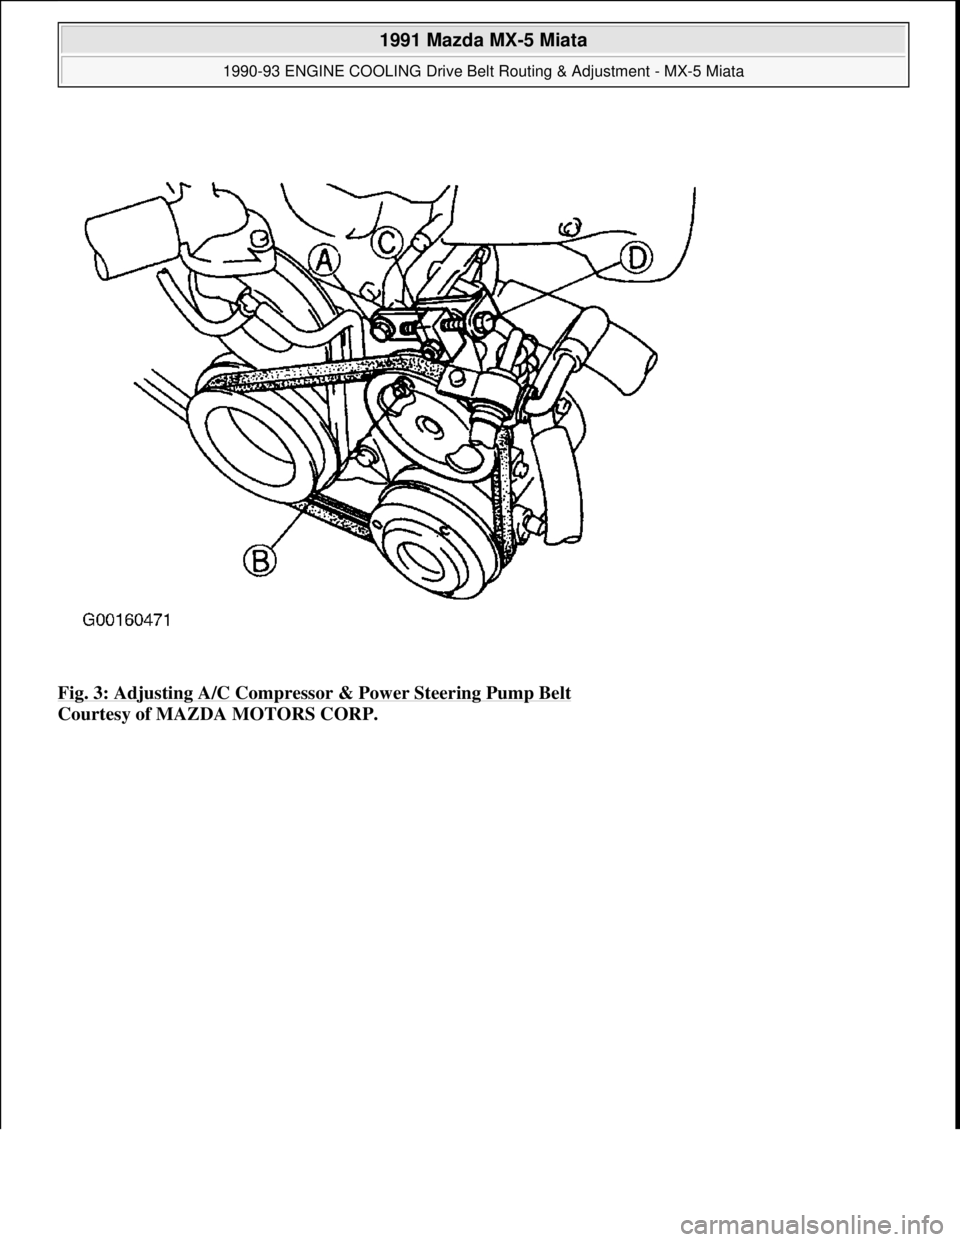
Fig. 3: Adjusting A/C Compressor & Power Steering Pump Belt
Courtesy of MAZDA MOTORS CORP.
1991 Mazda MX-5 Miata
1990-93 ENGINE COOLING Drive Belt Routing & Adjustment - MX-5 Miata
Microsoft
Sunday, July 05, 2009 2:14:16 PMPage 3 © 2005 Mitchell Repair Information Company, LLC.
Page 288 of 392
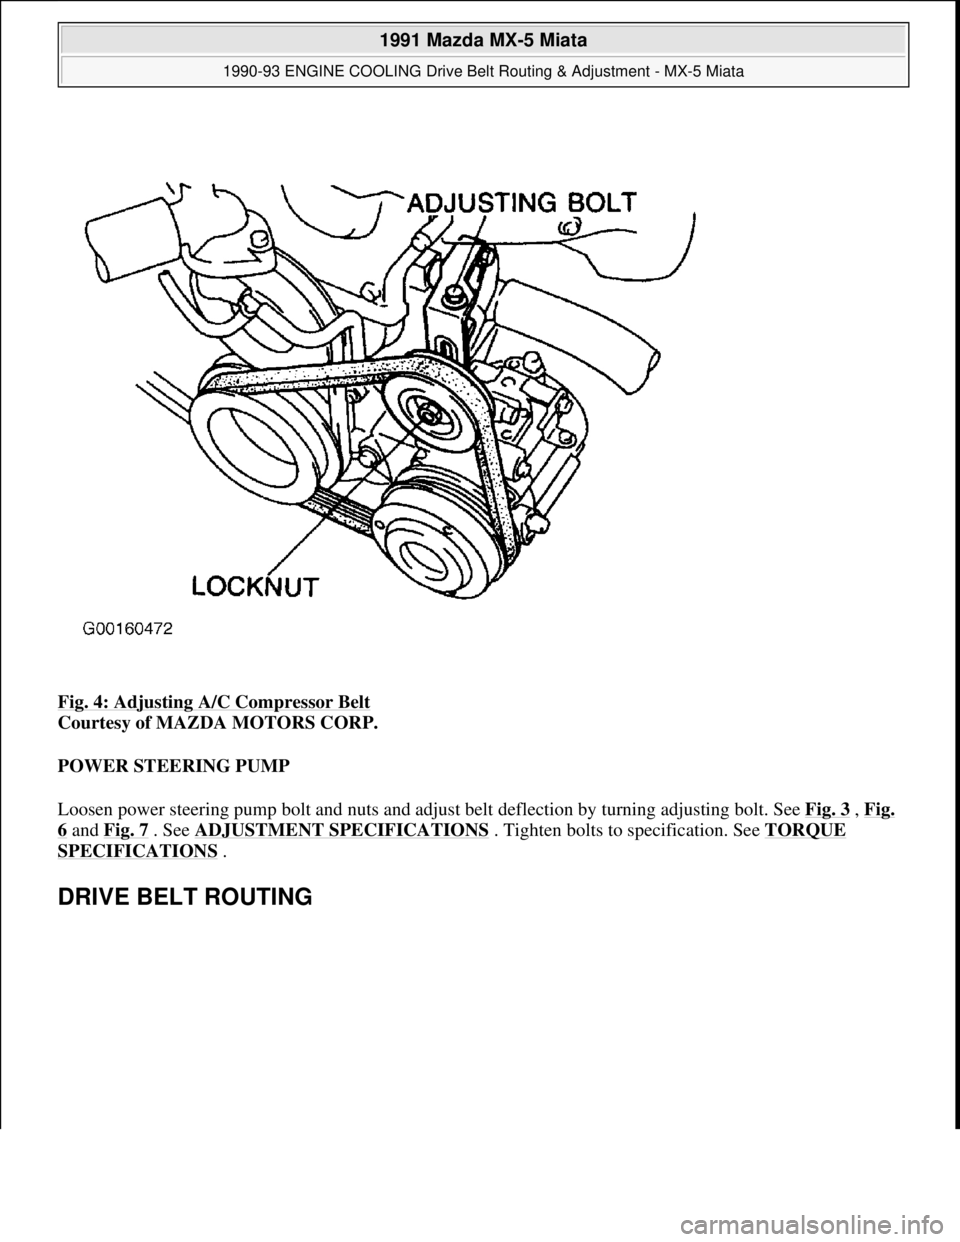
Fig. 4: Adjusting A/C Compressor Belt
Courtesy of MAZDA MOTORS CORP.
POWER STEERING PUMP
Loosen power steering pump bolt and nuts and adjust belt deflection by turning adjusting bolt. See Fig. 3
, Fig.
6 and Fig. 7 . See ADJUSTMENT SPECIFICATIONS . Tighten bolts to specification. See TORQUE
SPECIFICATIONS .
DRIVE BELT ROUTING
1991 Mazda MX-5 Miata
1990-93 ENGINE COOLING Drive Belt Routing & Adjustment - MX-5 Miata
Microsoft
Sunday, July 05, 2009 2:14:16 PMPage 4 © 2005 Mitchell Repair Information Company, LLC.
Page 289 of 392
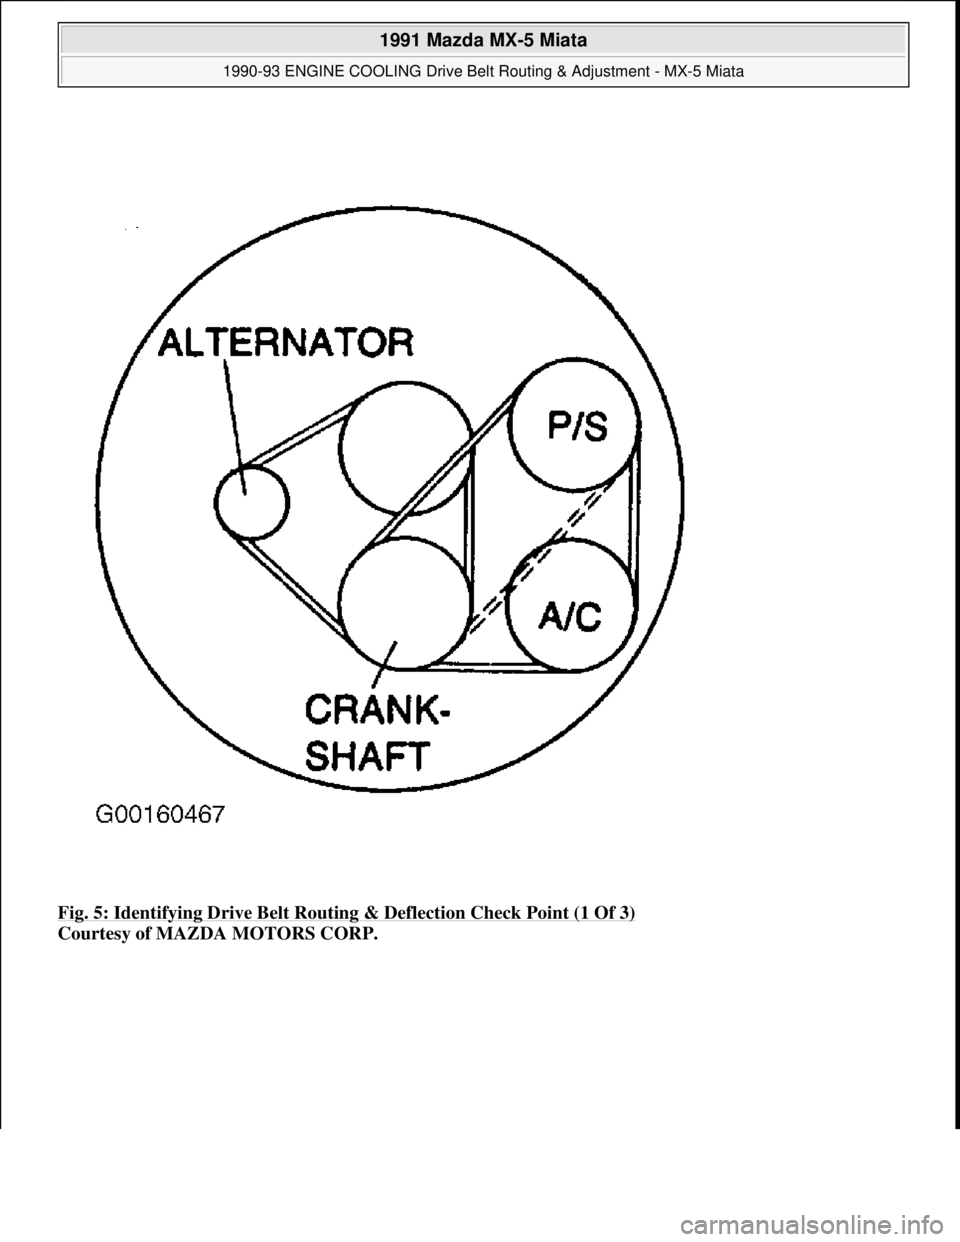
Fig. 5: Identifying Drive Belt Routing & Deflection Check Point (1 Of 3)
Courtesy of MAZDA MOTORS CORP.
1991 Mazda MX-5 Miata
1990-93 ENGINE COOLING Drive Belt Routing & Adjustment - MX-5 Miata
Microsoft
Sunday, July 05, 2009 2:14:16 PMPage 5 © 2005 Mitchell Repair Information Company, LLC.
Page 290 of 392
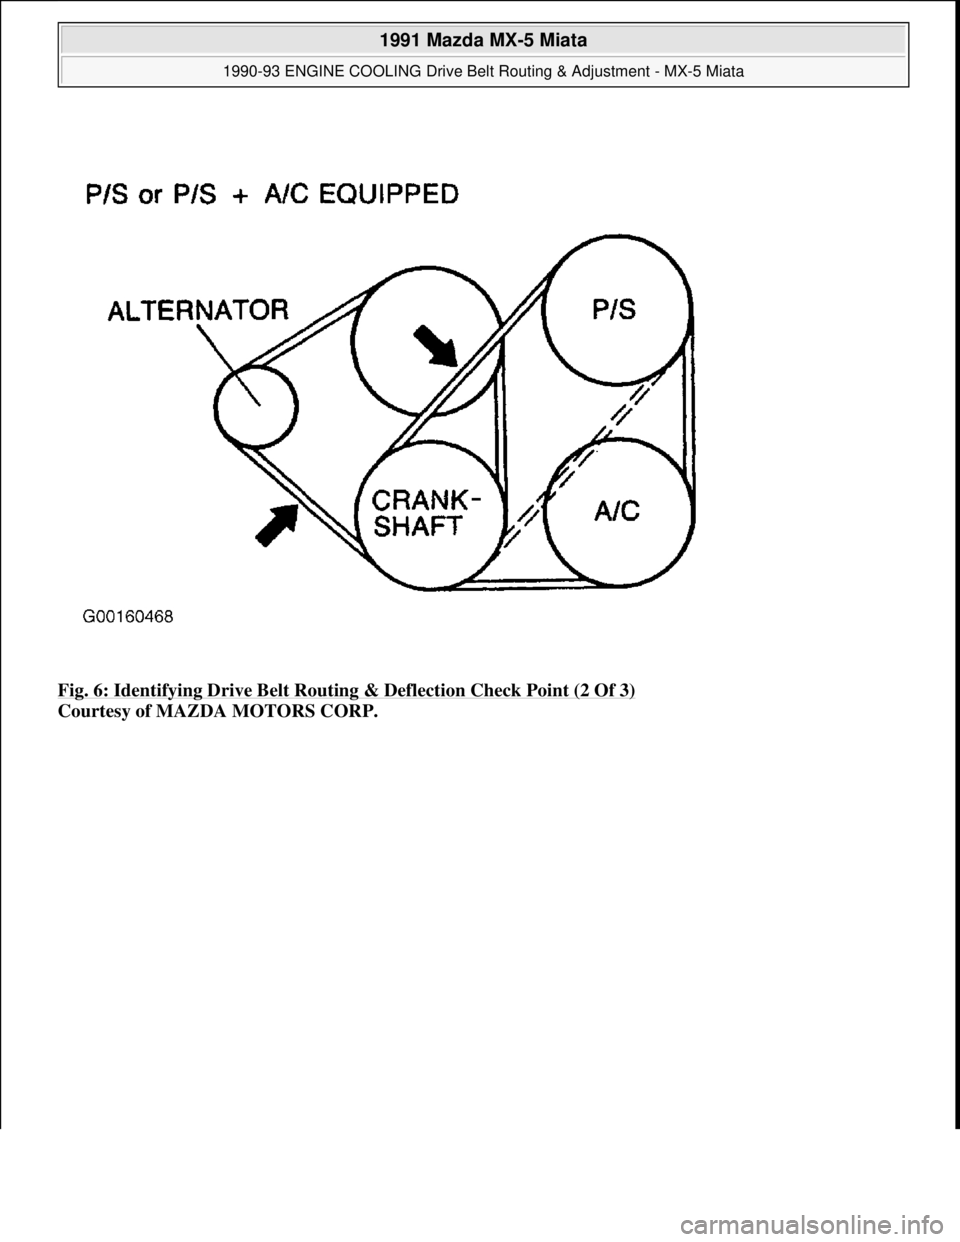
Fig. 6: Identifying Drive Belt Routing & Deflection Check Point (2 Of 3)
Courtesy of MAZDA MOTORS CORP.
1991 Mazda MX-5 Miata
1990-93 ENGINE COOLING Drive Belt Routing & Adjustment - MX-5 Miata
Microsoft
Sunday, July 05, 2009 2:14:16 PMPage 6 © 2005 Mitchell Repair Information Company, LLC.