136 MAZDA MIATA 1991 Factory Service Manual
[x] Cancel search | Manufacturer: MAZDA, Model Year: 1991, Model line: MIATA, Model: MAZDA MIATA 1991Pages: 392, PDF Size: 29.45 MB
Page 275 of 392

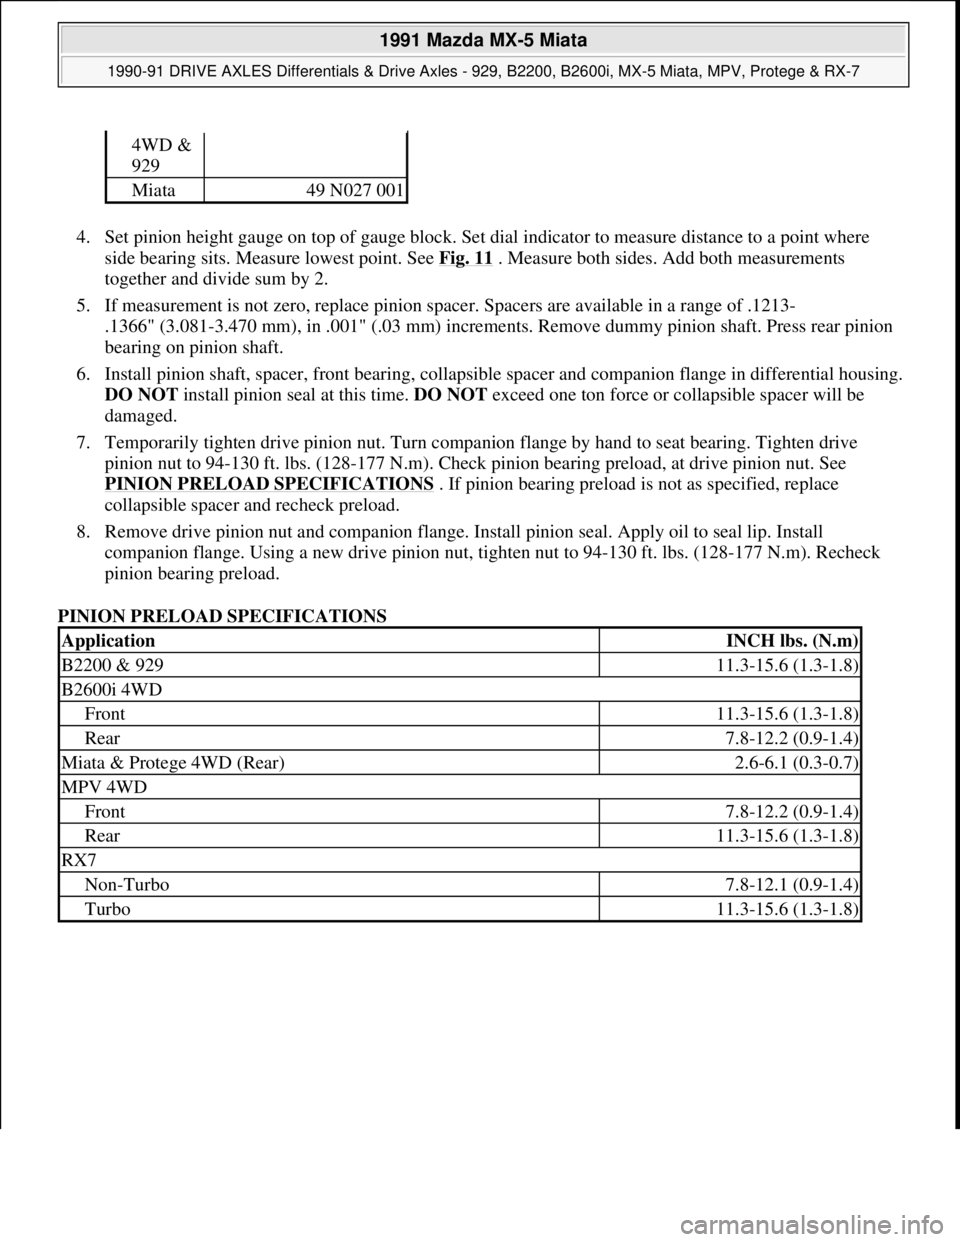
4. Set pinion height gauge on top of gauge block. Set dial indicator to measure distance to a point where
side bearing sits. Measure lowest point. See Fig. 11
. Measure both sides. Add both measurements
together and divide sum by 2.
5. If measurement is not zero, replace pinion spacer. Spacers are available in a range of .1213-
.1366" (3.081-3.470 mm), in .001" (.03 mm) increments. Remove dummy pinion shaft. Press rear pinion
bearing on pinion shaft.
6. Install pinion shaft, spacer, front bearing, collapsible spacer and companion flange in differential housing.
DO NOT install pinion seal at this time. DO NOT exceed one ton force or collapsible spacer will be
damaged.
7. Temporarily tighten drive pinion nut. Turn companion flange by hand to seat bearing. Tighten drive
pinion nut to 94-130 ft. lbs. (128-177 N.m). Check pinion bearing preload, at drive pinion nut. See
PINION PRELOAD SPECIFICATIONS
. If pinion bearing preload is not as specified, replace
collapsible spacer and recheck preload.
8. Remove drive pinion nut and companion flange. Install pinion seal. Apply oil to seal lip. Install
companion flange. Using a new drive pinion nut, tighten nut to 94-130 ft. lbs. (128-177 N.m). Recheck
pinion bearing preload.
PINION PRELOAD SPECIFICATIONS
4WD &
929
Miata49 N027 001
ApplicationINCH lbs. (N.m)
B2200 & 92911.3-15.6 (1.3-1.8)
B2600i 4WD
Front11.3-15.6 (1.3-1.8)
Rear7.8-12.2 (0.9-1.4)
Miata & Protege 4WD (Rear)2.6-6.1 (0.3-0.7)
MPV 4WD
Front7.8-12.2 (0.9-1.4)
Rear11.3-15.6 (1.3-1.8)
RX7
Non-Turbo7.8-12.1 (0.9-1.4)
Turbo11.3-15.6 (1.3-1.8)
1991 Mazda MX-5 Miata
1990-91 DRIVE AXLES Differentials & Drive Axles - 929, B2200, B2600i, MX-5 Miata, MPV, Protege & RX-7
Microsoft
Sunday, July 05, 2009 2:17:01 PMPage 17 © 2005 Mitchell Repair Information Company, LLC.
Page 277 of 392

Fig. 11: Checking Pinion Installation & Position
Courtesy of MAZDA MOTORS CORP.
Pinion Assembly (RX7)
1. Using a press, install rear pinion bearing outer race in differential housing. Install center bearing outer
race. Using original rear bearing spacer, install rear bearing on Setting Pinion (49 F027 001 ).
2. Position drive pinion in carrier and install center bearing, long collar and companion flange. Tighten
pinion nut just enough so pinion can be turned by hand.
3. Place a dial indicator on Pinion Height Gauge (49 0727 570 ). Place pinion height gauge on a flat surface
and zero dial indicator. Position Gauge Block (49 0305 555 ) on top of Setting Pinion (49 F027 001 ).
4. Set pinion height gauge on top of gauge block. Set dial indicator to measure distance to lowest point
where side bearing sits. See Fig. 11
. Measure both sides. Add both measurements together and divide
sum by 2.
5. If measurement is not zero, replace pinion spacer. Spacers are available in a range of .1213-
.1366" (3.081-3.470 mm) in .001" (.03 mm) increments. Remove setting pinion, select spacer and press
rear pinion bearing on drive pinion shaft.
6. Install drive pinion, spacer, front bearing, collapsible spacer and companion flange in differential
housing. DO NOT install pinion seal yet. Press center bearing onto drive pinion using Adapter (49 1243
465A ). DO NOT exceed one-ton force or collapsible spacer will be damaged. Two different collapsible
spacers are available, ensure correct one is used.
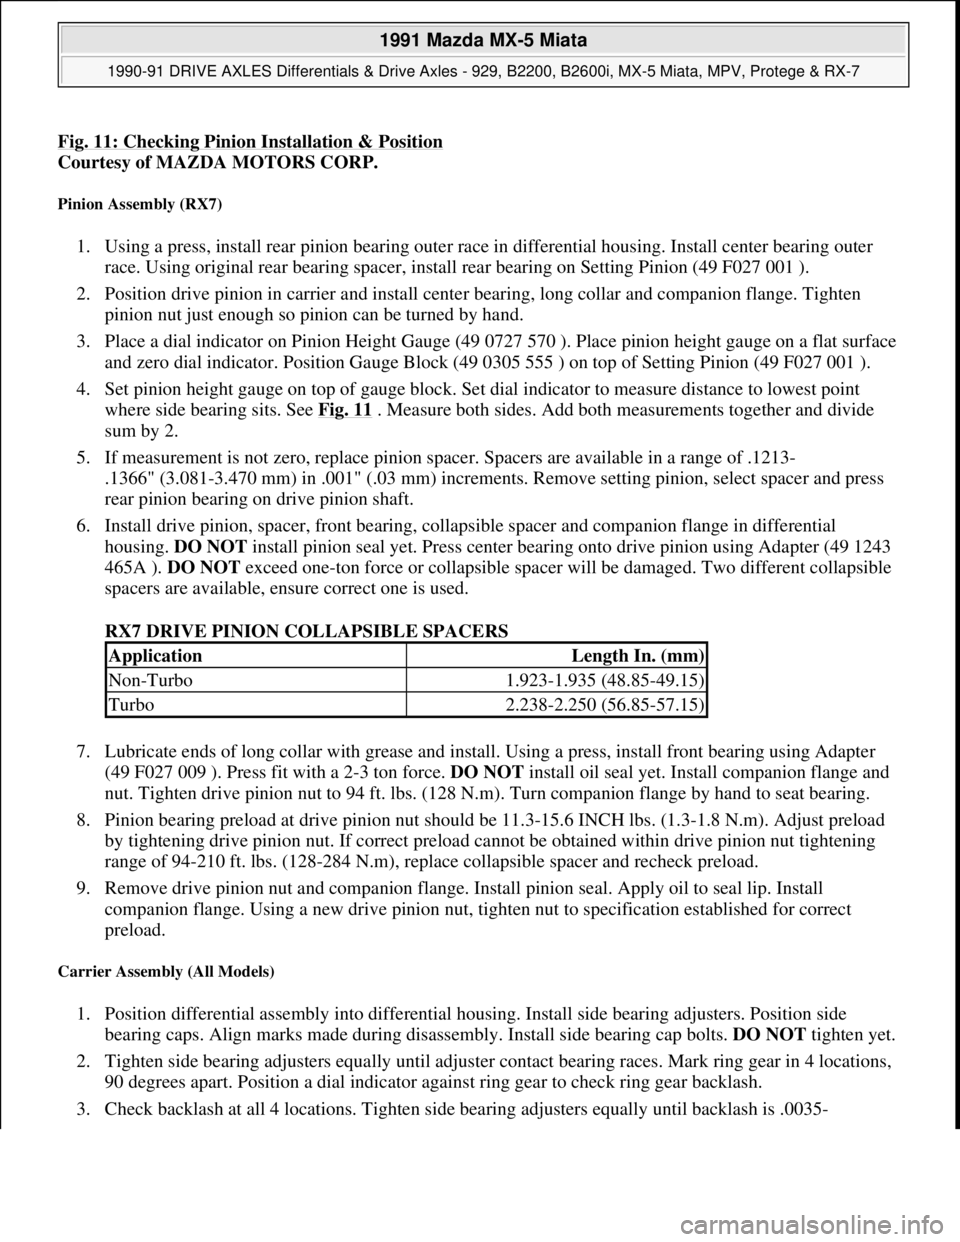
RX7 DRIVE PINION COLLAPSIBLE SPACERS
7. Lubricate ends of long collar with grease and install. Using a press, install front bearing using Adapter
(49 F027 009 ). Press fit with a 2-3 ton force. DO NOT install oil seal yet. Install companion flange and
nut. Tighten drive pinion nut to 94 ft. lbs. (128 N.m). Turn companion flange by hand to seat bearing.
8. Pinion bearing preload at drive pinion nut should be 11.3-15.6 INCH lbs. (1.3-1.8 N.m). Adjust preload
by tightening drive pinion nut. If correct preload cannot be obtained within drive pinion nut tightening
range of 94-210 ft. lbs. (128-284 N.m), replace collapsible spacer and recheck preload.
9. Remove drive pinion nut and companion flange. Install pinion seal. Apply oil to seal lip. Install
companion flange. Using a new drive pinion nut, tighten nut to specification established for correct
preload.
Carrier Assembly (All Models)
1. Position differential assembly into differential housing. Install side bearing adjusters. Position side
bearing caps. Align marks made during disassembly. Install side bearing cap bolts. DO NOT tighten yet.
2. Tighten side bearing adjusters equally until adjuster contact bearing races. Mark ring gear in 4 locations,
90 degrees apart. Position a dial indicator against ring gear to check ring gear backlash.
3. Check backlash at all 4 locations. Ti
ghten side bearing adjusters equally until backlash is .0035-
ApplicationLength In. (mm)
Non-Turbo1.923-1.935 (48.85-49.15)
Turbo2.238-2.250 (56.85-57.15)
1991 Mazda MX-5 Miata
1990-91 DRIVE AXLES Differentials & Drive Axles - 929, B2200, B2600i, MX-5 Miata, MPV, Protege & RX-7
Microsoft
Sunday, July 05, 2009 2:17:01 PMPage 19 © 2005 Mitchell Repair Information Company, LLC.