run flat MAZDA MODEL 3 HATCHBACK 2020 Owners Manual (in English)
[x] Cancel search | Manufacturer: MAZDA, Model Year: 2020, Model line: MODEL 3 HATCHBACK, Model: MAZDA MODEL 3 HATCHBACK 2020Pages: 598, PDF Size: 89.37 MB
Page 104 of 598
If the key is left in the following areas
and you leave the vehicle, the doors may
be locked depending on the radio wave
conditions even if the key is left in the
vehicle.
Around the dashboard
In the storage compartments such as
the glove compartment or the center
console
On the rear parcel shelf (4–door)
Next to a communication device such
as a mobile phone
When the ignition is switched to ACC or
ON, the vehicle lock-out prevention
feature prevents you from locking
yourself out of the vehicle.
All doors, fuel-filler lid, and liftgate will
automatically unlock if they are locked
using the power door locks with any
door or the liftgate open.
The vehicle lock-out prevention feature
does not operate while the ignition is
switched off.
When all doors, fuel-filler lid, and
liftgate are locked using the power door
lock with any door or the liftgate/trunk
lid open, the closed doors, fuel-filler lid,
and liftgate are locked. After that, when
all doors and the liftgate/trunk lid are
closed, all doors and the liftgate/trunk
lid are locked. However, if the key is
inside the vehicle, all doors, fuel-filler
lid, and liftgate are automatically
unlocked.
(With the advanced keyless function)
The beep sound is heard for about 10
seconds to notify the driver that the key
has been left in the vehicle.
(Without the advanced keyless
function)
The horn sound is heard twice to notify
the driver that the key has been left in
the vehicle.
(Door unlock (control) system with
collision detection)
This system automatically unlocks the
doors, fuel-filler lid, and liftgate in the
event the vehicle is involved in an
accident to allow passengers to get out
of the vehicle immediately and prevent
being trapped inside. While the ignition
is switched ON and in the event the
vehicle receives an impact strong
enough to inflate the air bags, all the
doors, fuel-filler lid, and liftgate are
automatically unlocked after about 6
seconds have elapsed from the time of
the accident.
The doors, fuel-filler lid, and liftgate
may not unlock depending on how an
impact is applied, the force of the
impact, and other conditions of the
accident.
If door-related systems or the battery is
malfunctioning, the doors, fuel-filler lid,
and liftgate will not unlock.
Before Driving
Doors and Locks
3-12
Mazda3_8HZ1-EA-19G_Edition1_old 2019-5-17 13:49:03
Page 136 of 598

Break-In Period
▼Break-In Period
No special break-in is necessary, but a few
precautions in the first 1,000 km (600
miles) may add to
the performance,
economy, and life of the vehicle.
Do not race the engine.
Do not maintain one constant speed,
either slow or fast, for a long period of
time.
Do not drive constantly at full-throttle or
high engine rpm for e xtended periods of
time.
Avoid unnecessary hard stops.
Avoid full-throttle starts.
Saving Fuel and Protection of the Environment
▼Saving Fuel and Protection of the
Environment
How you operate your Mazda determines
how far it will travel
on a tank of fuel. Use
these suggestions to help save fuel and
reduce CO
2.
Avoid long warm-ups. Once the engine
runs smoothly, begin driving.
Avoid fast starts.
Drive at lower speeds.
Anticipate when to apply the brakes
(avoid sudden braking).
Follow the maintenance schedule and
have an Authorized Mazda Dealer
perform inspections and servicing.
Refer to Scheduled Maintenance
(U.S.A. and Puerto Rico) on page 6-4.
Refer to Scheduled Maintenance
(Canada) on page 6-6.
Refer to Scheduled Maintenance
(Mexico) on page 6-8.
Use the air conditioner only when
necessary.
Slow down on rough roads.
Keep the tires properly inflated.
Do not carry unnecessary weight.
Do not rest your foot on the brake pedal
while driving.
Keep the wheels in correct alignment.
Keep windows closed at high speeds.
Slow down when driving in crosswinds
and headwinds.
Before Driving
Driving Tips
3-44
Mazda3_8HZ1-EA-19G_Edition1_old 2019-5-17 13:49:03
Page 303 of 598
NOTE
The vehicle posture changes depending
on the accelerator pedal, brake pedal
and steering wheel operations, which
could make it difficult for the system to
recognize an obstruction, or it could
facilitate unnecessary detection. In such
cases, the SBS-R may or may not
operate.
The SBS-R system will operate under the
following conditions.
The engine is running.
The shift lever (manual transmission
vehicle) or the selector lever
(automatic transmission vehicle) is in
the R (reverse) position.
i-ACTIVSENSE warning indication/
warning light is not displayed in the
multi-information display.
The vehicle speed is between about 2
to 8 km/h (2 to 4 mph).
The SBS-R is not turned off.
The DSC is not malfunctioning.
In the following cases, the rear
ultrasonic sensor and rear camera
cannot detect obstructions and the
SBS-R may not operate.
The height of the obstruction is low
such as low walls or trucks with low
loading platforms.
The height of the obstruction is high
such as trucks with high loading
platforms.
The obstruction is small.
The obstruction is thin such as a
signpost.
The surface of the obstruction is not
pointed vertically relative to the
vehicle.
The obstruction is soft such as a
hanging curtain or snow stuck to a
vehicle.
The obstruction is shaped irregularly.
The obstruction is extremely close.
In the following cases, the rear
ultrasonic sensor and rear camera
cannot detect obstructions correctly and
the SBS-R may not operate.
Something is stuck on the bumper
near a rear ultrasonic sensor.
The brake or accelerator pedal is
operated.
There is another obstruction near one
obstruction.
During inclement weather such as
rain, fog and snow.
High or low humidity.
High or low temperatures
Strong winds.
The path of travel is not flat.
Heavy luggage is loaded in the
luggage compartment or on the rear
seat.
Objects such as a wireless antenna,
fog light, or illuminated license plate
is installed near a rear ultrasonic
sensor.
The orientation of a rear ultrasonic
sensor has deviated for reasons such
as a collision.
The vehicle is affected by other sound
waves such as the horn, engine noise,
ultrasonic sensor of another vehicle.
In the following cases, a rear ultrasonic
sensor and rear camera may detect
something as a target obstruction which
could cause the SBS-R system to
operate.
Driving on a steep slope.
Wheel blocks.
When Driving
i-ACTIVSENSE
4-159
Mazda3_8HZ1-EA-19G_Edition1_old 2019-5-17 13:49:03
Page 468 of 598
CAUTION
When removing the lens or lamp unit using
a flathead screwdriver, make sure that the
flathead screwdriver does not contact the
interior terminal. If the flathead screwdriver
contacts the terminal, a short circuit may
occur.
NOTE
When replacing a bulb, contact an
Authorized Mazda Dealer if necessary.
Use the protective cover and carton for
the replacement bulb to dispose of the
old bulb promptly and out of the reach
of children.
For details regarding the installation
positions of the interior lights, refer to
the following:
Vanity mirror lights
Refer to Vanity Mirrors on page 5-34.
Overhead Lights/front map lights,
overhead light (rear), trunk light, and
luggage compartment light
Refer to Interior Lights on page 5-35.
▼ Replacing Exterior Light Bulbs
The exterior lights
have either LEDs or
normal bulbs.
Only the bulb for a parking lights/front
side-marker lights (type B) can be
replaced.
LED type
Headlights
Daytime running lights
Parking lights (Type A)
Front turn signal lights
Front side-marker lights (Type A)
Side turn signal lights*
High-mount brake light
Rear turn signal lights
Rear side-marker lights
Brake lights
Taillights
Reverse lights
License plate lights
The LED bulb cannot be replaced as a
single unit because it is an integrated unit.
The LED bulb has to be replaced with the
unit. We recommend an Authorized
Mazda Dealer when the replacement is
necessary.
Bulb type
Parking lights/Front side-marker lights
(Type B)
1. Make sure the ignition is switched off, and the headligh t switch is off.
2. If you are changing the left bulb, start
the engine, turn the steering wheel all
the way to the right, and turn off
engine. If you are changing the right
bulb, turn the steering wheel to the left.
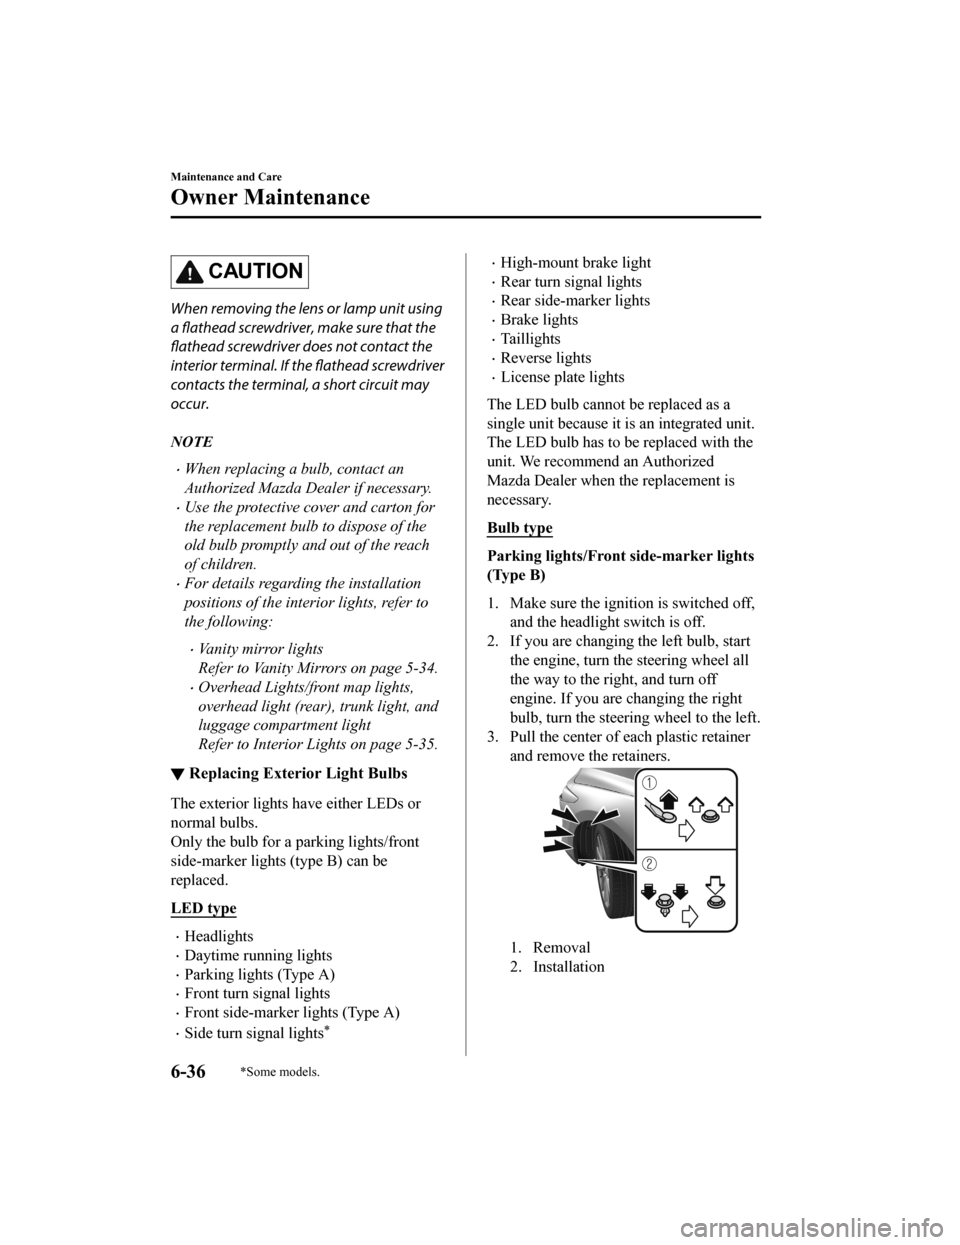
3. Pull the center of each plastic retainer
and remove the retainers.
1. Removal
2. Installation
Maintenance and Care
Owner Maintenance
6-36*Some models.
Mazda3_8HZ1-EA-19G_Edition1_old 2019-5-17 13:49:03
Page 485 of 598
7If Trouble Arises
Helpful information on what to do if a problem arises with the vehicle.
Parking in an Emergency................. 7-2 Parking in an Emergency..............7-2
Flat Tire.............................................. 7-3 Spare Tire and Tool Storage......... 7-3
Changing a Flat Tire..................... 7-7
Battery Runs Out............................ 7-17 Jump-Starting............................. 7-17
Emergency Starting.........................7-20 Starting a Flooded Engine.......... 7-20
Push-Starting.............................. 7-20
Overheating......................................7-21 Overheating................................ 7-21
Emergency Towing.......................... 7-23 Towing Description.................... 7-23
Tiedown Hooks
*......................... 7-24
Warning/Indicator Lights and
Warning Sounds.............................. 7-27If a Warning Light Turns On or
Flashes........................................ 7-27
Message Indicated on Multi-
information Display.................... 7-38
Warning Sound is Activated....... 7-41
When Liftgate/Trunk Lid Cannot be
Opened..............................................7-46 When Liftgate/Trunk Lid Cannot be
Opened........................................7-46
Active Driving Display Does Not
Operate............................................. 7-48 If the Active Driving Display Does
Not Operate
*............................... 7-48
Windshield Wipers Operate at High
Speed.................................................7-49 Windshield Wipers Operate at High
Speed.......................................... 7-49
*Some models.7-1
Mazda3_8HZ1-EA-19G_Edition1_old 2019-5-17 13:49:03
Page 487 of 598

Spare Tire and ToolStorage
▼Spare Tire and Tool Storage
Spare tire and tools are stored in the
locations illustrated in the diagram.
4–Door
1. Tiedown eyelet*
2. Spare tire hold-down bolt
3. Jack lever
4. Flat tire hold-down bolt
*
5. Jack
6. Lug wrench
7. Spare tire
5–Door
Ty p e A
1. Tiedown eyelet*
2. Flat tire hold-down bolt*
3. Jack lever
4. Jack
5. Spare tire hold-down bolt
6. Spare tire
7. Lug wrench
Ty p e B
1. Tiedown eyelet*
2. Spare tire hold-down bolt
3. Flat tire hold-down bolt
4. Jack lever
5. Jack
6. Spare tire
7. Lug wrench
▼Jack
To remove the jack
4–Door
1. Remove the trunk mat.
If Trouble Arises
Flat Tire
*Some models.7-3
Mazda3_8HZ1-EA-19G_Edition1_old 2019-5-17 13:49:03
Page 489 of 598

5–Door
Perform the removal procedure in reverse.
Maintenance
Always keep the jack clean.
Make sure the moving parts are kept
free from dirt or rust.
Make sure the screw thread is
adequately lubricated.
▼Spare Tire
Your Mazda has a temporary spare tire.
The temporary spare tire is lighter and
smaller than a conventional tire, and is
designed only for emergency use and
should be used only for VERY short
periods. Temporary spare tires should
NEVER be used for long drives or
extended periods.
WA R N I N G
Do not install the temporary spare tire on
the front wheels (driving wheels):
Driving with the temporary spare tire on
one of the front driving wheels is
dangerous. Handling will be
affected. You
could lose control of the vehicle, especially
on ice or snow bound roads, and have an
accident. Move a regular tire to the front
wheel and install the temporary spare tire
to the rear.
CAUTION
When using the temporary spare tire,
driving stability may decrease compared
to when using only the conventional tire.
Drive carefully.
To avoid damage to the temporary spare
tire or to the vehicle, observe the
following precautions:
Do not exceed 80 km/h (50 mph).
Avoid driving over obstacles. Also, do
not drive through an automatic car
wash. This tire's diameter is smaller
than a conventional tire, so the ground
clearance is reduced.
Do not use a tire chain on this tire
because it will not
fit properly.
Do not use your temporary spare tire
on any other vehicle, it has been
designed only for your Mazda.
Use only one temporary spare tire on
your vehicle at the same time.
To remove the spare tire
4–Door
1. Remove the trunk mat.
If Trouble Arises
Flat Tire
7-5
Mazda3_8HZ1-EA-19G_Edition1_old 2019-5-17 13:49:03
Page 495 of 598

NOTE
When raising the jack head into the
jacking position and aligning the
groove in the jack head with the rail
under the vehicle body, the top of the
jack head contacts the vehicle's
underbody without the rail contacting
the bottom of the groove.
7. Insert the jack lever and attach the lug wrench to tire jack.
8. Turn the jack handle clockwise and
raise the vehicle high enough so that
the spare tire can be installed. Before
removing the lug nuts, make sure your
Mazda is firmly in position and that it
cannot slip or move.
WA R N I N G
Do not jack up the vehicle higher than
is necessary:
Jacking up the vehicle higher than is
necessary is dangerous as it could
destabilize the vehicle resulting in an
accident.
Do not start the engine or shake the
vehicle while it is jacked up:
Starting the engine or shaking the
vehicle while it is jacked up is
dangerous as it could cause the vehicle
to fall off the jack resulting in an
accident.
Never go under the vehicle while it is
jacked up:
Going under the vehicle while it is
jacked up is dangerous as it could result
in death or serious injury if the vehicle
were to fall off the jack.
9. Remove the lug nuts by turning them counterclockwise; then remove the
wheel and center cap.
▼Locking Lug Nuts
If your Mazda is equipped with the
optional antitheft wheel lug nuts, a special
key must be used to unlock the locking lug
nut for each wheel. The key is stored in
the glove compartment, center console
storage, storage box, o
r trunk. Register the
key and lug nuts with the lock
manufacturer by filling out the registration
card and mailing it in using the
accompanying envelope. If the key is lost,
consult an Authorized Mazda Dealer or
use the lock manufacturer’s order form to
order a new key.
If Trouble Arises
Flat Tire
7-11
Mazda3_8HZ1-EA-19G_Edition1_old 2019-5-17 13:49:03
Page 497 of 598
WA R N I N G
Do not apply oil or grease to lug nuts
and bolts and do not tighten the lug
nuts beyond the recommended
tightening torque:
Applying oil or grease to lug nuts and
bolts is dangerous. The lug nuts could
loosen while driving and cause the tire
to come off, resulting in an accident. In
addition, lug nuts and bolts could be
damaged if tightened more than
necessary.
4. Turn the jack handle counterclockwise using the lug wrench and lower the
vehicle.
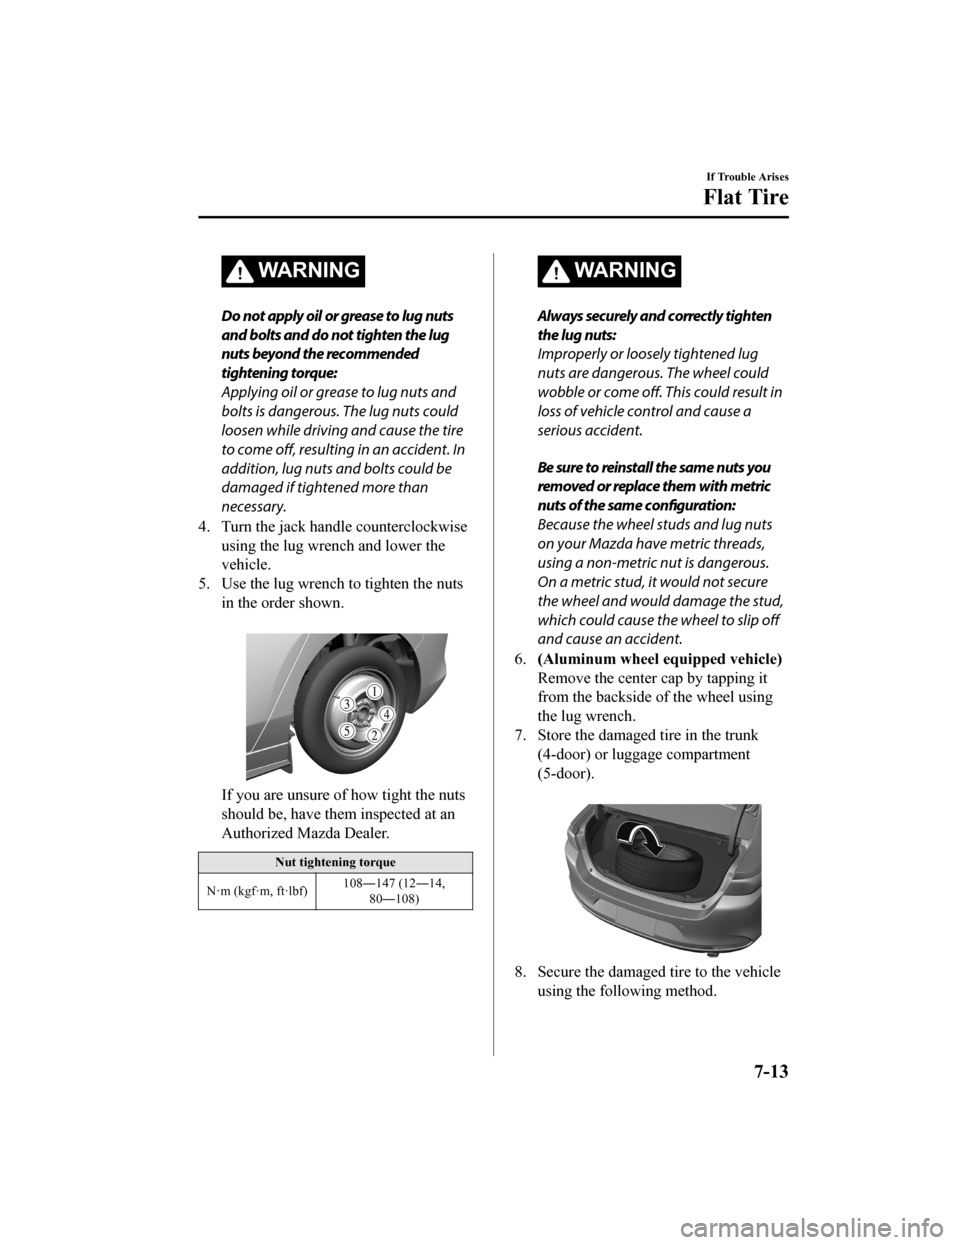
5. Use the lug wrench to tighten the nuts in the order shown.
If you are unsure of how tight the nuts
should be, have them inspected at an
Authorized Mazda Dealer.
Nut tightening torque
N·m (kgf·m, ft·lbf) 108―147 (12―14,
80―108)
WA R N I N G
Always securely and correctly tighten
the lug nuts:
Improperly or loosely tightened lug
nuts are dangerous. The wheel could
wobble or come off. This could result in
loss of vehicle control and cause a
serious accident.
Be sure to reinstall the same nuts you
removed or replace them with metric
nuts of the same configuration:
Because the wheel studs and lug nuts
on your Mazda have metric threads,
using a non-metric nut is dangerous.
On a metric stud, it would not secure
the wheel and would damage the stud,
which could cause the wheel to slip off
and cause an accident.
6. (Aluminum wheel equipped vehicle)
Remove the center cap by tapping it
from the backside of the wheel using
the lug wrench.
7. Store the damaged tire in the trunk (4-door) or lugg age compartment
(5-door).
8. Secure the damaged tire to the vehicle using the following method.
If Trouble Arises
Flat Tire
7-13
Mazda3_8HZ1-EA-19G_Edition1_old 2019-5-17 13:49:03
Page 499 of 598

(Vehicles without flat tire hold-down
bolt)
1. Secure the damaged tire to thevehicle using the spare tire
hold-down bolt removed when
removing the spare tire.
9. Place the trunk mat (4-door) orluggage mat (5-door) on the damaged
tire.
10. Remove the tire blocks and store thetools and jack.
11. Check the inflation pressure. Refer to Tires on page 9-9.
12. Have the flat tire repaired or replaced
as soon as possible.
13. After repairing or replacing the flat
tire, install the wheel cover (vehicles
with steel wheels) or center cap
(vehicles with alumi num wheels) using
the following procedure.
(Wheel cover)
1. Align the notch on the wheel cover with the tire valve of the wheel and
install the whee l cover to the
wheel.
1. Notch
2. Tire valve
CAUTION
Always align the notch on the wheel
cover with the tire valve of the
wheel. Otherwise, it could cause
damage to the wheel cover and the
tire valve.
(Center cap)
1. Align the center cap with the center hole of the wheel and install the
center cap to the wheel.
If Trouble Arises
Flat Tire
7-15
Mazda3_8HZ1-EA-19G_Edition1_old 2019-5-17 13:49:03