clock MAZDA MODEL 6 2009 (in English) User Guide
[x] Cancel search | Manufacturer: MAZDA, Model Year: 2009, Model line: MODEL 6, Model: MAZDA MODEL 6 2009Pages: 464, PDF Size: 4.61 MB
Page 257 of 464

Black plate (257,1)
Channel selection within a category
If category is not in“ALL ”and the
channel number is displayed, turning the
manual tuning dial moves the channel
number up/down in the present category.
lTurn the manual tuning dial clockwise:
Channel Up
lTurn the manual tuning dial
counterclockwise: Channel Down
NOTE
The channel number needs to be indicated in
the display to use manual tuning dial for this
function.
Channel number, channel name,category, artist, song titles and infodisplay
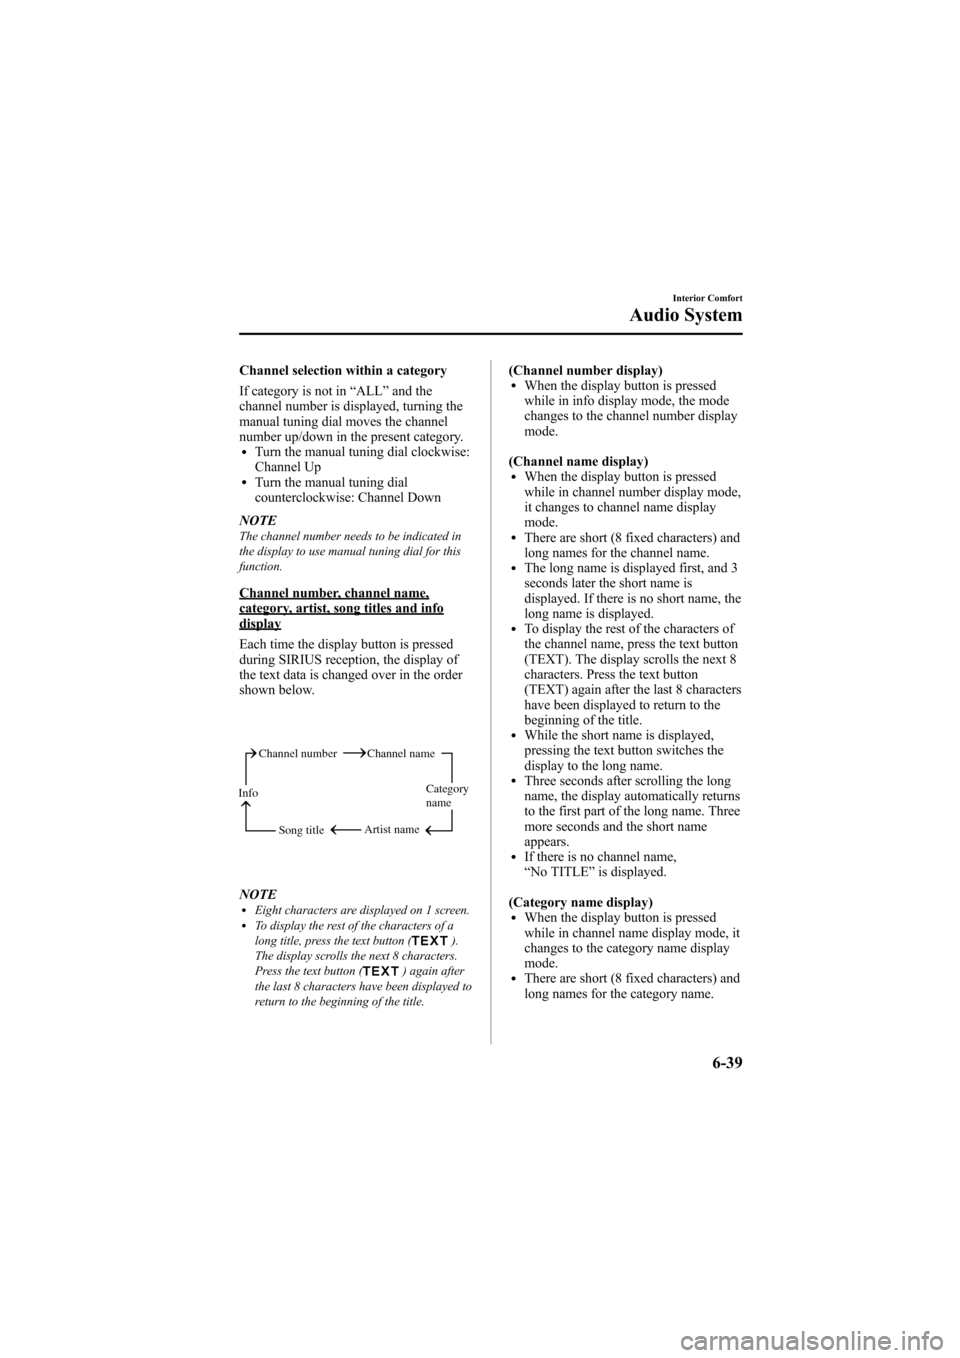
Each time the display button is pressed
during SIRIUS reception, the display of
the text data is changed over in the order
shown below.
Channel number Channel name
Category
name
Artist name
Info
Song title
NOTElEight characters are displayed on 1 screen.lTo display the rest of the characters of a
long title, press the text button ().
The display scrolls the next 8 characters.
Press the text button (
) again after
the last 8 characters have been displayed to
return to the beginning of the title.
(Channel number display)lWhen the display button is pressed
while in info display mode, the mode
changes to the channel number display
mode.
(Channel name display)
lWhen the display button is pressed
while in channel number display mode,
it changes to channel name display
mode.
lThere are short (8 fixed characters) and
long names for the channel name.
lThe long name is displayed first, and 3
seconds later the short name is
displayed. If there is no short name, the
long name is displayed.
lTo display the rest of the characters of
the channel name, press the text button
(TEXT). The display scrolls the next 8
characters. Press the text button
(TEXT) again after the last 8 characters
have been displayed to return to the
beginning of the title.
lWhile the short name is displayed,
pressing the text button switches the
display to the long name.
lThree seconds after scrolling the long
name, the display automatically returns
to the first part of the long name. Three
more seconds and the short name
appears.
lIf there is no channel name,
“ No TITLE ”is displayed.
(Category name display)
lWhen the display button is pressed
while in channel name display mode, it
changes to the category name display
mode.
lThere are short (8 fixed characters) and
long names for the category name.
Interior Comfort
Audio System
6-39
Mazda6_8Z64-EA-08H_Edition1 Page257
Wednesday, June 25 2008 10:4 AM
Form No.8Z64-EA-08H
Page 287 of 464

Black plate (287,1)
3. The name of the first device among theprogrammed devices is displayed.
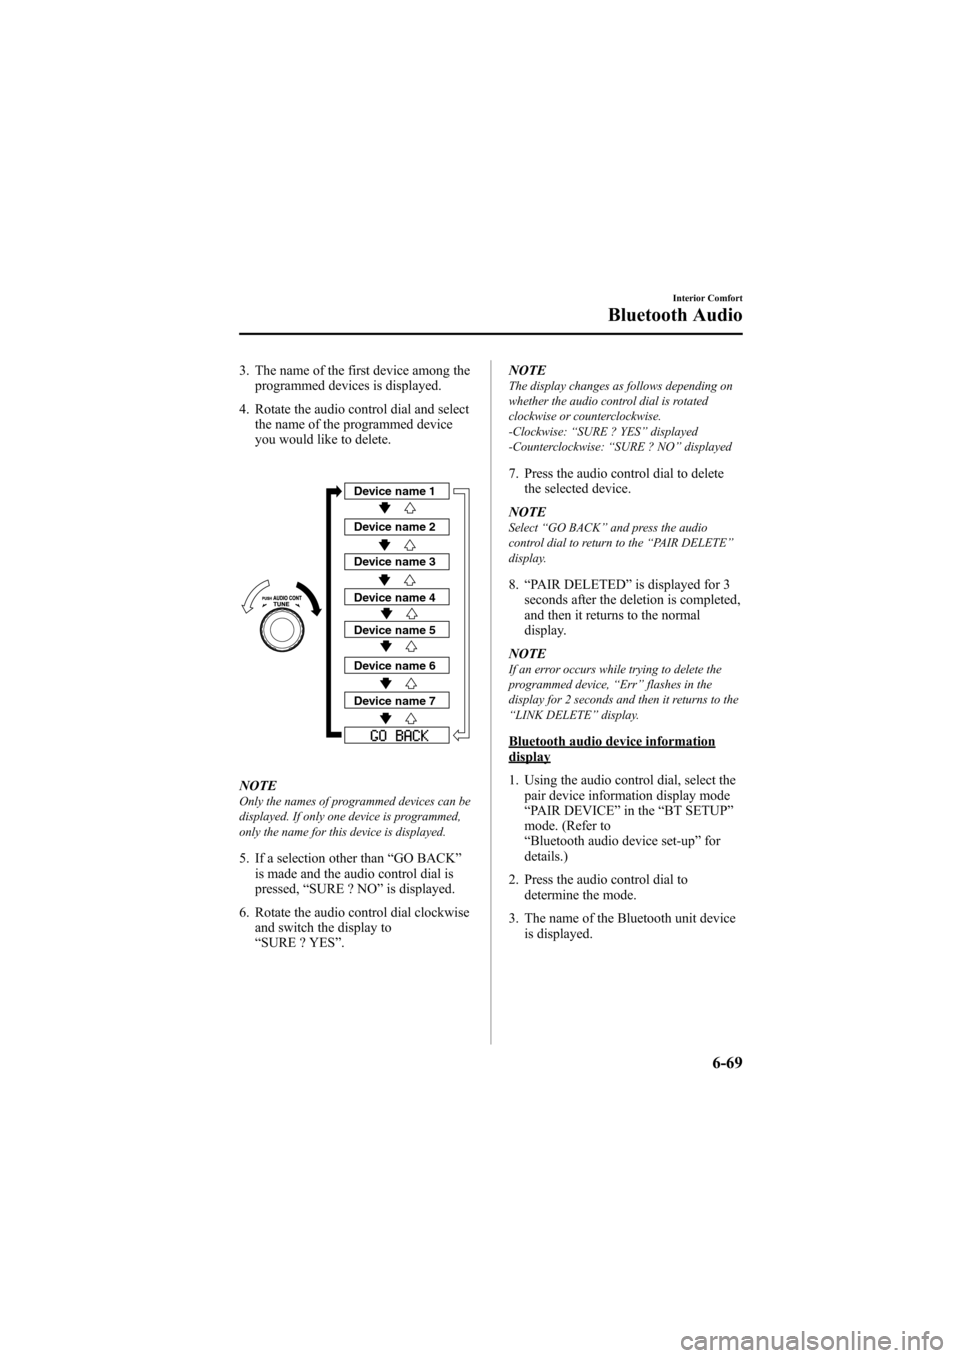
4. Rotate the audio control dial and select the name of the programmed device
you would like to delete.
Device name 1
Device name 2
Device name 3
Device name 4
Device name 5
Device name 6
Device name 7
NOTEOnly the names of programmed devices can be
displayed. If only one device is programmed,
only the name for this device is displayed.
5. If a selection other than “GO BACK ”
is made and the audio control dial is
pressed, “SURE ? NO ”is displayed.
6. Rotate the audio control dial clockwise and switch the display to
“SURE ? YES ”. NOTE
The display changes as follows depending on
whether the audio control dial is rotated
clockwise or counterclockwise.
-Clockwise:
“SURE ? YES ”displayed
-Counterclockwise: “SURE ? NO ”displayed
7. Press the audio control dial to delete
the selected device.
NOTE
Select “GO BACK ”and press the audio
control dial to return to the “PAIR DELETE ”
display.
8. “PAIR DELETED ”is displayed for 3
seconds after the deletion is completed,
and then it returns to the normal
display.
NOTE
If an error occurs while trying to delete the
programmed device, “Err ”flashes in the
display for 2 seconds and then it returns to the
“ LINK DELETE ”display.
Bluetooth audio device informationdisplay
1. Using the audio control dial, select the
pair device information display mode
“PAIR DEVICE ”in the “BT SETUP”
mode. (Refer to
“ Bluetooth audio device set-up ”for
details.)
2. Press the audio control dial to determine the mode.
3. The name of the Bluetooth unit device is displayed.
Interior Comfort
Bluetooth Audio
6-69
Mazda6_8Z64-EA-08H_Edition1 Page287
Wednesday, June 25 2008 10:4 AM
Form No.8Z64-EA-08H
Page 314 of 464

Black plate (314,1)
Information Display
Audio/hands-free displayClimate control displayClimate control
displayTrip
computer/clock
display
With trip computer
Without trip computer
With trip computer
q
Information Display Functions
The information display has the following functions:lClockí
lClimate Control Display (Fully Automatic Type Air Conditioning System)lAudio DisplaylTrip Computerí
lBluetooth Hands-Free DisplayíRefer to Bluetooth Hands-Free on page 6-72.
6-96
Interior Comfort
íSome models.
Interior Equipment
Mazda6_8Z64-EA-08H_Edition1 Page314
Wednesday, June 25 2008 10:5 AM
Form No.8Z64-EA-08H
Page 315 of 464

Black plate (315,1)
qClock
NOTEWhen the trip computer is being displayed,
press the CLOCK button to change the display
to the time.
The time is displayed when the ignition is
switched to ACC or ON.
Without navigation system
Time setting
1. Turn the ignition switch to the ACC or
ON position.
2. Adjust the time using the time setting buttons (
,).
The hours advance while the time
setting button (
) is pressed.
The minutes advance while the time
setting button (
) is pressed.
Time resetting (Without trip computer
type only)
1. Turn the ignition switch to the ACC or ON position.
2. Press and hold the :00 button for 1.5 seconds or more. The displayed time
flashes. 3. When the button is released, the time
will be reset as follows:
(Example)
12:01 ―12:29 →12:00
12:30 ―12:59 →1:00
NOTE
When the :00 button is released, the seconds
will start at “00 ”.
NOTE(With trip computer type only)
The clock display can be switched on or off by
pressing the CLOCK button.
With navigation system
Refer to the separate manual
“NAVIGATION SYSTEM ”.
NOTE
Minutes and seconds are adjusted by the GPS,
however, it is necessary to adjust hours under
the following conditions:
lDriving across different time zoneslDaylight saving time start and end
q Climate Control Display (Fully
Automatic Type)
The climate control system status is
displayed. To operate the climate control
system, refer to “Climate Control System ”
(page 6-2).
q Audio Display
The audio system status is displayed. To
operate the audio system, refer to
“Audio System ”(page 6-16).
Interior Comfort
Interior Equipment
6-97
Mazda6_8Z64-EA-08H_Edition1 Page315
Wednesday, June 25 2008 10:5 AM
Form No.8Z64-EA-08H
Page 320 of 464

Black plate (320,1)
Storage Compartments
WARNING
Keep storage boxes closed when
driving:Driving with the storage boxes open
is dangerous. To reduce the
possibility of injury in an accident or
a sudden stop, keep the storage
boxes closed when driving.
CAUTION
Do not leave lighters or eyeglasses in
the storage boxes while parked under
the sun. A lighter could explode or
the plastic material in eyeglasses
could deform and crack from high
temperature.
qOverhead Console
This console box is designed to store a
garage door opener or other accessories.
Push and release to open.
qStorage Pocket
To open, push the release catch down and
pull the lid downward.
qGlove Box
To open the glove box, pull the latch
toward you.
Insert the key (auxiliary key
*) and turn it
clockwise to lock, counterclockwise to
unlock.
* Advanced key equipped vehicle
Unlock
Lock
6-102
Interior Comfort
Interior Equipment
Mazda6_8Z64-EA-08H_Edition1 Page320
Wednesday, June 25 2008 10:5 AM
Form No.8Z64-EA-08H
Page 328 of 464

Black plate (328,1)
qJack
To remove the jack
1. Open the trunk mat.
2. Remove the jack container lid.
3. Turn the wing bolt and jack screw
counterclockwise.
Wing bolt
Jack screw
To secure the jack
1. Insert the wing bolt into the jack with the jack screw pointing front and turn
the wing bolt clockwise to temporarily
tighten it.
2. Turn the jack screw in the direction shown in the figure.
Wing bolt
Jack screw
3. Turn the wing bolt completely to secure the jack.
NOTE
If the jack is not completely secured, it could
rattle while driving. Make sure the jack screw
is sufficiently tightened.
q Spare Tire
Your Mazda has a temporary spare tire.
The temporary spare tire is lighter and
smaller than a conventional tire, and is
designed only for emergency use and
should be used only for VERY short
periods. Temporary spare tires should
NEVER be used for long drives or
extended periods.
7-4
In Case of an Emergency
Flat Tire
Mazda6_8Z64-EA-08H_Edition1 Page328
Wednesday, June 25 2008 10:5 AM
Form No.8Z64-EA-08H
Page 329 of 464

Black plate (329,1)
WARNING
Do not install the temporary spare tire
on the front wheels (driving wheels):Driving with the temporary spare tire
on one of the front driving wheels is
dangerous. Handling will be affected.
You could lose control of the vehicle,
especially on ice or snow bound
roads, and have an accident. Move a
regular tire to the front wheel and
install the temporary spare tire to the
rear.
CAUTION
ØWhen using the temporary spare
tire, driving stability may decrease
compared to when using only the
conventional tire. Drive carefully.
Ø To avoid damage to the temporary
spare tire or to the vehicle, observe
the following precautions:
ØDo not exceed 80 km/h (50
mph).
ØAvoid driving over obstacles.
Also, do not drive through an
automatic car wash. This tire's
diameter is smaller than a
conventional tire, so the ground
clearance is reduced about
7 mm (0.3 in).
ØDo not use tire chains on any
type of tire, including the spare
tire.
ØDo not use your temporary
spare tire on any other vehicle,
it has been designed only for
your Mazda.
ØUse only one temporary spare
tire on your vehicle at the same
time.
To remove the spare tire
1. Remove the trunk mat, and if a trunk
board is equipped remove it also.
2. Turn the tire hold-down boltcounterclockwise.
To secure the spare tire
Perform the removal procedure in reverse.
In Case of an Emergency
Flat Tire
7-5
Mazda6_8Z64-EA-08H_Edition1 Page329
Wednesday, June 25 2008 10:5 AM
Form No.8Z64-EA-08H
Page 331 of 464

Black plate (331,1)
qRemoving a Flat Tire
1. If your vehicle is equipped with a
wheel cover, pry off the wheel cover
with the beveled end of the lug wrench.
NOTEForce the end of the lug wrench firmly between
wheel and cover, or removal will be difficult.
CAUTION
Align the notch on the wheel cover
with the valve stem when installing
it.
Tire valve
Notch
Damage could occur during
installation if the wheel cover is not
properly aligned. 2. Loosen the lug nuts by turning them
counterclockwise one turn each, but
don't remove any lug nuts until the tire
has been raised off the ground.
3. Place the jack under the jackingposition closest to the tire being
changed.
Jacking position
In Case of an Emergency
Flat Tire
7-7
Mazda6_8Z64-EA-08H_Edition1 Page331
Wednesday, June 25 2008 10:5 AM
Form No.8Z64-EA-08H
Page 332 of 464

Black plate (332,1)
WARNING
Use only the front and rear jacking
positions recommended in this manual:Attempting to jack the vehicle in
positions other than those
recommended in this manual is
dangerous. The vehicle could slip off
the jack and seriously injure or even
kill someone. Use only the front and
rear jacking positions recommended
in this manual.
Use only the jack provided with your
Mazda: Using a jack that is not designed for
your Mazda is dangerous. The vehicle
could slip off the jack and seriously
injure someone.
Never place objects under the jack: Jacking the vehicle with an object
under the jack is dangerous. The jack
could slip and someone could be
seriously injured by the jack or the
falling vehicle.
4. Turn the lug wrench clockwise and raise the vehicle high enough so that
the spare tire can be installed. Before
removing the lug nuts, make sure your
Mazda is firmly in position and that it
cannot slip or move.
5. Remove the lug nuts by turning themcounterclockwise; then remove the
wheel and center cap.
qLocking Lug Nutsí
If your vehicle has optional antitheft
wheel lug nuts, one on each wheel will
lock the tires and you must use a special
key to unlock them. This key is attached
to the lug wrench and is stored with the
spare tire. Register them with the lock
manufacturer by filling out the card
provided in the glove box and mailing it
in the accompanying envelope. If you lose
this key, consult an Authorized Mazda
Dealer or use the lock manufacturer's
order form, which is with the registration
card.
Special key
Antitheft lug nut
To remove an antitheft lug nut
1. Obtain the key for the antitheft lug nut.
2. Place the key on top of the nut, and be
sure to hold the key square to it. If you
hold the key at an angle, you may
damage both key and nut. Don't use a
power impact wrench.
3. Place the lug wrench on top of the key and apply pressure. Turn the wrench
counterclockwise.
7-8
In Case of an Emergency
íSome models.
Flat Tire
Mazda6_8Z64-EA-08H_Edition1 Page332
Wednesday, June 25 2008 10:5 AM
Form No.8Z64-EA-08H
Page 333 of 464

Black plate (333,1)
To install the nut
1. Place the key on top of the nut, and besure to hold the key square to it. If you
hold the key at an angle, you may
damage both key and nut. Don't use a
power impact wrench.
2. Place the lug wrench on top of the key, apply pressure, and turn it clockwise.
qMounting the Spare Tire
1. Remove dirt and grime from the
mounting surfaces of the wheel and
hub, including the hub bolts, with a
cloth.
WARNING
Make sure the mounting surfaces of
the wheel, hub and lug nuts are clean
before changing or replacing tires: When changing or replacing a tire,
not removing dirt and grime from the
mounting surfaces of the wheel, hub
and hub bolts is dangerous. The lug
nuts could loosen while driving and
cause the tire to come off, resulting in
an accident.
2. Mount the spare tire. 3. Install the lug nuts with the beveled
edge inward; tighten them by hand.
WARNING
Do not apply oil or grease to lug nuts
and bolts and do not tighten the lug
nuts beyond the recommended
tightening torque: Applying oil or grease to lug nuts and
bolts is dangerous. The lug nuts
could loosen while driving and cause
the tire to come off, resulting in an
accident. In addition, lug nuts and
bolts could be damaged if tightened
more than necessary.
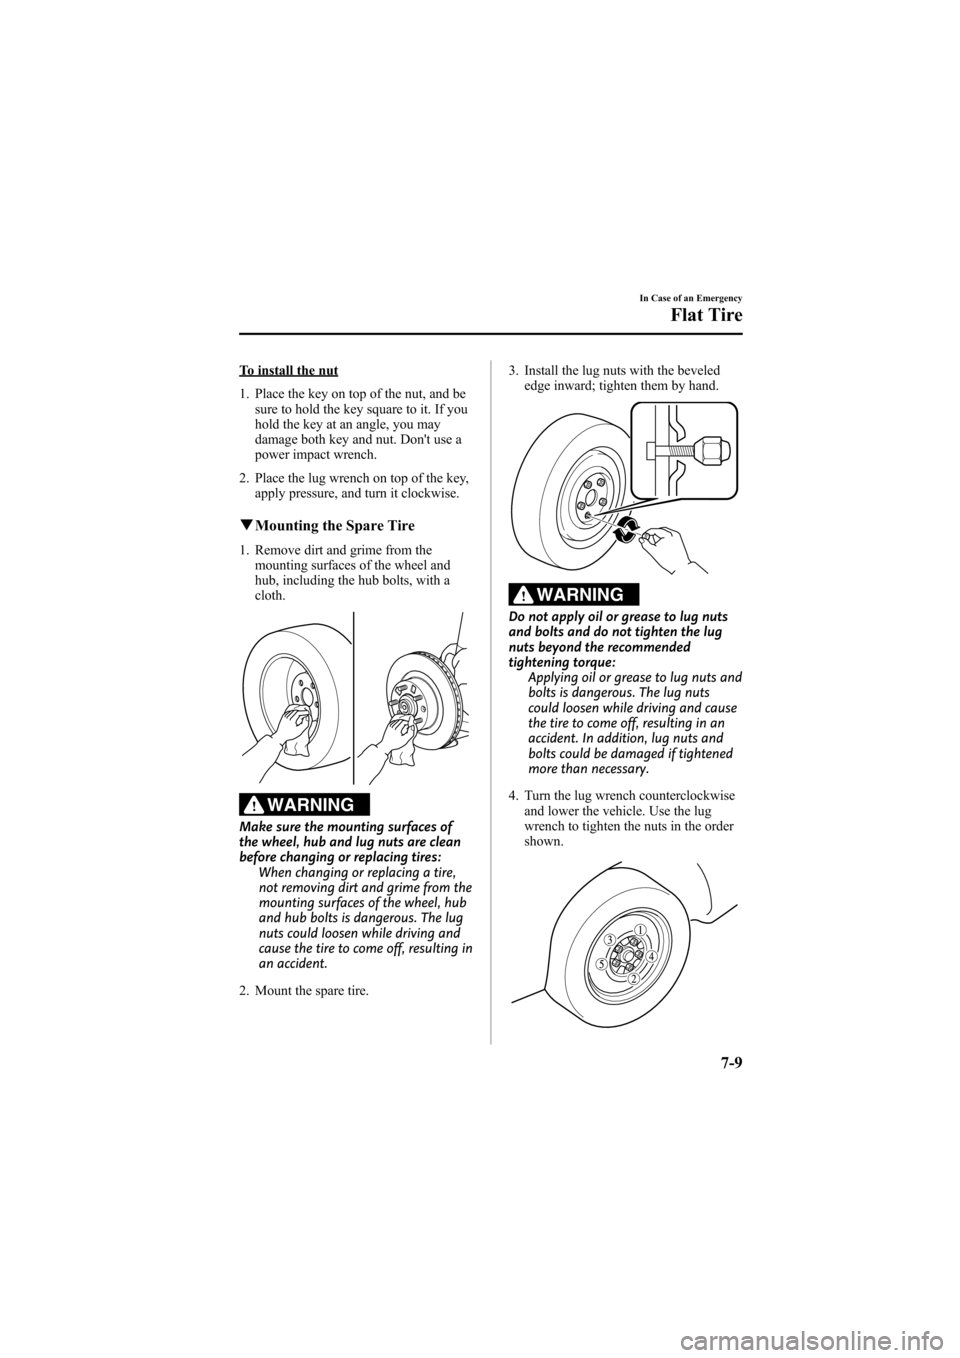
4. Turn the lug wrench counterclockwise and lower the vehicle. Use the lug
wrench to tighten the nuts in the order
shown.
In Case of an Emergency
Flat Tire
7-9
Mazda6_8Z64-EA-08H_Edition1 Page333
Wednesday, June 25 2008 10:5 AM
Form No.8Z64-EA-08H