set clock MAZDA MODEL 6 2010 Smart Start Guide (in English)
[x] Cancel search | Manufacturer: MAZDA, Model Year: 2010, Model line: MODEL 6, Model: MAZDA MODEL 6 2010Pages: 16, PDF Size: 4.67 MB
Page 3 of 16
34
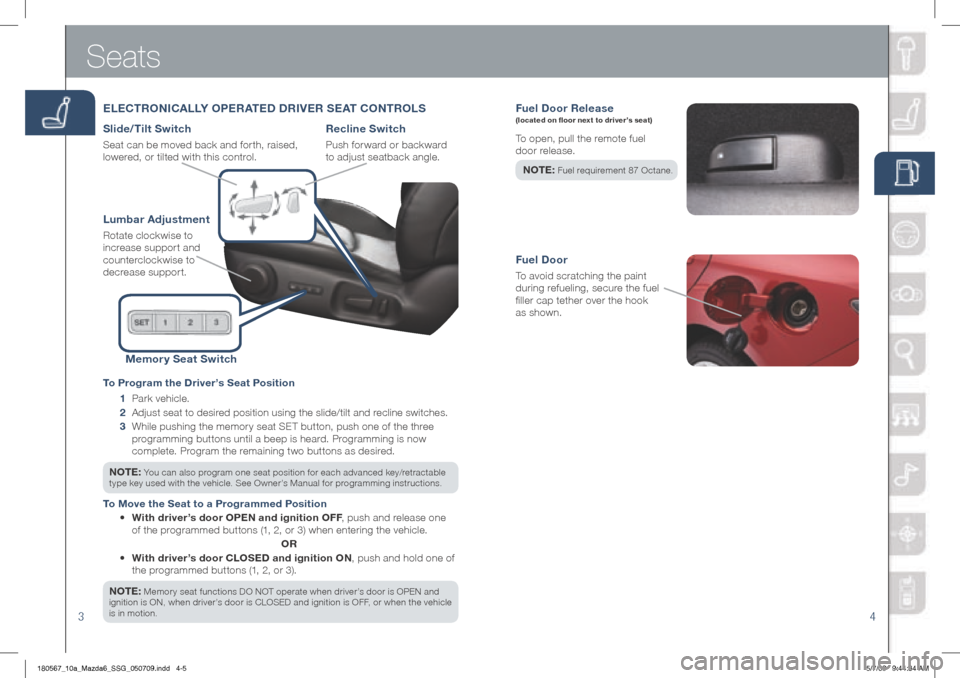
Fuel Door Rele ase (located on floor next to driver’s seat)
To open, pull the remote fuel
door release.
NOTE :
Fuel requirement 87 Octane.
Fuel Door
To avoid scratching the paint
during refueling, secure the fuel
filler cap tether over the hook
as shown.
Seats
ELECTRONICALLY OPERATED DRIVER SEAT CONTROLS
Slide/Tilt Switch
Seat can be moved back and forth, raised,
lowered, or tilted with this control.
Lumbar Adjustment
Rotate clockwise to
increase support and
counterclockwise to
decrease support.
Recline Switch
Push forward or backward
to adjust seatback angle.
Memory Seat Switch
To Program the Driver’s Seat Position
1 Park vehicle.
2 Adjust seat to desired position using the slide/tilt and recline switches.
3 While pushing the memory seat SET button, push one of the three
programming buttons until a beep is heard. Programming is now
complete. Program the remaining two buttons as desired.
NOTE: You can also program one seat position for each advanced key/retractable
type key used with the vehicle. See Owner’s Manual for programming instructions.
To Move the Seat to a Programmed Position
• With driver’s door OPEN and ignition OFF , push and release one
of the programmed buttons (1, 2, or 3) when entering the vehicle.
OR
• With driver’s door CLOSED and ignition ON , push and hold one of
the programmed buttons (1, 2, or 3).
NOTE:
Memory seat functions DO NOT operate when driver’s door is OPEN and
ignition is ON, when driver’s door is CLOSED and ignition is OFF, or when the vehicle
is in motion.
180567_10a_Mazda6_SSG_050709.indd 4-55/7/09 9:44:34 AM
Page 6 of 16
Feature Highlights
910
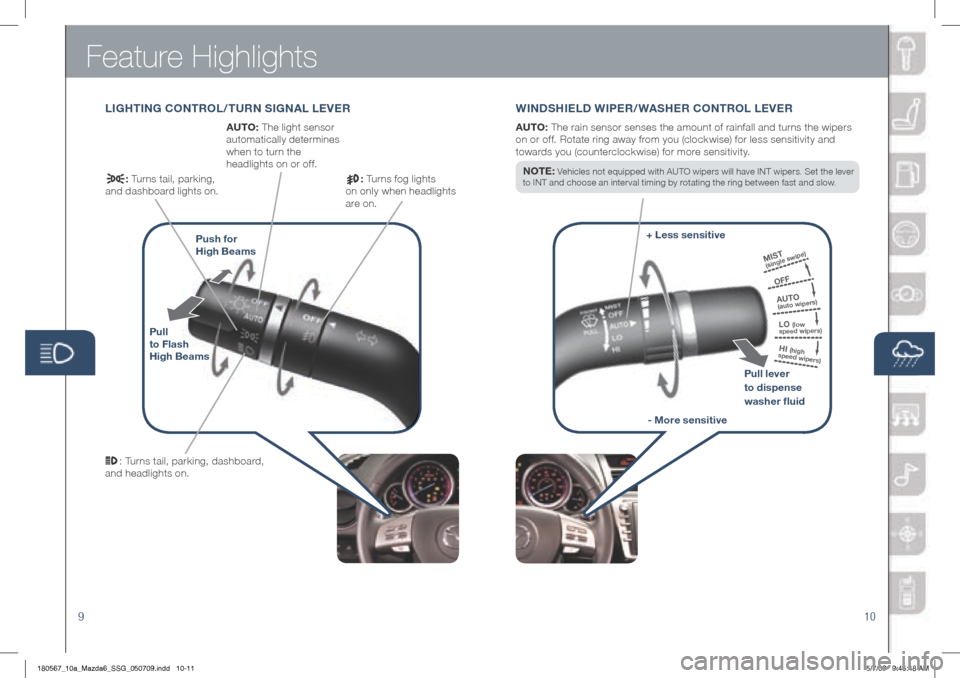
LIgh TIN g CONTROL/TURN SI gNAL LEVER WINDShIELD WIPER/WAS hER CONTROL LEVER
Pull
to Flash
h igh Beams Push for
h igh Beams
: Turns tail, parking, dashboard,
and headlights on.
AUTO: The light sensor
automatically determines
when to turn the
headlights on or off.
: Turns fog lights
on only when headlights
are on.
:
Turns tail, parking,
and dashboard lights on.
AUTO: The rain sensor senses the amount of rainfall and turns the wipers
on or off. Rotate ring away from you (clockwise) for less sensitivity and
towards you (counterclockwise) for more sensitivity.
N O T E :
Vehicles not equipped with AUTO wipers will have INT wipers. Set the lever
to INT and choose an interval timing by rotating the ring between fast and slow.
AUTO(auto wipers)
OFF
MIST(single swipe)
LO (low
speed wipers)
HI (high
speed wipers)
Pull lever
to dispense
washer fluid
- More sensitive
+ Less sensitive
180567_10a_Mazda6_SSG_050709.indd 10-115/7/09 9:45:48 AM
Page 8 of 16
Feature Highlights
13
NOTE: Do not rely completely on the BSM system and be sure to look over
your shoulder before changing lanes:
• The BSM system can assist the driver in confirming the safety of the surroundings,
but is not a complete substitute.
• The driver is responsible for ensuring safe lane changes and other maneuvers.
• Always pay attention to the direction in which the vehicle is traveling and the
vehicle’s surroundings.
• The BSM system does not operate when the vehicle speed is lower than about
20 mph (32 km/h).
Turning BSM System Off
To manually turn the BSM system off, push the BSM OFF switch on the dash.
The BSM OFF indicator will illuminate in the instrument cluster when the BSM
system is off. The BSM system will automatically turn on the next time the
vehicle is started.
14
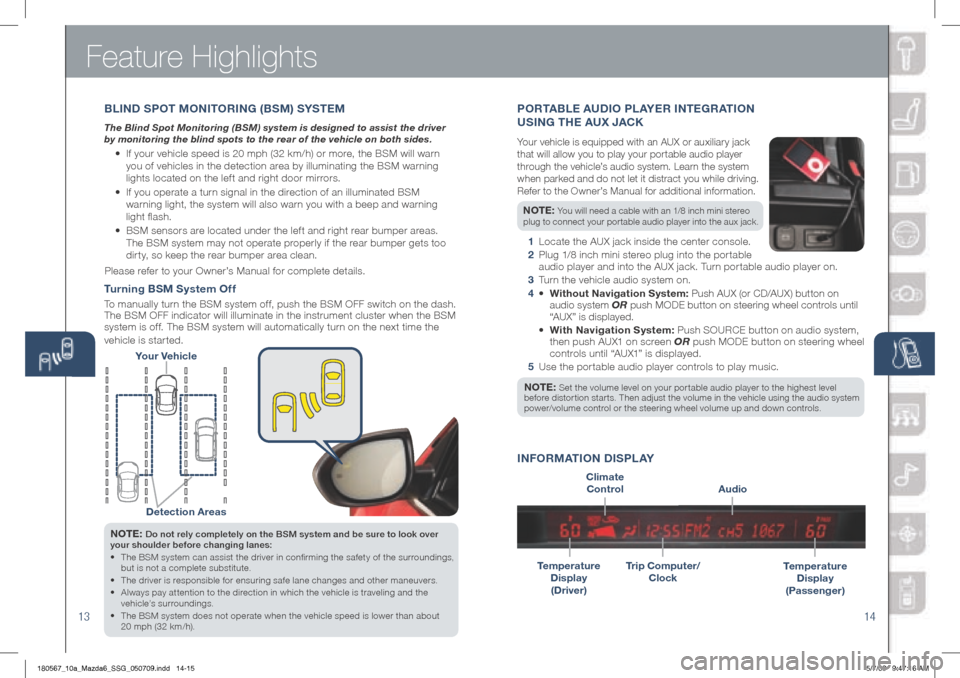
Your Vehicle
Detection Areas
PORTABLE AUDIO PL AYER INTE gRAT ION
USIN g ThE AUX JACK
Your vehicle is equipped with an AUX or auxiliary jack
that will allow you to play your portable audio player
through the vehicle’s audio system. Learn the system
when parked and do not let it distract you while driving.
Refer to the Owner’s Manual for additional information.
NOTE: You will need a cable with an 1/8 inch mini stereo
plug to connect your portable audio player into the aux jack.
1 Locate the AUX jack inside the center console.
2 Plug 1/8 inch mini stereo plug into the portable
audio player and into the AUX jack. Turn portable audio player on.
3 Turn the vehicle audio system on.
4 • Without Navigation System: Push AUX (or CD/AUX) button on
audio system OR push MODE button on steering wheel controls until
“AUX” is displayed.
• With Navigation System: Push SOURCE button on audio system,
then push AUX1 on screen OR push M ODE button on steering wheel
controls until “AUX1” is displayed.
5 Use the portable audio player controls to play music.
NOTE: Set the volume level on your por table audio player to the highest level before distortion starts. Then adjust the volume in the vehicle using the audio system
power/volume control or the steering wheel volume up and down controls.
Temperature
Display
(Driver)
Audio
INFORMATION DISPLAY
Temperature
Display
(Passenger)Trip Computer/
Clock
Climate
Control
B LIND S POT MONITORIN g (BSM) SYSTEM
The Blind Spot Monitoring (BSM) system is designed to assist the driver
by monitoring the blind spots to the rear of the vehicle on both sides.
• If your vehicle speed is 20 mph (32 km/h) or more, the BSM will warn
you of vehicles in the detection area by illuminating the BSM warning
lights located on the left and right door mirrors.
• If you operate a turn signal in the direction of an illuminated BSM
warning light, the system will also warn you with a beep and warning
light flash.
• BSM sensors are located under the left and right rear bumper areas.
The BSM system may not operate properly if the rear bumper gets too
dirty, so keep the rear bumper area clean.
Please refer to your Owner’s Manual for complete details.
180567_10a_Mazda6_SSG_050709.indd 14-155/7/09 9:47:16 AM
Page 10 of 16
Audio Controls Without Navigation
1718
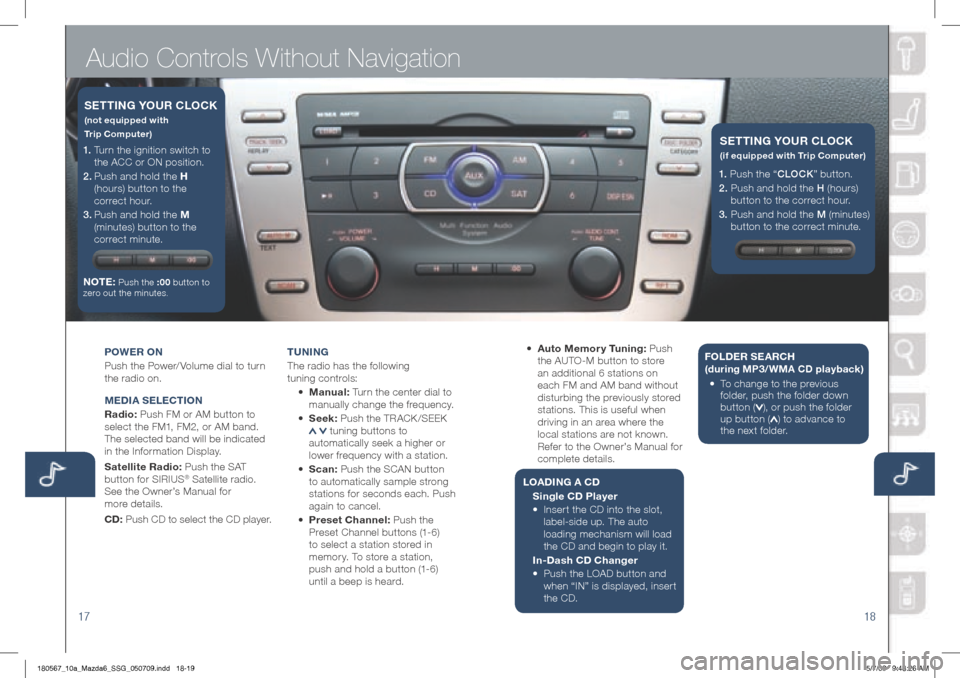
POWER ON
Push the Power/ Volume dial to turn
the radio on.
MEDIA S ELECTION
Radio: Push FM or AM button to
select the FM1, FM2, or AM band.
The selected band will be indicated
in the Information Display.
Satellite Radio: Push the SAT
button for SIRIUS
® Satellite radio.
See the Owner’s Manual for
more details.
CD: Push CD to select the CD player. T
UNIN g
The radio has the following
tuning controls:
• M anual: Turn the center dial to
manually change the frequency.
• S eek: Push the TRACK /SEEK
tuning buttons to
automatically seek a higher or
lower frequency with a station.
• Scan: Push the SCAN button
to automatically sample strong
stations for seconds each. Push
again to cancel.
• Preset Channel: Push the
Preset Channel buttons (1-6)
to select a station stored in
memory. To store a station,
push and hold a button (1-6)
until a beep is heard.
1. Turn the ignition switch to
the ACC or ON position.
2 . Push and hold the h
(hours) button to the
correct hour.
3 . Push and hold the M
(minutes) button to the
correct minute.
NOTE:
Push the :00 button to
zero out the minutes.
SETTIN g YOUR CLOCK
(not equipped with
Trip Computer)
• Auto Memor y Tuning: Push
the AUTO-M button to store
an additional 6 stations on
each FM and AM band without
disturbing the previously stored
stations. This is useful when
driving in an area where the
local stations are not known.
Refer to the Owner’s Manual for
complete details.
L OADIN g A CD
Single CD Player
•
Insert the CD into the slot,
label-side up. The auto
loading mechanism will load
the CD and begin to play it.
In-Dash CD Changer
•
Push the LOAD button and
when “IN” is displayed, insert
the CD. F
OLDER SEARC h
(during MP3/WMA CD playback )
• To c hange to the previous
folder, push the folder down
button (
), or push the folder
up button () to advance to
the next folder.
1. Push the “ CLOCK” button.
2. Push and hold the H (hours)
button to the correct hour.
3. Push and hold the M (minutes)
button to the correct minute.
SETTIN g YOUR CLOCK
(if equipped with Trip Computer)
180567_10a_Mazda6_SSG_050709.indd 18-195/7/09 9:48:26 AM
Page 11 of 16
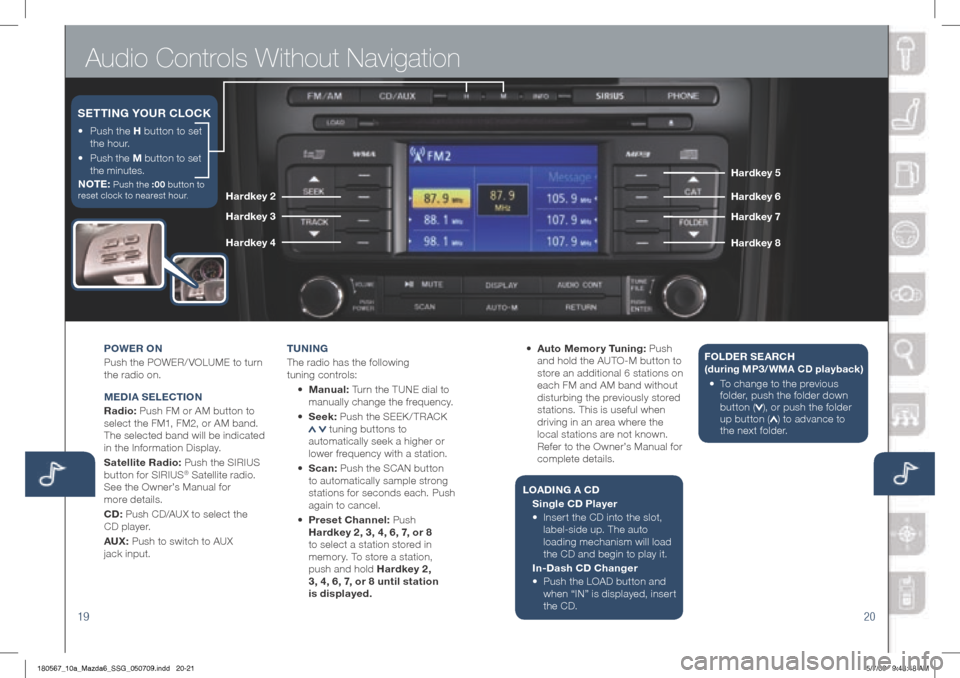
Audio Controls Without Navigation
1920
POWER ON
Push the POWER/ VOLUME to turn
the radio on.
MEDIA S ELECTION
Radio: Push FM or AM button to
select the FM1, FM2, or AM band.
The selected band will be indicated
in the Information Display.
Satellite Radio: Push the SIRIUS
button for SIRIUS
® Satellite radio.
See the Owner’s Manual for
more details.
CD: Push CD/AUX to select the
CD player.
AUX: Push to switch to AUX
jack input. T
U NIN g
The radio has the following
tuning controls:
• M anual: Turn the TUNE dial to
manually change the frequency.
• S eek: Push the SEEK / TRACK
tuning buttons to
automatically seek a higher or
lower frequency with a station.
• Scan: Push the SCAN button
to automatically sample strong
stations for seconds each. Push
again to cancel.
• Preset Channel: Push
h ardkey 2, 3, 4, 6, 7, or 8
to select a station stored in
memory. To store a station,
push and hold h ardkey 2,
3, 4, 6, 7, or 8 until station
is displayed. •
Auto Memor y Tuning: Push
and hold the AUTO-M button to
store an additional 6 stations on
each FM and AM band without
disturbing the previously stored
stations. This is useful when
driving in an area where the
local stations are not known.
Refer to the Owner’s Manual for
complete details.
L OADIN g A CD
Single CD Player
•
Insert the CD into the slot,
label-side up. The auto
loading mechanism will load
the CD and begin to play it.
In-Dash CD Changer
•
Push the LOAD button and
when “IN” is displayed, insert
the CD. F
OLDER SEARC h
(during MP3/WMA CD playback )
• To c hange to the previous
folder, push the folder down
button (
), or push the folder
up button () to advance to
the next folder.
•
Push the h button to set
the hour.
•
Push the M button to set
the minutes.
NOTE:
Push the :00 button to
reset clock to nearest hour.
SETTIN g YOUR CLOCK
hardkey 5
ha rdk ey 6
ha rdkey 7
h ardk ey 8
hardkey 2
ha rdkey 3
ha rdkey 4
180567_10a_Mazda6_SSG_050709.indd 20-215/7/09 9:48:48 AM
Page 12 of 16
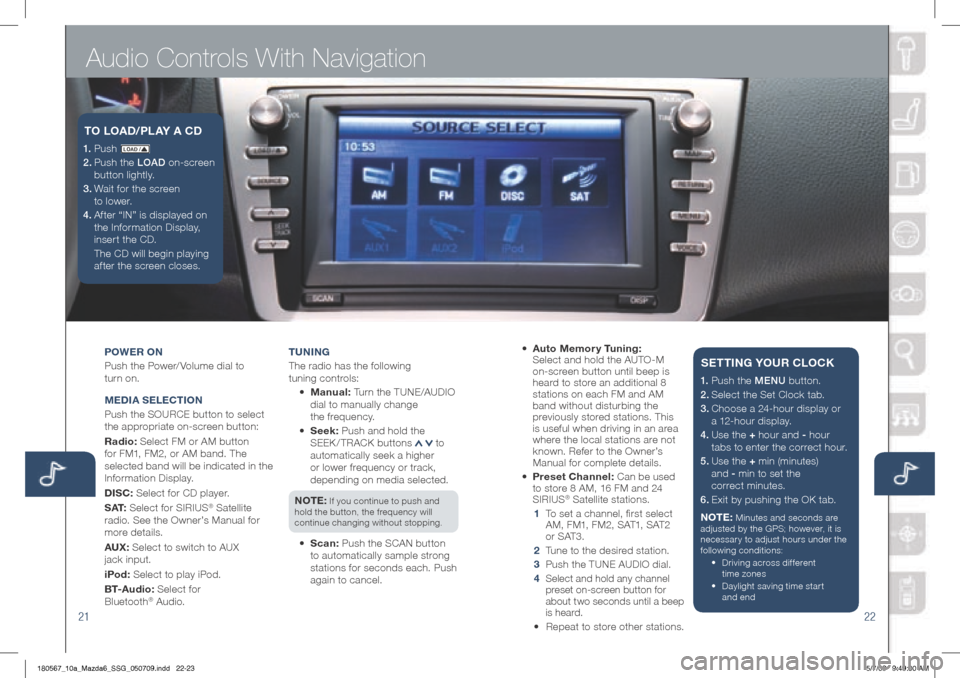
Audio Controls With Navigation
2122
POWER ON
Push the Power/ Volume dial to
turn on.
M EDIA S ELECTION
Push the SOURCE button to select
the appropriate on-screen button:
Radio: Select FM or AM button
for FM1, FM2, or AM band. The
selected band will be indicated in the
Information Display.
DISC: Select for CD player.
S AT: Select for SIRIUS
® Satellite
radio. See the Owner’s Manual for
more details.
AUX: Select to switch to AUX
jack input.
iPod: Select to play iPod.
B T- A u d i o : Select for
Bluetooth
® Audio. T
UNIN g
The radio has the following
tuning controls:
• M anual: Turn the TUNE/AUDIO
dial to manually change
the frequency.
• S eek: Push and hold the
SEEK / TRACK buttons
to
automatically seek a higher
or lower frequency or track,
depending on media selected.
NOTE:
If you continue to push and
hold the button, the frequency will
continue changing without stopping.
• Scan: Push the SCAN button
to automatically sample strong
stations for seconds each. Push
again to cancel.
1. P u s h LO AD /
2. Push the LOAD on-screen
button lightly.
3. Wait for the screen
to lower.
4 . Af ter “IN” is displayed on
the Information Display,
insert the CD.
The CD will begin playing
after the screen closes.
TO LOAD /PLAY A CD
• Auto Memor y Tuning:
Select and hold the AUTO-M
on-screen button until beep is
heard to store an additional 8
stations on each FM and AM
band without disturbing the
previously stored stations. This
is useful when driving in an area
where the local stations are not
known. Refer to the Owner’s
Manual for complete details.
• Preset Channel: Can be used
to store 8 AM, 16 FM and 24
SIRIUS
® Satellite stations.
1 To set a channel, first select
AM, FM1, FM2, SAT1, SAT2
or SAT3.
2 Tune to the desired station.
3 Push the TUNE AUDIO dial.
4
Select and hold any channel
preset on-screen button for
about two seconds until a beep
is heard.
• Repeat to store other stations.
1. Push the MENU button.
2. Select the Set Clock tab.
3.
Choose a 24-hour display or
a 12-hour display.
4. Use the + hour and - hour
tabs to enter the correct hour.
5.
Use the + min (minutes)
and - min to set the
correct minutes.
6. Exit by pushing the OK tab.
NOTE:
Minutes and seconds are
adjusted by the GPS; however, it is
necessary to adjust hours under the
following conditions:
• Driving across different
time zones
•
Daylight saving time start
and end
SETTIN g YOUR CLOCK
180567_10a_Mazda6_SSG_050709.indd 22-235/7/09 9:49:00 AM
Page 15 of 16
SALES CONSULTANTCUSTOMER
All items in the Customer Delivery Checklist have been reviewed with the customer and
the first maintenance appointment has been scheduled:
*if equipped
Signed copy must be placed in dealer jacket
DEALERShIP DAT E
SALES CONSULTANT CUSTOMER’S NAME
VIN E-MAIL
Smart Start g
uide
• Remove this checklist from
Smart Start Guide
Warranty Information
•
Basic Vehicle –
36 months/36,000 miles
• Roadside assistance program
MyMazda.com
•
Offer to register customer on
MyMazda.com
• Tell the owner about the
(“how-to”) videos that will help
them get acquainted with the
vehicle’s features
Owner’s Manual
•
Personalization Features
(refer to enclosed postcard
or your Owner’s Manual)
P RESENTATION OF O WNER’S M ATERIALS :
Review the following items with the customer
SERVICE D EPARTMENT
Introduce Service Manager;
Provide business cards
Review Ser vice and Par ts Depar tment
hours of operation
Explain free initial Full Circle
service inspection.
Schedule first maintenance service
Scheduled Maintenance
Windshield Cling Reminder
Affix to inside windshield
Customer Delivery Checklist
Keyless Entr y
.................................1
• Key Fob
• Smart Entry
(Advanced Key*)
• Door Request Switch*
• Trunk Request Switch*
• Power Door Locks
Starting the Engine*
......................2
• Push Button Ignition
• Emergency
Engine Stop
Seat Adjustments*
.........................3
Fuel Door
........................................4
• Fuel Door Release and Fuel Spec
Driver’s View
...............................5-6
• Location of Switches and Controls
Instrument Cluster
......................7- 8
• Review indicator light function
and location
Lighting Control
............................9
Wiper Washer
................................10
Aluminum Wheel Care
..................11
VE h ICLE PRESENTATION :
Refer to Smart Start Guide during presentation
Customer Delivery Checklist
Auto-Dimming Mirrors*
...............12
Blind Spot Monitoring*
................13
A
UX Input ......................................14
Climate Control
.........................15 -16
• Manual Mode
• Auto Mode*
Audio Controls
..........................17-2 2
• SIRIUS® Satellite Radio* Operation
Set Clock
..............................17-19, 22
Navigation System*
.................23-24
• 2 Disc System, Insert Map Disc
• Enter Destination
• Select POI
Bluetooth
hands-Free* ...............25
• Tutorial
• Pair Phone
• Make a Call
• Toll-Free Customer Service
800-430-0153
Tutorial Videos on MyMazda.com
........................... Inside Back Cover
180567_10a_Mazda6_SSG_050709.indd 28-295/7/09 9:49:48 AM