clock MAZDA MODEL 6 2017 Owners Manual (in English)
[x] Cancel search | Manufacturer: MAZDA, Model Year: 2017, Model line: MODEL 6, Model: MAZDA MODEL 6 2017Pages: 578, PDF Size: 54.72 MB
Page 103 of 578
3–29
Before Driving
Fuel and Emission
Fuel-Filler Cap
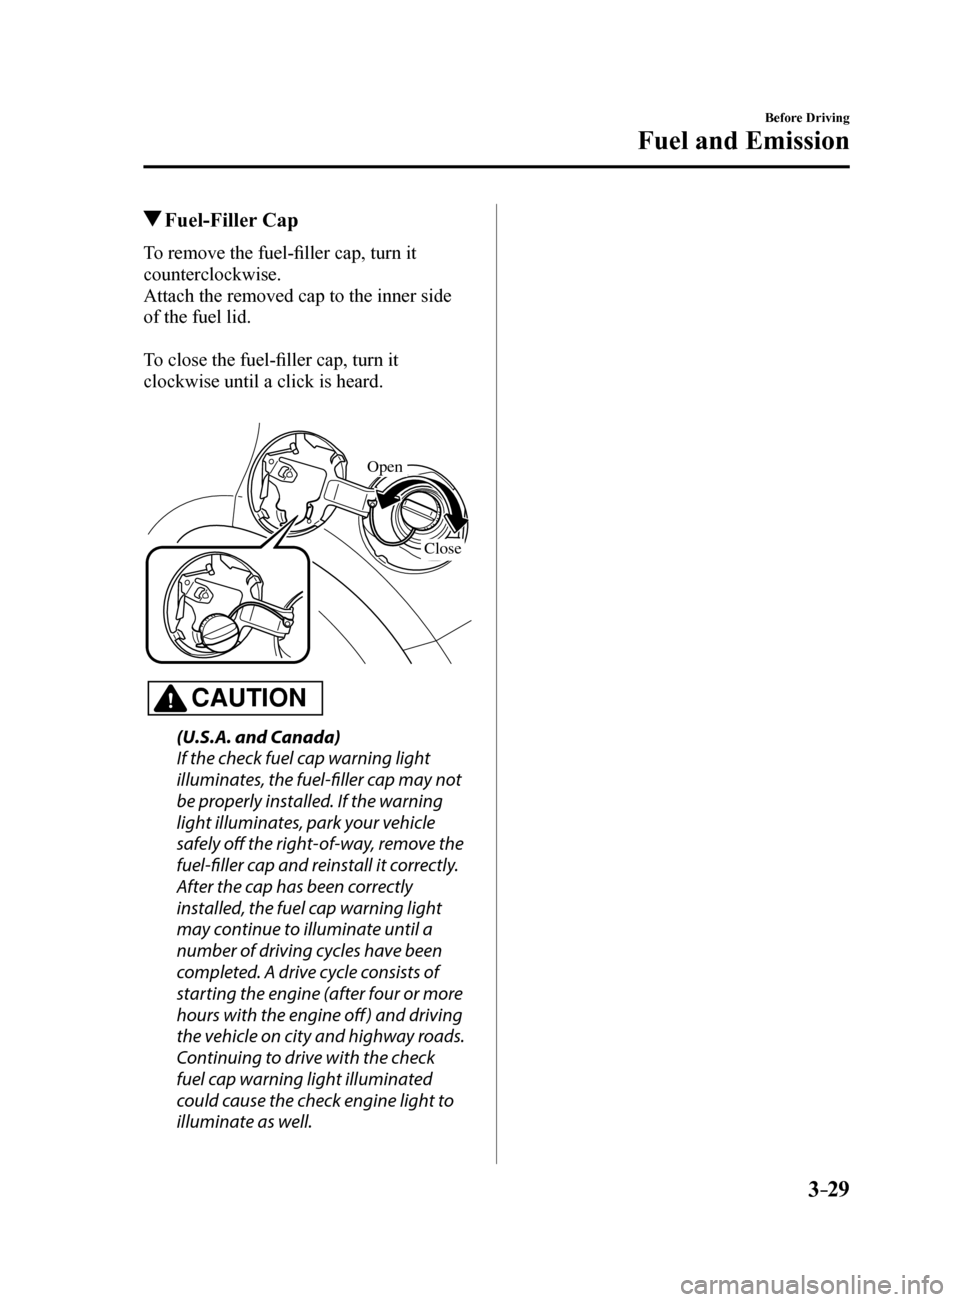
To remove the fuel-filler cap, turn it
counterclockwise.
Attach the removed cap to the inner side
of the fuel lid.
To close the fuel-filler cap, turn it
clockwise until a click is heard.
Open
Close
CAUTION
(U.S.A. and Canada)
If the check fuel cap warning light
illuminates, the fuel-filler cap may not
be properly installed. If the warning
light illuminates, park your vehicle
safely off the right-of-way, remove the
fuel-filler cap and reinstall it correctly.
After the cap has been correctly
installed, the fuel cap warning light
may continue to illuminate until a
number of driving cycles have been
completed. A drive cycle consists of
starting the engine (after four or more
hours with the engine off ) and driving
the vehicle on city and highway roads.
Continuing to drive with the check
fuel cap warning light illuminated
could cause the check engine light to
illuminate as well.
Mazda6_8FH2-EA-16F_Edition2.indb 292016/07/07 13:44:27
Page 299 of 578
5–5
Interior Features
Climate Control System
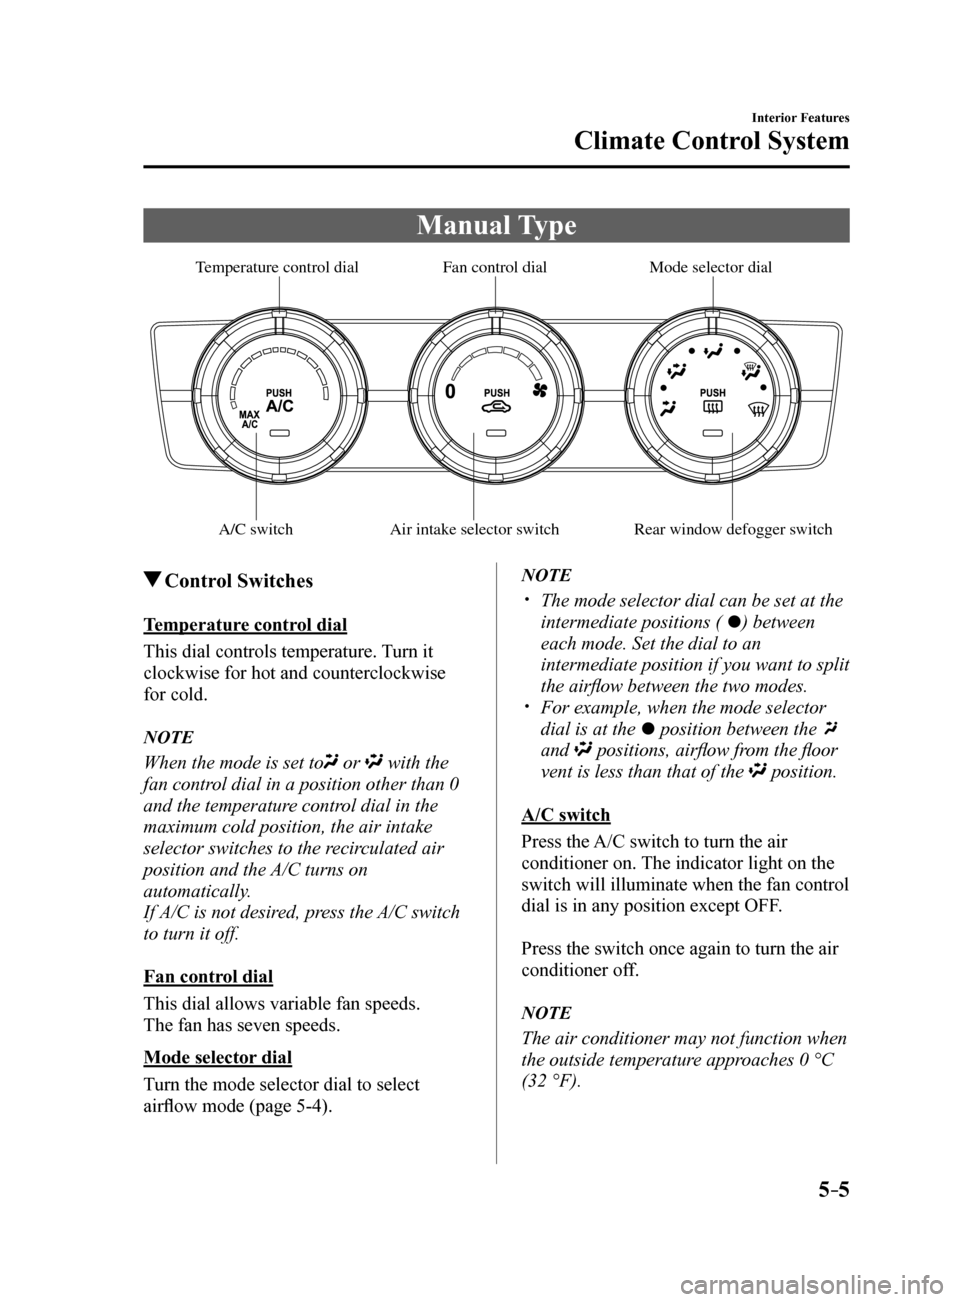
Manual Type
A/C switchAir intake selector switch Rear window defogger switch
Mode selector dial
F an control dial
T emperature control dial
Control Switches
Temperature control dial
This dial controls temperature. Turn it
clockwise for hot and counterclockwise
for cold.
NOTE
When the mode is set to or with the
fan control dial in a position other than 0
and the temperature control dial in the
maximum cold position, the air intake
selector switches to the recirculated air
position and the A/C turns on
automatically.
If A/C is not desired, press the A/C switch
to turn it off.
Fan control dial
This dial allows variable fan speeds.
The fan has seven speeds.
Mode selector dial
Turn the mode selector dial to select
airflow mode (page 5-4).
NOTE
The mode selector dial can be set at the
intermediate positions (
) between
each mode. Set the dial to an
intermediate position if you want to split
the airflow between the two modes.
For example, when the mode selector
dial is at the
position between the
and
positions, airflow from the floor
vent is less than that of the
position.
A/C switch
Press the A/C switch to turn the air
conditioner on. The indicator light on the
switch will illuminate when the fan control
dial is in any position except OFF.
Press the switch once again to turn the air
conditioner off.
NOTE
The air conditioner may not function when
the outside temperature approaches 0 °C
(32 °F).
Mazda6_8FH2-EA-16F_Edition2.indb 52016/07/07 13:45:27
Page 301 of 578
5–7
Interior Features
Climate Control System
Cooling (With air conditioner)
1. Set the mode selector dial to the
position.
2. Set the temperature control dial to the
cold position.
3. Set the fan control dial to the desired
speed.
4. Turn on the air conditioner by pressing
the A/C switch.
5. After cooling begins, adjust the fan
control dial and temperature control
dial as needed to maintain maximum
comfort.
CAUTION
If the air conditioner is used while
driving up long hills or in heavy
traffic, monitor the engine coolant
temperature warning light to see if it is
illuminated or flashing (page 4-32).
The air conditioner may cause engine
overheating. If the warning light is
illuminated or flashing, turn the air-
conditioning off (page 7-17).
NOTE
When maximum cooling is desired,
set the temperature control dial to the
extreme cold position and set the air
intake selector to the recirculated air
position, then turn the fan control dial
fully clockwise.
If warmer air is desired at floor level,
set the mode selector dial at the
position and adjust the temperature
control dial to maintain maximum
comfort.
The air to the floor is warmer than air
to the face (except when the temperature
control dial is set at the extreme hot or
cold position).
Ventilation
1. Set the mode selector dial to the
position.
2. Set the air intake selector to the outside
air position (indicator light turns off).
3. Set the temperature control dial to the
desired position.
4. Set the fan control dial to the desired
speed.
Windshield Defrosting and
Defogging
1. Set the mode selector dial to the
position.
2. Set the temperature control dial to the
desired position.
3. Set the fan control dial to the desired
speed.
4. If dehumidified heating is desired, turn
on the air conditioner.
WARNING
Do not defog the windshield using the
position with the temperature
control set to the cold position: Using the
position with the
temperature control set to the cold
position is dangerous as it will cause
the outside of the windshield to fog up.
Your vision will be hampered, which
could lead to a serious accident. Set
the temperature control to the hot or
warm position when using the
position.
Mazda6_8FH2-EA-16F_Edition2.indb 72016/07/07 13:45:28
Page 302 of 578
5–8
Interior Features
Climate Control System
NOTE
For maximum defrosting, turn on the air
conditioner, set the temperature control
dial to the extreme hot position, and
turn the fan control dial fully clockwise.
If warm air is desired at the floor, set the
mode selector dial to the
position. In the or position, the air
conditioner is automatically turned on
and the outside air position is
automatically selected to defrost the
windshield. In the
or position, the
outside air position cannot be changed
to the recirculated air position.
Dehumidifying (With air
conditioner)
Operate the air conditioner in cool or cold
weather to help defog the windshield and
side windows.
1. Set the mode selector dial to the desired
position.
2. Set the air intake selector to the outside
air position (indicator light turns off).
3. Set the temperature control dial to the
desired position.
4. Set the fan control dial to the desired
speed.
5. Turn on the air conditioner by pressing
the A/C switch.
NOTE
One of the functions of the air conditioner
is dehumidifying the air and, to use
this function, the temperature does not
have to be set to cold. Therefore, set the
temperature control dial to the desired
position (hot or cold) and turn on the air
conditioner when you want to dehumidify
the cabin air.
Mazda6_8FH2-EA-16F_Edition2.indb 82016/07/07 13:45:28
Page 304 of 578
5–10
Interior Features
Climate Control System
OFF switch
Pressing the OFF switch shuts off the
climate control system.
Temperature control dial
This dial controls temperature. Turn it
clockwise for hot and counterclockwise
for cold.
When the DUAL switch is off:
Turn the driver temperature control dial
to control the temperature throughout
the entire cabin.
When the DUAL switch is on:
Turn the driver or front passenger
temperature control dial to
independently control the temperature
on each side of the cabin.
NOTE
The climate control system changes to
the individual operation mode (DUAL
switch indicator light illuminated) by
turning the front passenger temperature
control dial even when the DUAL switch
is off, which allows individual control
of the set temperature for the driver and
front passenger.
The temperature units for the
temperature setting display can be
changed in conjunction with the
temperature units for the outside
temperature display. Refer to Outside
Temperature Display on page 4-18.
Fan control switch
The fan has seven speeds. The selected
speed will be displayed.
Mode selector switch
The desired airflow mode can be selected
(page 5-4).
NOTE
With the airflow mode set to the
position and the temperature control
dial set at a medium temperature,
heated air is directed to the feet and air
at a comparably lower temperature will
flow through the central, left and right
vents.
To set the air vent to , press the
windshield defroster switch.
In the position, the outside air
position is automatically selected.
A/C switch
Pressing the A/C switch while the AUTO
switch is turned on will turn off the air-
conditioning (cooling/dehumidifying
functions).
The air-conditioning can be turned on and
off by pressing the A/C switch while the
fan control switch is on.
NOTE
The air-conditioning operates when the
A/C switch is pressed even if the fan is
off.
The air conditioner may not function
when the outside temperature
approaches 0 °C (32 °F).
Mazda6_8FH2-EA-16F_Edition2.indb 102016/07/07 13:45:28
Page 315 of 578
5–21
Interior Features
Audio System
Audio Set
NOTE
The explanation of functions described in this manual may differ from the actual
operation, and the shapes of screens and buttons and the letters and cha\
racters displayed
may also differ from the actual appearance.
Additionally, depending on future software updates, the content may successively cha\
nge
without notice.
Audio Set has three different human interfaces.
Commander switch Touch panel Voice recognition with steering switch and microphone
Commander switch operation
NOTE
For safety reasons, some operations are disabled while the vehicle is being driven.
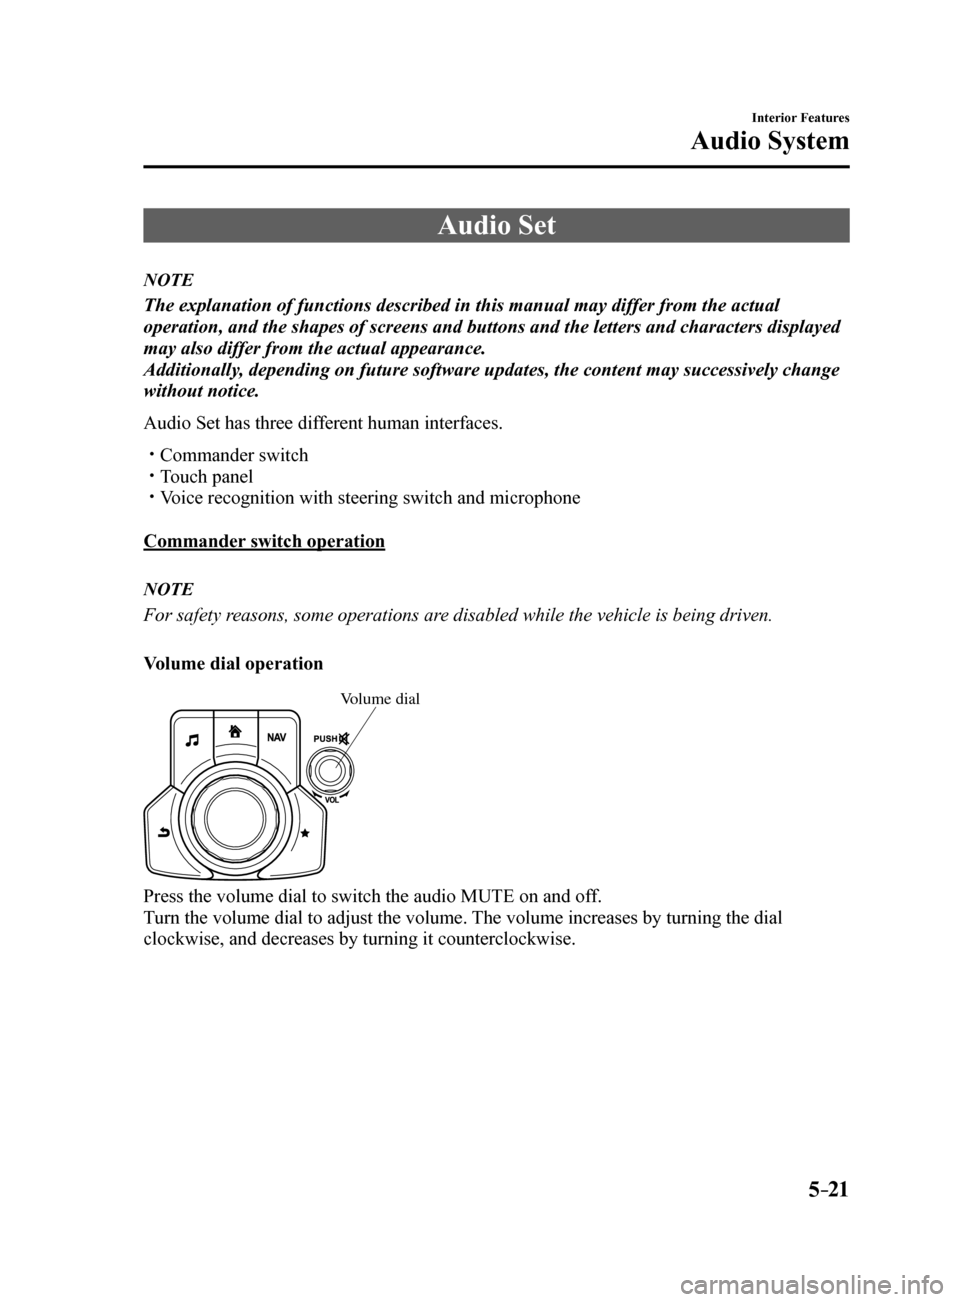
Volume dial operation
V olume dial
Press the volume dial to switch the audio MUTE on and off.
Turn the volume dial to adjust the volume. The volume increases by turning the dial
clockwise, and decreases by turning it counterclockwise.
Mazda6_8FH2-EA-16F_Edition2.indb 212016/07/07 13:45:32
Page 320 of 578
5–26
Interior Features
Audio System
Volume/Display/Sound Controls
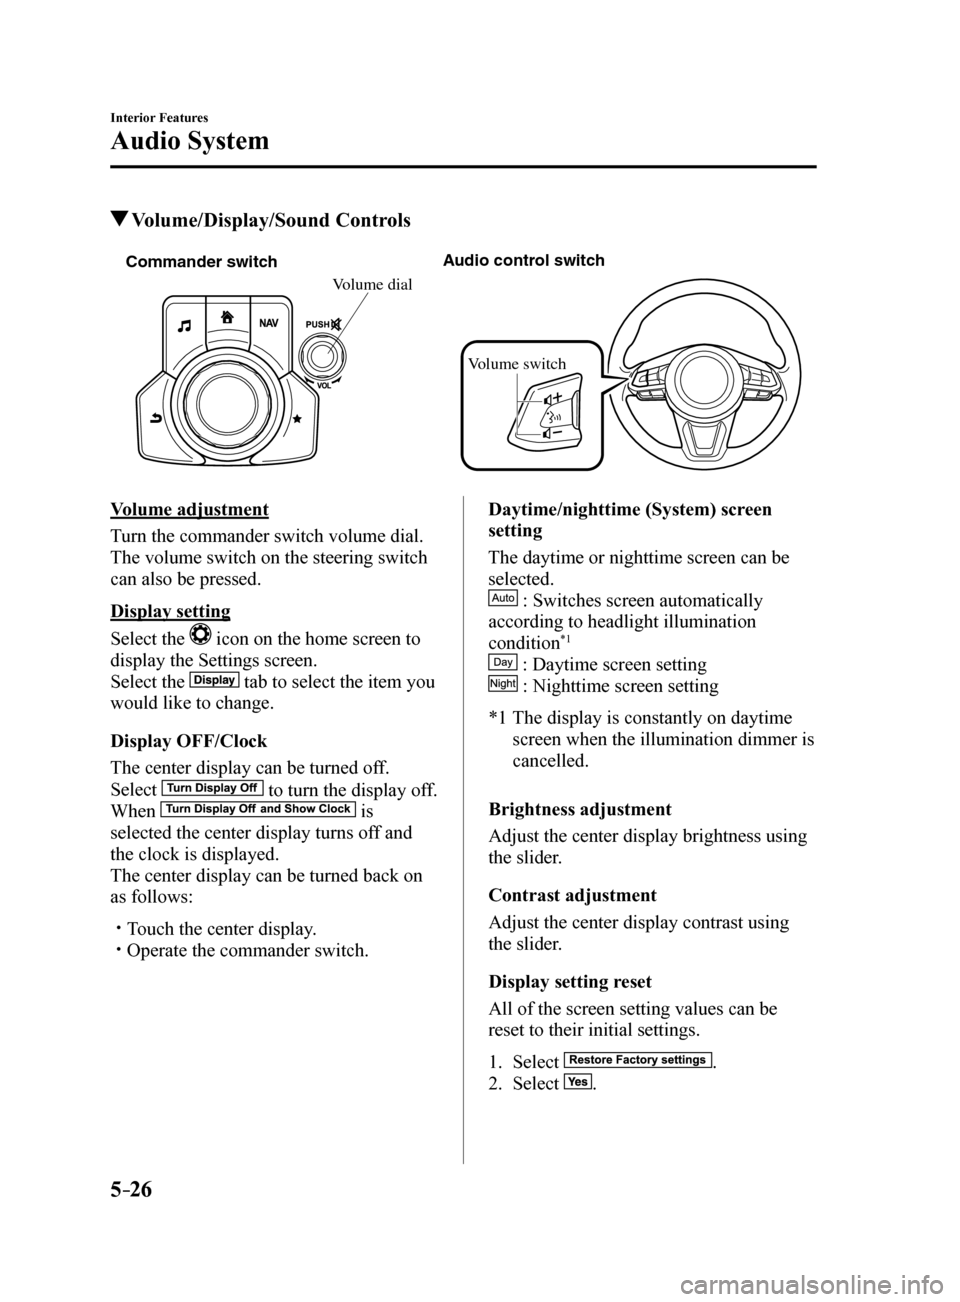
Commander switch A
udio contr ol switc h
Volume switch
Volume dial
Volume adjustment
Turn the commander switch volume dial.
The volume switch on the steering switch
can also be pressed.
Display setting
Select the
icon on the home screen to
display the Settings screen.
Select the
tab to select the item you
would like to change.
Display OFF/Clock
The center display can be turned off.
Select
to turn the display off.
When
is
selected the center display turns off and
the clock is displayed.
The center display can be turned back on
as follows:
Touch the center display. Operate the commander switch. Daytime/nighttime (System) screen
setting
The daytime or nighttime screen can be
selected.
: Switches screen automatically
according to headlight illumination
condition
*1
: Daytime screen setting
: Nighttime screen setting
*1 The display is constantly on daytime
screen when the illumination dimmer is
cancelled.
Brightness adjustment
Adjust the center display brightness using
the slider.
Contrast adjustment
Adjust the center display contrast using
the slider.
Display setting reset
All of the screen setting values can be
reset to their initial settings.
1. Select
.
2. Select
.
Mazda6_8FH2-EA-16F_Edition2.indb 262016/07/07 13:45:36
Page 333 of 578
5–39
Interior Features
Audio System
Settings
NOTE
Depending on the grade and specification, the screen display may differ.
Select the
icon on the home screen and display the Settings screen.
Switch the tab and select the setting item you want to change.
You can customize settings in the setup display as follows:
Ta b Item Function
AD-Disp Height
Brightness Control
Other Refer to Active Driving Display on page 4-29.
Display Refer to Volume/Display/Sound Controls on page 5-26.
Safety Distance Recognition Support System
SBS/SCBS
Other Refer to Personalization Features on page 9-10.
Sound Refer to Volume/Display/Sound Controls on page 5-26.
Clock Adjust Time
Displays the currently set time is displayed.
Press
to advance the hour/minute, and select to
move the hour/minute back.
AM/PM can only be selected with the 12-hour clock
display.
GPS Sync Synchronizes with GPS when turned on.
When turned off, the time can be changed from “Adjust
Time”.
Time Format Changes the display between 12 and 24-hour clock
time.
Time Zone Select When it's not synchronized with GPS, select the region
you want to specify.
Daylight Savings Time Turns the daylight saving time setting on/off.
When ON, the time advances 1 hour. When OFF, it
returns to normal time.
Vehicle Rain Sensing Wiper
Door Locks
Other Refer to Personalization Features on page 9-10.
Devices Bluetooth
®Refer to Bluetooth® Preparation on page 5-54.
Mazda6_8FH2-EA-16F_Edition2.indb 392016/07/07 13:45:43
Page 433 of 578
6–47
Maintenance and Care
Owner Maintenance
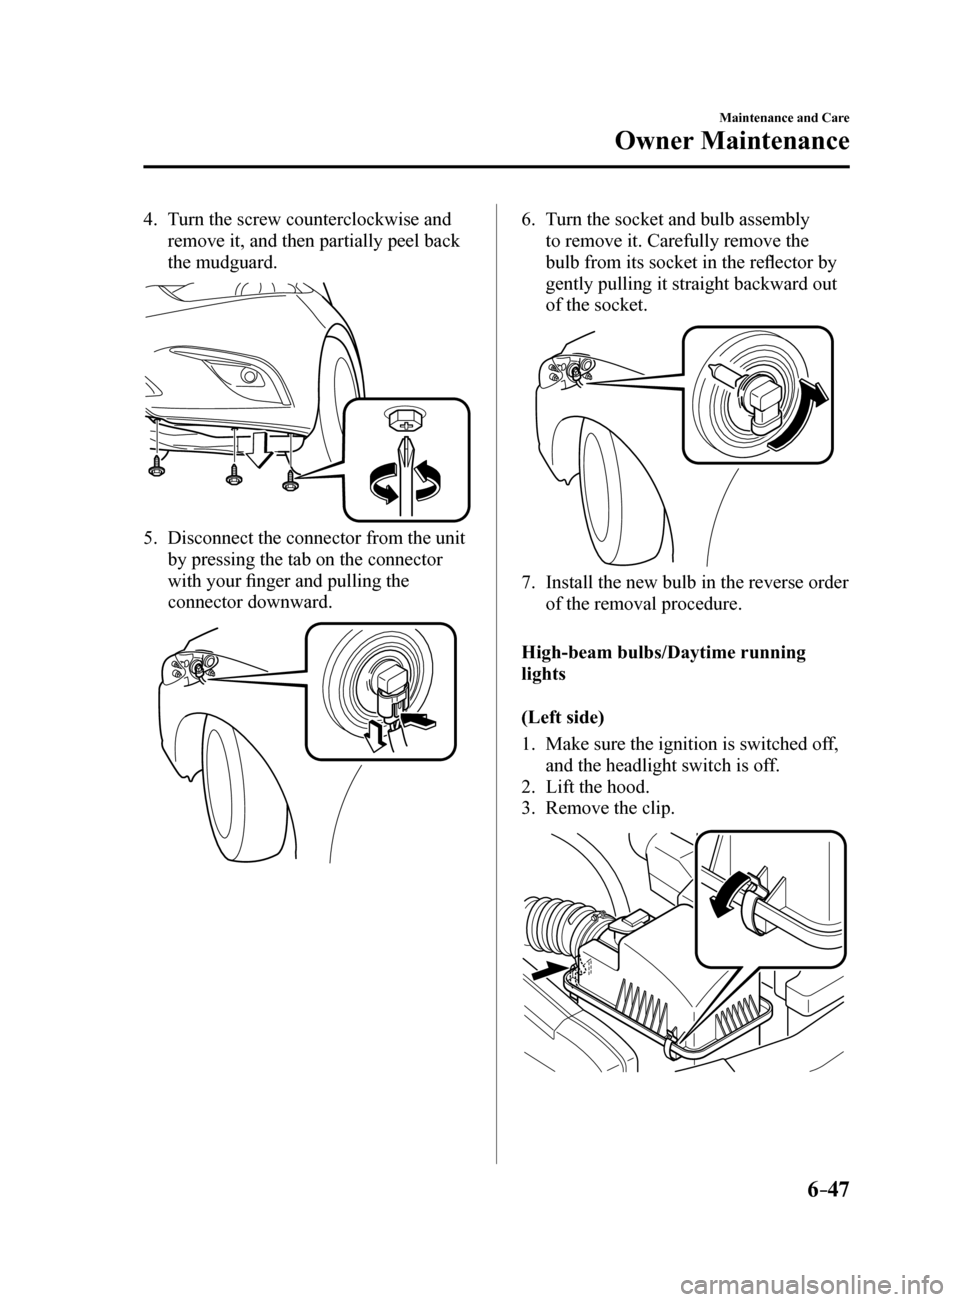
4. Turn the screw counterclockwise and
remove it, and then partially peel back
the mudguard.
5. Disconnect the connector from the unit
by pressing the tab on the connector
with your finger and pulling the
connector downward.
6. Turn the socket and bulb assembly
to remove it. Carefully remove the
bulb from its socket in the reflector by
gently pulling it straight backward out
of the socket.
7. Install the new bulb in the reverse order
of the removal procedure.
High-beam bulbs/Daytime running
lights
(Left side)
1. Make sure the ignition is switched off,
and the headlight switch is off.
2. Lift the hood.
3. Remove the clip.
Mazda6_8FH2-EA-16F_Edition2.indb 472016/07/07 13:46:17
Page 436 of 578
6–50
Maintenance and Care
Owner Maintenance
*Some models.
Front turn signal lights/Front side-
marker lights, Parking lights (With
halogen headlights)
1. Make sure the ignition is switched off,
and the headlight switch is off.
2. If you are changing the right bulb, start
the engine, turn the steering wheel all
the way to the left, and turn off engine.
If you are changing the left bulb, turn
the steering wheel to the right.
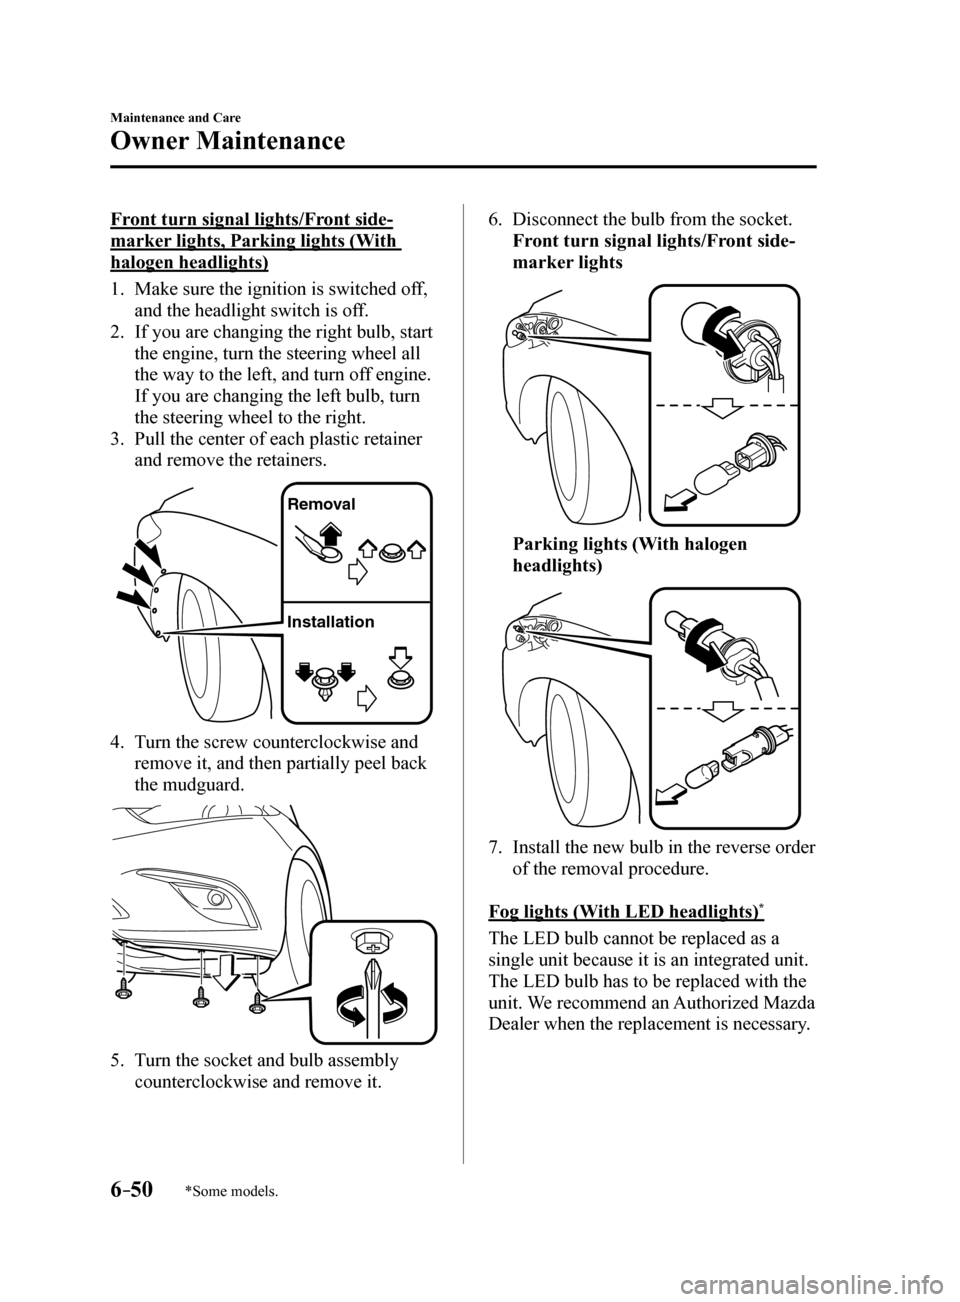
3. Pull the center of each plastic retainer
and remove the retainers.
Remova l
Installation
4. Turn the screw counterclockwise and
remove it, and then partially peel back
the mudguard.
5. Turn the socket and bulb assembly
counterclockwise and remove it.
6. Disconnect the bulb from the socket.
Front turn signal lights/Front side-
marker lights
Parking lights (With halogen
headlights)
7. Install the new bulb in the reverse order
of the removal procedure.
Fog lights (With LED headlights)
*
The LED bulb cannot be replaced as a
single unit because it is an integrated unit.
The LED bulb has to be replaced with the
unit. We recommend an Authorized Mazda
Dealer when the replacement is necessary.
Mazda6_8FH2-EA-16F_Edition2.indb 502016/07/07 13:46:18