lock MAZDA MODEL CX-3 2021 Manual PDF
[x] Cancel search | Manufacturer: MAZDA, Model Year: 2021, Model line: MODEL CX-3, Model: MAZDA MODEL CX-3 2021Pages: 618, PDF Size: 64.58 MB
Page 302 of 618
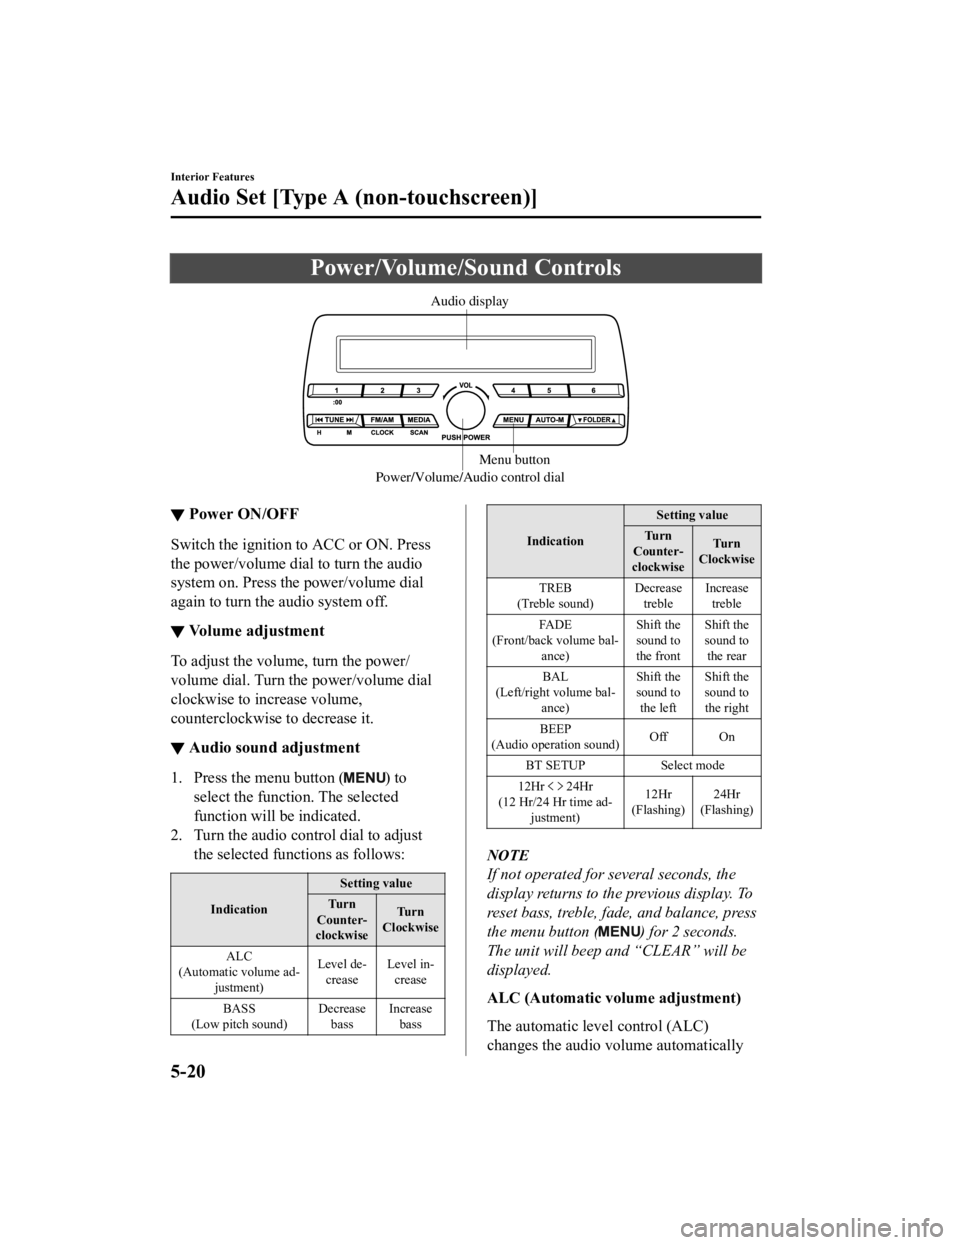
Power/Volume/Sound Controls
Power/Volume/Audio control dialMenu button
Audio display
Ō¢╝
Power ON/OFF
Switch the ignition to ACC or ON. Press
the power/volume dial to turn the audio
system on. Press the power/volume dial
again to turn the audio system off.
Ō¢╝Volume adjustment
To adjust the volume, turn the power/
volume dial. Turn the power/volume dial
clockwise to increase volume,
counterclockwise to decrease it.
Ō¢╝Audio sound adjustment
1. Press the menu button () to
select the function. The selected
function will be indicated.
2. Turn the audio control dial to adjust the selected functions as follows:
Indication Setting value
Tu r n
CounterŌĆÉ
clockwise Tu r n
Clockwise
ALC
(Automatic volume ad ŌĆÉ
justment) Level de
ŌĆÉ
crease Level in
ŌĆÉ
crease
BASS
(Low pitch sound) Decrease
bass Increase
bass
Indication Setting value
Tu r n
CounterŌĆÉ
clockwise Tu r n
Clockwise
TREB
(Treble sound) Decrease
treble Increase
treble
FADE
(Front/back volume bal ŌĆÉ
ance) Shift the
sound to
the frontShift the
sound to
the rear
BAL
(Left/right volume bal ŌĆÉ
ance) Shift the
sound to
the left Shift the
sound to
the right
BEEP
(Audio operation sound) Off On
BT SETUP Select mode
12Hr
24Hr
(12 Hr/24 Hr time ad ŌĆÉ
justment) 12Hr
(Flashing) 24Hr
(Flashing)
NOTE
If not operated for several seconds, the
display returns to the previous display. To
reset bass, treble, fade, and balance, press
the menu button (
) for 2 seconds.
The unit will beep and ŌĆ£CLEARŌĆØ will be
displayed.
ALC (Automatic volume adjustment)
The automatic leve l control (ALC)
changes the audio volume automatically
Interior Features
Audio Set [Type A (non-touchscreen)]
5-20
CX-3_8JL1-EA-20G_Edition1_old 2020-5-22 15:31:00
Page 303 of 618

according to the vehicle speed. The faster
the vehicle speed, the higher the volume
increases. ALC has ALC OFF and ALC
LEVEL 1 to 7 modes. At ALC LEVEL 7,
the amount that the volume can increase is
at the maximum. Select the mode
according to the driving conditions.
BEEP (Audio operation sound)
The setting for the operation sound when
pressing and holding a button can be
changed. The initial setting is ON. Set to
OFF to mute the operation sound.
BT SETUP mode
Music and other audio such as voice data
recorded on portable audio devices and
mobile phones available on the market
which are equipped with the Bluetooth
®
transmission function can be listened to
via wireless transmission over the
vehicle's speakers. Using the BT SETUP
mode, these devices can be programmed
to the Bluetooth
® unit or changed (page
5-34).
12Hr
24Hr (12 Hr/24 Hr time
adjustment)
Rotating the audio control dial switches
the display between 12 and 24-hour clock
time (page 5-22).
Interior Features
Audio Set [Type A (non-touchscreen)]
5-21
CX-3_8JL1-EA-20G_Edition1_old 2020-5-22 15:31:00
Page 304 of 618

Clock
Audio display
Audio control dial
Hour/Minute set switch:00 button
Menu button
Clock button
Ō¢╝ Setting the time
The clock can be set at any time when the
ignition is switched to ACC or ON.
1. To adjust the time, press the clock
button (
) for about 2 seconds
until a beep is heard.
2. The clock's current time will flash. Time adjustment
’éĘTo adjust the time, press the hour/
minute set button (
, ) while the
clock's current time is flashing.
’éĘThe hours advance while the hour
set button (
) is pressed. The
minutes advance while the minute
set button (
) is pressed.
3. Press the clock button (
) again to
start the clock.
Ō¢╝ Time resetting
1. Press the clock button () for
about 2 seconds until a beep is heard.
2. Press the :00 button (1).
3. When the button is pressed, the time
will be reset as follows:
(Example)
12:01ŌĆĢ 12:29ŌåÆ12:00
12:30ŌĆĢ 12:59ŌåÆ1:00
NOTE
’éĘWhen the :00 button (1) is pressed, the
seconds will start at ŌĆ£00ŌĆØ.
’éĘSwitching between 12 and 24-hour clock
time:
Press the menu button (
) several
times until 12 and 24-hour clock time
are displayed. Turn the audio control
dial in either direction, select the
desired clock setting while the preferred
clock time is flashing.
Interior Features
Audio Set [Type A (non-touchscreen)]
5-22
CX-3_8JL1-EA-20G_Edition1_old 2020-5-22 15:31:00
Page 324 of 618
2. Press the audio control dial todetermine the mode.
3. The name of the first device among the
paired devices is displayed.
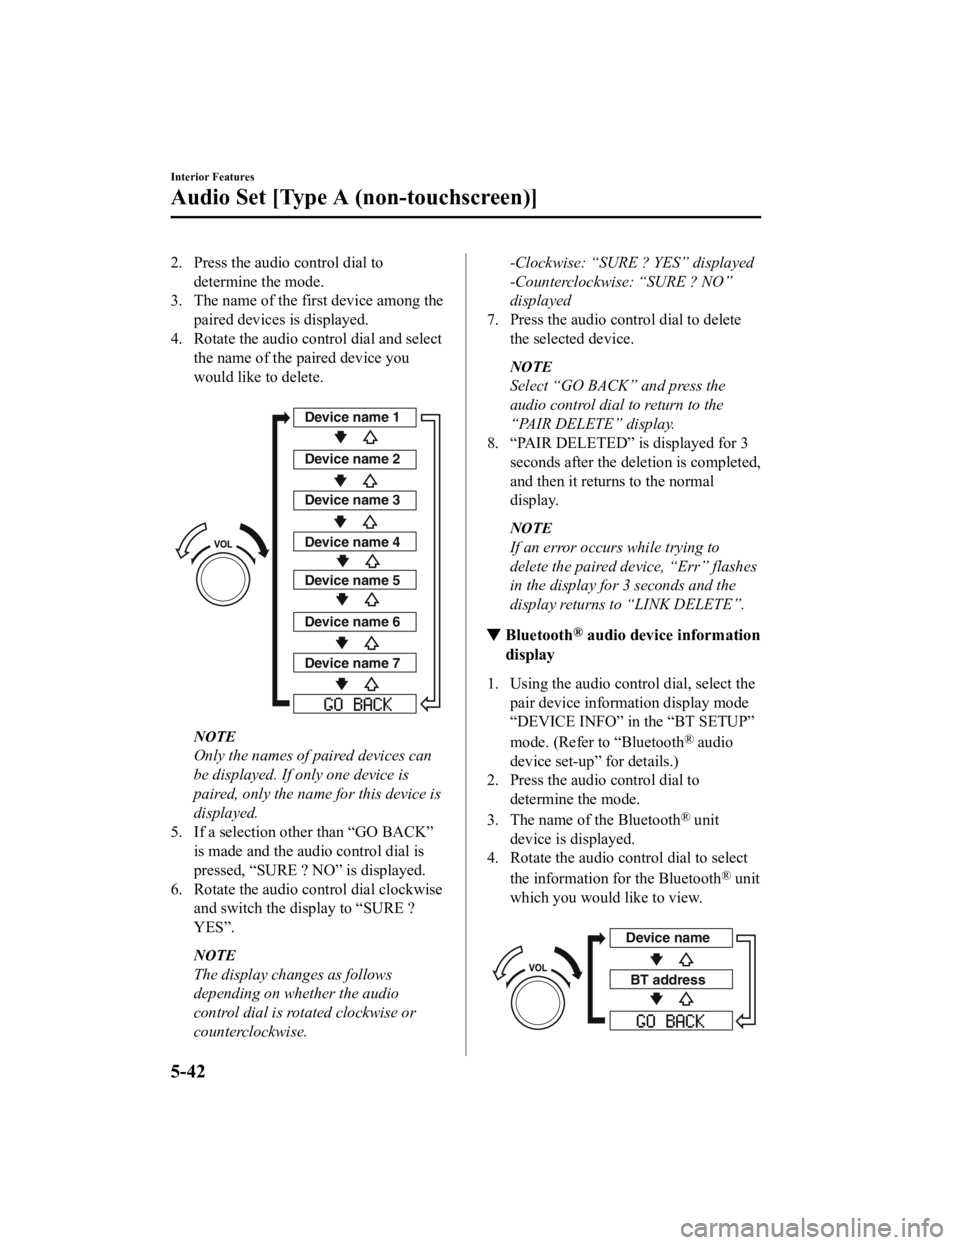
4. Rotate the audio control dial and select
the name of the paired device you
would like to delete.
Device name 1
Device name 2
Device name 3
Device name 4
Device name 5
Device name 6
Device name 7
NOTE
Only the names of paired devices can
be displayed. If only one device is
paired, only the name for this device is
displayed.
5. If a selection other than ŌĆ£GO BACKŌĆØ is made and the audio control dial is
pressed, ŌĆ£SURE ? NOŌĆØ is displayed.
6. Rotate the audio control dial clockwise and switch the display to ŌĆ£SURE ?
YESŌĆØ.
NOTE
The display changes as follows
depending on whether the audio
control dial is rotated clockwise or
counterclockwise.
-Clockwise: ŌĆ£SURE ? YESŌĆØ displayed
-Counterclockwise: ŌĆ£SURE ? NOŌĆØ
displayed
7. Press the audio control dial to delete the selected device.
NOTE
Select ŌĆ£GO BACKŌĆØ and press the
audio control dial to return to the
ŌĆ£PAIR DELETEŌĆØ display.
8. ŌĆ£PAIR DELETEDŌĆØ is displayed for 3 seconds after the deletion is completed,
and then it returns to the normal
display.
NOTE
If an error occurs while trying to
delete the paired device, ŌĆ£ErrŌĆØ flashes
in the display for 3 seconds and the
display returns to ŌĆ£LINK DELETEŌĆØ.
Ō¢╝Bluetooth┬« audio device information
display
1. Using the audio control dial, select the pair device information display mode
ŌĆ£DEVICE INFOŌĆØ in the ŌĆ£BT SETUPŌĆØ
mode. (Refer to ŌĆ£Bluetooth
® audio
device set-upŌĆØ for details.)
2. Press the audio control dial to
determine the mode.
3. The name of the Bluetooth
® unit
device is displayed.
4. Rotate the audio control dial to select
the information for the Bluetooth
® unit
which you would like to view.
Device name
BT address
Interior Features
Audio Set [Type A (non-touchscreen)]
5-42
CX-3_8JL1-EA-20G_Edition1_old 2020-5-22 15:31:00
Page 326 of 618
![MAZDA MODEL CX-3 2021 Manual PDF 7.Prompt: ŌĆ£French (Desired language)
selected. Is this correct?ŌĆØ
8. Say: [Beep] ŌĆ£YesŌĆØ
9. Prompt: ŌĆ£French (Desired language)
selectedŌĆØ (Spoken in the newly
selected language).
(Method 2) MAZDA MODEL CX-3 2021 Manual PDF 7.Prompt: ŌĆ£French (Desired language)
selected. Is this correct?ŌĆØ
8. Say: [Beep] ŌĆ£YesŌĆØ
9. Prompt: ŌĆ£French (Desired language)
selectedŌĆØ (Spoken in the newly
selected language).
(Method 2)](/img/28/40981/w960_40981-325.png)
7.Prompt: ŌĆ£French (Desired language)
selected. Is this correct?ŌĆØ
8. Say: [Beep] ŌĆ£YesŌĆØ
9. Prompt: ŌĆ£French (Desired language)
selectedŌĆØ (Spoken in the newly
selected language).
(Method 2)
1. Press the pick-up but ton or talk button
with a short press.
2. Say: [Beep] ŌĆ£FrenchŌĆØ (Say the desired
language: ŌĆ£EnglishŌĆØ, ŌĆ£FrenchŌĆØ or
ŌĆ£SpanishŌĆØ). (Change the desired
language by saying the language
name.)
NOTE
Other language settings can also be
made while in the current setting by
saying the name of the language in the
native pronunciation.
3. Prompt: ŌĆ£Would you like to change
the language to French (Desired
language)?ŌĆØ
4. Say: [Beep] ŌĆ£YesŌĆØ
5. Prompt: ŌĆ£Please wait. Switching to
French phonebook. French selectedŌĆØ
(Spoken in the newly selected
language).
Security Setting
If a passcode is set, the system cannot be
activated unless the passcode is input.
NOTE
Do this function only when parked. It is
too distracting to attempt while driving
and you may make too many errors to be
effective.
Passcode setting
1. Press the pick-up button or talk button with a short press.
2. Say: [Beep] ŌĆ£SetupŌĆØ
3. Prompt: ŌĆ£Select one of the following:
Pairing options, confirmation prompts,
language, passcode, select phone or
select music player.ŌĆØ
4. Say: [Beep] ŌĆ£PasscodeŌĆØ
5. Prompt: ŌĆ£Passcode is disabled. Would
you like to enable it?ŌĆØ
6. Say: [Beep] ŌĆ£YesŌĆØ
7. Prompt: ŌĆ£Please say a 4-digit
passcode. Remember this passcode. It
will be required to use this system.ŌĆØ
8. Say: [Beep] ŌĆ£XXXXŌĆØ (Say a desired
4-digit passcode, ŌĆ£PCodeŌĆØ.)
9. Prompt: ŌĆ£Passcode XXXX (Passcode,
PCode). Is this correct?ŌĆØ
10. Say: [Beep] ŌĆ£YesŌĆØ
11. Prompt: ŌĆ£Passcode is enabled.ŌĆØ
Using Bluetooth
® Hands-Free with a
passcode
1. Press the pick-up button or talk button with a short press.
2. Prompt: ŌĆ£Hands-Free system is
locked. State the passcode to
continue.ŌĆØ
3. Say: [Beep] ŌĆ£XXXXŌĆØ (Say the set
passcode ŌĆ£PCodeŌĆØ.)
Interior Features
Audio Set [Type A (non-touchscreen)]
5-44
CX-3_8JL1-EA-20G_Edition1_old 2020-5-22 15:31:00
Page 345 of 618
Basic Operation Method
NOTE
’éĘThe explanation of functions described in this manual may differ from the actual
operation, and the shapes of screens and buttons and the letters and characters displayed
may also differ from the actual appearance.
Additionally, depending on future software updates, the content may successively change
without notice.
’éĘFor additional information regarding Mazda Connect, please refer to the following
We b s i t e .
http://infotainment.mazdahandsfree.com/
Audio Set (Type B) has 3 different human interfaces.
’éĘCommander switch
’éĘTouch panel
’éĘVoice recognition with steering switch and microphone
Refer to Voice Recognition on page 5-120.
Ō¢╝ Commander switch operation
NOTE
For safety reasons, some operations are disabled while the vehicle is being driven.
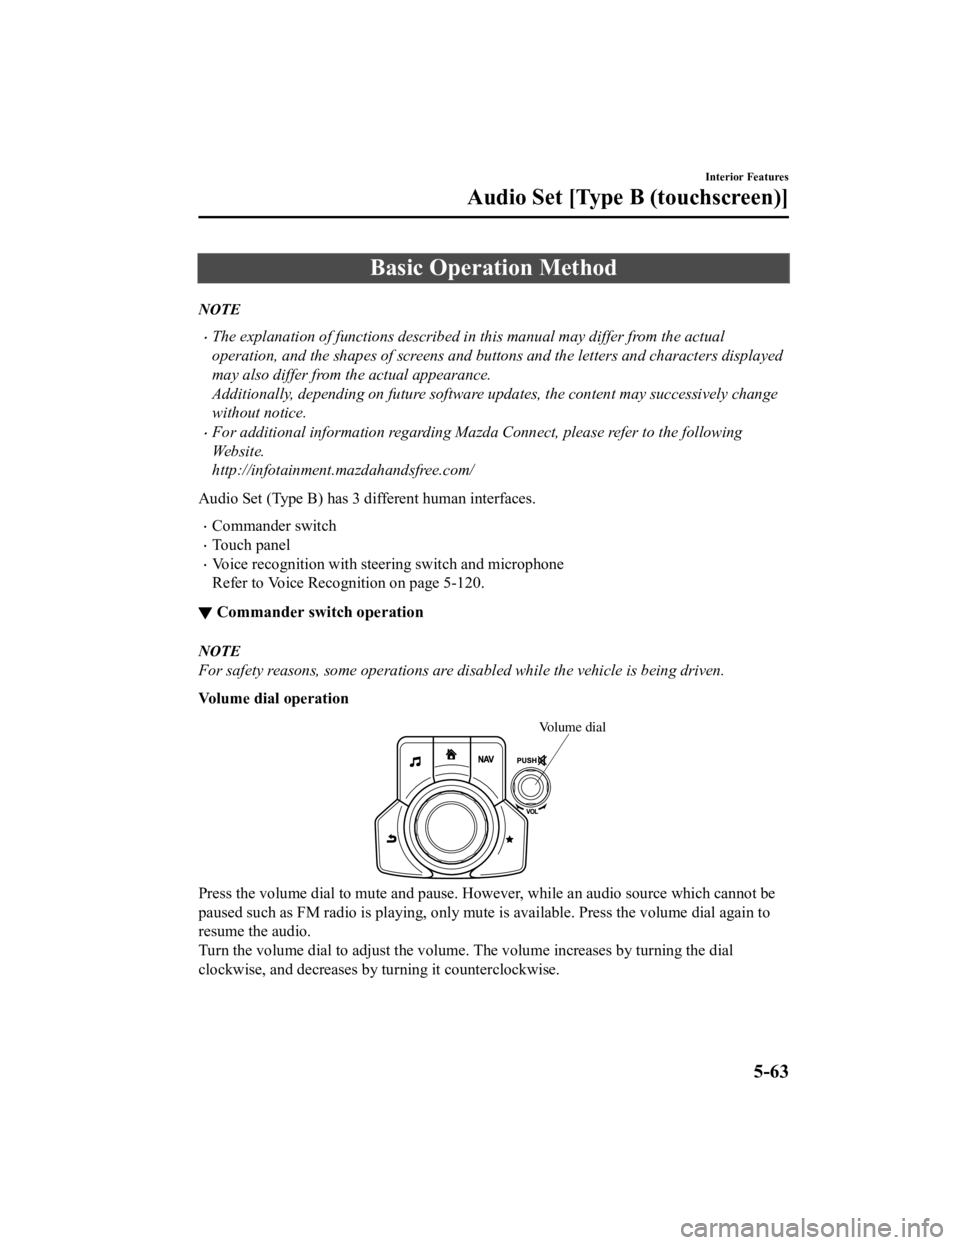
Volume dial operation
Vo l
ume dial
Press the volume dial to mute and pause. Howe ver, while an audio source which cannot be
paused such as FM radio is playing, only mute is available. Press the volume dial again to
resume the audio.
Turn the volume dial to adjust the volume. The volume increases by turning the dial
clockwise, and decreases by turning it counterclockwise.
Interior Features
Audio Set [Type B (touchscreen)]
5-63
CX-3_8JL1-EA-20G_Edition1_old 2020-5-22 15:31:00
Page 350 of 618
Volume/Display/Sound Controls
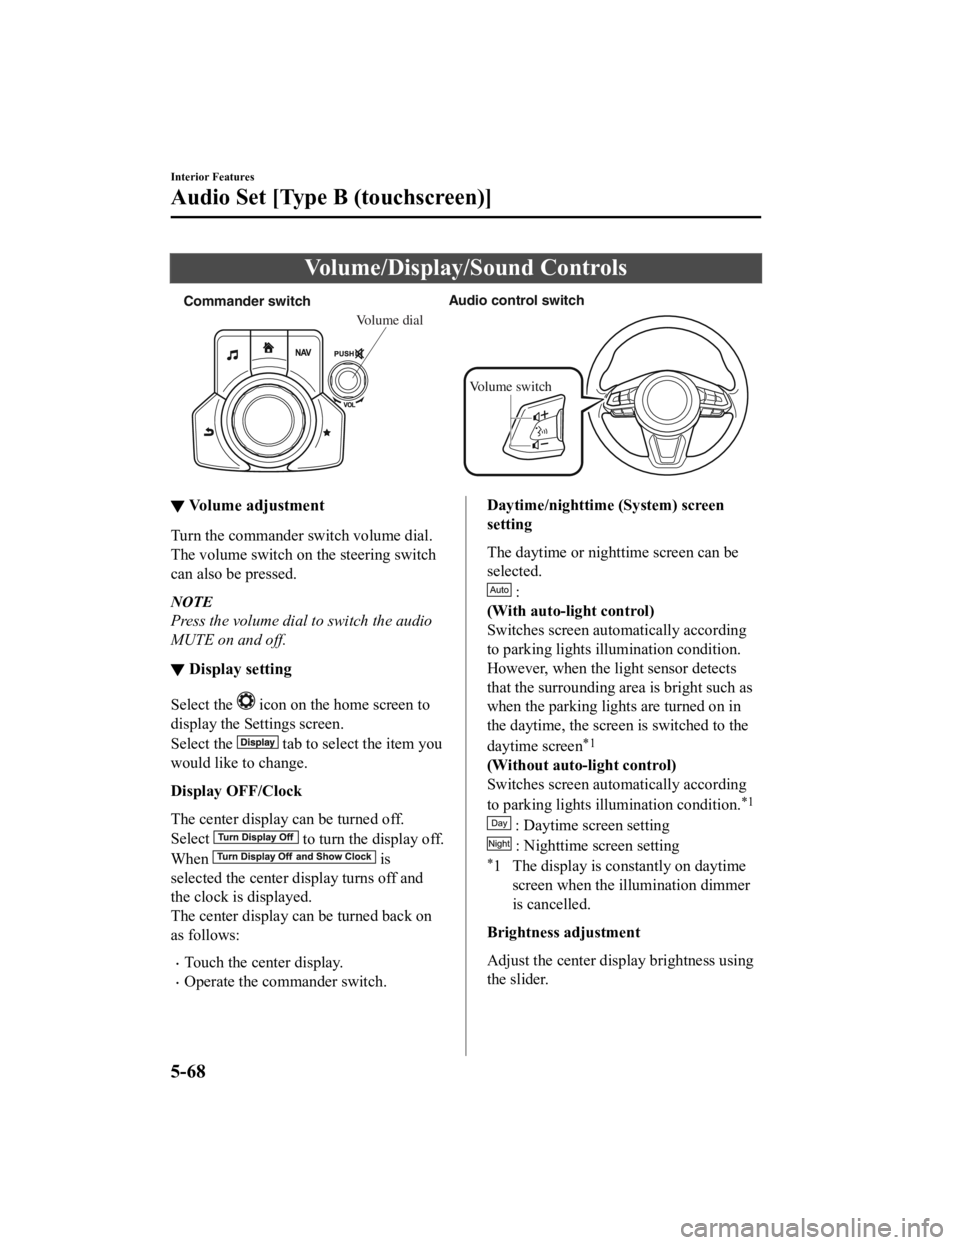
Commander switch Audio control s
witch
Volume switch
Volume dial
Ō¢╝Volume adjustment
Turn the commander switch volume dial.
The volume switch on the steering switch
can also be pressed.
NOTE
Press the volume dial to switch the audio
MUTE on and off.
Ō¢╝Display setting
Select the icon on the home screen to
display the Settings screen.
Select the
tab to select the item you
would like to change.
Display OFF/Clock
The center display can be turned off.
Select
to turn the display off.
When
is
selected the center di splay turns off and
the clock is displayed.
The center display can be turned back on
as follows:
’éĘTouch the center display.
’éĘOperate the commander switch.
Daytime/nighttime (System) screen
setting
The daytime or nighttime screen can be
selected.
:
(With auto-light control)
Switches screen automatically according
to parking lights illumination condition.
However, when the light sensor detects
that the surrounding area is bright such as
when the parking ligh ts are turned on in
the daytime, the screen is switched to the
daytime screen
*1
(Without auto-light control)
Switches screen automatically according
to parking lights illumination condition.
*1
: Daytime screen setting
: Nighttime screen setting
*1 The display is constantly on daytime screen when the illumination dimmer
is cancelled.
Brightness adjustment
Adjust the center display brightness using
the slider.
Interior Features
Audio Set [Type B (touchscreen)]
5-68
CX-3_8JL1-EA-20G_Edition1_old 2020-5-22 15:31:00
Page 359 of 618
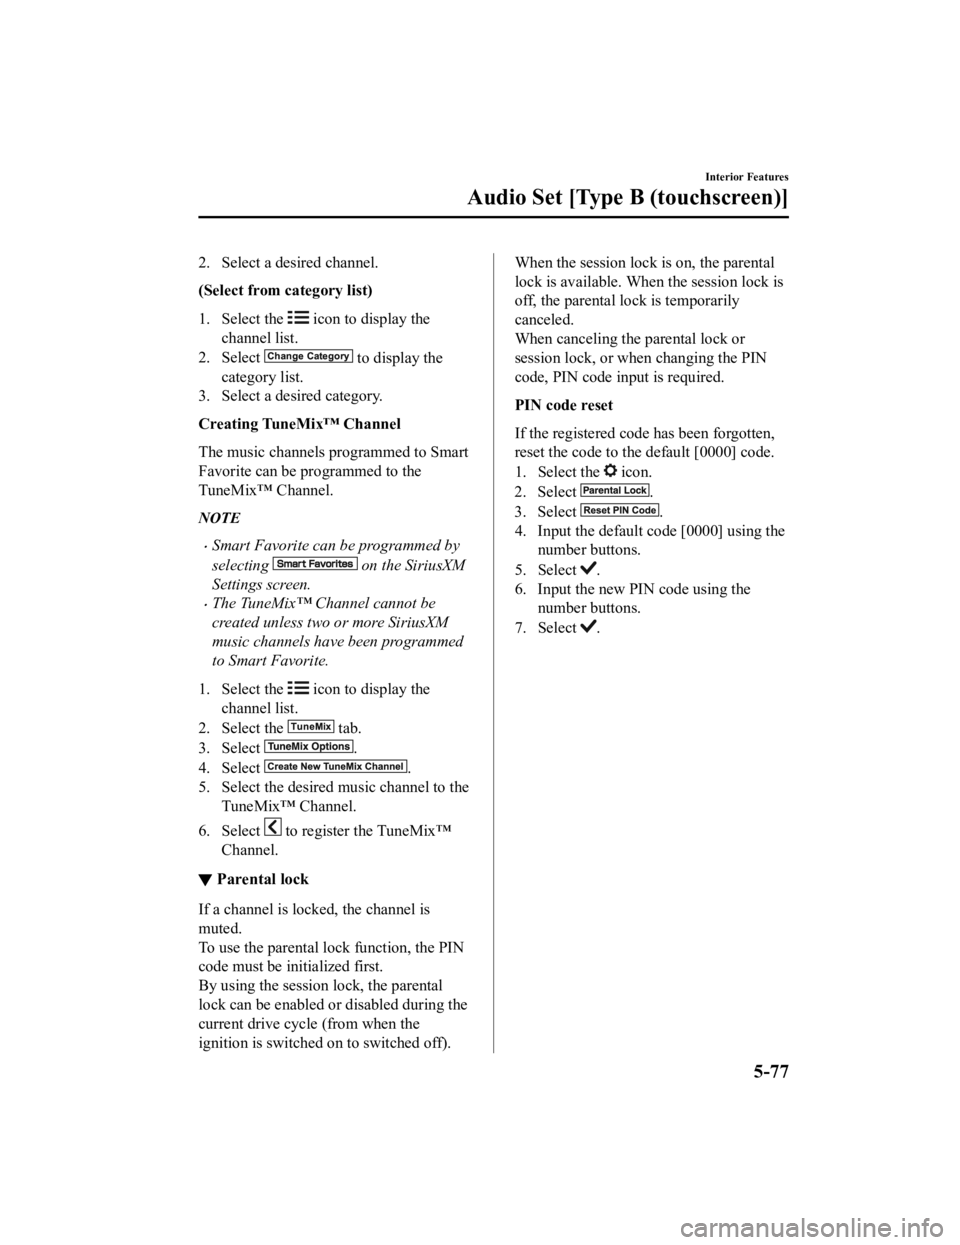
2. Select a desired channel.
(Select from category list)
1. Select the
icon to display the
channel list.
2. Select
to display the
category list.
3. Select a desired category.
Creating TuneMixŌäó Channel
The music channels programmed to Smart
Favorite can be pr ogrammed to the
TuneMixŌäó Channel.
NOTE
’éĘSmart Favorite can be programmed by
selecting
on the SiriusXM
Settings screen.
’éĘThe TuneMixŌäó Channel cannot be
created unless two or more SiriusXM
music channels have been programmed
to Smart Favorite.
1. Select the
icon to display the
channel list.
2. Select the
tab.
3. Select
.
4. Select
.
5. Select the desired music channel to the
TuneMixŌäó Channel.
6. Select
to register the TuneMixŌäó
Channel.
Ō¢╝ Parental lock
If a channel is locked, the channel is
muted.
To use the parental lock function, the PIN
code must be initialized first.
By using the session lock, the parental
lock can be enabled or disabled during the
current drive cycl
e (from when the
ignition is switched on to switched off).
When the session lock is on, the parental
lock is available. When the session lock is
off, the parental lock is temporarily
canceled.
When canceling the parental lock or
session lock, or when changing the PIN
code, PIN code input is required.
PIN code reset
If the registered code has been forgotten,
reset the code to the default [0000] code.
1. Select the
icon.
2. Select
.
3. Select
.
4. Input the default code [0000] using the number buttons.
5. Select
.
6. Input the new PIN code using the number buttons.
7. Select
.
Interior Features
Audio Set [Type B (touchscreen)]
5-77
CX-3_8JL1-EA-20G_Edition1_old 2020-5-22 15:31:00
Page 405 of 618
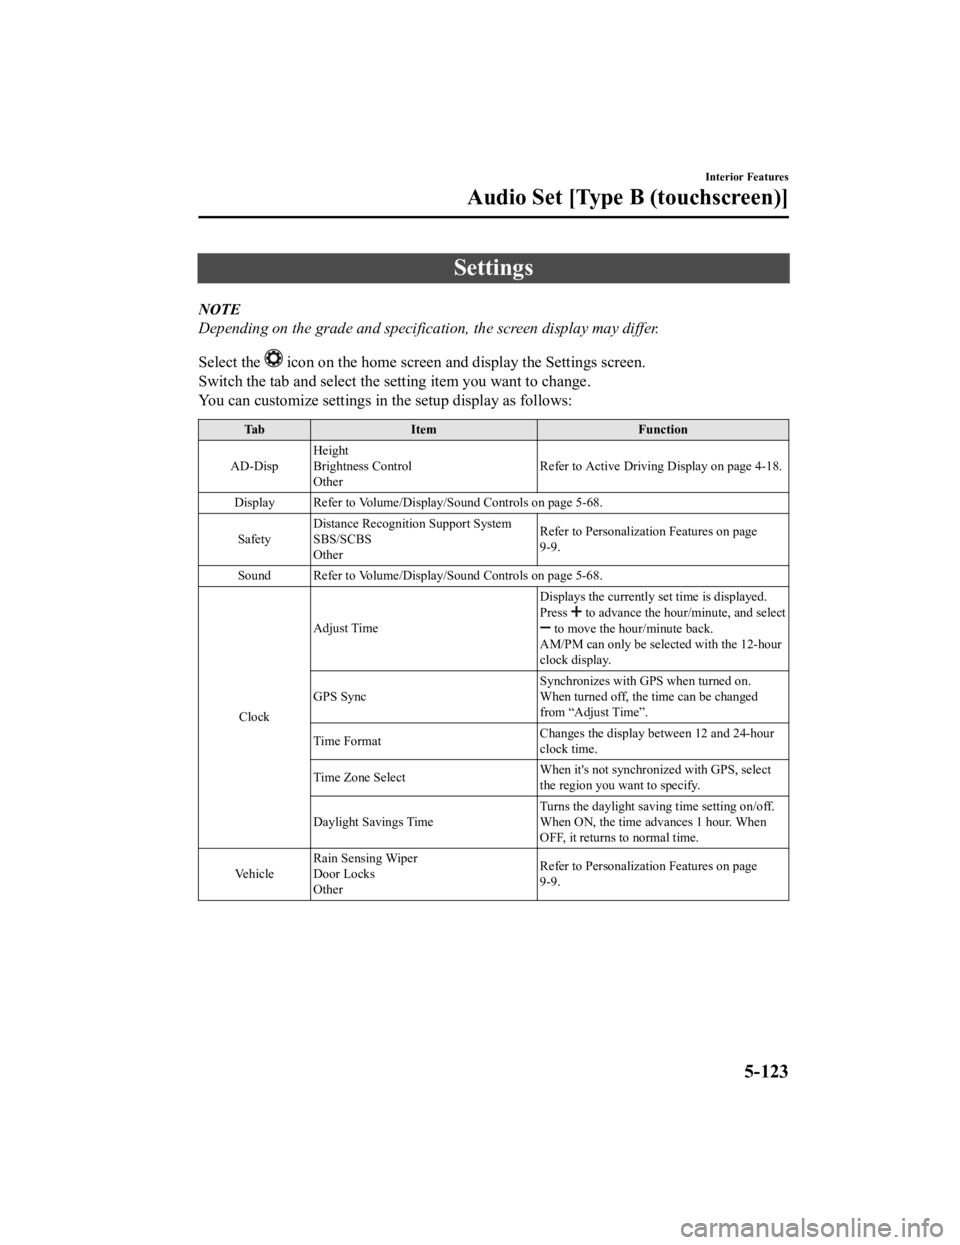
Settings
NOTE
Depending on the grade and specification, the screen display may differ.
Select the
icon on the home screen and display the Settings screen.
Switch the tab and select the setting item you want to change.
You can customize settings in the setup display as follows:
Ta b I t e m F u n c t i o n
AD-Disp Height
Brightness Control
Other
Refer to Active Driving Display on page 4-18.
Display Refer to Volume/Display/Sound Controls on page 5-68. Safety Distance Recognition Support System
SBS/SCBS
Other Refer to Personalization Features on page
9-9.
Sound Refer to Volume/Display/Sound Controls on page 5-68.
Clock Adjust Time
Displays the currently set time is displayed.
Press
to advance the hour/minute, and select to move the ho
ur/minute back.
AM/PM can only be sele cted with the 12-hour
clock display.
GPS Sync Synchronizes with GPS when turned on.
When turned off, th
e time can be changed
from ŌĆ£Adjust TimeŌĆØ.
Time Format Changes the display between 12 and 24-hour
clock time.
Time Zone Select When it's not synchronized with GPS, select
the region you want to specify.
Daylight Savings Time Turns the daylight saving time setting on/off.
When ON, the time advances 1 hour. When
OFF, it returns
to normal time.
Ve h i c l e Rain Sensing Wiper
Door Locks
Other Refer to Personalization Features on page
9-9.
Interior Features
Audio Set [Type B (touchscreen)]
5-123
CX-3_8JL1-EA-20G_Edition1_old
2020-5-22 15:31:00
Page 425 of 618

Map Lights
When the overhead light switch is in the
door or off position, press the lens to
illuminate the map lights, and then press
the lens again to turn them off.
NOTE
The map lights will not turn off even if the
lens is pressed in the following cases:
’éĘThe overhead light switch is in the ON
position.
’éĘThe overhead light switch is in the door
position with the door open.
’éĘThe illuminated entry system is on.
Luggage Compartment Lights
Switch Posi ŌĆÉ
tion Luggage Compartment Light
Light off
Light on when the liftgate is open
Ō¢╝
Illuminated Entry System
The overhead lights turn on when any of
the following operations is done with the
overhead light switch in the DOOR
position.
’éĘThe driver's door is unlocked with the
ignition is switched OFF.
’éĘThe ignition is swit
ched OFF with all
doors closed.
NOTE
’éĘThe illumination tim e differs depending
on the operation.
’éĘBattery saver
If an interior light is left on with the
ignition switched OFF, the light is
turned off automatically after about 30
minutes to prevent battery depletion.
’éĘThe operation of the illuminated entry
system can be changed.
Refer to Personalization Features on
page 9-9.
Interior Features
Interior Equipment
5-143
CX-3_8JL1-EA-20G_Edition1_old 2020-5-22 15:31:00