MAZDA MODEL CX-30 2022 Owners Manual
Manufacturer: MAZDA, Model Year: 2022, Model line: MODEL CX-30, Model: MAZDA MODEL CX-30 2022Pages: 595, PDF Size: 84.02 MB
Page 361 of 595

‚ĖľWhen a tire pressure decreases
If the TPMS warning light turns on, a
tire pressure may be low. Inspect the
tire pressures and adjust them to the
correct inÔ¨āation pressure.
Refer to Tire Pressure Monitoring
System (TPMS) Warning Indication/
Warning Light (Turns on) on page
7-32.
‚ĖľTires and Wheels
CAUTION
When inspecting/adjusting the tire
pressures, do not apply excessive force
to the air valve of the tire pressure
sensor. Otherwise, the tire pressure
sensor could be damaged.
When changing tires and wheels
When changing the tires or wheels
(such as installing winter tires), it will
be necessary to register the ID signal
code of the tire pressure sensor to the
TPMS.
Have an Authorized Mazda Dealer do
the registration or register the ID signal
codes of the tire pressure sensors using
the following procedure.
NOTE
The tire pressure sensors on each
wheel have a unique ID signal code.
For the TPMS to operate correctly, the
ID signal codes of the tire pressure
sensors need to be registered to the
system.
1. Wait more than 19 minutes after
changing a tire or wheel.
2. After more than 19 minutes have passed, drive the vehicle at a speed
of about 25 km/h (16 mph) or
faster for 3 minutes or longer. While
driving , the ID signal codes of the
tire pressure sensors are
automatically registered.
NOTE
If you drive the vehicle within 19
minutes of changing a tire or wheel,
the TPMS warning light will Ô¨āash
because the ID signal codes for the tire
pressure sensors were not registered.
In this case, stop the vehicle and
register the ID signal codes of the tire
pressure sensors following the
procedure.
When replacing tires and wheels
CAUTION
ÔÉėWhen replacing the tires and wheels,
consult an Authorized Mazda Dealer
Otherwise, the tire pressure sensors
could be damaged when replacing
them.
ÔÉė Do not install non-genuine wheels. If
wheels other than genuine ones are
installed, it may not be possible to
install the tire pressure sensors.
When Driving
Tire Pressure Monitoring System (TPMS)
4-214
CX-30_8KN2-EA-21L_Edition1_new 2021-9-15 19:39:56
Page 362 of 595

When replacing a tire or wheel, always
install the tire pressure sensor. The
following combinations of tires,
wheels, or tires and wheels are
possible.
Ôā∑The tire pressure sensor from the old
wheel is removed and it is installed
to the new wheel.
Ôā∑Only a tire is replaced without
replacing the tire pressure sensor and
wheel.
Ôā∑A new tire pressure sensor is installed
to a new wheel.
NOTE
When installing a new tire pressure
sensor, the ID signal code for the tire
pressure sensor needs to be registered.
For details on purchasing a tire
pressure sensor and registering the ID
signal of the tire pressure sensor,
consult an Authorized Mazda Dealer.
When Driving
Tire Pressure Monitoring System (TPMS)
4-215
CX-30_8KN2-EA-21L_Edition1_new2021-9-15 19:39:56
Page 363 of 595

Rear View Monitor*
‚ĖľRear View Monitor
The rear view monitor provides visual
images of the rear of the vehicle when
reversing.
WARNING
Always drive carefully conÔ¨Ārming the
safety of the rear and the surrounding
conditions by looking directly with
your eyes:
Reversing the vehicle by only looking at
the screen is dangerous as it may cause
an accident or a collision with an
object. The rear view monitor is only a
visual assist device when reversing the
vehicle. The images on the screen may
be
different from the actual conditions.
CAUTION
ÔÉė
Do not use the rear view monitor
under the following conditions:
Using the rear view monitor under
the following conditions is
dangerous and could result in injury
or vehicle damage or both.
ÔÉė Icy or snow-covered roads.
ÔÉė Tire chains or a temporary spare
tire is installed.
ÔÉė The trunk lid is not fully closed.
ÔÉė The vehicle is on a road incline.
ÔÉė Bumpy roads.
ÔÉė When the display is cold, images
may course across the monitor or the
screen and may be dimmer than
usual, which could cause
difficulty in
conÔ¨Ārming the surrounding
conditions of the vehicle. Always
drive carefully conÔ¨Ārming the safety
of the rear and the surrounding
conditions by looking directly with
your eyes.
ÔÉė Do not apply excessive force to the
camera. The camera position and
angle may deviate.
ÔÉė Do not disassemble, modify, or
remove it as it may no longer be
waterproof.
ÔÉė The camera cover is made of plastic.
Do not apply degreasing agents,
organic solvents, wax, or glass
coating agents to the camera cover.
If any are spilled on the cover, wipe
off with a soft cloth immediately.
ÔÉė Do not rub the camera cover
forcefully with an abrasive or hard
brush. The camera cover or lens may
be scratched which might affect the
images.
ÔÉė If a camera lens is severely damaged
by Ô¨āying gravel, have the camera
replaced. For camera replacement,
consult an Authorized Mazda Dealer.
NOTE
Ôā∑If water, snow, or mud is stuck on
the camera lens, wipe it off using a
soft cloth. If it cannot be wiped off,
use a mild detergent.
Ôā∑If the camera temperature changes
rapidly (Hot to cold, cold to hot), the
rear view monitor may not operate
correctly.
Ôā∑When replacing the tires, consult an
Authorized Mazda Dealer. Replacing
the tires could result in deviation of
the guide lines which appear on the
display.
Ôā∑If the vehicle's front, side, or rear has
been involved in a collision, the
alignment of the rear view parking
camera (location, installation angle)
may have deviated. Always consult
an Authorized Mazda Dealer to have
the vehicle inspected.
When Driving
Rear View Monitor
4-216*Some models.
CX-30_8KN2-EA-21L_Edition1_new 2021-9-15 19:39:56
Page 364 of 595
Ôā∑If ‚ÄúNo camera signal.‚ÄĚ is indicated in
the display, there could be a
problem with the camera. Have your
vehicle inspected at an Authorized
Mazda Dealer.
Ôā∑(Predicted vehicle path assist lines
display type)
If force is applied to the steering
wheel, the guide lines may not
display. Loosen your grip on the
steering wheel to allow the guide
lines to display.
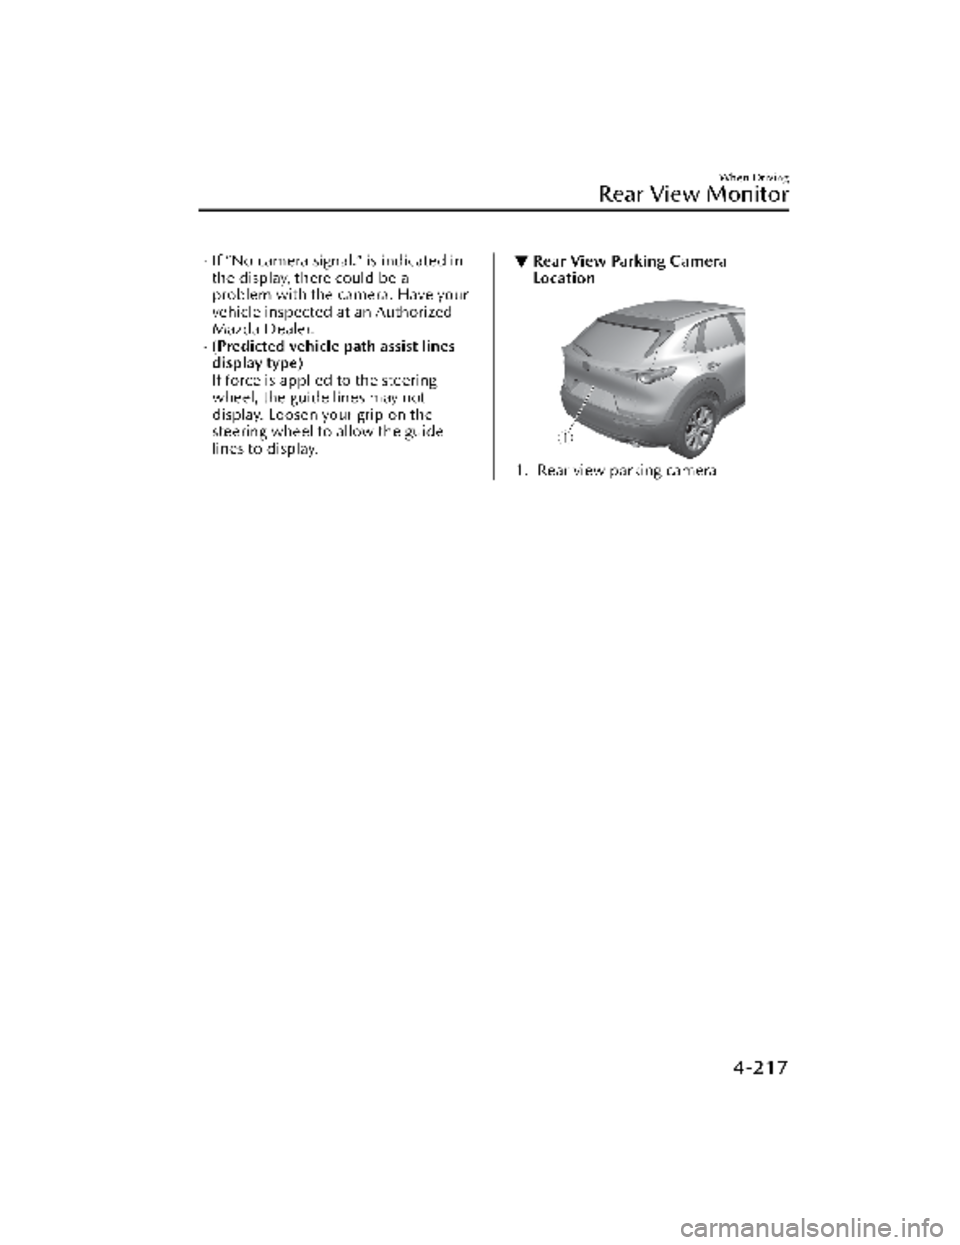
‚ĖľRear View Parking Camera
Location
1. Rear view parking camera
When Driving
Rear View Monitor
4-217
CX-30_8KN2-EA-21L_Edition1_new
2021-9-15 19:39:56
Page 365 of 595

‚ĖľSwitching to the Rear View Monitor Display
Shift the selector lever to reverse (R) po
sition with the ignition switched ON to
switch the display to the rear view monitor display.
NOTE
When the selector lever is shifted from reverse (R) position to another selector lever
position, the screen returns to the previous display.
‚Ėľ Displayable Range on the Screen
The images on the screen may be different from the actual conditions.
1. (Screen display)
2. (Actual view)
3. Bumper
4. ‚ÄúCheck surroundings for safety.‚ÄĚ message is displayed
5. Object
When Driving
Rear View Monitor
4-218
CX-30_8KN2-EA-21L_Edition1_new
2021-9-15 19:39:56
Page 366 of 595

NOTE
Ôā∑The displayable range varies depending on the vehicle and road conditions.Ôā∑If the camera lens is touched or there is any dirt on it, it could affect the screen
image. Wipe the lens using a soft cloth.
Ôā∑The displayable range is limited. Objects under the bumper or around the bumper
ends cannot be displayed.
Ôā∑The distance appearing in the displayed image is different from the actual distance
because the rear view parking camera is equipped with a speciÔ¨Āc lens.
Ôā∑Images displayed on the monitor from the rear view parking camera are reversed
images (mirror images).
Ôā∑Some optionally installed vehicle accessories may be picked up by the camera. Do
not install any optional parts that can interfere with the camera view, such as
illuminating parts or parts made of
reÔ¨āective material.
Ôā∑It may be difficult to see the display un
der the following conditions, however, it
does not indicate a malfunction.
Ôā∑In darkened areas.Ôā∑When the temperature around the lens is high/low.Ôā∑When the camera is wet such as on a rainy day or during periods of high
humidity.
Ôā∑When foreign material such as mud is stuck around the camera.Ôā∑When the camera lens reÔ¨āects sunlight or headlight beams.Ôā∑The surroundings are illuminated by vehicle lights, Ô¨āuorescent lights, or LED
lights (display may Ô¨āicker).
Ôā∑Extremely small dark or white dots appear on the screen (dots may Ô¨āicker).Ôā∑An object is close to a camera.Ôā∑Image display may be delayed if the te mperature around the camera is low.
When Driving
Rear View Monitor
4-219
CX-30_8KN2-EA-21L_Edition1_new 2021-9-15 19:39:56
Page 367 of 595
‚ĖľViewing the Display
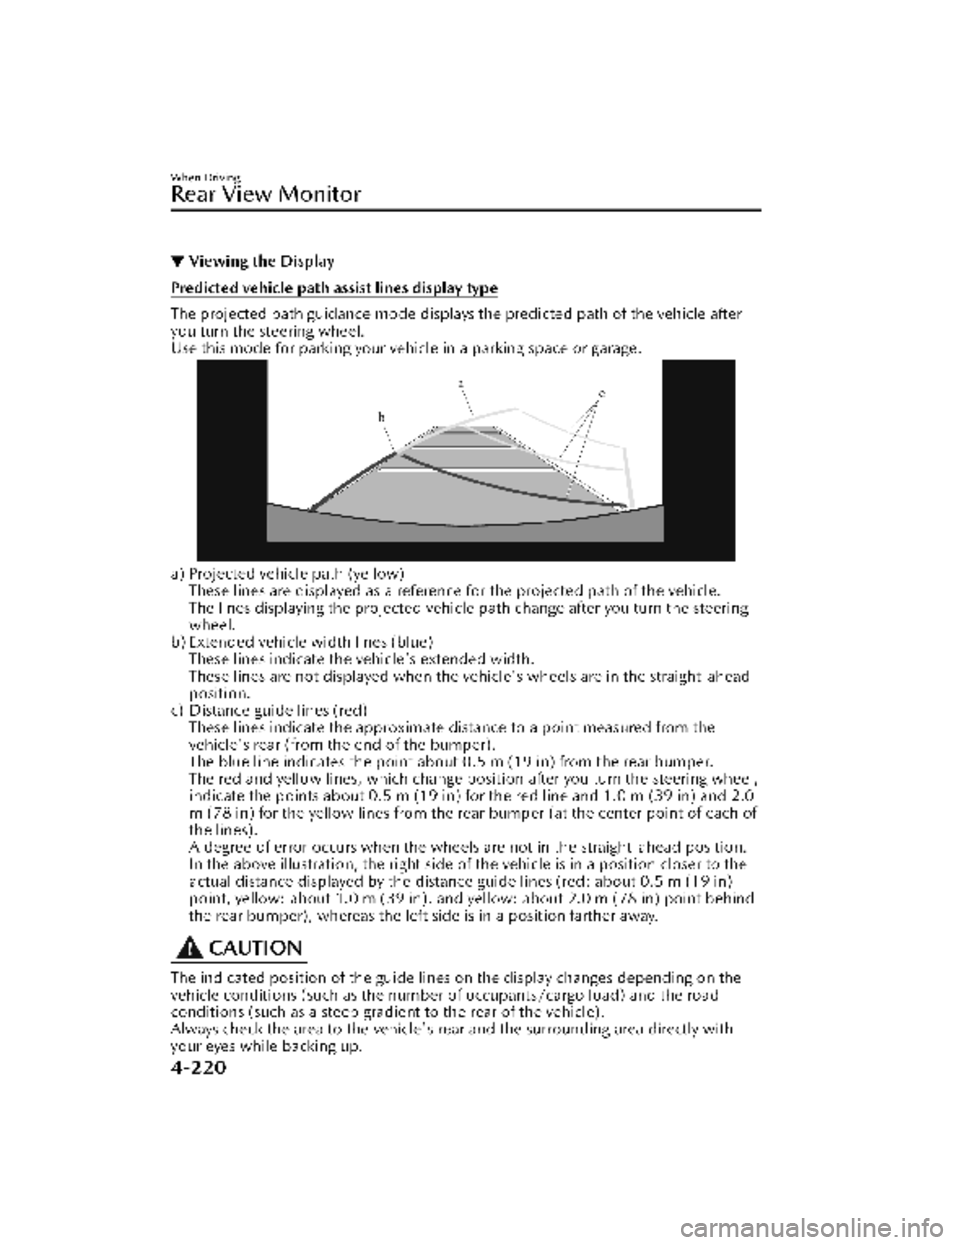
Predicted vehicle path assist lines display type
The projected path guidance mode displays the predicted path of the vehicle after
you turn the steering wheel.
Use this mode for parking your vehi
cle in a parking space or garage.
a) Projected vehicle path (yellow)
These lines are displayed as a reference for the projected path of the vehicle.
The lines displaying the projected vehicle path change after you turn the steering
wheel.
b) Extended vehicle width lines (blue) These lines indicate the vehicle's extended width.
These lines are not displayed when the vehicle's wheels are in the straight-ahead
position.
c) Distance guide lines (red) These lines indicate the approximate distance to a point measured from the
vehicle's rear (from the end of the bumper).
The blue line indicates the point about 0.5 m (19 in) from the rear bumper.
The red and yellow lines, which change position after you turn the steering wheel,
indicate the points about 0.5 m (19 in) for the red line and 1.0 m (39 in) and 2.0
m (78 in) for the yellow lines from the rear bumper (at the center point of each of
the lines).
A degree of error occurs when the wheels are not in the straight-ahead position.
In the above illustration, the right side of the vehicle is in a position closer to the
actual distance displayed by the distance guide lines (red: about 0.5 m (19 in)
point, yellow: about 1.0 m (39 in), and yellow: about 2.0 m (78 in) point behind
the rear bumper), whereas the left side is in a position farther away.
CAUTION
The indicated position of the guide lines on the display changes depending on the
vehicle conditions (such as the number of occupants/cargo load) and the road
conditions (such as a steep gradient to the rear of the vehicle).
Always check the area to the vehicle's rear and the surrounding area directly with
your eyes while backing up.
When Driving
Rear View Monitor
4-220
CX-30_8KN2-EA-21L_Edition1_new 2021-9-15 19:39:56
Page 368 of 595
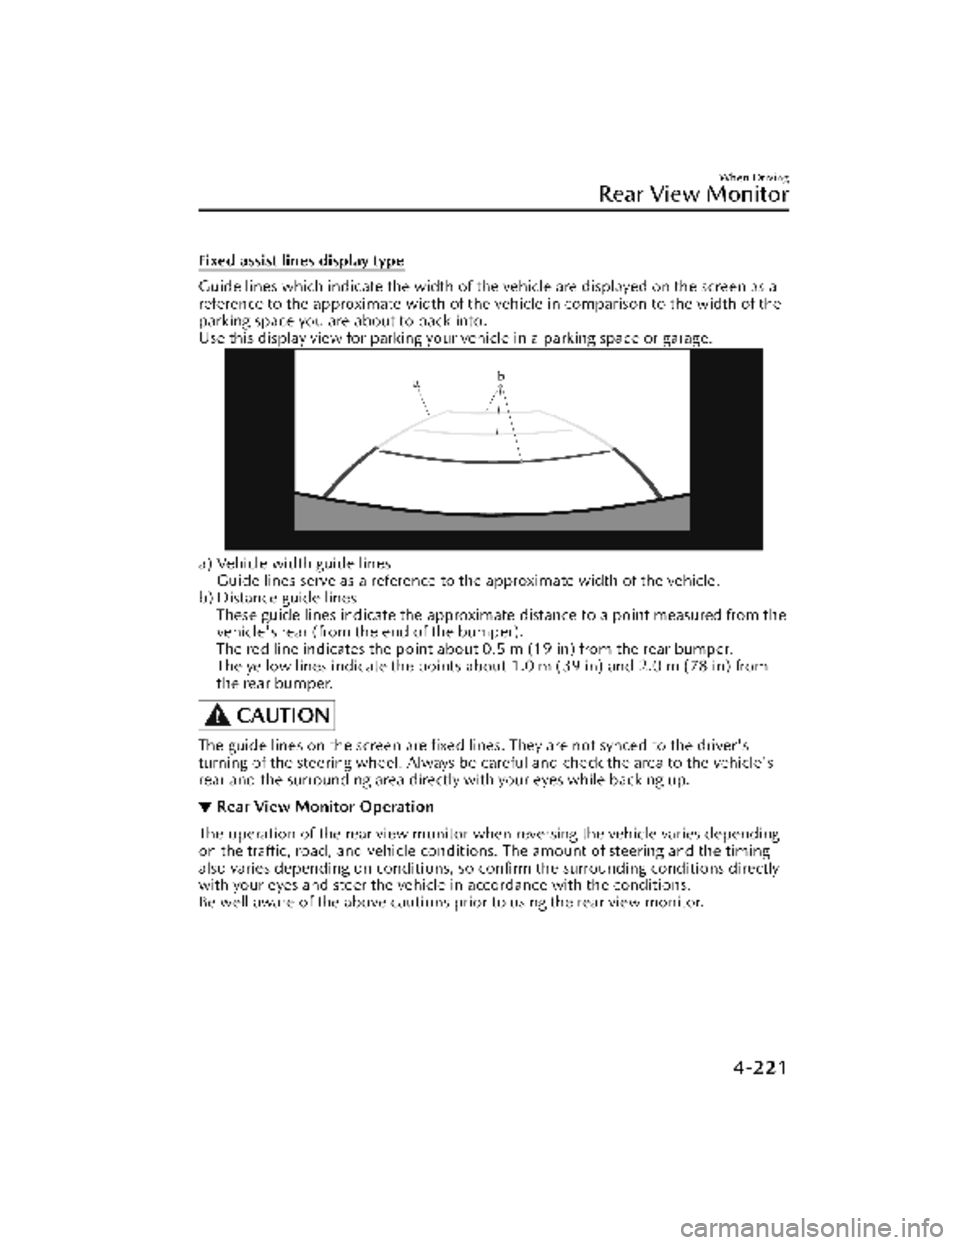
Fixed assist lines display type
Guide lines which indicate the width of the vehicle are displayed on the screen as a
reference to the approximate width of the vehicle in comparison to the width of the
parking space you are about to back into.
Use this display view for parking your vehicle in a parking space or garage.
a) Vehicle width guide lines
Guide lines serve as a reference to the approximate width of the vehicle.
b) Distance guide lines These guide lines indicate the approximate distance to a point measured from the
vehicle's rear (from the end of the bumper).
The red line indicates the point about 0.5 m (19 in) from the rear bumper.
The yellow lines indicate the points abou t 1.0 m (39 in) and 2.0 m (78 in) from
the rear bumper.
CAUTION
The guide lines on the screen are Ô¨Āxed li nes. They are not synced to the driver's
turning of the steering wheel. Always be careful and check the area to the vehicle's
rear and the surrounding area directly with your eyes while backing up.
‚Ėľ Rear View Monitor Operation
The operation of the rear view monitor when reversing the vehicle varies depending
on the traffic, road, and vehicle conditions. The amount of steering and the timing
also varies depending on conditions, so conÔ¨Ārm the surrounding conditions directly
with your eyes and steer the vehicle in accordance with the conditions.
Be well aware of the above cautions prior to using the rear view monitor.
When Driving
Rear View Monitor
4-221
CX-30_8KN2-EA-21L_Edition1_new
2021-9-15 19:39:56
Page 369 of 595
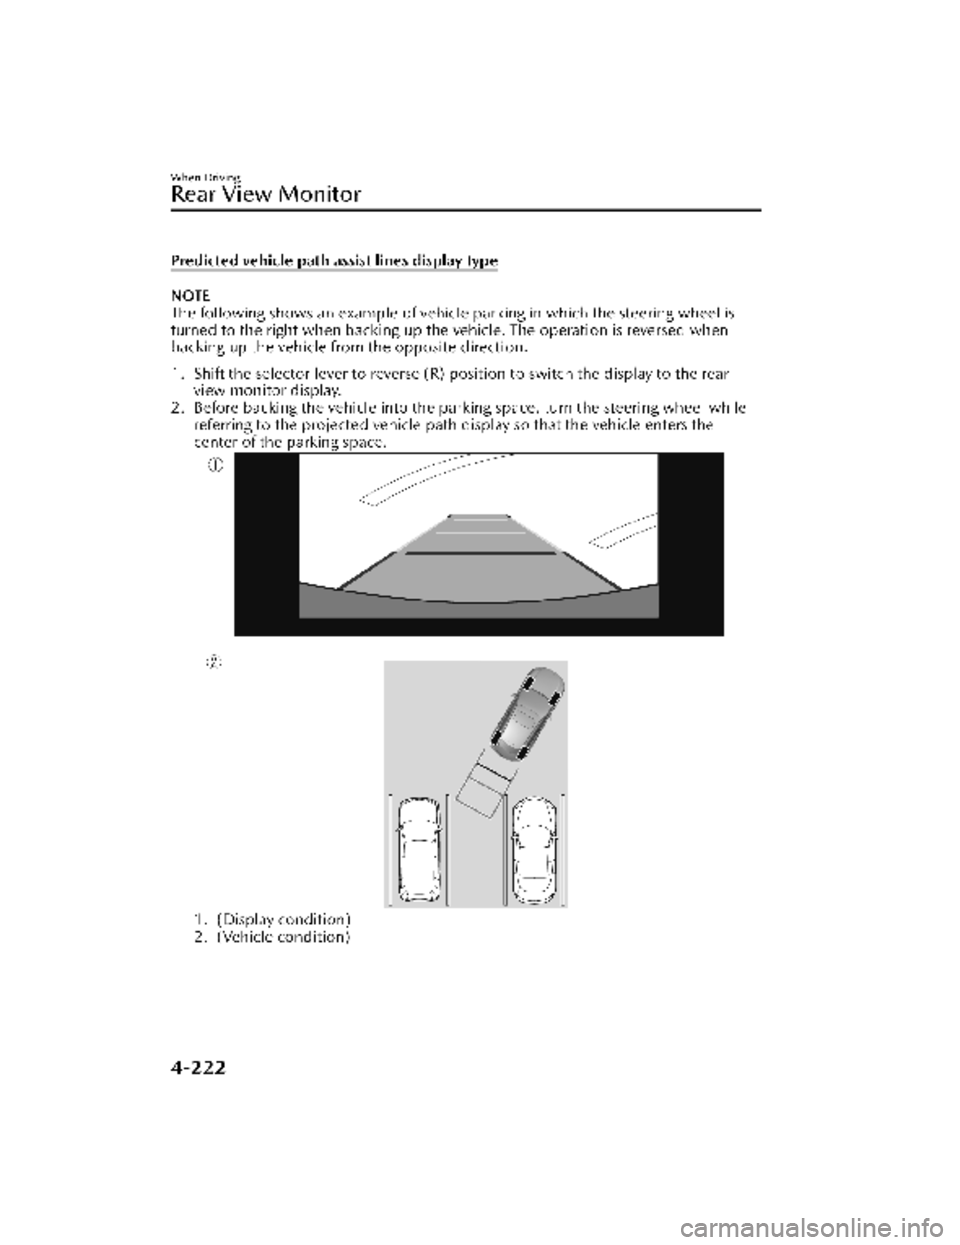
Predicted vehicle path assist lines display type
NOTE
The following shows an example of vehicle parking in which the steering wheel is
turned to the right when backing up the vehicle. The operation is reversed when
backing up the vehicle from the opposite direction.
1. Shift the selector lever to reverse (R) po sition to switch the display to the rear
view monitor display.
2. Before backing the vehicle into the parking space, turn the steering wheel while referring to the projected vehicle path display so that the vehicle enters the
center of the parking space.
1. (Display condition)
2. (Vehicle condition)
When Driving
Rear View Monitor
4-222
CX-30_8KN2-EA-21L_Edition1_new 2021-9-15 19:39:56
Page 370 of 595
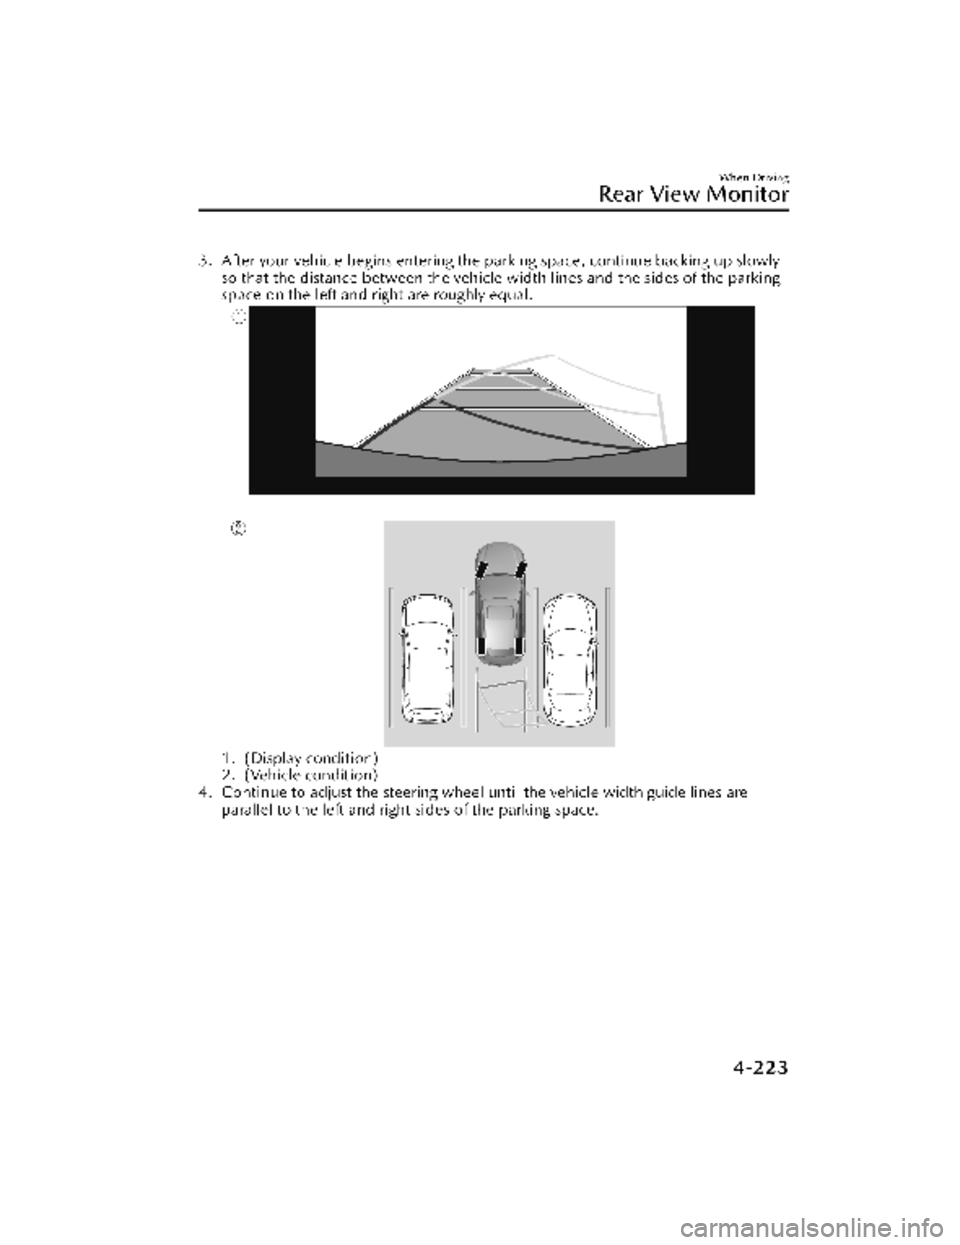
3. After your vehicle begins entering the parking space, continue backing up slowlyso that the distance between the vehicle width lines and the sides of the parking
space on the left and right are roughly equal.
1. (Display condition)
2. (Vehicle condition)
4. Continue to adjust the steering wheel until the vehicle width guide lines are parallel to the left and right sides of the parking space.
When Driving
Rear View Monitor
4-223
CX-30_8KN2-EA-21L_Edition1_new 2021-9-15 19:39:56