change time MAZDA MODEL CX-5 2013 (in English) User Guide
[x] Cancel search | Manufacturer: MAZDA, Model Year: 2013, Model line: MODEL CX-5, Model: MAZDA MODEL CX-5 2013Pages: 488, PDF Size: 8.75 MB
Page 164 of 488

Black plate (164,1)
Lighting Control
qHeadlights
lTurn the headlight switch to turn the headlights, other exterior lights and dashboard
illumination on or off.
lA system malfunction or operation conditions are indicated by a warning.
Refer to Warning/Indicator Lights on page 4-15.
NOTE
lIf the light switch is left on, the lights will automatically switch off (if equipped) approximately 30
seconds after switching the ignition off.
The time setting can be changed.
Refer to Personalization Features on page 9-9.
lTo prevent discharging the battery, do not leave the lights on while the engine is off unless safety
requires them.
Without auto-light control
Switch Position
Ignition Position ON OFF ON OFF ON OFF
Headlights Off Off Off Off On On
Daytime running lights On Off On Off Off Off
Taillights
Parking lights
License lights
Side-marker lights
Dashboard illuminationOff Off On On On On
4-40
When Driving
Switches and Controls
CX-5_8CA5-EA-11L_Edition3 Page164
Friday, June 22 2012 3:45 PM
Form No.8CA5-EA-11L
Page 167 of 488

Black plate (167,1)
NOTElThe headlights, other exterior lights and dashboard illumination may not turn off immediately
even if the surrounding area becomes well-lit because the light sensor determines that it is
nighttime if the surrounding area is continuously dark for several minutes such as inside long
tunnels, traffic jams inside tunnels, or in indoor parking lots.
In this case, the light turns off if the light switch is turned to the
position.l(Without auto headlight off function)
When the headlight switch is in the
position and the ignition is switched to ACC or the
ignition is switched off, the headlights, other exterior lights and dashboard illumination will turn
off.
lThe dashboard illumination can be adjusted by rotating the knob in the instrument cluster. Also,
the day/night mode can be changed by rotating the knob until a beep sound is heard. To adjust the
brightness of the dashboard illumination:
Refer to Dashboard Illumination on page 4-11.
lThe sensitivity of the AUTO lights may be changed by an Authorized Mazda Dealer.
Refer to Personalization Features on page 9-9.
Xenon fusion headlight bulbsí
The low-beam bulbs of the headlights have xenon fusion bulbs that produce a bright white
beam over a wide area.
WARNING
Do not replace the xenon fusion bulbs yourself
Replacing the xenon fusion bulbs yourself is dangerous. Because the xenon fusion
bulbs require high voltage, you could receive an electric shock if the bulbs are
handled incorrectly. Consult an Authorized Mazda Dealer when the replacement is
necessary.
NOTE
If the headlights flicker, or the brightness weakens, the bulb-life may be depleted and a replacement is
necessary. Consult an Authorized Mazda Dealer.
When Driving
Switches and Controls
4-43íSome models. CX-5_8CA5-EA-11L_Edition3 Page167
Friday, June 22 2012 3:45 PM
Form No.8CA5-EA-11L
Page 170 of 488

Black plate (170,1)
Turn and Lane-Change
Signals
NOTElIf an indicator light stays on without
flashing or if it flashes abnormally, one of
the turn signal bulbs may be burned out.
lA personalized function is available to
change the turn indicator sound volume.
Refer to Personalization Features on page
9-9.
qTurn Signals
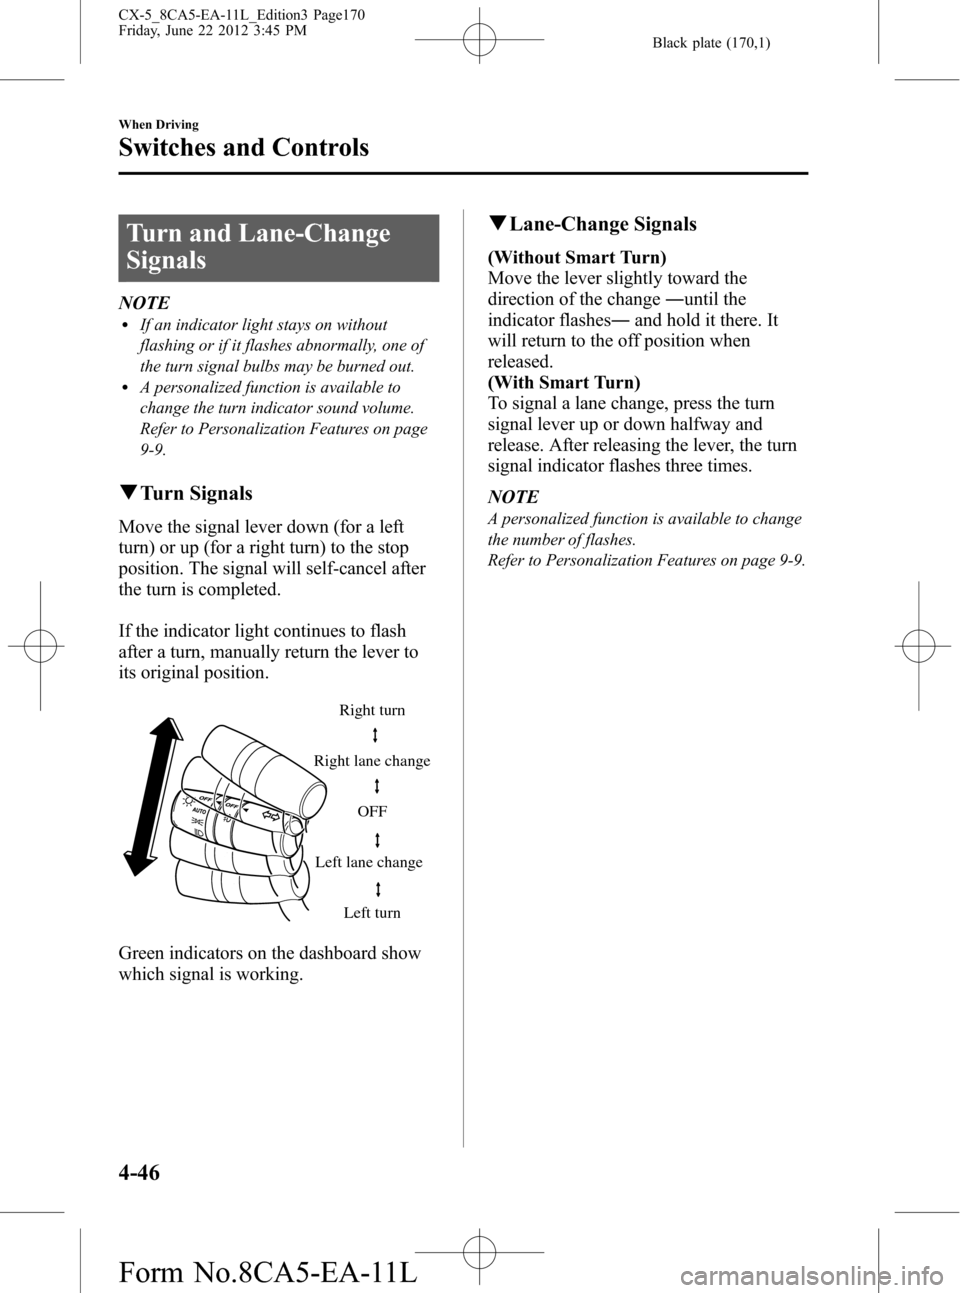
Move the signal lever down (for a left
turn) or up (for a right turn) to the stop
position. The signal will self-cancel after
the turn is completed.
If the indicator light continues to flash
after a turn, manually return the lever to
its original position.
Right turn
Left turn Right lane change
Left lane changeOFF
Green indicators on the dashboard show
which signal is working.
qLane-Change Signals
(Without Smart Turn)
Move the lever slightly toward the
direction of the change―until the
indicator flashes―and hold it there. It
will return to the off position when
released.
(With Smart Turn)
To signal a lane change, press the turn
signal lever up or down halfway and
release. After releasing the lever, the turn
signal indicator flashes three times.
NOTE
A personalized function is available to change
the number of flashes.
Refer to Personalization Features on page 9-9.
4-46
When Driving
Switches and Controls
CX-5_8CA5-EA-11L_Edition3 Page170
Friday, June 22 2012 3:45 PM
Form No.8CA5-EA-11L
Page 179 of 488

Black plate (179,1)
NOTE
If the HomeLink indicator light does not
change to a rapidly blinking light, contact
HomeLink atwww.homelink.comor call1-
800-355-3515for assistance.
4. Firmly press and hold the programmed
HomeLink button for five seconds, and
then release it. Perform this operation
two times to activate the door. If the
door does not activate, press and hold
the just-trained HomeLink button and
observe the indicator light.
If the indicator lightstays on constantly,
programming is completeand your
device should activate when the
HomeLink button is pressed and released.
NOTE
To program the remaining two HomeLink
buttons, begin with“Programming”―step 1.
If the indicator light blinksrapidly for
two seconds and then turns to a
constant light, continue with
“Programming”steps 5―7to complete
the programming of a rolling code
equipped device (most commonly a
garage door opener).
5. At the garage door opener receiver
(motor-head unit) in the garage, locate
the“learn”or“smart”button. This can
usually be found where the hanging
antenna wire is attached to the motor-
head unit.
6. Firmly press and release the“learn”or
“smart”button. (The name and color of
the button may vary by manufacturer.)
NOTE
There are 30 seconds in which to initiate step
7.
7. Return to the vehicle and firmlypress,
hold for two seconds and releasethe
programmed HomeLink button. Repeat
the“press/hold/release”sequence a
second time, and, depending on the
brand of the garage door opener (or
other rolling code equipped device),
repeat this sequence a third time to
complete the programming process.
HomeLink should now activate your
rolling code equipped device.
NOTE
To program the remaining two HomeLink
buttons, begin with“Programming”―step 1.
For questions or comments, please contact
HomeLink atwww.homelink.comor1-
800-355-3515.
qGate operator/Canadian
Programming
Canadian radio-frequency laws require
transmitter signals to“time-out”(or quit)
after several seconds of transmission―
which may not be long enough for
HomeLink to pick up the signal during
programming. Similar to this Canadian
law, some U.S. gate operators are
designed to“time-out”in the same
manner.
If you live in Canada or you are having
difficulties programming a gate operator
by using the“Programming”procedures
(regardless of where you live),replace
“Programming HomeLink”step 2with
the following:
NOTE
If programming a garage door opener or gate
operator, it is advised to unplug the device
during the“cycling”process to prevent
possible overheating.
When Driving
Switches and Controls
4-55
CX-5_8CA5-EA-11L_Edition3 Page179
Friday, June 22 2012 3:45 PM
Form No.8CA5-EA-11L
Page 194 of 488

Black plate (194,1)
To increase speed using accelerator
pedal
Depress the accelerator pedal to accelerate
to the desired speed. Press the SET
or
SET - switch and release it immediately.
NOTE
Accelerate if you want to speed up temporarily
when the cruise control is on. Greater speed
will not interfere with or change the set speed.
Take your foot off the accelerator to return to
the set speed.
qTo Decrease Cruising Speed
Press the SET - switch and hold it. The
vehicle will gradually slow.
Release the switch at the speed you want.
Press the SET- switch and release it
immediately to adjust the preset speed.
Multiple operations will decrease the
preset speed according to the number of
times it is operated.
Decreasing speed with a single SET-
operation
Meter display for vehicle speed indicated
in km/h: 1 km/h (0.6 mph)
Meter display for vehicle speed indicated
in mph: 1 mph (1.6 km/h)
qTo Resume Cruising Speed at
More Than 25 km/h (16 mph)
If some other method besides the OFF
switch was used to cancel cruising speed
(such as applying the brake pedal) and the
system is still activated, the most recent
set speed will automatically resume when
the RES switch is pressed.
If vehicle speed is below 25 km/h (16
mph), increase the vehicle speed up to 25
km/h (16 mph) or more and press the RES
switch.
qTo Temporarily Cancel
To temporarily cancel the system, use one
of these methods:
lPress the OFF switch.lSlightly depress the brake pedal.lDepress the clutch pedal (Manual
transaxle only).
lPress the CANCEL switch.
If the RESUME switch is pressed when
the vehicle speed is 25 km/h or higher, the
system reverts to the previously set speed.
qTo Deactivate
To deactivate the system, press the OFF
switch.
4-70
When Driving
Cruise Control
CX-5_8CA5-EA-11L_Edition3 Page194
Friday, June 22 2012 3:45 PM
Form No.8CA5-EA-11L
Page 229 of 488

Black plate (229,1)
Multipath noise
Since FM signals can be reflected by
obstructions, it is possible to receive both
the direct signal and the reflected signal at
the same time. This causes a slight delay
in reception and may be heard as a broken
sound or a distortion. This problem may
also be encountered when in close
proximity to the transmitter.
Reflected wave
Direct
Flutter/Skip noise
Signals from an FM transmitter move in
straight lines and become weak in valleys
between tall buildings, mountains, and
other obstacles. When a vehicle passes
through such an area, the reception
conditions may change suddenly, resulting
in annoying noise.
Weak signal noise
In suburban areas, broadcast signals
become weak because of distance from
the transmitter. Reception in such fringe
areas is characterized by sound breakup.
Strong signal noise
This occurs very close to a transmitter
tower. The broadcast signals are
extremely strong, so the result is noise and
sound breakup at the radio receiver.
Station drift noise
When a vehicle reaches the area of two
strong stations broadcasting at similar
frequencies, the original station may be
temporarily lost and the second station
picked up. At this time there will be some
noise from this disturbance.
Station 2
88.3 MHz Station 1
88.1 MHz
Interior Features
Audio System
5-15
CX-5_8CA5-EA-11L_Edition3 Page229
Friday, June 22 2012 3:46 PM
Form No.8CA5-EA-11L
Page 245 of 488

Black plate (245,1)
Folder search (during MP3/WMA/AAC
CD playback)
To change to the previous folder, press the
folder down button (
), or press the
folder up button (
) to advance to the
next folder.
Music scan
During music CD playback
This function scans the titles on a CD and
plays 10 seconds of each song to aid you
in finding a song you want to listen to.
Press the scan button (
) during
playback to start the scan play operation
(the track number will flash). Press the
scan button (
) again to cancel scan
playback.
During MP3/WMA/AAC CD playback
This function scans the titles in a folder
currently being played and plays 10
seconds of each song to aid you in finding
a song you want to listen to. Press the
scan button (
) during playback to
start the scan play operation (the track
number will flash).
Press the scan button (
) again to
cancel scan playback.
NOTE
If the unit is left in scan, normal playback will
resume where scan was selected.
Repeat playback
During music CD playback
Press the repeat button (1) during
playback to repeat the playback of the
current song.“TRACK RPT”is displayed
during playback.
Press the repeat button (1) while
displaying the“TRACK RPT”to cancel.During MP3/WMA/AAC CD playback
(Track repeat)
Press the repeat button (1) during
playback to repeat the playback of the
current song.“TRACK RPT”is displayed
during playback.
Press the repeat button (1) two times
while displaying the“TRACK RPT”to
cancel.
(Folder repeat)
Press the repeat button (1) two times
during playback to repeat the playback of
the current song in the folder.“FOLDER
RPT”is displayed during playback.
Press the repeat button (1) while
displaying“FOLDER RPT”to cancel.
Random playback
During music CD playback
Press the random button (2) during
playback to play the tracks in the CD
randomly.“DISC RDM”is displayed
during playback.
Press the random button (2) while
displaying“DISC RDM”to cancel.
During MP3/WMA/AAC CD playback
(Folder random)
Press the random button (2) during
playback to play the tracks in the folder
randomly.“FOLDER RDM”is displayed
during playback.
Press the random button (2) two times
while displaying“FOLDER RDM”to
cancel.
Interior Features
Audio System
5-31
CX-5_8CA5-EA-11L_Edition3 Page245
Friday, June 22 2012 3:46 PM
Form No.8CA5-EA-11L
Page 250 of 488

Black plate (250,1)
qPower/Volume/Display/Sound Controls
Setup button
Audio control dial Audio button
Phone button
Navigation button
Power/Volume dial
Power ON/OFF
Switch the ignition to ACC or ON.
Press the power/volume dial to turn the
audio system on. Press the power/volume
dial again to turn the audio system off.
Volume adjustment
To adjust the volume, turn the power/
volume dial.
Turn the power/volume dial to the right to
increase volume, to the left to decrease it.
Display setting
Press the setup button (
) to display
the display setting screen.
Touch the
on-screen tab to select
the item you would like to change.
Brightness adjustment
: Increase brightness
: Decrease brightness
Contrast adjustment
: Higher contrast
: Lower contrastTint adjustment
*1
: Green tint enhancement color
: Red tint enhancement color
*1 Adjustment can be performed only
while in the rear view camera mode.
Color adjustment
*1
: To deepen a color
: To fade a color
*1 Adjustment can be performed only
while in the rear view camera mode.
Daytime/nighttime screen setting
The daytime or nighttime screen can be
selected even if the headlights are
illuminated or turned off (when bright
screen is required at night or dark screen
is required at noon).
: Daytime screen setting
: Nighttime screen setting
: Switches screen automatically
according to headlight illumination
condition
Display OFF
The display can be turned off. Touch the
on-screen button to turn the
display off.
5-36
Interior Features
Audio System
CX-5_8CA5-EA-11L_Edition3 Page250
Friday, June 22 2012 3:46 PM
Form No.8CA5-EA-11L
Page 256 of 488

Black plate (256,1)
Ex.)
89.3 is currently being received. With
Rock selected as the Genre, the radio
stations broadcasting Rock are at the
following frequencies.
98.3
*1, 98.7, 104.3*1, 107.1
*1 Radio stations with good reception
The frequency changes as follows each
time the Genre Seek on-screen button is
pressed.
89.3→98.3→104.3→98.3
NOTE
lOnly one Genre can be selected.lTouch theon-screen button to
return to the FM1 or FM2 main screen.
lIt may not be possible to receive any station
even if the Genre Seek function is used.
lIf a program in the selected genre is not
broadcast to a region, reception is not
possible even if the Genre Seek function is
used.
lThe Genre Seek function searches for genre
code (program type) which FM analog
broadcasts transmit.
specialty
programs (HD2-HD8) cannot be searched
because they are not FM analog
broadcasts.
lIf radio stations which are selected by
scanning using the Genre Seek function are
broadcasting stations, they are
changed from analog broadcasts to
broadcasts after a few seconds
if the reception conditions are good. The
genre is displayed after the switch,
however, the genre for FM analog
broadcasts may differ.
HD Radioí
What is HD Radio™Technology and
how does it work?
HD Radio™Technology is the digital
evolution of analog AM/FM radio. Your
radio product has a special receiver which
allows it to receive digital broadcasts
(where available) in addition to the analog
broadcasts it already receives. Digital
broadcasts have better sound quality than
analog broadcasts as digital broadcasts
provide free, crystal clear audio. For more
information, and a guide to available radio
stations and programming, please visit
www.hdradio.com.
Benefits of HD Radio™Technology
(Information)
The song title, artist name and genre will
appear on the screen when available by
the radio station.
(Multicast)
On the FM radio frequency most digital
stations have“multiple”or supplemental
programs on each FM station.
Listening to HD Radio™Technology
If
turns on by selecting a radio
station which is an
broadcasting station, the analog broadcast
is switched to an
broadcast
automatically after a few seconds and then
received. For FM,
, and for AM,
is displayed, and theilluminates
in orange.
If the HD Radio broadcast is stopped and
changed to an analog broadcast, press
down
to turn off.
Multicast channel selection (FM)
Press
on-screen button to
switch to the multi-cast channel for the
displayed number.
5-42
Interior Features
íSome models.
Audio System
CX-5_8CA5-EA-11L_Edition3 Page256
Friday, June 22 2012 3:46 PM
Form No.8CA5-EA-11L
Page 259 of 488

Black plate (259,1)
Displaying the SIRIUS ID (ESN)
Turn the manual tuning dial and select
channel 0 to display the twelve-digit
Electronic Serial Number (ESN) for the
SIRIUS tuner.
SIRIUS operation
All operations of the satellite radio are
conducted by means of the audio unit.
SIRIUS radio mode selection
Touch the
on-screen tab on the
audio screen to receive the previously
received SIRIUS channel.
Every time the
on-screen tab is
touched, the bank changes in the order
shown below.
SIRIUS1 SIRIUS2 SIRIUS3
NOTElSIRIUS1, SIRIUS2 and SIRIUS3: six
stations can be stored in each bank for
convenient access to your favorite stations.
lis displayed when SIRIUS1 is
selected,
is displayed when
SIRIUS2 is selected, and
is
displayed when SIRIUS3 is selected.
Operation in the initial state
It may take some time to start up the
equipment when it is in the initial state,
when there is a change in the user's
subscription condition, when the firmware
is updated or when the SIRIUS channel
map is changed.
“Updating Channels XXX %”is
displayed when the SIRIUS channel map
is changed.If the user contract content is changed,
“Subscription Updated”is displayed.
When the firmware is updated, the
“Updating Receiver”is displayed.
Updating could take as long as a few
minutes depending on the geographical
area. When the unit is in an initialized
state, channel 184 is displayed after the
display indicates“Updating Receiver”.
NOTE
Do not perform the following operation while
“Updating Channels XXX %”,“Updating
Receiver”is displayed. Otherwise, the
updating procedure will be canceled.
lTurning off the audio powerlSwitching to other modeslSwitching the ignition off
When the SIRIUS mode is switched to
another mode, or when the power is
turned off, the present channel which is
being received is stored as the last
channel.
Channel up
Turn the manual tuning dial to the right or
press the seek up button (
).
Channel down
Turn the manual tuning dial to the left or
press the seek down button (
).
NOTE
The channel is continuously switched to the
next or previous channel while the seek tuning
button (
,) is continuously pressed.
Unsubscribed channel
When a channel which has been preset
becomes unsubscribed or the current
channel being listened to becomes
unsubscribed, the following is displayed:
“Call 888-539-SIRIUS”
“to subscribe”
Interior Features
Audio System
5-45
CX-5_8CA5-EA-11L_Edition3 Page259
Friday, June 22 2012 3:46 PM
Form No.8CA5-EA-11L