ignition MAZDA MODEL CX-5 2013 Smart Start Guide (in English)
[x] Cancel search | Manufacturer: MAZDA, Model Year: 2013, Model line: MODEL CX-5, Model: MAZDA MODEL CX-5 2013Pages: 20, PDF Size: 5.61 MB
Page 2 of 20
2
www.MazdaUSA.com
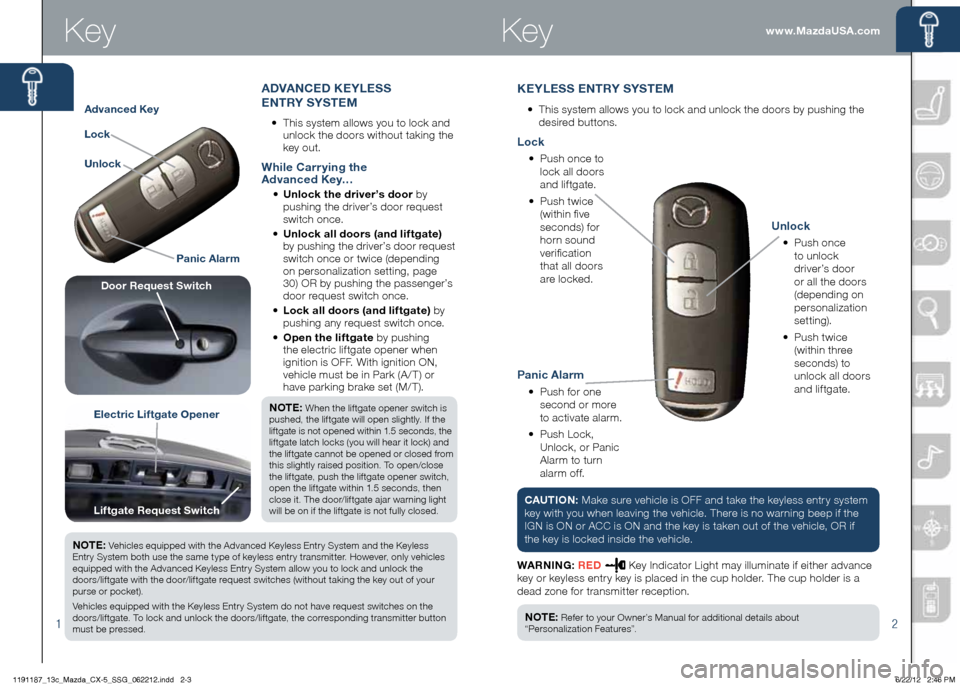
KEYLESS ENTRY SYSTEM
•
This system allows you to lock and unlock the doors by pushing the
desired buttons.
1
Key
Advanced Key
Electric Liftgate Opener
Lock
Unlock Panic Alarm
ADVANCED KEYLESS
ENTRY SYSTEM
• This system allows you to lock and
unlock the doors without taking the
key out.
While Carrying the
Advanced Key…
•
Unlock the driver’s door by
pushing the driver’s door request
switch once.
•
Unlock all doors (and liftgate)
by pushing the driver’s door request
switch once or twice (depending
on personalization setting, page
30) OR by pushing the passenger’s
door request switch once.
•
Lock all doors (and liftgate) by
pushing any request switch once.
•
Open the liftgate by pushing
the electric liftgate opener when
ignition is OFF. With ignition ON,
vehicle must be in Park (A / T) or
have parking brake set (M/ T).
NOTE:
When the liftgate opener switch is
pushed, the liftgate will open slightly. If the
liftgate is not opened within 1.5 seconds, the
liftgate latch locks (you will hear it lock) and
the liftgate cannot be opened or closed from
this slightly raised position. To open/close
the liftgate, push the liftgate opener switch,
open the liftgate within 1.5 seconds, then
close it. The door/liftgate ajar warning light
will be on if the liftgate is not fully closed.
Door Request Switch
Liftgate Request Switch
Unlock
• P u s h o n c e
to unlock
driver’s door
or all the doors
(depending on
personalization
setting).
• Push twice
(within three
seconds) to
unlock all doors
and liftgate.
Panic Alarm
•
Push for one
second or more
to activate alarm.
• Push Lock,
Unlock, or Panic
Alarm to turn
alarm off.
Lock
•
Push once to
lock all doors
and liftgate.
•
Push twice
(within five
seconds) for
horn sound
verification
that all doors
are locked.
NOTE:
Vehicles equipped with the Advanced Keyless Entry System and the Keyless
Entry System both use the same type of keyless entry transmitter. However, only vehicles
equipped with the Advanced Keyless Entry System allow you to lock and unlock the
doors/liftgate with the door/liftgate request switches (without taking the key out of your
purse or pocket).
Vehicles equipped with the Keyless Entry System do not have request switches on the
doors/liftgate. To lock and unlock the doors/liftgate, the corresponding transmitter button
must be pressed.
NOTE: Refer to your Owner’s Manual for additional details about
“Personalization Features”.
CAUTION: Make sure vehicle is OFF and take the keyless entry system
key with you when leaving the vehicle. There is no warning beep if the
IGN is ON or ACC is ON and the key is taken out of the vehicle, OR if
the key is locked inside the vehicle.
WARNING: RED
Key Indicator Light may illuminate if either advance
key or keyless entry key is placed in the cup holder. The cup holder is a
dead zone for transmitter reception.
Key
1191187_13c_Mazda_CX-5_SSG_062212.indd 2-36/22/12 2:46 PM
Page 3 of 20
ACCELERATED WARM-UP SYSTEM (AWS)
Vehicle Starting:
Your vehicle is equipped with SKYACTIV combustion technology. This
technology includes AWS (Accelerated Warm-up System) for optimal
emission performance during cold starting conditions.
Cold Start (First start of the day on cold mornings):
Depress the brake (Automatic Trans.) or clutch (Manual Trans.), when the
key indicator light turns green
press the START/STOP button.
What you will notice: On start-up, the engine speed and sound are
higher (1500 RPM) for 30 seconds to 1 minute to quickly bring the catalyst
to efficient operating temperature. The RPM will reduce to idle once the
temperature is achieved. This is normal engine operation under cold
start conditions.
NOTE:
You can drive the vehicle during AWS activation, no need to wait.
Normal Start (Emission components within optimal
temperature range):
Depress the brake (Automatic Trans.) or clutch (Manual Trans.), when the
key indicator light turns green
press the START/STOP button.
4
www.MazdaUSA.com
3
Key
STARTING THE ENGINE
While Car rying the Key…
• Start the engine by pushing the START/STOP button, while
pushing the clutch pedal (manual transmission) or the brake pedal
(automatic transmission).
• Shut the engine OFF by placing the vehicle in Park, then push the
S TA R T/ S TO P b u t t o n .
• Activate Accessories (ACC) by pushing the START/STOP button
once without pushing the clutch or brake pedal.
• To turn the ignition to the ON position, push the START/STOP
button twice without pushing the clutch or brake pedal.
The key indicator light
in the instrument cluster will show GREEN (engine ready to start) when the key is detected and the clutch pedal (M/ T)
or the brake pedal (A / T) is pushed. If the KEY warning light illuminates
RED , or the START/STOP button indicator light flashes AMbER , this
could indicate a problem with the engine starting system and the inability
to start the engine or switch the ignition to ACC or ON. Have your vehicle
inspecte d at an Authorized Mazda Dealer as soon as possible.
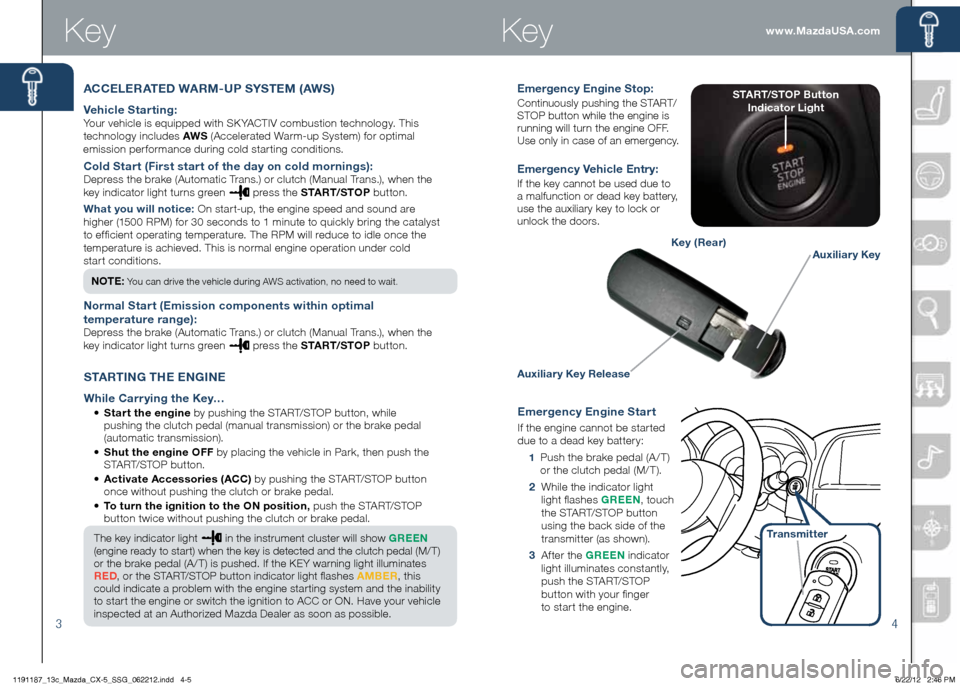
Emergency Engine Start
If the engine cannot be started
due to a dead key battery:
1 Push the brake pedal (A / T)
or the clutch pedal (M/ T).
2 While the indicator light
light flashes GREEN , touch
the START/STOP button
using the back side of the
transmitter (as shown).
3 After the GREEN indicator
light illuminates constantly,
push the START/STOP
button with your finger
to start the engine.
Transmitter
Emergency Engine Stop:
Continuously pushing the START/
STOP button while the engine is
running will turn the engine OFF.
Use only in case of an emergency.
Emergency Vehicle Entry:
If the key cannot be used due to
a malfunction or dead key battery,
use the auxiliary key to lock or
unlock the doors.
Auxiliary Key Release
Auxiliary KeyKey (Rear)
START/STOP b utton
Indicator Light
Key
1191187_13c_Mazda_CX-5_SSG_062212.indd 4-56/22/12 2:46 PM
Page 4 of 20
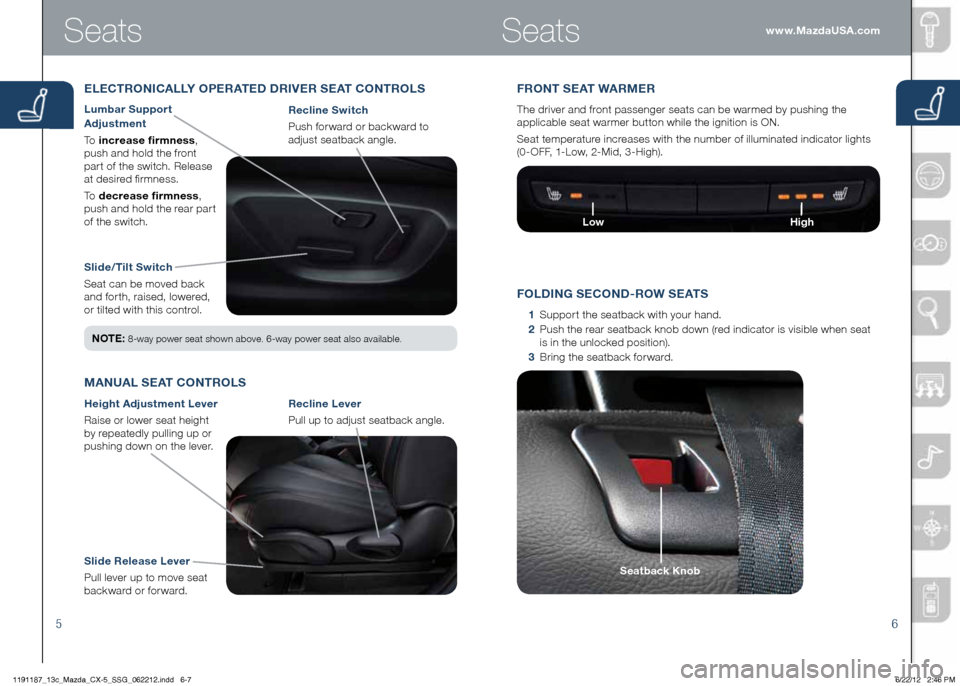
56
Slide/Tilt Switch
Seat can be moved back
and forth, raised, lowered,
or tilted with this control. Recline Switch
Push forward or backward to
adjust seatback angle.
ELECTRONICALLY OPERATED DRIVER SEAT CONTROLSFRONT S EAT WARMER
The driver and front passenger seats can be warmed by pushing the
applicable seat warmer button while the ignition is ON.
Seat temperature increases with the number of illuminated indicator lights
(0-OFF, 1-Low, 2-Mid, 3-High).
www.MazdaUSA.com
Lumbar Support
Adjustment
To increase firmness ,
push and hold the front
part of the switch. Release
at desired firmness.
To decrease firmness ,
push and hold the rear part
of the switch.
Slide Release Lever
Pull lever up to move seat
backward or forward. Recline Lever
Pull up to adjust seatback angle.
MANUAL SEAT CONTROLS
Height Adjustment Lever
Raise or lower seat height
by repeatedly pulling up or
pushing down on the lever.
Seats
NOTE: 8-way power seat shown above. 6-way power seat also available.
Seatback Knob
FOLDING SECOND-ROW SEATS
1 Support the seatback with your hand.
2
Push the rear seatback knob down (red indicator is visible when seat
is in the unlocked position).
3 Bring the seatback forward. Low
High
Seats
1191187_13c_Mazda_CX-5_SSG_062212.indd 6-76/22/12 2:46 PM
Page 5 of 20
GENUINE MAzDA ACCESSORIES
Genuine Mazda Accessories are built to the same standards of quality as
your Mazda. That means they fit right, work right, and look great. Choose
from a wide range of interior and exterior accessories to make your Mazda
CX-5 fit your personality and lifestyle. After all, you are what you drive.
Personalize your CX-5 with the following Genuine Mazda Accessories:
• 3.5 mm Audio Cable
• All Weather Floor Mats
• Auto-Dimming
Rearview Mirror
with Compass
and HomeLink
®
• Bike Carrier,
Hitch Mount
• Bluetooth Car Kit
by Motorola
• Cargo Liner
• Cargo Mat
• Cargo Net
• Cargo Tray
• Carpet Floor Mats
• Door Edge Protection
• First Aid Kit
• Fog Lights• Front Mask
• Front Paint Protection
• Hood Edge Protector
• License Plate Frames –
CX-5 and zoom-zoom
• Moonroof
Wind Deflector
• Navigation System
• Rear Bumper Guard
• Rear Bumper
Protection
• Rear Parking Sensors
• Remote Engine Start
• Retractable
Cargo Cover
• Roadside
Assistance Kit • Roof Rack
and Attachments
Cargo Box
Kayak Carrier
Surfboard Carrier
Luggage Basket
Bike Carrier
Ski/Snowboard
Carrier
• Side Window
Deflectors
• SiriusXM
®
• Splash Guards
• Touch Up Paint
• Trailer Hitch
• Wheel Locks
• Windshield Sunscreen
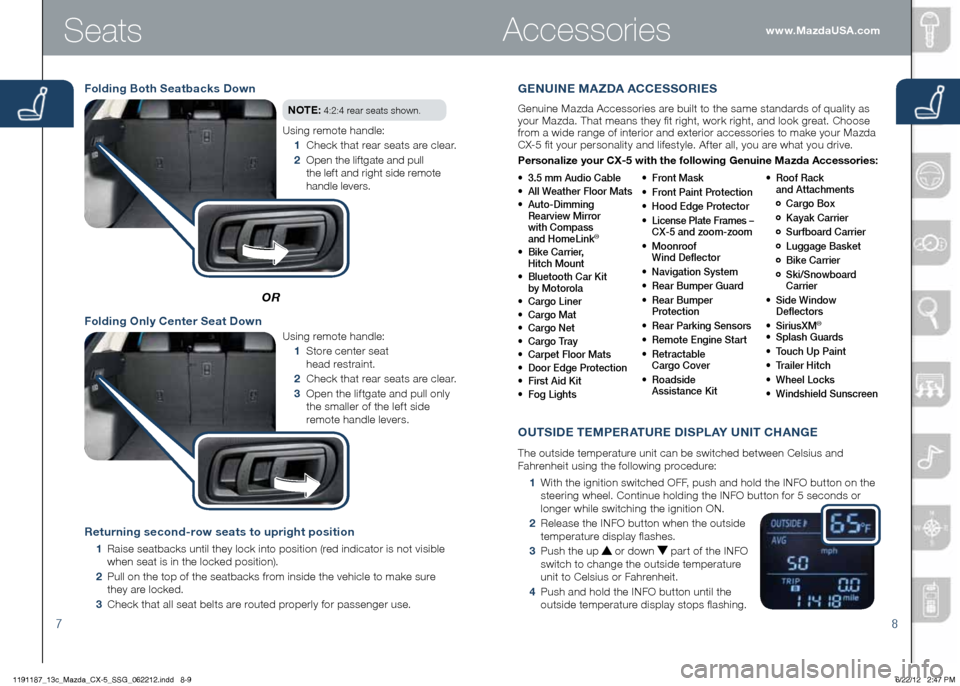
Folding b oth Seatbacks Down
OR
Returning second-row seats to upright position
1 Raise seatbacks until they lock into position (red indicator is not visible
when seat is in the locked position).
2 Pull on the top of the seatbacks from inside the vehicle to make sure
they are locked.
3 Check that all seat belts are routed properly for passenger use.
Folding Only Center Seat Down
NOTE: 4:2:4 rear seats shown.
Using remote handle:
1 Check that rear seats are clear.
2
Open the liftgate and pull
the left and right side remote
handle levers.
Using remote handle:
1 Store center seat
head restraint.
2 Check that rear seats are clear.
3 Open the liftgate and pull only
the smaller of the left side
remote handle levers.
7 8
www.MazdaUSA.comSeats
OUTSIDE TEMPERATURE DISPLAY UNIT CHANGE
The outside temperature unit can be switched between Celsius and
Fahrenheit using the following procedure:
1 With the ignition switched OFF, push and hold the INFO button on the
steering wheel. Continue holding the INFO button for 5 seconds or
longer while switching the ignition ON.
2
Release the INFO button when the outside
temperature display flashes.
3
Push the up
or down part of the INFO
switch to change the outside temperature
unit to Celsius or Fahrenheit.
4
Push and hold the INFO button until the
outside temperature display stops flashing.
Accessories
1191187_13c_Mazda_CX-5_SSG_062212.indd 8-96/22/12 2:47 PM
Page 8 of 20
Lights
14
www.MazdaUSA.com
13
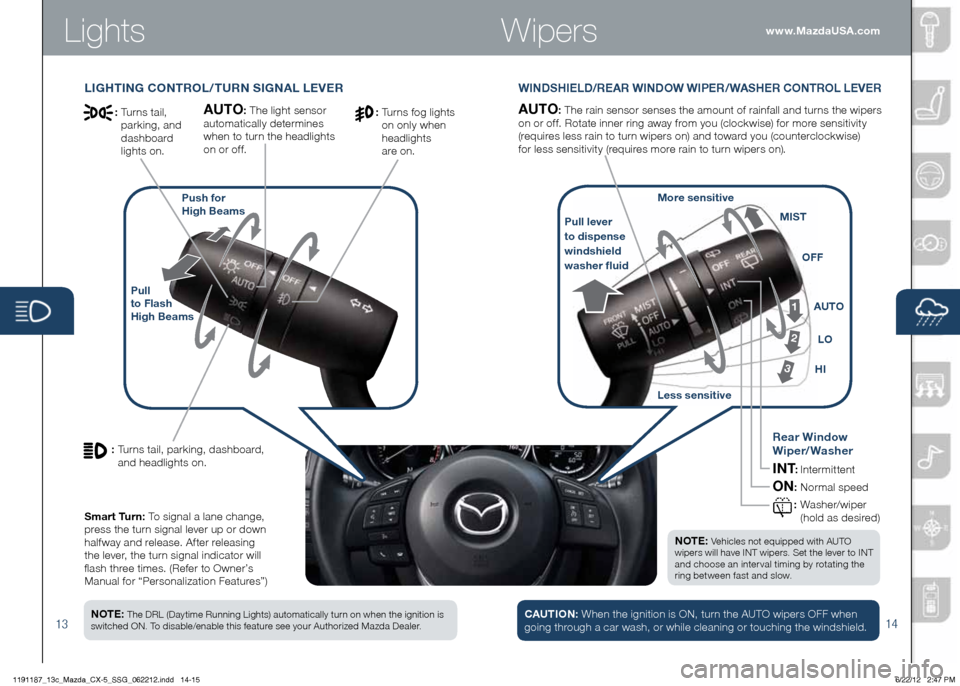
WINDSHIELD/REAR WINDOW WIPER/WASHER CONTROL LEVER
AUTO: The rain sensor senses the amount of rainfall and turns the wipers
on or off. Rotate inne r ring away from you (clockwise) for more sensitivity
(requires less rain to turn wipers on) and toward you (counterclockwise)
for less sensitivity (requires more rain to turn wipers on).
CAUTION: When the ignition is ON, turn the AUTO wipers OFF when
going through a car wash, or while cleaning or touching the windshield.
NOTE: Vehicles not equipped with AUTO
wipers will have INT wipers. Set the lever to INT
and choose an interval timing by rotating the
ring between fast and slow.
LIGHTING CONTROL/TURN SIGNAL LEVER
: Turns tail, parking, dashboard,
and headlights on.
: Turns tail,
parking, and
dashboard
lights on.
Pull lever
to dispense
windshield
washer fluid
Less sensitive More sensitive
1
2
3HILO
AUTO
OFF
MIST
Pull
to Flash
High beams Push for
High b eams
Rear Window
Wiper/Washer
INT: Intermittent
ON: Normal speed
: Washer/wip er
(hold as desired)
NOTE: The DRL (Daytime Running Lights) automatically turn on when the ignition is
switched ON. To disable/enable this feature see your Authorized Mazda Dealer.
AUTO: The light sensor
automatically determines
when to turn the headlights
on or off.: Turns fog lights
on only when
headlights
are on.
Smart Turn: To signal a lane change,
press the turn signal lever up or down
halfway and release. After releasing
the lever, the turn signal indicator will
flash three times. (Refer to Owner’s
Manual for “Personalization Features”)
Wipers
1191187_13c_Mazda_CX-5_SSG_062212.indd 14-156/22/12 2:47 PM
Page 12 of 20
2122
www.MazdaUSA.comLights
TIRE PRESSURE MONITORING SYSTEM (TPMS)
Your vehicle is equipped with a Tire Pressure Monitoring System (TPMS)
that detects low tire pressure in one or more tires. In the following cases,
the TPMS must be “initialized” so the system can operate normally.
• The tire pressure is adjusted (up or down) in one or more tires.
• A tire rotation is performed.
•
Any tire or wheel is replaced.
•
The vehicle’s battery is disconnected, replaced or completely dead.
Initialization Process (TPMS Warning Light is Illuminated):
1
Park the vehicle in a safe place and firmly apply the parking brake.
2
Let the tires cool, then adjust the tire pressure to the specified
pressure (Refer to your Owner’s Manual for correct tire pressure) on
all four (4) tires.
3
Switch the ignition ON, but leave the vehicle parked.
4
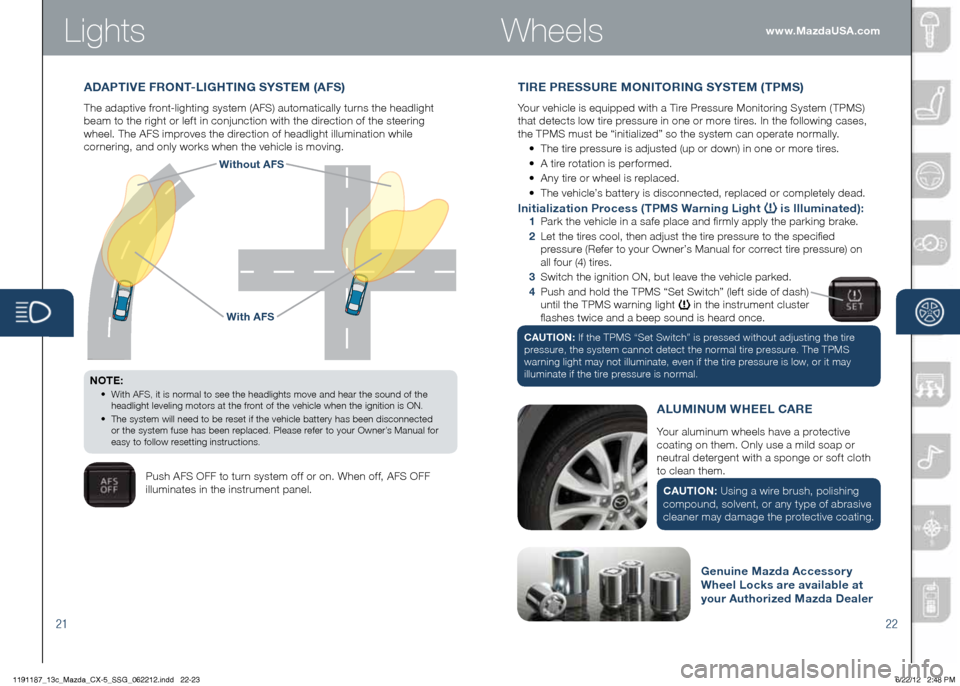
Push and hold the TPMS “Set Switch” (left side of dash)
until the TPMS warning light
in the instrument cluster
flashes twice and a beep sound is heard once.
CAUTION: If the TPMS “Set Switch” is pressed without adjusting the tire
pressure, the system cannot detect the normal tire pressure. The TPMS
warning light may not illuminate, even if the tire pressure is low, or it may
illuminate if the tire pressure is normal.
Wheels
Push AFS OFF to turn system off or on. When off, AFS OFF
illuminates in the instrument panel.
With AFS
Without AFS
Genuine Mazda Accessory
Wheel Locks are available at
your Authorized Mazda Dealer
Your aluminum wheels have a protective
coating on them. Only use a mild soap or
neutral detergent with a sponge or soft cloth
to clean them.
CAUTION: Using a wire brush, polishing
compound, solvent, or any type of abrasive
cleaner may damage the protective coating.
ALUMINUM WHEEL CARE
A DAPTIVE FRONT-LIGHTING SYSTEM (AFS)
The adaptive front-lighting system (AFS) automatically turns the headlight
beam to the right or left in conjunction with the direction of the steering
wheel. The AFS improves the direction of headlight illumination while
cornering, and only works when the vehicle is moving.
NOTE:
•
With AFS, it is normal to see the headlights move and hear the sound of the
headlight leveling motors at the front of the vehicle when the ignition is ON.
•
The system will need to be reset if the vehicle battery has been disconnected
or the system fuse has been replaced. Please refer to your Owner’s Manual for
easy to follow resetting instructions.
1191187_13c_Mazda_CX-5_SSG_062212.indd 22-236/22/12 2:48 PM
Page 17 of 20
3132
Navigation System
3 T o u c h Navigate to .
4 T o u c h Address .
NOTE:
You can change the country or state setting by touching the flag before
you select a city.
5 Enter the town or city name.
6 Enter the street name.
7 Enter the house number, then touch Done .
8
The location is shown on the map. Touch Select to continue or back
to enter another address.
9 When the new route is shown, touch Done .
For more information about the route, touch Details .
P LANNING A ROUTE USING YOUR VOICE
You can navigate to any of the following places using your voice:
• An address, including home .
• Favorites .
•
Cities and towns.
•
POI (Point of Interest) categories. •
POIs for named brands of,
for example, restaurants, gas
stations, car rental and gyms.
•
A recent destination.
To plan a route to an address using your voice, do the following:
NOTE:
Planning a route using your voice can be done while driving the vehicle.
1
Touch the voice control button in the Driving view.
2
When you hear the tone, you can say, for example “Drive to
an address”.
3
Say the full address for your destination, for example “123 Main St.,
Los Angeles, California”.
NOTE:
For best results, say the full address without pausing.
4
Say “Yes” if the address is correct. If shown a list of addresses, say
the list number for the correct address or say “none of these”.
N AVIGATION SYSTEM FEATURES :
•
While driving your vehicle, you can enter a destination address
using your voice, but you cannot enter a destination address using
the keyboard.
•
While driving your vehicle, the vehicle speed and the maximum
speed limit (for most roads) can be seen on the bottom left tabs of
the Navigation screen.
NOTE:
•
Voice guidance can be skipped by pressing the talk button.
•
Refer to the Navigation System Owners Manual for additional navigation
system details.
www.MazdaUSA.com
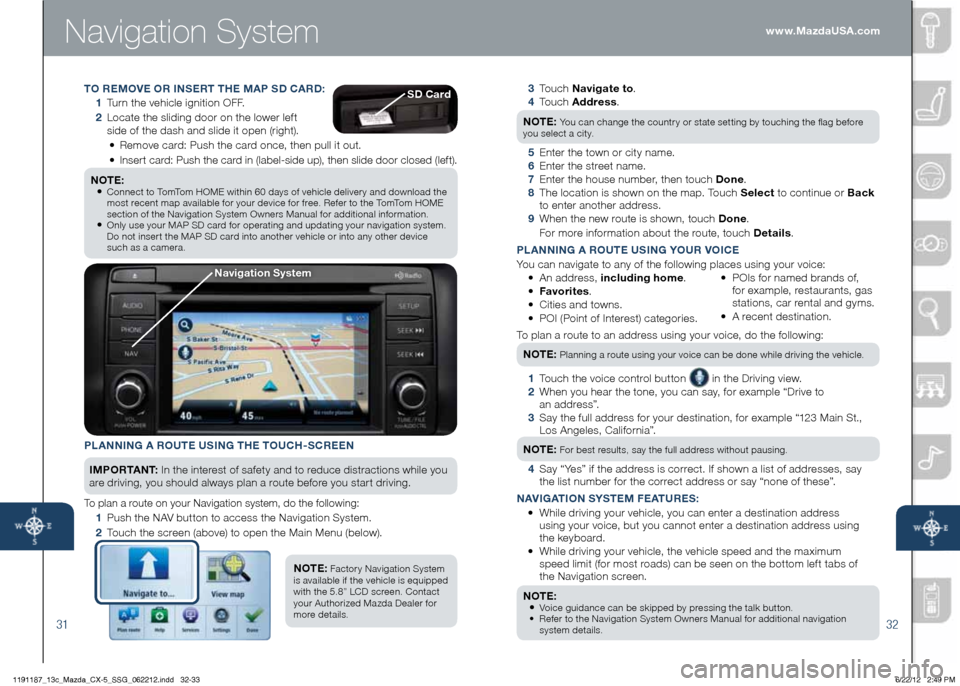
PLANNING A ROUTE USING THE TOUCH-SCREEN
IM P O R TA N T : In the interest of safety and to reduce distractions while you
are driving, you should always plan a route before you start driving.
To plan a route on your Navigation system, do the following:
1
Push the NAV button to access the Navigation System.
2
Touch the screen (above) to open the Main Menu (below).
NOTE:
Fact ory Navigation System
is available if the vehicle is equipped
with the 5.8” LCD screen. Contact
your Authorized Mazda Dealer for
more details.
Navigation System
TO REMOVE OR INSERT THE MAP SD CARD:
1
Turn the vehicle ignition OFF.
2
Locate the sliding door on the lower left
side of the dash and slide it open (right).
•
Remove card: Push the card once, then pull it out.
•
Insert card: Push the card in (label-side up), then slide door closed (left).
NOTE:
•
Connect to TomTom HOME within 60 days of vehicle delivery and download the
most recent map available for your device for free. Refer to the TomTom HOME
section of the Navigation System Owners Manual for additional information.
• Only use your MAP SD card for operating and updating your navigation system.
Do not insert the MAP SD card into another vehicle or into any other device
such as a camera.
SD Card
1191187_13c_Mazda_CX-5_SSG_062212.indd 32-336/22/12 2:49 PM