change MAZDA MODEL CX-9 2010 (in English) Manual Online
[x] Cancel search | Manufacturer: MAZDA, Model Year: 2010, Model line: MODEL CX-9, Model: MAZDA MODEL CX-9 2010Pages: 592
Page 351 of 592
Black plate (351,1)
qInitial Setting Function
The settings set in the initial setting
function remain after the unit is turned off
or the disc is changed.
The following items can be set in the
initial setting.
Lang: Sound and subtitle setting
Rating: Parental lock setting
Mark: On-Screen Mark, Angle Mark and
Mode Priority settings
Audio: Audio DRC setting
Aspect: Not available
Displaying/selecting the initial setting
function menu
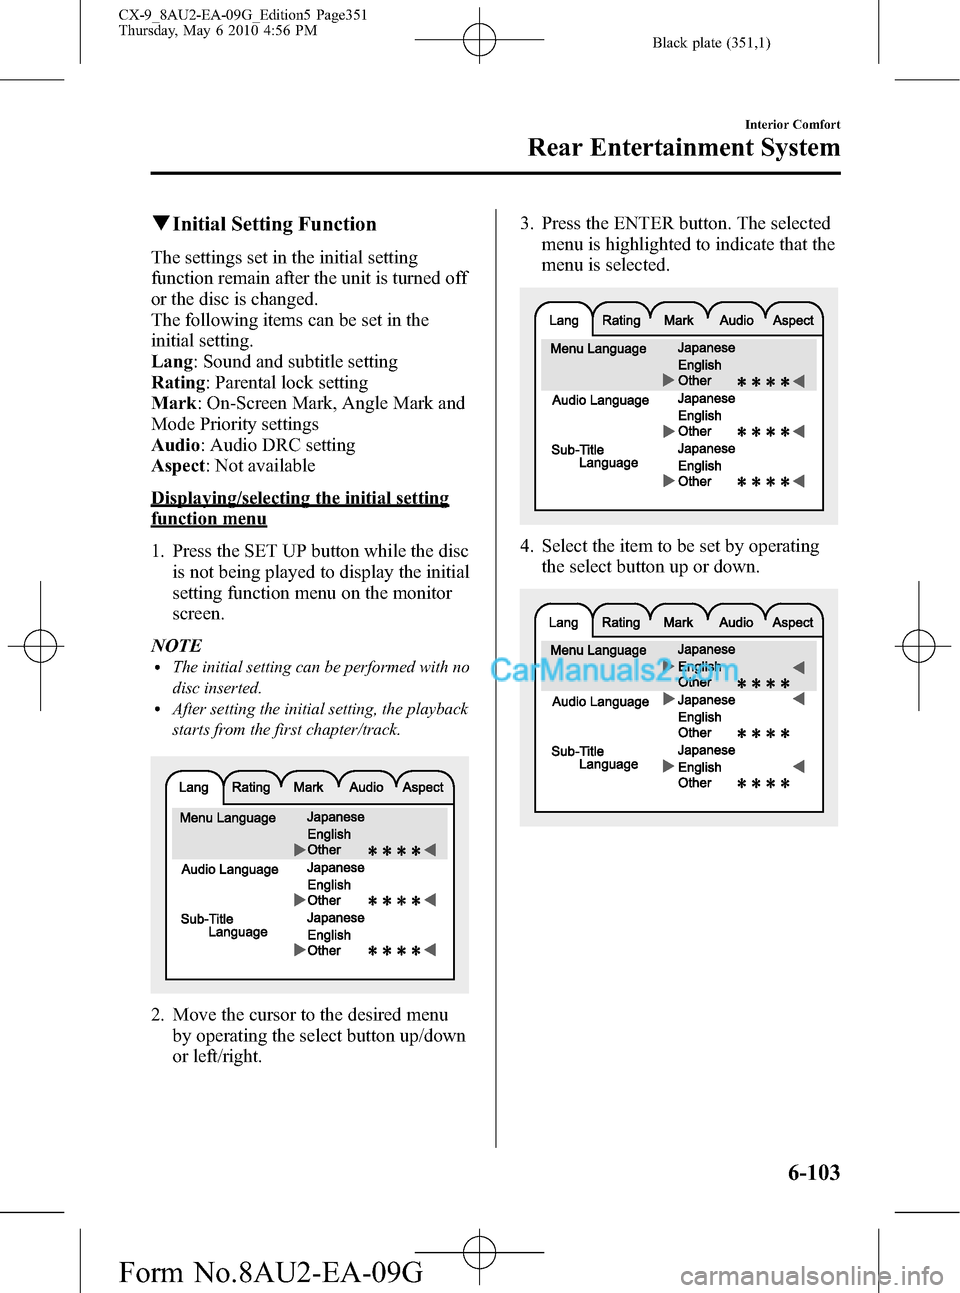
1. Press the SET UP button while the disc
is not being played to display the initial
setting function menu on the monitor
screen.
NOTE
lThe initial setting can be performed with no
disc inserted.
lAfter setting the initial setting, the playback
starts from the first chapter/track.
2. Move the cursor to the desired menu
by operating the select button up/down
or left/right.3. Press the ENTER button. The selected
menu is highlighted to indicate that the
menu is selected.
4. Select the item to be set by operating
the select button up or down.
Interior Comfort
Rear Entertainment System
6-103
CX-9_8AU2-EA-09G_Edition5 Page351
Thursday, May 6 2010 4:56 PM
Form No.8AU2-EA-09G
Page 352 of 592
Black plate (352,1)
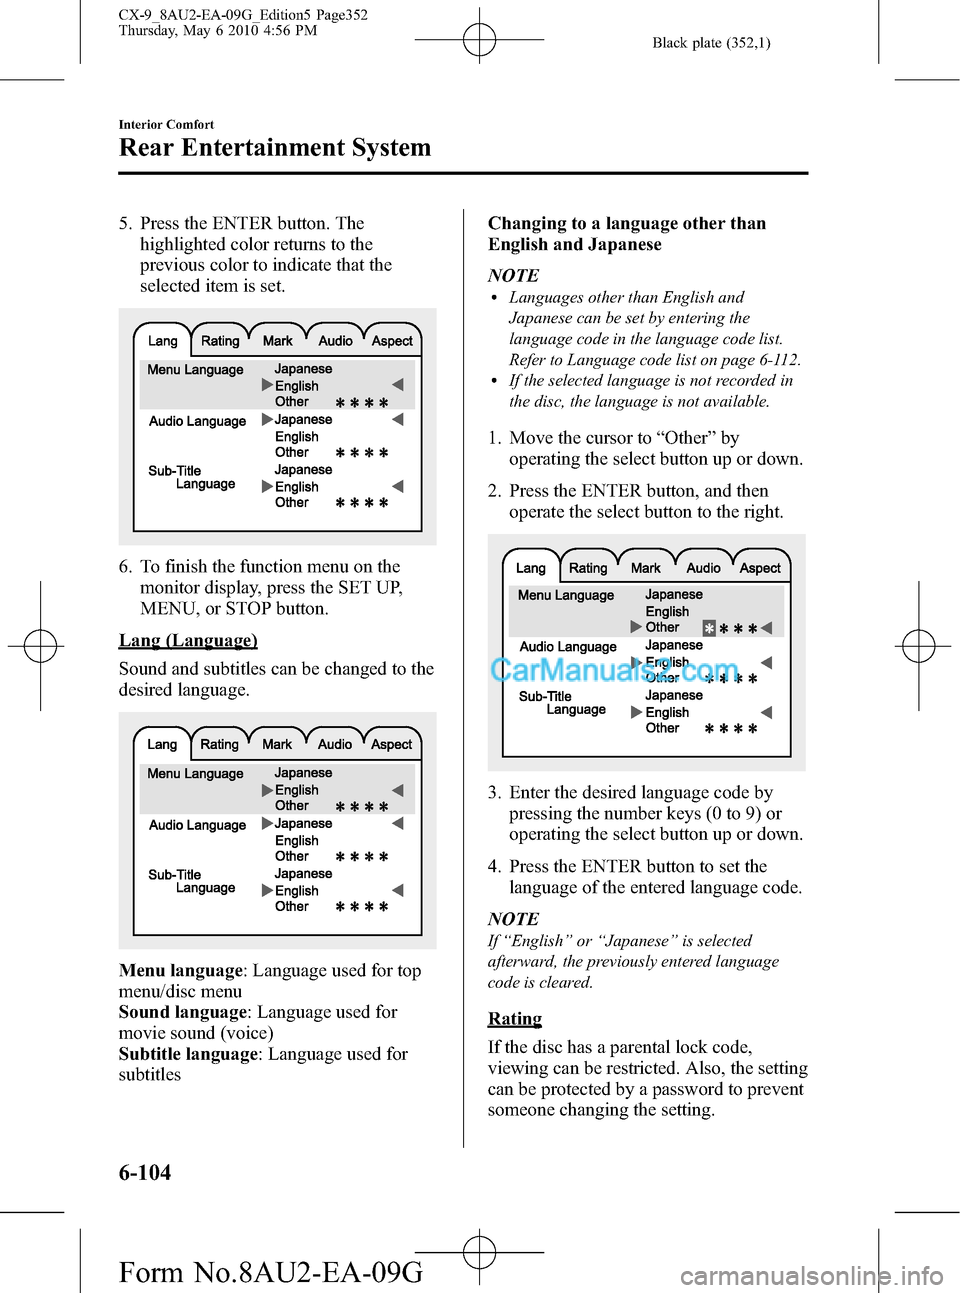
5. Press the ENTER button. The
highlighted color returns to the
previous color to indicate that the
selected item is set.
6. To finish the function menu on the
monitor display, press the SET UP,
MENU, or STOP button.
Lang (Language)
Sound and subtitles can be changed to the
desired language.
Menu language: Language used for top
menu/disc menu
Sound language: Language used for
movie sound (voice)
Subtitle language: Language used for
subtitlesChanging to a language other than
English and Japanese
NOTE
lLanguages other than English and
Japanese can be set by entering the
language code in the language code list.
Refer to Language code list on page 6-112.
lIf the selected language is not recorded in
the disc, the language is not available.
1. Move the cursor to“Other”by
operating the select button up or down.
2. Press the ENTER button, and then
operate the select button to the right.
3. Enter the desired language code by
pressing the number keys (0 to 9) or
operating the select button up or down.
4. Press the ENTER button to set the
language of the entered language code.
NOTE
If“English”or“Japanese”is selected
afterward, the previously entered language
code is cleared.
Rating
If the disc has a parental lock code,
viewing can be restricted. Also, the setting
can be protected by a password to prevent
someone changing the setting.
6-104
Interior Comfort
Rear Entertainment System
CX-9_8AU2-EA-09G_Edition5 Page352
Thursday, May 6 2010 4:56 PM
Form No.8AU2-EA-09G
Page 353 of 592
Black plate (353,1)
Viewing can be restricted by setting the
parent lock level.
For example, if the level is set to 6, level 7
or higher viewing is locked and cannot be
played.
NOTE
lParent lock is not available depending on
the disc.
lThe initial password setting (when
purchased) is“0000”.
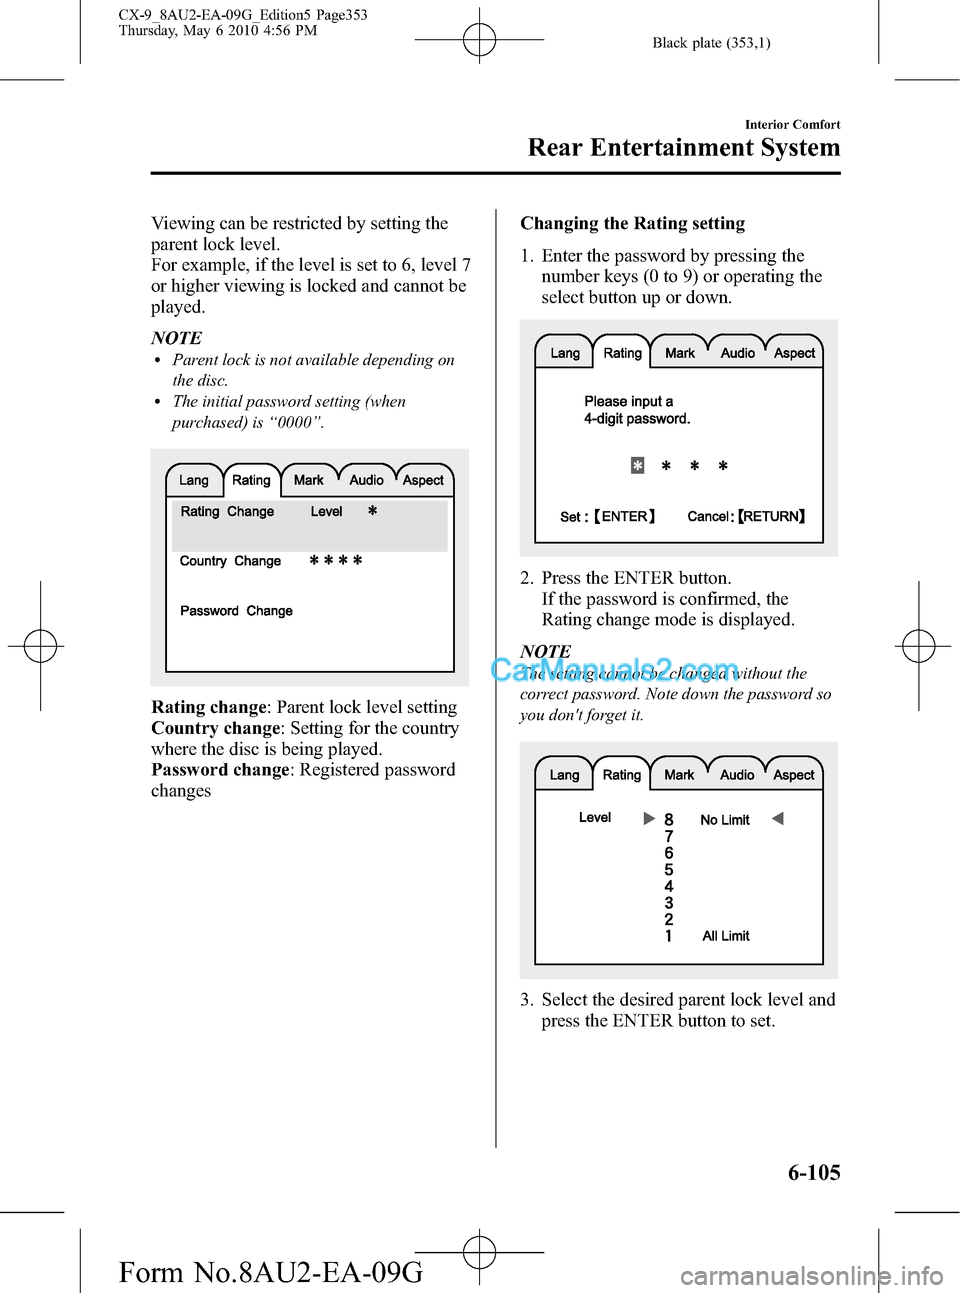
Rating change: Parent lock level setting
Country change: Setting for the country
where the disc is being played.
Password change: Registered password
changesChanging the Rating setting
1. Enter the password by pressing the
number keys (0 to 9) or operating the
select button up or down.
2. Press the ENTER button.
If the password is confirmed, the
Rating change mode is displayed.
NOTE
The setting cannot be changed without the
correct password. Note down the password so
you don't forget it.
3. Select the desired parent lock level and
press the ENTER button to set.
Interior Comfort
Rear Entertainment System
6-105
CX-9_8AU2-EA-09G_Edition5 Page353
Thursday, May 6 2010 4:56 PM
Form No.8AU2-EA-09G
Page 354 of 592
Black plate (354,1)
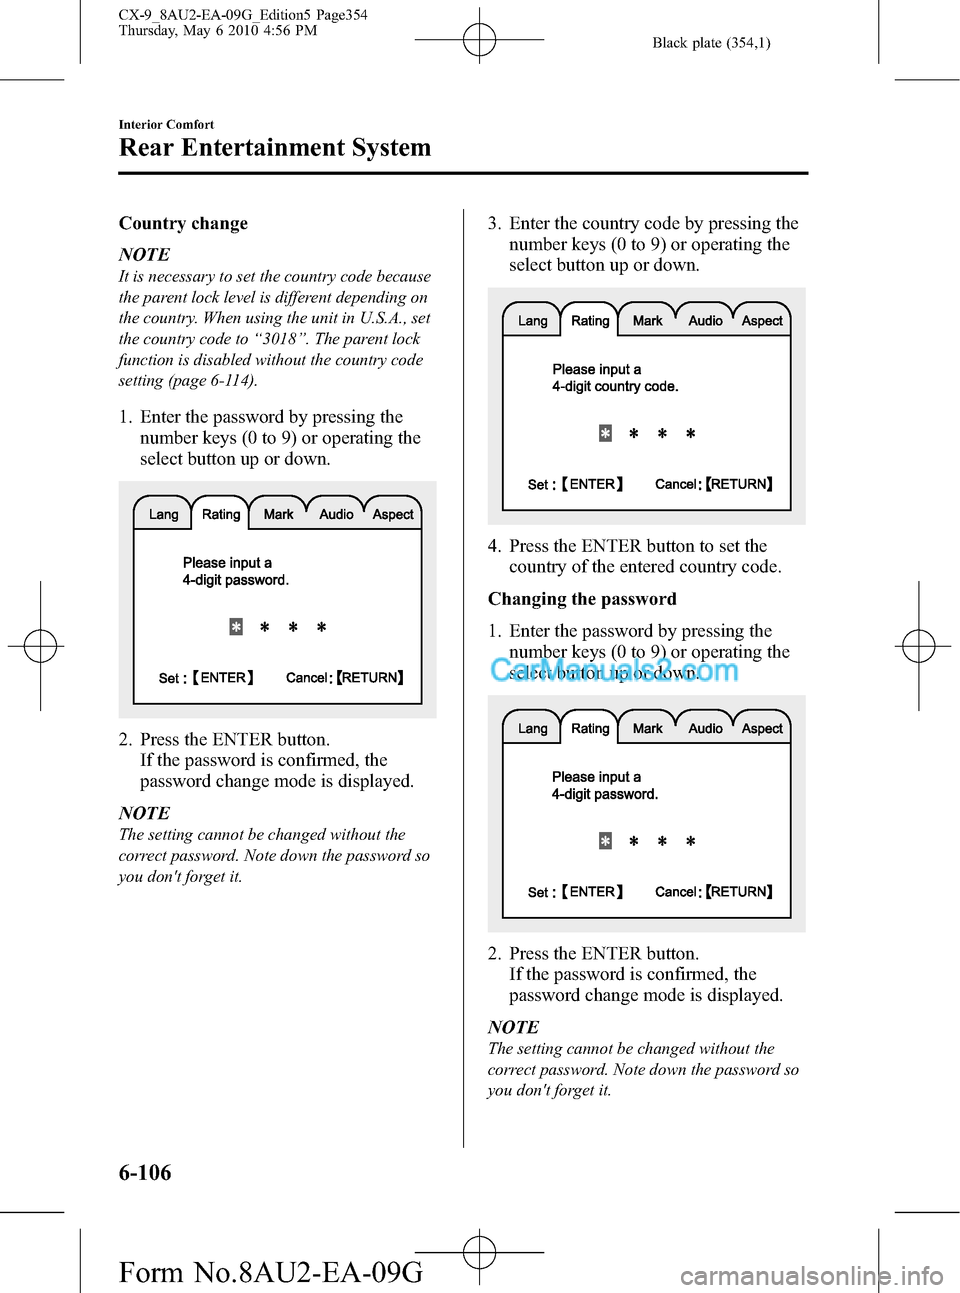
Country change
NOTE
It is necessary to set the country code because
the parent lock level is different depending on
the country. When using the unit in U.S.A., set
the country code to“3018”. The parent lock
function is disabled without the country code
setting (page 6-114).
1. Enter the password by pressing the
number keys (0 to 9) or operating the
select button up or down.
2. Press the ENTER button.
If the password is confirmed, the
password change mode is displayed.
NOTE
The setting cannot be changed without the
correct password. Note down the password so
you don't forget it.
3. Enter the country code by pressing the
number keys (0 to 9) or operating the
select button up or down.
4. Press the ENTER button to set the
country of the entered country code.
Changing the password
1. Enter the password by pressing the
number keys (0 to 9) or operating the
select button up or down.
2. Press the ENTER button.
If the password is confirmed, the
password change mode is displayed.
NOTE
The setting cannot be changed without the
correct password. Note down the password so
you don't forget it.
6-106
Interior Comfort
Rear Entertainment System
CX-9_8AU2-EA-09G_Edition5 Page354
Thursday, May 6 2010 4:56 PM
Form No.8AU2-EA-09G
Page 356 of 592
Black plate (356,1)
NOTElThe display angle change is not available
for discs other than multi-angle recorded
DVD discs. Refer to the instruction manual
accompanying the disc for details.
lThe screen size and angle can be changed
when On-Screen Mark and Angle Mark is
off.
Mode Priority
The priority of the inserted discs (CD-R/
CD-RW) can be selected.
Audio
Digital Output
Not used with this unit.
Audio DRC
The audio dynamic range can be adjusted
to reduce the difference between the
maximum and minimum audio output.
Audio compression of the DVD video
playback can be selected or deselected
during playback using the following
modes:
Mode Function
NONE Playback with normal volume
LINELower volume is increased to
reduce difference in volume range.
RFUse when it is still difficult to hear
sound while using LINE.
Sound quality is reduced while
using RF.
NOTE
Only sound output from the headphones is
available.
Auxiliary Input (AUX mode)
In AUX mode, AV equipment such as a
video game player or a video camera can
be used by connecting the image and
sound cables to the auxiliary terminals.
NOTE
lBefore operating, read the instruction
manual accompanying the AV equipment to
be used.
lTo listen to the Rear Entertainment System
sound from the vehicle speakers, change the
audio or navigation system sound to the
Rear Entertainment System sound.
Refer to Sound on page 6-89.
To listen to audio other than from the
speakers of the rear entertainment system, it
is necessary to use the wireless headphones
that are included. For headphone
specification, refer to
“Operation Tips for Headphones”(page
6-79).
lThe cooling fan for this unit may activate if
the temperature of the unit is high, however,
this does not indicate a malfunction.
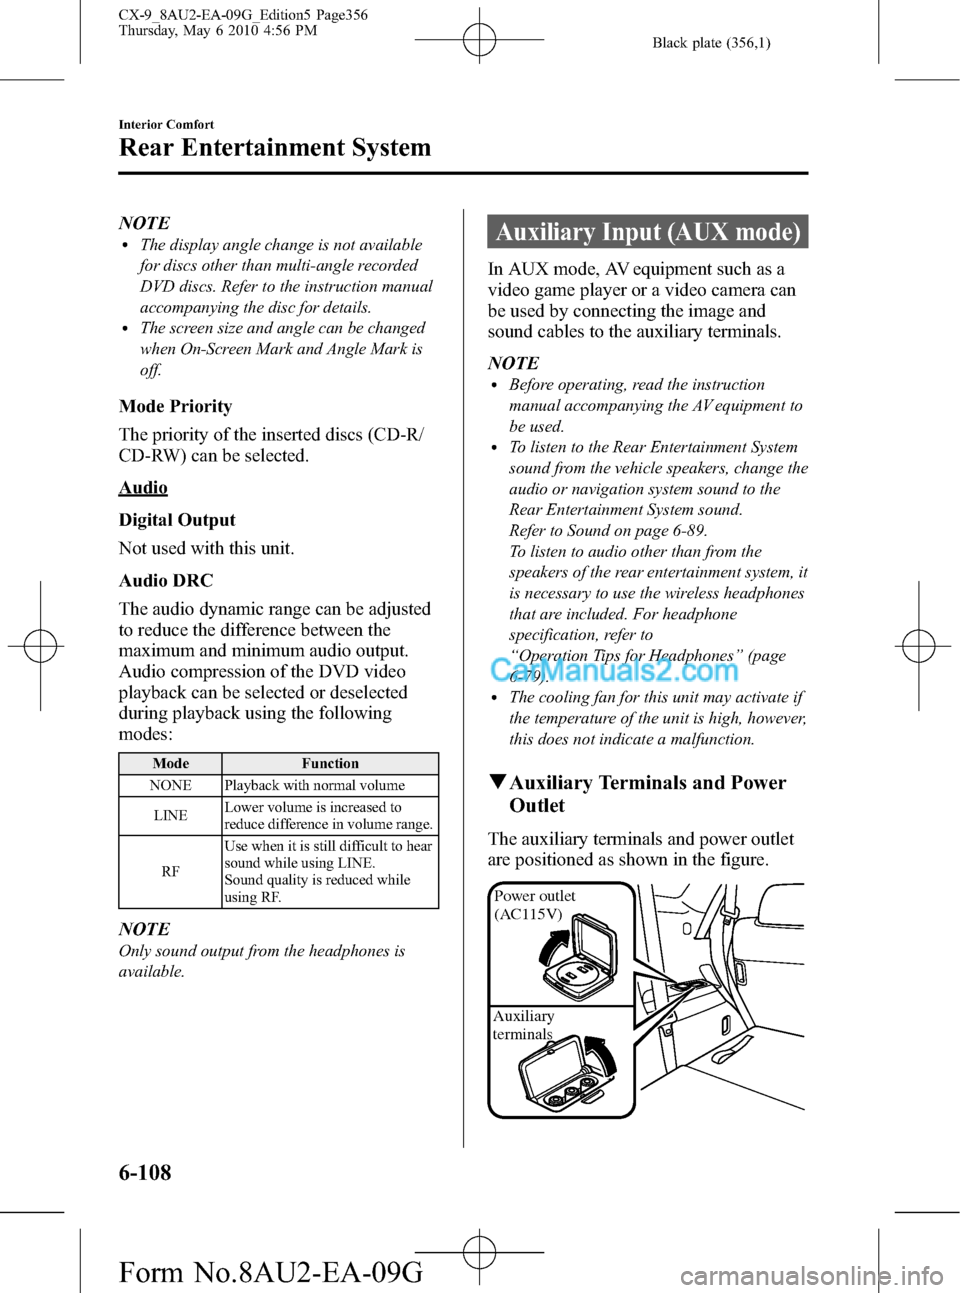
qAuxiliary Terminals and Power
Outlet
The auxiliary terminals and power outlet
are positioned as shown in the figure.
Power outlet
(AC115V)
Auxiliary
terminals
6-108
Interior Comfort
Rear Entertainment System
CX-9_8AU2-EA-09G_Edition5 Page356
Thursday, May 6 2010 4:56 PM
Form No.8AU2-EA-09G
Page 368 of 592
Black plate (368,1)
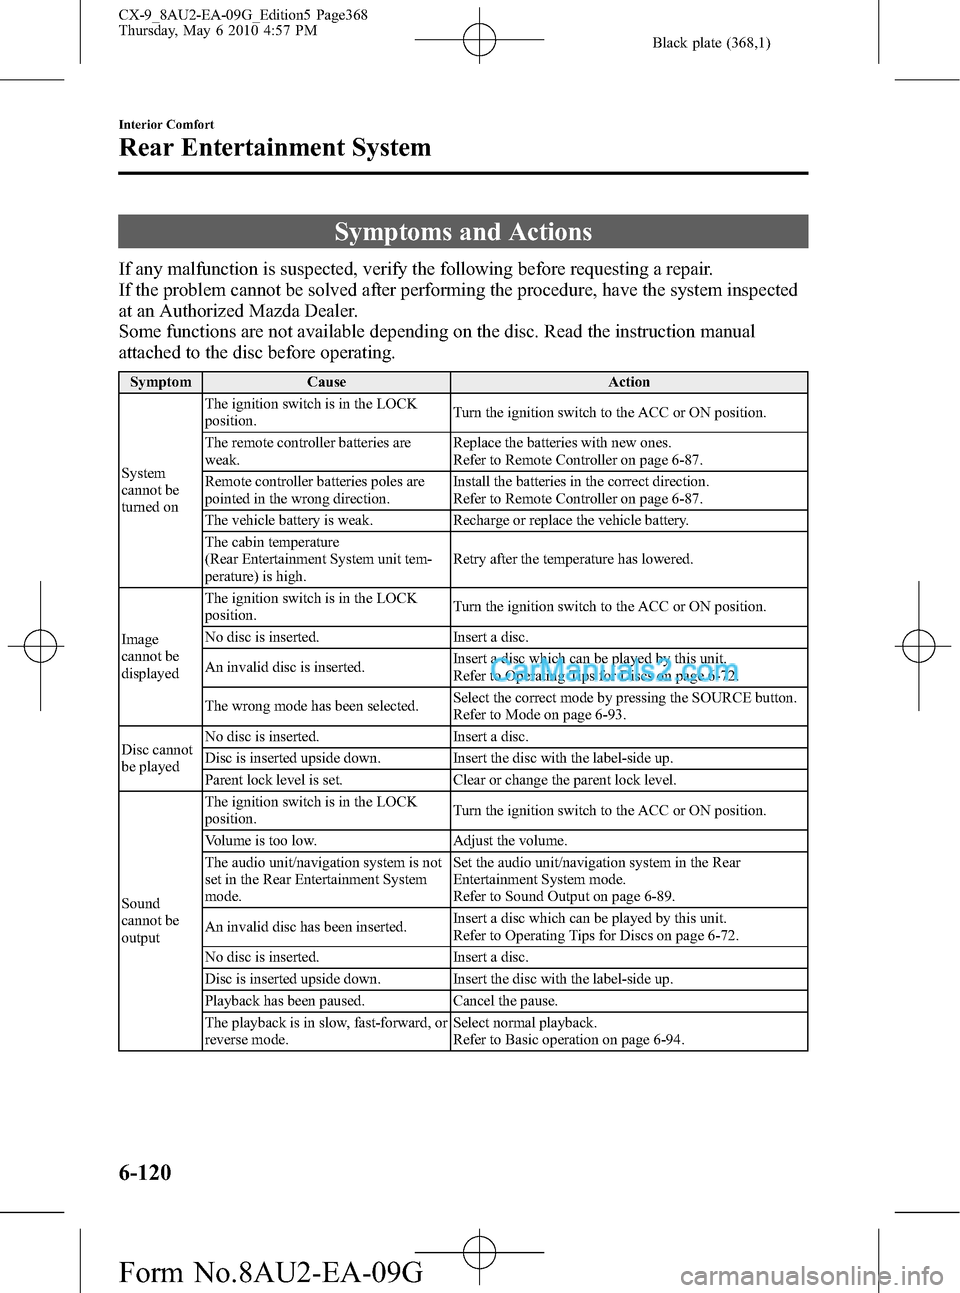
Symptoms and Actions
If any malfunction is suspected, verify the following before requesting a repair.
If the problem cannot be solved after performing the procedure, have the system inspected
at an Authorized Mazda Dealer.
Some functions are not available depending on the disc. Read the instruction manual
attached to the disc before operating.
Symptom Cause Action
System
cannot be
turned onThe ignition switch is in the LOCK
position.Turn the ignition switch to the ACC or ON position.
The remote controller batteries are
weak.Replace the batteries with new ones.
Refer to Remote Controller on page 6-87.
Remote controller batteries poles are
pointed in the wrong direction.Install the batteries in the correct direction.
Refer to Remote Controller on page 6-87.
The vehicle battery is weak. Recharge or replace the vehicle battery.
The cabin temperature
(Rear Entertainment System unit tem-
perature) is high.Retry after the temperature has lowered.
Image
cannot be
displayedThe ignition switch is in the LOCK
position.Turn the ignition switch to the ACC or ON position.
No disc is inserted. Insert a disc.
An invalid disc is inserted.Insert a disc which can be played by this unit.
Refer to Operating Tips for Discs on page 6-72.
The wrong mode has been selected.Select the correct mode by pressing the SOURCE button.
Refer to Mode on page 6-93.
Disc cannot
be playedNo disc is inserted. Insert a disc.
Disc is inserted upside down. Insert the disc with the label-side up.
Parent lock level is set. Clear or change the parent lock level.
Sound
cannot be
outputThe ignition switch is in the LOCK
position.Turn the ignition switch to the ACC or ON position.
Volume is too low. Adjust the volume.
The audio unit/navigation system is not
set in the Rear Entertainment System
mode.Set the audio unit/navigation system in the Rear
Entertainment System mode.
Refer to Sound Output on page 6-89.
An invalid disc has been inserted.Insert a disc which can be played by this unit.
Refer to Operating Tips for Discs on page 6-72.
No disc is inserted. Insert a disc.
Disc is inserted upside down. Insert the disc with the label-side up.
Playback has been paused. Cancel the pause.
The playback is in slow, fast-forward, or
reverse mode.Select normal playback.
Refer to Basic operation on page 6-94.
6-120
Interior Comfort
Rear Entertainment System
CX-9_8AU2-EA-09G_Edition5 Page368
Thursday, May 6 2010 4:57 PM
Form No.8AU2-EA-09G
Page 369 of 592
Black plate (369,1)
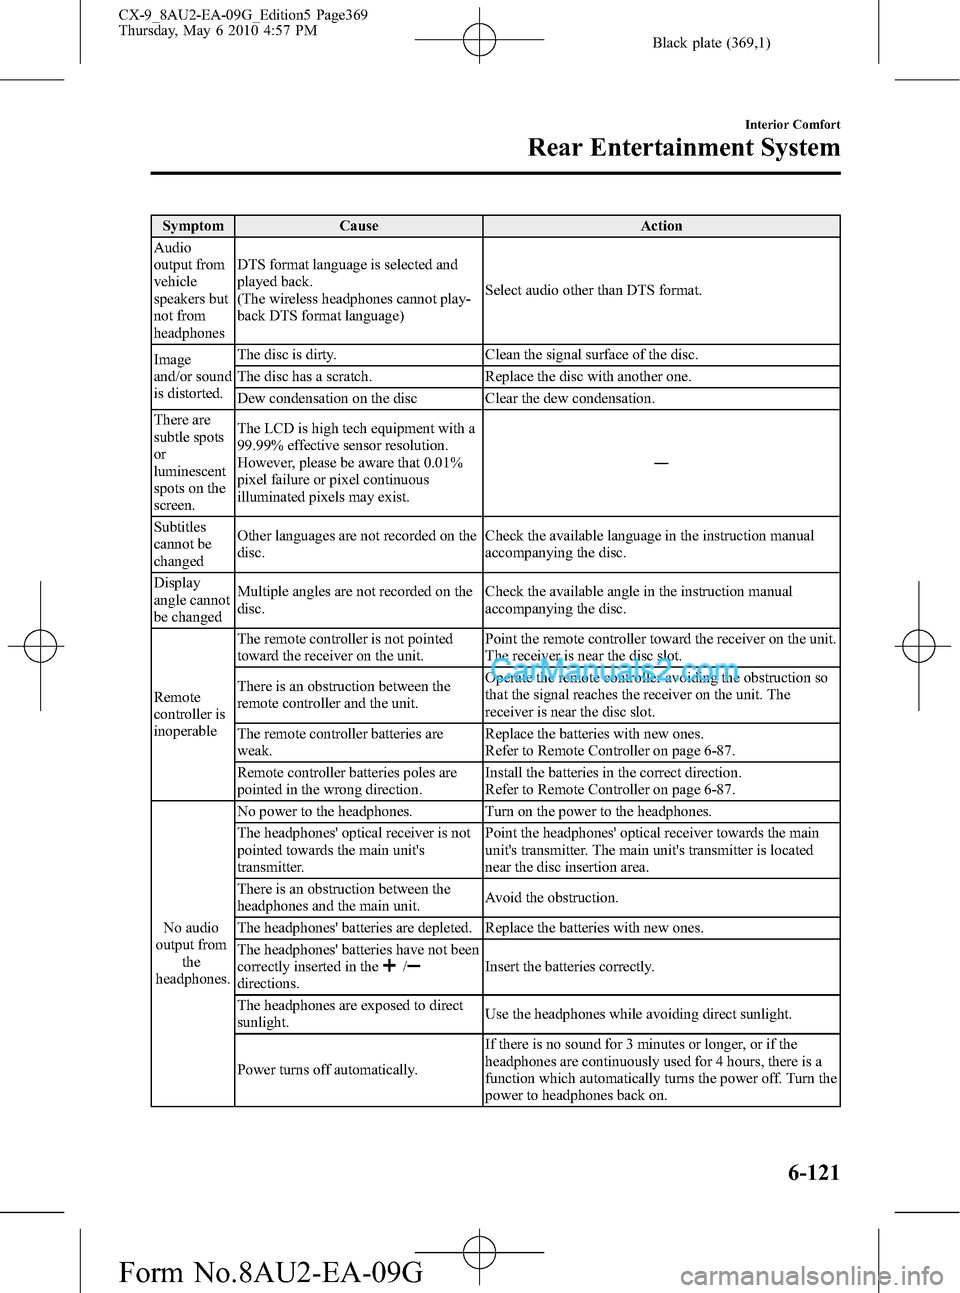
Symptom Cause Action
Audio
output from
vehicle
speakers but
not from
headphonesDTS format language is selected and
played back.
(The wireless headphones cannot play-
back DTS format language)Select audio other than DTS format.
Image
and/or sound
is distorted.The disc is dirty. Clean the signal surface of the disc.
The disc has a scratch. Replace the disc with another one.
Dew condensation on the disc Clear the dew condensation.
There are
subtle spots
or
luminescent
spots on the
screen.The LCD is high tech equipment with a
99.99% effective sensor resolution.
However, please be aware that 0.01%
pixel failure or pixel continuous
illuminated pixels may exist.―
Subtitles
cannot be
changedOther languages are not recorded on the
disc.Check the available language in the instruction manual
accompanying the disc.
Display
angle cannot
be changedMultiple angles are not recorded on the
disc.Check the available angle in the instruction manual
accompanying the disc.
Remote
controller is
inoperableThe remote controller is not pointed
toward the receiver on the unit.Point the remote controller toward the receiver on the unit.
The receiver is near the disc slot.
There is an obstruction between the
remote controller and the unit.Operate the remote controller avoiding the obstruction so
that the signal reaches the receiver on the unit. The
receiver is near the disc slot.
The remote controller batteries are
weak.Replace the batteries with new ones.
Refer to Remote Controller on page 6-87.
Remote controller batteries poles are
pointed in the wrong direction.Install the batteries in the correct direction.
Refer to Remote Controller on page 6-87.
No audio
output from
the
headphones.No power to the headphones. Turn on the power to the headphones.
The headphones' optical receiver is not
pointed towards the main unit's
transmitter.Point the headphones' optical receiver towards the main
unit's transmitter. The main unit's transmitter is located
near the disc insertion area.
There is an obstruction between the
headphones and the main unit.Avoid the obstruction.
The headphones' batteries are depleted. Replace the batteries with new ones.
The headphones' batteries have not been
correctly inserted in the
/directions.Insert the batteries correctly.
The headphones are exposed to direct
sunlight.Use the headphones while avoiding direct sunlight.
Power turns off automatically.If there is no sound for 3 minutes or longer, or if the
headphones are continuously used for 4 hours, there is a
function which automatically turns the power off. Turn the
power to headphones back on.
Interior Comfort
Rear Entertainment System
6-121
CX-9_8AU2-EA-09G_Edition5 Page369
Thursday, May 6 2010 4:57 PM
Form No.8AU2-EA-09G
Page 373 of 592
Black plate (373,1)
Bluetooth is the registered trademark of
Bluetooth SIG. Inc.
NOTE
lIt may not be possible to play a Bluetooth
audio device if it is placed in a location
where transmission is compromised, such
as inside a metal container or the trunk.
Move the Bluetooth audio device to a
location where transmission is possible.
lThe battery consumption of Bluetooth audio
devices is higher while Bluetooth-
connected.
lIf a non-Bluetooth device is to be used, a
commercially-available Bluetooth adapter
is required. When playing an audio device
with a Bluetooth adapter installed,
programming of the audio device may not
be possible or audio may not be heard from
the vehicle speakers if the connection of the
adapter and the device is poor. If this
happens, check whether the Bluetooth
adapter is properly connected.
qBluetooth Audio Preparation
Bluetooth audio device set-up
Bluetooth audio programming, changes,
deletions, and display of programmed
device information can be performed.
Bluetooth audio device programming
Any Bluetooth audio device must be
programmed to the vehicle's Bluetooth
unit before it can be listened to over the
vehicle's speakers.
A maximum of seven devices including
Bluetooth audio devices and hands-free
mobile phones can be programmed to one
vehicle.NOTE
lAlways perform Bluetooth audio device
programming while the vehicle is stopped.
lProgramming cannot be performed while
the vehicle is moving. If you attempt to
perform programming while the vehicle is
moving,“Pairing prohibited”is displayed.
lA total of seven devices can be programmed
to one vehicle. If you require an additional
device to be programmed to a vehicle with
seven devices already programmed, delete
one of the programmed devices before
programming the latest one.
lIf a Bluetooth device has already been
programmed to the vehicle as a hands-free
mobile phone, it does not need to be
programmed again when using the device
as a Bluetooth audio device. Conversely, it
does not need to be programmed again as a
hands-free mobile phone if it has already
been programmed as a Bluetooth audio
device.
lLook around to be sure other likely
Bluetooth audio devices are not in range
when you start to program. If in doubt,
move your car to another location. The
transmission range of a Bluetooth audio
device is about 10 m (32 ft). Therefore, if
there is another Bluetooth audio device
within a 10 m (32 ft) radius of the vehicle,
the device may be identified and
programmed instead.
lDevice registration can also be done using
voice recognition (page 6-136).
Concerning the operation of a Bluetooth
audio device itself, refer to its instruction
manual.
Some Bluetooth audio devices have PIN
codes (four digits). Refer to the audio
device's instruction manual because the
programming procedure differs depending
on whether it has a PIN code or not.
Interior Comfort
Bluetooth Audio (Type B)
6-125
CX-9_8AU2-EA-09G_Edition5 Page373
Thursday, May 6 2010 4:57 PM
Form No.8AU2-EA-09G
Page 374 of 592
Black plate (374,1)
Programming a Bluetooth audio device
which has a PIN code (four digits)
1. Press selection button 2 to display the
Bluetooth audio setting menu screen.
2. Press selection button 2 again to
display the pairing program screen.
3.“Enter Pin:0000”and
“Rotate/Press TUNE dial to change
code. Select“OK”when complete.”are
displayed for input of the PIN code.
4. Turn the manual tuning dial to select
the specified number for the Bluetooth
audio device and press the enter button
(
) to input the number.
NOTE
Some devices accept only a particular pairing
code (Usually,“0000”or“1234”).
If pairing cannot be completed, refer to the
owner's manual of your mobile device, and try
those numbers if necessary.
5. After inputting the four digits, turn the
manual tuning dial and select“OK”,
and then press the enter button
(
) to set the four digits and
display
“Pairing is in progress. Please start
pairing procedure on your Bluetooth
device. Use the PIN“xxxx”.”.
6. Operate the Bluetooth audio device and
set it to the program mode while
“Pairing is in progress. Please start
pairing procedure on your Bluetooth
device. Use the PIN“xxxx”.”is
displayed.7. When the pairing programming is
completed, a“
”symbol and
“Pairing complete”are displayed, and
then the display returns to the normal
display.
If an error occurs during program
pairing,“Error”is displayed and the
display returns to the pairing program
screen.
NOTE
Some Bluetooth audio devices need a certain
amount of time before the“
”symbol is
displayed.
Programming a Bluetooth audio device
which does not have a PIN code (four
digits)
1. Press selection button 2 to display the
Bluetooth audio setting menu screen.
2. Press selection button 2 again to
display the pairing program screen.
3.“Enter Pin:0000”and
“Rotate/Press TUNE dial to change
code. Select“OK”when complete.”are
displayed for input of the PIN code.
4. Turn the manual tuning dial and select
“OK”, and then press the enter button
(
) to set the four digits and
display
“Pairing is in progress. Please start
pairing procedure on your Bluetooth
device. Use the PIN“0000”.”.
5. Operate the Bluetooth audio device and
set it to the program mode while
“Pairing is in progress. Please start
pairing procedure on your Bluetooth
device. Use the PIN“0000”.”is
displayed.
6-126
Interior Comfort
Bluetooth Audio (Type B)
CX-9_8AU2-EA-09G_Edition5 Page374
Thursday, May 6 2010 4:57 PM
Form No.8AU2-EA-09G
Page 375 of 592
Black plate (375,1)
6. The Bluetooth audio device will
request input of a PIN code. Input
“0000”.
7. When the pairing programming is
completed, a“
”symbol and
“Pairing complete”are displayed, and
then it returns to the normal display.
If an error occurs during program
pairing,“Error”is displayed and the
display returns to the pairing program
screen.
NOTE
lIf pairing cannot be completed, try“1234”
instead. Refer to the owner's manual of
your mobile device for the right PIN code.
lSome Bluetooth audio devices need a
certain amount of time before the“
”
symbol is displayed.
Changing the link to a Bluetooth audio
device
If several devices have been programmed,
the Bluetooth unit links the device last
programmed. If you would like to link a
different programmed device, it is
necessary to change the link. The order of
device priority after the link has been
changed is maintained even when the
ignition switch is turned off.
NOTE
lIf a hands-free type mobile phone has been
the most recently programmed device, the
Bluetooth unit links this device. If you
would like to use a Bluetooth audio type
device which has been previously
programmed to the Bluetooth unit, the link
must be changed to this device.
lIf the device name cannot be displayed,
“...”is added at the end to the part of the
title which can be displayed.
Changing the link to only a Bluetooth
audio device
1. Press selection button 2 to display the
Bluetooth audio setting menu screen.
2. Press selection button 3 to display the
link change screen and the current
pairing programming device name.
3. Press selection button 1, 2, 3, 4, 5, 6, or
7 to select the name of the device you
would like to change.
The“
”symbol disappears, and the
device name and
“Connection is in progress.”are
displayed.
4. When the link change is completed, a
“
”symbol and“Link Changed”are
displayed, and then it returns to the
normal display.
If an error occurs while trying to link a
device,“Error”is displayed and the
display returns to the link change
screen.
NOTE
lSome Bluetooth audio devices need a
certain amount of time before the“
”
symbol is displayed.
lIf a link change error occurs, check the
programming status of the Bluetooth audio
device and the location of the device in the
vehicle (not in the trunk or a metal-type
box), and then try the link operation again.
Changing the link to a Bluetooth
Hands-Free and Bluetooth audio device
1. Press selection button 2 to display the
Bluetooth audio setting menu screen.
2. Press selection button 3 to display the
link change screen and the current
pairing programming device name.
Interior Comfort
Bluetooth Audio (Type B)
6-127
CX-9_8AU2-EA-09G_Edition5 Page375
Thursday, May 6 2010 4:57 PM
Form No.8AU2-EA-09G