change MAZDA MODEL CX-9 2010 (in English) Workshop Manual
[x] Cancel search | Manufacturer: MAZDA, Model Year: 2010, Model line: MODEL CX-9, Model: MAZDA MODEL CX-9 2010Pages: 592
Page 270 of 592

Black plate (270,1)
lDo not use record sprays, antistatic
agents, or household spray cleaners.
Volatile chemicals such as benzine and
thinner can also damage the surface of
the CD and must not be used. Anything
that can damage, warp, or fog plastic
should never be used to clean CDs.
lInsert discs one by one. If two discs are
inserted at the same time, the system
may not operate properly.
lThe CD player/In-dash CD changer
ejects the CD if the CD is inserted
upside down. Also dirty and/or
defective CDs may be ejected.
lDo not insert cleaning discs in the CD
player/In-dash CD changer.
lDo not insert any disc with a peel-off
seal affixed to it.
lThis unit may not be able to play
certain CD-R/CD-RWs made using a
computer or music CD recorder due to
disc characteristics, scratches,
smudges, dirt, etc., or due to dust or
condensation on the lens inside the
unit.
lStoring CDs in the vehicle exposed to
direct sunlight or high temperature may
damage the CD-R/CD-RWs, and make
them unplayable.
lCD-R/CD-RW exceeding 700 MB
cannot be played.
lThis unit may not be able to play
certain discs made using a computer
due to the application (writing
software) setting used. (For details,
consult the store where the application
was purchased.)
lIt is possible that certain text data, such
as titles, recorded on a CD-R/CD-RW
may not be displayed when musical
data (CD-DA) is playing.
lThe period from when a CD-RW is
inserted to when it begins playing is
longer than a normal CD or CD-R.
lCompletely read the instruction manual
and cautions for CD-R/CD-RWs.
lDo not use discs with cellophane tape
adhering, partially peeled off labels, or
adhesive material exuding from the
edges of the CD label. Also, do not use
discs with a commercially-available
CD-R label affixed. The disc may not
eject resulting in a malfunction.
qOperating tips for MP3
NOTE
Supply of this product only conveys a license
for private, non-commercial use and does not
convey a license nor imply any right to use this
product in any commercial (i.e. revenue-
generating) real time broadcasting (terrestrial,
satellite, cable and/or any other media),
broadcasting/streaming via the Internet,
intranets and/or other networks or in other
electronic content distribution systems, such as
pay-audio or audio-on-demand applications.
An independent license for such use is
required. For details, please visit
http://www.mp3licensing.com.
lThis audio system handles MP3 files
that have been recorded on CD-R/CD-
RW/CD-ROMs. Discs that have been
recorded using the following formats
can be played:
lISO 9660 level 1lISO 9660 level 2lJoliet extended formatlRomeo extended formatlThis unit handles MP3 files
conforming to the MP3 format
containing both header frames and data
frames.
lThis unit can play multi-session
recorded discs that have up to 40
sessions.
6-22
Interior Comfort
Audio System
CX-9_8AU2-EA-09G_Edition5 Page270
Thursday, May 6 2010 4:53 PM
Form No.8AU2-EA-09G
Page 276 of 592
Black plate (276,1)
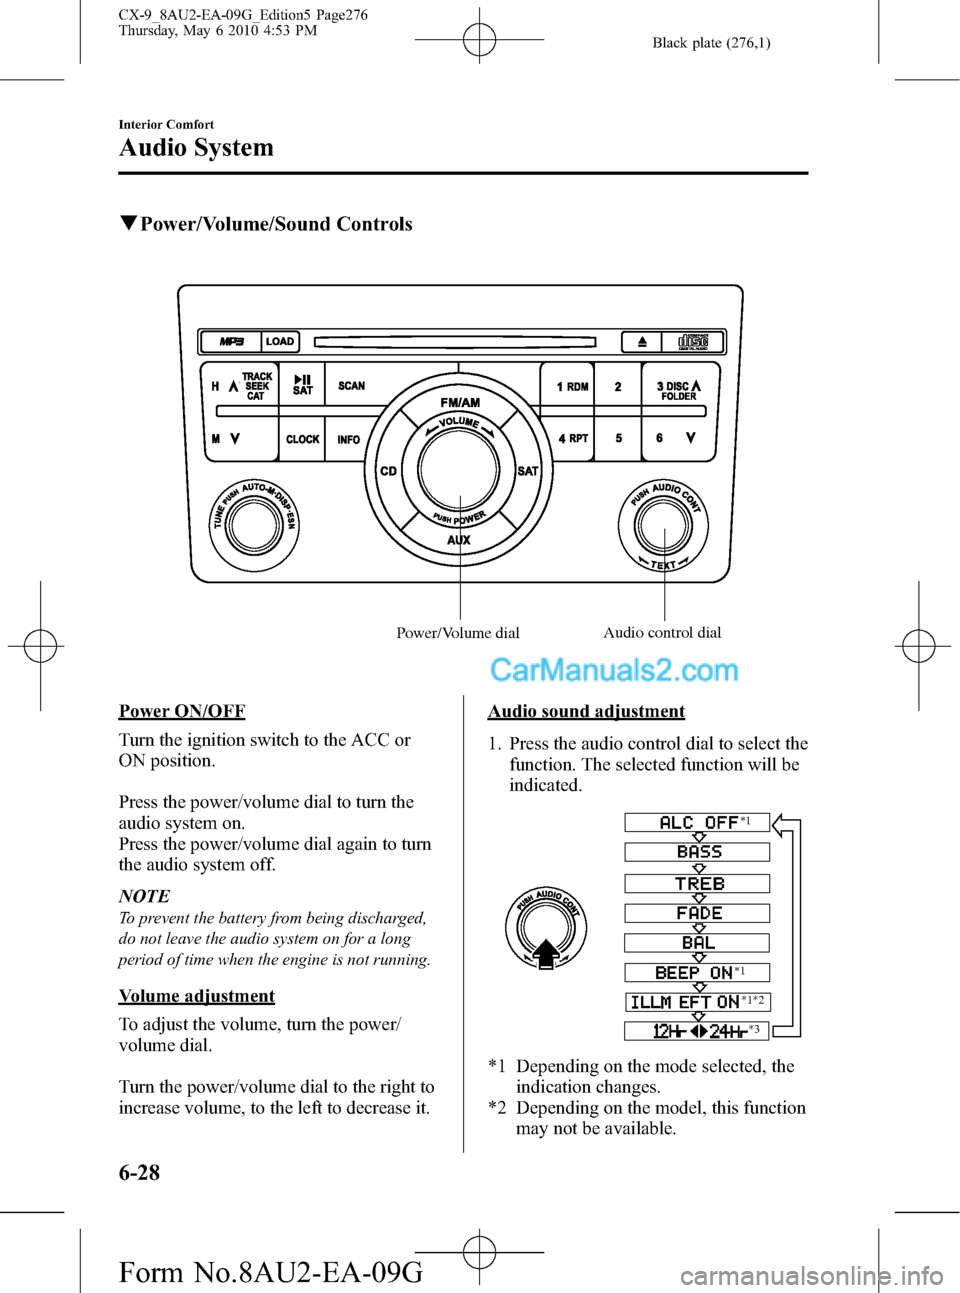
qPower/Volume/Sound Controls
Power/Volume dialAudio control dial
Power ON/OFF
Turn the ignition switch to the ACC or
ON position.
Press the power/volume dial to turn the
audio system on.
Press the power/volume dial again to turn
the audio system off.
NOTE
To prevent the battery from being discharged,
do not leave the audio system on for a long
period of time when the engine is not running.
Volume adjustment
To adjust the volume, turn the power/
volume dial.
Turn the power/volume dial to the right to
increase volume, to the left to decrease it.
Audio sound adjustment
1. Press the audio control dial to select the
function. The selected function will be
indicated.
*1
*1
*2
*1
*3
*1 Depending on the mode selected, the
indication changes.
*2 Depending on the model, this function
may not be available.
6-28
Interior Comfort
Audio System
CX-9_8AU2-EA-09G_Edition5 Page276
Thursday, May 6 2010 4:53 PM
Form No.8AU2-EA-09G
Page 277 of 592

Black plate (277,1)
*3 The function may appear on the
display but is only adjustable in the
European market models.
2. Turn the audio control dial to adjust the
selected functions as follows:
Indication Turn Left Turn Right
Select mode
Decrease
bassIncrease
bass
Decrease
trebleIncrease
treble
Shift the
sound to the
frontShift the
sound to the
rear
Shift the
sound to the
leftShift the
sound to the
right
OFF ON
OFF ON
12Hr
(Flashing)24Hr
(Flashing)
* The function may appear on the display but is only
adjustable in the European market models.
NOTE
About 5 seconds after selecting any mode, the
volume function will be automatically selected.
To reset bass, treble, fade, and balance, press
the audio control dial for 2 seconds. The unit
will beep and“CLEAR”will be displayed.
Automatic Level Control (ALC)
The automatic level control (ALC) is a
feature that automatically adjusts audio
volume and sound quality according to
the vehicle speed.
The volume increases in accordance with
the increase in vehicle speed, and
decreases as vehicle speed decreases.Select the desired ALC mode.
Mode Volume change
No change
Minimum
Medium
Maximum
Turn the audio control dial to select ALC
OFF or ALC LEVEL1―3 modes. The
selected mode will be indicated.
BEEP setting
The beep-sound when operating the audio
system can be set on or off.
ILLM EFT setting (Illumination setting
during operation)
The audio system illumination during
operation can be set on or off.
Time adjustment
Rotating the audio control dial switches
the display between 12 and 24-hour clock
time (page 6-185).
Interior Comfort
Audio System
6-29
CX-9_8AU2-EA-09G_Edition5 Page277
Thursday, May 6 2010 4:53 PM
Form No.8AU2-EA-09G
Page 278 of 592

Black plate (278,1)
qOperating the Radio
Band selector button Scan button
Seek tuning
buttonsManual tuning dial/Auto memory button
Channel preset buttons
Radio ON
Press a band selector button (
)to
turn the radio on.
Band selection
Successively pressing the band selector
button (
) switches the bands as
follows: FM1→FM2→AM.
The selected mode will be indicated. If
FM stereo is being received,“ST”will be
displayed.
NOTE
If the FM broadcast signal becomes weak,
reception automatically changes from
STEREO to MONO for reduced noise, and the
“ST”indicator will go out.
Tuning
The radio has the following tuning
methods: Manual, Seek, Scan, Preset
channel, and Auto memory tuning. The
easiest way to tune stations is to set them
on preset channels.
NOTE
If the power supply is interrupted (fuse blows
or the battery is disconnected), the preset
channels will be erased.
Manual tuning
Turning the manual tuning dial will
change the frequency higher or lower.
Seek tuning
Pressing the seek tuning button (
,)
will cause the tuner to seek a higher or
lower frequency automatically.
6-30
Interior Comfort
Audio System
CX-9_8AU2-EA-09G_Edition5 Page278
Thursday, May 6 2010 4:53 PM
Form No.8AU2-EA-09G
Page 281 of 592
Black plate (281,1)
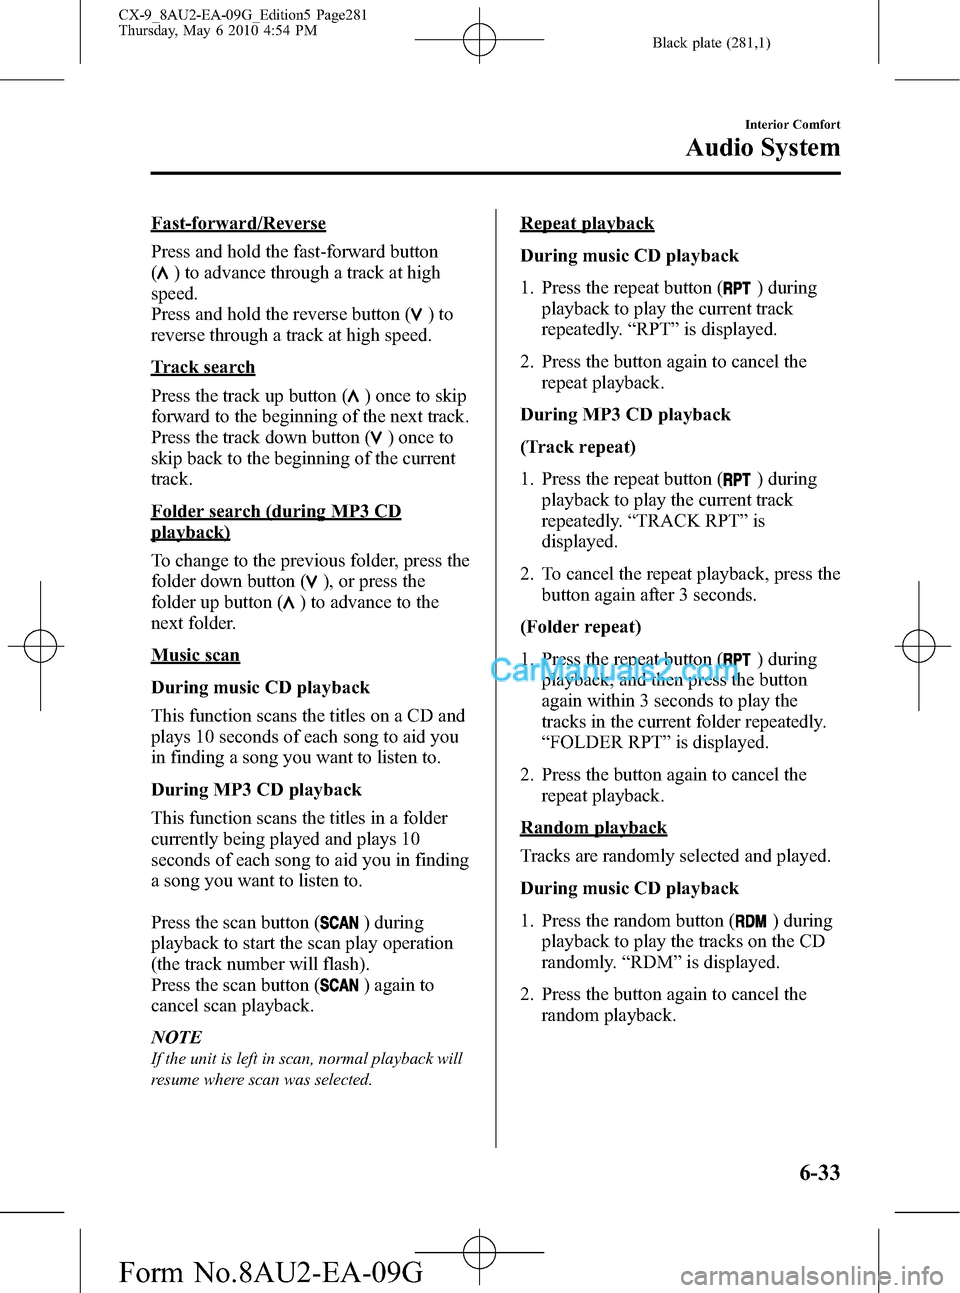
Fast-forward/Reverse
Press and hold the fast-forward button
(
) to advance through a track at high
speed.
Press and hold the reverse button (
)to
reverse through a track at high speed.
Track search
Press the track up button (
) once to skip
forward to the beginning of the next track.
Press the track down button (
)onceto
skip back to the beginning of the current
track.
Folder search (during MP3 CD
playback)
To change to the previous folder, press the
folder down button (
), or press the
folder up button (
) to advance to the
next folder.
Music scan
During music CD playback
This function scans the titles on a CD and
plays 10 seconds of each song to aid you
in finding a song you want to listen to.
During MP3 CD playback
This function scans the titles in a folder
currently being played and plays 10
seconds of each song to aid you in finding
a song you want to listen to.
Press the scan button (
) during
playback to start the scan play operation
(the track number will flash).
Press the scan button (
) again to
cancel scan playback.
NOTE
If the unit is left in scan, normal playback will
resume where scan was selected.
Repeat playback
During music CD playback
1. Press the repeat button (
) during
playback to play the current track
repeatedly.“RPT”is displayed.
2. Press the button again to cancel the
repeat playback.
During MP3 CD playback
(Track repeat)
1. Press the repeat button (
) during
playback to play the current track
repeatedly.“TRACK RPT”is
displayed.
2. To cancel the repeat playback, press the
button again after 3 seconds.
(Folder repeat)
1. Press the repeat button (
) during
playback, and then press the button
again within 3 seconds to play the
tracks in the current folder repeatedly.
“FOLDER RPT”is displayed.
2. Press the button again to cancel the
repeat playback.
Random playback
Tracks are randomly selected and played.
During music CD playback
1. Press the random button (
) during
playback to play the tracks on the CD
randomly.“RDM”is displayed.
2. Press the button again to cancel the
random playback.
Interior Comfort
Audio System
6-33
CX-9_8AU2-EA-09G_Edition5 Page281
Thursday, May 6 2010 4:54 PM
Form No.8AU2-EA-09G
Page 285 of 592
Black plate (285,1)
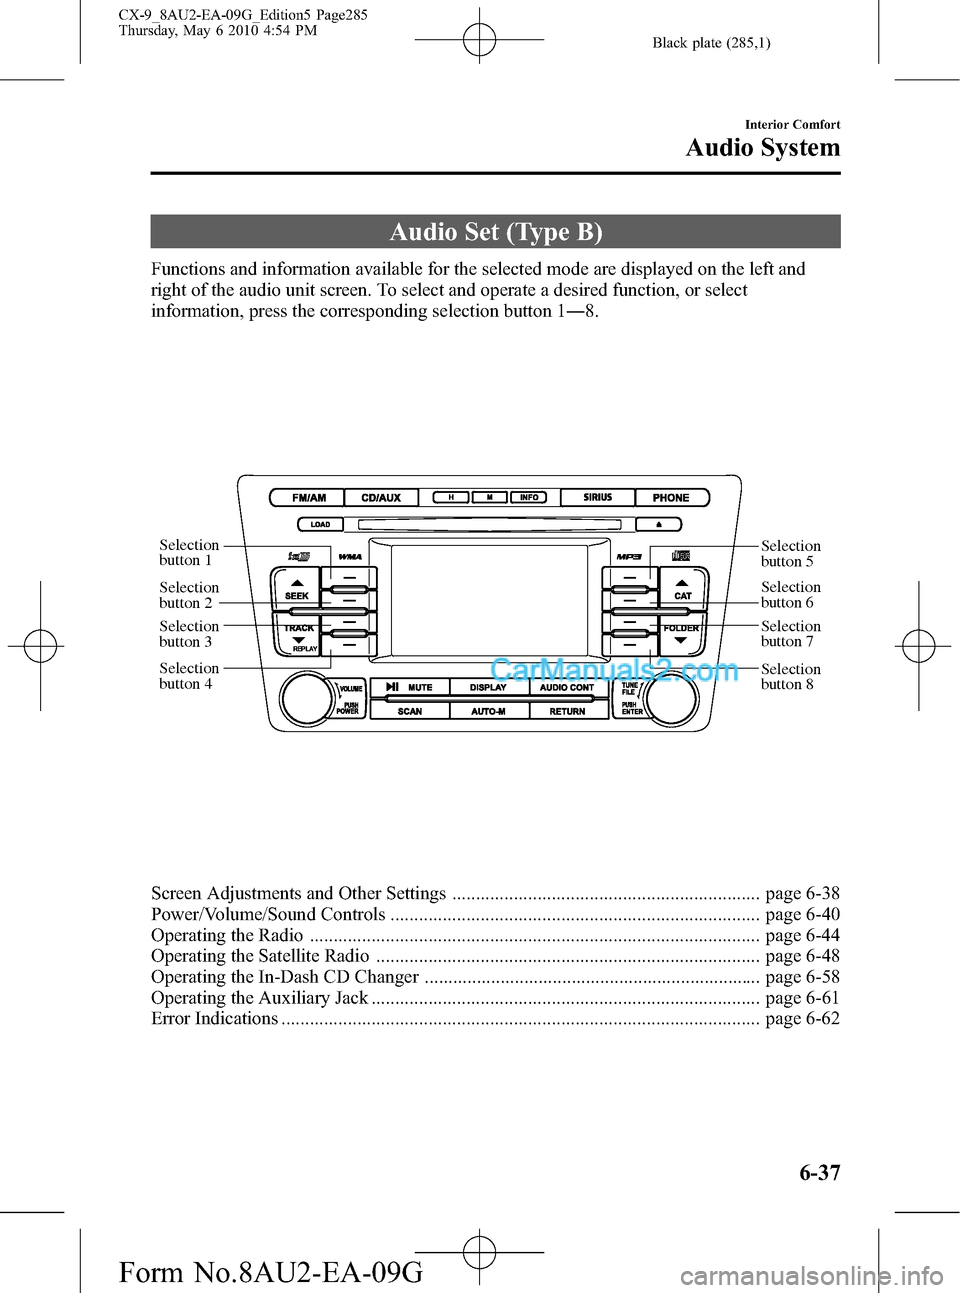
Audio Set (Type B)
Functions and information available for the selected mode are displayed on the left and
right of the audio unit screen. To select and operate a desired function, or select
information, press the corresponding selection button 1―8.
Selection
button 1
Selection
button 2
Selection
button 3
Selection
button 4Selection
button 5
Selection
button 6
Selection
button 7
Selection
button 8
Screen Adjustments and Other Settings ................................................................. page 6-38
Power/Volume/Sound Controls .............................................................................. page 6-40
Operating the Radio ............................................................................................... page 6-44
Operating the Satellite Radio ................................................................................. page 6-48
Operating the In-Dash CD Changer ....................................................................... page 6-58
Operating the Auxiliary Jack .................................................................................. page 6-61
Error Indications ..................................................................................................... page 6-62
Interior Comfort
Audio System
6-37
CX-9_8AU2-EA-09G_Edition5 Page285
Thursday, May 6 2010 4:54 PM
Form No.8AU2-EA-09G
Page 287 of 592
Black plate (287,1)
Color adjustment*
To deepen a color
Press selection button 7.
To fade color
Press selection button 3.
* Adjustment is available depending on
the display.
NOTE
Continuous adjustment of the brightness,
contrast, tint, and color can be done by long-
pressing the selection button for the adjustment
item.
Daytime/Night screen
When the headlights are on, daytime
mode can also be selected (if a brighter
screen is needed at night). This selection
can only be done when the headlights are
on.
The screen can be returned to the daytime
screen while the headlights or running
lights are on by pressing the dashboard
illumination knob.
Language setting
The displayed language can be changed to
one of the three available languages.
Press selection button 5 to display the
language setting screen.
English display
Press selection button 2.
French display
Press selection button 3.
Spanish display
Press selection button 4.NOTE
A language setting is unavailable for the
satellite radio. English is constantly displayed.
Screen display off
Press selection button 4.
Press the display button (
)to
return to the previously selected mode's
screen.
Interior Comfort
Audio System
6-39
CX-9_8AU2-EA-09G_Edition5 Page287
Thursday, May 6 2010 4:54 PM
Form No.8AU2-EA-09G
Page 292 of 592

Black plate (292,1)
qOperating the Radio
Mute buttonAuto memory buttonScan button Seek tuning
buttonsManual tuning dial
Band selector button
Selection
button 2
Selection
button 3
Selection
button 4Selection
button 5
Selection
button 6
Selection
button 7
Selection
button 8
Radio ON
Press a band selector button (
)to
turn the radio on.
Band selection
Successively pressing the band selector
button (
) switches the bands as
follows: FM1→FM2→AM.
The selected mode will be indicated. If
FM stereo is being received,“ST”will be
displayed.
NOTE
If the FM broadcast signal becomes weak,
reception automatically changes from
STEREO to MONO for reduced noise, and the
“ST”indicator will no longer display.
Tuning
The radio has the following tuning
methods: Manual, Seek, Scan, Preset
channel, and Auto memory tuning. The
easiest way to tune stations is to set them
on preset channels.
NOTE
If the power supply is interrupted (fuse blows
or the battery is disconnected), the preset
channels will be erased.
Manual tuning
Turning the manual tuning dial will
change the frequency higher or lower.
Seek tuning
Pressing the seek tuning button (
,)
will cause the tuner to seek a higher or
lower frequency automatically.
6-44
Interior Comfort
Audio System
CX-9_8AU2-EA-09G_Edition5 Page292
Thursday, May 6 2010 4:54 PM
Form No.8AU2-EA-09G
Page 298 of 592

Black plate (298,1)
SIRIUS service uses an ID code to
identify your radio. This code is needed to
activate SIRIUS service, and report any
problems.
To activate you SIRIUS radio tuner, call a
SIRIUS customer service specialist at 1-
888-539-7474 or you can visit SIRIUS
online at www.sirius.com.
Please have the following information
ready:
lSIRIUS ID (12-digit electronic serial
no., or ESN*)lValid credit card information (may not
be required at initial sign-up)
Be sure you are parked outside with a
clear view of open sky, you will be
instructed to turn on your radio (in
SIRIUS mode and tuned to channel 184).
Activation typically takes only 2―5
minutes.
* ESN: Electronic Serial Number
SIRIUS operation
All operations of the satellite radio are
conducted by means of the audio unit.
SIRIUS radio mode selection
When the SIRIUS button (
)is
pressed during ACC ON, it will play the
last SIRIUS channel in use before the
mode was switched over to another mode
or the power was turned off.When the SIRIUS button (
)is
pressed in a mode other than the SIRIUS
mode, the last channel in use will be
received. Every time the SIRIUS button
(
) is pressed, the bank changes in
the order shown below.
SIRIUS1 SIRIUS2 SIRIUS3
NOTE
SIRIUS1, SIRIUS2 and SIRIUS3: six stations
can be stored in each bank for convenient
access to your favorite stations.
Operation in the initial state
It may take some time to start up the
equipment when it is in the initial state,
when there is a change in the user's
subscription condition, or when the
SIRIUS channel map is changed.
6-50
Interior Comfort
Audio System
CX-9_8AU2-EA-09G_Edition5 Page298
Thursday, May 6 2010 4:54 PM
Form No.8AU2-EA-09G
Page 299 of 592

Black plate (299,1)
“Updating channels XXX% complete”is
displayed when the SIRIUS channel map
is changed. If the“Updating channels
XXX% complete”display is not available,
“Updating channels”is displayed. If the
unit is initialized or the user contract
content is changed,“Updating channels.
Subscription Updated.”is displayed.
Updating could take as long as a few
minutes depending on the geographical
area. When the unit is in an initialized
state, channel 184 is displayed after the
display indicates“Updating channels
XXX% complete”. If the SIRIUS channel
map or the user contract content is
changed, the channel prior to the change
is displayed after“Updating channels
XXX% complete”is displayed. After the
initialization display, it may take as long
as ten seconds or more to receive channel
184.
NOTE
Do not perform the following operation while
“Updating”is displayed. Otherwise, the
updating procedure will be canceled.
lTurning off the audio powerlSwitching to other modeslTurning the ignition off
When the SIRIUS mode is switched to
another mode, or when the power is
turned off, the present channel which is
being received is stored as the last
channel.
Channel selection
Turning the manual tuning dial allows you
to select the desired receiving channel.
Channel up
Turn the manual tuning dial clockwise.
Channel down
Turn the manual tuning dial
counterclockwise.Unsubscribed channel
When a selected station has not been
subscribed to, the display indicates the
following:
“Call 888-539-7474”
“To Subscribe”
NOTE
When the subscription contract is canceled, all
of the channels including channel 184 appear
as unsubscribed.
Invalid channel
When a selected channel is not
broadcasting,“Invalid”is displayed.
NOTE
If the last channel selected has become
unavailable because of a channel update the
above indication is displayed until any button
is pressed.
Preset channel programming
1. Turn the manual tuning dial and select
the desired channel.
2. Press and hold selection button 2, 3, 4,
6, 7, or 8.
NOTE
Six stations can be stored in each bank,
SIRIUS1, SIRIUS2 and SIRIUS3 for
convenient access to your favorite stations.
Preset channel call-up
Press selection button 2, 3, 4, 6, 7, or 8.
NOTE
In the initial setting, all channels are preset to
184.
Category change
Press the category button (
,) and
select the desired category.
Interior Comfort
Audio System
6-51
CX-9_8AU2-EA-09G_Edition5 Page299
Thursday, May 6 2010 4:54 PM
Form No.8AU2-EA-09G