change MAZDA MODEL CX-9 2010 (in English) Repair Manual
[x] Cancel search | Manufacturer: MAZDA, Model Year: 2010, Model line: MODEL CX-9, Model: MAZDA MODEL CX-9 2010Pages: 592
Page 300 of 592

Black plate (300,1)
Category up
Press the category up button (
).
Category down
Press the category down button (
).
Every time the category up button (
)is
pressed, the category is changed over in
the order shown below.
At this time, the lowest (smallest-number)
channel within the category indicated is
received.
When the highest (or lowest) category is
reached, the category is changed over in
the order shown below.
Highest category→Lowest category→
XXX category
Category set (Category lock)
Press selection button 1 to lock the
category of the channel being received.
Press selection button 1 again to clear the
lock.
NOTE
A category can be set only when a channel
which belongs to a category is being received.
Channel selection within a category
To select a radio station in a set category,
turn the manual tuning dial.
NOTE
lThe channel number needs to be indicated
in the display to use the manual tuning dial
for this function.
lTo select a radio station other than one in a
set category, turn the manual tuning dial.
Scan tuning
Press the scan button (
)to
automatically sample stations. Scanning
stops at each station for about five
seconds. To hold a station, press the scan
button (
) again during this interval.NOTE
lUnsubscribed channels, invalid channels,
parental lock channels and channel 0 are
not subject to the scan, therefore these
channels will skip automatically.
lIf a category is set, scan channels in the
category. If a category is not set, scan all
channels.
Channel number, channel name,
category name, artist name, song titles
and information display
The information regarding the channel
which is currently being received is
displayed.
NOTE
lIf the entire title cannot be displayed,“...”
is added at the end to the part of the title
which can be displayed.
lIf a channel other than a parental-locked
channel is received, channel name,
category name, artist name, song title, and
information are displayed.
(Channel number display)
The channel number for the channel
currently being received is displayed.
(Channel name display)
lThe channel name for the channel
currently being received is displayed.
lA channel name may have a full title
and an abbreviated title. In this case,
the full title is displayed. If the channel
only has an abbreviated title, it is
displayed.
lIf there is no channel name,“No Ch
Name”is displayed.
(Category name display)
lThe category name for the channel
currently being received is displayed.
6-52
Interior Comfort
Audio System
CX-9_8AU2-EA-09G_Edition5 Page300
Thursday, May 6 2010 4:54 PM
Form No.8AU2-EA-09G
Page 302 of 592

Black plate (302,1)
Parental lock
Parental lock, parental unlock, parental
lock ID change, and parental lock ID reset
can be set.
NOTE
lPress the return button () during
all the settings to return to the previous
display.
lTurn the manual tuning dial during the ID
code or master code input to select“CLR”,
and then press the enter button (
)to
delete an input number.
lIf there is no input for ten seconds during
the ID code or master code input, the
system returns to the settings screen.
lIf only a four-digit ID code or master code
is input,“OK”can be selected.
lIf the registered ID code has been forgotten,
reset the code in“Parental-lock ID reset”
to [0000].
Parental lock
If a channel is locked, the channel is
muted.
(Channel locking)
1. Turn the manual tuning dial to select
the desired channel.
(Registered ID code input preparation)
2. Press selection button 5 to display the
settings screen.
3. Press selection button 1 to display the
parental lock settings screen.
4.“Enter Pin”and“----”are displayed,
and input of the registered ID code is
possible.
(Registered ID code input)
5. Turn the manual tuning dial to select a
number and press the enter button
(
) to input the number.(Registered ID code input
confirmation)
6. After inputting the four digits, turn the
manual tuning dial and select“OK”,
and then press the enter button
(
) to confirm the four digits.
7. If the four digits match the registered
ID code,“Parental lock”appears and
mute is turned on.
If they do not match the registered ID
code,“Error”appears and then the
display returns to“----”.
Parental unlock
Channels locked using the parental lock
function can be unlocked.
(Channel unlocking)
1. Select a channel to be unlocked by
turning the manual tuning dial.
(Registered ID code input preparation)
2. Press selection button 5 to display the
settings screen.
3. Press selection button 2 to display the
parental unlock screen.
4.“Enter Pin”and“----”are displayed,
and input of the registered ID code is
possible.
(Registered ID code input)
5. Turn the manual tuning dial to select a
number and press the enter button
(
) to input the number.
(Registered ID code input
confirmation)
6. After inputting the four digits, turn the
manual tuning dial and select“OK”,
and then press the enter button
(
) to confirm the four digits.
6-54
Interior Comfort
Audio System
CX-9_8AU2-EA-09G_Edition5 Page302
Thursday, May 6 2010 4:54 PM
Form No.8AU2-EA-09G
Page 303 of 592

Black plate (303,1)
7. If the four digits match the registered
ID code,“Parental unlock”appears and
mute is canceled.
If they do not match the registered ID
code,“Error”appears and then the
display returns to“----”.
Parental-lock ID change
When changing the ID code, the new ID
code is input after the previous one is
input first.
(Registered ID code input preparation)
1. Press selection button 5 to display the
settings screen.
2. Press selection button 3 to display the
ID code change screen.
3.“Enter Pin”and“----”are displayed,
and input of the registered ID code is
possible.
(Registered ID code input)
4. Turn the manual tuning dial to select a
number and press the enter button
(
) to input the number.
(Registered ID code input
confirmation)
5. After inputting the four digits, turn the
manual tuning dial and select“OK”,
and then press the enter button
(
) to confirm the four digits.
6. If the four digits match the registered
ID code,“Enter Pin”and“----”are
displayed.
If they do not match the registered ID
code,“Error”appears and then the
display returns to“----”.
(New ID code input)
7. Turn the manual tuning dial to select a
number and press the enter button
(
) to input the number.(New ID code input confirmation)
8. After inputting the four digits, turn the
manual tuning dial and select“OK”,
and then press the enter button
(
) to confirm the four digits.
9.“Pin Changed”appears to indicate that
the new ID code input has been
completed.
10. The display returns to its normal
display.
NOTE
Channels locked before changing the ID code
remain after changing the ID code. To unlock a
channel, input the changed ID code.
Parental-lock ID reset
If the registered ID code has been
forgotten, reset the ID code to the default
[0000] code.
(Master code input preparation)
1. Press selection button 5 to display the
settings screen.
2. Press selection button 4 to display the
ID code initial screen.
3.“Enter Pin”and“----”are displayed,
and input of the registered ID code is
possible.
(Master code input)
4. Turn the manual tuning dial to select a
number and then press the enter button
(
) to input the number.
Interior Comfort
Audio System
6-55
CX-9_8AU2-EA-09G_Edition5 Page303
Thursday, May 6 2010 4:54 PM
Form No.8AU2-EA-09G
Page 306 of 592
Black plate (306,1)
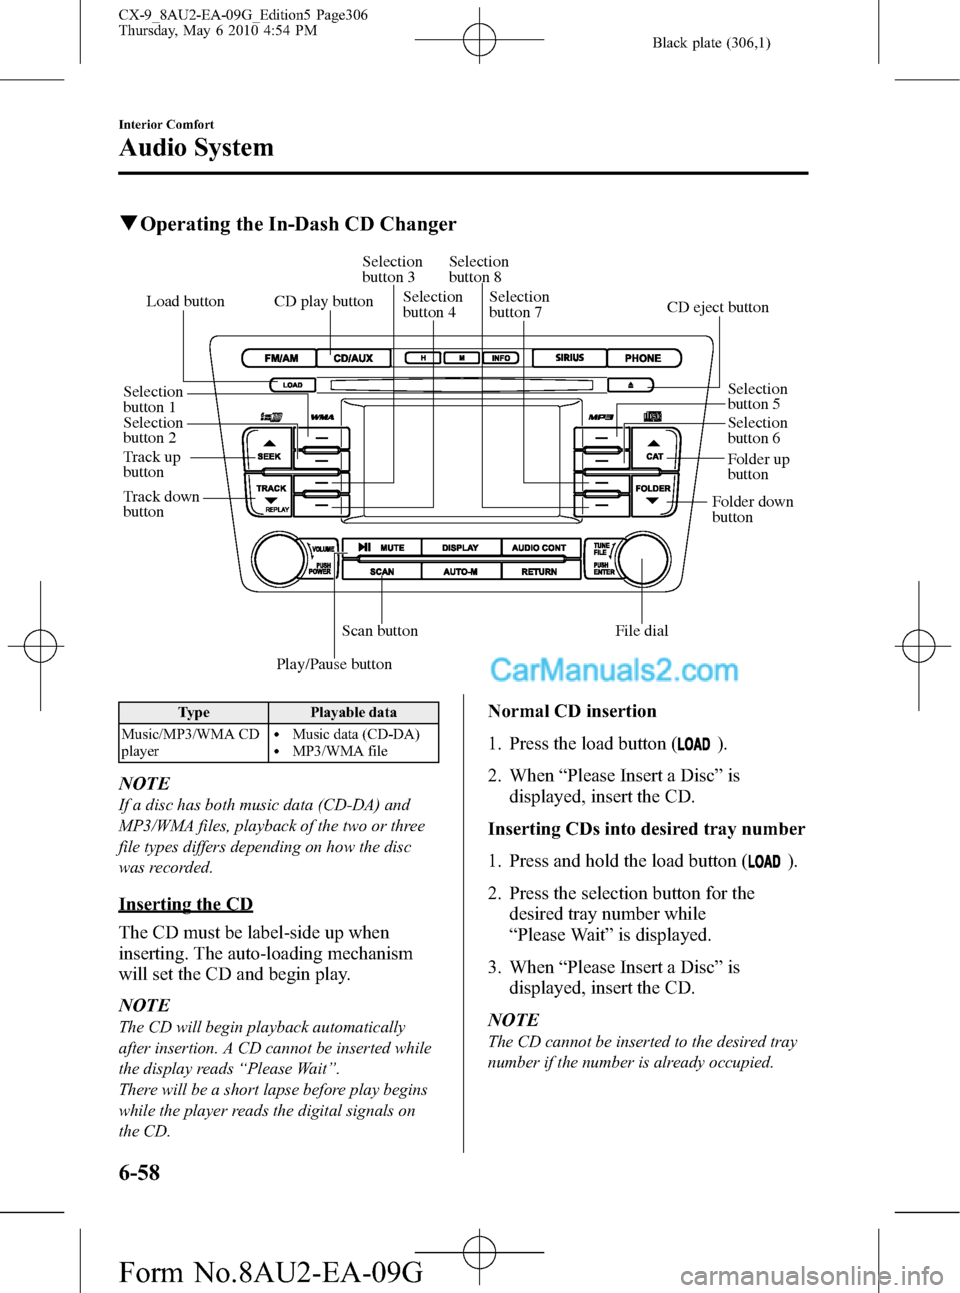
qOperating the In-Dash CD Changer
Folder down
buttonFolder up
button
Play/Pause button
Scan button Track down
button Track up
buttonFile dial
CD play buttonLoad buttonCD eject button
Selection
button 1Selection
button 3Selection
button 8
Selection
button 4Selection
button 7
Selection
button 5
Selection
button 6 Selection
button 2
Type Playable data
Music/MP3/WMA CD
player
lMusic data (CD-DA)lMP3/WMA file
NOTE
If a disc has both music data (CD-DA) and
MP3/WMA files, playback of the two or three
file types differs depending on how the disc
was recorded.
Inserting the CD
The CD must be label-side up when
inserting. The auto-loading mechanism
will set the CD and begin play.
NOTE
The CD will begin playback automatically
after insertion. A CD cannot be inserted while
the display reads“Please Wait”.
There will be a short lapse before play begins
while the player reads the digital signals on
the CD.
Normal CD insertion
1. Press the load button (
).
2. When“Please Insert a Disc”is
displayed, insert the CD.
Inserting CDs into desired tray number
1. Press and hold the load button (
).
2. Press the selection button for the
desired tray number while
“Please Wait”is displayed.
3. When“Please Insert a Disc”is
displayed, insert the CD.
NOTE
The CD cannot be inserted to the desired tray
number if the number is already occupied.
6-58
Interior Comfort
Audio System
CX-9_8AU2-EA-09G_Edition5 Page306
Thursday, May 6 2010 4:54 PM
Form No.8AU2-EA-09G
Page 312 of 592
Black plate (312,1)
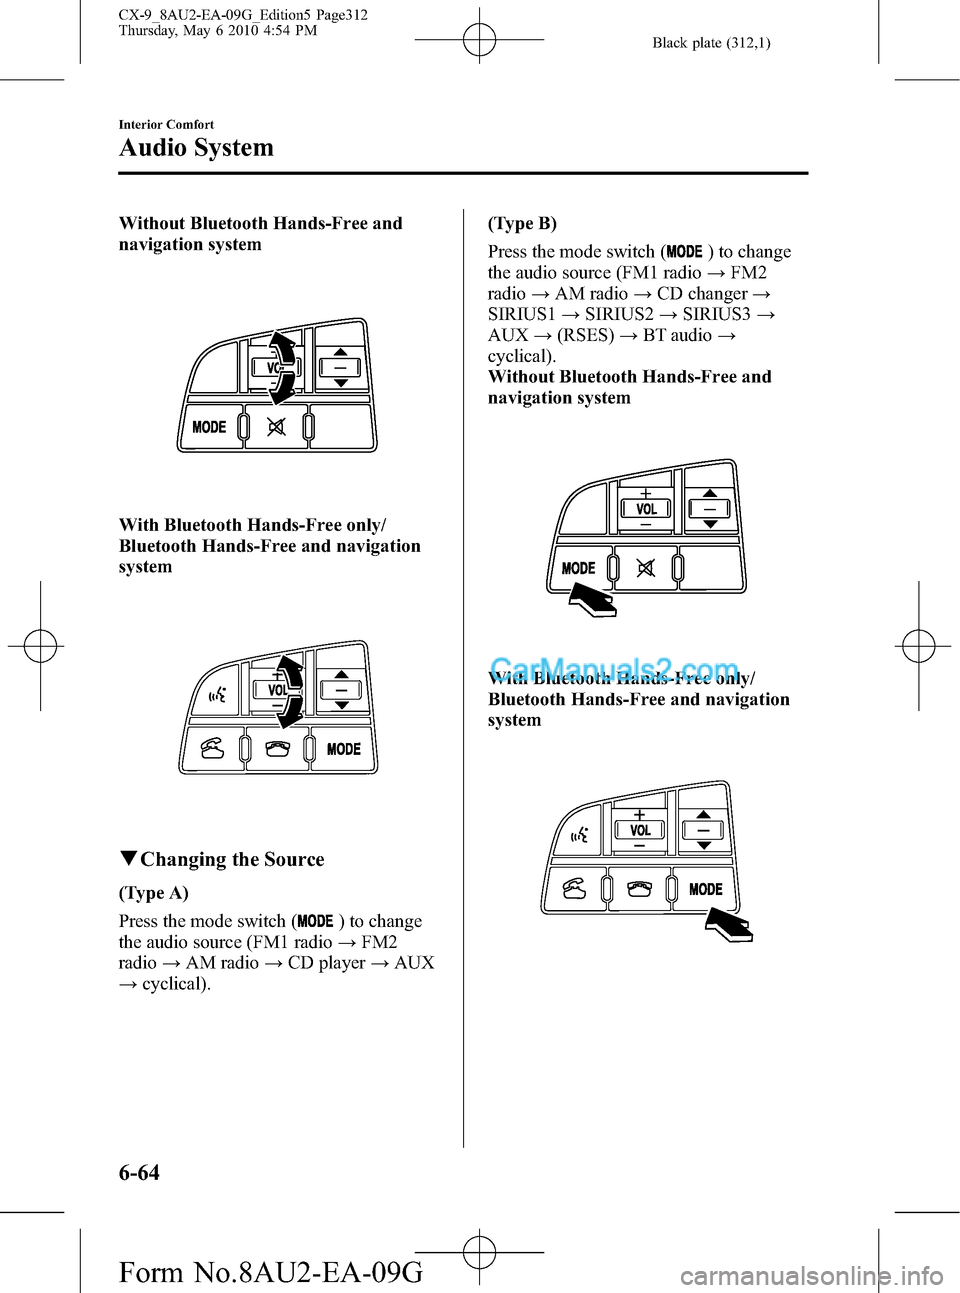
Without Bluetooth Hands-Free and
navigation system
With Bluetooth Hands-Free only/
Bluetooth Hands-Free and navigation
system
qChanging the Source
(Type A)
Press the mode switch (
) to change
the audio source (FM1 radio→FM2
radio→AM radio→CD player→AUX
→cyclical).(Type B)
Press the mode switch (
) to change
the audio source (FM1 radio→FM2
radio→AM radio→CD changer→
SIRIUS1→SIRIUS2→SIRIUS3→
AUX→(RSES)→BT audio→
cyclical).
Without Bluetooth Hands-Free and
navigation system
With Bluetooth Hands-Free only/
Bluetooth Hands-Free and navigation
system
6-64
Interior Comfort
Audio System
CX-9_8AU2-EA-09G_Edition5 Page312
Thursday, May 6 2010 4:54 PM
Form No.8AU2-EA-09G
Page 313 of 592
Black plate (313,1)
NOTE
CD, CD changer, RSES, SIRIUS digital
satellite radio, and BT audio modes cannot be
selected in the following cases:
· RSES, SIRIUS digital satellite radio unit, or
BT audio unit is not equipped on the audio
system.
· CD has not been inserted.
The AUX mode is locked out unless you
connect a commercially available portable
audio unit to the auxiliary jack. Connect a
portable audio unit or similar product on the
market to the auxiliary jack to listen to music
or audio over the vehicle's speakers. Change
the audio source to AUX mode (page 6-66).
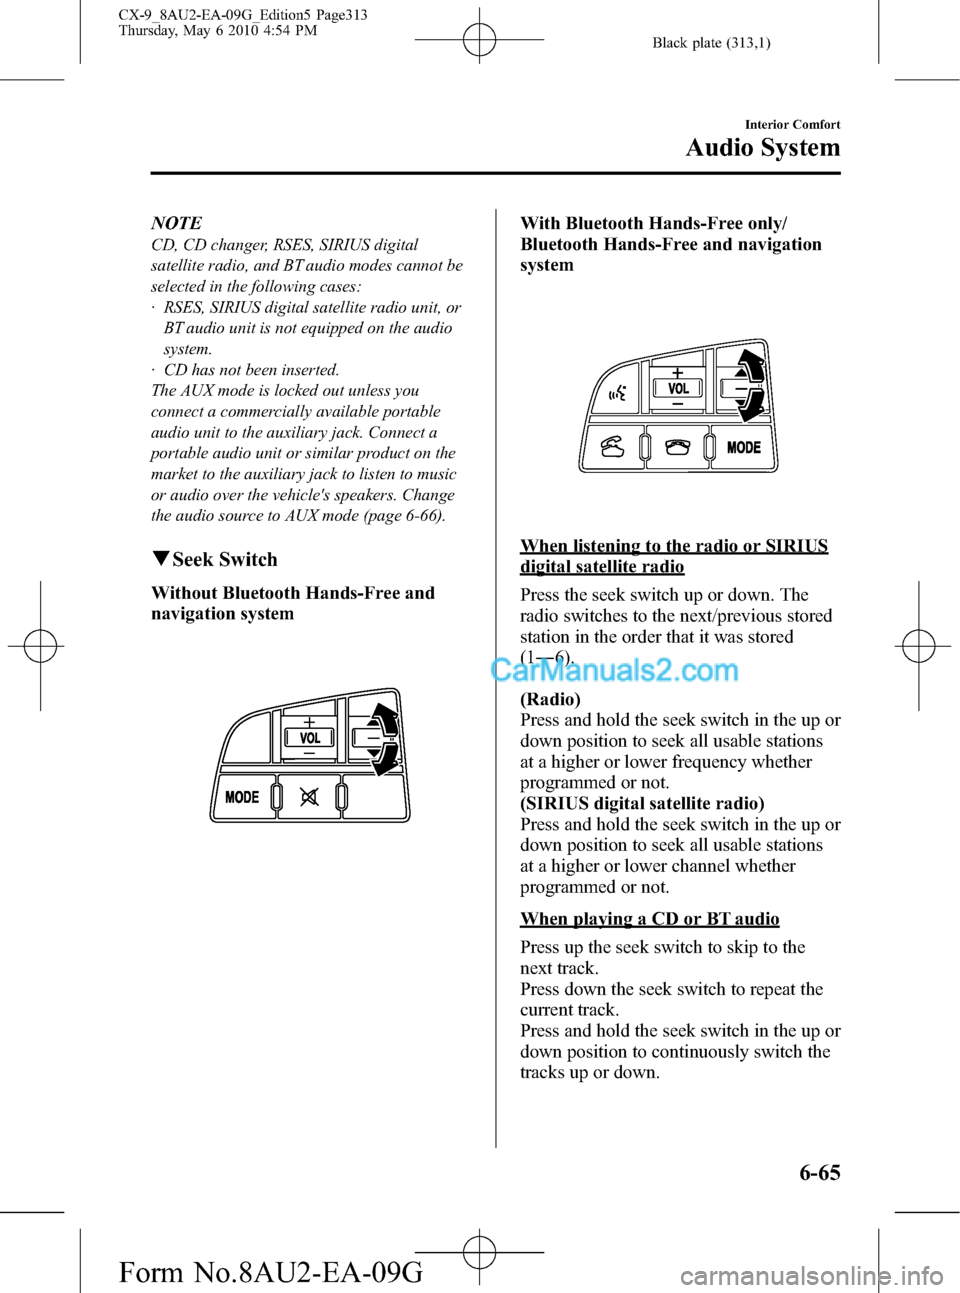
qSeek Switch
Without Bluetooth Hands-Free and
navigation system
With Bluetooth Hands-Free only/
Bluetooth Hands-Free and navigation
system
When listening to the radio or SIRIUS
digital satellite radio
Press the seek switch up or down. The
radio switches to the next/previous stored
station in the order that it was stored
(1―6).
(Radio)
Press and hold the seek switch in the up or
down position to seek all usable stations
at a higher or lower frequency whether
programmed or not.
(SIRIUS digital satellite radio)
Press and hold the seek switch in the up or
down position to seek all usable stations
at a higher or lower channel whether
programmed or not.
When playing a CD or BT audio
Press up the seek switch to skip to the
next track.
Press down the seek switch to repeat the
current track.
Press and hold the seek switch in the up or
down position to continuously switch the
tracks up or down.
Interior Comfort
Audio System
6-65
CX-9_8AU2-EA-09G_Edition5 Page313
Thursday, May 6 2010 4:54 PM
Form No.8AU2-EA-09G
Page 316 of 592
Black plate (316,1)
2. Press the power/volume dial to turn the
audio system on.
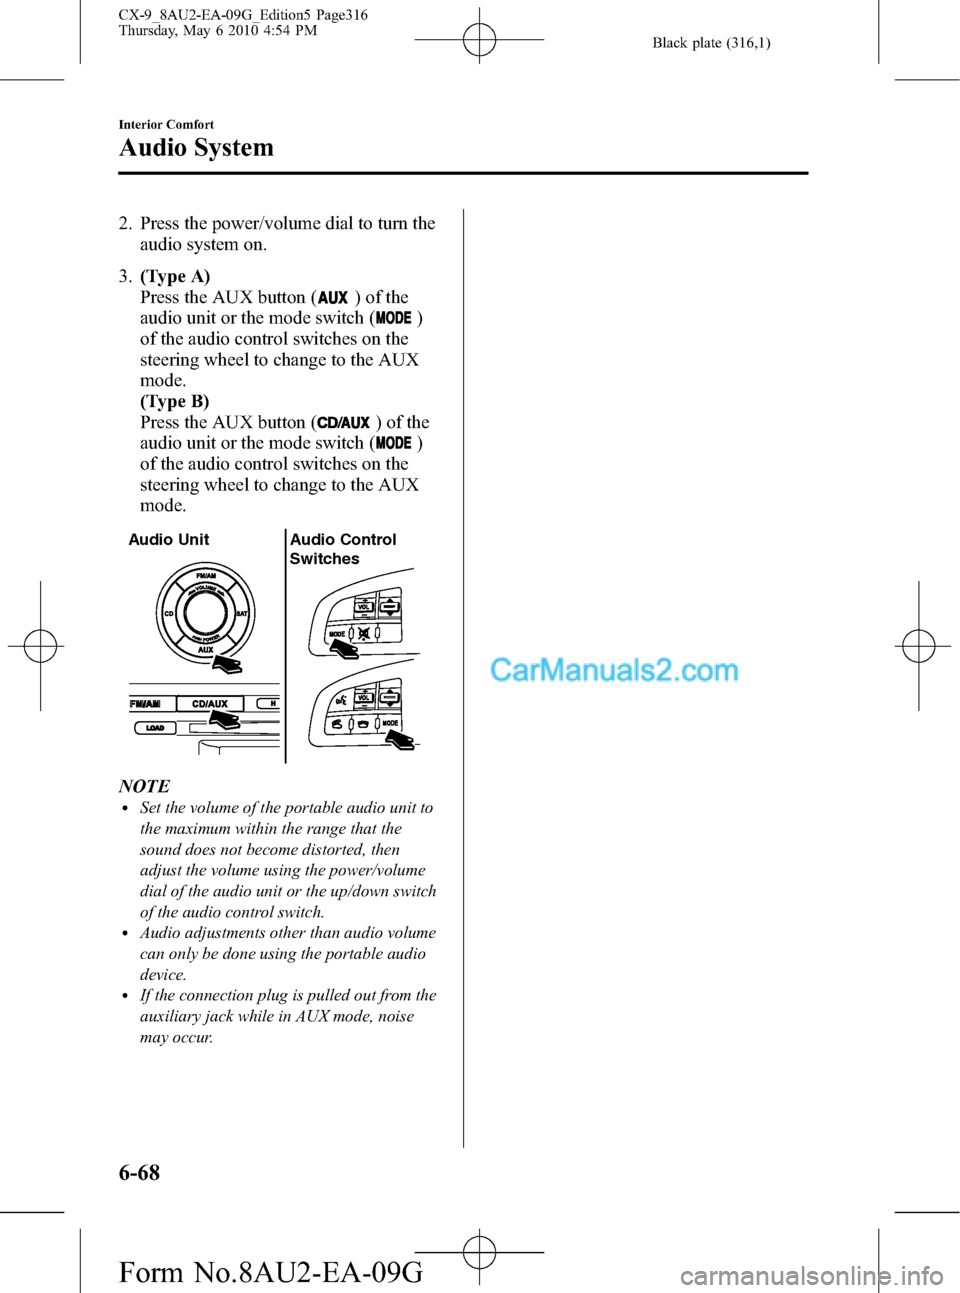
3.(Type A)
Press the AUX button (
) of the
audio unit or the mode switch (
)
of the audio control switches on the
steering wheel to change to the AUX
mode.
(Type B)
Press the AUX button (
) of the
audio unit or the mode switch (
)
of the audio control switches on the
steering wheel to change to the AUX
mode.
Audio Unit Audio Control
Switches
NOTElSet the volume of the portable audio unit to
the maximum within the range that the
sound does not become distorted, then
adjust the volume using the power/volume
dial of the audio unit or the up/down switch
of the audio control switch.
lAudio adjustments other than audio volume
can only be done using the portable audio
device.
lIf the connection plug is pulled out from the
auxiliary jack while in AUX mode, noise
may occur.
6-68
Interior Comfort
Audio System
CX-9_8AU2-EA-09G_Edition5 Page316
Thursday, May 6 2010 4:54 PM
Form No.8AU2-EA-09G
Page 317 of 592

Black plate (317,1)
Safety Certification
This CD player is made and tested to meet exacting safety standards. It meets FCC
requirements and complies with safety performance standards of the U.S. Department of
Health and Human Services.
CAUTION
ØThis CD player should not be adjusted or repaired by anyone except qualified
service personnel.
If servicing is required, contact an Authorized Mazda Dealer.
ØUse of controls or adjustments or performance of procedures other than those
specified herein may result in hazardous laser exposure. Never operate the CD
player with the top case of the unit removed.
ØChanges or modifications not expressly approved by the party responsible for
compliance could void the user's authority to operate this equipment.
NOTE
For CD player section:
This device complies with part 15 of the FCC Rules. Operation is subject to the following two
conditions: (1) This device may not cause harmful interference, and (2) this device must accept any
interference received, including interference that may cause undesired operation.
NOTE
This equipment has been tested and found to comply with the limits for a Class B digital device,
pursuant to part 15 of the FCC Rules. These limits are designed to provide reasonable protection
against harmful interference in a residential installation. This equipment generates, uses, and can
radiate radio frequency energy and, if not installed and used in accordance with the instructions,
may cause harmful interference to radio communications. However, there is no guarantee that
interference will not occur in a particular installation.
Interior Comfort
Audio System
6-69
CX-9_8AU2-EA-09G_Edition5 Page317
Thursday, May 6 2010 4:54 PM
Form No.8AU2-EA-09G
Page 332 of 592

Black plate (332,1)
Inserting the disc
Insert the disc into the disc slot with the
label-side up.
Disc slot
CAUTION
Insert the disc with its label-side
(decorated side) facing upward. If the
disc is inserted upside-down, it may
cause a malfunction.
NOTE
If a disc is inserted while the Rear
Entertainment System is turned off but the
display is open, and when the ignition switch is
in the ACC or ON position, the system
automatically turns on and starts playback.
Ejecting the disc
Press the eject button to eject the disc.
Eject button
NOTElWhen the eject button is pressed, the disc is
ejected halfway.
lA disc can be ejected with the Rear
Entertainment System turned off.
qPicture Adjustment
The brightness (BRIGHT), color
adjustment (TINT), color density
(COLOR), and contrast (CONTRAST) of
the screen can be adjusted.
Press the picture adjust button
(PICTURE) on the remote controller to
change to the picture adjustment mode.
The picture mode changes in the order of
BRIGHT→TINT→COLOR
→CONTRAST→OFF each time the
button is pressed in this mode.
Press the picture adjust button (
)or(),
positioned to top/bottom of the picture
adjustment mode button (PICTURE), to
adjust each picture mode.
NOTE
lIf the picture adjustment mode is on and no
operation has been done for about 5
seconds, the mode is canceled
automatically.
lIf the picture is no longer adjustable by
pressing the picture adjust button (
)or
(
), it indicates that the adjustment value
has reached the maximum/minimum value.
Adjusting the brightness
1. Press the picture adjustment mode
button (PICTURE) and select the
BRIGHT mode.
2. Press the picture adjust button (
)or
(
) to adjust.
lPicture adjust button (): Brighten
6-84
Interior Comfort
Rear Entertainment System
CX-9_8AU2-EA-09G_Edition5 Page332
Thursday, May 6 2010 4:56 PM
Form No.8AU2-EA-09G
Page 333 of 592

Black plate (333,1)
lPicture adjust button (): Darken
Adjusting the color adjustment
1. Press the picture adjustment mode
button (PICTURE) and select the TINT
mode.
2. Press the picture adjust button (
)or
(
) to adjust.
lPicture adjust button (): GreenlPicture adjust button (): Red
Adjusting the color density
1. Press the picture adjustment mode
button (PICTURE) and select the
COLOR mode.
2. Press the picture adjust button (
)or
(
) to adjust.
lPicture adjust button (): Darken
lPicture adjust button (): Lighten
Adjusting the contrast (definition)
1. Press the picture adjustment mode
button (PICTURE) and select the
CONTRAST mode.
2. Press the picture adjust button (
)or
(
) to adjust.
lPicture adjust button (): HigherlPicture adjust button (): Lower
qScreen Size Setting
The size of the screen can be changed.
Press the DISPLAY MODE button to set
the desired screen size.
The screen size changes in the order of
Full→Normal→Wide→Cinema each
time the button is pressed.
Interior Comfort
Rear Entertainment System
6-85
CX-9_8AU2-EA-09G_Edition5 Page333
Thursday, May 6 2010 4:56 PM
Form No.8AU2-EA-09G