automatic transmission MAZDA MODEL CX-9 2015 Smart Start Guide (in English)
[x] Cancel search | Manufacturer: MAZDA, Model Year: 2015, Model line: MODEL CX-9, Model: MAZDA MODEL CX-9 2015Pages: 18, PDF Size: 5.42 MB
Page 5 of 18

78
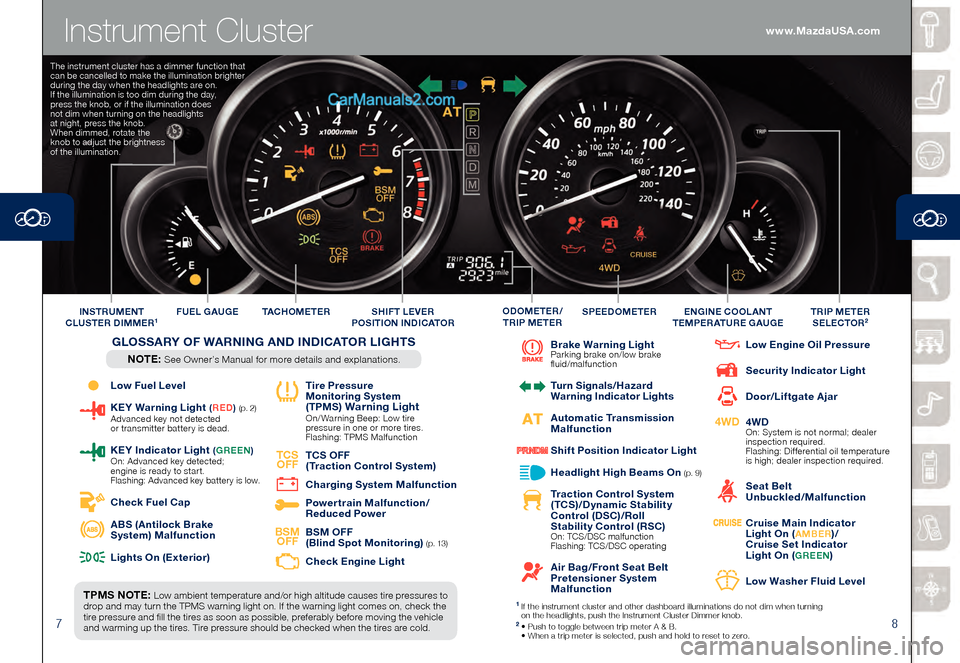
Instrument Cluster
Low Fuel Level
KEY Warning Light (RED ) (p. 2) Advanced key not detected
or transmitter batter y is dead.
KEY Indicator L ight (GREEN ) On: Advanced key detected;
engine is ready to start.
Flashing: Advanced key batter y is low.
Check Fuel Cap
ABS (Antilock Brake
System) Malfunction
Lights On (Exterior)
Tire Pressure
Monitoring System
(TPMS
) Warning Light On/ Warning Beep: Low tire
pressure in one or more tires.
Flashing: TPMS Malfunction
TCS OFF
TCS OFF
(Traction Control System)
Charging System Malfunction
Powertrain Malfunction/
Reduced Power
BSM OFF
BSM OFF
(Blind Spot Monitoring) ( p. 13)
Check Engine Light
Brake Warning Light Parking brake on/low brake
fluid/malfunction
Turn Signals/Hazard
Warning Indicator Lights
Automatic Transmission
Malfunction
Shift Position Indicator Light
Headlight High Beams On (p. 9)
Traction Control System
(TCS)/Dynamic Stability
Control (DSC)/Roll
Stability Control (RSC)
On: TCS/DSC malfunction
Flashing: TCS/DSC operating
Air Bag/Front Seat Belt
Pretensioner System
Malfunction
Low Engine Oil Pressure
Security Indicator Light
Door/Liftgate Ajar
4WD
4WD On: System is not normal; dealer
inspection required.
Flashing: Differential oil temperature
is high; dealer inspection required.
Seat Belt
Unbuckled/Malfunction
Cruise Main Indicator
Light On (AMBER)/
Cruise Set Indicator
Light On (
GREEN)
Low Washer Fluid Level
TPMS NOTE: Low ambient temperature and/or high altitude causes tire pressures to
drop and may turn the TPMS warning light on. If the warning light comes on, check the
tire pressure and fill the tires as soon as possible, preferably before moving the vehicle
and warming up the tires. Tire pressure should be checked when the tires are cold. TAC H O M E T E R
FUEL GAUGE
SPEEDOMETERTRIP METER
SELECTOR2INSTRUMENT
CLUSTER DIMMER1ENGINE COOLANT
TEMPERATURE GAUGEODOMETER/
TRIP METERSHIFT LEVER
POSITION INDICATOR
GLOSSARY OF WARNING AND INDICATOR LIGHTS
NOTE: See Owner’s Manual for more details and explanations.
1 If the instrument cluster and other dashboard illuminations do not dim when tur ning
on the headlights, push the Instrument Cluster Dimmer knob.
2 • Push to toggle between trip meter A & B. • When a trip meter is selected, push and hold to reset to zer o.
The instrument cluster has a dimmer function that
can be cancelled to make the illumination brighter
during the day when the headlights are on.
If the illumination is too dim during the day,
press the knob, or if the illumination does
not dim when turning on the headlights
at night, press the knob.
When dimmed, rotate the
knob to adjust the brightness
of the illumination.
www.MazdaUSA.com
Page 9 of 18

1516
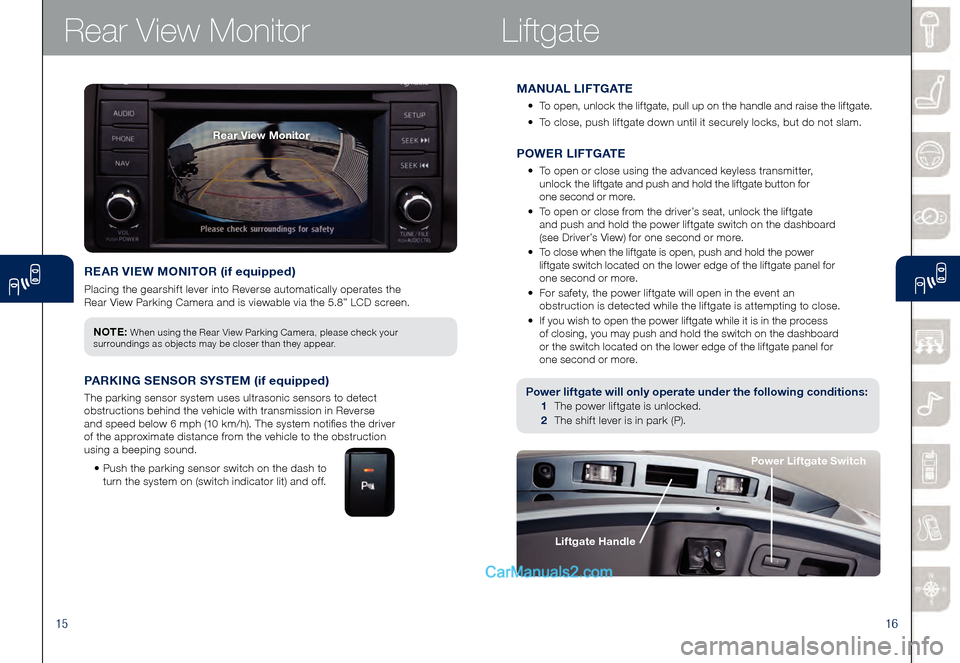
REAR VIEW MONITOR (if equipped)
Placing the gearshift lever into Reverse automatically operates the
Rear View Parking Camera and is viewable via the 5.8” LCD screen.
Rear View MonitorLiftgate
Power liftgate will only operate under the following conditions:
1 The power liftgate is unlocked.
2 The shift lever is in park (P).
NOTE: When using the Rear View Parking Camera, please check your
surroundings as objects may be closer than they appear.
PARKING SENSOR SYSTEM (if equipped)
The parking sensor system uses ultrasonic sensors to detect
obstructions behind the vehicle with transmission in Reverse
and speed below 6 mph (10 km/h). The system notifies the driver
of the approximate distance from the vehicle to the obstruction
using a beeping sound.
• Push the parking sensor switch on the dash to
turn the system on (switch indicator lit) and off.
Liftgate Handle
Power Liftgate Switch
MANUAL LIFTGATE
• To open, unlock the liftgate, pull up on the handle and raise the liftgate.
• To close, push liftgate down until it securely locks, but do not slam.
Rear View Monitor
POWER LIFTGATE
• To open or close using the advanced keyless transmitter,
unlock the liftgate and push and hold the liftgate button for
one second or more.
• To open or close from the driver’s seat, unlock the liftgate
and push and hold the power liftgate switch on the dashboard
(see Driver’s View) for one second or more.
• To close when the liftgate is open, push and hold the power
liftgate switch located on the lower edge of the liftgate panel for
one second or more.
• For safety, the power liftgate will open in the event an
obstruction is detected while the liftgate is attempting to close.
• If you wish to open the power liftgate while it is in the process
of closing, you may push and hold the switch on the dashboard
or the switch located on the lower edge of the liftgate panel for
one second or more.
Page 15 of 18

2728
Transmission
ACTIVE ADAPTIVE SHIFT (AAS) CONTROL
The transmission will automatically adjust how and when it shifts gears
based on road conditions and your driving style. The transmission may
stay in a lower gear longer than usual when going up or down hills or
driving around corners. This feature gives you better control and a more
connected driving experience.
Fuel
Fuel Door Rele ase (located on floor in front of driver’s seat)
To o p en, pull the fuel door release.
Fuel
Regular Unleaded Fuel – 87 Octane
Fuel Door
Release
Fuel Door
To avoid scratching
the paint during
refueling, secure
the fuel filler cap
tether over the
hook as shown.
Hook
BREAK-IN PERIOD
No special break-in is necessary,
but a few precautions in the first 600
miles should be observed.
• Do not race the engine.
• Do not maintain one constant
speed, either slow or fast,
for a long period of time.
• Avoid full-throttle starts.
• Avoid unnecessary hard stops.
• Do not drive constantly at full-
throttle or high engine rpm for
extended periods of time.
FUEL ECONOMY:
To achieve the best fuel economy,
visit www.fueleconomy.gov for
more information.
Lower
Gear
Higher Gear
SPORT A /T MANUAL SHIFT MODE
The Sport A/T Manual Shift Mode gives you the feel of driving a manual
transmission by allowing you to manually shift to control engine rpm and
torque when more control is desired.
To Use
Manual Shift Mode:
• Shift the lever
from D to M. To Shift Up
To A Higher Gear:
• Tap the shift lever
back (+) once. To Shift Down
To A Lower Gear:
• Tap the shift lever
forward (-) once.
NOTE: Changing to manual mode can be done while driving the vehicle.
Various Lockouts:
Indicates the shift lever can be
shifted freely into any position.
Indicates that you must depress
the brake pedal to shift
(The ignition must be
switched to ON).