on off MAZDA MODEL MX-5 MIATA 2019 Owners Manual
[x] Cancel search | Manufacturer: MAZDA, Model Year: 2019, Model line: MODEL MX-5 MIATA, Model: MAZDA MODEL MX-5 MIATA 2019Pages: 553, PDF Size: 59 MB
Page 361 of 553

Maintenance Monitor
Ō¢╝Maintenance Monitor
1. Select the icon on the home screen to display the Applications screen.
2. Select ŌĆ£Vehicle Status MonitorŌĆØ.
3. Select ŌĆ£MaintenanceŌĆØ to display the maintenance list screen.
4. Switch the tab and select the setting item you want to change .
You can customize settings in the setup display as follows:
Ta bI t e m E x p l a n a t i o n
Scheduled Setting
Notification can be switched on/off.
Time (months) Displays the time or distance until maintenance is due.
Select this item to set the maintenance period.
The wrench indication/indicator light in the instrument cluster
will be illuminated when the remai ning distance is less than 1,000
km or 600 mile, or the remaining number of days is less than 15
(whichever comes first).
Distance (km or mile)
Reset
Resets the time and distance to the initial values.
Once the system turns on, it needs to be reset whenever carrying
out maintenance.
Tire Rotation Setting
Notification can be switched on/off.
Distance (km or mile) Displays the distance until tire rotation is due.
Select this item to set the tire rotation distance.
The wrench indication/indicator
light in the instrument cluster
will be illuminated when the remai ning distance is less than 1,000
km or 600 mile.
Reset Resets the remaining distance to the initial value.
Once the system turns on, it need
s to be reset whenever rotating
the tires.
Maintenance and Care
Scheduled Maintenance
6-15
MX-5_8GV5-EA-18E_Edition3 2018-7-17 15:48:16
Page 364 of 553

WA R N I N G
Do not perform maintenance work if you lack sufficient knowledge and experience or the
proper tools and equipment to do the work. Have maintenance work done by a qualified
technician:
Performing maintenance work on a vehicle is dangerous if not done properly. You can be
seriously injured while performing some maintenance procedures.
If you must run the engine while working under the hood, make certain that you remove all
jewelry (especially rings, bracelets, watches, and necklaces) and all neckties, scarves, and
similar loose clothing before getting near the engine or cooling fan which may turn on
unexpectedly:
Working under the hood with the engine ru nning is dangerous. It becomes even more
dangerous when you wear jewelry, loose clot hing or have long hair or a long beard.
Either can become entangled in moving parts and result in injury.
Pull over to a safe location, then switch the ignition off and make sure the fan is not
running before attempting to work near the cooling fan:
Working near the cooling fan when it is runn ing is dangerous. The fan could continue running
indefinitely even if the engine has stopped an d the engine compartment temperature is high.
You could be hit by the fan and seriously injured.
Do not leave items in the engine compartment:
After you have finished checking or doing servicing in the engine compartment, do not forget
and leave items such as tools or rags in the engine compartment.
Tools or other items left in the engine co mpartment could cause engine damage or a
fire
leading to an unexpected accident.
Maintenance and Care
Owner Maintenance
6-18
MX-5_8GV5-EA-18E_Edition3 2018-7-17 15:48:16
Page 369 of 553
.
(ILSAC)
(Mexico)
Use SAE 5W-30 engine oil. If SAE 5W-30
en")
fuel necessary to overcome engine
friction.
For maintenance service, Mazda
recommends Mazda Genuine Parts and
Castrol
® (Mexico only).
(ILSAC)
(Mexico)
Use SAE 5W-30 engine oil. If SAE 5W-30
engine oil is not available, use SAE 5W-20
engine oil.
The quality designation SM, or ILSAC
must be on the label.
80
60
40
20
0
ŌĆō40 ŌĆō20
30
100
40
20
10
0
ŌĆō10
ŌĆō20
ŌĆō30
ŌĆō40
Ō¢╝ Inspecting Engine Oil Level
1. Be sure the vehicle is on a level
surface.
2. Warm up the engine to normal operating temperature.
3. Turn it off and wait at least 5 minutes for the oil to return to the oil pan.
4. Pull out the dipstick, wipe it clean, and reinsert it fully.
MIN
MAX
OK
5. Pull it out again and examine the level. The level is normal if it is between the
MIN and MAX marks.
If it is near or below MIN, add enough
oil to bring the level to MAX.
CAUTION
Do not overfill the engine oil. This may
cause engine damage.
6. Make sure the O-ring on the dipstick is
positioned properly before reinserting
the dipstick.
7. Reinsert the dipstick fully.
Maintenance and Care
Owner Maintenance
6-23
MX-5_8GV5-EA-18E_Edition3 2018-7-17 15:48:16
Page 370 of 553

Engine Coolant
Ō¢╝Inspecting Coolant Level
WA R N I N G
Do not use a match or live flame in the
engine compartment. DO NOT ADD
COOLANT WHEN THE ENGINE IS HOT:
A hot engine is dangerous. If the engine has
been running, parts of the engine
compartment can become very hot. You
could be burned. Carefully inspect the
engine coolant in the coolant reservoir, but
do not open it.
Pull over to a safe location, then switch
the ignition off and make sure the fan is
not running before attempting to work
near the cooling fan:
Working near the cooling fan when it is
running is dangerous. The fan could
continue running indefinitely even if the
engine has stopped and the engine
compartment temperature is high. You
could be hit by the fan and seriously
injured.
Do not remove either cooling
system cap when the engine and radiator
are hot:
When the engine and radiator are hot,
scalding coolant and steam may shoot out
under pressure and cause serious injury.
NOTE
Changing the coolant should be done by
an Authorized Mazda Dealer.
Inspect the antifreeze protection and
coolant level in the coolant reservoir at
least once a yearŌĆĢat the beginning of the
winter seasonŌĆĢand before traveling where
temperatures may drop below freezing.
Inspect the condition and connections of
all cooling system and heater hoses.
Replace any that are swollen or
deteriorated.
The coolant should be at full in the
radiator and between the FULL and LOW
marks on the coolant reservoir when the
engine is cool.
Coolant reservoir
Cooling fan
Cooling system cap
If it is at or near LOW, add enough coolant
to the coolant reservoir to provide freezing
and corrosion protec tion and to bring the
level to FULL.
Securely tighten the c oolant reservoir tank
cap after adding coolant.
CAUTION
’āś Radiator coolant will damage paint.
Rinse it off quickly if spilled.
Maintenance and Care
Owner Maintenance
6-24
MX-5_8GV5-EA-18E_Edition3 2018-7-17 15:48:16
Page 373 of 553

Body Lubrication
All moving points of the body, such as
door and hood hinges and locks, should be
lubricated each time the engine oil is
changed. Use a nonfreezing lubricant on
locks during cold weather.
Make sure the hood's secondary latch
keeps the hood from opening when the
primary latch is released.
Wiper Blades
CAUTION
’āśHot waxes applied by automatic car
washers have been known to
affect the
wiper's ability to clean windows.
’āś To prevent damage to the wiper blades,
do not use gasoline, kerosene, paint
thinner, or other solvents on or near
them.
’āś When the wiper lever is in the AUTO
position and the ignition is switched ON,
the wipers may move automatically in
the following cases:
’āś If the windshield above the rain sensor
is touched.
’āś If the windshield above the rain sensor
is wiped with a cloth.
’āś If the windshield is struck with a hand
or other object.
’āś If the rain sensor is struck with a hand
or other object from inside the vehicle.
Be careful not to pinch hands or fingers
as it may cause injury, or damage the
wipers. When washing or servicing the
vehicle, make sure the wiper lever is in
the OFF position.
Contamination of either the windshield or
the blades with foreign matter can reduce
wiper effectiveness. Common sources are
insects, tree sap, and hot wax treatments
used by some commercial car washes.
If the blades are not wiping properly, clean
the window and blades with a good
cleaner or mild detergent; then rinse
thoroughly with clean water. Repeat if
necessary.
Maintenance and Care
Owner Maintenance
6-27
MX-5_8GV5-EA-18E_Edition3 2018-7-17 15:48:16
Page 375 of 553
CAUTION
’āśDo not bend or discard the
stiffeners.
You need to use them again.
’āś If the metal stiffeners are switched,
the blade's wiping efficiency could be
reduced.
So do not use the driver's side metal
stiffeners on the passenger's side, or
vice versa.
’āś Be sure to reinstall the metal
stiffeners in the new blade rubber so
that the curve is the same as it was in
the old blade rubber.
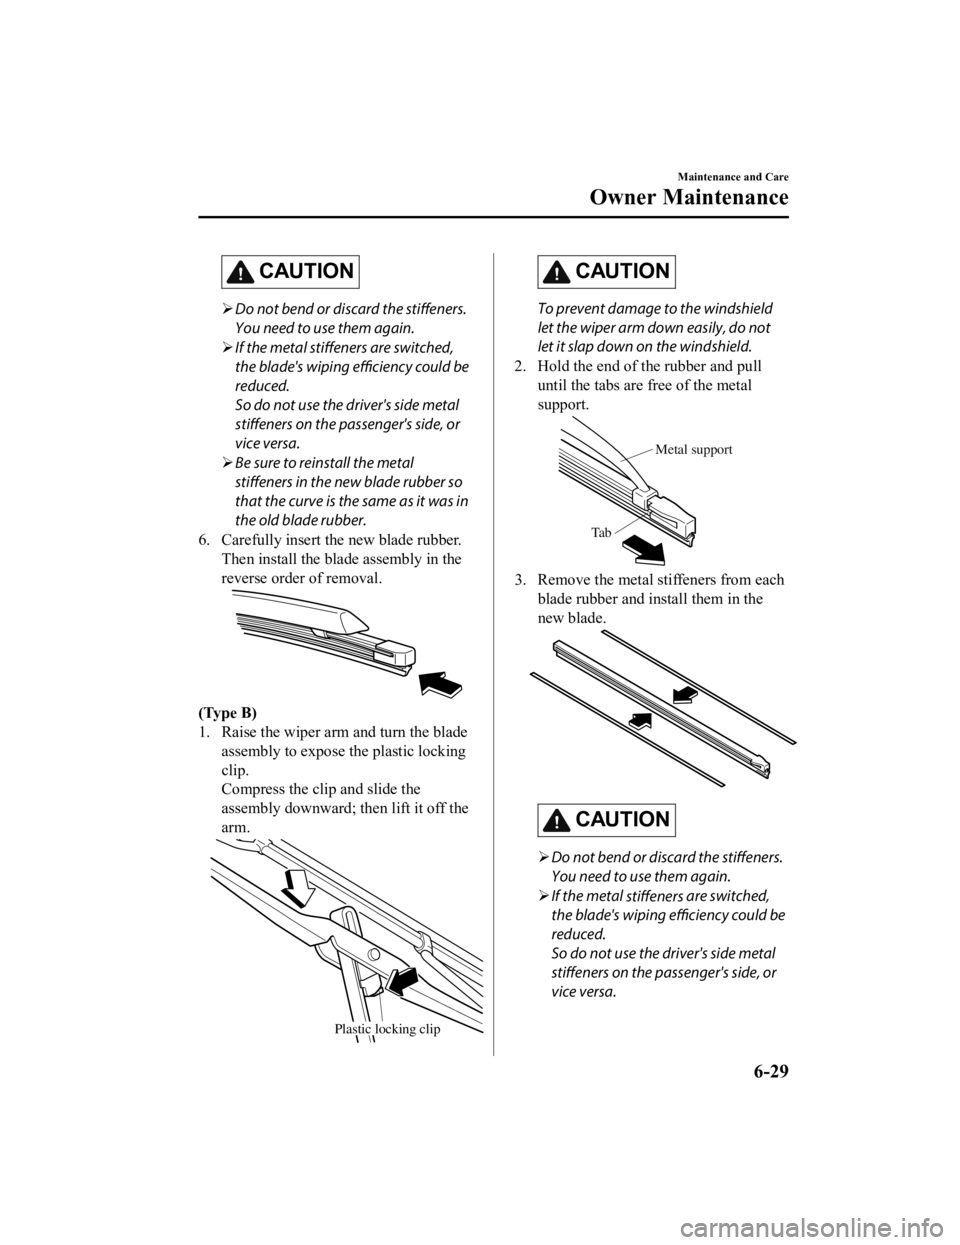
6. Carefully insert th e new blade rubber.
Then install the blade assembly in the
reverse order of removal.
(Type B)
1. Raise the wiper arm and turn the blade assembly to expose the plastic locking
clip.
Compress the clip and slide the
assembly downward; then lift it off the
arm.
Plastic locking clip
CAUTION
To prevent damage to the windshield
let the wiper arm down easily, do not
let it slap down on the windshield.
2. Hold the end of the rubber and pull until the tabs are free of the metal
support.
Metal support
Ta b
3. Remove the metal stiffeners from each blade rubber and install them in the
new blade.
CAUTION
’āśDo not bend or discard the stiffeners.
You need to use them again.
’āś If the metal
stiffeners are switched,
the blade's wiping efficiency could be
reduced.
So do not use the driver's side metal
stiffeners on the passenger's side, or
vice versa.
Maintenance and Care
Owner Maintenance
6-29
MX-5_8GV5-EA-18E_Edition3 2018-7-17 15:48:16
Page 379 of 553

Ō¢╝Battery Maintenance
To get the best service from a battery:
’éĘKeep it securely mounted.
’éĘKeep the top clean and dry.
’éĘKeep terminals and connections clean,
tight, and coated with
petroleum jelly or
terminal grease.
’éĘRinse off spilled electrolyte immediately
with a solution of water and baking
soda.
’éĘIf the vehicle will not be used for an
extended time, disconnect the battery
cables and charge the battery every 6
weeks.
Ō¢╝ Battery Replacement
Contact an Authorized Mazda Dealer for a
battery replacement purchase.
Key Battery Replacement
If the buttons on the transmitter are
inoperable and the operation indicator
light does not flash, the battery may be
dead.
Replace with a new b
attery before the
transmitter becomes unusable.
CAUTION
’āś Make sure the battery is installed
correctly. Battery leakage could occur if it
is not installed correctly.
’āś When replacing the battery, be careful
not to touch any of the internal circuitry
and electrical terminals, bend the
electrical terminals, or get dirt in the
transmitter as the transmitter could be
damaged.
’āś There is the danger of explosion if the
battery is not correctly replaced.
’āś Dispose of used batteries according to
the following instructions.
’āś Insulate the plus and minus terminals
of the battery using cellophane or
equivalent tape.
’āś Never disassemble.
’āś Never throw the battery into fire or
water.
’āś Never deform or crush.
’āś Replace only with the same type battery
(CR2025 or equivalent).
Maintenance and Care
Owner Maintenance
6-33
MX-5_8GV5-EA-18E_Edition3 2018-7-17 15:48:16
Page 380 of 553
 flashes
in the instrument cluster for about 30
seconds after the engine is switched
OFF (for vehicle")
The following conditions indicate that the
battery power is low:
’éĘThe KEY indicator light (green) flashes
in the instrument cluster for about 30
seconds after the engine is switched
OFF (for vehicles with a type A
instrument cluster (page 4-26), messages
are displayed in the instrument cluster).
’éĘThe system does not operate and the
operation indicator light on the
transmitter does not flash when the
buttons are pressed.
’éĘThe system's operational range is
reduced.
Replacing the battery at an Authorized
Mazda Dealer is recommended to prevent
damage to the key. If replacing the battery
by yourself, follow the instruction.
Replacing the key battery
1. Press the knob and pull out the auxiliary key.
Knob
2. Twist a tape-wrapped flathead
screwdriver in the direction of the
arrow and open the cover slightly.
Cover
3. Insert the tape-wrapped flatheadscrewdriver into the gap and slide it in
the direction of the arrow.
Cover
Gap
4. Twist the flathead screwdriver in the
direction of the arrow and remove the
cover.
Cover
Maintenance and Care
Owner Maintenance
6-34
MX-5_8GV5-EA-18E_Edition3 2018-7-17 15:48:16
Page 384 of 553

Replace the tire when this happens.
New treadTread wear indicator
Worn tread
You should replace the tire before the band
crosses the entire tread.
NOTE
Tires degrade over time, even when they
are not being used on the road. It is
recommended that tires generally be
replaced when they are 6 years or older.
Heat caused by hot climates or frequent
high loading conditions can accelerate the
aging process. The period in which the tire
was manufactured (both week and year) is
indicated by a 4-digit number.
Refer to Tire Labeling on page 8-25.
Ō¢╝ Replacing a Wheel
WA R N I N G
Always use wheels of the correct size on
your vehicle:
Using a wrong-sized wheel is dangerous.
Braking and handling could be affected,
leading to loss of control and an accident.
CAUTION
A wrong-sized wheel may adversely
affect:
’āś Tire fit
’āś Wheel and bearing life
’āś Ground clearance
’āś Snow-chain clearance
’āś Speedometer calibration
’āś Headlight aim
’āś Bumper height
’āś Tire Pressure Monitoring System
NOTE
’éĘWhen replacing a wheel, make sure the
new one is the same as the original
factory wheel in diameter, rim width,
and offset (inset/outset).
’éĘFor details, contact an Authorized
Mazda Dealer.
Proper tire balancing provides the best
riding comfort and helps reduce tread
wear. Out-of-balance tires can cause
vibration and uneven wear, such as
cupping and flat spots.
Maintenance and Care
Owner Maintenance
6-38
MX-5_8GV5-EA-18E_Edition3 2018-7-17 15:48:16
Page 386 of 553

CAUTION
When removing the lens or lamp unit using
a flathead screwdriver, make sure that the
flathead screwdriver does not contact the
interior terminal. If the flathead screwdriver
contacts the terminal, a short circuit may
occur.
NOTE
’éĘTo replace the bulb, contact an
Authorized Mazda Dealer.
’éĘUse the protective cover and carton for
the replacement bulb to dispose of the
old bulb promptly and out of the reach
of children.
Ō¢╝Replacing Exterior Light Bulbs
Headlights, Daytime running lights
(LED type), Parking lights, High-mount
brake light, Brake lights, Taillights
The LED bulb cannot be replaced as a
single unit because it is
an integrated unit.
The LED bulb has to be replaced with the
unit. We recommend an Authorized
Mazda Dealer when the replacement is
necessary.
Daytime running li ghts (Bulb type)
1. Make sure the ignition is switched off,
and the headligh t switch is off.
2. Pull the center of each plastic retainer
and remove the retainers.
Removal
Installation
Maintenance and Care
Owner Maintenance
6-40
MX-5_8GV5-EA-18E_Edition3 2018-7-17 15:48:16