lock MAZDA MODEL PROTÉGÉ 2001 (in English) Workshop Manual
[x] Cancel search | Manufacturer: MAZDA, Model Year: 2001, Model line: MODEL PROTÉGÉ, Model: MAZDA MODEL PROTÉGÉ 2001Pages: 290, PDF Size: 5.53 MB
Page 195 of 290

In Case of an Emergency
I Fuse Panel DescriDtion
tr88
E80
HBE
HEE
HEE
F'H
EE
E
V Fuse block (Engin€ compartment)
DESCRIPTIONFUSDRA1.INGPROTECIED COMPONDNT
HEATER
2(ABS)For pmrection of vanons ci(uirs*
lIC KEYlor pole.lio of veious cimiB
5(CLOw)
6
COOLINC30A
BTNInlerior lights, Power dooi lock+
9Addrtronrl rool,ng lan for r'r rondirion.r'
INJORFIP
(r'JC)
(sTsrc)
HORN
TAIL
(HEADC U)Foi piote.rion of vfjos c;cuits
(FOC)For protecion of vdious cncuns
'sune nodek. 6-9
Page 201 of 290
In Cas€ ofan Emerg€ncy
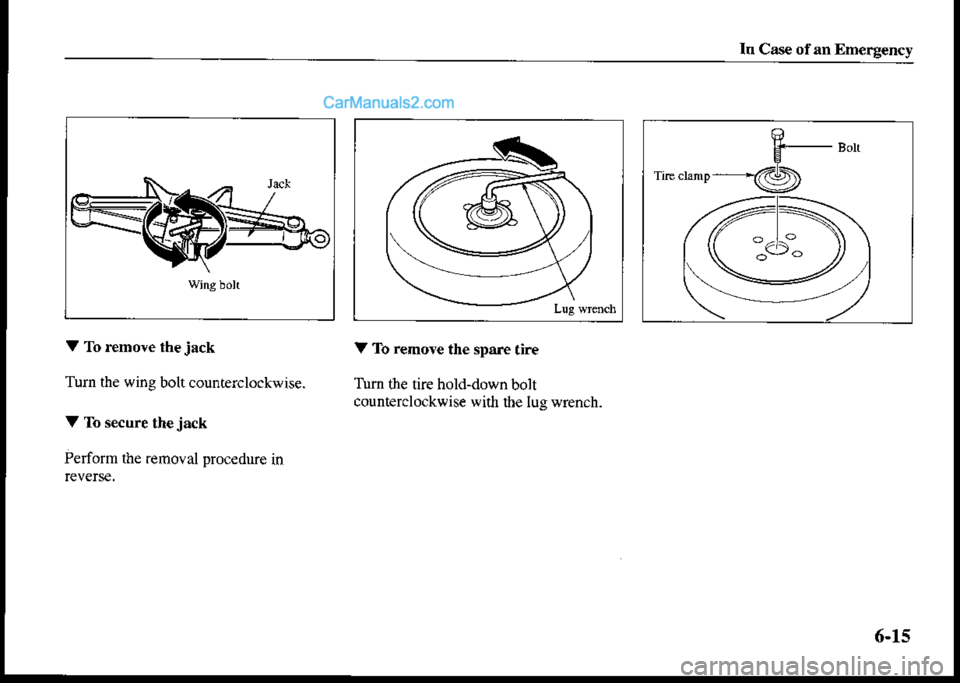
V To rcmove thejack
Turn the wing bolt counterclockwise.
V To secure the jack
Perform the remoyal proc€dure in
V To remove the spare tire
Tum the tire hold-down bolt
counterclockwise wift dre lug wrench.
6-15
Page 203 of 290
In Case of an Emergency
I . Park on a level surface off the
right of,way and firmly set theparking brake.
2. Pul avehicle with an automatic
transaxle in pa.k (P), a manual
transaxle in reverse (R), and turn off
3. Tum on the hazard warning flasher
4. Have everyone getoutofthe vehicle
and away from the vebicle and traffic.
5. Remove lhejack,jack handle,lug
lvrench, and spare rire.
6. Block the wheel diagonally opposite
the flat tire. When blocking a front
wheel, place the block in fronr of rhe
tire. When blocking a rear wheel,
place the block behind the tire.
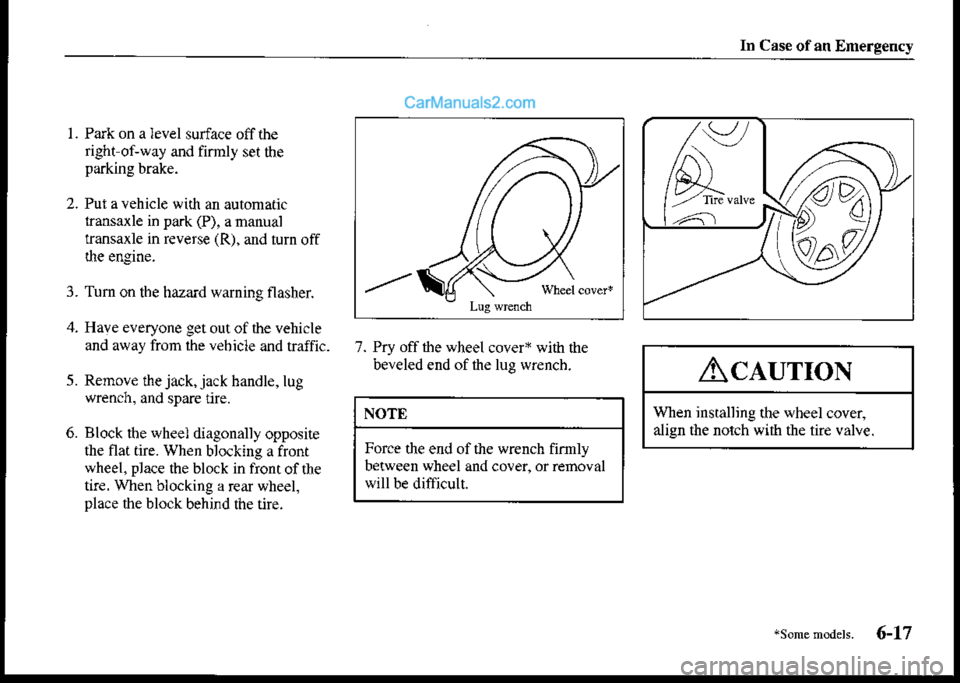
7. Pry off the wheel cover* with the
beveled end of the lug wrench.
NOTE
Force the end of the wrench firmly
between wheel and cover, or removal
will be difficult.
Ac.rurroN
Wlen installing the wheel covet
align the norch wiih the tire valve.
/..uJ
/n\
vl-
D
Qla
*so...od.h. 6-17
Page 204 of 290
In Case of aD Emergency
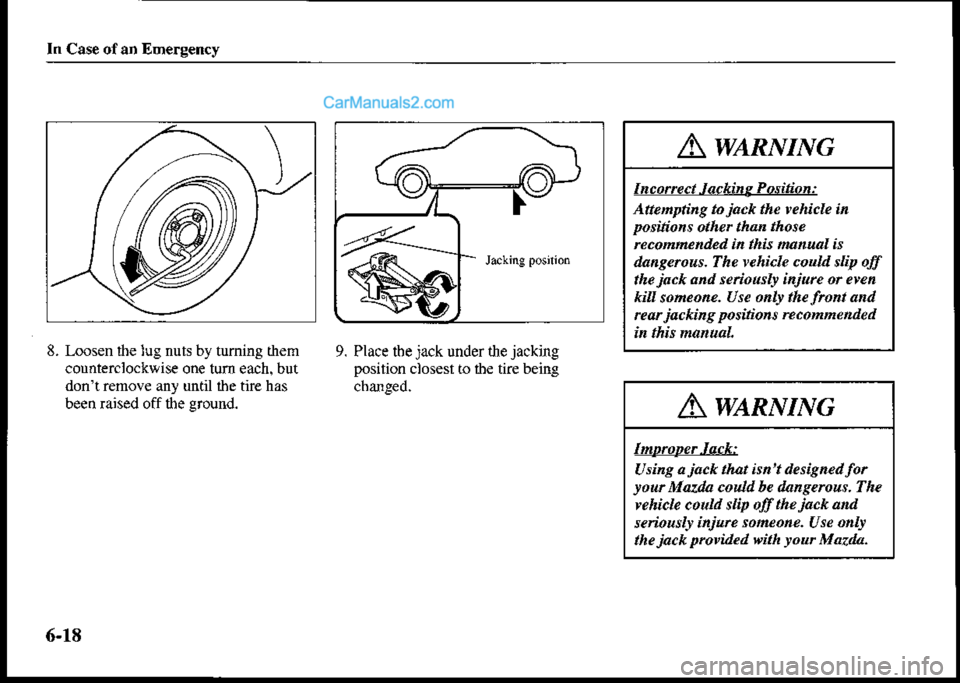
8. Loosen $e lug nuts by turning them
counterclockwise one tum each. but
don't remove any until ihe tire has
been raised off the groud.
9. Place tbe jack under the jacking
position closest io tbe tire being
cbanged.
Awtnvme
I nc orrc ct.l ackin g P osition :
Attenptilg tojack the rehicle in
positions other than those
nconne ded inthk Iu ual is
dansenus. The rehicle couu slip off
thejack and senoustr injure or even
kill someone. Use onlr the front and
rcarjacking positioN recomme ded
A waRlrnsc
Inuapcr,latk
Using a jack that isn't desiened foryo r Mazda codd be dengercus. The
rehick coua snp olf the jack a d
seiouslr inj rc someone. Use o lt
thejack ptovided dth rou Mozda.
6-18
Page 205 of 290
ln Case of an Em€rgency
A wLR.nrnyc
Pla.ing Objects Under the .Iack:
J.ckins the vehicte iith an object
u derthejack it dangerous. Thejack coutd sup a d soneone coud be
senousl! injured br the jack or the
fathns vehicte. Nert place objects
''-^,/A)
@
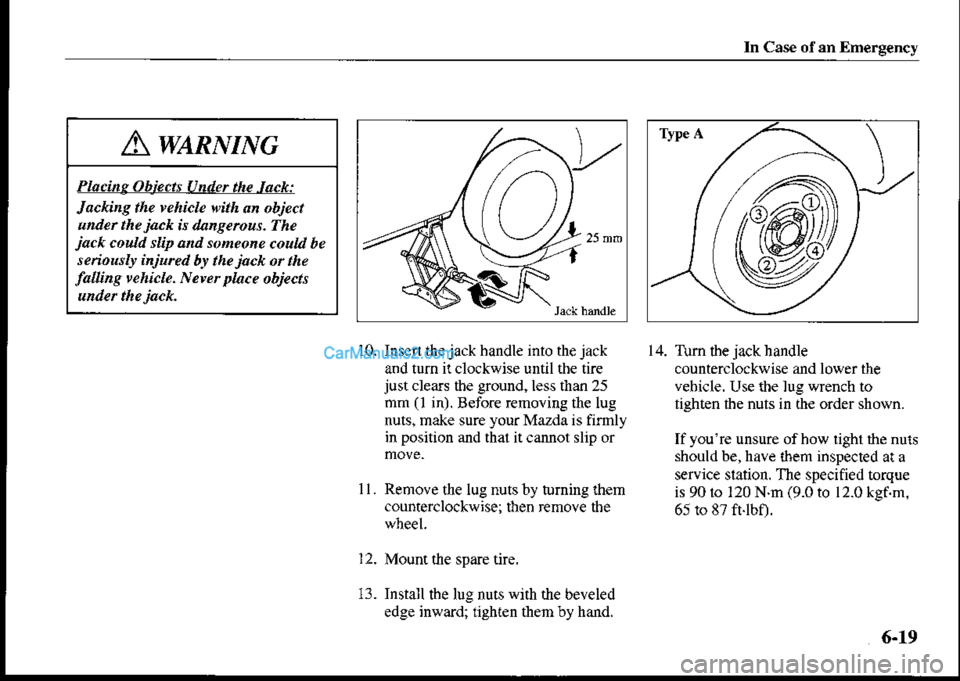
10. Insenthejack handle into thejack
and turn ir clockwise until the tirejust clears the ground, less than 25
rnm (l in). Betore removins the lug
nuts, make sure your Mazda is fimly
in position and thal it cannot dip or
11. Remove the lug nuts by turning rhem
counterclockwise; then remoYe the
12. Mount ihe spare tire.
13. Install the lug nurs with the beveled
edge inward; tighten them by hand.
14. Tum the jack handle
counterclockwise and lower the
vehicle. Use the lug wrench to
iighten lhe nuis in the order shown.
If you're unsure of how lighl the nuN
should be, have them inspected at a
service station. The specified torque
is 9010 120 N.m (9.0 to 12.0 kgf.rn.
65 ro 87 ft.lbo.
6-19
Page 207 of 290
ln Cas€ ofsn Emergency
,6
(@).:)F ri'e (rame
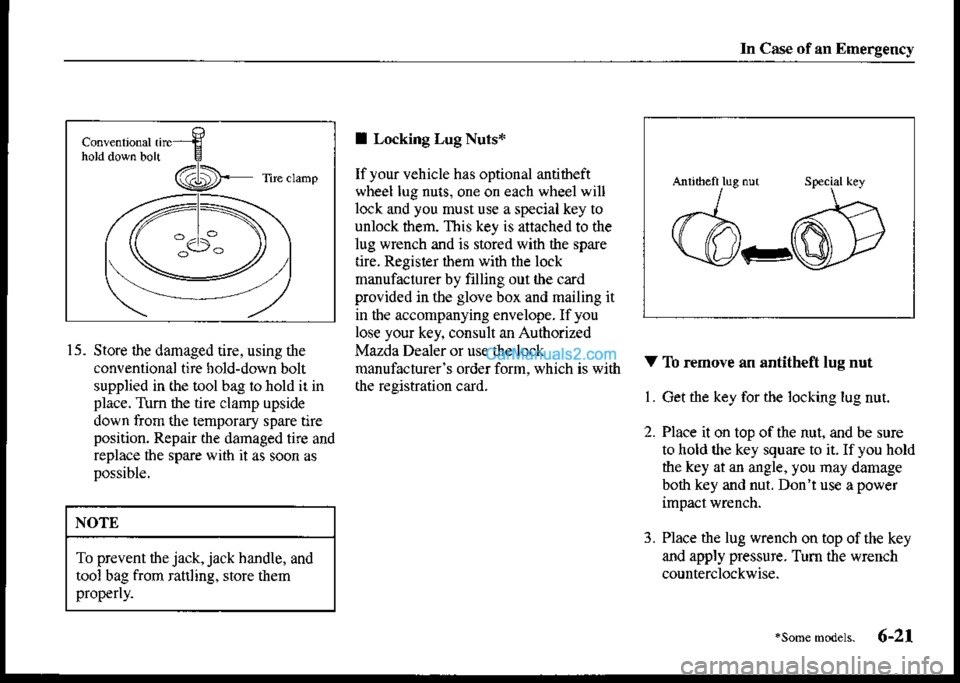
I Locking Lug Nuts*
Ifyour vehicle has optional antitheft
wheel lug nuas, one on each wheel will
lock and you must use a special key to
unlock them. This key is attached to the
lug wrench and is stored with the spare
lire. Regisler ihem with the lock
nanufaclurer by filling out lhe card
provided in rbe glove box and mailing it
in the accompanying envelope. If you
lose your key, consult an Authorized
Mazda Dealer or use tle lock
manufacturer's order form, which is widr
lhe registration card.
d--Gffi
15. Store the damaged tire, using the
convenlional tire hold-down bolt
supplied in (he tool bag 1() hold ir in
place. Tum the tir€ clarnp upside
down liom ahe temporary spare tire
position. Repair the damaged tire and
replace ihe spare with it as soon as
possible.
V Tb rcmove an antith€ft lug nut
L Get the key for the locking lug nut.
2. Place it on top of the nut, and be sure
to hold the key square to it. If you hold
the key at an angle, you may damage
both key and nut. Don't us€ apower
3. Place the lug wrench on top ofthe key
and apply pressure. Tum the wrench
counterclockwise.
NOTE
To prevent $ejack,jack handle, and
tool bag from rattling, store them
properly.
.soD€ modeh. 6-21
Page 208 of 290

In Case of sn Emergency
V To replace the nut
l Place the key on top of the nut.
2. Place ihe lug wrench on top of the key.
apply pressure, and tum itclockwise.
I Spare fir€
Your Mazda has a temporary spare tire.
Ii lighier and smaller than a
conventional tir€, is designed only for
emergency use and should be used only
for VERY shon periods. Temporary
spares should NE\.ER b€ used for long
drives or extended periods.
A wamrnrc
Diving with a Tenpotury Spa&n&
on Ic. or Snow:
Dit'ing with a sparc nrc on th. ftont(dtivins) wheek on ice or sno$,is
dancerous- Handlins N'iA be
affected. You couu bse contot of
the vehicle and hat'e an accident. Put
the spa.e tirc on the rcar axle an,l
nove a rcgubr tbe to the Imnt.
6.22
Page 247 of 290

Maint€nance
_<---.--..-.--A waRlnarc
S ubs titute Washer F lnid:
Using tudiator antifreeze as vather
lluid is dansemus. If sprared on the
windshieu, it '.rilt dirty the
*indshieu, allect Jour visibw and
couA result in an accident. Use onlr
rtindshieu vashetflui.d ot pl&in
water in the reservoi.
I Body Lubrication
All moving points of the body, such as
door and hood hinges and locks, should
be lubicated each time the engine oil ischanged. Use a nonfreezing lubricanr onlocks during €old weather.
Make sure the engine hood's secondary
latch keeps the hood from opening when
the primary latch is released.
I Inspecting Washer fluid Lev€l
Inspectfluid level in ihe washer fluid
reservoiq add fluid if necessary.
The iop of lhe float should be between
FULL and LOW.
Use plain waterjffluid is unavailabie.
But use only washerfluid in cold weather
to prevent it from freezing.
4.27
Page 250 of 290
Maintenance
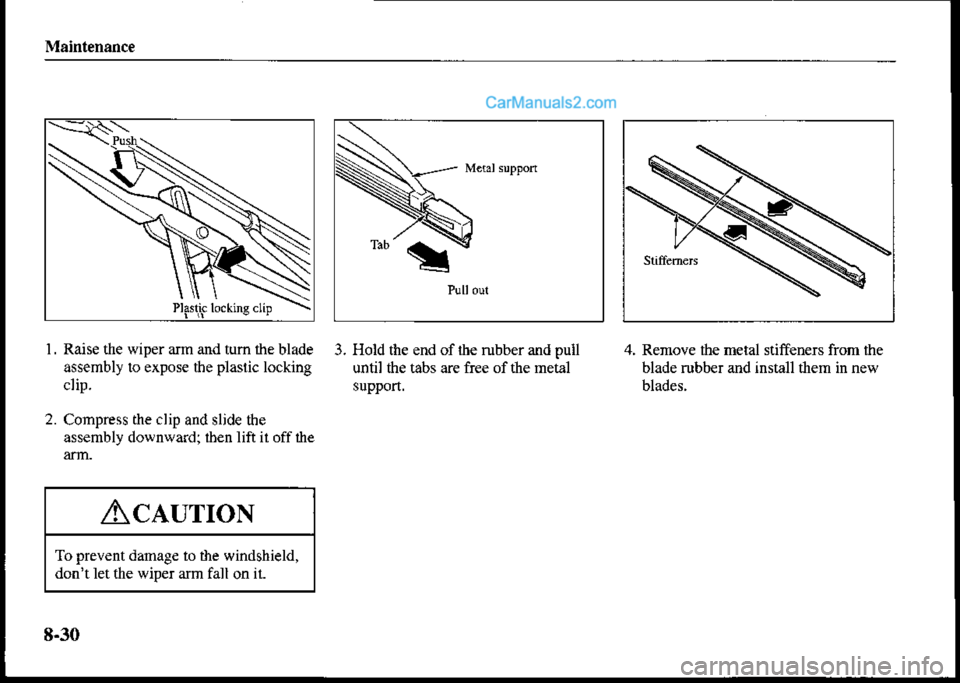
Raise the wiper arm and tum the blade
assembly to expose the plastic locking
clip.
Compress the clip and sljde the
assembly downward; iben lift il off ihe
3. Hold the end of rhe rubber and puil
until the tabs are free of the metal
suppon.
4. Remove the metal stiffeners from the
blade rubb€r and installdlem in new
Ac.turroN
To prevent damag€ to the windshield,
don't let rhe wiper arm fall on i1.
8-30
Page 284 of 290
Page
A
Add'On Non Genuine Paris and
Accesories .................. -. -.. 9 7
Air Bag Restnint Syslem
Supplenental Resfiaint Syslem . . . . . 2-3O
waminglight ................... 5-31
Aluminun Wheel Maintenance ........ 7-8
Ant€nna ......................... 5-86
Antil@kBEke System (ABS) ........ 5 13
Waminglight .......-........-.. 5 30
Ashtmy.......-.................. 5-3E
ADdio System .... -. ......... - 5 56,5 57
Drivinglips...........-.......... 5 8
Fluid level . . . . . . . . . . . . . . . . . . . . . . 8-25
Overdnve ....................... 5-9
Shift-locksystem ................ 5-10
Transaxleranges .................. 5-7
Page
B
Battery .......................... 8-31
Charging system waming light .... -. 5 28
Jumpstaning ..........-...... -.. 6-4
Beforc Driling
Afte! getringin ..-... -..-..-.......1-6
Beforc g€ltingin ..,.,..,.,.,.,.,.. +6
Body Lubrication ...... - -... -...... a-27
Antilo.kbrakesysten (ABS) .. -.... 5 13
Pluidlevel ...................... E-23
Foo! brake . . . . . . . . . . . . . . . . . . . . . . 5 I I
Pad wear indicator . . . . . . . . . . - . - . . 5 12
ParKngbrake ......... -...... -.. 5-lZ
System weinS light -.. .. -.. -. ... 5-26
BEaklnPeriod ......-....-........ +6
BrighrMetal Mainiemnce, -. -....,.., 7-7
Headright......................- 8,37
Red........................... 8-43
Buld Replacenenr, Front,
interior ..................... 8-40, 8-41
Page
C
Capacities.............-.......... l0-4
(see Emission Conrol Slstem)
CenterConsole.................... 5-40
Chains ....-.....--...-...-...... 4-10
ChangingaFlatTirc--.....-....... - 6 16
ChdgiDgCoolani ............-.... 8'20
Chdging the Oil .................. 8-18
Cheging Systen wamjng Light .. .. .. 5-28
Check Engine Light . . . . . . . . . . . - . . . . 5-29
Ct'ecking
Automatic transaxlefluid ]evel...... 8-25
Brake/clulch fluid level............ E-23
Coolant1eveI.................... 8'19
Engineoillevel .................. 8-l?
Power steering fluid level ..........8-24
washer fluid level . . . . - . . . . . . . - . . . 8'27
Child Restnint, P@autions. ......... 2-20
Child Safety t-ockforRearD@r.. -. -.. 3-6
Child-RestFinr Syst€mr............. 2-22
Installing ....-................ -. 2-23
CigareueLighter .................. 5-3E
Ciean'ng
Dashb@rd....................... 7-9
Laphhoulderbeltwebbing -........ 7-10
rt-2