lock MAZDA MODEL SPEED MX-5 MIATA 2005 Repair Manual
[x] Cancel search | Manufacturer: MAZDA, Model Year: 2005, Model line: MODEL SPEED MX-5 MIATA, Model: MAZDA MODEL SPEED MX-5 MIATA 2005Pages: 298, PDF Size: 3.03 MB
Page 153 of 298
Black plate (153,1)
Seek tuning
Pressing the seek tuning button (
,)
will cause the tuner to seek a higher or
lower frequency automatically.
NOTE
If you continue to press and hold the
button, the frequency will continue
changing without stopping.
Scan tuning
Press the scan button (
)to
automatically sample strong stations.
Scanning stops at each station for about 5
seconds. To hold a station, merely press
the scan button (
) again during this
interval.
Preset channel tuning
The 6 preset channels can be used to store
6 AM and 12 FM stations.
1. To set a channel first select AM, FM1, or FM2. Tune to the station you want.
2. Depress a channel preset button for about 2 seconds until a beep is heard.
The preset channel number and station
frequency will be displayed. The
station is now held in the memory.
NOTE
When the clock is displayed, the preset
channel number will not be displayed.
3. Repeat this operation for the other stations and bands you want to store.
To tune one in the memory, select AM,
FM1, or FM2 and then press its
channel preset button. The station
frequency and the channel number will
be displayed.
NOTE
If the power supply is interrupted (fuse
blows or the battery is disconnected),
the preset channels will be canceled.
Auto memory tuning
This is especially useful when driving in
an area where the local stations are not
known. Additional AM/FM stations can
be stored without disturbing the
previously set channels.
Press and hold the auto memory button
(
) for about 2 seconds until a beep
is heard; the system will automatically
scan and temporarily store up to 6 stations
with the strongest frequencies in each
selected band in that area.
After scanning is completed, the station
with the strongest frequency will be tuned
and its frequency displayed.
Press and release the auto memory button
(
) to recall stations from the auto-
stored stations. One stored station will be
selected each time; its frequency and
channel number will be displayed.
NOTE
lWhen the clock is displayed, the
preset channel number will not be
displayed.
lIf no stations can be tuned after
scanning operations, “A ”will be
displayed.
Interior Comfort
Audio System
6-27
MX-5 Miata_8T72-EA-04G_Edition2 Page153
Tuesday, August 31 2004 11:24 AM
Form No.8T72-EA-04G
Page 158 of 298
Black plate (158,1)
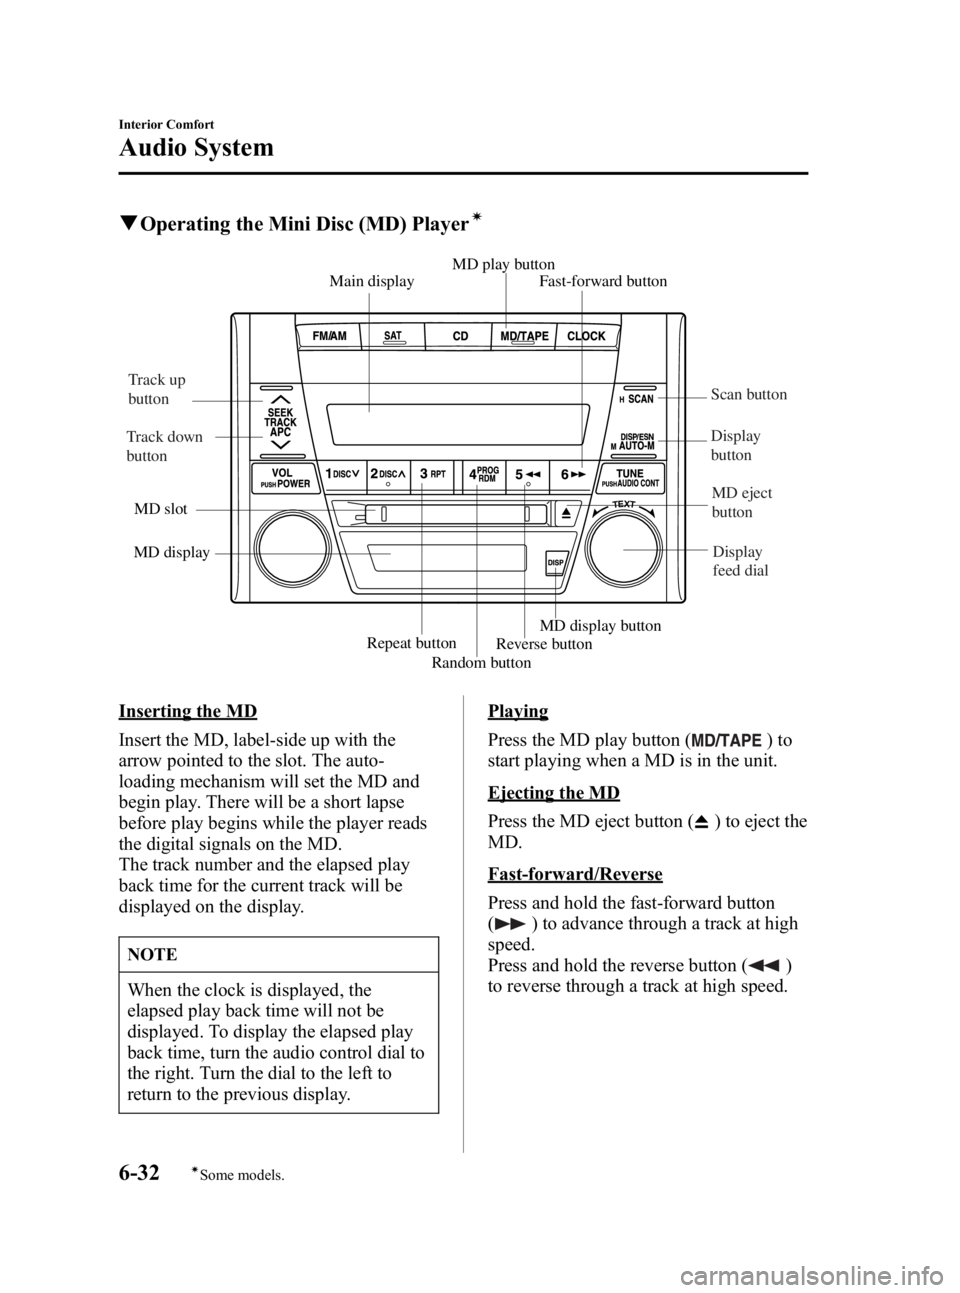
qOperating the Mini Disc (MD) Playerí
Main display Fast-forward button
MD play button
Reverse button
Repeat button
MD display
MD slot
Random buttonMD display button
Track up
button
Track down
button Scan button
Display
button MD eject
button
Display
feed dial
Inserting the MD
Insert the MD, label-side up with the
arrow pointed to the slot. The auto-
loading mechanism will set the MD and
begin play. There will be a short lapse
before play begins while the player reads
the digital signals on the MD.
The track number and the elapsed play
back time for the current track will be
displayed on the display.
NOTE
When the clock is displayed, the
elapsed play back time will not be
displayed. To display the elapsed play
back time, turn the audio control dial to
the right. Turn the dial to the left to
return to the previous display.
Playing
Press the MD play button (
)to
start playing when a MD is in the unit.
Ejecting the MD
Press the MD eject button (
) to eject the
MD.
Fast-forward/Reverse
Press and hold the fast-forward button
(
) to advance through a track at high
speed.
Press and hold the reverse button (
)
to reverse through a track at high speed.
6-32
Interior Comfort
íSome models.
Audio System
MX-5 Miata_8T72-EA-04G_Edition2 Page158
Tuesday, August 31 2004 11:24 AM
Form No.8T72-EA-04G
Page 162 of 298
Black plate (162,1)
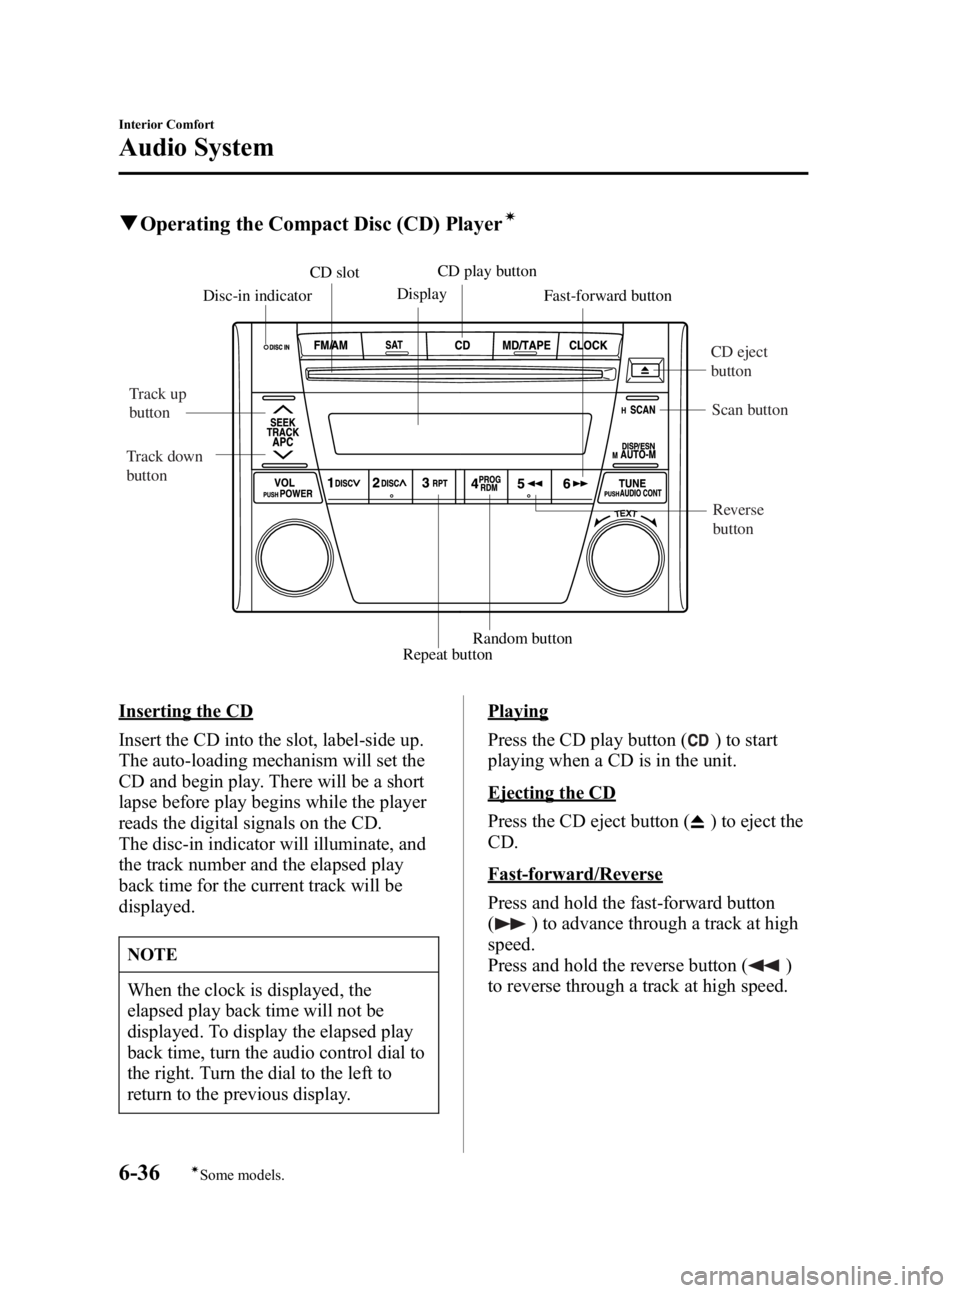
qOperating the Compact Disc (CD) Playerí
Display
CD slot
Disc-in indicator CD play button
Random button
Repeat button Fast-forward button
CD eject
button
Scan button
Reverse
button
Track up
button
Track down
button
Inserting the CD
Insert the CD into the slot, label-side up.
The auto-loading mechanism will set the
CD and begin play. There will be a short
lapse before play begins while the player
reads the digital signals on the CD.
The disc-in indicator will illuminate, and
the track number and the elapsed play
back time for the current track will be
displayed.
NOTE
When the clock is displayed, the
elapsed play back time will not be
displayed. To display the elapsed play
back time, turn the audio control dial to
the right. Turn the dial to the left to
return to the previous display.
Playing
Press the CD play button (
) to start
playing when a CD is in the unit.
Ejecting the CD
Press the CD eject button (
) to eject the
CD.
Fast-forward/Reverse
Press and hold the fast-forward button
(
) to advance through a track at high
speed.
Press and hold the reverse button (
)
to reverse through a track at high speed.
6-36
Interior Comfort
íSome models.
Audio System
MX-5 Miata_8T72-EA-04G_Edition2 Page162
Tuesday, August 31 2004 11:24 AM
Form No.8T72-EA-04G
Page 164 of 298
Black plate (164,1)
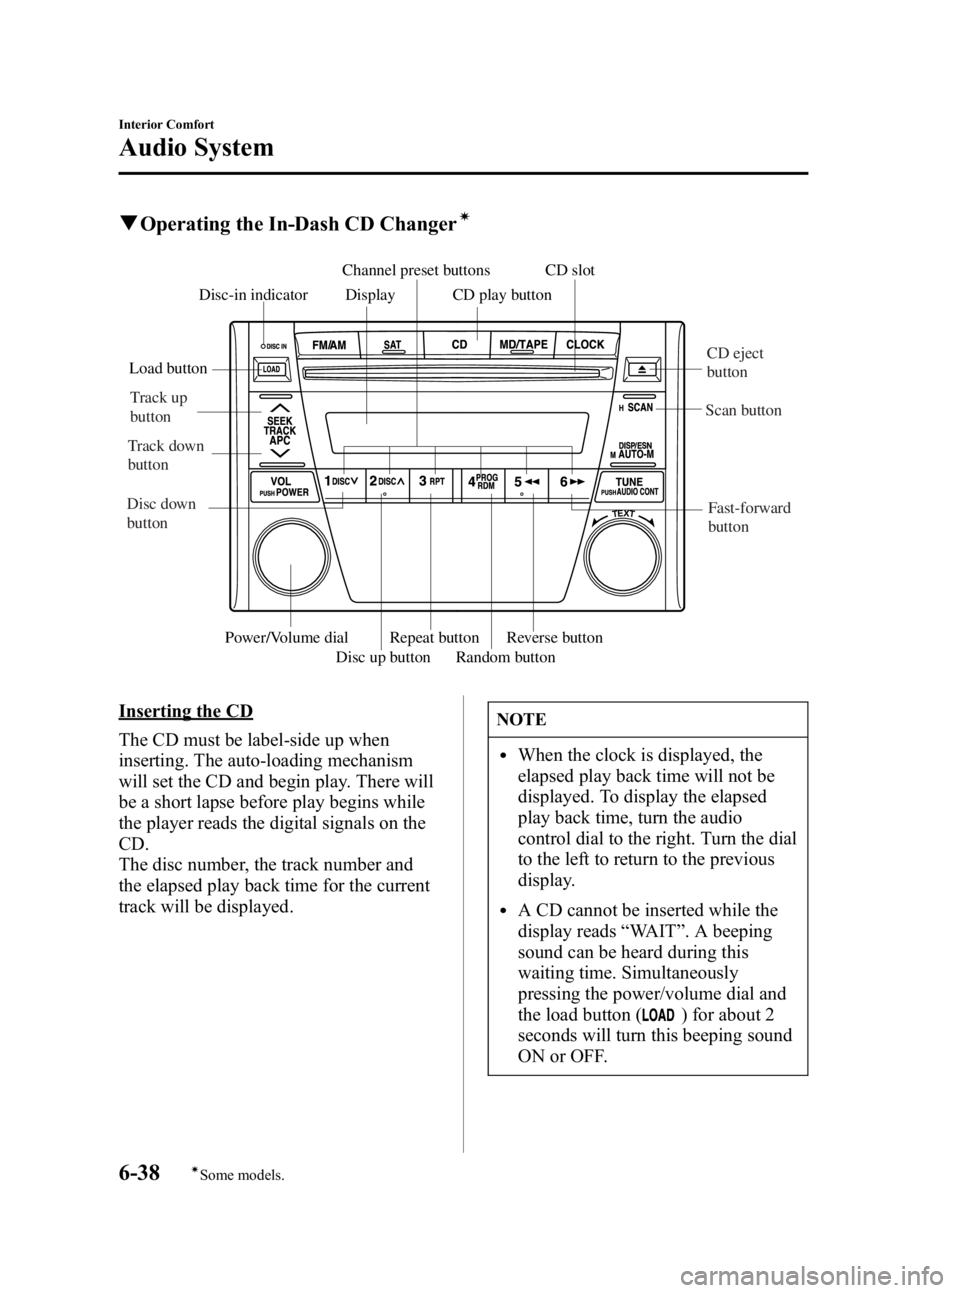
qOperating the In-Dash CD Changerí
Display CD slot
Disc-in indicator CD play button
Random button
Repeat button
Disc up button Reverse button
Load button
Power/Volume dial
Channel preset buttons
CD eject
button
Scan button
Fast-forward
button
Track up
button
Track down
button
Disc down
button
Inserting the CD
The CD must be label-side up when
inserting. The auto-loading mechanism
will set the CD and begin play. There will
be a short lapse before play begins while
the player reads the digital signals on the
CD.
The disc number, the track number and
the elapsed play back time for the current
track will be displayed.NOTE
lWhen the clock is displayed, the
elapsed play back time will not be
displayed. To display the elapsed
play back time, turn the audio
control dial to the right. Turn the dial
to the left to return to the previous
display.
lA CD cannot be inserted while the
display reads “WAIT ”. A beeping
sound can be heard during this
waiting time. Simultaneously
pressing the power/volume dial and
the load button (
) for about 2
seconds will turn this beeping sound
ON or OFF.
6-38
Interior Comfort
íSome models.
Audio System
MX-5 Miata_8T72-EA-04G_Edition2 Page164
Tuesday, August 31 2004 11:24 AM
Form No.8T72-EA-04G
Page 169 of 298
Black plate (169,1)
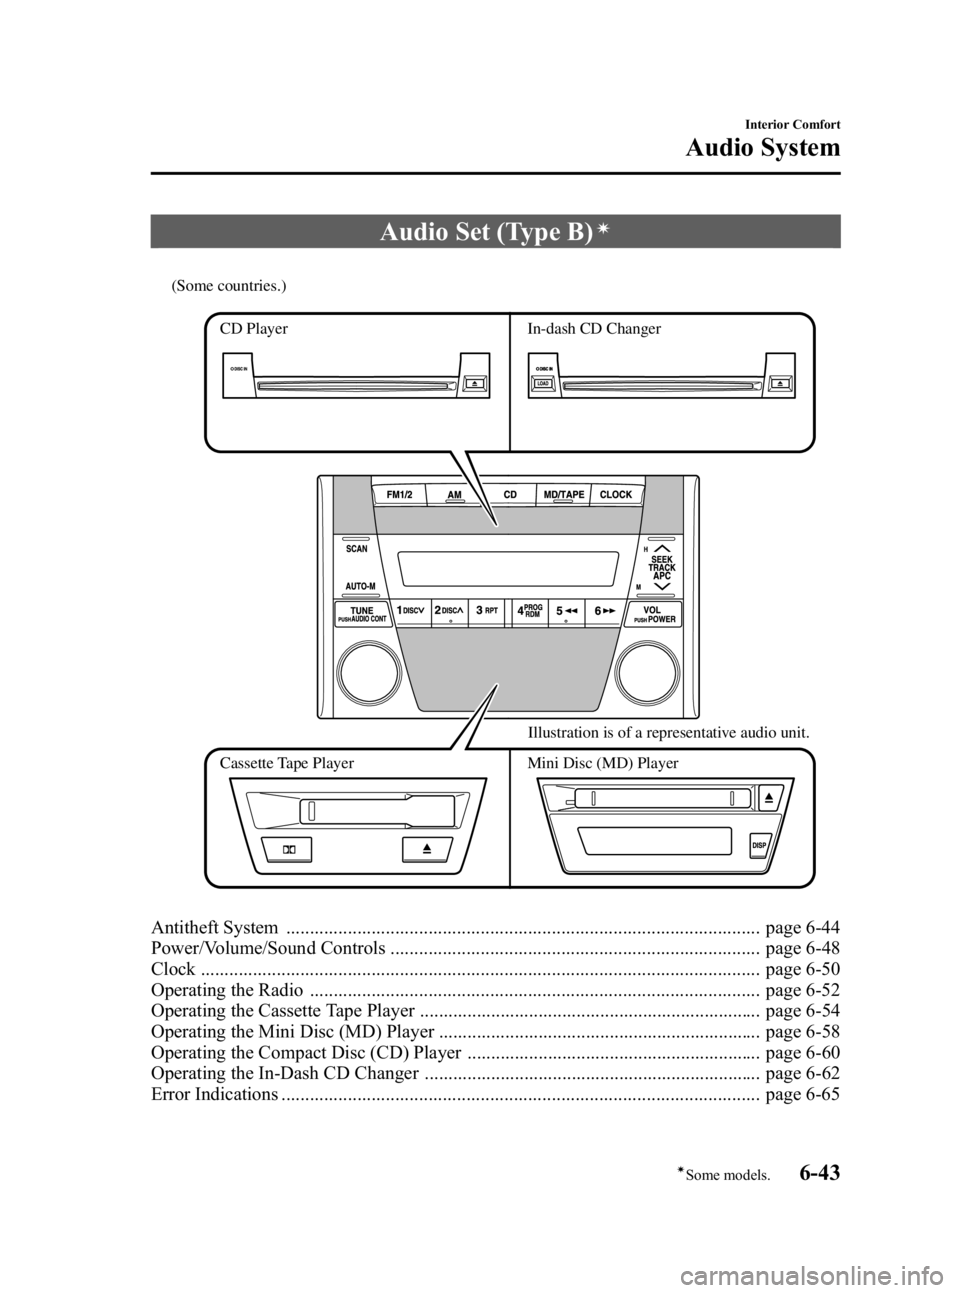
Audio Set (Type B)í
CD Player In-dash CD Changer
Cassette Tape Player Mini Disc (MD) Player Illustration is of a representative audio unit.
(Some countries.)
Antitheft System .................................................................................................... page 6-44
Power/Volume/Sound Controls .............................................................................. page 6-48
Clock ...................................................................................................................... page 6-50
Operating the Radio ............................................................................................... page 6-52
Operating the Cassette Tape Player ........................................................................ page 6-54
Operating the Mini Disc (MD) Player .................................................................... page 6-58
Operating the Compact Disc (CD) Player .............................................................. page 6-60
Operating the In-Dash CD Changer ....................................................................... page 6-62
Error Indications ..................................................................................................... page 6-65
Interior Comfort
Audio System
6-43íSome models.
MX-5 Miata_8T72-EA-04G_Edition2 Page169
Tuesday, August 31 2004 11:24 AM
Form No.8T72-EA-04G
Page 176 of 298
Black plate (176,1)
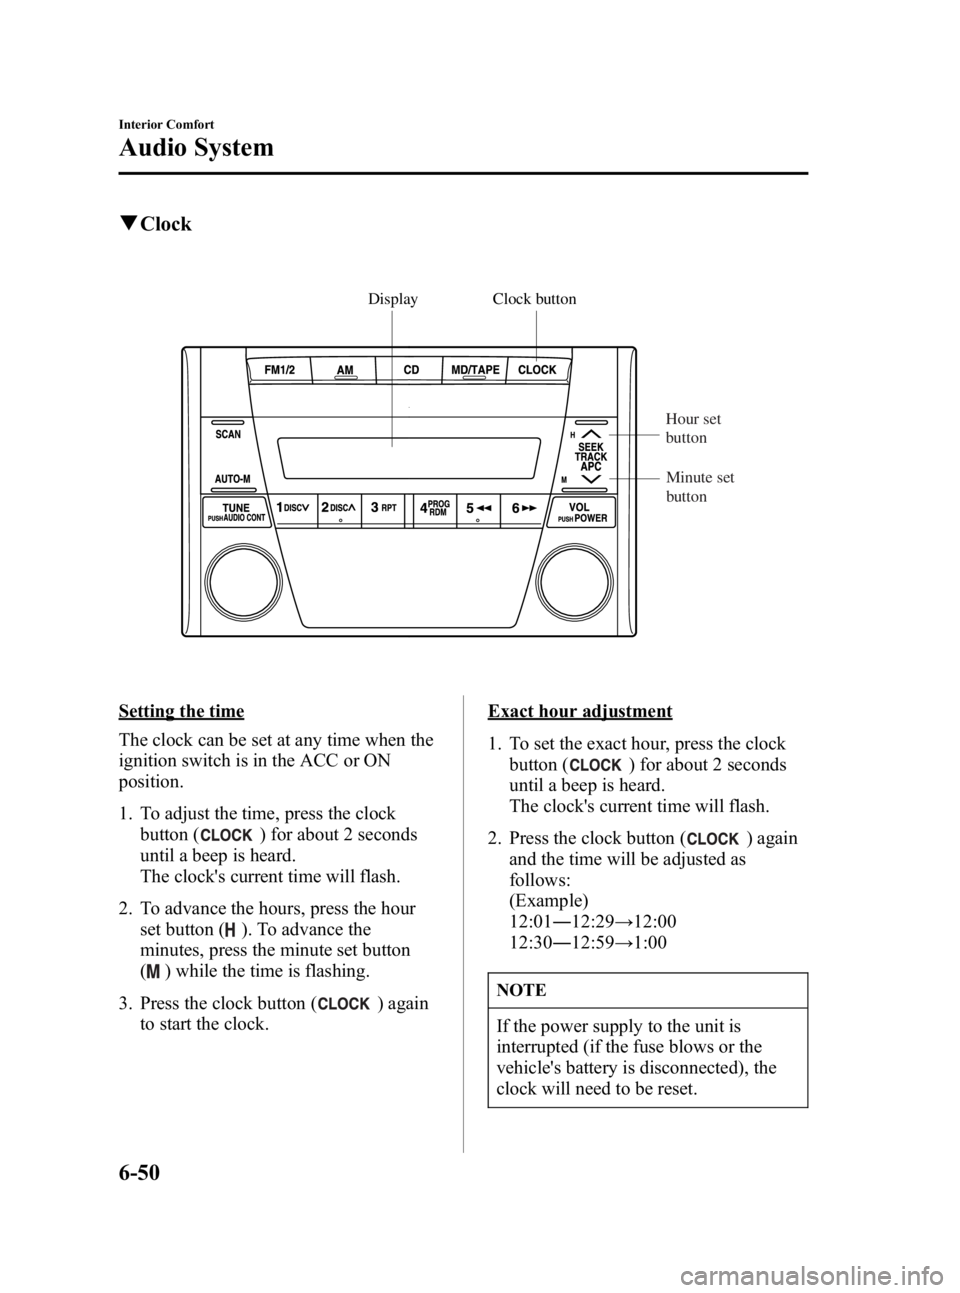
qClock
Display Clock button
Hour set
button
Minute set
button
Setting the time
The clock can be set at any time when the
ignition switch is in the ACC or ON
position.
1. To adjust the time, press the clock button (
) for about 2 seconds
until a beep is heard.
The clock's current time will flash.
2. To advance the hours, press the hour set button (
). To advance the
minutes, press the minute set button
(
) while the time is flashing.
3. Press the clock button (
) again
to start the clock.
Exact hour adjustment
1. To set the exact hour, press the clock button (
) for about 2 seconds
until a beep is heard.
The clock's current time will flash.
2. Press the clock button (
) again
and the time will be adjusted as
follows:
(Example)
12:01 ―12:29 →12:00
12:30 ―12:59 →1:00
NOTE
If the power supply to the unit is
interrupted (if the fuse blows or the
vehicle's battery is disconnected), the
clock will need to be reset.
6-50
Interior Comfort
Audio System
MX-5 Miata_8T72-EA-04G_Edition2 Page176
Tuesday, August 31 2004 11:24 AM
Form No.8T72-EA-04G
Page 177 of 298
Black plate (177,1)
Changing the display mode
The display on the unit can be changed by
pressing the clock button (
). This
alternates the display between time and
audio. When the clock mode has been
selected, the time will be displayed.
NOTE
If audio operation is selected while the
time mode is on, the selected audio
mode will be displayed for 10 seconds,
then the display will revert to the time
mode.
Interior Comfort
Audio System
6-51
MX-5 Miata_8T72-EA-04G_Edition2 Page177
Tuesday, August 31 2004 11:24 AM
Form No.8T72-EA-04G
Page 196 of 298
Black plate (196,1)
Storage Compartments
WARNING
Open Storage Boxes:
Driving with the storage boxes open is
dangerous. To reduce the possibility of
injury in an accident or a sudden stop,
keep the storage boxes closed when
driving.
CAUTION
Don't leave eyeglasses or lighters in the
storage boxes while parked under the
sun. A lighter could explode or the
plastic material in eyeglasses could
deform and crack from high
temperature.
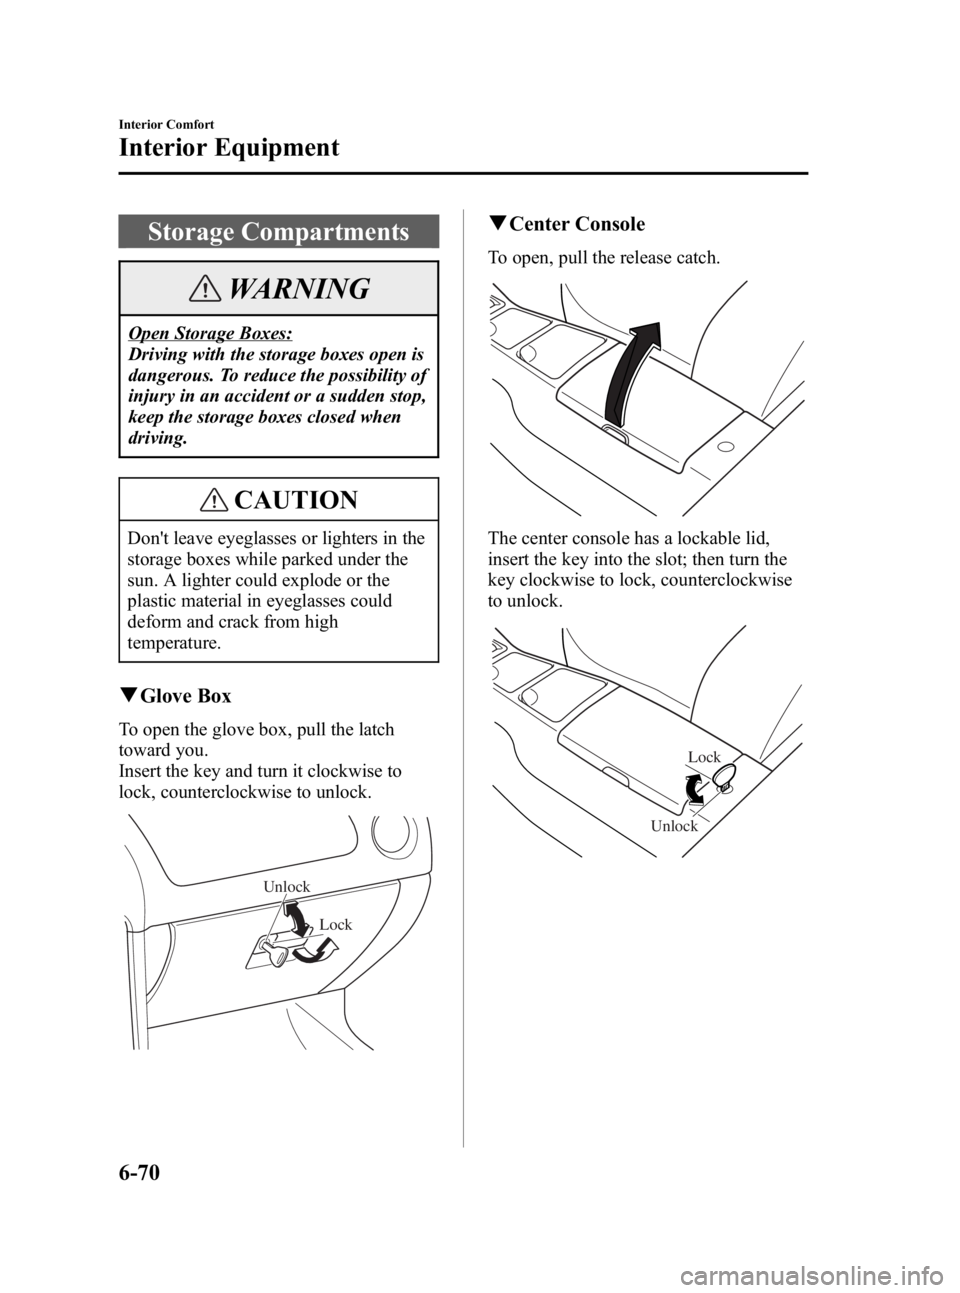
qGlove Box
To open the glove box, pull the latch
toward you.
Insert the key and turn it clockwise to
lock, counterclockwise to unlock.
Unlock
Lock
qCenter Console
To open, pull the release catch.
The center console has a lockable lid,
insert the key into the slot; then turn the
key clockwise to lock, counterclockwise
to unlock.
Unlock Lock
6-70
Interior Comfort
Interior Equipment
MX-5 Miata_8T72-EA-04G_Edition2 Page196
Tuesday, August 31 2004 11:25 AM
Form No.8T72-EA-04G
Page 197 of 298
Black plate (197,1)
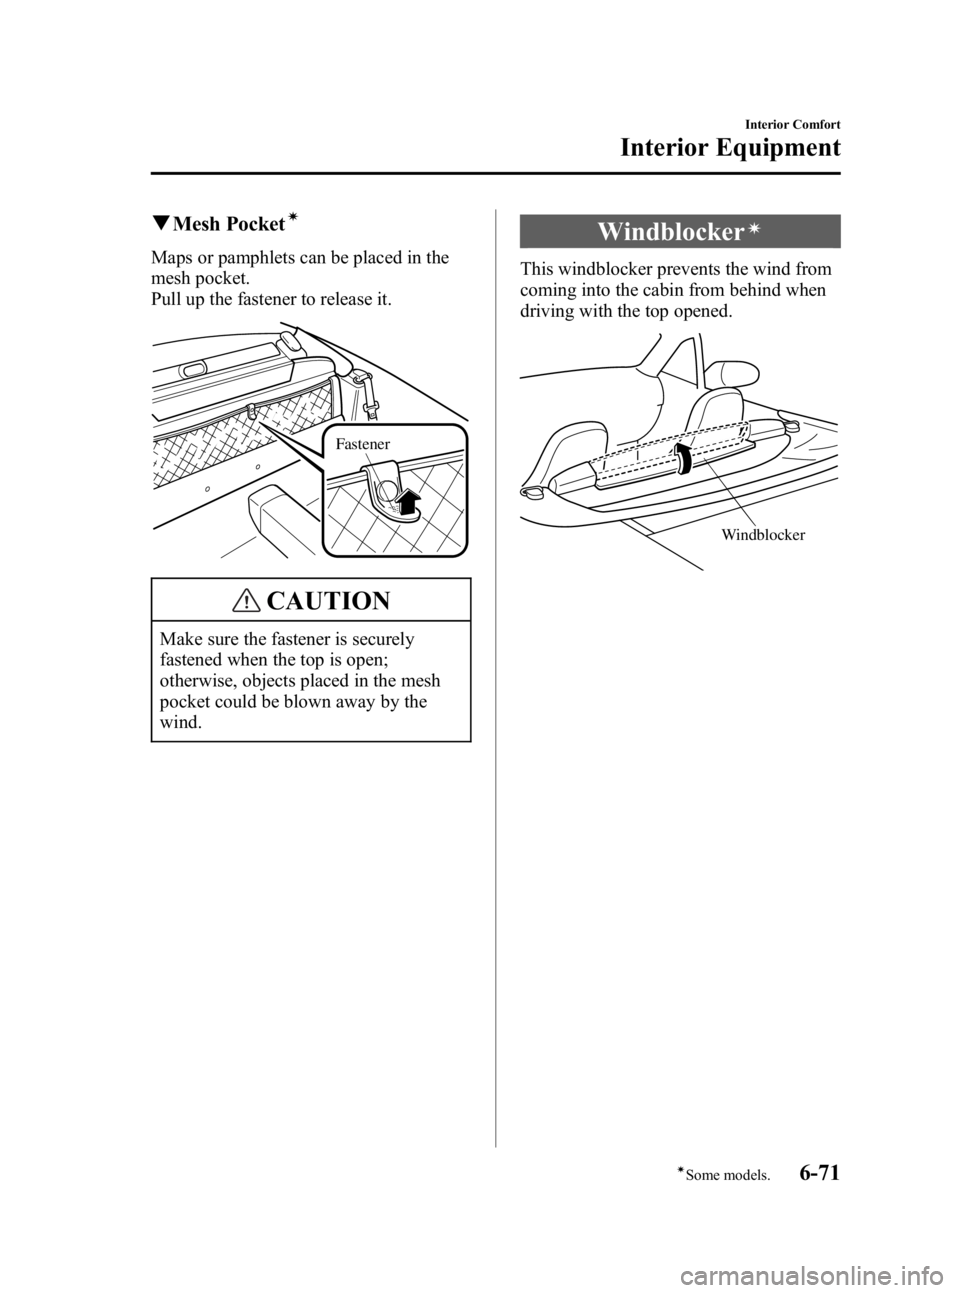
qMesh Pocketí
Maps or pamphlets can be placed in the
mesh pocket.
Pull up the fastener to release it.
Fastener
CAUTION
Make sure the fastener is securely
fastened when the top is open;
otherwise, objects placed in the mesh
pocket could be blown away by the
wind.
Windblockerí
This windblocker prevents the wind from
coming into the cabin from behind when
driving with the top opened.
Windblocker
Interior Comfort
Interior Equipment
6-71íSome models.
MX-5 Miata_8T72-EA-04G_Edition2 Page197
Tuesday, August 31 2004 11:25 AM
Form No.8T72-EA-04G
Page 202 of 298
Black plate (202,1)
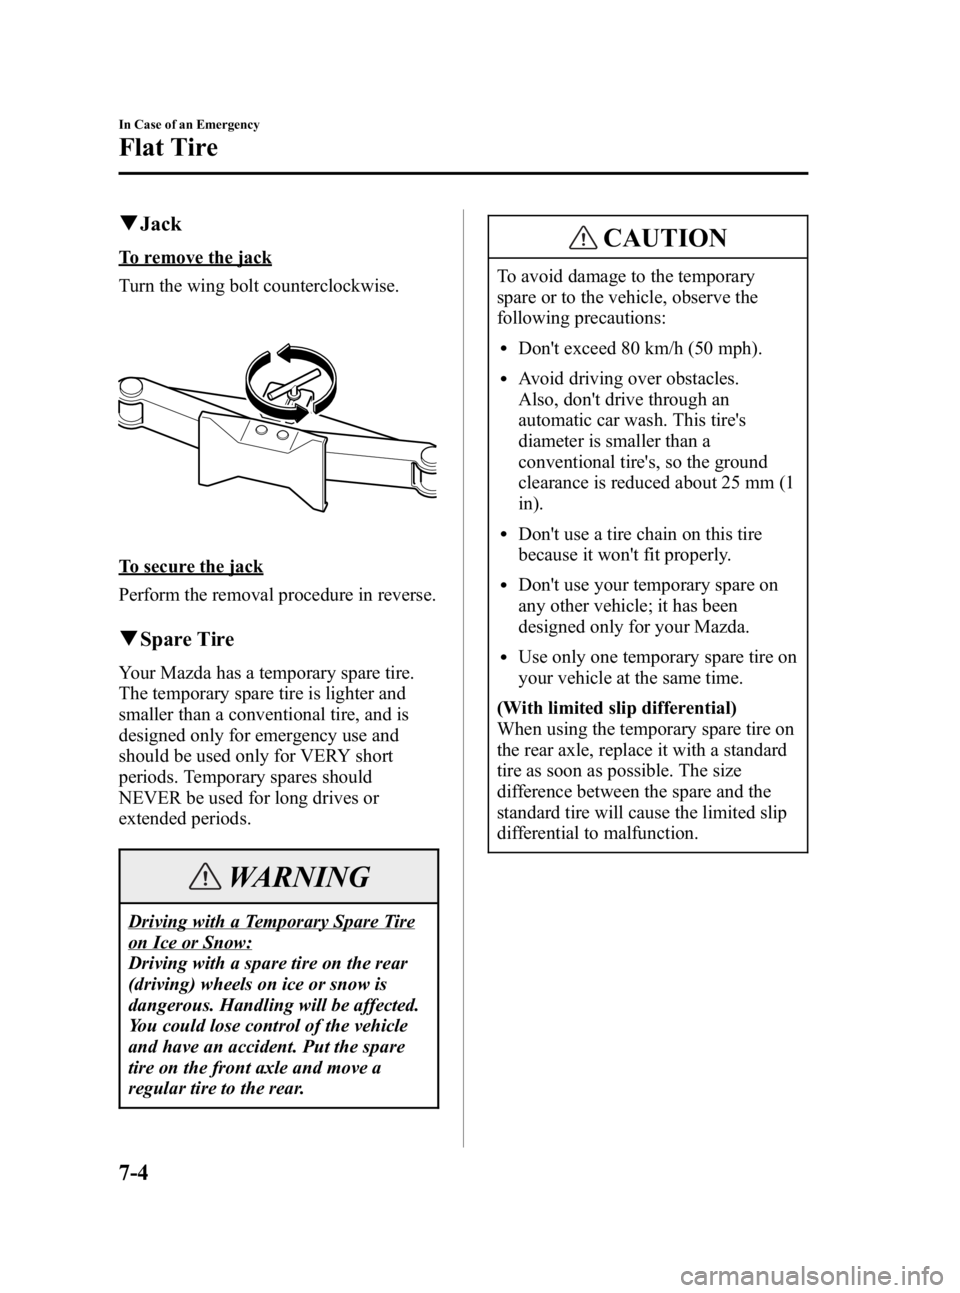
qJack
To remove the jack
Turn the wing bolt counterclockwise.
To secure the jack
Perform the removal procedure in reverse.
qSpare Tire
Your Mazda has a temporary spare tire.
The temporary spare tire is lighter and
smaller than a conventional tire, and is
designed only for emergency use and
should be used only for VERY short
periods. Temporary spares should
NEVER be used for long drives or
extended periods.
WARNING
Driving with a Temporary Spare Tire
on Ice or Snow:
Driving with a spare tire on the rear
(driving) wheels on ice or snow is
dangerous. Handling will be affected.
You could lose control of the vehicle
and have an accident. Put the spare
tire on the front axle and move a
regular tire to the rear.
CAUTION
To avoid damage to the temporary
spare or to the vehicle, observe the
following precautions:
lDon't exceed 80 km/h (50 mph).
lAvoid driving over obstacles.
Also, don't drive through an
automatic car wash. This tire's
diameter is smaller than a
conventional tire's, so the ground
clearance is reduced about 25 mm (1
in).
lDon't use a tire chain on this tire
because it won't fit properly.
lDon't use your temporary spare on
any other vehicle; it has been
designed only for your Mazda.
lUse only one temporary spare tire on
your vehicle at the same time.
(With limited slip differential)
When using the temporary spare tire on
the rear axle, replace it with a standard
tire as soon as possible. The size
difference between the spare and the
standard tire will cause the limited slip
differential to malfunction.
7-4
In Case of an Emergency
Flat Tire
MX-5 Miata_8T72-EA-04G_Edition2 Page202
Tuesday, August 31 2004 11:25 AM
Form No.8T72-EA-04G