length MAZDA MX-5 1994 User Guide
[x] Cancel search | Manufacturer: MAZDA, Model Year: 1994, Model line: MX-5, Model: MAZDA MX-5 1994Pages: 1708, PDF Size: 82.34 MB
Page 429 of 1708
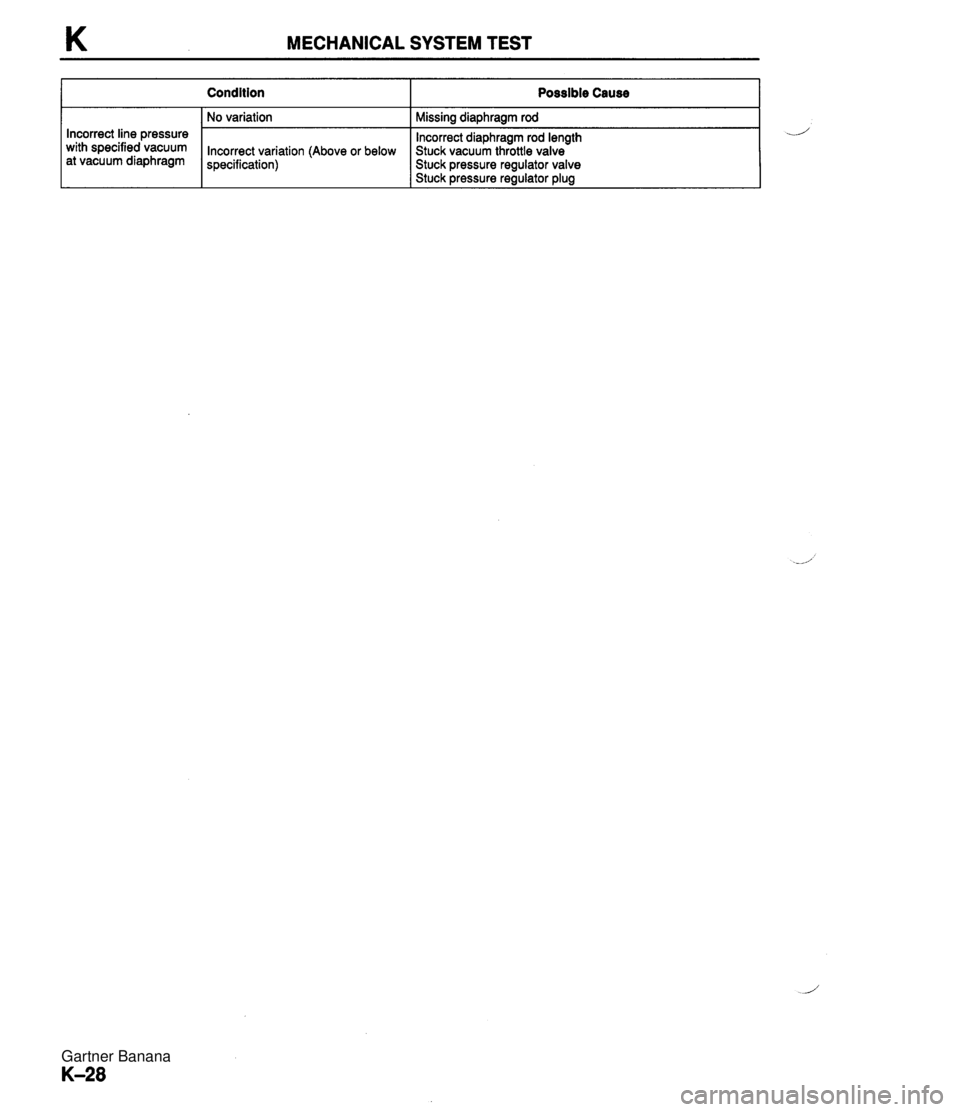
K MECHANICAL SYSTEM TEST Incorrect line pressure with specified vacuum at vacuum diaphragm Condition No variation Possible Cause Missing diaphragm rod lncorrect variation (Above or below specification) Incorrect diaphragm rod length Stuck vacuum throttle valve Stuck pressure regulator valve Stuck Dressure regulator ~lua Gartner Banana
Page 473 of 1708
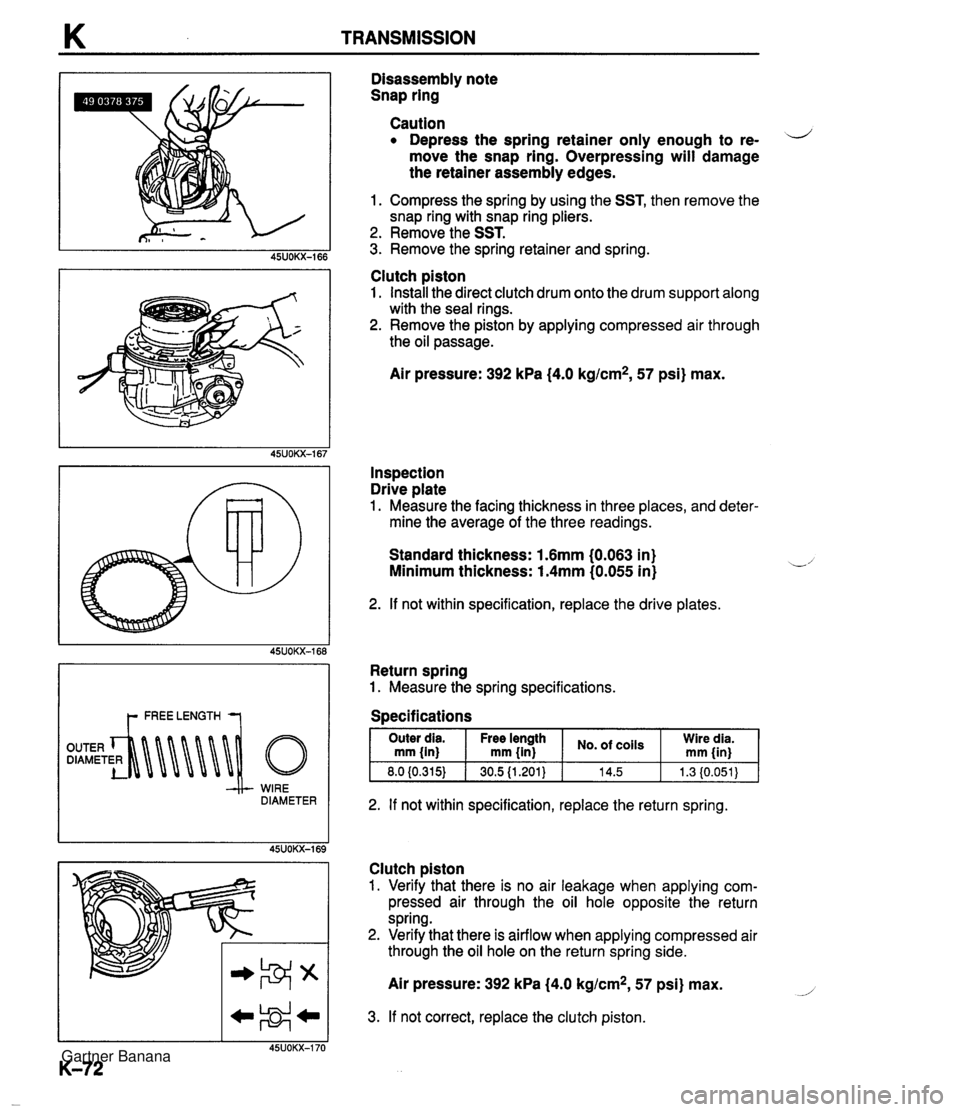
WIRE DIAMETER Disassembly note Snap ring Caution Depress the spring retainer only enough to re- d move the snap ring. Overpressing will damage the retainer assembly edges. 1. Compress the spring by using the SST, then remove the snap ring with snap ring pliers. 2. Remove the SST. 3. Remove the spring retainer and spring. Clutch piston 1. Install the direct clutch drum onto the drum support along with the seal rings. 2. Remove the piston by applying compressed air through the oil passage. Air pressure: 392 kPa {4.0 kglcm2, 57 psi) max. Inspection Drive plate 1. Measure the facing thickness in three places, and deter- mine the average of the three readings. Standard thickness: 1.6mm (0.063 in) Minimum thickness: 1.4mm (0.055 in) 2. If not within specification, replace the drive plates. Return spring 1. Measure the spring specifications. Specifications 2. If not within specification, replace the return spring. Clutch piston 1. Verify that there is no air leakage when applying com- pressed air through the oil hole opposite the return spring. 2. Verify that there is airflow when applying compressed air through the oil hole on the return spring side. - Outer dia mm {in) 8.0 (0.315) Air pressure: 392 kPa (4.0 kg/cm2, 57 psi) max. No. ,oils 14.5 - Free length mm {in) 30.5 {1.201} 3. If not correct, replace the clutch piston. Wire dia. rnm {in) 1.3 (0.051) Gartner Banana
Page 478 of 1708

TRANSMISSION K Disassembly note Piston assembly Remove the piston assembly from the body by applying compressed air through the oil passage hole. Air pressure: 392 kPa f4.0 kg/cm2,57 psi) max. Inspection Return spring 1. Measure the spring specifications. I Outer dia. I Free length I No. of tolls I mm (in) mm {in) mm {in} 2. If not within specification, replace the return spring. Assembly procedure 1. Apply ATF to the new seal rings, and install them onto the body. 2. Apply ATF to the new O-rings, and install them onto the piston assembly. 3. Apply ATF to the piston assembly and body. 4. Apply even pressure to the perimeter of the piston, and install it into the body. 5. Verify that the piston can be turned by hand. If it cannot, then remove it and check for damage to the seal ring. 6. Apply ATF to the piston stem and washer, and install them into the body. 7. Loosely tighten the nut. Gartner Banana
Page 481 of 1708
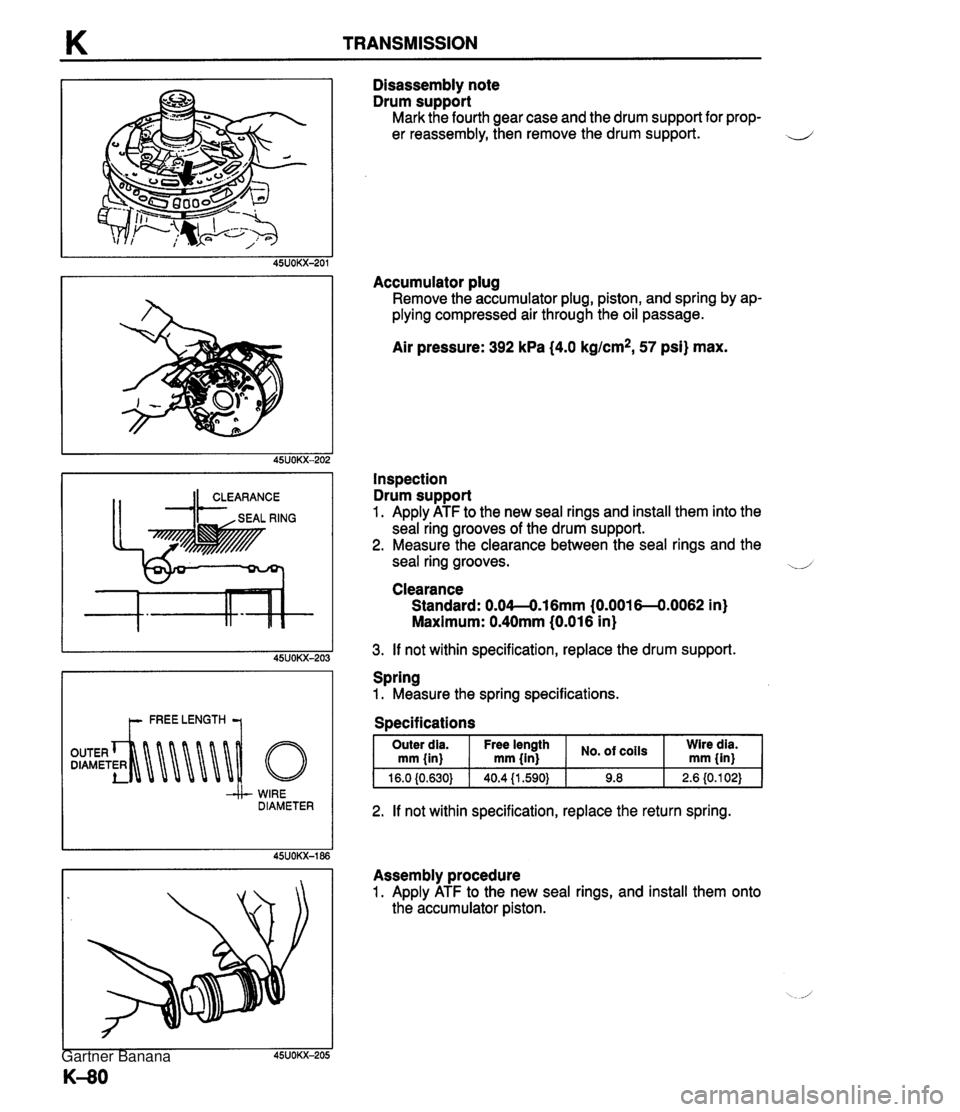
K TRANSMISSION t- FREE LENGTH 7 -& WIRE DIAMETER Disassembly note Drum support Mark the fourth gear case and the drum support for prop- er reassembly, then remove the drum support. Accumulator plug Remove the accumulator plug, piston, and spring by ap- plying compressed air through the oil passage. Air pressure: 392 kPa (4.0 kg/cm2, 57 psi) max. Inspection Drum support 1. Apply ATF to the new seal rings and install them into the seal ring grooves of the drum support. 2. Measure the clearance between the seal rings and the seal ring grooves. 4 Clearance Standard: 0.04--0.16mm (0.0016--0.0062 in) Maximum: 0.40mm (0.016 in) 3. If not within specification, replace the drum support. Spring 1. Measure the spring specifications. Specifications I Outer dia. I Free length I No. of I mm linl mm linl mm iinl Wire I 2. If not within specification, replace the return spring. Assembly procedure 1. Apply ATF to the new seal rings, and install them onto the accumulator piston. Gartner Banana
Page 485 of 1708

K TRANSMISSION --/b WIRE DIAMETER Inspection Return spring 1. Measure the spring specifications. Specifications 2. If not within specification, replace the return spring. Outer dia. mm {in} 28.2 11.1 10) Assembly procedure 1. Apply ATF to the new seal rings, and install them onto the piston assembly. 2. Apply ATF to a new O-ring, and install it onto the piston assembly. 3. Apply ATF to the piston assembly and body. 4. Apply even pressure to the perimeter of the piston, and install it into the body. 5. Verify that the piston can be turned by hand. If it cannot, then remove it and check for damage to the seal ring. i/ Free length mm {in) 38.7 (1 524) 6. Apply ATF to the piston stem and washer, and install them into the body. 7. Loosely tighten the nut. 8. Apply even pressure to the perimeter of the body, and install it into the transmission case. 9. Install the piston assembly. No, of coils 6.324 Wire dia. mm {in} 3.5 (0.1 38) Gartner Banana
Page 489 of 1708
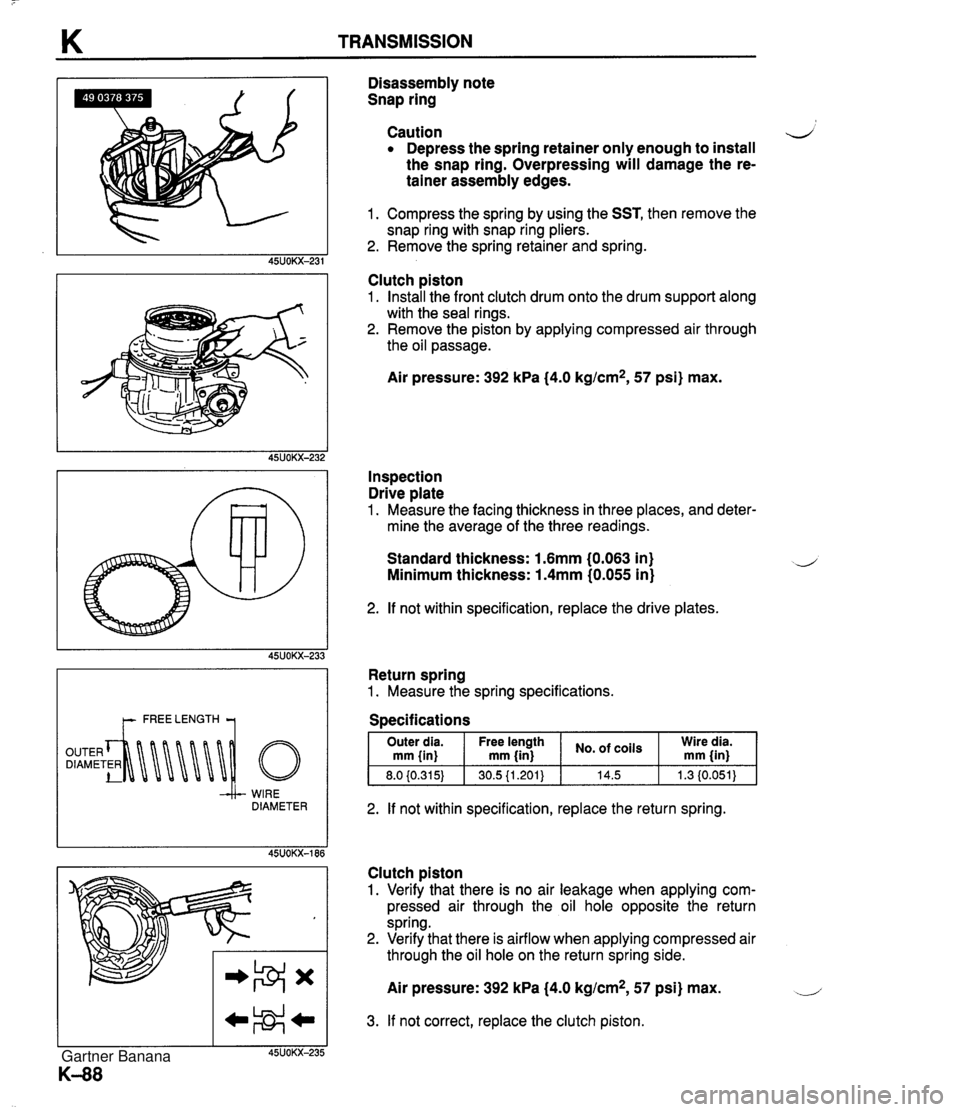
K TRANSMISSION -&- WIRE DIAMETER Disassembly note Snap ring Caution 4' Depress the spring retainer only enough to install the snap ring. Overpressing will damage the re- tainer assembly edges. 1. Compress the spring by using the SST, then remove the snap ring with snap ring pliers. 2. Remove the spring retainer and spring. Clutch piston 1. Install the front clutch drum onto the drum support along with the seal rings. 2. Remove the piston by applying compressed air through the oil passage. Air pressure: 392 kPa (4.0 kg/cm2, 57 psi) max. Inspection Drive plate 1. Measure the facing thickness in three places, and deter- mine the average of the three readings. Standard thickness: 1.6mm (0,063 in) Minimum thickness: 1.4mm (0.055 in) 2. If not within specification, replace the drive plates. Return spring 1. Measure the spring specifications. Specifications I Outer dia. I Free length I No. of coils I mm {in} mm {in} Wire mm {in) dia. I Air pressure: 392 kPa (4.0 kg/cm2, 57 psi) max. 2. If not within specification, replace the return spring. Clutch piston 1. Verify that there is no air leakage when applying com- pressed air through the oil hole opposite the return spring. 2. Verify that there is airflow when applying compressed air through the oil hole on the return spring side. 3. If not correct, replace the clutch piston. Gartner Banana
Page 494 of 1708
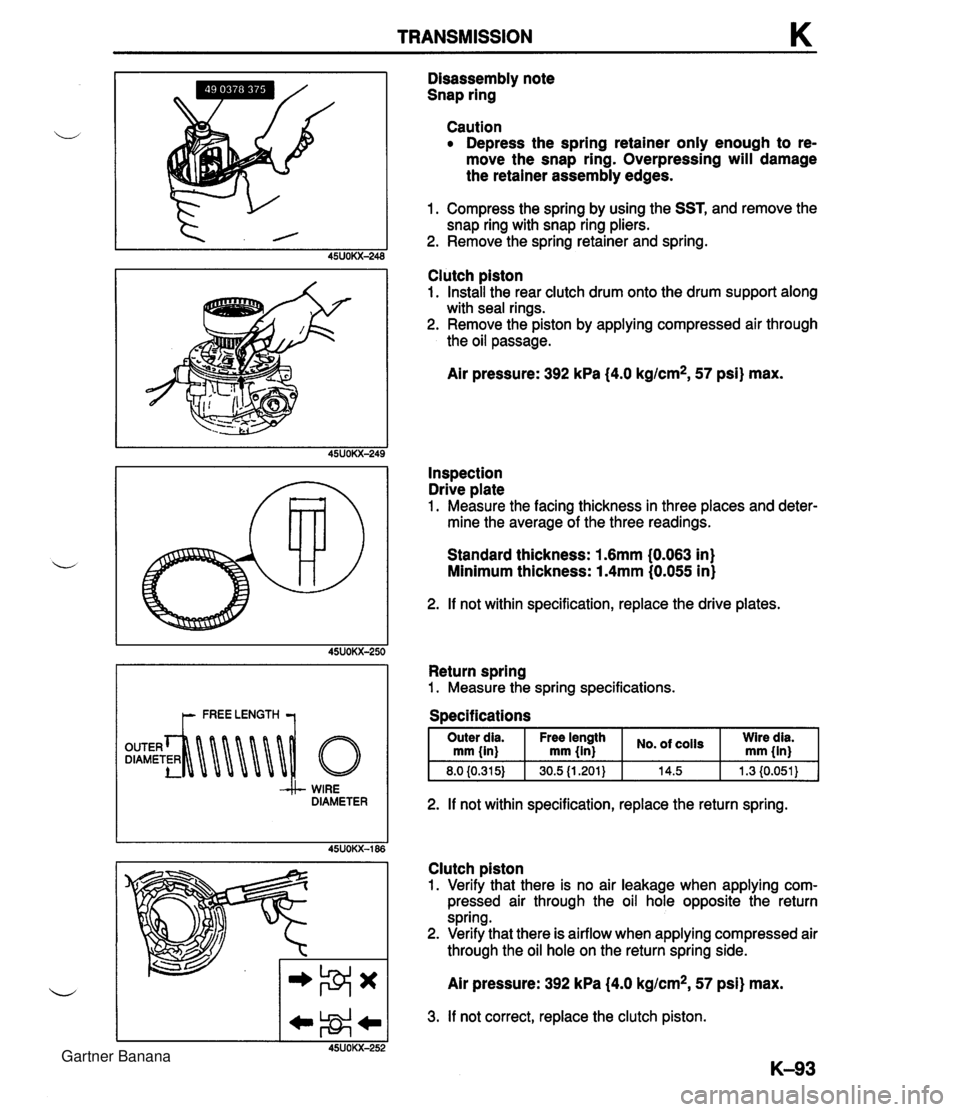
TRANSMISSION K WIRE DIAMETER Disassembly note Snap ring Caution Depress the spring retainer only enough to re- move the snap ring. Overpressing will damage the retainer assembly edges. 1. Compress the spring by using the SST, and remove the snap ring with snap ring pliers. 2. Remove the spring retainer and spring. Clutch piston 1. Install the rear clutch drum onto the drum support along with seal rings. 2. Remove the piston by applying compressed air through the oil passage. Air pressure: 392 kPa (4.0 kg/cm2, 57 psi) max. Inspection Drive plate 1. Measure the facing thickness in three places and deter- mine the average of the three readings. Standard thickness: 1.6mm (0.063 in) Minimum thickness: 1.4mm (0.055 in) 2. If not within specification, replace the drive plates. Return spring 1. Measure the spring specifications. I Outer dia. I Free length I No. of I ;i;;i I mm fin) mm {in} 2. If not within specification, replace the return spring. Clutch piston 1. Verify that there is no air leakage when applying com- pressed air through the oil hole opposite the return spring. 2. Verify that there is airflow when applying compressed air through the oil hole on the return spring side. Air pressure: 392 kPa (4.0 kg/cm2, 57 psi) max. 3. If not correct, replace the clutch piston. Gartner Banana
Page 505 of 1708
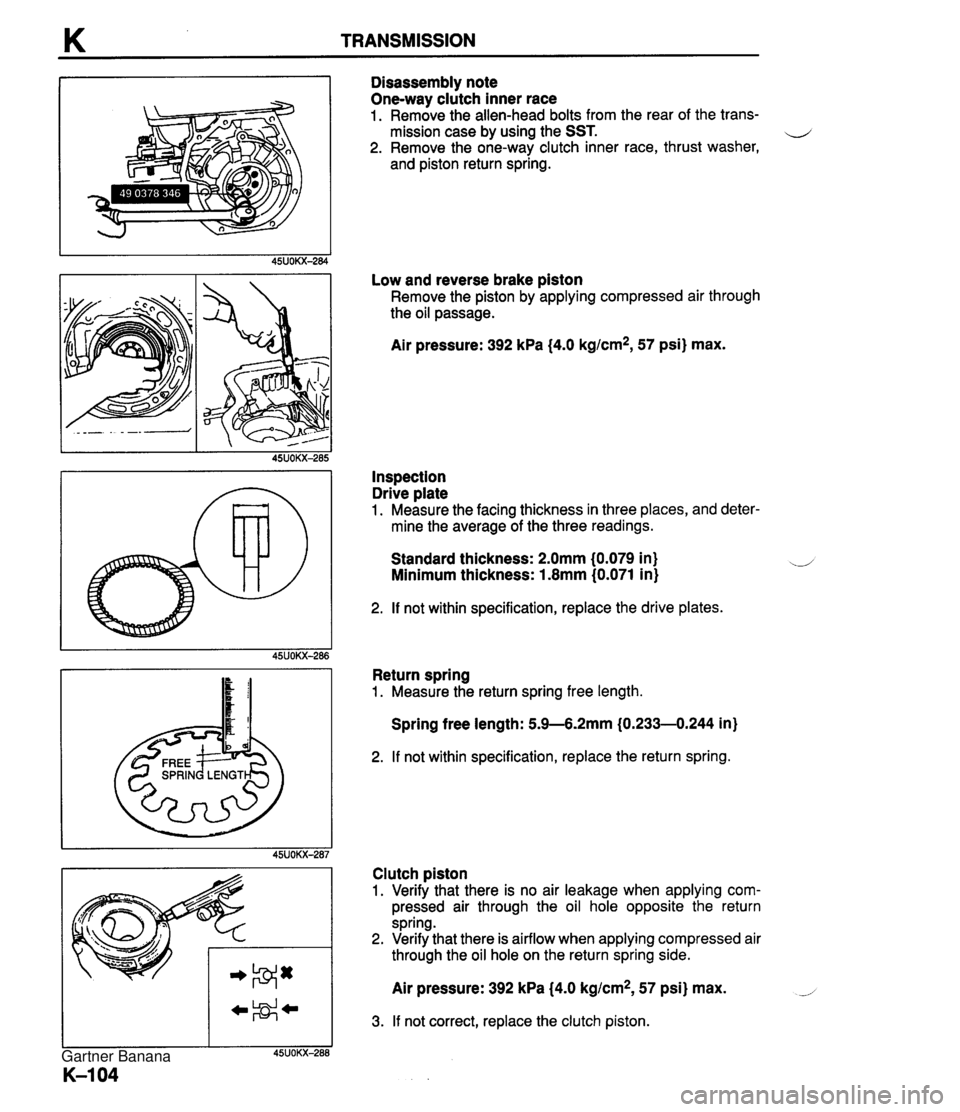
K TRANSMISSION Disassembly note One-way clutch inner race 1. Remove the allen-head bolts from the rear of the trans- mission case by using the SST. 4 2. Remove the one-wav clutch inner race, thrust washer, and piston return spring. Low and reverse brake &ton Remove the piston by gpplying compressed air through the oil passage. Air pressure: 392 kPa (4.0 kg/cm2, 57 psi) max. Inspection Drive plate 1. Measure the facing thickness in three places, and deter- mine the average of the three readings. Standard thickness: 2.0mm (0.079 in) Minimum thickness: 1.8mm (0.071 in) 2. If not within specification, replace the drive plates. Return spring 1. Measure the return spring free length. Spring free length: 5.9-6.2mm (0.233-0.244 in) 2. If not within specification, replace the return spring. Clutch piston 1. Verify that there is no air leakage when applying com- pressed air through the oil hole opposite the return spring. 2. Verify that there is airflow when applying compressed air through the oil hole on the return spring side. Air pressure: 392 kPa (4.0 kg/cm2, 57 psi) max. 3. If not correct, replace the clutch piston. Gartner Banana
Page 509 of 1708
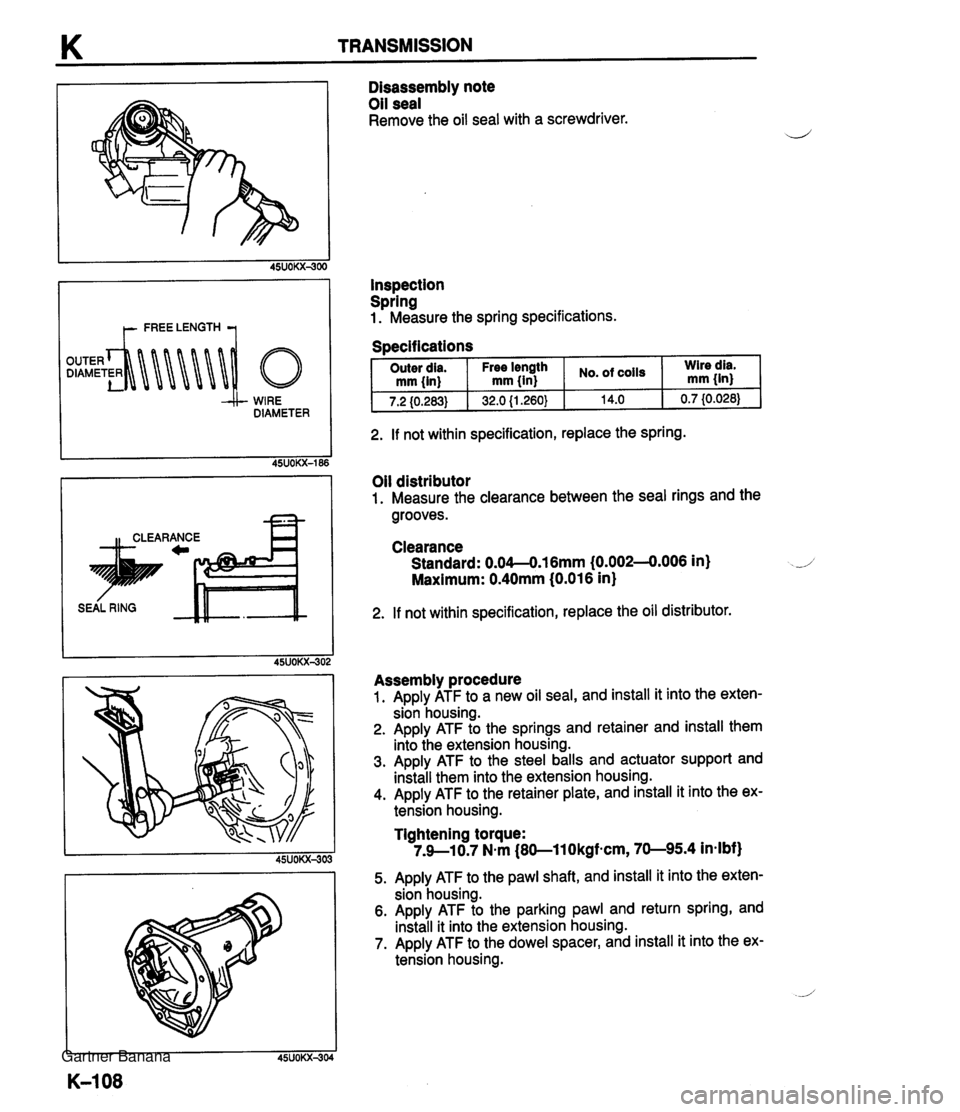
K TRANSMISSION t- FREE LENGTH 1 WIRE DIAMETER n CLEARANCE -a Disassembly note Oil seal Remove the oil seal with a screwdriver. Inspection Spring 1. Measure the spring specifications. Specifications . I Outer dia. 2. If not within specification, replace the spring. Oil distributor 1. Measure the clearance between the seal rings and the grooves. - -. - . - - mm {in) 7.2 (0.283) Clearance Standard: 0.04--0.16mm (0.0024.006 in) Maximum: 0.40mm (0.016 in} No. of coils 14.0 Free length mm {in} 32.0 {I .260} 2. If not within specification, replace the oil distributor. Wire dia. mm 0.7 I0.028) Assembly procedure 1. Apply ATF to a new oil seal, and install it into the exten- sion housing. 2. Apply ATF to the springs and retainer and install them into the extension housing. 3. Apply ATF to the steel balls and actuator support and install them into the extension housing. 4. Apply ATF to the retainer plate, and install it into the ex- tension housing. Tightening torque: 7.9--10.7 Nmm (80-11 Okgfmcm, 70-95.4 in-lbf) 5. Apply ATF to the pawl shaft, and install it into the exten- sion housing. 6. Apply ATF to the parking pawl and return spring, and install it into the extension housing. 7. Apply ATF to the dowel spacer, and install it into the ex- tension housing. Gartner Banana
Page 516 of 1708

TRANSMISSION K r FREE LENGTH 1 -/i- WIRE DIAMETER 15. Gently remove the separator plate. Note Tag the orifice check valves for proper reassembly, 16. Remove the orifice check valves and springs. Inspection 1. Measure the spring specifications. 2. If not within specification, replace the spring(s). item Outer dia. Spring mm {in} Free length mm {in) 15.5 (0.61 0) 26.8 (1.055) Orifice check Throttle relief 5.0 (0.1 97) 6.5 I0.256) No. of coils 12.0 14.0 Wire dla. mm {in) 0.23 (0.009) 0.9 {0.035) Gartner Banana