length MAZDA MX-5 1994 Owner's Manual
[x] Cancel search | Manufacturer: MAZDA, Model Year: 1994, Model line: MX-5, Model: MAZDA MX-5 1994Pages: 1708, PDF Size: 82.34 MB
Page 518 of 1708

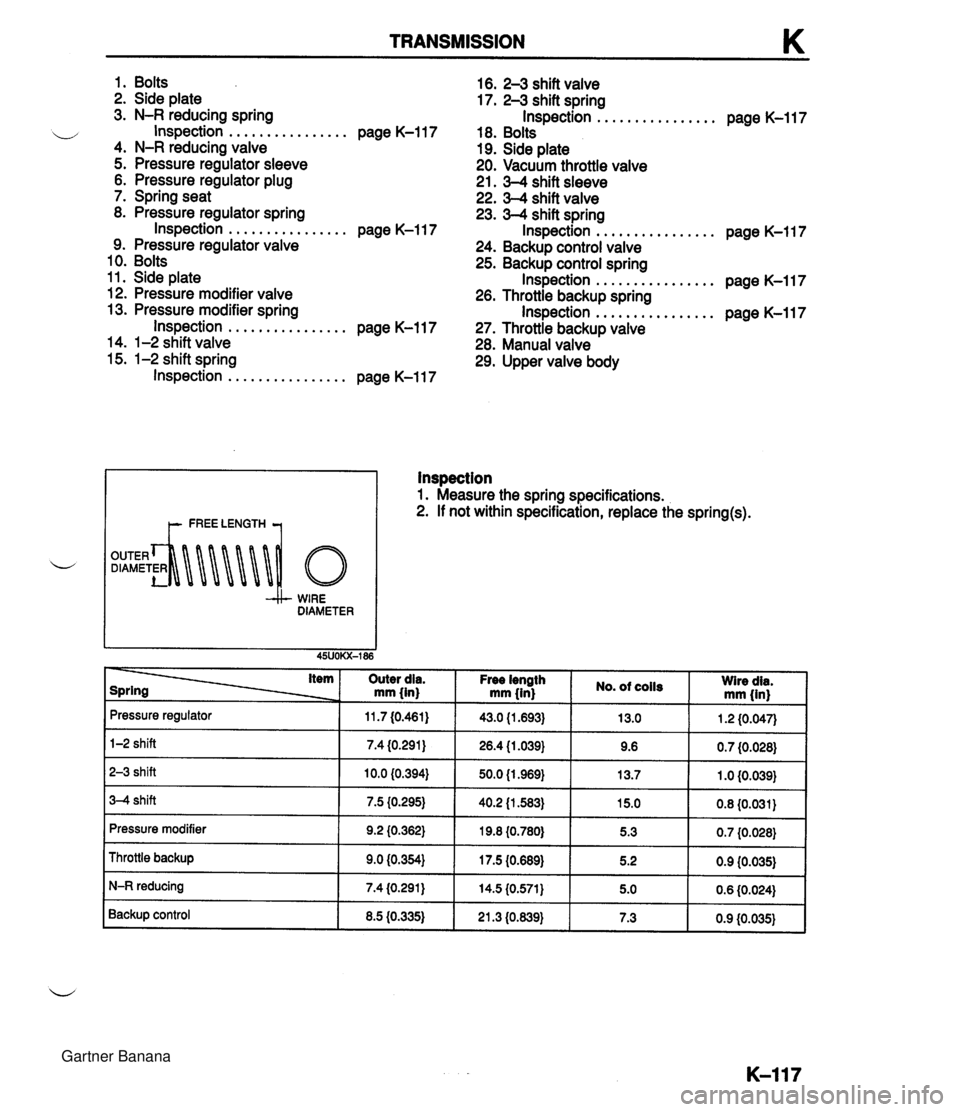
TRANSMISSION 1. Bolts 16. 2-3 shift valve 2. Side plate 17. 2-3 shift spring 3. N-R reducing spring Inspection ................ page K-117 ................ w Inspection page K-117 18. Bolts 4. N-R reducing valve 19. Side plate 5. Pressure regulator sleeve 20. Vacuum throttle valve 6. Pressure regulator plug 21. 3-4 shift sleeve 7. Spring seat 22. 3-4 shift valve 8. Pressure regulator spring 23. 3-4 shift spring Inspection ................ page K-117 Inspection ................ page K-117 9. Pressure regulator valve 24. Backup control valve 10. Bolts 25. Backup control spring 11. Side plate Inspection ................ page K-117 12. Pressure modifier valve 26. Throttle backup spring ................ 13. Pressure modifier spring Inspection page K-117 Inspection ................ page K-117 27. Throttle backup valve 14. 1-2 shift valve 28. Manual valve 15. 1-2 shift spring 29. Upper valve body Inspection ................ page K-117 I t- FREE LENGTH 7 WIRE DIAMETER lnspection 1. Measure the spring specifications. 2. If not within specification, replace the spring(s). item Outer dia. mm (in) Pressure regulator 1-2 shift Free iength mm (in} 2-3 shift 3-4 shift 11.7 (0.461) 7.4 (0.291) Pressure modifier Throttle backup No. of coils 10.0 (0.394) 7.5 (0.295) I I I I Wire dia. mm (in} 43.0 (1.693) 26.4 (1.039) 9.2 (0.362) 9.0 (0.354) N-R reducing Backup control 50.0 (1 .969) 40.2 (1 583) 13.0 9.6 19.8 {0.780} 17.5 {0.689) 8.5 (0.335) 1.2 (0.047) 0.7 (0.028) 13.7 15.0 0.6 (0.024) 7.4 (0.291) 1 .O (0.039) 0.8 (0.031) 5.3 5.2 21.3 (0.639) 0.7 (0.028) 0.9 (0.035) 14.5 (0.571) 5.0 7.3 0.9 (0.035) Gartner Banana
Page 522 of 1708

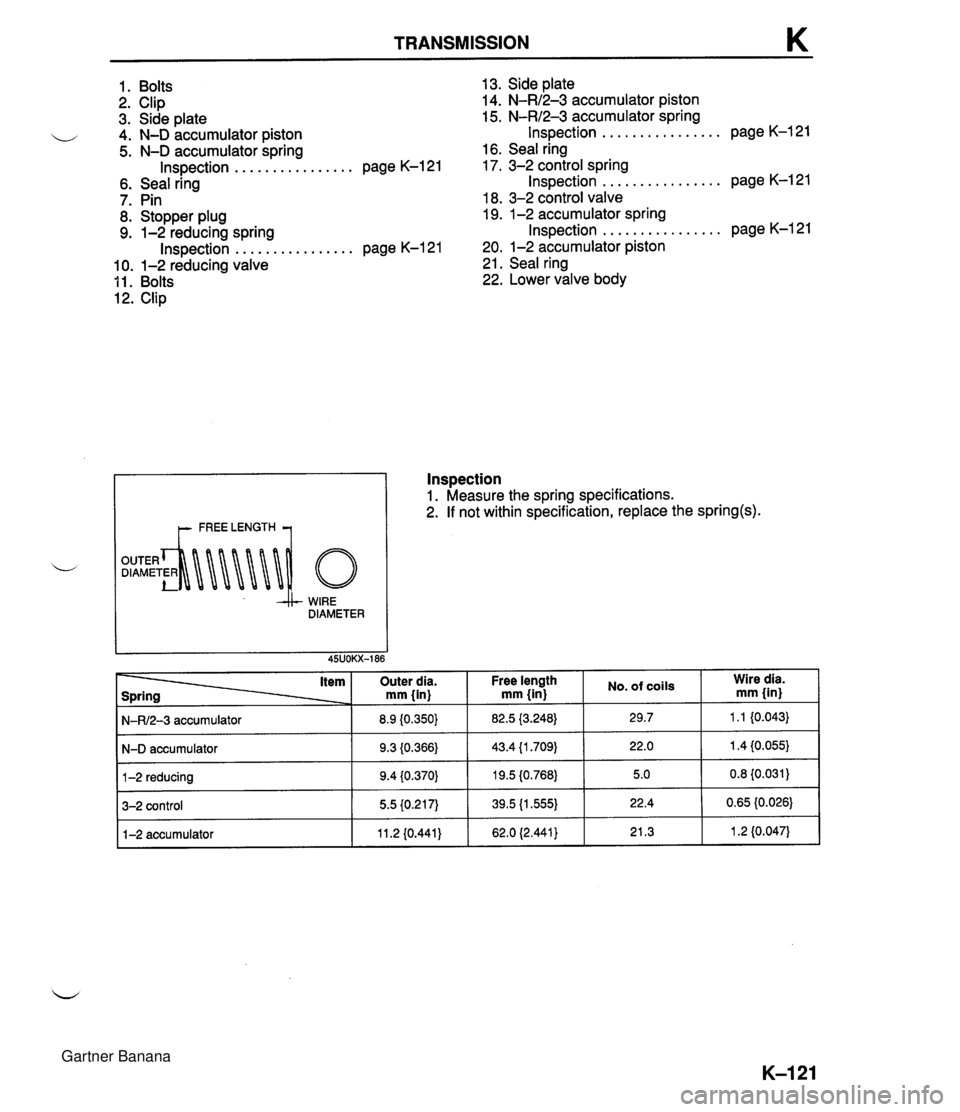
TRANSMISSION K 1. Bolts 13. Side plate 2. Clip 14. N-R/2-3 accumulator piston 3. Side plate 15. N-R/2-3 accumulator spring ................ i/ 4. N-D accumulator piston Inspection page K-121 5. N-D accumulator spring 16. Seal ring Inspection ................ page K-121 17. 3-2 control spring 6. Seal ring Inspection ................ page K-121 7. Pin 18. 3-2 control valve 8. Stopper plug 19. 1-2 accumulator spring ................ 9. 1-2 reducing spring Inspection page K-121 Inspection ................ page K-121 20. 1-2 accumulator piston 10. 1-2 reducing valve 21. Seal ring 11. Bolts 22. Lower valve body 12. Clip i- FREE LENGTH 1 --k WIRE DIAMETER lnspection 1. Measure the spring specifications. 2. If not within specification, replace the spring(s). - 3-2 control Item Spring N-R/2-3 accumulator N-D accumulator 1-2 reducing Free length mm {in) 82.5 13.248) Outer dia. mm {in} 8.9 10.3501 9.3 {0.366) 9.4 10.370) 1-2 accumulator No. of coils 29.7 Wire dia. mm {in) 1.1 10.043) 43.4 {I .709) 19.5 {0.768) 11.2 I0.441) 22.0 5.0 62.0 (2.441) 1.4 I0.055) 0.8 {0.031) 21.3 1.2 (0.047) Gartner Banana
Page 583 of 1708

L OUTLINE, TROUBLESHOOTING GUIDE, PROPELLER SHAFT OUTLINE SPECIFICATIONS TROUBLESHOOTING GUIDE Enginefrransmission Problem I Possible Cause BP DOHC Vibration Worn universal joint Bent propeller shaft Worn slip yoke splines Runout of propeller shaft Unbalanced propeller shaft Item MI 5M-D Abnormal noise NC4A-EL Worn or damaged universal joint Worn slip yoke splines PROPELLER SHAFT PREPARATION SST 1,001 (39.41) 816 (32.1) 60.5 ( 2.38) Length mm {in) Outer diameter mm{in) Holder, main shaft Ll L2 D For prevention of oil leakage Action 1 Page Replace Replace Replace Replace Replace Replace Replace Gartner Banana
Page 588 of 1708

OUTLINE OUTLINE Front axle Rear axle Differentlal Drive shaft Item I Specifications TY pe Bearing Double-wishbone Angular ball bearing Maximum wheel bearing play mm {in} TY pe Bearing 0.05 {0.002} Double-wishbone Angular ball bearing Maximum wheel bearing play mm {in} Type Reduction gear Reduction ratio Oil I Viscosity 0.05 {0.002} -- ---- Differential gear Ring gear size mm {in} Grade Above -1 8°C {O°F}: SAE 90 Below -1 8°C {O°F}: SAE 80 Standard Hypoid gear Straight-bevel gear 182.88 {7.20) API service GL-5 I Capacity L {US qt. imp qt} I 1 .OO {I .06,0.88) "TORSEN" LSD Worm gear 4.100 TY ~e Length mm {in} Constant velocity (double offset) joint 640.6 I25.220) 45UOMX-00 Gartner Banana
Page 607 of 1708

M DRIVE SHAFT 5. Align the marks, then install a new clip. Boot bands 1. Set the boots onto the rings. 2. Release any trapped air from the boots by carefully lifting up the small end of each boot with a cloth-wrapped screwdriver. 3. Verify that the boots are not dented or twisted. 4. Measure the drive shaft length. Standard length: 623.7--658.8mm (24.556-25-936 in) 5. If not within specification, return to step 1. J Standard length (On-vehicle): 640.6mm (25,220 in) 6. Fold the new band back by pulling on the end of it with pliers. The band should be folded in the direction oppo- site the forward revolving direction of the drive shaft. 7. Lock the end of the band by bending the locking clips. Gartner Banana
Page 638 of 1708

MANUAL STEERING N Disassembly Note Steering lock mounting bolts and bracket Use a chisel to make a groove in the heads of the steer- ing lock mounting bolts. Remove the bolts with a screw- driver. Remove the steering lock assembly. Inspection Check the following, and replace the column assembly if necessary. Steering shaft 1. Column bearing damage. 2. Steering shaft length. Length: 603.7--605.7mm (23.77-23.84 in) Assembly Note Steering lock mounting bolts and bracket Install the steering lock assembly on the jacket. Install the new steering lock mounting bolts. Tighten the bolts until the heads break off. Gartner Banana
Page 681 of 1708

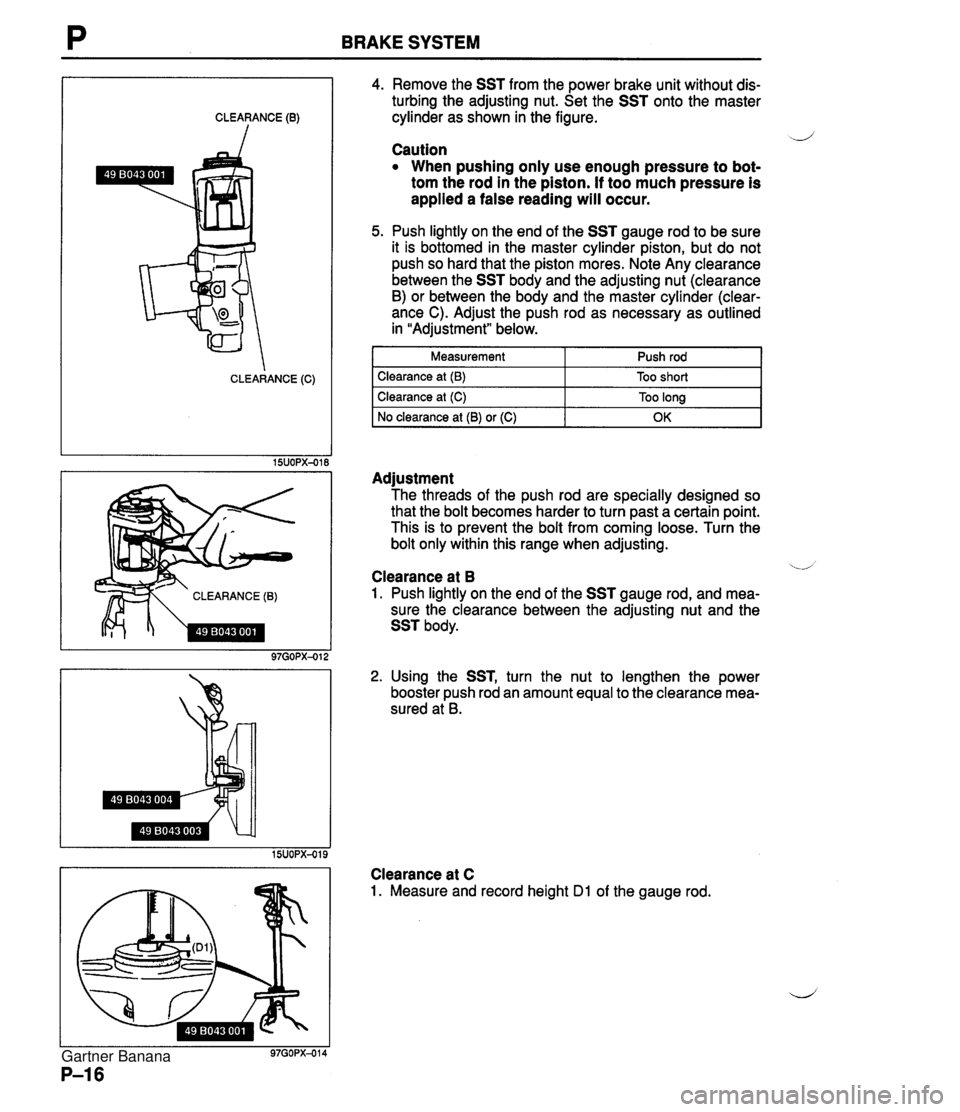
BRAKE SYSTEM CLEARANCE (0) CLEARANCE (C) CLEARANCE (B) 4. Remove the SST from the power brake unit without dis- turbing the adjusting nut. Set the SST onto the master cylinder as shown in the figure. -J Caution When pushing only use enough pressure to bot- tom the rod in the piston. If too much pressure is applied a false reading will occur. 5. Push lightly on the end of the SST gauge rod to be sure it is bottomed in the master cylinder piston, but do not push so hard that the piston mores. Note Any clearance between the SST body and the adjusting nut (clearance B) or between the body and the master cylinder (clear- ance C). Adjust the push rod as necessary as outlined in "Adjustment" below. I Measurement 1 Push rod I I Clearance at (B) I Too short I Adjustment The threads of the push rod are specially designed so that the bolt becomes harder to turn past a certain point. This is to prevent the bolt from coming loose. Turn the bolt only within this range when adjusting. Clearance at (C) No clearance at (B) or (C) '.A Clearance at B 1. Push lightly on the end of the SST gauge rod, and mea- sure the clearance between the adjusting nut and the SST body. Too long OK 2. Using the SST, turn the nut to lengthen the power booster push rod an amount equal to the clearance mea- sured at B. Clearance at C 1. Measure and record height Dl of the gauge rod. Gartner Banana
Page 736 of 1708

OUTLINE OUTLINE SPECIFICATIONS Front Suspension - Transmission item (Stabilizer Specifications MT I AT - I Susoension tvoe I . , . , I . , Shock absorber Cylindrical double acting, low-pressure-gas charged I Double-wishbone TY pe Torsion bar Coil spring I - Diameter mm linl I 20.0 10.79) Identification mark color 19.0 (0.75) White Wire diameter mm (in) Coil inner diameter mm {in) I Blue Free length mm {in) Coil number 11 .O (0.43) 83 i3.27) 11 .O (0.43) 83 (3.27) 292.5 (1 1 32) 6.32 3 +. 3 (0.12 + 0.12) 0°18' + 18' Total toe-in I - I 35UORX-001 Rear Suspension 302.0 (1 1.89) 6.32 mm {in) degree Total toe-in (per side) 1 degree Front wheel alignment (Unladedt1) 0°09' +. 09' Caster anglee3 4"26' +. 45' Kingpin angle 11 "20' Maximum steering angle Transmission Specifications MT I AT Item Differential - Suspension type Inner Outer "TORSEN" LSD 1 Standard Double-wishbone Coil springs 370 23' a 2" 32" 32' -t 2" Camber anglee2 Torsion bar 12.0 (0.47) 1 11.0 (0.43) 1 11 .O (0.43) Cylindrical double acting, low-pressure-gas charged - Stabilizer Identification mark color Wire diameter mm {in) 0°24' + 45' Type Diameter mm {in) I Coil number I 7.68 I 7.96 I Shock absorber Yellow 10.1 {0.40} Coil inner diameter mm {in) Free length mm {in) Green 10.2 {0.40) 35UORX-002 *I Fuel tank full; radiator coolant and engine oil at specified levels; spare tire, jack, and tools in designated positions. '2 Difference between left and right must not exceed I O. '3 Difference between left and right must not exceed 1'30'. "TORSEN" is a registered trademark of ZEXEL-GLEASON USA.INC 83 I3.27) 348.5 j13.72) Rear wheel alignment (Unladed*') 83 (3.27) 356.5 (1 4.04) Total toe-in Total toe-in (per side) mm (in) degree degree 3 -c 3 (0.12 + 0.121 0°18' + 18' 0°09' + 09' Camber angle*2 -0°43' 2 30' Gartner Banana
Page 803 of 1708

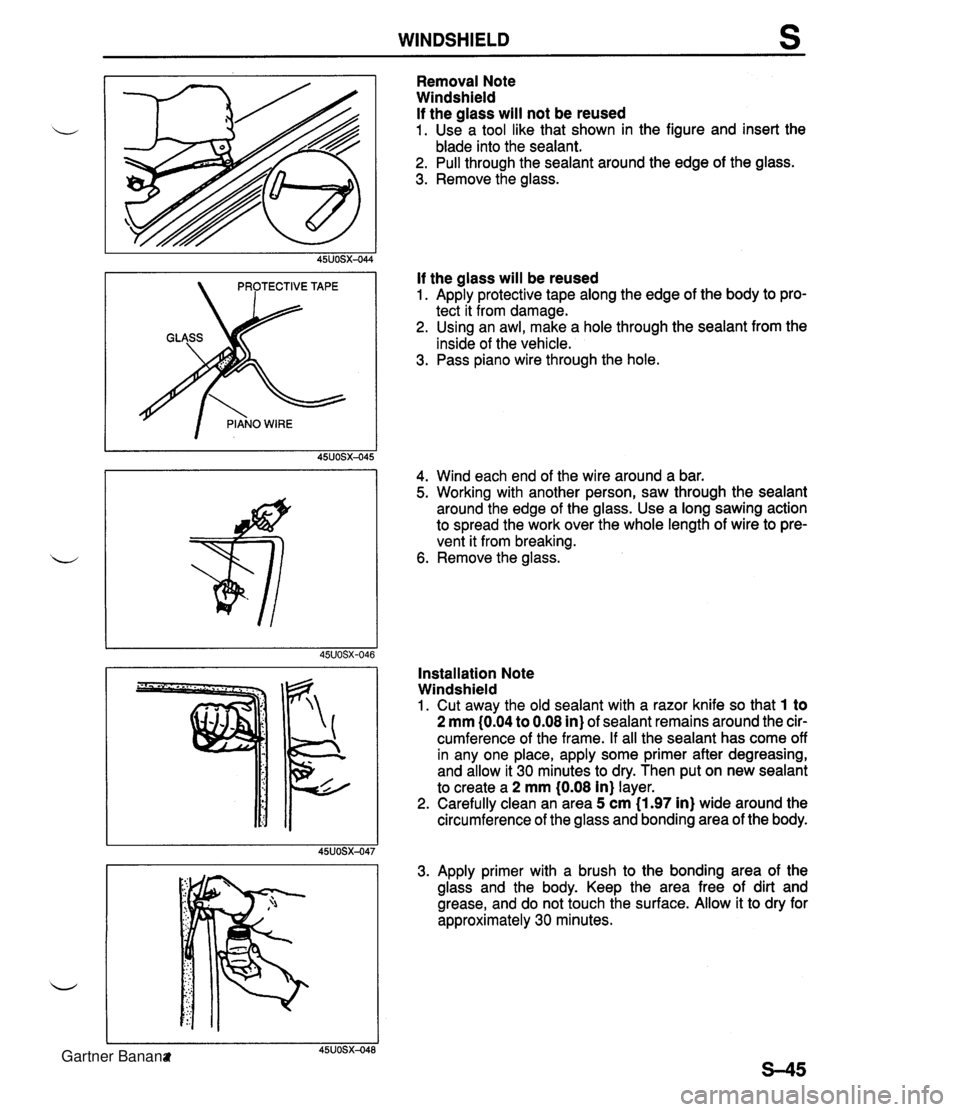
WINDSHIELD Removal Note Windshield If the glass will not be reused 1. Use a tool like that shown in the figure and insert the blade into the sealant. 2. Pull through the sealant around the edge of the glass. 3. Remove the glass. If the glass will be reused 1. Apply protective tape along the edge of the body to pro- tect it from damage. 2. Using an awl, make a hole through the sealant from the inside of the vehicle. 3. Pass piano wire through the hole. 4. Wind each end of the wire around a bar. 5. Working with another person, saw through the sealant around the edge of the glass. Use a long sawing action to spread the work over the whole length of wire to pre- vent it from breaking. 6. Remove the glass. Installation Note Windshield 1. Cut away the old sealant with a razor knife so that 1 to 2 mm (0.04 to 0.08 in) of sealant remains around the cir- cumference of the frame. If all the sealant has come off in any one place, apply some primer after degreasing, and allow it 30 minutes to dry. Then put on new sealant to create a 2 mm (0.08 in} layer. 2. Carefully clean an area 5 cm (1.97 in) wide around the circumference of the glass and bonding area of the body. 3. Apply primer with a brush to the bonding area of the glass and the body. Keep the area free of dirt and grease, and do not touch the surface. Allow it to dry for approximately 30 minutes. Gartner Banana
Page 807 of 1708

REAR WINDOW GLASS I PROTECTIVE TAPE I I PIANO WIRE GYSS DETACHABLE HARDTOP O...PLACES PIANO WIRE WILL NOT CUT 1 Removal Note Rear window glass 1. Apply protective tape along the edge of the detachable hardtop to protect it from damage. 2. Remove the glass mounting nuts. 3. Using an awl, make a hole through the sealant from the inside of the vehicle. 4. Pass piano wire through the hole. 5. Wind each end of the wire around a bar. 6. Saw through the sealant around the edge of the glass. Use a long sawing action to spread the work over the whole length of wire to prevent it from breaking. 7. Use a razor knife to cut where the piano wire will not cut. 8. Remove the glass. Installation Note Rear window glass 1. Cut away the old sealant with a razor knife so that 1 to 2 mm (0.04 to 0.08 in) of sealant remains around the cir- cumference of the frame. If all the sealant has come off in any one place, apply some primer after decreasing, and allow it 30 minutes to dry. Then put on new sealant to create a 2 mm I0.08 in) layer. 2. Carefully clean an area 5 cm (1.97 in) wide around the circumference of the glass and bonding area of the top. 3. Apply primer with a brush to the bonding area of the glass and top. Keep the area free of dirt and grease, and do not touch the surface. Allow the primer to dry for approximately 30 minutes. Gartner Banana