oil MAZDA MX-5 1994 Owner's Guide
[x] Cancel search | Manufacturer: MAZDA, Model Year: 1994, Model line: MX-5, Model: MAZDA MX-5 1994Pages: 1708, PDF Size: 82.34 MB
Page 65 of 1708

B REMOVAL REMOVAL Caution Fuel line spills and leaks are dangerous. Fuel can ignite and cause serious injuries or death -d and damage. Fuel can also irritate skin and eyes. To prevent this, always complete the "Fuel Line safety Procedures" on section F. PROCEDURE 1. Disconnect the negative battery cable. 2. Drain the engine coolant. (Refer to section E.) 3. Remove the transmission. 4. Remove in the order shown in the figure, referring to Removal Note. Step 1 1. Air cleaner housing assembly 2. Accelerator cable 3. Radiator hose 4. Oil cooler hose 5. Coolant reservoir hose 6. Fan connector 7. Radiator and fan assembly 8. PIS andlor A/C drive belt ................ Removal 9. Alternator drive belt .................. Removal page B- 6 10. PIS oil pump (If equipped) ............. Removal Note page 529 11. AIC compressor (If equipped) Removal Note ............. page 529 1 page B- 6 Gartner Banana
Page 66 of 1708

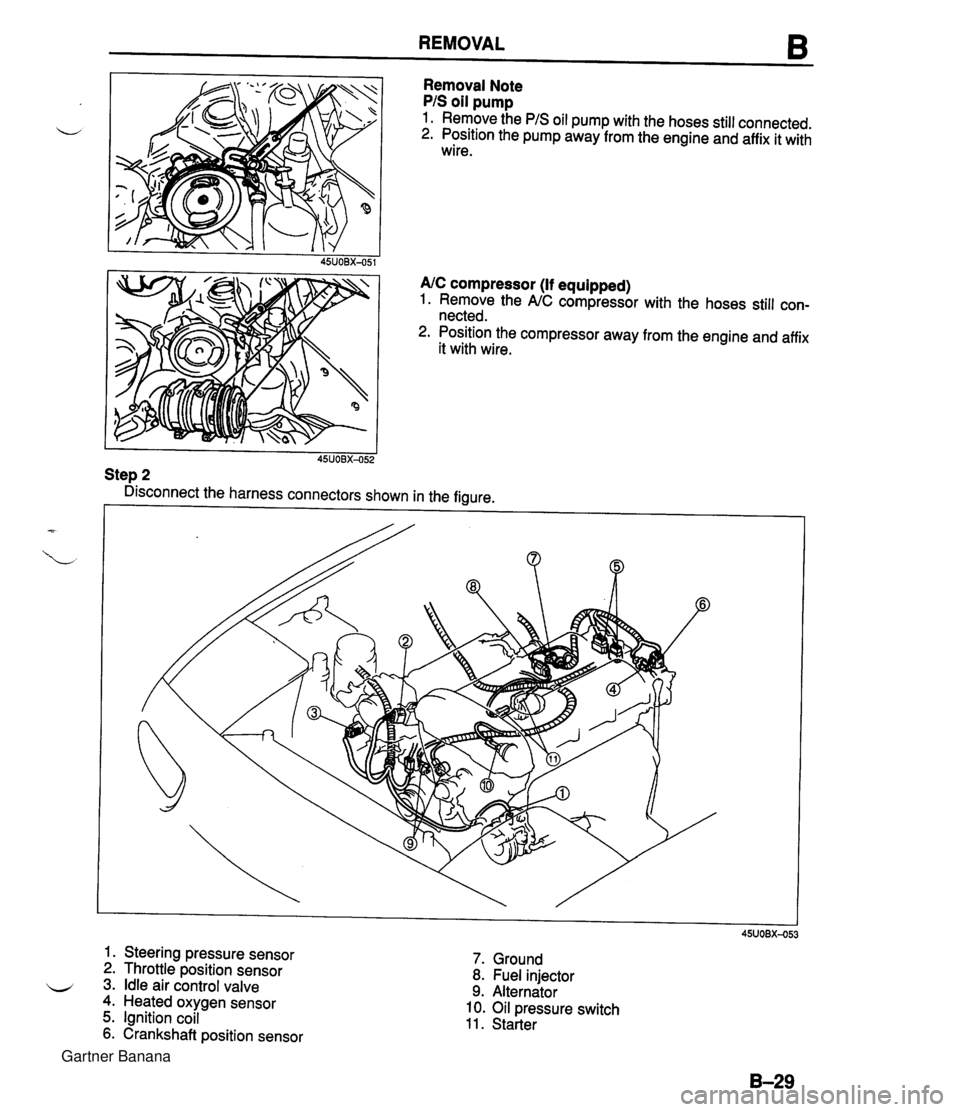
REMOVAL 6 Removal Note PIS oil pump 1. Remove the PIS oil pump with the hoses still connected. 2. Position the pump away from the engine and affix it with wire. 45UOBX-051 AIC compressor (If equipped) 1. Remove the NC compressor with the hoses still con- nected. 2. Position the compressor away from the engine and affix it with wire. I I 45UOBX-052 Step 2 Disconnect the harness connectors shown in the figure. 6 1. Steering pressure sensor 2. Throttle position sensor 3. Idle air control valve 4. Heated oxygen sensor 5. Ignition coil 6. Crankshaft position sensor 7. Ground 8. Fuel injector 9. Alternator 10. Oil pressure switch 11. Starter Gartner Banana
Page 70 of 1708

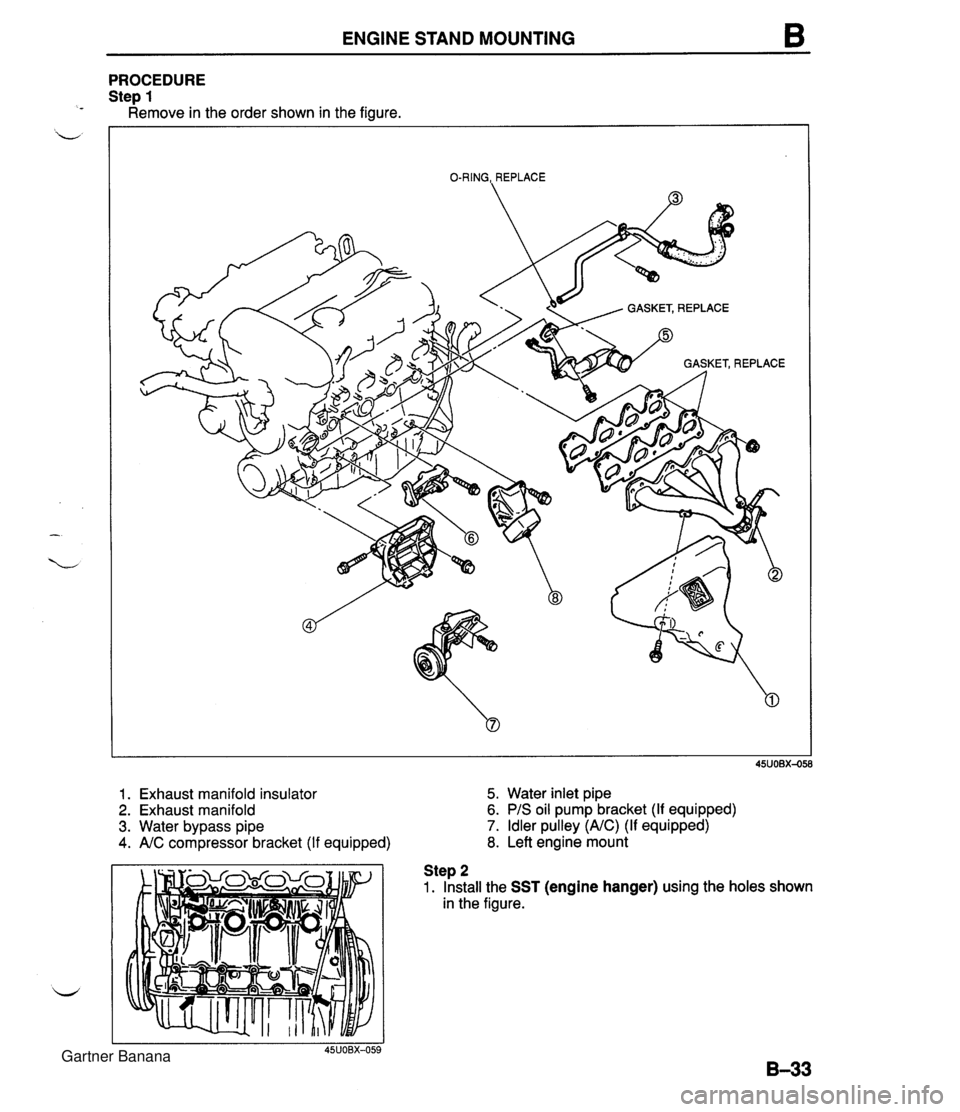
ENGINE STAND MOUNTING PROCEDURE Ste~ 1 ~emove in the order shown in the figure. O-RING,, REPLACE 1. Exhaust manifold insulator 5. Water inlet pipe 2. Exhaust manifold 6. PIS oil pump bracket (If equipped) 3. Water bypass pipe 7. Idler pulley (NC) (If equipped) 4. NC compressor bracket (If equipped) 8. Left engine mount Step 2 1. Install the SST (engine hanger) using the holes shown in the figure. Gartner Banana
Page 73 of 1708

DISASSEMBLY AUXILIARY PARTS 1. Drain the engine oil. 2. Disassemble in the order shown in the figure. 1. Ignition coil and high-tension lead 2. Crankshaft position sensor 3. Manifold bracket 4. Intake manifold assembly 5. Alternator 6. Alternator bracket 7. Right engine mount 8. Oil filter 9. Oil cooler 10. Oil pressure switch 11. Water outlet pipe 12. Spark plug 13. Dipstick and pipe 14. Engine hanger Gartner Banana
Page 77 of 1708

DISASSEMBLY Disassembly Note Camshaft pulley 1. Hold the camshaft with a wrench at the cast hexagon. 2. Remove the camshaft pulley lock bolts. 3. Remove the camshaft pulleys. Camshaft 1. Loosen the camshaft cap bolts in two or three steps in the order shown in the figure. 2. Remove the camshaft caps. 3. Remove the camshafts. 4. Remove the camshaft oil seals from the camshafts. HLA Caution The HLA must be reinstalled in the same position from which they were removed. If they are not, it can cause premature and uneven wear. L Note Mark the HLA to show their original positions. Remove the HLA from the cylinder head. Cylinder head bolt 1. Loosen the cylinder head bolts in two or three steps in the order shown in the figure. 2. Remove the cylinder head bolts. Valve keeper 1. Set the SST against the upper valve spring seat as shown in the figure. 2. Compress the spring and remove the valve keepers. Gartner Banana
Page 79 of 1708

B DISASSEMBLY CYLINDER BLOCK (EXTERNAL PARTS) Disassemble in the order shown in the figure, referring to Disassembly Note. GASKET, REPLACE - L 1. Clutch cover, clutch disc (MT) Removal 1 Installation ......... section H 2. Flywheel (MT), drive plate (AT) Disassembly Note .......... page 8-43 3. End plate 4. Oil pan Disassembly Note .......... page B43 5. Oil strainer 6. Oil pan baffle Disassembly Note .......... page B-44 7. Water pump 8. Oil pump ...... Disassembly 1 Assembly section D 9. Front oil seal Disassembly Note .......... page B-43 10. Rear cover 11. Rear oil seal Disassembly Note .......... page 6-43 Gartner Banana
Page 80 of 1708

DISASSEMBLY B PROTECT PUMP BODY WlTH RAG 05UOBX-10; I PROTECT REAR COYER WITH RAG I Disassembly Note Flywheel (MT) or drive plate (AT) 1. Hold the flywheel with the SST. 2. Remove the flywheel lock bolts. 3. Remove the flywheel. Oil pan 1. Remove the oil pan mounting bolts. Caution Pry tools can easily scratch the cylinder block and oil pan contact surfaces. 2. Insert a screwdriver only at the points shown in the fig- ure. 3. Remove the oil pan. Oil pan baffle 1. Insert a screwdriver between the cylinder block and the baffle to separate them. 2. Remove the baffle. Front oil seal Remove the oil seal with a screwdriver protected with a rag. Rear oil seal Remove the oil seal with a screwdriver protected with a rag. Gartner Banana
Page 81 of 1708

B DISASSEMBLY CYLINDER BLOCK (INTERNAL PARTS) Disassemble in the order shown in the figure, referring to Disassembly Note. 1. Connecting rod cap Inspection ................. page B-45 2. Lower connecting rod bearing Inspection ................. page 8-45 3. Connecting rod and piston assembly Disassembly Note .......... page 545 4. Upper connecting rod bearing Inspection ................. page 8-57 5. Piston ring Disassembly Note .......... page 545 Inspection ................. page 555 6. Piston pin clip 7. Piston pin Disassembly Note Inspection ................. page 6-45 8. Piston Inspection ................. page 555 9. Connecting rod Inspection ................. page I345 10. Main bearing cap Disassembly Note .......... page 8-46 11. Lower main bearing Inspection ................. page B-46 12. Crankshaft Inspection ................. page 8-46 13. Upper main bearing Inspection ................. page 8-46 14. Thrust bearing Inspection ................. page 6-63 15. Oil jet Inspection ................. page B-53 16. Cylinder block Inspection ................. page 553 Gartner Banana
Page 82 of 1708

DISASSEMBLY Disassembly Note Connecting rod cap Before removing the connecting rod caps, measure the connecting rod side clearance. (Refer to page 8-64.) Connecting rod and piston assembly 1. Before removing the connecting rod and piston assem- bly, measure the connecting rod oil clearance. (Refer to page 8-64.) 2. Remove the Plastigage from the crankpin journals. 3. Use the handle of a hammer to remove the piston and connecting rod assembly through the top of the cylinder block. Piston ring Remove the piston rings with a piston ring expander (commercially available). Piston pin Remove the piston pin with the SST. Gartner Banana
Page 83 of 1708

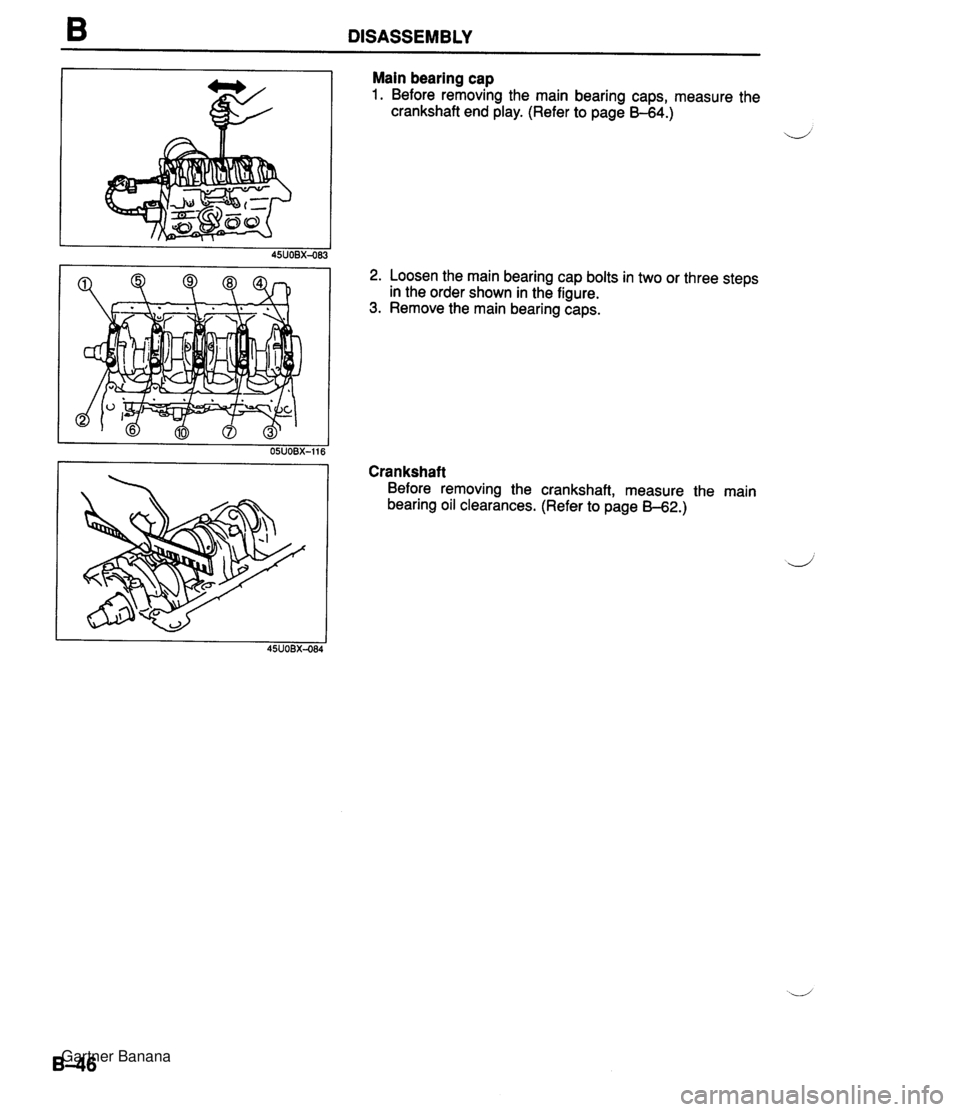
DISASSEMBLY Main bearing cap 1. Before removing the main bearing caps, measure the crankshaft end play. (Refer to page B-64.) u 2. Loosen the main bearing cap bolts in two or three steps in the order shown in the figure. 3. Remove the main bearing caps. Crankshaft Before removing the crankshaft, measure the main bearing oil clearances. (Refer to page B-62.) Gartner Banana