coolant temperature MAZDA PROTEGE 1992 Workshop Manual
[x] Cancel search | Manufacturer: MAZDA, Model Year: 1992, Model line: PROTEGE, Model: MAZDA PROTEGE 1992Pages: 1164, PDF Size: 81.9 MB
Page 20 of 1164
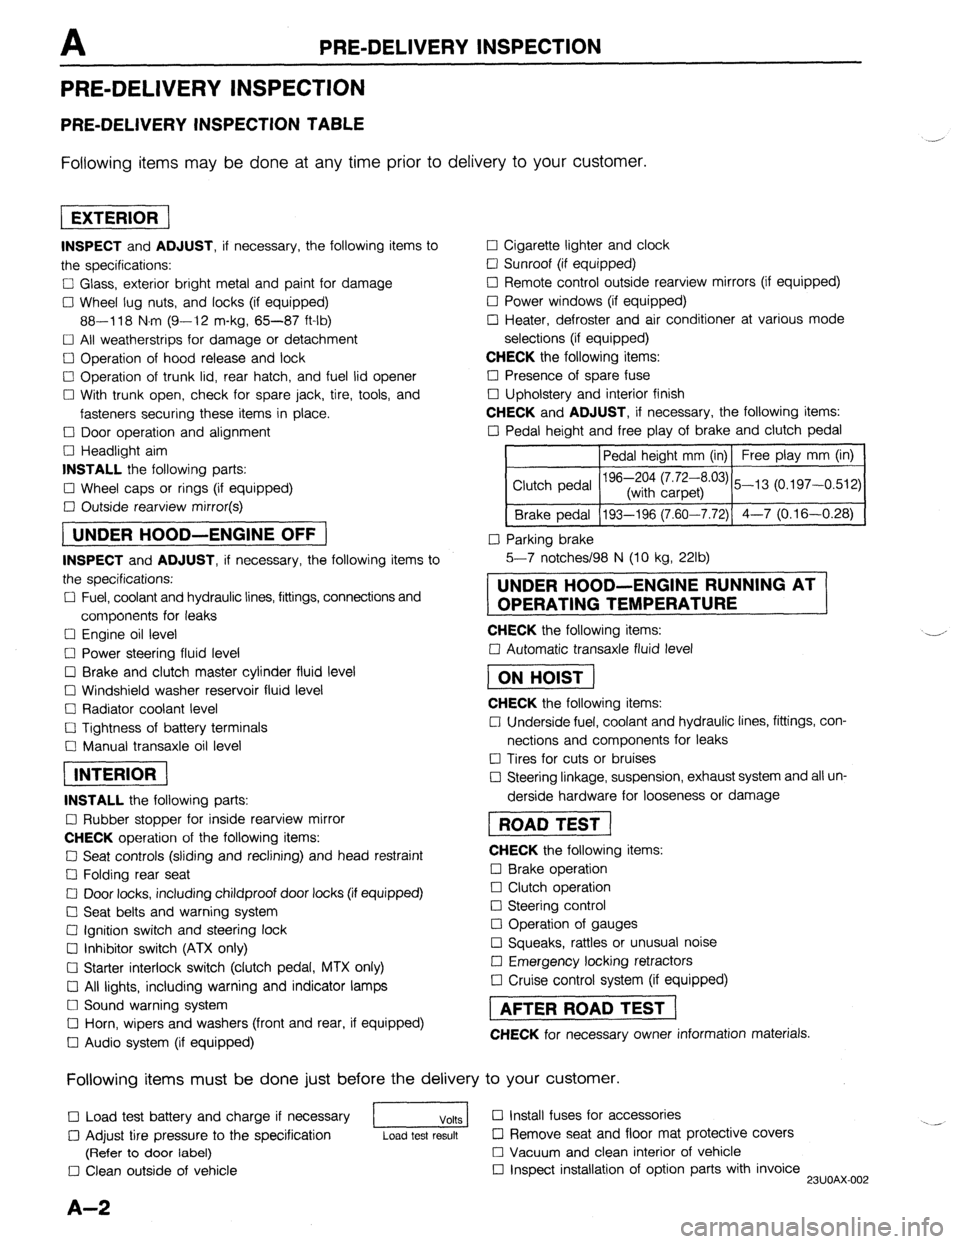
PRE-DELIVERY INSPECTION
PRE-DELIVERY INSPECTION
PRE-DELIVERY INSPECTION TABLE
Following items may be done at any time prior to delivery to your customer.
INSPECT and ADJUST, if necessary, the following items to
the specifications:
0 Glass, exterior bright metal and paint for damage
Cl Wheel lug nuts, and locks (if equipped)
88-118 N.m (9-12 m-kg, 65-87 ft-lb)
q All weatherstrips for damage or detachment
0 Operation of hood release and lock
0 Operation of trunk lid, rear hatch, and fuel lid opener
Cl With trunk open, check for spare jack, tire, tools, and
fasteners securing these items in place.
Cl Door operation and alignment
Cl Headlight aim
INSTALL the following parts:
Cl Wheel caps or rings (if equipped)
q Outside rearview mirror(s)
1 UNDER HOOD-ENGINE OFF )
INSPECT and ADJUST, if necessary, the following items to
the specifications:
0 Fuel, coolant and hydraulic lines, fittings, connections and
components for leaks
Cl Engine oil level
0 Power steering fluid level
0 Brake and clutch master cylinder fluid level
El Windshield washer reservoir fluid level
Cl Radiator coolant level
Cl Tightness of battery terminals
Cl Manual transaxle oil level
riizmiq
INSTALL the following parts:
Cl Rubber stopper for inside rearview mirror
CHECK operation of the following items:
0 Seat controls (sliding and reclining) and head restraint
Cl Folding rear seat
0 Door locks, including childproof door locks (if equipped)
Seat belts and warning system
Cl Ignition switch and steering lock
0 Inhibitor switch (ATX only)
U Starter interlock switch (clutch pedal, MTX only)
Cl All lights, including warning and indicator lamps
Cl Sound warning system
Cl Horn, wipers and washers (front and rear, if equipped)
0 Audio system (if equipped) 0 Cigarette lighter and clock
0 Sunroof (if equipped)
II Remote control outside rearview mirrors (if equipped)
Cl Power windows (if equipped)
q Heater, defroster and air conditioner at various mode
selections (if equipped)
CHECK the following items:
Cl Presence of spare fuse
0 Upholstery and interior finish
CHECK and ADJUST, if necessary, the following items:
0 Pedal height and free play of brake and clutch pedal
Pedal height mm (in) Free play mm (in)
0 Parking brake
5-7 notches/98 N (10 kg, 22lb)
UNDER HOOD-ENGINE RUNNING AT
OPERATING TEMPERATURE
CHECK the following items:
q Automatic transaxle fluid level
[I
CHECK the following items:
Cl Underside fuel, coolant and hydraulic lines, fittings, con-
nections and components for leaks
0 Tires for cuts or bruises
0 Steering linkage, suspension, exhaust system and all un-
derside hardware for looseness or damage
[I
CHECK the following items:
0 Brake operation
0 Clutch operation
Cl Steering control
Cl Operation of gauges
q Squeaks, rattles or unusual noise
Cl Emergency locking retractors
0 Cruise control system (if equipped)
1 AFTER ROAD TEST (
CHECK for necessary owner information materials.
Following items must be done just before the delivery to your customer.
q Load test battery and charge if necessary
1 Volts 1 0 Install fuses for accessories
i.. _
0 Adjust tire pressure to the specification
Load test result cl Remove seat and floor mat protective covers
(Refer to door label) 0 Vacuum and clean interior of vehicle
0 Clean outside of vehicle q Inspect installation of option parts with invoice
23UOAX-002
A-2
Page 35 of 1164
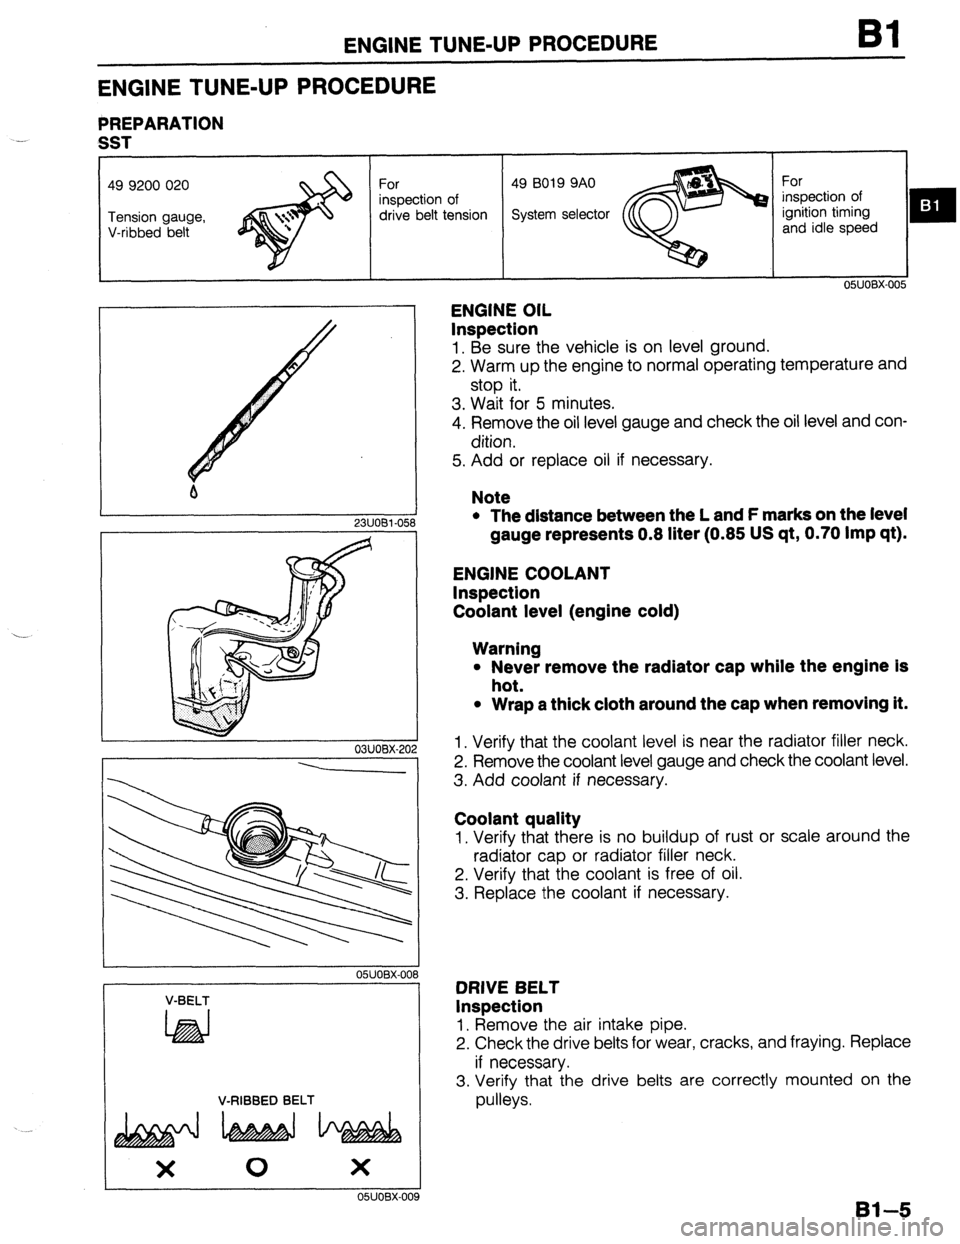
ENGINE TUNE-UP PROCEDURE Bl
ENGINE TUNE-UP PROCEDURE
PREPARATION
-.
SST
drive belt tension
m :
I 1 2311081-058
- 03UOBX-20
---
OSUOBX-OC
V-BELT
LhEd
V-RIBBED BELT
OSJOBX-00
ENGINE OIL
Inspection
1. Be sure the vehicle is on level ground.
2. Warm up the engine to normal operating temperature and
stop it.
3. Wait for 5 minutes.
4. Remove the oil level gauge and check the oil level and con-
dition.
5. Add or replace oil if necessary.
Note
l The distance between the L and F marks on the level
gauge represents 0.8 liter (0.85 US qt, 0.70 Imp qt).
ENGINE COOLANT
Inspection
Coolant level (engine cold)
Warning
l Never remove the radiator cap while the engine is
hot.
l Wrap a thick cloth around the cap when removing it.
1. Verify that the coolant level is near the radiator filler neck.
2. Remove the coolant level gauge and check the coolant level.
3. Add coolant if necessary.
Coolant quality
1. Verify that there is no buildup of rust or scale around the
radiator cap or radiator filler neck.
2. Verify that the coolant is free of oil.
3. Replace the coolant if necessary.
DRIVE BELT
Inspection
1, Remove the air intake pipe.
2. Check the drive belts for wear, cracks, and fraying. Replace
if necessary.
3. Verify that the drive belts are correctly mounted on the
pulleys.
Bl--5
Page 137 of 1164

ENGINE TUNE-UP PROCEDURE 82
ENGINE TUNE-UP PROCEDURE
PREPARATION
SST
49 BO19 9AO
drive belt tension
23UOB2-048
OBUOBX-158
I’ ,
OSJOBX-001
V BELT
V RIBBED BELT
_
x 0 x
3
L
03UOB2-005
ENGINE OIL
Inspection
1. Be sure the vehicle is on level ground.
2. Warm up the engine to normal operating temperature and
stop it.
3. Wait for 5 minutes.
4. Remove the oil level gauge and check the oil level and con-
dition.
5. Add or replace oil if necessary.
Note
l The distance between the L and F marks on the level
gauge represents 0.8 liter (0.85 US qt, 0.70 Imp qt).
ENGINE COOLANT
Inspection
Coolant level (engine cold)
Warning
l Never remove the radiator cap while the engine is
hot.
l Wrap a thick cloth around the cap when removing it.
1. Verify that the coolant level is near the radiator filler neck.
2. Remove the coolant level gauge and check the coolant level.
3. Add coolant if necessary.
Coolant quality
1. Verify that there is no buildup of rust or scale around the
radiator cap or radiator filler neck.
2. Verify that the coolant is free of oil.
3. Replace the coolant if necessary.
DRIVE BELT
Inspection
1. Check the drive belts for wear, cracks, and fraying. Replace
if necessary.
2. Verify that the drive belts are correctly mounted on the
pulleys.
B2-5
Page 252 of 1164
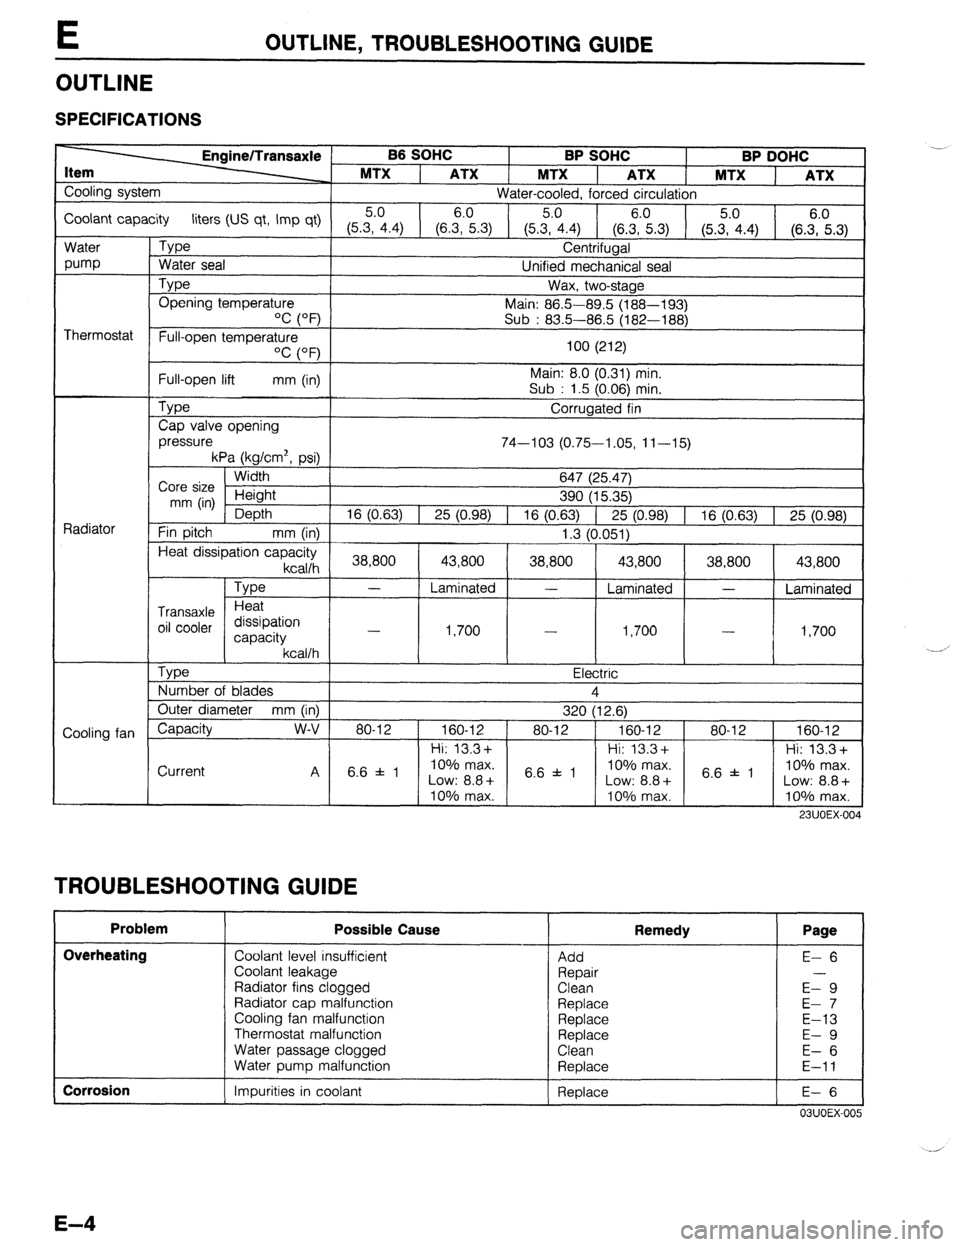
E OUTLINE, TROUBLESHOOTING GUIDE
OUTLINE
SPECIFICATIONS
B6 SOHC
BP SOHC BP DOHC
MTX
1 ATX 1 MTX ATX 1 MTX
ATX
Cooling system
Water-cooled, forced circulation
Coolant capacity liters (US qt, Imp qt) 5.0 6.0
5.0
(5.3, 4.4) (6.3, 5.3)
(5.35.04.4) (6.zi.3) (5.3, 4.4) (6.::.3)
Water
pump
Thermostat
Radiator
Cooling fan
L Type
Water seal Centrifugal
Unified mechanical seal
Type Opening temperature
‘C (OF’) Wax, two-stage
Main: 86.5-89.5 (188-193)
Sub : 83.5-86.5 (182-188)
Full-open temperature
OC (OF)
Full-open lift mm (in)
Type
Cap valve opening
pressure 100 (212)
Main: 8.0 (0.31) min.
Sub : 1.5 (0.06) min.
Corrugated fin
74-103 (0.75-1.05, 11-15)
kPa (kg/cm2, psi)
Width
Core size Height
mm (in)
Depth
Fin pitch
mm (in) 647 (25.47)
390 (15.35)
16 (0.63) 1 25 (0.98) 1 16 (0.63) 1 25 (0.98) 1 16 (0.63) 1 25 (0.98)
1.3 (0.051)
Heat dissipation capacity
kcallh 1 38,800 [ 43,800 ( 38,800 1 43,800 1 38,800 1 43,800 1
Type
Transaxle Heat
oil cooler dissipation
capacity
kcallh
Tvoe
- Laminated - Laminated -
Laminated
1,700
I .I -?nn
- -
I,,“”
I
I - I 4 Ye,-. I,IVV 1
, a-
- Electric
Number of blades 4
Outer diameter mm (in)
320 (12.6)
Capacity w-v 80-12 1 160-12 ) 80-12 ) 160-12 1 80-12 1 160-12
1 Hi: 13.3+ 1 1 Hi: 13.3+ 1 1 Hi: 13.3+
Current
TROUBLESHOOTING GUIDE I I I I
Problem Possible Cause
Overheating
Coolant level insufficient
Coolant leakage
Radiator fins clogged
Radiator cap malfunction
Cooling fan malfunction
Thermostat malfunction
Water passage clogged
Water puma malfunction .- Remedy Page
Add
Repair
Clean
Replace
Replace
Replace
Clean
Reolace E- 6
E-9
E- 7
E-13
E- 9
E- 6
E-11
I Corrosion
1 Impurities in coolant 1 Replace
I E-6 I
03UOEX-005
Page 254 of 1164
E ENGINE COOLANT
SPECIFIC
GRAVITY COOLANT PROTECTION
l.OOd ’ ’ I I I I I
0, I I
-10 0 i 10 20 30 40 50 60
70 60 90
(14) (32) (50) (66) (66)(104)(122)(140)(158~176)(194)
COOLANT TEMPERATURE OC (OF)
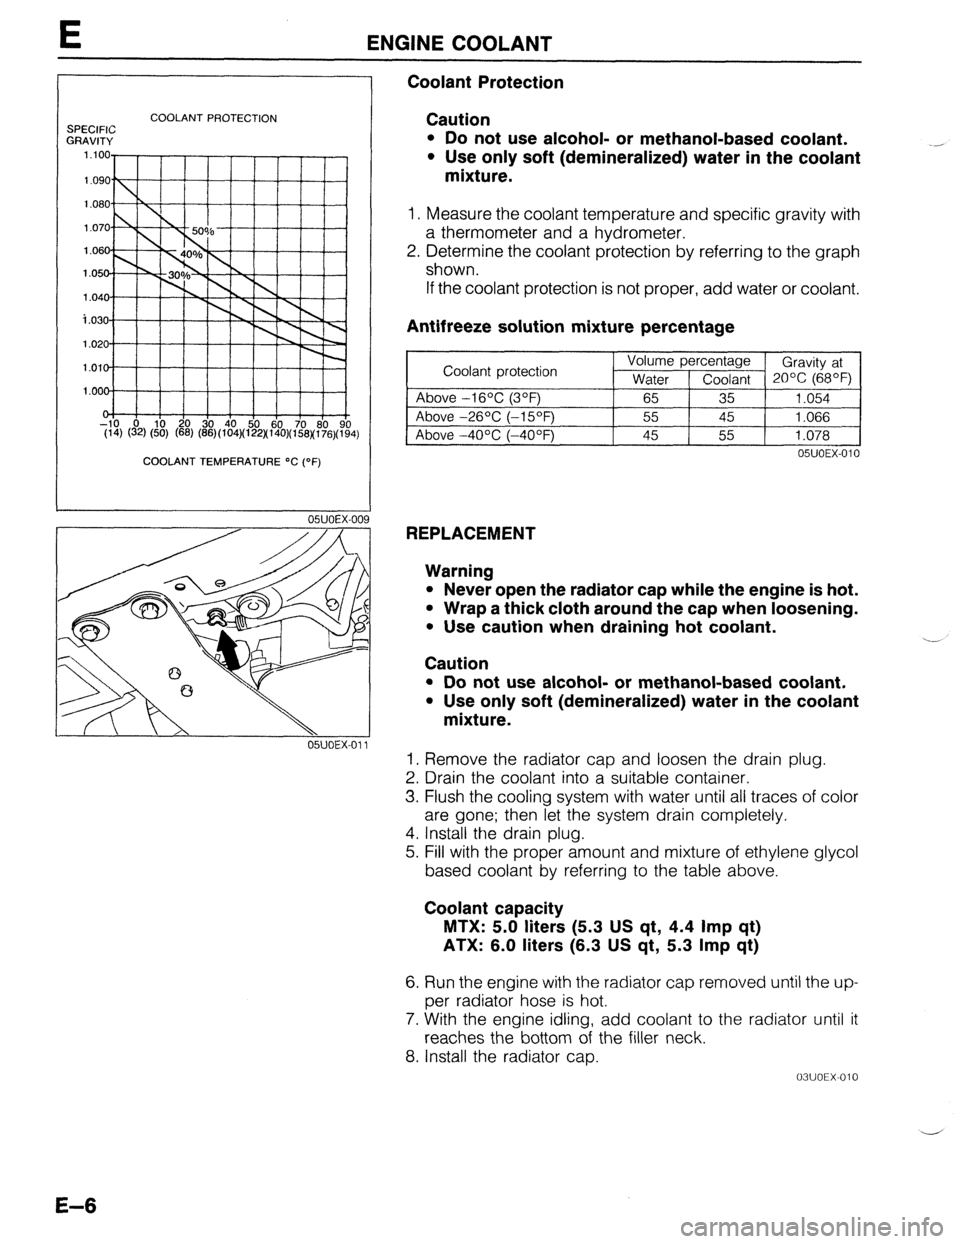
Coolant Protection
Caution
l Do not use alcohol- or methanol-based coolant.
l Use only soft (demineralized) water in the coolant
mixture.
1. Measure the coolant temperature and specific gravity with
a thermometer and a hydrometer.
2. Determine the coolant protection by referring to the graph
shown.
If the coolant protection is not proper, add water or coolant.
Antifreeze solution mixture percentage
~1
05UOEX-010
REPLACEMENT
Warning
l Never open the radiator cap while the engine is hot.
l Wrap a thick cloth around the cap when loosening.
. Use caution when draining hot coolant.
Caution ..-
l Do not use alcohol- or methanol-based coolant.
l Use only soft (demineralized) water in the coolant
mixture.
1. Remove the radiator cap and loosen the drain plug.
2. Drain the coolant into a suitable container.
3. Flush the cooling system with water until all traces of color
are gone; then let the system drain completely.
4. Install the drain plug.
5. Fill with the proper amount and mixture of ethylene glycol
based coolant by referring to the table above.
Coolant capacity
MTX: 5.0 liters (5.3 US qt, 4.4 Imp qt)
ATX: 6.0 liters (6.3 US qt, 5.3 Imp qt)
6. Run the engine with the radiator cap removed until the up-
per radiator hose is hot.
7. With the engine idling, add coolant to the radiator until it
reaches the bottom of the filler neck.
8. Install the radiator cap.
03UOEX-010 -
E-6
Page 257 of 1164
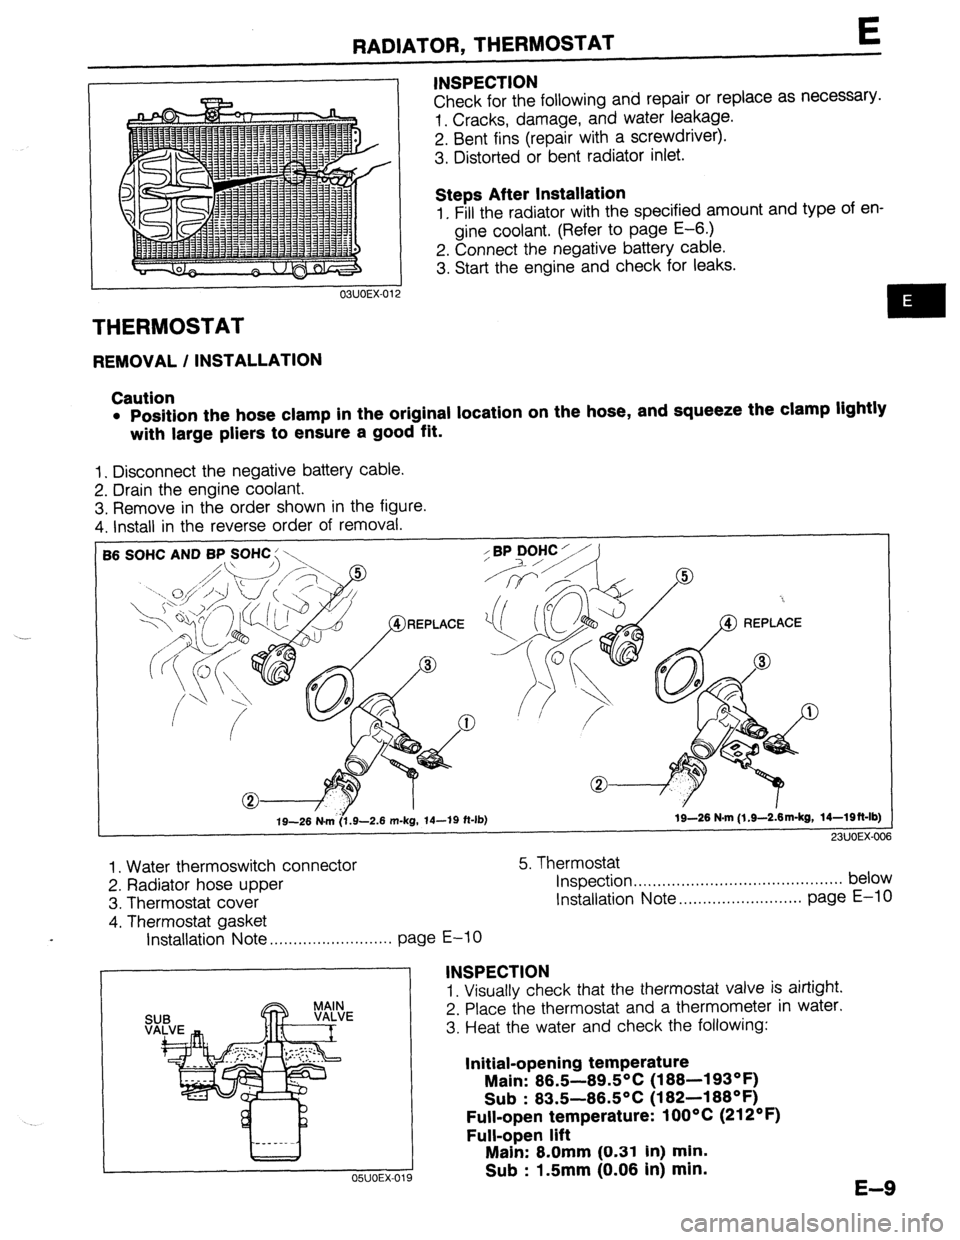
RADIATOR, THERMOSTAT t
THERMOSTAT
REMOVAL / INSTALLATION INSPECTION
Check for the following and repair or replace as necessary.
1. Cracks, damage, and water leakage.
2. Bent fins (repair with a screwdriver).
3. Distorted or bent radiator inlet.
Steps After Installation
1. Fill the radiator with the specified amount and type of en-
gine coolant. (Refer to page E-6.)
2. Connect the negative battery cable.
3. Start the engine and check for leaks.
Caution
l Position the hose clamp in the original location on the hose, and squeeze the clamp lightly
with large pliers to ensure a good fit.
1. Disconnect the negative battery cable.
2. Drain the engine coolant.
3. Remove in the order shown in the figure.
4. Install in the reverse order of removal.
SOHC AND BP SOHC : \,
19-26 N&6.9-2.6 m-kg, 14-19 ft-lb) 19-26 N-m (l.S--2&m-kg, 14-Wft-lb)
23UOEX-006
1. Water thermoswitch connector
2. Radiator hose upper
3. Thermostat cover
4. Thermostat gasket 5. Thermostat
Inspection . . . . .., .., ,.. ,.. . . . ,.. . . . . . . . . . . . . . . . . . . . . . . below
Installation Note ..,....................... page E-10
Installation Note . . . . . . . . . . . . . . . . . . . . . . . . . .
page E-10
INSPECTION
1. Visually check that the thermostat valve is airtight.
2. Place the thermostat and a thermometer in water.
3. Heat the water and check the following:
Initial-opening temperature
Main: 86.5-89.5°C (188-193OF)
Sub : 83.5-86.5OC (182-188OF)
Full-open temperature: 1 OOOC (212OF)
Full-open lift
OSUOEX-019
Main: 8.0mm (0.31 In) min.
Sub : 1.5mm (0.06 in) min.
E-9
Page 262 of 1164

E ELECTRIC COOLING FAN SYSTEM, FAN MOTOR
03UOEX-02
I
1
I
‘4
.
2
.:
)
SYSTEM INSPECTION
1. Jump across the fan test (TFA) terminal and the ground
(GND) terminal of the diagnosis connector.
2. Turn the ignition switch ON and verify that the fan operates.
If the fan does not operate, inspect the cooling fan system
components and wire harness. -.-
3. Remove the radiator cap and place a thermometer in the
radiator filler neck.
4. Start the engine.
5. Verify that the fan operates when the coolant temperature
reaches approx. 97OC (207OF).
If it does, check the water thermoswitch.
(Refer to page E-16.)
FAN MOTOR
INSPECTION
Single-Speed Type
1. Check that the battery is fully charged.
2. Disconnect the fan motor connector.
3. Connect the battery and an ammeter to the fan motor con-
nectar.
4. Verify that current is as specified.
Current (A)
B6 SOHC
BP SOHC
BP DOHC MTX ATX
6.6 f 1 6.6 f 1
6.6 f 1 -
6.6 f 1 -
5. If current is not within specification and/or the fan does not
turn smoothly, replace the fan motor.
Two-Speed Type
1. Check that the battery is fully charged.
2. Disconnect the fan motor connector.
3. Connect the battery and an ammeter to the fan motor con-
nectors for low-speed inspection. 4. Verify that the fan motor operates smoothly at the standard
current.
Current (A): 8.8 + 10% MAX
I
03UOEX-022
E-14
Page 282 of 1164
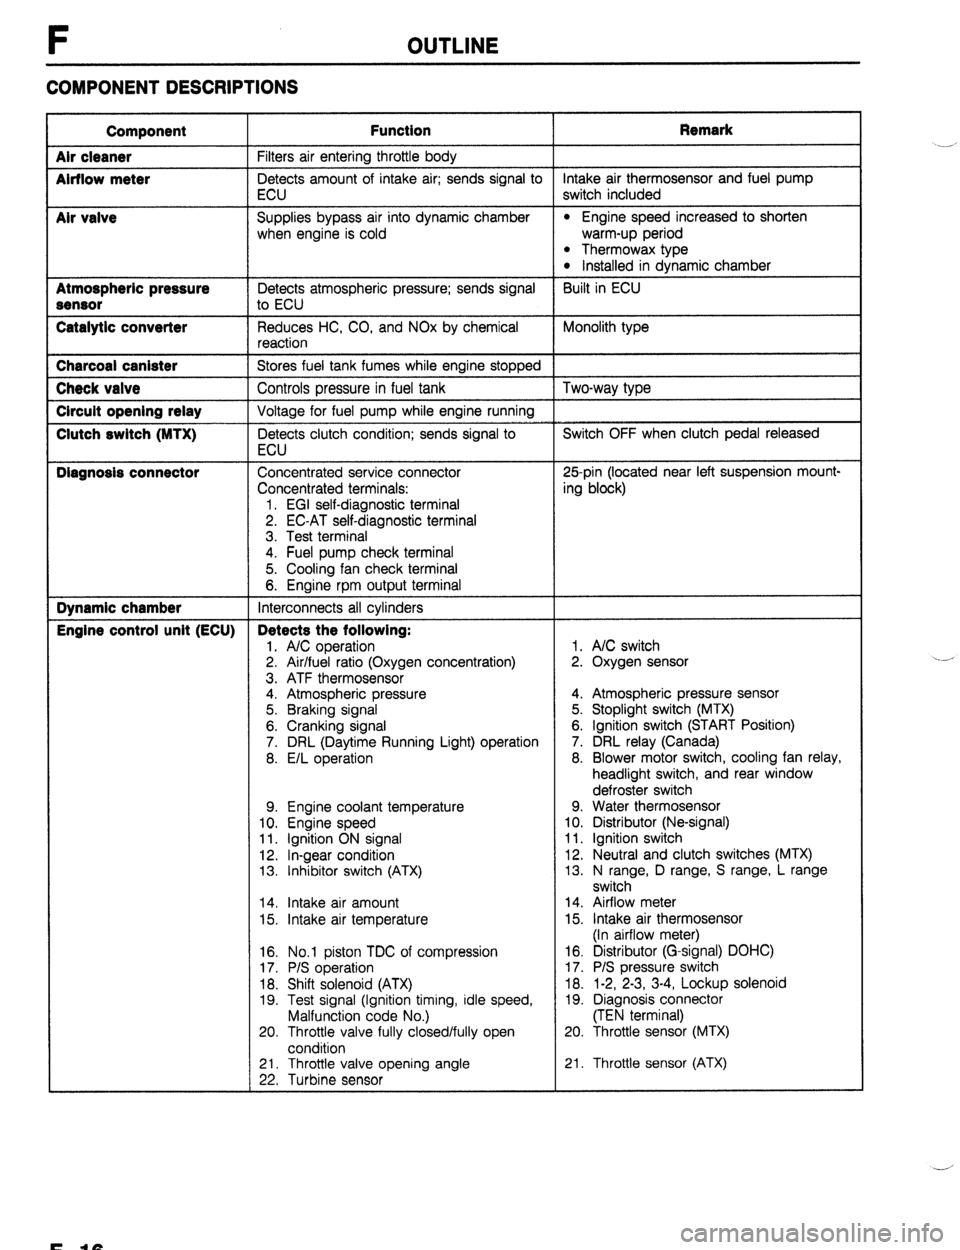
F OUTLINE
COMPONENT DESCRIPTIONS
Component
Air cleaner
Airflow meter
Mr valve
Atmospheric pressure
Sensor
Catalytic converter Function Remark
Filters air entering throttle body
Detects amount of intake air; sends signal to intake air thermosensor and fuel pump
ECU switch included
Supplies bypass air into dynamic chamber
l Engine speed increased to shorten
when engine is cold warm-up period
l Thermowax type l Installed in dynamic chamber
Detects atmospheric pressure; sends signal Built in ECU
to ECU
Reduces HC, CO, and NOx by chemical Monolith type
reaction Charcoal canister
Stores fuel tank fumes while engine stopped Check valve
Controls pressure in fuel tank Two-way type Circuit opening relay
Voltage for fuel pump while engine running Clutch switch (MTX)
Detects clutch condition; sends signal to Switch OFF when clutch pedal released
ECU Diagnosis connector
Concentrated service connector 25pin (located near left suspension mount-
Concentrated terminals: ing block)
1. EGI self-diagnostic terminal
2. EC-AT self-diagnostic terminal
3. Test terminal
4. Fuel pump check terminal
5. Cooling fan check terminal
6. Engine rpm output terminal Dynamic chamber
Interconnects all cylinders Engine control unit (ECU) Detects the following:
1. A/C operation 1. A/C switch
2. Air/fuel ratio (Oxygen concentration) 2. Oxygen sensor
3. ATF thermosensor
4. Atmospheric pressure 4. Atmospheric pressure sensor
5. Braking signal 5. Stoplight switch (MTX)
6. Cranking signal 6. Ignition switch (START Position)
7. DRL (Daytime Running Light) operation 7. DRL relay (Canada)
8. E/L operation 8. Blower motor switch, cooling fan relay,
headlight switch, and rear window
defroster switch
9. Engine coolant temperature 9. Water thermosensor
10. Engine speed 10. Distributor (Ne-signal)
11. Ignition ON signal 11. Ignition switch
12. In-gear condition 12. Neutral and clutch switches (MTX)
13. Inhibitor switch (ATX) 13. N range, D range, S range, L range
switch
14. Intake air amount 14. Airflow meter
15. Intake air temperature 15. Intake air thermosensor
(In airflow meter)
16. No.1 piston TDC of compression
17. P/S operation
18. Shift solenoid (ATX)
19. Test signal (Ignition timing, idle speed,
Malfunction code No.)
20. Throttle valve fully closed/fully open
condition 16. Distributor (G-signal) DOHC)
17. P/S pressure switch
18. 1-2, 2-3, 3-4, Lockup solenoid
19. Diagnosis connector
(TEN terminal)
20. Throttle sensor (MTX)
21. Throttle valve opening angle
22. Turbine sensor 21. Throttle sensor (ATX) .__r
F-10
Page 284 of 1164

F OUTLINE
I Component
I Function
I Remark
I
Three-way
solenoid
valve vIcs*
Pressure
regulator
control
Controls vacuum to shutter valve actuator
Controls vacuum to pressure regulator Cuts vacuum when engine speed above
5.000 ram
Cuts vacuum just after starting when engine
hot starting Vacuum chamber
(DOHC)
Water thermosensor
Stores vacuum for use during wide open For WCS*
throttle
Detects coolant temperature; sends signal to
ECU
l WCS: Variable Inertia Charging System 23UOFX-013
F-l 8
Page 292 of 1164

F TROUBLESHOOTING GUIDE
Troubleshooting chart
6 I
CRANKS NORMALLY BUT HARD TO START - WHEN ENGINE COLD
*Engine cranks at normal speed but requires excessive crankmg time before starting
IESCRIP-
l Batterv in normal condition
llON l Restans OK after warmup l Engine runs normally at idle [If Idle condrtron is not OK, refer to “Rough idle” (Nos. S-12)]
TROUBLESHOOTING HINTS]
B Air/Fuel mrxture too rrch @Air/Fuel mixture too lean
l Arrflow meter stickrng l Fuel iniectron control malfunction
l Aw cleaner element clogged
*Idle weed control malfunction (Correction for coolant temperature)
0 Poor atomizatron
- ~~ ~~ *Low RVP (summer) fuel is used rn cold weather >
f INSPECTION T Check If “00” is displayed on Self-Diagnosis
Checker wth Ignition switch ON -
Yes
No CT page F-73
SYSTEM SELECT: 1
“SELECT SW: A
Check if ECU terminal voltages are OK
(Especially 1C. 2D. and 2Q)
cc page F-144
Check If engine starts easily when throttle valve -
Yes
-
NO
-
Yes ACTION
Go to next step
Malfunctlon Code No. dlsplayed
Check for cause (Refer to specified
check sequence)
“58” flashes CT- page F-79
Check ECU terminal 1F voltage
Speciflcetlon: Battery voltage CT page F-144
(Ignition ewltch ON)
+ If OK, replace ECU CT page F-143
e If. not OK, check wrring between
ECU and Self-Diagnoos Checker
Go to next step
Check for cause CI page F-145
(-!hnrlr ,‘ ICP ..-I..- .^ nv
c+ page F-103
13UOFX-009
DESCRIPTION:
Further describes the symptom. Confirm that the chart addresses the actual symptom before beginning
troubleshooting.
TROUBLESHOOTING HINTS:
This describes the possible point of malfunction.
STEP:
This shows the order of troubleshooting. Proceed with troubleshooting as indicated.
INSPECTION:
This describes an inspection to quickly determine the malfunction of parts. If a detailed procedure is necessary
to perform the INSPECTION, refer to the page shown by the “~7” mark.
ACTION:
This recommends the appropriate action to take as a result (Yes/No) of the INSPECTION. How to perform
the action is described on the reference page shown by the “~7” mark.
OWOFX-016
F-26