key MAZDA PROTEGE 1992 Workshop Manual
[x] Cancel search | Manufacturer: MAZDA, Model Year: 1992, Model line: PROTEGE, Model: MAZDA PROTEGE 1992Pages: 1164, PDF Size: 81.9 MB
Page 3 of 1164
GENERAL INFORMATION
IMPORTANT INFORMATION ..................... GI- 2
BASIC ASSUMPTIONS ............................ GI- 2
SAFETY RISK ........................................ GI- 2
POSSIBLE LOSS OF WARRANTY ............. GI- 2
WARNING ON LUBRICANTS
AND GREASES .................................... GI- 2
HOW TO USE THIS MANUAL.. .................. GI- 3
PREPARATION ...................................... GI- 3
REPAIR PROCEDURE ............................. GI- 3
SYMBOLS ............................................. GI- 4
NOTES, CAUTIONS, AND WARNINGS.. ..... GI- 4
FUNDAMENTAL PROCEDURES.. ............... GI- 4
PROTECTION OF THE VEHICLE .............. GI- 4
A WORD
ABOUT SAFETY ....................... GI- 5
PREPARATION OF TOOLS
AND MEASURING EQUIPMENT.. ........... GI- 5
SPECIAL TOOLS .................................... GI- 5
REMOVAL OF PARTS ............................. GI- 5
DISASSEMBLY ...................................... GI- 5
REASSEMBLY ....................................... GI- 6
ADJUSTMENTS ..................................... GI- 7
RUBBER
PARTS AND TUBING ................
GI- 7
JACK AND SAFETY STAND POSITIONS.. .. GI- 6
VEHICLE LIFT (P-SUPPORT TYPE)
POSITIONS ............................................ GI- 6
TOWING .................................................. GI- 9
IDENTIFICATION NUMBER LOCATIONS ..... 61-10
UNITS ..................................................... GI-10
ABBREVIATIONS ..................................... GI-10
CAUTION ................................................ GI-1 1
INSTALLATION OF MOBILE
TWO-WAY RADIO SYSTEM .................... GI-11
REMOVAL OF IGNITION KEY ON
AUTOMATIC TRANSAXLE MODEL.. ........
GI-1 1
ELECTRICAL TROUBLESHOOTING TOOLS GI-12
CAUTION WITH ELECTRICAL PARTS ........
GI-13
03UGIX-001
Page 13 of 1164
CAUTION GI
CAUTION
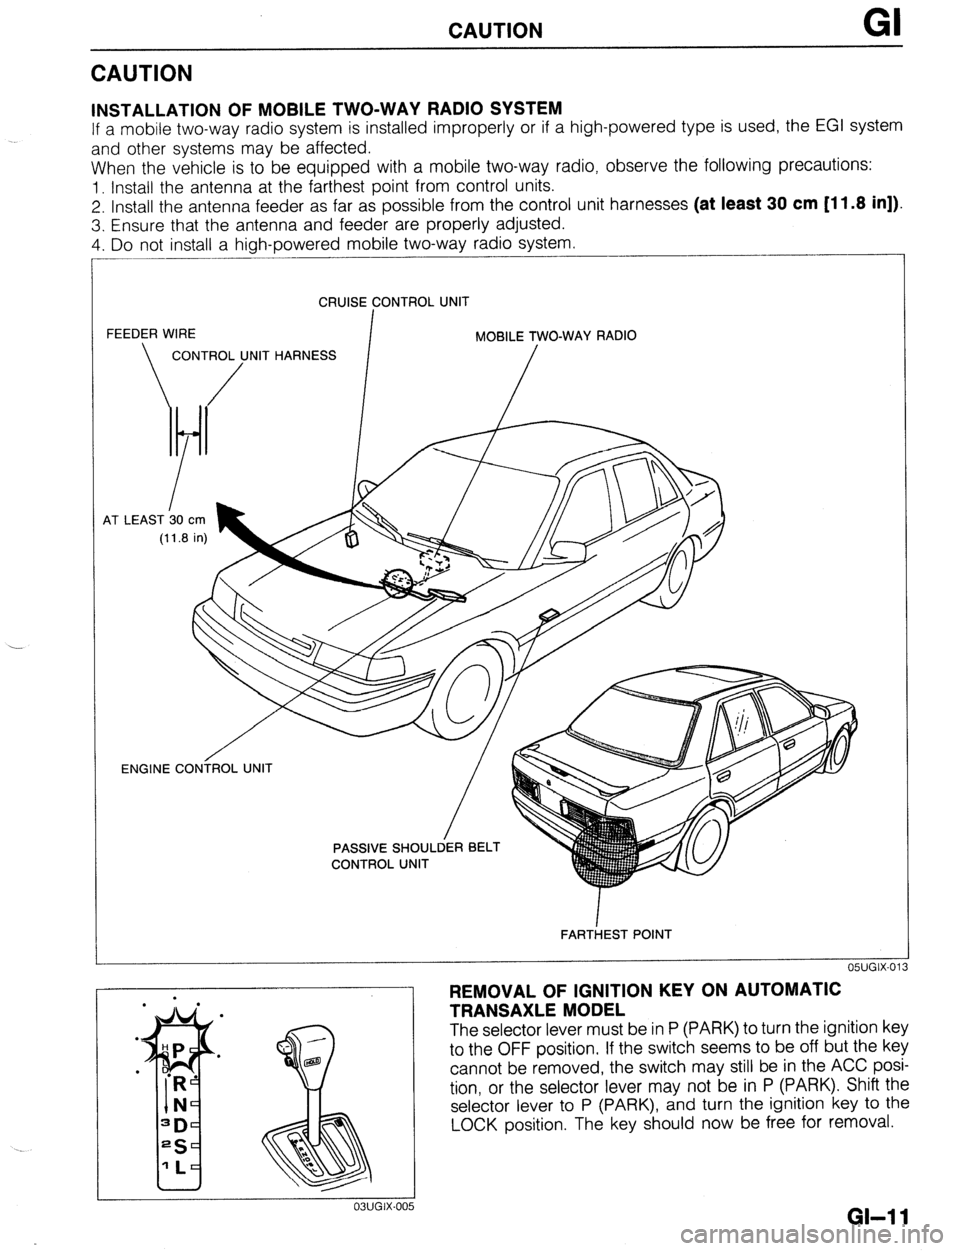
INSTALLATION OF MOBILE TWO-WAY RADIO SYSTEM
If a mobile two-way radio system is installed improperly or if a high-powered type is used, the EGI system
and other systems may be affected.
When the vehicle is to be equipped with a mobile two-way radio, observe the following precautions:
1. Install the antenna at the farthest point from control units.
2. Install the antenna feeder as far as possible from the control unit harnesses (at least 30 cm [11.8 in]).
3. Ensure that the antenna and feeder are properly adjusted.
4. Do not install a high-powered mobile two-way radio system.
CRUISE CONTROL UNIT
FEEDER WIRE
I MOBILE TWO-WAY RADIO
CONTROL UNIT HARNESS
/ /
4T LEAST b0
cm
(11.8 in)
OWGIX-013 ENGINE CONiROL UNIT
/
FARTiEST POINT
REMOVAL OF IGNITION KEY ON AUTOMATIC
TRANSAXLE MODEL
The selector lever must be in P (PARK) to turn the ignition key
to the OFF position. If the switch seems to be off but the key
cannot be removed, the switch may still be in the ACC posi-
tion, or the selector lever may not be in P (PARK). Shift the
selector lever to P (PARK), and turn the ignition key to the
LOCK position. The key should now be free for removal.
GI-1 1
Page 54 of 1164
Bl ON-VEHICLE MAINTENANCE
01 EOBX-056
23UOBi -0:
Steps After Installation
1. Lower the vehicle.
2. Connect the negative battery cable.
3. Start the engine and check the ignition timing.
(Refer to page 61-8)
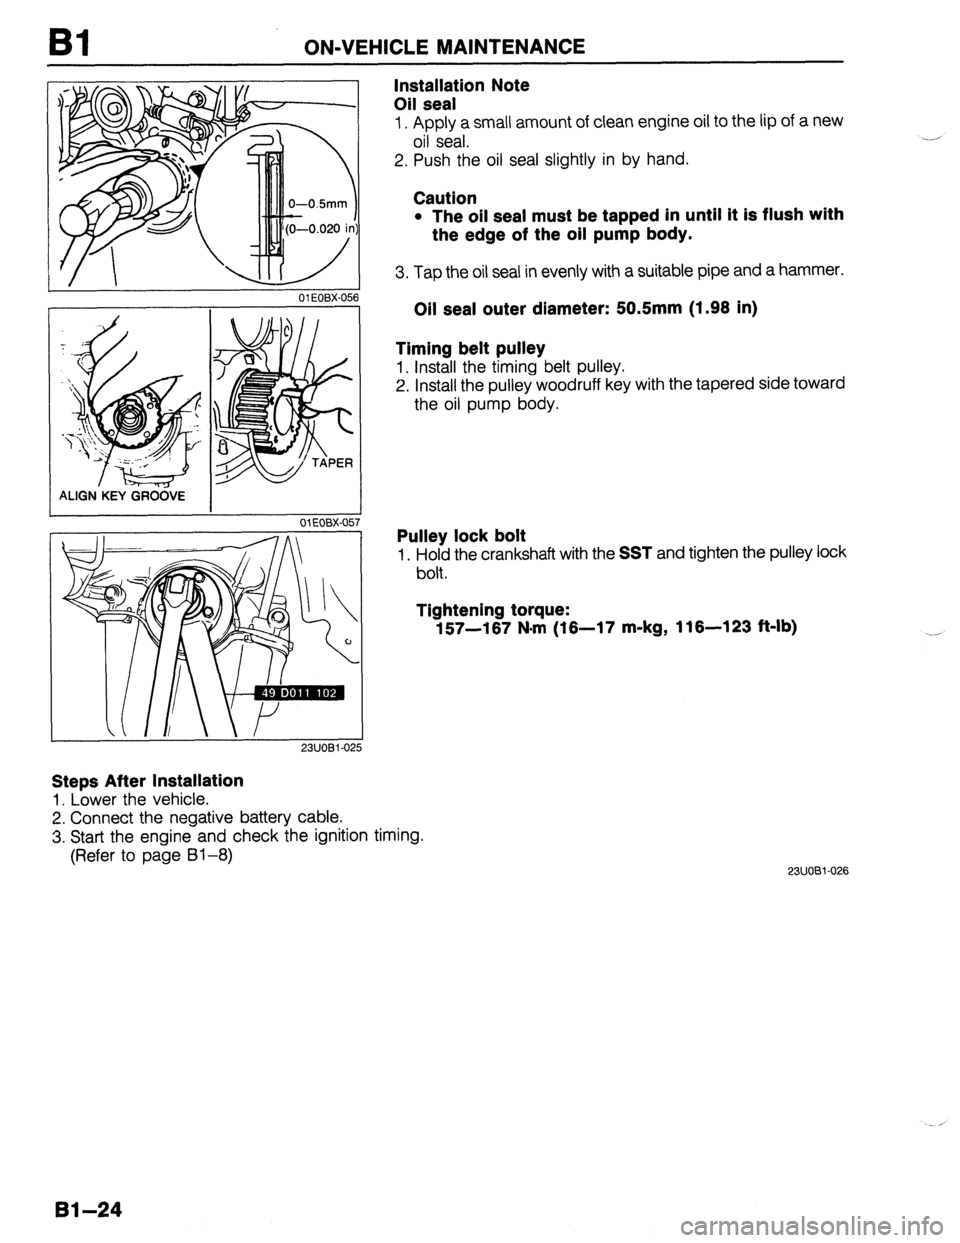
Installation Note
Oil seal
1. Apply a small amount of clean engine oil to the lip of a new
oil seal.
2. Push the oil seal slightly in by hand.
Caution
l The oil seal must be tapped in until it is flush with
the edge of the oil pump body.
3. Tap the oil seal in evenly with a suitable pipe and a hammer.
Oil seal outer diameter: 50.5mm (1.98 in)
Timing belt pulley
1. Install the timing belt pulley.
2. Install the pulley woodruff key with the tapered side toward
the oil pump body.
Pulley lock bolt
1. Hold the crankshaft with the SST and tighten the pulley lock
bolt.
Tightening torque:
157-167 N*rn (16-17 m-kg, 116-123 ft-lb)
23UOBi-026
Bl-24
Page 78 of 1164

Bl DISASSEMBLY
23UOBl-068
23UOBl-06!
I 2311081-070
23UOBl-071
Disassembly Note
Timing belt pulley
1. Hold the flywheel (MTX) or drive plate (ATX) with the SST
or equivalent.
2. Loosen the pulley lock bolt.
3. Remove the pulley lock bolt. -
4. Remove the timing belt pulley.
5. Remove the pulley Woodruff key.
2311081-059
Clutch cover (MTX)
1. Hold the flywheel with the SST or equivalent.
2. Loosen the clutch cover lock bolts in two or three steps in
the order shown in the figure.
3. Remove the clutch cover.
-
Flywheel (MTX)
1. Hold the flywheel with the SST or equivalent.
2. Remove the flywheel lock bolts.
3. Remove the flywheel.
4. Remove the
SST or equivalent.
Backing plate, drive plate, and adapter (ATX)
1. Hold the drive plate with the SST or equivalent.
2. Remove the drive plate lock bolts.
3. Remove the backing plate, drive plate, and adapter.
4. Remove the
SST or equivalent.
Bl-48
Page 159 of 1164
ON-VEHICLE MAINTENANCE
I 05UOBX-063
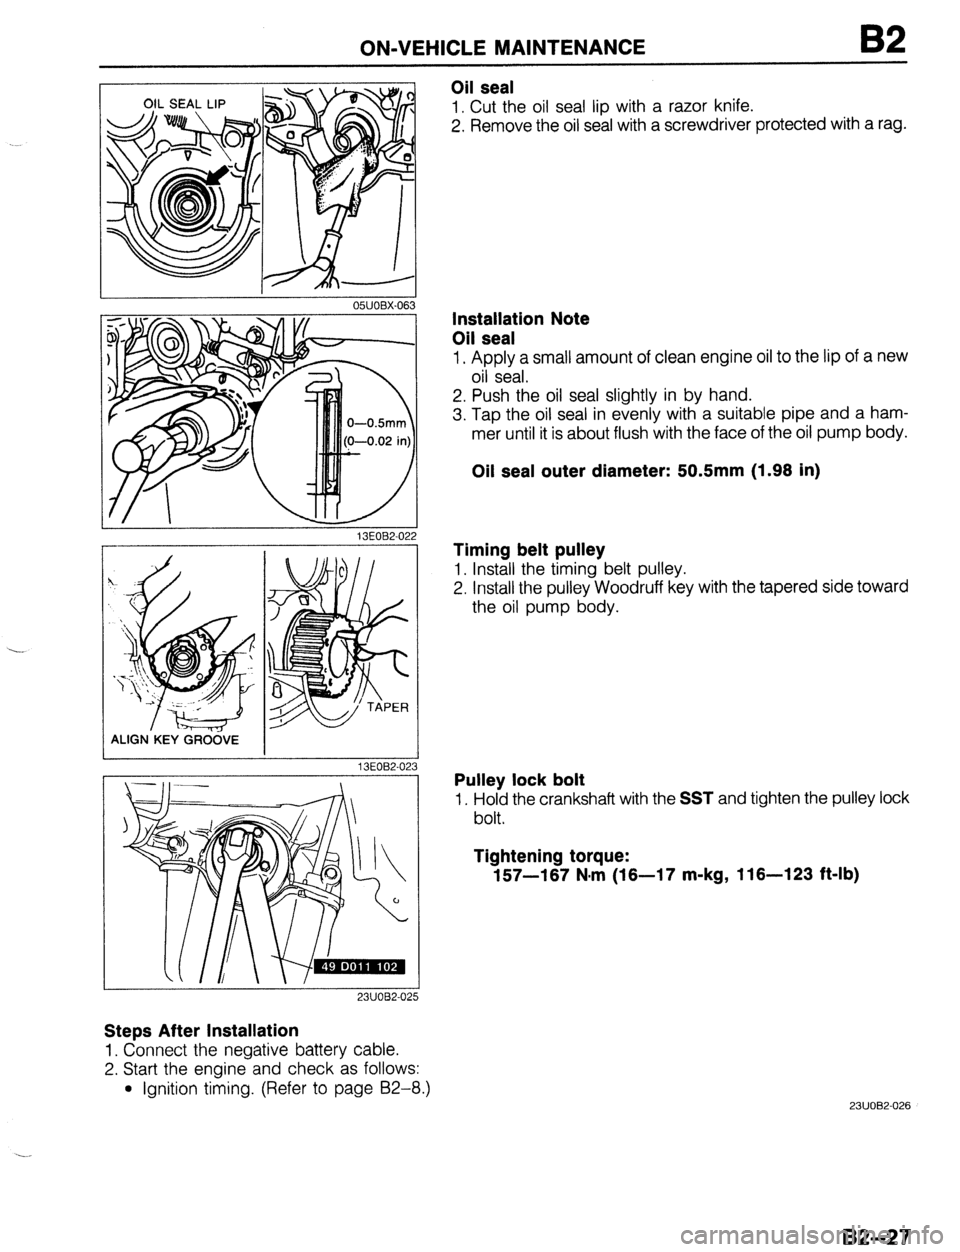
Oil seal
1. Cut the oil seal lip with a razor knife.
2. Remove the oil seal with a screwdriver protected with a rag.
13EOB2-02
ALIGN.KEY GRCi&E
13EOB2-02
23UOB2-025
Steps After Installation
1. Connect the negative battery cable.
2. Start the engine and check as follows:
l Ignition timing. (Refer to page 92-8.)
3
Installation Note
Oil seal
1. Apply a small amount of clean engine oil to the lip of a new
oil seal.
2. Push the oil seal slightly in by hand.
3. Tap the oil seal in evenly with a suitable pipe and a ham-
mer until it is about flush with the face of the oil pump body.
Oil seal outer diameter: 50.5mm (1.98 in)
Timing belt pulley
1. Install the timing belt pulley.
2. Install the pulley Woodruff key with the tapered side toward
the oil pump body.
Pulley lock bolt
1. Hold the crankshaft with the SST and tighten the pulley lock
bolt.
Tightening torque:
157-187 N.m (18-17 m-kg, 116-123 ft-lb)
23UOB2-026
82-27
Page 181 of 1164

DISASSEMBLY
23UOW056
03UOB2-073
Disassembly Note
Timing belt pulley
1. Hold the flywheel or the drive plate with the SST or
equivalent.
2. Loosen the pulley lock bolt.
3. Remove the pulley lock bolt.
4. Remove the timing belt pulley.
5. Remove the pulley Woodruff key.
23UOB2-049
Flywheel (MTX)
1. Hold the flywheel with the SST or equivalent.
2. Remove the flywheel lock bolts.
3. Remove the flywheel.
Backing plate, drive plate, and adapter (ATX)
1. Hold the drive plate with the SST or equivalent.
2. Remove the drive plate lock bolts.
3. Remove the backing plate, drive plate, and adapter.
Oil pan
1. Remove the oil pan mounting bolts.
Caution
l Do not force a prying tool between the cylinder
block and the oil pan, which may damage the con-
tact surfaces.
l Do not damage or scratch the contact surfaces
when removing the old sealant.
2. Insert a screwdriver or a suitable tool only at the points
shown in the figure.
3. Remove the oil pan.
82-49
Page 210 of 1164
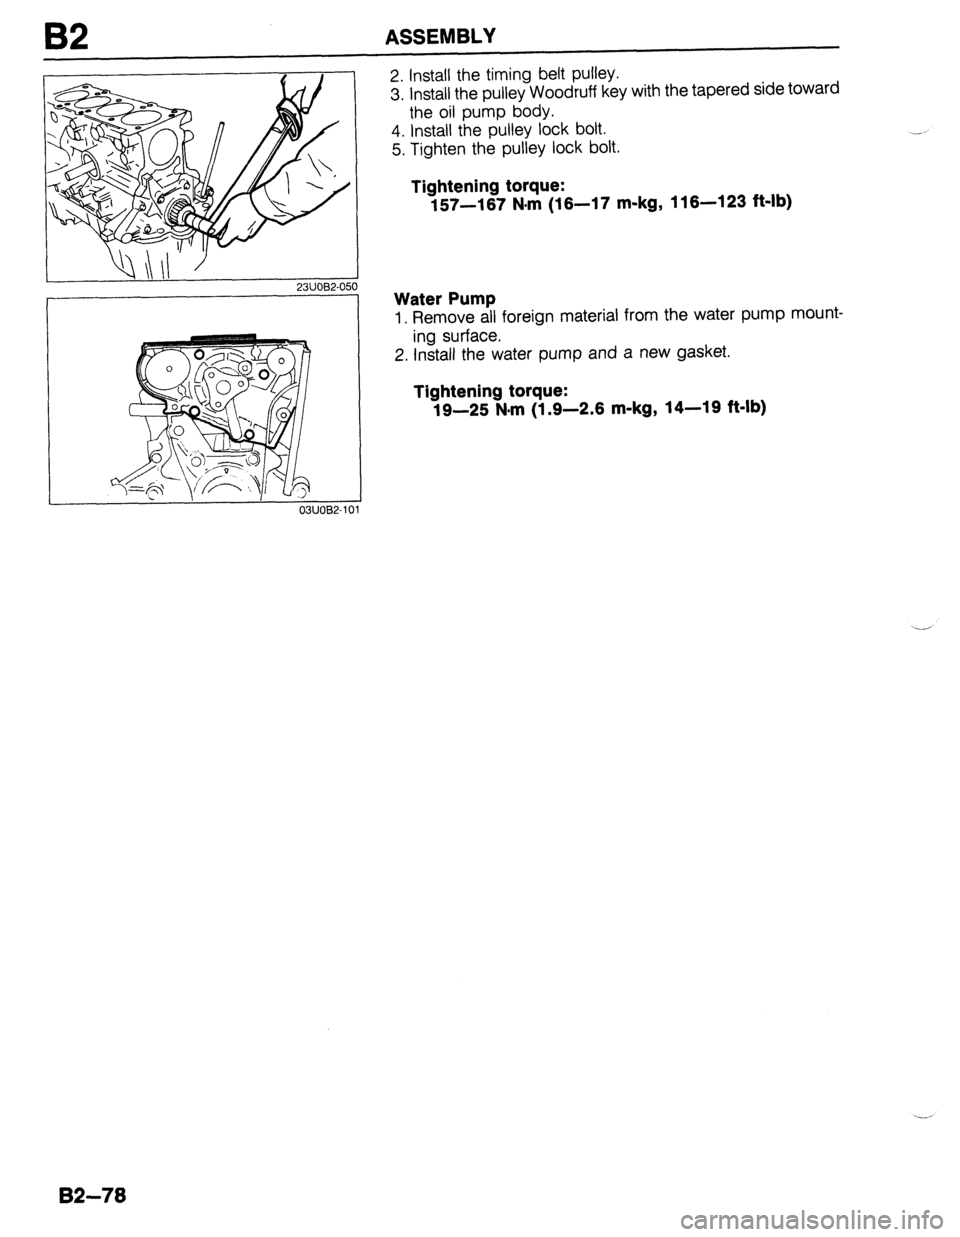
I32 ASSEMBLY
Qill’ ’ 23UOB2-050
03UOB2-10
2. Install the timing belt pulley.
3. install the pulley Woodruff key with the tapered side toward
the oil pump body.
4. Install the pulley lock bolt.
5. Tighten the pulley lock bolt.
Tightening torque:
157-167 N#rn (16-17 m-kg, 116-123 ft-lb)
Water Pump
1. Remove all foreign material from the water pump mount-
ing surface.
2. Install the water pump and a new gasket.
Tightening torque:
19-25 N.m (1.9-2.6 m-kg, 14-19 ft-lb)
82-78
Page 496 of 1164

Jl TROUBLESHOOTING GUIDE
TROUBLESHOOTING GUIDE
Problem
Shift lever won’t shift
smoothly or is hard
to shift
Too much play in
shift lever
I------
Difficult to shift
Won’t stay in gear
Abnormal noise
I
Possible cause
Seized shift lever ball
Seized change control rod joint
Bent change control rod
Worn change control rod bushing
Weak shift lever ball spring
Worn shift lever ball bushing
Bent change rod
No grease in transaxle control
Insufficient oil
Deterioration of oil quality
Wear or play of shift fork or shift rod
Worn synchronizer ring
Worn synchronizer cone of gear
Bad contact of synchronizer ring and cone of gear
Excessive longitudinal play of gears
Worn bearing
Worn synchronizer key spring
Excessive primary shaft gear bearing preload
improperly adjusted change guide plate
Bent change control rod
Worn change control rod bushing
Weak shift lever ball spring
improperly installed extension bar
Worn shift fork
Worn clutch hub
Worn clutch hub sleeve
Worn gear sliding part of both shaft gears
Worn gear sliding part of each gear
Worn steel sliding groove of control end
Weak spring pressing against steel ball
Excessive thrust clearance
Worn bearing
Improperly installed engine mount
Insufficient oil
Deterioration of oil quality
Worn bearing
Worn sliding surfaces of gears or shafts
Excessive gear backlash
Damaged gear teeth
Foreign material in gears
Damaged differential gear or excessive backlash Remedy Replace
Replace
Replace
Replace
Replace
Replace
Replace
Lubricate with grease
Add oil
Replace with oil of
specified quality
Replace
Replace
Replace
Replace
Replace
Replace
Replace
Adjust
Adjust
Replace
Replace
Replace
Tighten
Replace
Replace
Replace
Replace
Replace
Replace
Replace
Replace
Replace
Tighten
Add oil
Replace
Adjust or replace
Replace
Replace
Replace with oil of
specified quality
Replace
Adjust or replace Page Jl-56
Jl-56
Jl-56
Jl-56
Jl-56
Jl-56
Jl-56
Jl-56
Jl- 7
Jl- 7
Jl-14
Jl-22, 24
Jl-22, 24
Jl-22, 24
Jl-22, 24
Jl-22, 24
Jl-22, 24
Jl-36
Jl-17
Jl-56
Jl-56
Jl-56
Jl-56
Jl-14
Jl-22, 24
Jl-22, 24
Jl-22, 24
Jl-22, 24
Jl-14
Jl-14
Jl-22, 24
Jl-22, 24
Jl-48
Jl- 7
Jl- 7
Jl-22, 24
Jl-22, 24
Jl-22, 24
Jl-22, 24
Jl-22, 24
Jl-53
03UOJl-OC --
-../
51-6
Page 505 of 1164

TRANSAXLE Jl
1, Rear cover
2. Locknut (Primary shaft)
Disassembly Note .,......,,.,......... page Jl-15
3. Stop plate
4. Locknut (Secondary shaft)
Disassembly Note ,..,....,,.,......... page Jl-15
5. 5th shift fork
6. Clutch hub assembly (5th)
Inspection . . . . . . . . . . . . . . . . ..*............... page J l-29
7. Synchronizer ring (5th)
Inspection . . . . . . . . . . . . . . . . . . . . . . . . . . . . . . . . . . page Jl-27
8. 5th gear
Inspection . . . . . . . . . . . . . . . . . . . . . . . . . . . . . . . . . . page Jl-28
9. Gear sleeve
Inspection . . . . . . . . . . . . . . . . ..*...*........... page Jl-28
10. Secondary 5th gear
11. Lock bolt and washer
12. Back-up light switch
13. Neutral switch
14. Transaxle case assembly
15. Magnet
16. Reverse idler shaft
17. Reverse idler gear
Inspection.. . . , . . . . . . . . . . . . . . . , , . , . . . . . . . . . . page J l-27
L ,
03UOJl-022
I
I I
03UOJl-023
18. 5th shift rod
19. 5th shift rod end
20. Pin
21. Crank lever shaft
22. Crank lever assembly
23. Shift fork and shift rod assembly
Disassembly Note ,.................... page Jl-16
24. Steel ball
25. Spring
26. Primary shaft gear assembly
27. Secondary shaft gear assembly
28. Differential assembly
29. Clutch housing
30. Synchronizer spring
31. Clutch hub sleeve
32. Synchronizer key
33. Clutch hub
34. 3rd/4th shift fork
35. Interlock sleeve
36. Control lever
37. lstl2nd shift fork
38. Control rod
39. Control end
03UOJl-021
Preinspection
5th gear thrust clearance
1. Measure the 5th gear thrust clearance with a dial indicator.
Clearance: 0.06-0.26mm (0.0024-0.0102 in)
Maximum : 0.31 mm (0.0122 in)
2. If the clearance exceeds the the maximum, check the con-
tact surfaces of 5th gear and the clutch hub. Replace worn
or damaged parts.
Disassembly note
Locknut
1, Mount the transaxle on the SST.
Jl-15
Page 512 of 1164

Jl TRANSAXLE
Primary Shaft Assembly
1. Measure the thrust clearances of all gears before disassembly, referring to Preinspection.
2. Disassemble in the order shown in the figure, referring to Disassembly Note.
REPLACE
1. Bearing
Disassembly Note.. . . . . . . . . . . . . . . . page Jl-23
Inspection.. . . .., . . . . . . . . . . . . . . . . . . . . . page J l-28
2.4th gear
Disassembly Note . . . . . . . . . . . . . . . . . . . . . page Jl-23
Inspection.. . . . . . . . . . . . . . . . . . . . . . . page J l-28
3. Synchronizer ring (4th)
Inspection.. . . . . . . . . . . . . . . . . . . . . . page J l-27
4. Retaining ring
5. Clutch hub assembly (3rd/4th)
Disassembly Note . . . . . . . . . . . . . . . . page Jl-23
inspection.. . . . . . . . . . . . . . . . . . . . . . . page J l-29
6. Synchronizer ring (3rd)
Disassembly Note . . . . . . . . . . . . . . . . . . . . page Jl-23
Inspection.. . . . .., . . . . . . ,.. . . . . . . . . page J l-27 7. 3rd gear
Disassembly Note.. . . . . . . . . . . . page J l-23
Inspection.. . . . . . . . . . . page J 1-28
8. Bearing
Disassembly Note.. . ., . . . page J l-23
9. Primary shaft
Inspection., . . . . . . . . . . . page J 1-27
10. Synchronizer spring
11. Clutch hub sleeve
12. Synchronizer key
13. Clutch hub
. . /’
Jl-22