tow MERCEDES-BENZ A-CLASS HATCHBACK 2015 Owner's Manual
[x] Cancel search | Manufacturer: MERCEDES-BENZ, Model Year: 2015, Model line: A-CLASS HATCHBACK, Model: MERCEDES-BENZ A-CLASS HATCHBACK 2015Pages: 417, PDF Size: 11.91 MB
Page 81 of 417
ATA (Anti-Theft Alarm system)
X
To prime: lock the vehicle with the key or
KEYLESS-GO.
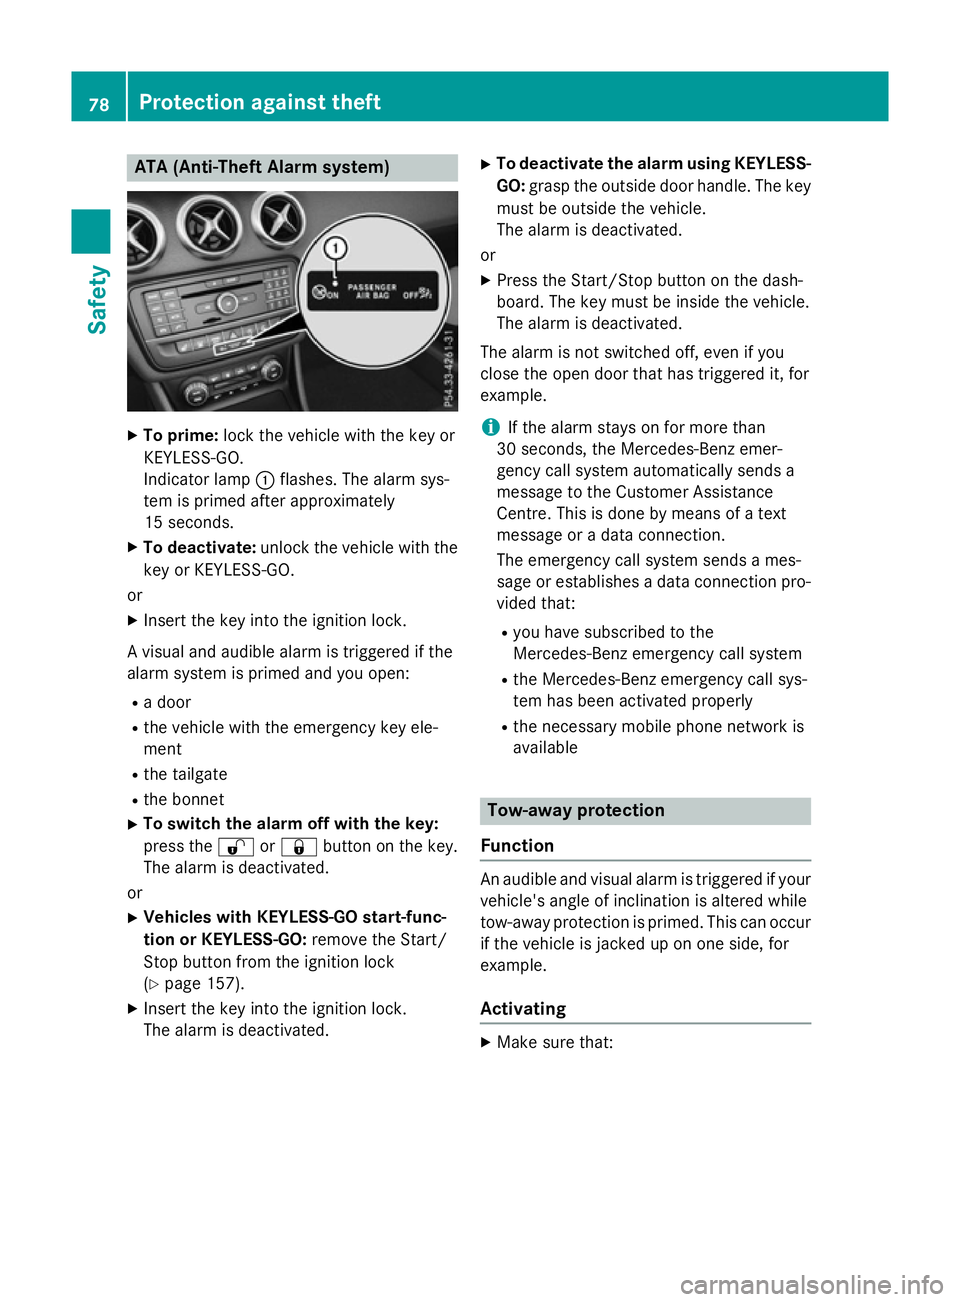
Indicator lamp :flashes. The alarm sys-
tem is primed after approximately
15 seconds.
X To deactivate: unlock the vehicle with the
key or KEYLESS-GO.
or X Insert the key into the ignition lock.
A visual and audible alarm is triggered if the
alarm system is primed and you open:
R a door
R the vehicle with the emergency key ele-
ment
R the tailgate
R the bonnet
X To switch the alarm off with the key:
press the %or& button on the key.
The alarm is deactivated.
or X Vehicles with KEYLESS-GO start-func-
tion or KEYLESS-GO: remove the Start/
Stop button from the ignition lock
(Y page 157).
X Insert the key into the ignition lock.
The alarm is deactivated. X
To deactivate the alarm using KEYLESS-
GO: grasp the outside door handle. The key
must be outside the vehicle.
The alarm is deactivated.
or
X Press the Start/Stop button on the dash-
board. The key must be inside the vehicle.
The alarm is deactivated.
The alarm is not switched off, even if you
close the open door that has triggered it, for
example.
i If the alarm stays on for more than
30 seconds, the Mercedes‑Benz emer-
gency call system automatically sends a
message to the Customer Assistance
Centre. This is done by means of a text
message or a data connection.
The emergency call system sends a mes-
sage or establishes a data connection pro-
vided that:
R you have subscribed to the
Mercedes‑ Benz emergency call system
R the Mercedes‑Benz emergency call sys-
tem has been activated properly
R the necessary mobile phone network is
available Tow-away protection
Function An audible and visual alarm is triggered if your
vehicle's angle of inclination is altered while
tow-away protection is primed. This can occur if the vehicle is jacked up on one side, for
example.
Activating X
Make sure that: 78
Protection against theftSafety
Page 82 of 417
R
the doors are closed
R the tailgate is closed
Only then is tow-away protection primed.
X Lock the vehicle with the key or KEYLESS-
GO.
Tow-away protection is primed after
approximately 60 second s.
Switching off X
Unlo ck the vehicle with the key or KEY-
LESS-GO.
or X Insert the key into the ignition lock.
Tow-away protection is switched off auto-
matically.
Deactivating X
Remove the key from the ignition lock.
or X Vehicles with KEYLESS-GO start func-
tion or KEYLESS-GO: switch off the engine
using the Start/Stop button and open the
driver's door.
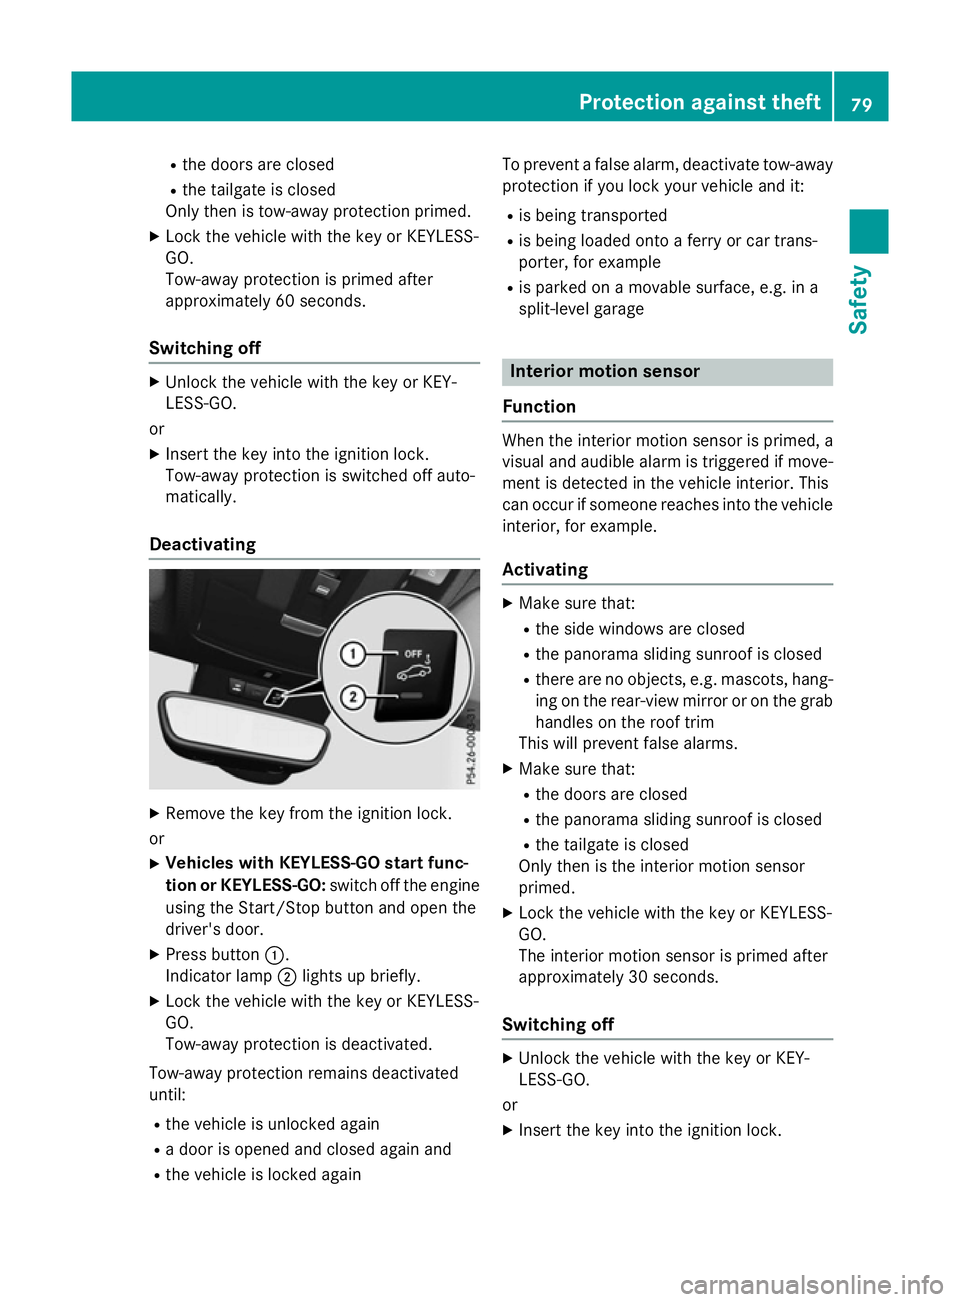
X Press button :.
Indicator lamp ;lights up briefly.
X Lock the vehicle with the key or KEYLESS-
GO.
Tow-away protection is deactivated.
Tow-away protection remains deactivated
until:
R the vehicle is unlocked again
R a door is opened and closed again and
R the vehicle is locked again To prevent a false alarm, deactivate tow-away
protection if you lock your vehicle and it:
R is being transported
R is being loaded onto a ferry or car trans-
porter, for example
R is parked on a movable surface, e.g. in a
split-level garage Interior motion sensor
Function When the interior motion sensor is primed, a
visual and audible alarm is triggered if move-
ment is detected in the vehicle interior. This
can occur if someone reaches into the vehicle interior, for example.
Activating X
Make sure that:
R the side windows are closed
R the panorama sliding sunroof is closed
R there are no objects, e.g. mascots, hang-
ing on the rear-view mirror or on the grab handles on the roof trim
This will prevent false alarms.
X Make sure that:
R the doors are closed
R the panorama sliding sunroof is closed
R the tailgate is closed
Only then is the interior motion sensor
primed.
X Lock the vehicle with the key or KEYLESS-
GO.
The interior motion sensor is primed after
approximately 30 seconds.
Switching off X
Unlock the vehicle with the key or KEY-
LESS-GO.
or X Insert the key into the ignition lock. Protection against theft
79Safety Z
Page 92 of 417
Problem
Possible causes/consequences and
M
MSolutions You have lost a key. X
Have the key deactivated at a qualified specialist workshop.
X Report the loss immediately to the vehicle insurers.
X If necessary, have the locks changed as well. You have lost the emer-
gency key element. X
Report the loss immediately to the vehicle insurers.
X If necessary, have the locks changed as well. Doors
Important safety notes
G
WARNING
If children are left unsupervised in the vehicle, they could:
R open doors, thereby endangering other per-
sons or road users
R get out and be struck by oncoming traffic
R operate vehicle equipment and become
trapped, for example
In addition, the children could also set the
vehicle in motion, for example, if they:
R release the parking brake
R shift the automatic transmission out of park
position P or shift manual transmission into
neutral
R start the engine
There is a risk of an accident and injury.
When leaving the vehicle, always take the key with you and lock the vehicle. Never leave
children and animals unattended in the vehi-
cle. Keep the keys out of the reach of children.
Stow luggage or loads preferably in the lug-
gage compartment. Observe the loading
guidelines (Y page 306).
United Kingdom only: G
WARNING
When the double locks are activated, the
doors can no longer be opened from the
inside. People in the vehicle can no longer get out, e.g. in hazardous situations. There is a
risk of injury. Therefore, do not leave any people unsuper-
vised in the vehicle, particularly children, eld-
erly people or people in need of special assis-
tance. Do not activate the double lock when
people are in the vehicle.
If the vehicle has been locked with the key,
the double lock function is activated as stand-
ard. It is then not possible to open the doors
from inside the vehicle. You can deactivate
the double lock function by deactivating the
interior motion sensor (Y page 80). The doors
can then be opened from the inside after the vehicle has been locked from the outside. You
can open the rear doors from inside the vehi- cle if they are not secured by the child-proof
locks (Y page 68). The anti-theft alarm system
is triggered if the door is opened from the
inside. Switch off the alarm (Y page 78). Unlocking and opening the doors
from the inside
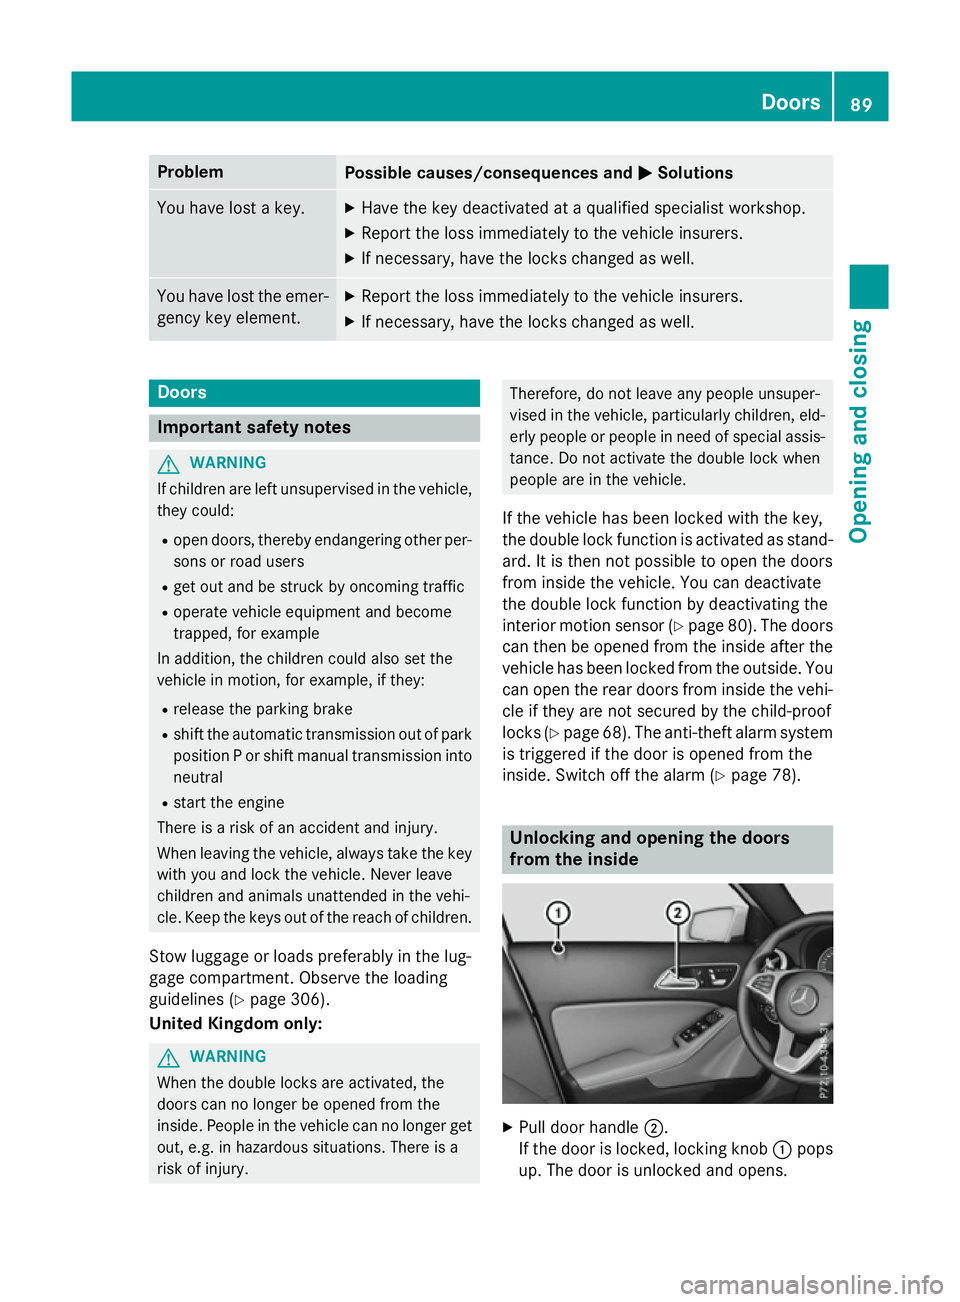
X
Pull door handle ;.
If the door is locked, locking knob :pops
up. The door is unlocked and opens. Doors
89Opening and closing Z
Page 94 of 417
vehicle. You can deactivate the double lock
function by deactivating the interior motion
sensor (Y page 80). The doors can then be
opened from the inside after the vehicle has
been locked from the outside. You can open
the rear doors from inside the vehicle if they
are not secured by the child-proof locks
(Y page 68). The anti-theft alarm system is
triggered if the door is opened from the
inside. Switch off the alarm (Y page 78).
When a locked door is opened from inside the vehicle, the previous unlocking process will
be observed if the vehicle has been:
R locked with the locking button for the cen-
tral locking or
R locked automatically
The vehicle will be fully unlocked if it had pre- viously been fully unlocked. Only the door
which has been opened from the inside is
unlocked if only the driver's door had been
previously unlocked. Automatic locking feature
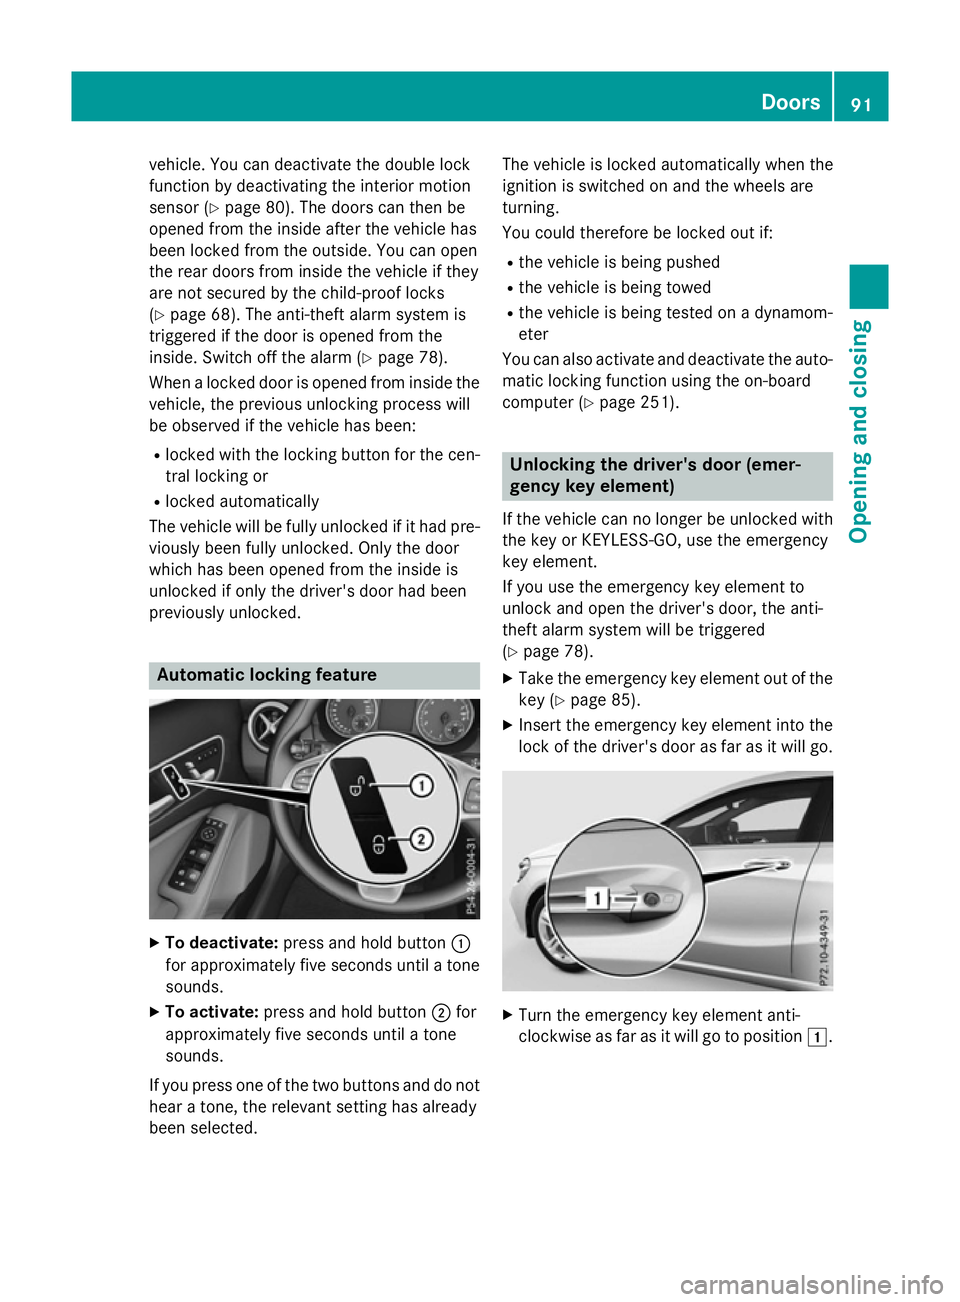
X
To deactivate: press and hold button :
for approximately five seconds until a tone sounds.
X To activate: press and hold button ;for
approximately five seconds until a tone
sounds.
If you press one of the two buttons and do not hear a tone, the relevant setting has already
been selected. The vehicle is locked automatically when the
ignition is switched on and the wheels are
turning.
You could therefore be locked out if:
R the vehicle is being pushed
R the vehicle is being towed
R the vehicle is being tested on a dynamom-
eter
You can also activate and deactivate the auto- matic locking function using the on-board
computer (Y page 251). Unlocking the driver's door (emer-
gency key element)
If the vehicle can no longer be unlocked with
the key or KEYLESS-GO, use the emergency
key element.
If you use the emergency key element to
unlock and open the driver's door, the anti-
theft alarm system will be triggered
(Y page 78).
X Take the emergency key element out of the
key (Y page 85).
X Insert the emergency key element into the
lock of the driver's door as far as it will go. X
Turn the emergency key element anti-
clockwise as far as it will go to position 1. Doors
91Opening and closing Z
Page 96 of 417
Stow luggage or loads preferably in the lug-
gage compartment. Observe the loading
guidelines (Y page 306).
Do not leave the key in the luggage compart- ment. You could otherwise lock yourself out.
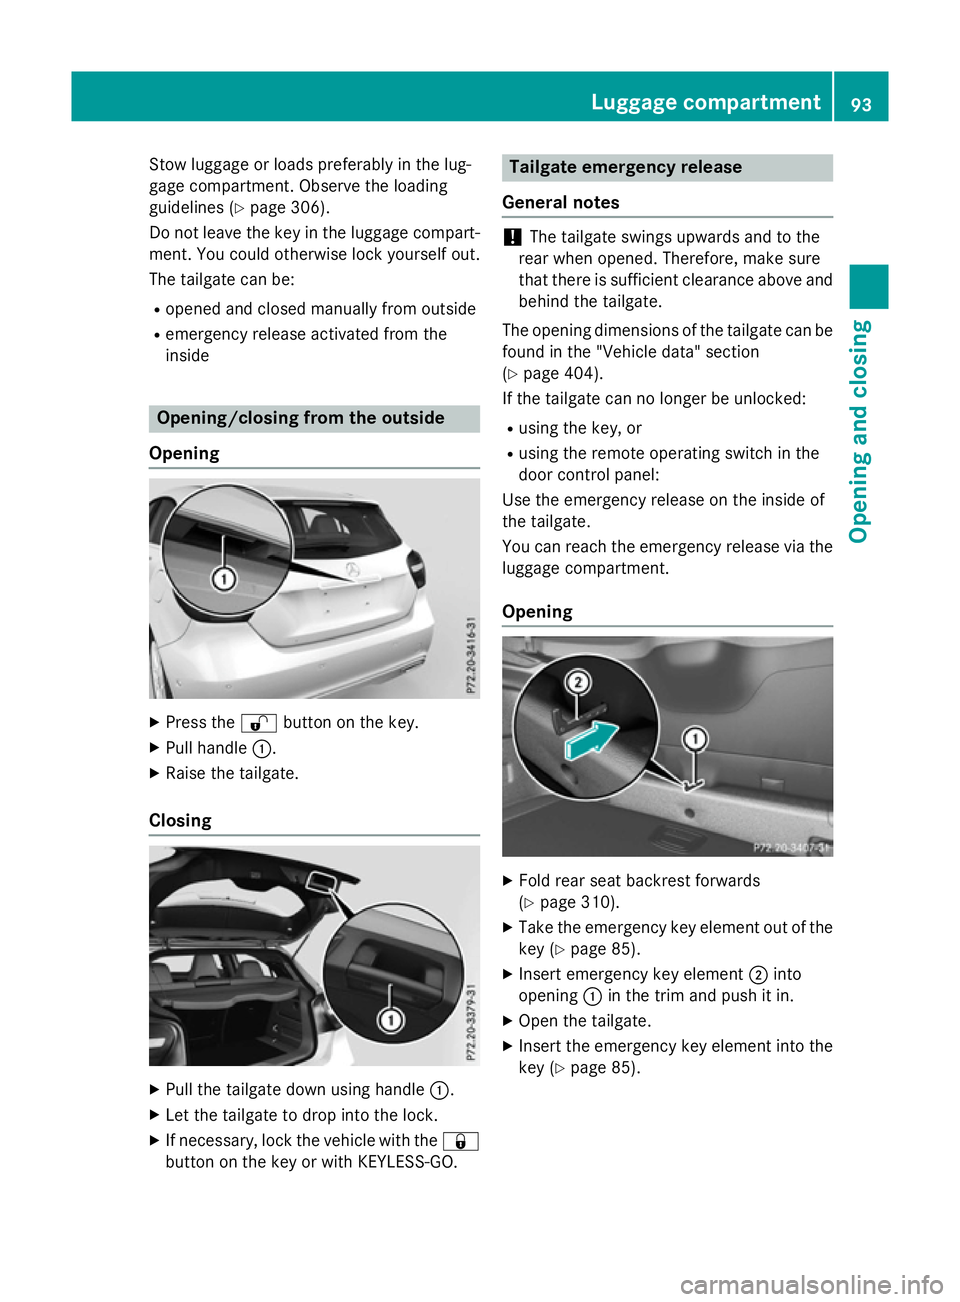
The tailgate can be:
R opened and closed manually from outside
R emergency release activated from the
inside Opening/closing from the outside
Opening X
Press the %button on the key.
X Pull handle :.
X Raise the tailgate.
Closing X
Pull the tailgate down using handle :.
X Let the tailgate to drop into the lock.
X If necessary, lock the vehicle with the &
button on the key or with KEYLESS-GO. Tailgate emergency release
General notes !
The tailgate swings upwards and to the
rear when opened. Therefore, make sure
that there is sufficient clearance above and behind the tailgate.
The opening dimensions of the tailgate can be
found in the "Vehicle data" section
(Y page 404).
If the tailgate can no longer be unlocked:
R using the key, or
R using the remote operating switch in the
door control panel:
Use the emergency release on the inside of
the tailgate.
You can reach the emergency release via the
luggage compartment.
Opening X
Fold rear seat backrest forwards
(Y page 310).
X Take the emergency key element out of the
key (Y page 85).
X Insert emergency key element ;into
opening :in the trim and push it in.
X Open the tailgate.
X Insert the emergency key element into the
key (Y page 85). Luggage compartment
93Opening and closing Z
Page 125 of 417
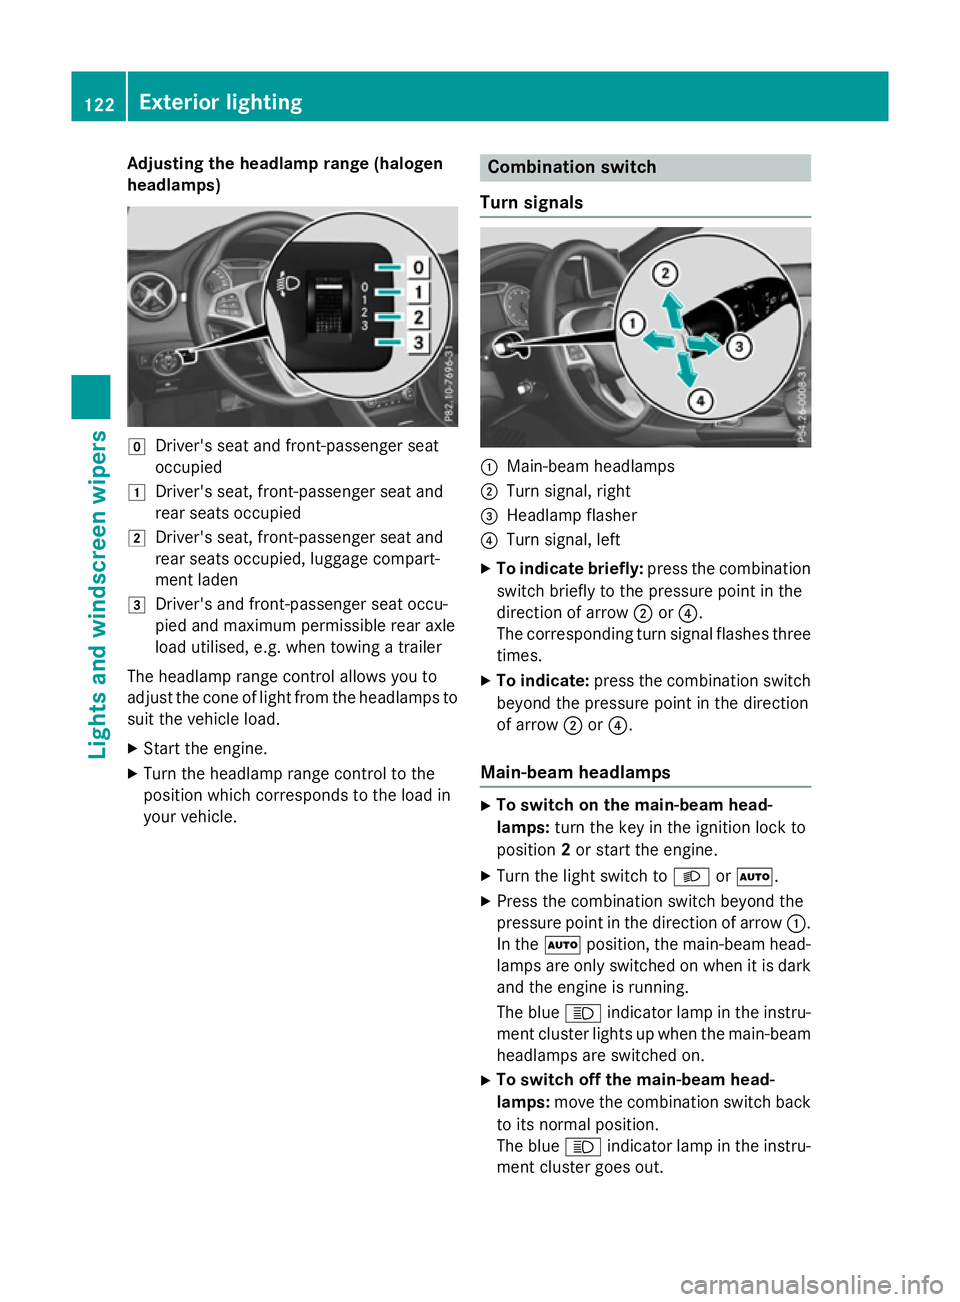
Adjusting the headlamp range (halogen
headlamps) g
Driver's seat and front-passenger seat
occupied
1 Driver's seat, front-passenger seat and
rear seats occupied
2 Driver's seat, front-passenger seat and
rear seats occupied, luggage compart-
ment laden
3 Driver's and front-passenger seat occu-
pied and maximum permissible rear axle
load utilised, e.g. when towing a trailer
The headlamp range control allows you to
adjust the cone of light from the headlamps to suit the vehicle load.
X Start the engine.
X Turn the headlamp range control to the
position which corresponds to the load in
your vehicle. Combination switch
Turn signals :
Main-beam headlamps
; Turn signal, right
= Headlamp flasher
? Turn signal, left
X To indicate briefly: press the combination
switch briefly to the pressure point in the
direction of arrow ;or?.
The corresponding turn signal flashes three
times.
X To indicate: press the combination switch
beyond the pressure point in the direction
of arrow ;or?.
Main-beam headlamps X
To switch on the main-beam head-
lamps: turn the key in the ignition lock to
position 2or start the engine.
X Turn the light switch to LorÃ.
X Press the combination switch beyond the
pressure point in the direction of arrow :.
In the Ãposition, the main-beam head-
lamps are only switched on when it is dark
and the engine is running.
The blue Kindicator lamp in the instru-
ment cluster lights up when the main-beam headlamps are switched on.
X To switch off the main-beam head-
lamps: move the combination switch back
to its normal position.
The blue Kindicator lamp in the instru-
ment cluster goes out. 122
Exterior lightingLights and windscreen wipers
Page 158 of 417
Useful information
............................156
Running-in notes ............................... 156
Driving ............................................... 156
DYNAMIC SELECT button (all vehi-
cles except Mercedes-AMG vehi-
cles) .................................................... 166
DYNAMIC SELECT controller
(Mercedes-AMG vehicles) .................167
Manual transmission ........................168
Automatic transmission ...................169
Refuelling ........................................... 180
Parking ............................................... 184
Driving tips ........................................ 187
Driving systems ................................ 191
Towing a trailer ................................. 229 155Driving and parking
Page 159 of 417
Useful information
i This Owner's Manual describes all mod-
els, series and optional equipment for your
vehicle that were available at the time of
going to press. National variations are pos- sible. Note that your vehicle may not be
equipped with all of the functions descri-
bed. This is also the case for systems and
functions relevant to safety.
i Read the information on qualified special-
ist workshops: (Y page 24). Running-in notes
Important safety notes
In certain driving and driving safety systems,
the sensors adjust automatically while a cer-
tain distance is being driven after the vehicle has been delivered or after repairs. Full sys-
tem effectiveness is not reached until the end
of this teach-in process.
Brake pads/linings and discs that are either
new or have been replaced only achieve opti- mum braking effect after several hundred kil-
ometres of driving. Compensate for the
reduced braking effect by applying greater
force to the brake pedal. The first 1500 km
If you treat the engine with sufficient care
from the very start, you will be rewarded with excellent performance for the remainder of
the engine's life.
R Drive at varying vehicle speeds and engine
speeds for the first 1500 km.
R Avoid overstraining the vehicle during this
period, e.g. driving at full throttle.
R Change gear in good time, before the rev
counter needle is Ôof the way to the red
area of the rev counter. R
Do not shift down a gear manually in order
to brake.
R Vehicles with automatic transmission:
try to avoid depressing the accelerator
pedal beyond the point of resistance (kick- down).
After 1500 km, you may gradually bring the
vehicle up to full road and engine speeds.
Additional notes on running in Mercedes-
AMG vehicles:
R for the first 1,500 km do not drive at speeds
above 140 km/h.
R only allow the engine to reach a maximum
engine speed of 4,500 rpm briefly.
You should also observe these notes on run-
ning-in if the engine or parts of the drive train on your vehicle have been replaced.
Always observe the maximum permissible
speed. Driving
Important safety notes
G
WARNING
Objects in the driver's footwell may restrict
the clearance around the pedals or block a
depressed pedal. This jeopardises the oper-
ating and road safety of the vehicle. There is a risk of an accident.
Stow all objects securely in the vehicle so that
they do not get into the driver's footwell.
Always fit the floormats securely and as pre-
scribed in order to ensure that there is always sufficient room for the pedals. Do not use
loose floormats and do not place several floor-mats on top of one another. G
WARNING
Unsuitable footwear can hinder correct usage of the pedals, e.g.:
R shoes with thick soles
R shoes with high heels
R slippers 156
DrivingDriving and parking
Page 171 of 417
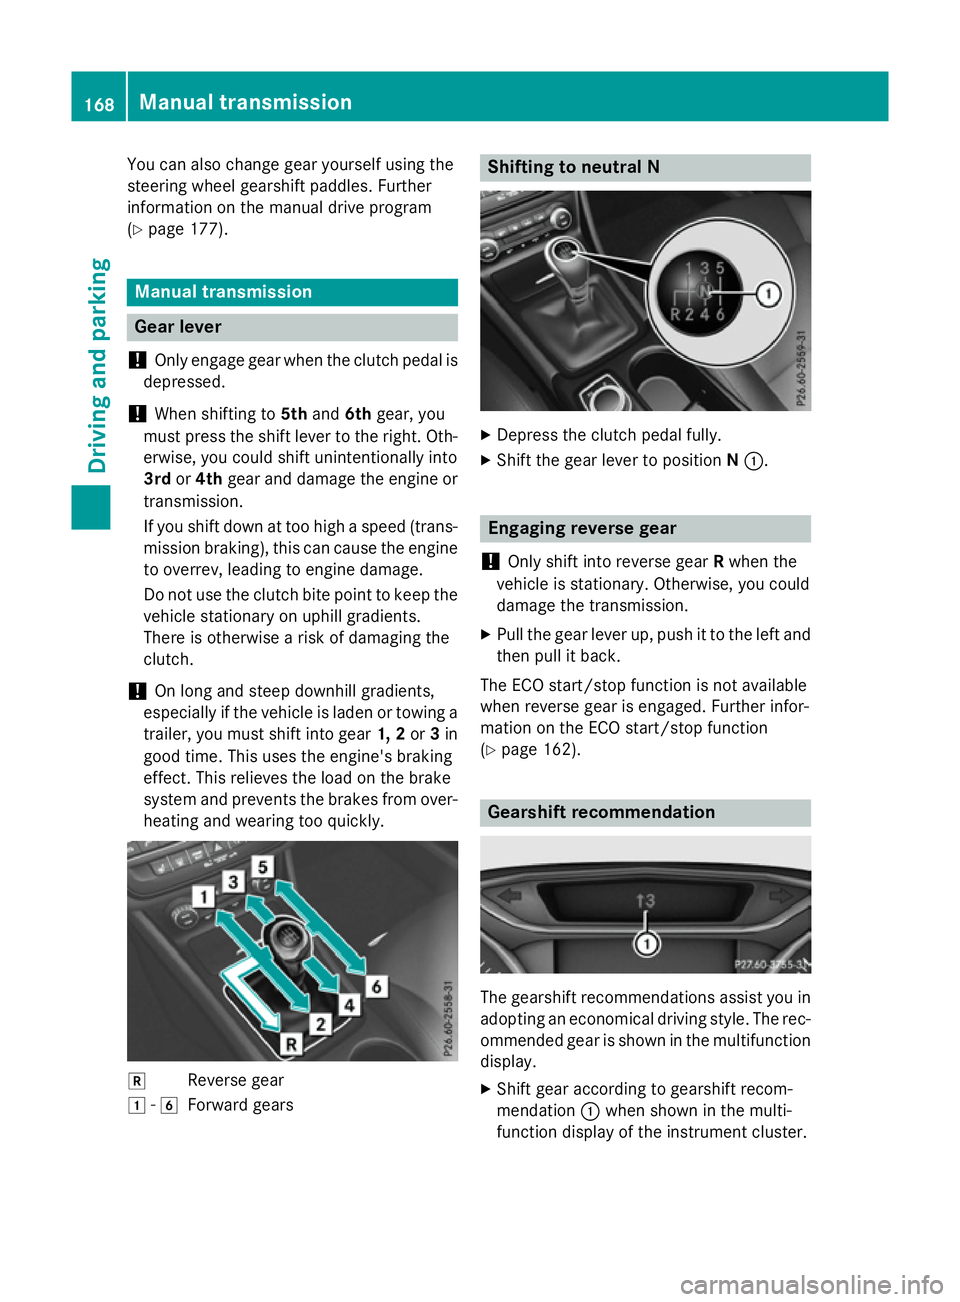
You can also change gear yourself using the
steering wheel gearshift paddles. Further
information on the manual drive program
(Y page 177). Manual transmission
Gear lever
! Only engage gear when the clutch pedal is
depressed.
! When shifting to
5thand 6thgear, you
must press the shift lever to the right. Oth-
erwise, you could shift unintentionally into
3rd or4th gear and damage the engine or
transmission.
If you shift down at too high a speed (trans-
mission braking), this can cause the engine to overrev, leading to engine damage.
Do not use the clutch bite point to keep the
vehicle stationary on uphill gradients.
There is otherwise a risk of damaging the
clutch.
! On long and steep downhill gradients,
especially if the vehicle is laden or towing a
trailer, you must shift into gear 1, 2or3in
good time. This uses the engine's braking
effect. This relieves the load on the brake
system and prevents the brakes from over- heating and wearing too quickly. k
Reverse gear
1 -6
Forward gears Shifting to neutral N
X
Depress the clutch pedal fully.
X Shift the gear lever to position N:. Engaging reverse gear
! Only shift into reverse gear
Rwhen the
vehicle is stationary. Otherwise, you could
damage the transmission.
X Pull the gear lever up, push it to the left and
then pull it back.
The ECO start/stop function is not available
when reverse gear is engaged. Further infor-
mation on the ECO start/stop function
(Y page 162). Gearshift recommendation
The gearshift recommendations assist you in
adopting an economical driving style. The rec- ommended gear is shown in the multifunction
display.
X Shift gear according to gearshift recom-
mendation :when shown in the multi-
function display of the instrument cluster. 168
Manual transmissionDriving and parking
Page 174 of 417
Engaging park position P automatically
Park position
Pis automatically engaged if:
R you switch off the engine using the key and
remove the key
R you switch off the engine using the key or
using the Start/Stop button and open the
driver's door or front-passenger door
R you open the driver's door when the vehicle
is stationary or when driving at a very low
speed and the transmission is in position D
or R
Under certain conditions, the automatic
transmission shifts automatically to transmis-
sion position Pif the HOLD function or
DISTRONIC PLUS is activated. Observe the
information on the HOLD function
(Y page 205) and on DISTRONIC PLUS
(Y page 199).
Engaging reverse gear R !
Only shift the automatic transmission to
R
when the vehicle is stationary.
X If the transmission is in position Dor N:
push the DIRECT SELECT lever up past the first point of resistance.
X If the transmission is in position P: depress
the brake pedal and push the DIRECT
SELECT lever up past the first point of
resistance.
The ECO start/stop function is not available
when reverse gear is engaged. Further infor-
mation on the ECO start/stop function
(Y page 162). Shifting to neutral N G
WARNING
If children are left unsupervised in the vehicle, they can:
R open doors and endanger other persons or
road users
R climb out and be injured by the traffic
R operate vehicle equipment and, for exam-
ple, trap themselves.
Children could also set the vehicle in motion, for example by:
R releasing the parking brake
R shifting the automatic transmission out of
park position P
R starting the engine.
There is a risk of an accident and injury.
When leaving the vehicle, always take the key
with you and lock the vehicle. Never leave
children unattended in the vehicle. Always
keep the key out of reach of children.
X If the transmission is in position Dor R:
push the DIRECT SELECT lever up or down
to the first point of resistance.
X If the transmission is in position P: depress
the brake pedal and push the DIRECT
SELECT lever up or down to the first point of
resistance.
If you switch the engine off with the trans-
mission in position Ror D, the automatic
transmission shifts to Nautomatically.
With the key: if you then open the driver's
door or the front-passenger door or remove
the key from the ignition, the automatic trans- mission shifts to Pautomatically.
With the Start/Stop button: if you then
open the driver's door or the front-passenger
door, the automatic transmission shifts to P
automatically.
If you want the automatic transmission to
remain in neutral N, e.g. when having the
vehicle cleaned in an automatic car wash with a towing system: Automatic transmission
171Driving and parking Z