clock MERCEDES-BENZ AMG GT R-ROADSTER 2020 Owners Manual
[x] Cancel search | Manufacturer: MERCEDES-BENZ, Model Year: 2020, Model line: AMG GT R-ROADSTER, Model: MERCEDES-BENZ AMG GT R-ROADSTER 2020Pages: 441, PDF Size: 7.76 MB
Page 128 of 441
Obser
vethe no tes on operating fluids and fuel.
The recommended octane number foryo ur vehi‐
cle can be found on the information label in the
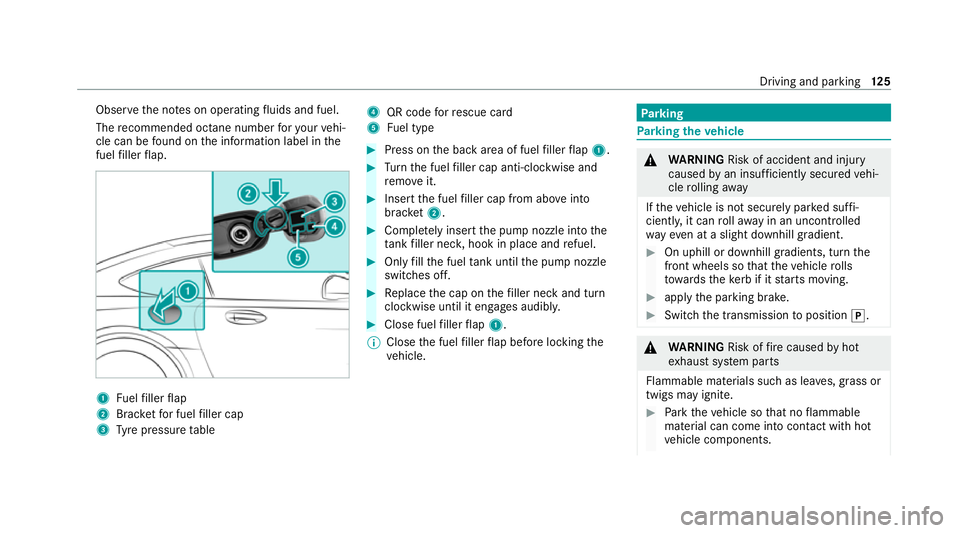
fuel filler flap. 1
Fuelfiller flap
2 Brac ketfo r fuel filler cap
3 Tyre pressure table 4
QR code forre scue card
5 Fuel type #
Press on the back area of fuel filler flap 1. #
Turn the fuel filler cap anti-clockwise and
re mo veit. #
Insert the fuel filler cap from abo veinto
brac ket2. #
Comp lete ly inse rtthe pump nozzle into the
ta nk filler nec k,hook in place and refuel. #
Only fill th e fuel tank until the pump nozzle
switches off. #
Replace the cap on thefiller neck and turn
clockwise until it engages audibl y. #
Close fuel filler flap 1.
% Close the fuel filler flap before locking the
ve hicle. Pa
rking Pa
rking theve hicle &
WARNING Risk of accident and inju ry
caused byan insuf ficiently secu redve hi‐
cle rolling away
If th eve hicle is not securely par ked suf fi‐
ciently, it can rollaw ay in an uncontro lled
wa yev en at a slight downhill gradient. #
On uphill or downhill gradients, turn the
front wheels so that theve hicle rolls
to wa rdsth eke rb if it starts moving. #
apply the parking brake. #
Switch the transmission toposition j. &
WARNING Risk offire caused byhot
ex haust sy stem parts
Flammable materials such as lea ves, grass or
twigs may ignite. #
Park theve hicle so that no flammable
material can come into con tact with hot
ve hicle components. Driving and parking
12 5
Page 151 of 441
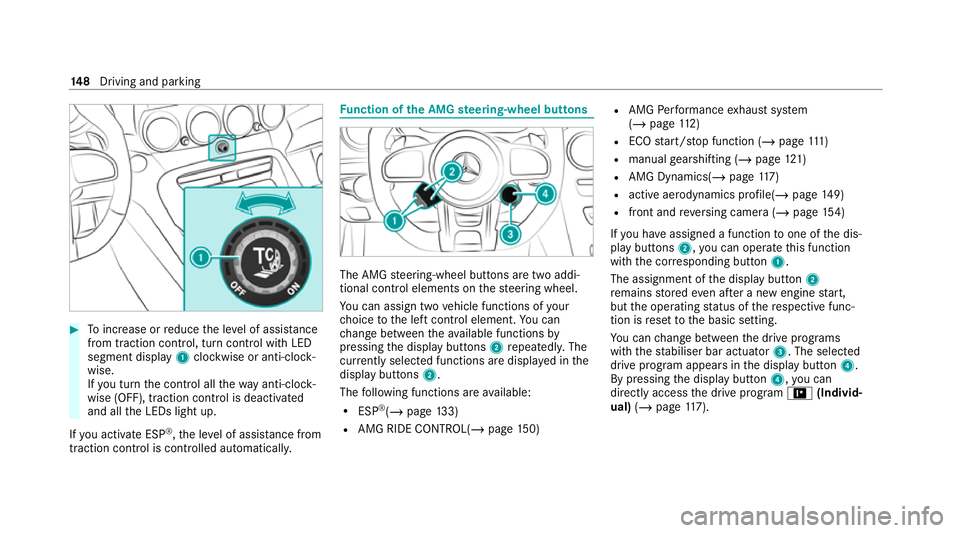
#
Toinc rease or reduce the le vel of assis tance
from traction control, turn control wi thLED
segment display 1clockwise or anti-clock‐
wise.
If yo u turn the control all thewa y anti-clo ck‐
wise (OFF), traction control is deactivated
and all the LEDs light up.
If yo u activate ESP ®
,th e le vel of assis tance from
traction control is controlled auto matically. Fu
nction of the AMG steering-wheel but tons The AMG
steering-wheel buttons are two addi‐
tional control elements on thesteering wheel.
Yo u can assign two vehicle functions of your
ch oice tothe left control element. You can
ch ange between theav ailable functions by
pressing the display buttons 2repeatedl y.The
cur rently selected functions are displ ayed in the
display buttons 2.
The following functions are available:
R ESP ®
(/ page 133)
R AMG RIDE CONTROL(/ page150) R
AMG Performance exhaust sy stem
(/ page 112)
R ECO start/ stop function (/ page111 )
R manual gearshifting (/ page121)
R AMG Dynamics( /page 117)
R active ae rodynamics profile(/ page149)
R front and reve rsing camera (/ page154)
If yo u ha veassigned a function toone of the dis‐
play buttons 2,you can operate this function
with the cor responding button 1.
The assignment of the display button 2
re mains stored even af ter a new engine start,
but the operating status of there spective func‐
tion is reset tothe basic setting.
Yo u can change between the drive prog rams
with thest abiliser bar actuator 3. The selected
drive program appears in the display button 4.
By pressing the display button 4,you can
direct lyaccess the drive prog ram = (Individ‐
ual) (/page 117). 14 8
Driving and pa rking
Page 186 of 441
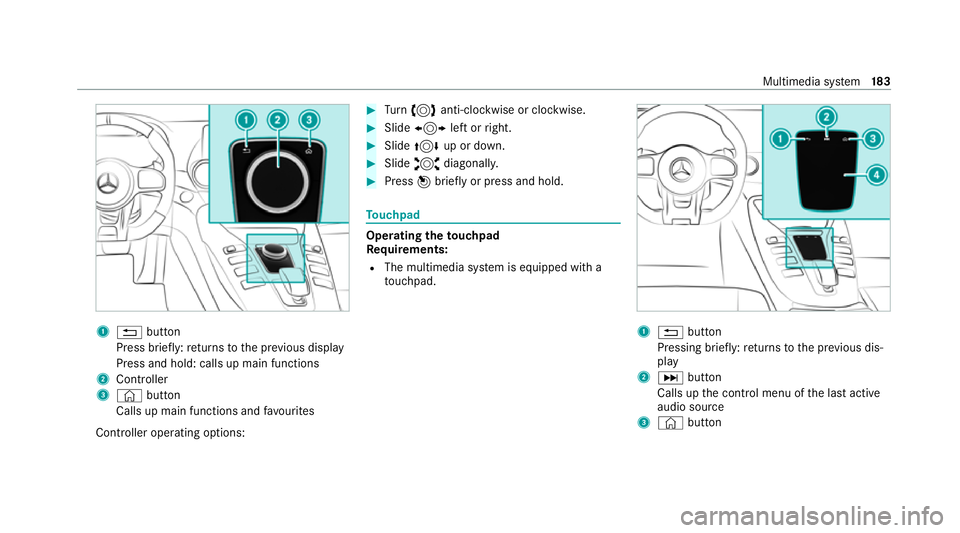
1
% button
Press brief ly:re turns tothe pr evious display
Press and hold: calls up main functions
2 Cont roller
3 © button
Calls up main functions and favo urites
Controller operating options: #
Turn 3 anti-clockwise or clo ckwise. #
Slide 1 left orright. #
Slide 4 up or down. #
Slide 2 diagonally. #
Press 7brief lyor press and hold. To
uchpad Operating
theto uchpad
Re quirements:
R The multimedia sy stem is equipped with a
to uchpad. 1
% button
Pressing brief ly:re turns tothe pr evious dis‐
play
2 D button
Calls up the control menu of the last active
audio source
3 © button Multimedia sy
stem 18 3
Page 228 of 441
R
The map is shown.
Multimedia sy stem:
4 Navigation #
Tozoom in: swipe down on theTo uch Con‐
trol.
or #
Turn the controller anti-clockwise.
or #
Movetwo fingers apart on theto uchpad. #
Tozoom out: swipe up on theTo uch Control.
or #
Turn the controller clockwise.
or #
Movetwo fingers toge ther on theto uchpad. Moving
the map
Multimedia sy stem:
4 Navigation 5
Z Options
5 Map menu #
Alternatively, if the map is displa yed in full
screen mode, press the cent ral control ele‐
ment.
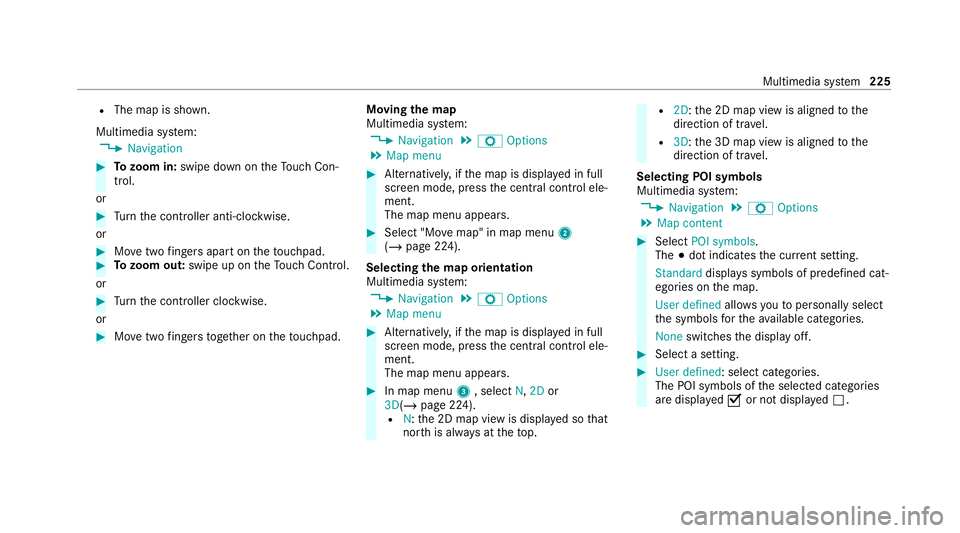
The map menu appears. #
Select "Mo vemap" in map menu 2
(/ page 224).
Selecting the map orientation
Multimedia sy stem:
4 Navigation 5
Z Options
5 Map menu #
Alternatively, if the map is displa yed in full
screen mode, press the cent ral control ele‐
ment.
The map menu appears. #
In map menu 3, select N,2D or
3D( /page 224).
R N:the 2D map view is displa yed so that
no rth is alw ays at theto p. R
2D: the 2D map view is aligned tothe
direction of tra vel.
R 3D:th e 3D map view is aligned tothe
direction of tra vel.
Selecting POI symbols
Multimedia sy stem:
4 Navigation 5
Z Options
5 Map content #
Select POI symbols .
The #dot indicates the cur rent setting.
Standard displays symbols of predefined cat‐
egories on the map.
User defined allowsyouto personally select
th e symbols forth eav ailable categories.
None switches the display off. #
Select a setting. #
User defined : select categories.
The POI symbols of the selected categories
are displa yedO or not displa yedª. Multimedia sy
stem 225
Page 297 of 441
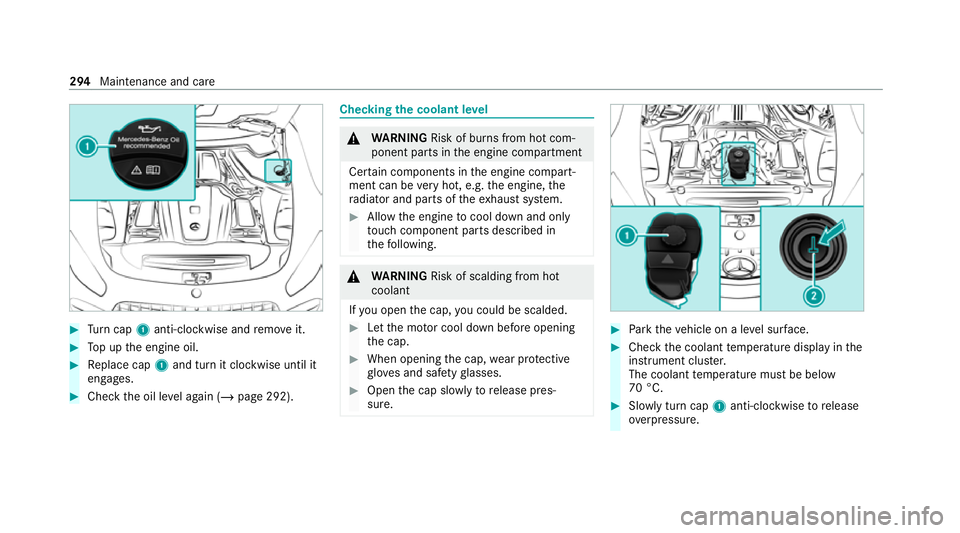
#
Turn cap 1anti-clockwise and remo veit. #
Top up the engine oil. #
Replace cap 1and turn it clockwise until it
engages. #
Check the oil le vel again (/ page 292). Checking
the coolant le vel &
WARNING Risk of burn s from hot com‐
ponent parts in the engine compartment
Cer tain components in the engine compart‐
ment can be very hot, e.g. the engine, the
ra diator and parts of theex haust sy stem. #
Allow the engine tocool down and only
to uch co mponent parts described in
th efo llowing. &
WARNING Risk of scalding from hot
coolant
If yo u open the cap, you could be scalded. #
Let the mo tor cool down before opening
th e cap. #
When opening the cap, wear pr otective
gl ove s and saf etygl asses. #
Open the cap slowly torelease pres‐
sure. #
Park theve hicle on a le vel sur face. #
Check the coolant temp erature display in the
instrument clus ter.
The coolant temp erature must be below
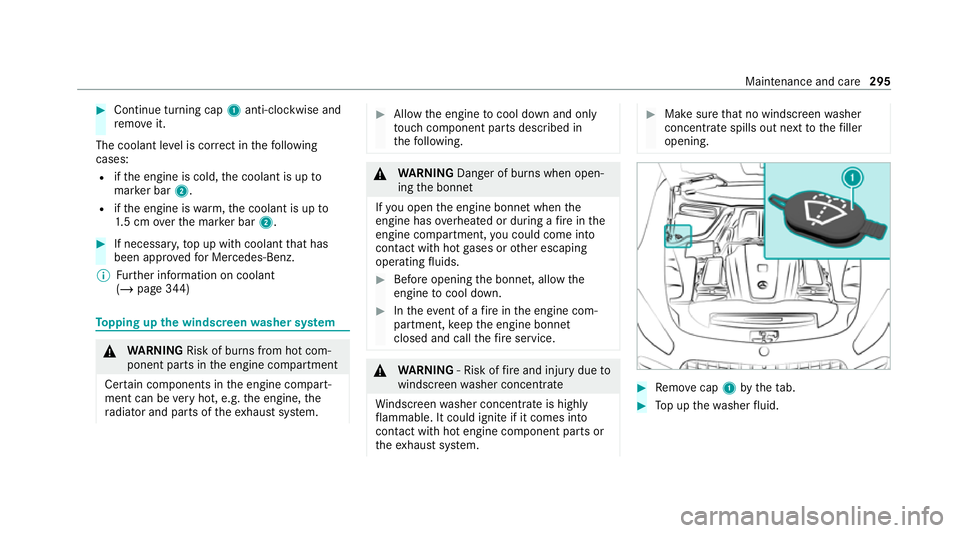
70 °C. #
Slowly turn cap 1anti-clockwise torelease
ove rpressure. 294
Maintenance and care
Page 298 of 441
#
Continue turning cap 1anti-clockwise and
re mo veit.
The coolant le vel is cor rect in thefo llowing
cases:
R ifth e engine is cold, the coolant is up to
mar ker bar 2.
R ifth e engine is warm,th e coolant is up to
1. 5 cm overth e mar ker bar 2. #
If necessar y,top up with coolant that has
been appr ovedfo r Mercedes-Benz.
% Further information on coolant
(/ page 344) To
pping up the windsc reen washer sy stem &
WARNING Risk of burn s from hot com‐
ponent parts in the engine compartment
Cer tain components in the engine compart‐
ment can be very hot, e.g. the engine, the
ra diator and parts of theex haust sy stem. #
Allow the engine tocool down and only
to uch co mponent parts described in
th efo llowing. &
WARNING Danger of burn s when open‐
ing the bonn et
If yo u open the engine bonn etwhen the
engine has overheated or during a fire inthe
engine compartment, you could come into
contact with hot gases or other escaping
operating fluids. #
Before opening the bonn et, allow the
engine tocool down. #
Intheeve nt of a fire inthe engine com‐
partment, keep the engine bonn et
closed and call thefire service. &
WARNING ‑ Risk of fire and injury due to
windscreen washer concentrate
Wi ndsc reen washer concentrate is highly
fl ammable. It could ignite if it comes into
con tact with hot engine component parts or
th eex haust sy stem. #
Make sure that no windscre enwasher
concentrate spills out next tothefiller
opening. #
Remo vecap 1bytheta b. #
Top up thewa sher fluid. Main
tenance and care 295
Page 321 of 441
To
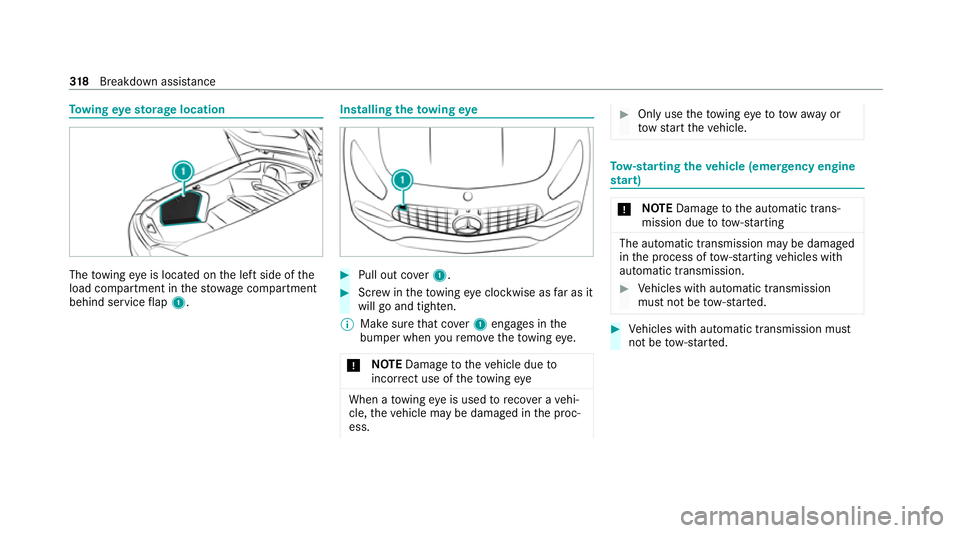
wing eyesto rage location The
towing eye is located on the left side of the
load compartment in thestow age compartment
behind service flap 1. Installing
theto wing eye #
Pull out co ver1. #
Screw intheto wing eyeclockwise as far as it
will go and tighten.
% Make sure that co ver1 engages in the
bumper when youre mo vetheto wing eye.
* NO
TEDama getotheve hicle due to
incor rect use of theto wing eye When a
towing eye is used toreco ver a vehi‐
cle, theve hicle may be damaged in the proc‐
ess. #
Only use theto wing eyeto to waw ay or
to w start theve hicle. To
w- starting theve hicle (eme rgency engine
st art) *
NO
TEDama getothe automatic trans‐
mission due to tow-starting The automatic transmission may be damaged
in
the process of tow- starting vehicles with
automatic transmission. #
Vehicles with automatic transmission
must not be tow- star ted. #
Vehicles with automatic transmission must
not be tow- star ted. 318
Breakdown assis tance
Page 336 of 441
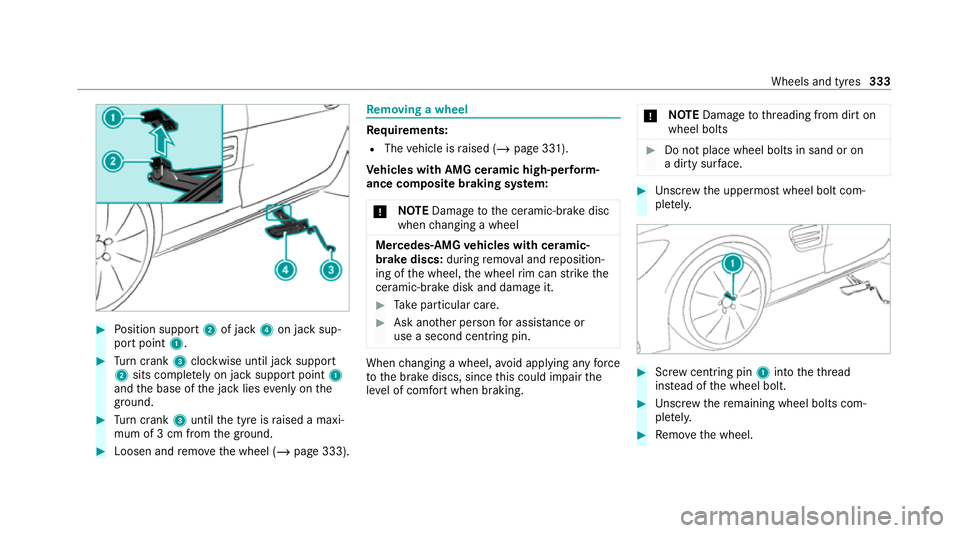
#
Position support 2of jack 4on jack sup‐
port point 1. #
Turn crank 3clockwise until jack suppo rt
2 sits comple tely on jack support point 1
and the base of the jack lies evenly on the
ground. #
Turn crank 3until the tyre is raised a maxi‐
mum of 3 cm from the ground. #
Loosen and remo vethe wheel (/ page 333). Re
moving a wheel Re
quirements:
R The vehicle is raised (/ page 331).
Ve hicles with AMG cera mic high-perform‐
ance composite braking sy stem:
* NO
TEDama getothe ceramic-brake disc
when changing a wheel Mercedes
-AMG vehicles with cera mic-
brake discs: during remo val and reposition‐
ing of the wheel, the wheel rim can strike the
ceramic-brake disk and damage it. #
Take particular care. #
Ask ano ther person for assi stance or
use a second centring pin. When
changing a wheel, avoid applying any force
to the brake discs, since this could impair the
le ve l of com fort when braking. *
NO
TEDama getothre ading from dirt on
wheel bolts #
Do not place wheel bolts in sand or on
a dirty sur face. #
Unscr ew the uppermost wheel bolt com‐
ple tely. #
Screw centring pin 1into theth re ad
ins tead of the wheel bolt. #
Unscr ew there maining wheel bolts com‐
ple tely. #
Remo vethe wheel. Wheels and tyres
333