MERCEDES-BENZ AMG GT ROADSTER 2016 Owners Manual
Manufacturer: MERCEDES-BENZ, Model Year: 2016, Model line: AMG GT ROADSTER, Model: MERCEDES-BENZ AMG GT ROADSTER 2016Pages: 289, PDF Size: 5.97 MB
Page 271 of 289
may also be damaged. There is a risk of acci-
dent.
Interchange front and rear wheels only if the
wheels and tyres are of the same dimensions.
! On vehicles fitted with a tyre pressure mon-
itor, electronic components are located in the wheel.
Tyre-fitting tools should not be applied in thearea of the valve, as this could damage the
electronic components.
Only have tyres changed at a qualified spe-
cialist workshop.
Interchanging front and rear wheels of differing
dimensions can render the general operating
permit invalid.
Observe the instructions and safety notes in the "Fitting a wheel" section (Y page 268).
The wear patterns on the front and rear tyres
differ depending on the operating conditions.
Interchange the wheels before a clear wear pat-
tern has formed on the tyres. Front tyres typi-
cally wear more on the shoulders and the rear
tyres in the centre.
On vehicles that have the same size front and
rear wheels, you can interchange the wheels
every 5000 to 10,000 km depending on the
degree of tyre wear. Ensure the direction of
rotation is maintained.
Clean the contact surfaces of the wheel and the brake disc thoroughly every time a wheel is
interchanged. Check the tyre pressure and reac-
tivate the tyre pressure monitor if necessary. Direction of rotation
Tyres with a specified direction of rotation have additional benefits, e.g. if there is a risk of aqua- planing. These advantages can only be gained if
the tyres are fitted corresponding to the direc-
tion of rotation.
An arrow on the sidewall of the tyre indicates its correct direction of rotation. Storing wheels
Store wheels in a cool, dry and preferably dark
place if they are not being used. Protect the
tyres against oil, grease, petrol and diesel. Fitting a wheel
Preparing the vehicle X
Stop the vehicle on solid, non-slippery and
level ground.
X Apply the electric parking brake manually.
X Move the front wheels to the straight-ahead
position.
X Shift the transmission to position P.
X Switch off the engine.
X Pump the tyre to the specified tyre pres-
sure:
open the driver's door.
The on-board electronics now have status 0.
This is the same as the key having been
removed.
or X Remove the key from the ignition lock.
X If included in the vehicle equipment, remove
the tyre-change tool kit from the vehicle.
X Safeguard the vehicle against rolling away.
i Apart from some country-specific variants,
vehicles are not equipped with tyre-changing
tools. Some tools for changing a wheel are
specific to the vehicle. For more information
on which tools are required to perform a
wheel change on your vehicle, consult a quali- fied specialist workshop.
Necessary tyre-changing tools may include,
for example:
R jack
R wheel chock
R wheel wrench
R centring pin
Securing the vehicle against rolling
away 268
Changing a wheelWheels and tyres
Page 272 of 289
If your vehicle is equipped with a wheel chock, it
can be found in the tyre-change tool kit
(Y page 246).
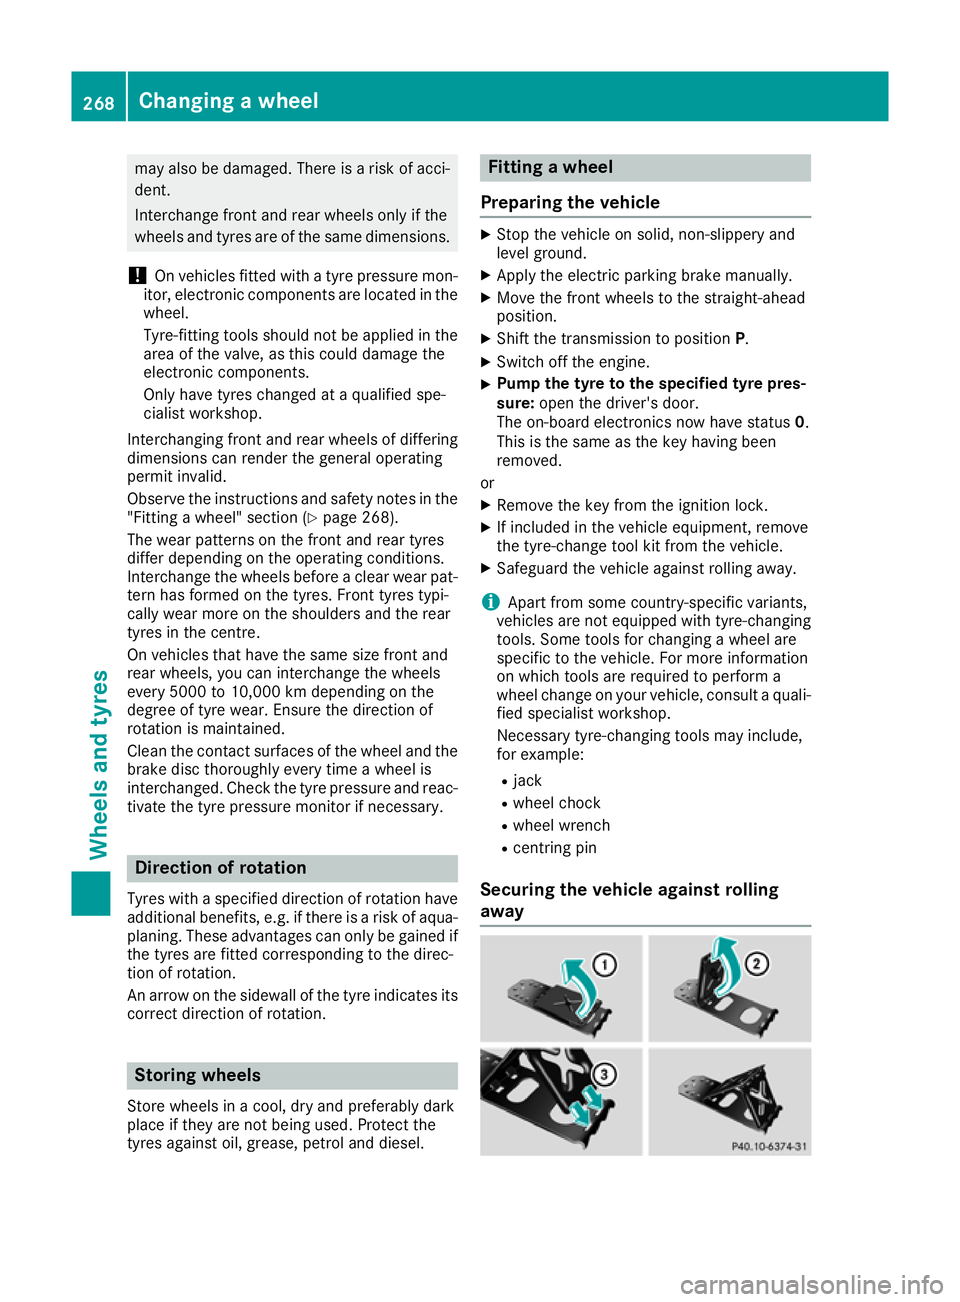
The folding wheel chock is an additional secur-
ing measure to safeguard the vehicle from roll-
ing away, for example when changing a wheel.
X Fold both plates upwards :.
X Fold out lower plate ;.
X Insert the lugs on the lower plate fully into the
openings in base plate =.X
Place chocks or other suitable items under
the front and rear of the wheel that is diago-
nally opposite the wheel you wish to change.
Raising the vehicle G
WARNING
If you do not position the jack correctly at the appropriate jacking point of the vehicle, the
jack could tip over with the vehicle raised.
There is a risk of injury.
Only position the jack at the appropriate jack-
ing point of the vehicle. The base of the jack
must be positioned vertically, directly under
the jacking point of the vehicle.
Observe the following when raising the vehi- cle:
R to raise the vehicle, only use the vehicle-spe-
cific jack that has been tested and approved
by Mercedes-Benz. If the jack is used incor-
rectly, it could tip over while the vehicle is
raised.
R the jack is designed only to raise and hold the
vehicle for a short time while a wheel is being
changed. It is not permissible to use it to per- form maintenance work under the vehicle. R
avoid changing the wheel on uphill and down-
hill slopes.
R before raising the vehicle, safeguard it from
rolling away by applying the parking brake and
positioning wheel chocks. Do not release theparking brake while the vehicle is raised.
R the jack must be placed on a firm, flat and
non-slip surface. On a loose surface, a large,
flat load-bearing underlay must be used. On a
slippery surface, a non-slip underlay must be
used, e.g. rubber mats.
R do not use wooden blocks or similar objects
as a jack underlay. Otherwise, the jack will not
be able to achieve its load-bearing capacity
due to the restricted height.
R make sure that the distance between the
underside of the tyres and the ground does
not exceed 3 cm.
R never place your hands or feet under the
raised vehicle.
R do not lie under the vehicle.
R do not start the engine when the vehicle is
raised.
R do not open or close a door or the tailgate
while the vehicle is raised.
R make sure that no persons are present in the
vehicle when the vehicle is raised.
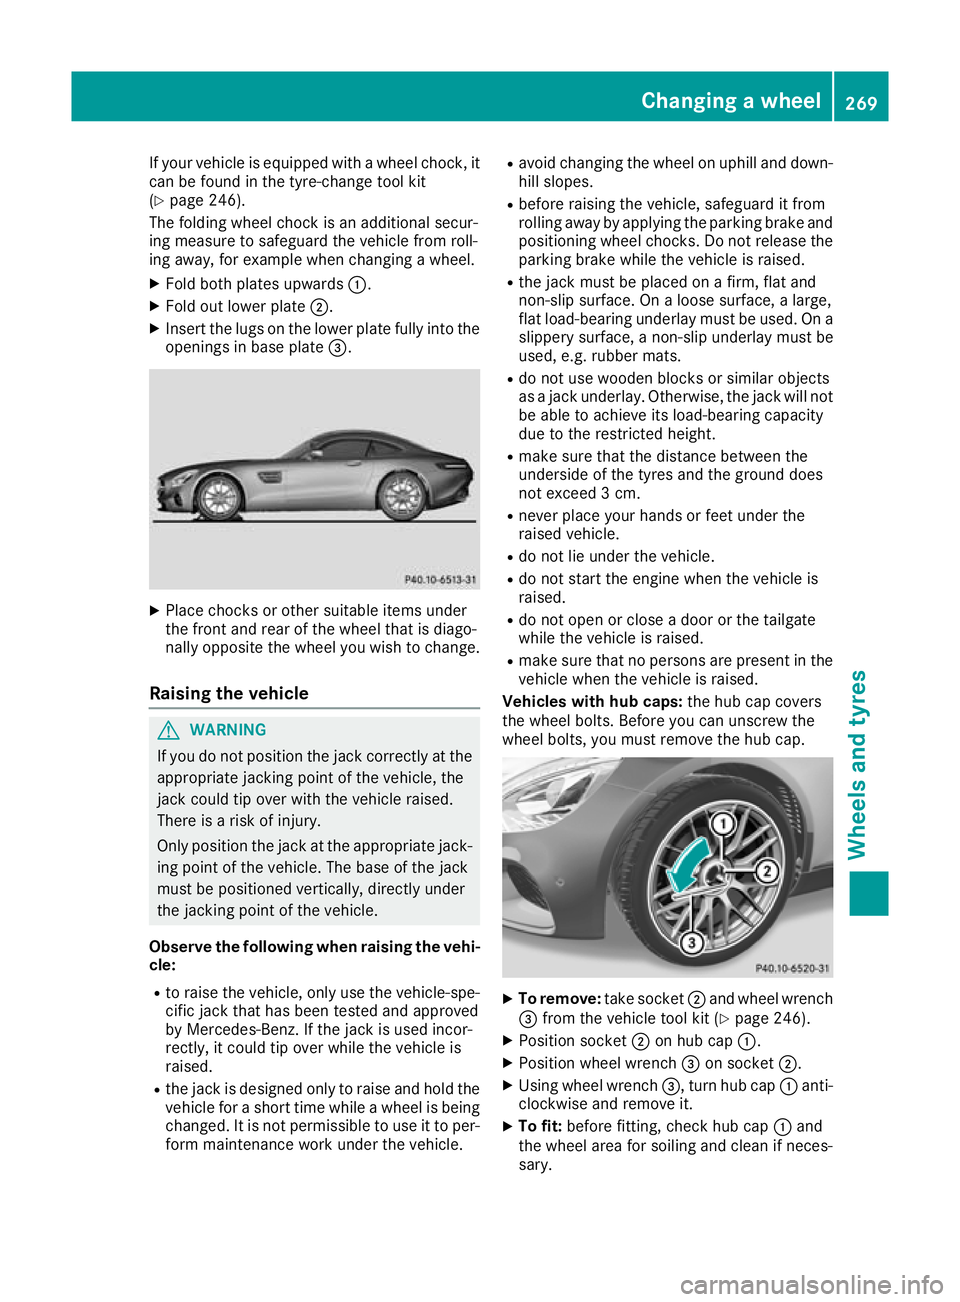
Vehicles with hub caps: the hub cap covers
the wheel bolts. Before you can unscrew the
wheel bolts, you must remove the hub cap. X
To remove: take socket;and wheel wrench
= from the vehicle tool kit (Y page 246).
X Position socket ;on hub cap :.
X Position wheel wrench =on socket ;.
X Using wheel wrench =, turn hub cap:anti-
clockwise and remove it.
X To fit: before fitting, check hub cap :and
the wheel area for soiling and clean if neces-
sary. Changing a wheel
269Wheels and tyres Z
Page 273 of 289
X
Put hub cap :in position and turn until it is in
the right position.
X Position socket ;on hub cap :.
X Attach wheel wrench =to socket ;and
tighten hub cap :.
The tightening torque must be 25 Nm.
i Note
that the hub cap should be tightened
to the specified torque of 25 Nm. Mercedes-
Benz recommends that you have the hub cap
fitted at a qualified specialist workshop. X
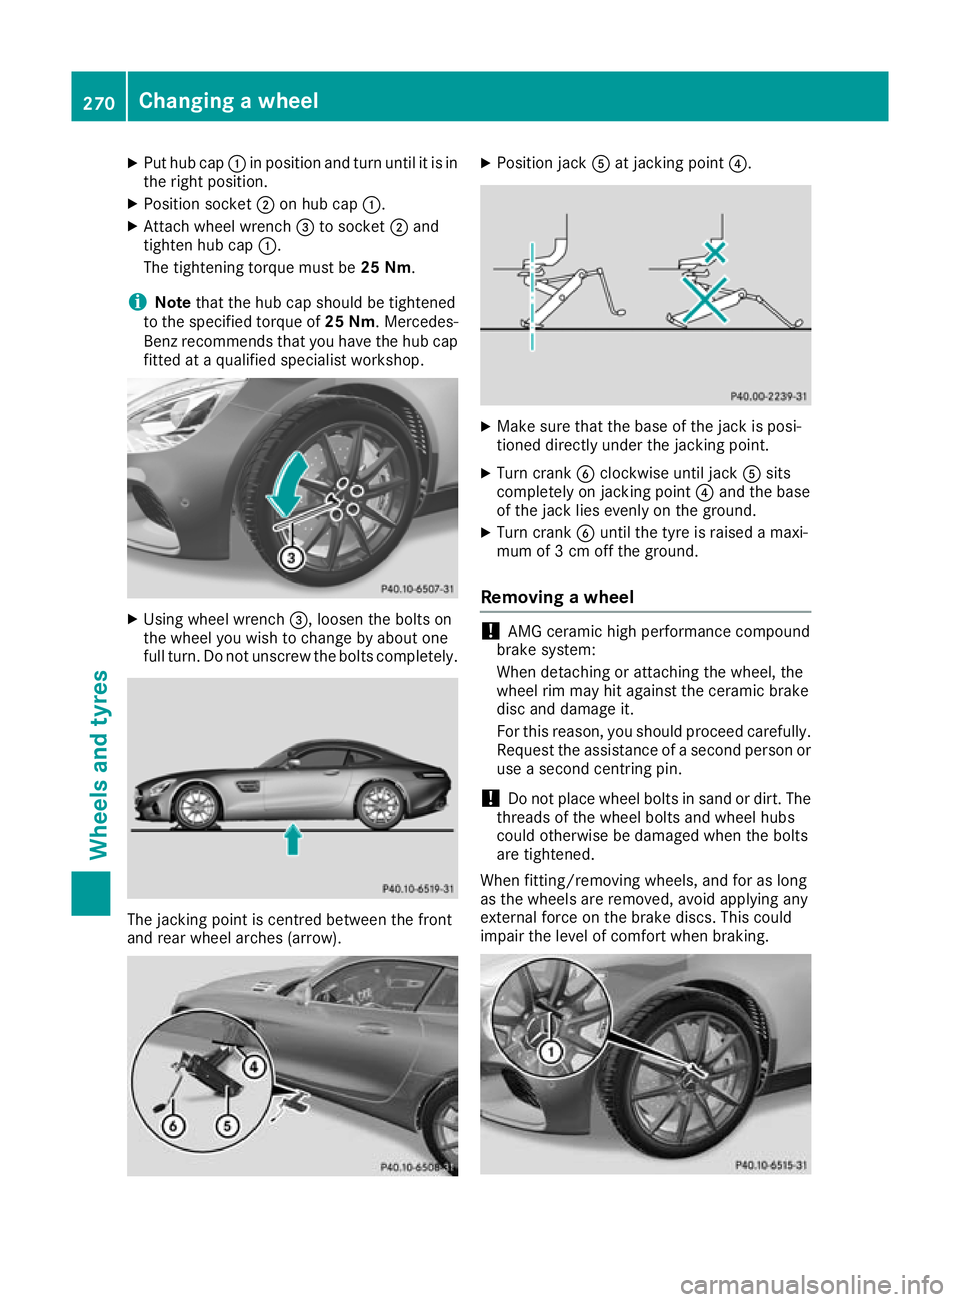
Using wheel wrench =, loosen the bolts on
the wheel you wish to change by about one
full turn. Do not unscrew the bolts completely. The jacking point is centred between the front
and rear wheel arches (arrow). X
Position jack Aat jacking point ?. X
Make sure that the base of the jack is posi-
tioned directly under the jacking point.
X Turn crank Bclockwise until jack Asits
completely on jacking point ?and the base
of the jack lies evenly on the ground.
X Turn crank Buntil the tyre is raised a maxi-
mum of 3 cm off the ground.
Removing a wheel !
AMG ceramic high performance compound
brake system:
When detaching or attaching the wheel, the
wheel rim may hit against the ceramic brake
disc and damage it.
For this reason, you should proceed carefully. Request the assistance of a second person or
use a second centring pin.
! Do not place wheel bolts in sand or dirt. The
threads of the wheel bolts and wheel hubs
could otherwise be damaged when the bolts
are tightened.
When fitting/removing wheels, and for as long
as the wheels are removed, avoid applying any
external force on the brake discs. This could
impair the level of comfort when braking. 270
Changing a wheelWheels and tyres
Page 274 of 289
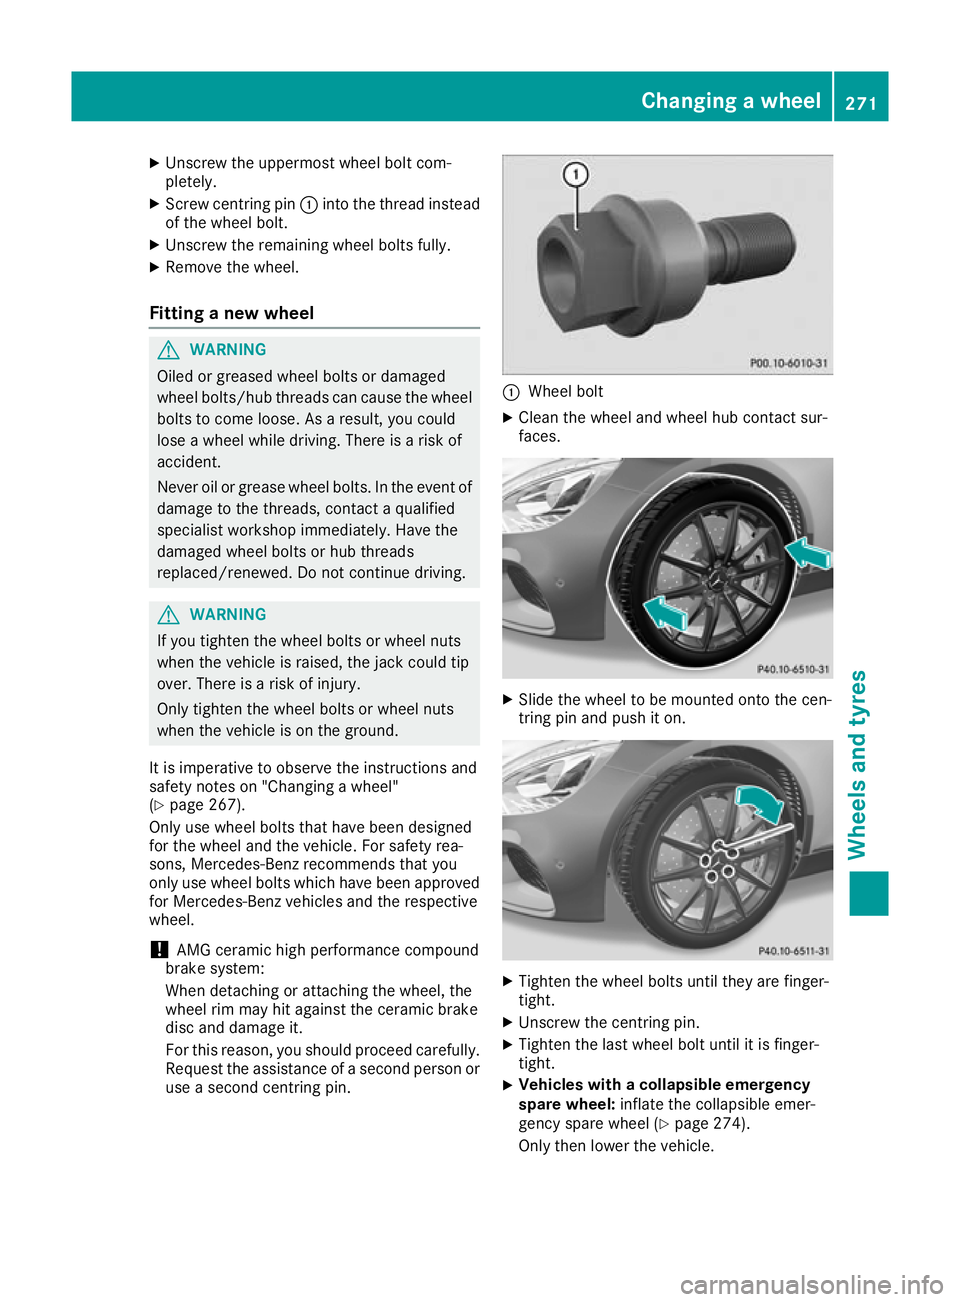
X
Unscrew the uppermost wheel bolt com-
pletely.
X Screw centring pin :into the thread instead
of the wheel bolt.
X Unscrew the remaining wheel bolts fully.
X Remove the wheel.
Fitting a new wheel G
WARNING
Oiled or greased wheel bolts or damaged
wheel bolts/hub threads can cause the wheel bolts to come loose. As a result, you could
lose a wheel while driving. There is a risk of
accident.
Never oil or grease wheel bolts. In the event ofdamage to the threads, contact a qualified
specialist workshop immediately. Have the
damaged wheel bolts or hub threads
replaced/renewed. Do not continue driving. G
WARNING
If you tighten the wheel bolts or wheel nuts
when the vehicle is raised, the jack could tip
over. There is a risk of injury.
Only tighten the wheel bolts or wheel nuts
when the vehicle is on the ground.
It is imperative to observe the instructions and
safety notes on "Changing a wheel"
(Y page 267).
Only use wheel bolts that have been designed
for the wheel and the vehicle. For safety rea-
sons, Mercedes-Benz recommends that you
only use wheel bolts which have been approved for Mercedes-Benz vehicles and the respective
wheel.
! AMG ceramic high performance compound
brake system:
When detaching or attaching the wheel, the
wheel rim may hit against the ceramic brake
disc and damage it.
For this reason, you should proceed carefully.
Request the assistance of a second person or use a second centring pin. :
Wheel bolt
X Clean the wheel and wheel hub contact sur-
faces. X
Slide the wheel to be mounted onto the cen-
tring pin and push it on. X
Tighten the wheel bolts until they are finger-
tight.
X Unscrew the centring pin.
X Tighten the last wheel bolt until it is finger-
tight.
X Vehicles with a collapsible emergency
spare wheel:
inflate the collapsible emer-
gency spare wheel (Y page 274).
Only then lower the vehicle. Changing a wheel
271Wheels and tyres Z
Page 275 of 289
Lowering the vehicle
G
WARNING
The wheels could work loose if the wheel nuts and bolts are not tightened to the specified
tightening torque. There is a risk of accident.
Have the tightening torque immediately
checked at a qualified specialist workshop
after a wheel is changed.
! Vehicles with a collapsible emergency
spare wheel: Inflate the collapsible emer-
gency spare wheel using the tyre inflation
compressor before lowering the vehicle. The
rim could otherwise be damaged.
X Turn the crank of the jack anti-clockwise until
the vehicle is once again standing firmly on
the ground.
X Place the jack to one side. X
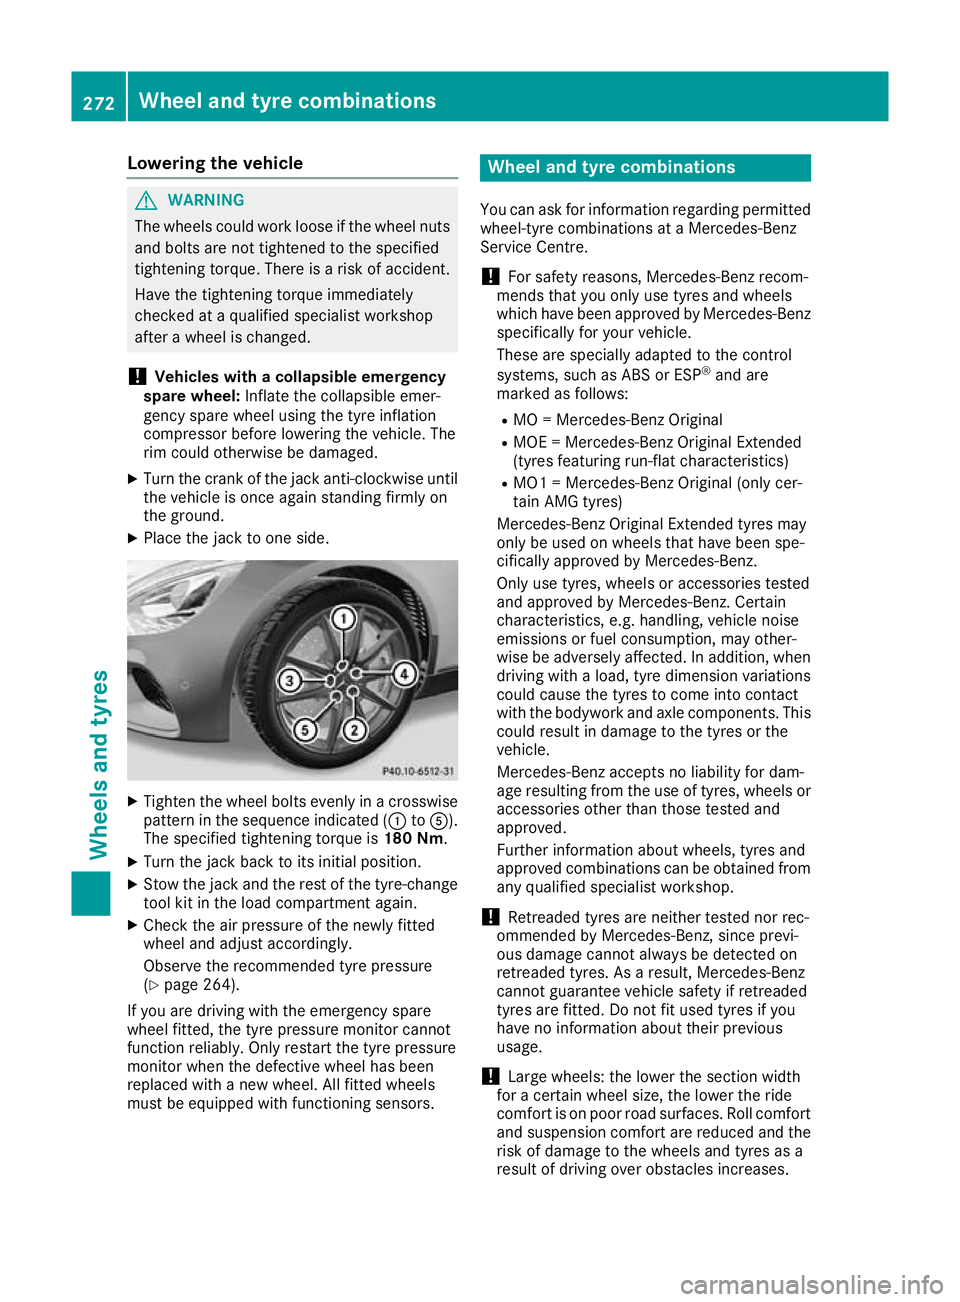
Tighten the wheel bolts evenly in a crosswise
pattern in the sequence indicated (: toA).
The specified tightening torque is 180 Nm.
X Turn the jack back to its initial position.
X Stow the jack and the rest of the tyre-change
tool kit in the load compartment again.
X Check the air pressure of the newly fitted
wheel and adjust accordingly.
Observe the recommended tyre pressure
(Y page 264).
If you are driving with the emergency spare
wheel fitted, the tyre pressure monitor cannot
function reliably. Only restart the tyre pressure
monitor when the defective wheel has been
replaced with a new wheel. All fitted wheels
must be equipped with functioning sensors. Wheel and tyre combinations
You can ask for information regarding permitted
wheel-tyre combinations at a Mercedes-Benz
Service Centre.
! For safety reasons, Mercedes-Benz recom-
mends that you only use tyres and wheels
which have been approved by Mercedes-Benz specifically for your vehicle.
These are specially adapted to the control
systems, such as ABS or ESP ®
and are
marked as follows:
R MO = Mercedes-Benz Original
R MOE = Mercedes-Benz Original Extended
(tyres featuring run-flat characteristics)
R MO1 = Mercedes-Benz Original (only cer-
tain AMG tyres)
Mercedes-Benz Original Extended tyres may
only be used on wheels that have been spe-
cifically approved by Mercedes-Benz.
Only use tyres, wheels or accessories tested
and approved by Mercedes-Benz. Certain
characteristics, e.g. handling, vehicle noise
emissions or fuel consumption, may other-
wise be adversely affected. In addition, when
driving with a load, tyre dimension variations
could cause the tyres to come into contact
with the bodywork and axle components. This
could result in damage to the tyres or the
vehicle.
Mercedes-Benz accepts no liability for dam-
age resulting from the use of tyres, wheels or accessories other than those tested and
approved.
Further information about wheels, tyres and
approved combinations can be obtained from
any qualified specialist workshop.
! Retreaded tyres are neither tested nor rec-
ommended by Mercedes-Benz, since previ-
ous damage cannot always be detected on
retreaded tyres. As a result, Mercedes-Benz
cannot guarantee vehicle safety if retreaded
tyres are fitted. Do not fit used tyres if you
have no information about their previous
usage.
! Large wheels: the lower the section width
for a certain wheel size, the lower the ride
comfort is on poor road surfaces. Roll comfort and suspension comfort are reduced and therisk of damage to the wheels and tyres as a
result of driving over obstacles increases. 272
Wheel and tyre combinationsWheels and tyres
Page 276 of 289
The recommended tyre pressures can be found
in the tyre pressure table on the fuel filler flap.
For further information on tyre pressure, see
(Y page 264). Check tyre pressures regularly
and only when the tyres are cold.
Notes on the vehicle equipment – always fit the
vehicle:
R with tyres of the same size across an axle
(left/right)
R with the same type of tyres on all wheels at a
given time (summer tyres, winter tyres)
Exception: it is permissible to fit a different
type or make in the event of a flat tyre. Emergency spare wheel
Important safety notes
G
WARNING
The wheel/tyre dimensions and the tyre type of the spare wheel/emergency spare wheel
and the wheel to be replaced may differ. Fit-
ting a spare wheel/emergency spare wheel
may severely impair the driving characteris-
tics. There is a risk of accident.
To prevent hazardous situations:
R Adapt your driving style accordingly and
drive carefully.
R Never fit more than one spare wheel/emer-
gency spare wheel if the dimensions are
different to those of the wheel being
replaced.
R Only use a spare wheel/emergency spare
wheel briefly if the dimensions are different to those of the wheel being replaced.
R Do not switch off ESP ®
.
R Have the spare wheel/emergency spare
wheel in question replaced at the nearest
qualified specialist workshop. Make sure
that the wheel/tyre dimensions and tyre
type are correct.
When using an emergency spare wheel or spare wheel of a different size, you must not exceed
the maximum speed of 80 km/h.
Snow chains must not be fitted to emergency
spare wheels. General notes
You can ask for information regarding permitted emergency spare wheels at a Mercedes-Benz
Service Centre.
You should regularly check the pressure of all
your tyres, including the emergency spare
wheel, particularly prior to long trips, and cor-
rect the pressure as necessary (Y page 264).
The value on the wheel is valid.
An emergency spare wheel may also be fitted
against the direction of rotation. Observe the
time restriction on use as well as the speed lim- itation specified on the emergency spare wheel.
Replace the tyres after six years at the latest,
regardless of wear. This also applies to the
emergency spare wheel.
i If you are driving with the emergency spare
wheel fitted, the tyre pressure monitor cannot function reliably. Only restart the tyre pres-
sure monitor when the defective wheel has
been replaced with a new wheel.
If an emergency spare wheel is fitted, for a few minutes the system may continue to show the
tyre pressure of the wheel that has been
removed. The value displayed for the position
where the emergency spare wheel is fitted is
not the same as the current tyre pressure of
the emergency spare wheel. Removing the collapsible emergency
spare wheel
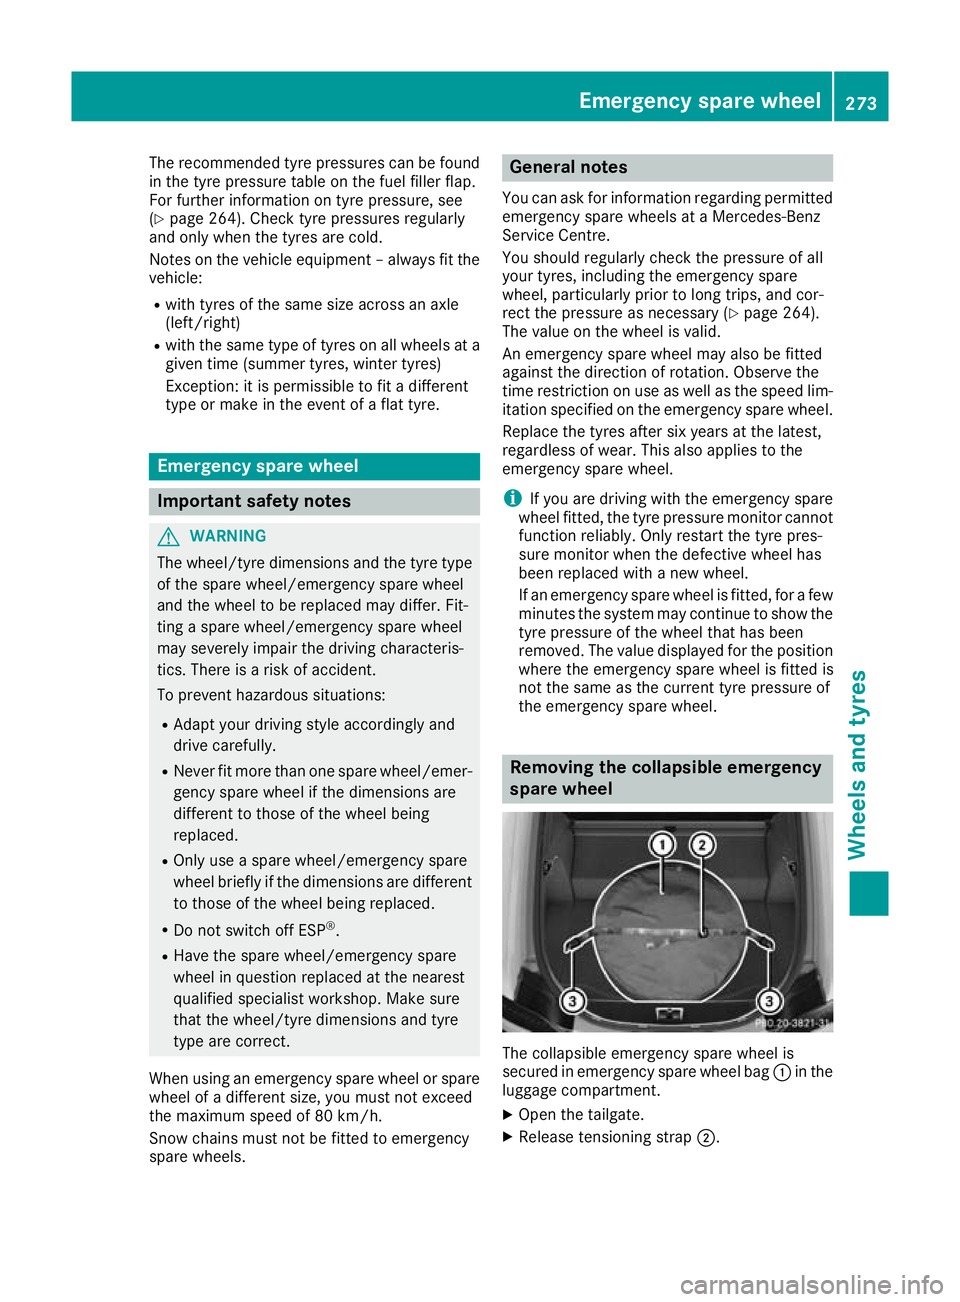
The collapsible emergency spare wheel is
secured in emergency spare wheel bag
:in the
luggage compartment.
X Open the tailgate.
X Release tensioning strap ;. Emergency spare wheel
273Wheels and tyres Z
Page 277 of 289
X
Unhook retaining spring hooks =of tension-
ing strap ;from the retainers.
X Remove emergency spare wheel bag :with
the collapsible emergency spare wheel.
X Open emergency spare wheel bag :and
remove the collapsible emergency spare
wheel.
Observe the instructions and safety notes in the "Fitting a wheel" section (Y page 268).Inflating the collapsible emergency
spare wheel
! Inflate the collapsible emergency spare
wheel using the tyre inflation compressor
before lowering the vehicle. The wheel rim
could otherwise be damaged.
! Do not operate the tyre inflation compres-
sor for longer than ten minutes at a time with-
out a break. It may otherwise overheat.
The tyre inflation compressor can be oper-
ated again once it has cooled down.
Comply with the manufacturer's safety instruc-
tions on the tyre inflation compressor label and
on the tyre sealant bottle.
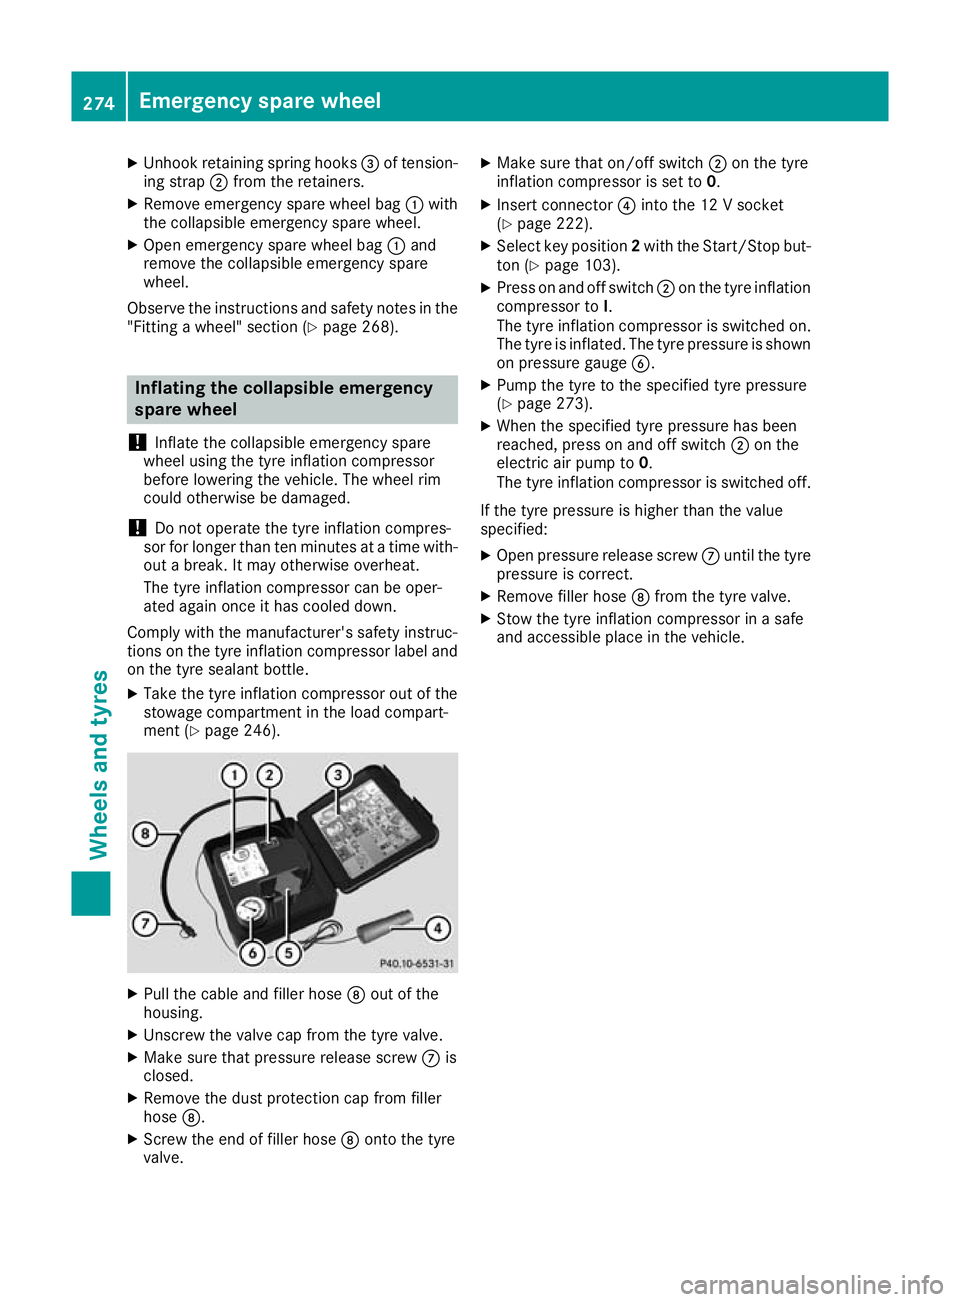
X Take the tyre inflation compressor out of the
stowage compartment in the load compart-
ment (Y page 246). X
Pull the cable and filler hose Dout of the
housing.
X Unscrew the valve cap from the tyre valve.
X Make sure that pressure release screw Cis
closed.
X Remove the dust protection cap from filler
hose D.
X Screw the end of filler hose Donto the tyre
valve. X
Make sure that on/off switch ;on the tyre
inflation compressor is set to 0.
X Insert connector ?into the 12 V socket
(Y page 222).
X Select key position 2with the Start/Stop but-
ton (Y page 103).
X Press on and off switch ;on the tyre inflation
compressor to I.
The tyre inflation compressor is switched on.
The tyre is inflated. The tyre pressure is shown
on pressure gauge B.
X Pump the tyre to the specified tyre pressure
(Y page 273).
X When the specified tyre pressure has been
reached, press on and off switch ;on the
electric air pump to 0.
The tyre inflation compressor is switched off.
If the tyre pressure is higher than the value
specified:
X Open pressure release screw Cuntil the tyre
pressure is correct.
X Remove filler hose Dfrom the tyre valve.
X Stow the tyre inflation compressor in a safe
and accessible place in the vehicle. 274
Emergency spare wheelWheels and tyres
Page 278 of 289
Information on technical data
i The technical data was determined in
accordance with EU Directives. All data
applies to the vehicle's standard equipment.
The data may therefore differ for vehicles with
optional equipment. You can obtain further
information from a Mercedes-Benz Service
Centre. Vehicle electronics
Tampering with the engine electron-
ics
! Only have work carried out on the engine
electronics and its associated parts, such as
control units, sensors, actuating components
and connector leads, at a qualified specialist
workshop. Vehicle components may other-
wise wear more quickly and the vehicle's
operating permit may be invalidated. Fitting two-way radios and mobile
phones (RF transmitters) G
WARNING
If RF transmitters are tampered with or not
properly retrofitted, the electromagnetic radi- ation they emit can interfere with the vehicle
electronics. This may jeopardise the opera-
tional safety of the vehicle. There is a risk of an
accident.
You should have all work on electrical and
electronic components carried out at a quali-
fied specialist workshop. G
WARNING
If you operate RF transmitters incorrectly in
the vehicle, the electromagnetic radiation
could interfere with the vehicle electronics,
e.g.:
R if the RF transmitter is not connected to an
exterior aerial
R the exterior aerial has been fitted incor-
rectly or is not a low-reflection type This could jeopardise the operating safety of
the vehicle. There is a risk of an accident.
Have the low-reflection exterior aerial fitted at
a qualified specialist workshop. When oper-
ating RF transmitters in the vehicle, always
connect them to the low-reflection exterior
aerial.
! The operating permit may be invalidated if
the instructions for installation and use of RF
transmitters are not observed.
In particular, the following conditions must be complied with:
R only approved wavebands may be used.
R observe the maximum permissible output
in these wavebands.
R only approved aerial positions may be
used.
Excessive levels of electromagnetic radiation
may cause damage to your health and to the
health of others. The use of an exterior aerial
takes into consideration the scientific discus-
sion surrounding the possible health risk posed
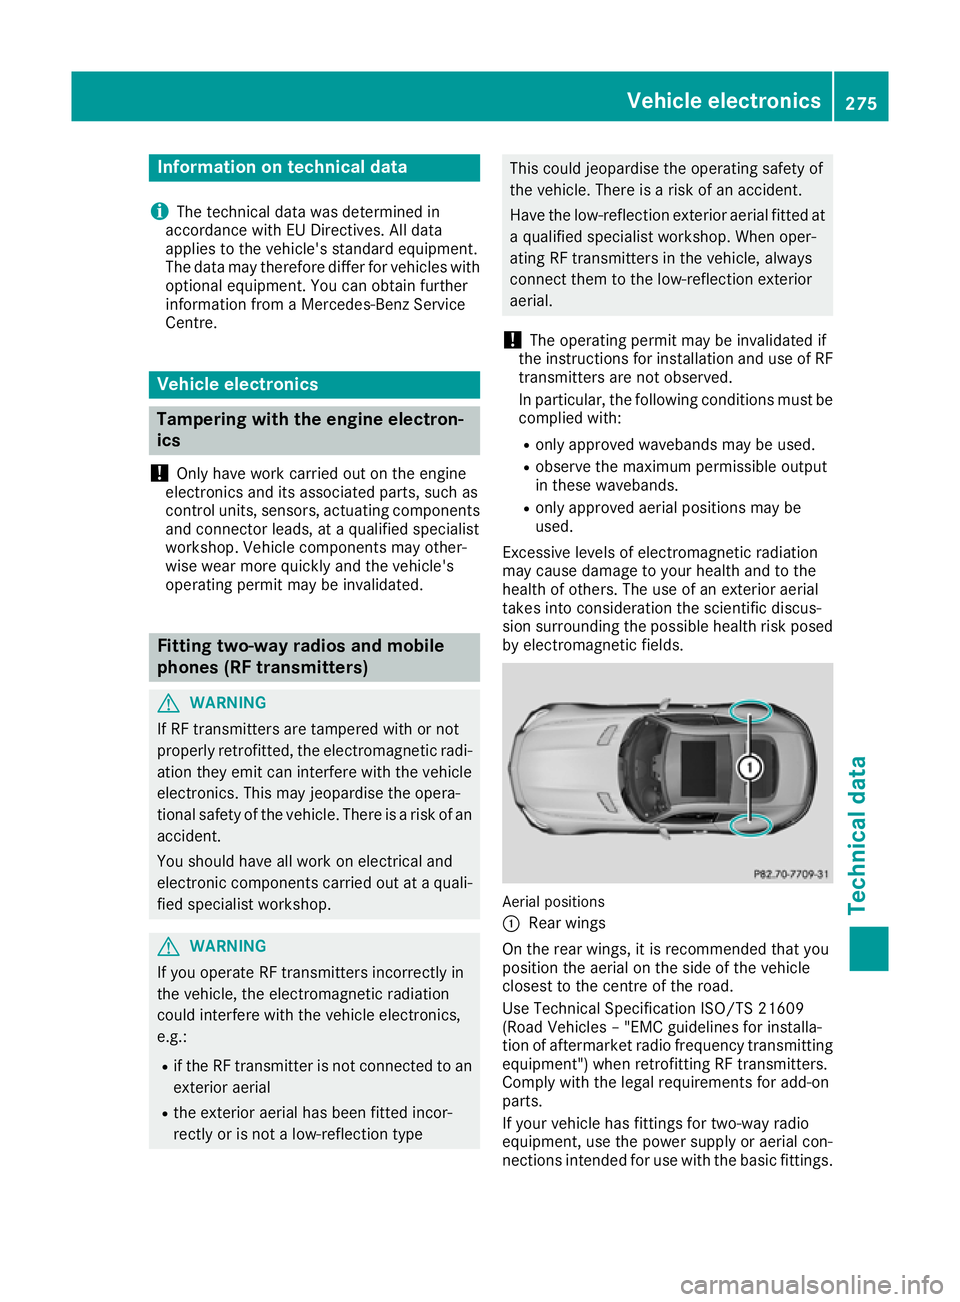
by electromagnetic fields. Aerial positions
:
Rear wings
On the rear wings, it is recommended that you
position the aerial on the side of the vehicle
closest to the centre of the road.
Use Technical Specification ISO/TS 21609
(Road Vehicles – "EMC guidelines for installa-
tion of aftermarket radio frequency transmitting
equipment") when retrofitting RF transmitters.
Comply with the legal requirements for add-on
parts.
If your vehicle has fittings for two-way radio
equipment, use the power supply or aerial con-
nections intended for use with the basic fittings. Vehicle electronics
275Technical data Z
Page 279 of 289
Be sure to observe the manufacturer's addi-
tional instructions when installing.
Deviations in respect of wavebands, maximum
transmission outputs or aerial positions must be approved by Mercedes-Benz.
The maximum transmission output (PEAK) at the base of the aerial must not exceed the followingvalues: Waveband Maximum
transmission output Short wave
3 - 54 MHz 100 W
4 m waveband
74–88 MHz 30 W
2 m waveband
144 - 174 MHz 50 W
Trunked radio/Tetra
380 - 460 MHz 10 W
70 cm waveband
400 - 460 MHz 35 W
Mobile communications
(2G/3G/4G) 10 W
The following can be used in the vehicle without
restrictions:
R RF transmitters with a maximum transmis-
sion output of up to 100 mW
R RF transmitters with transmitter frequencies
in the 380 - 410 MHz waveband and a maxi-
mum transmission output of up to 2 W
(trunked radio/Tetra)
R Mobile phones (2G/3G/4G)
There are no restrictions when positioning the
aerial on the outside of the vehicle for the fol-
lowing wavebands:
R Trunked radio/Tetra
R 70 cm waveband
R 2G/3G/4G Identification plates
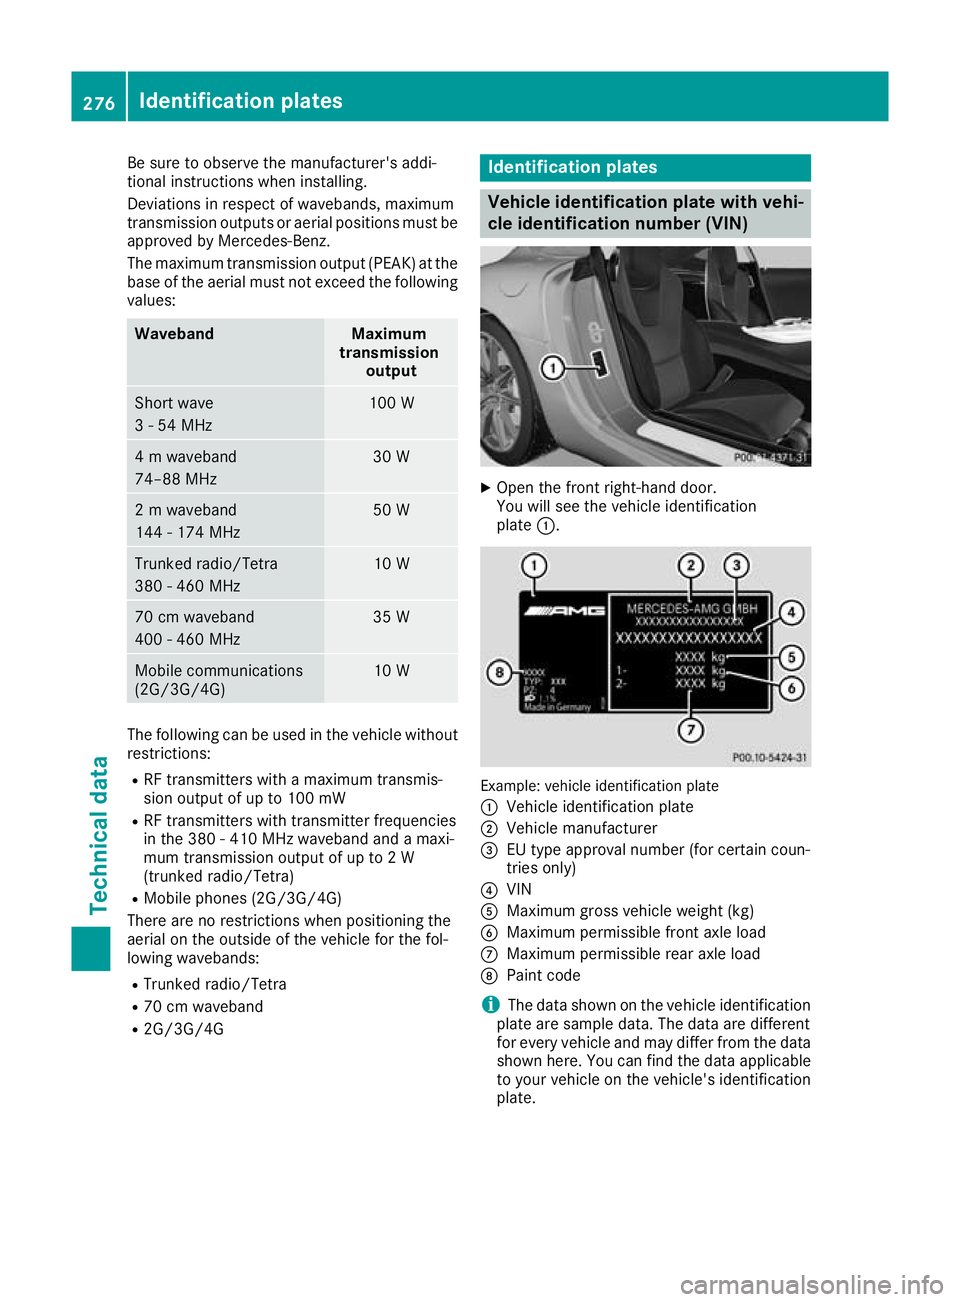
Vehicle identification plate with vehi-
cle identification number (VIN)
X
Open the front right-hand door.
You will see the vehicle identification
plate :. Example: vehicle identification plate
:
Vehicle identification plate
; Vehicle manufacturer
= EU type approval number (for certain coun-
tries only)
? VIN
A Maximum gross vehicle weight (kg)
B Maximum permissible front axle load
C Maximum permissible rear axle load
D Paint code
i The data shown on the vehicle identification
plate are sample data. The data are different
for every vehicle and may differ from the data shown here. You can find the data applicable
to your vehicle on the vehicle's identification
plate. 276
Identification platesTechnical data
Page 280 of 289
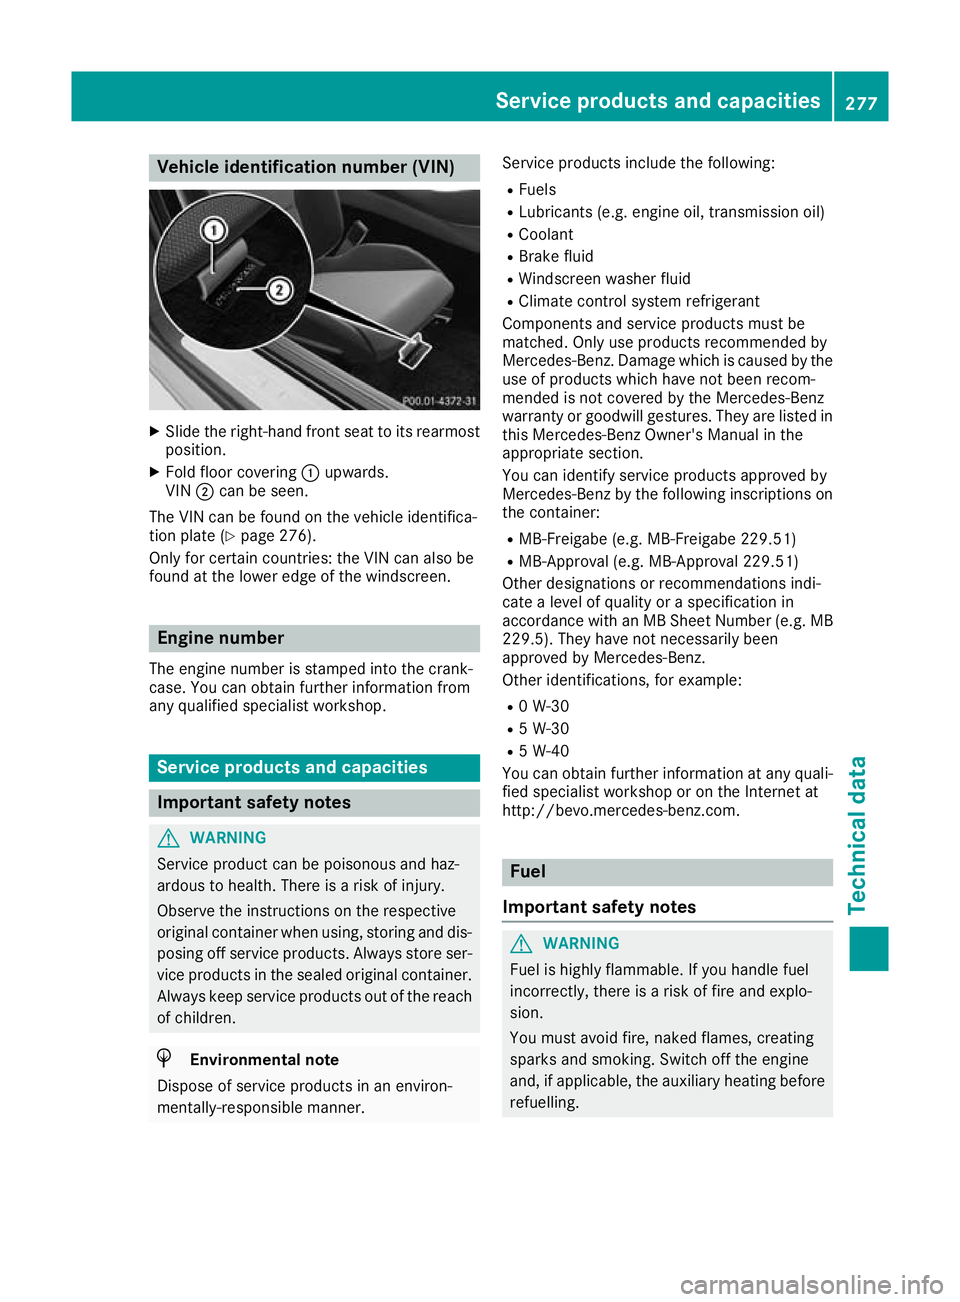
Vehicle identification number (VIN)
X
Slide the right-hand front seat to its rearmost
position.
X Fold floor covering :upwards.
VIN ;can be seen.
The VIN can be found on the vehicle identifica-
tion plate (Y page 276).
Only for certain countries: the VIN can also be
found at the lower edge of the windscreen. Engine number
The engine number is stamped into the crank-
case. You can obtain further information from
any qualified specialist workshop. Service products and capacities
Important safety notes
G
WARNING
Service product can be poisonous and haz-
ardous to health. There is a risk of injury.
Observe the instructions on the respective
original container when using, storing and dis- posing off service products. Always store ser-
vice products in the sealed original container. Always keep service products out of the reach
of children. H
Environmental note
Dispose of service products in an environ-
mentally-responsible manner. Service products include the following:
R Fuels
R Lubricants (e.g. engine oil, transmission oil)
R Coolant
R Brake fluid
R Windscreen washer fluid
R Climate control system refrigerant
Components and service products must be
matched. Only use products recommended by
Mercedes-Benz. Damage which is caused by the use of products which have not been recom-
mended is not covered by the Mercedes-Benz
warranty or goodwill gestures. They are listed in this Mercedes-Benz Owner's Manual in the
appropriate section.
You can identify service products approved by
Mercedes-Benz by the following inscriptions on
the container:
R MB-Freigabe (e.g. MB-Freigabe 229.51)
R MB-Approval (e.g. MB-Approval 229.51)
Other designations or recommendations indi-
cate a level of quality or a specification in
accordance with an MB Sheet Number (e.g. MB
229.5). They have not necessarily been
approved by Mercedes-Benz.
Other identifications, for example:
R 0 W-30
R 5 W-30
R 5 W-40
You can obtain further information at any quali-
fied specialist workshop or on the Internet at
http://bevo.mercedes-benz.co m. Fuel
Important safety notes G
WARNING
Fuel is highly flammable. If you handle fuel
incorrectly, there is a risk of fire and explo-
sion.
You must avoid fire, naked flames, creating
sparks and smoking. Switch off the engine
and, if applicable, the auxiliary heating before refuelling. Service products and capacities
277Technical data Z