garage door opener MERCEDES-BENZ AMG GT ROADSTER 2016 Owners Manual
[x] Cancel search | Manufacturer: MERCEDES-BENZ, Model Year: 2016, Model line: AMG GT ROADSTER, Model: MERCEDES-BENZ AMG GT ROADSTER 2016Pages: 289, PDF Size: 5.97 MB
Page 13 of 289
Checking the oil level using the
dipstick .......................................... 233
Checking the oil level using the
on-board computer ........................ 234
Display message ............................ 184
Filling capacity .............................. .279
Notes about oil grades ................... 279
Notes on oil level/consumption .... 233
Temperature (on-board com-
puter) ............................................. 167
Topping up ..................................... 234
Entering an address
See also Digital Owner's Manual ... 205
Environmental protection
Returning an end-of-life vehicle ....... 22
ESP ®
(Electronic Stability Pro-
gram)
AMG menu (on-board computer) ... 168
Characteristics ................................. 58
Deactivating/activating ................... 58
Display message ............................ 172
Function/notes ................................ 57
General notes .................................. 57
Important safety guidelines ............. 58
Warning lamp ................................. 197
ETS/4ETS (Electronic Traction Sys-
tem) ...................................................... 58
Exhaust pipe (cleaning instruc-
tions) ................................................. .242
Exterior lighting
Cleaning ......................................... 241
see Lights
Exterior mirrors
Adjusting ......................................... 84
Anti-dazzle mode (automatic) .......... 85
Folding in/out (automatically) ......... 85
Folding in/out (electrically) ............. 85
Out of position (troubleshooting) ..... 85
Parking position ............................... 86
Resetting ......................................... 85
Storing settings (memory func-
tion) ................................................. 87 F
Fault message see Display messages Favourites
Overview ........................................ 208
Features ............................................. 220
Filler cap
see Fuel filler flap
Fire extinguisher ............................... 245
First-aid kit ......................................... 245
Fitting a wheel
Fitting a wheel ............................... 271
Lowering the vehicle ...................... 272
Preparing the vehicle ..................... 268
Raising the vehicle ......................... 269
Removing a whee l.......................... 270
Securing the vehicle against roll-
ing away ........................................ 268
Flat tyre
Changing a wheel/fitting the
spare whee l................................... 267
Preparing the vehicle ..................... 247
TIREFIT kit ...................................... 247
see Emergency spare wheel
Floormat ............................................. 230
Frequencies
Garage door opener ....................... 228
Mobile phone ................................. 275
Two-way radio ................................ 275
Front-passenger front airbag deac-
tivation system
Operation ......................................... 42
Problems ......................................... 45
System self-test ............................... 44
Fuel
Additives ........................................ 279
Consumption statistics .................. 158
Displaying the current consump-
tion ................................................ 158
Displaying the range ...................... 158
Driving tip s.................................... 123
E10 ................................................ 278
Fuel gauge ....................................... 29
Grade (petrol) ................................ 278
Important safety notes .................. 277
Problem (malfunction) ................... 119
Refuelling ....................................... 117
Tank content/reserve fue l............. 278
Fuel filler flap
Closing ........................................... 118
General information ....................... 118 10
Index
Page 14 of 289
Opening ......................................... 118
Problem (malfunction) ...................1
19
Fuel level
Calling up the range (on-board
computer) ...................................... 158
Gauge .............................................. 29
Fuel tank
Capacity ........................................ 278
Problem (malfunction) ................... 119
Fuses
Allocation chart ............................ .260
Before changing ............................ .259
Fuse box in the front-passenger
footwell .......................................... 259
Fuse box in the luggage compart-
ment .............................................. 260
Important safety notes .................. 259 G
G-Meter (on-board computer) .......... 167
Garage door opener
Clearing the memory ..................... 227
Frequencies ................................... 228
General notes ................................ 225
Important safety notes .................. 226
Opening/closing the garage door .. 227
Problems when programming ....... .227
Programming (button in the rear-
view mirror) ................................... 226
Synchronising the rolling code ....... 226
Gear indicator (on-board com-
puter) ................................................. .167
Gearshift paddles
see Steering wheel gearshift paddles
Gearshift program
SETUP (on-board computer) .......... 168
Genuine Mercedes-Benz parts ........... 22
Glove compartment .......................... 218
Google™ Local Search
See also Digital Owner's Manual ... 205 H
Handwriting recognition Switching text reader function
on/off ............................................ 207
Touchpad ....................................... 207 Hazard warning lamps
........................ 90
Head restraints
Adjusting ......................................... 80
Headlamp
Cleaning system (notes) ................ 280
Headlamp flasher ................................ 89
Headlamps
Misting up ........................................ 91
see Automatic headlamp mode
Heating
see Climate control
High-pressure cleaners .................... 239
Hill start assist .................................. 104
HOLD function
Activating ....................................... 138
Deactivating ................................... 138
Display message ............................ 187
Function/notes ............................ .138
Home address
See also Digital Owner's Manual ... 205
Horn ...................................................... 27 I
Ignition lock see Key positions
Immobiliser .......................................... 60
Indicator and warning lamp
Restraint system ............................ 199
Indicator and warning lamps
COLLISION PREVENTION ASSIST
PLUS .............................................. 202
Coolant .......................................... 200
Engine diagnostics ......................... 200
SPORT handling mode ................... 199
Indicator lamps
Display message ............................ 182
see Warning and indicator lamps
Indicators
see Turn signals
Instrument cluster
Overview .......................................... 29
Warning and indicator lamps ........... 29
Instrument cluster lighting .............. 165
Interior lighting
Automatic control system ................ 91
General notes .................................. 91
Overview .......................................... 91 Index
11
Page 18 of 289
PRE-SAFE
®
(anticipatory occupant
protection)
Operation ......................................... 48
PRE-SAFE ®
(preventive occupant
safety system)
Display message ............................1 77
Protection against theft
ATA (Anti-Theft Alarm system) ......... 60
Immobiliser ...................................... 60
Interior motion sensor ..................... 61
Tow-away protectio n ........................61
Protection of the environment
General notes .................................. 22
Pulling away
Automatic transmission ................. 104
General notes ................................ 104
Hill start assist ............................... 104 Q
QR code Mercedes-Benz Guide App ................. 1
Rescue card ..................................... 26
Qualified specialist workshop ........... 25
Quick access for audio and tele-
phone
Changing the station/music
track .............................................. 208 R
RACE START Activating ....................................... 139
important safety notes ................... 139
RACETIMER (on-board computer) .... 168
Radio
Selecting a station ......................... 160
Radio mode
See also Digital Owner's Manual ... 205
Radio-based vehicle components
Declaration of conformity ................ 24
Reading lamp ....................................... 91
Rear foglamp
Display message ............................ 182
Switching on/off .............................. 89
Rear lamps
see Lights Rear spoiler
Extending/retracting ..................... 224
Problem ......................................... 225
Rear window heating
Problem (fault) ................................. 99
Switching on/off .............................. 99
Rear wing
Display message ............................ 193
Rear-view mirror
Anti-dazzle mode (automatic) .......... 85
Dipping (manual ).............................. 84
Reflective safety vest ....................... 244
Refuelling
Fuel gaug e....................................... 29
Important safety notes .................. 117
Refuelling process ......................... 118
see Fuel
Remote control
Garage door opener ....................... 225
Programming (garage door
opener) .......................................... 226
Replacing bulbs
General notes .................................. 92
Rescue card ......................................... 26
Reserve (fuel tank)
see Fuel
Reserve fuel
Display message ............................ 185
Warning lamp ................................. 200
Restraint system
Display message ............................ 178
Introduction ..................................... 34
Warning lamp ................................. 199
Warning lamp (function) ................... 35
Rev counter ........................................ 155
Reversing camera
Cleaning instructions ..................... 241
Function/note s............................. 144
Switching on/of f........................... 144
Reversing feature
Side window s................................... 74
Reversing lamp (display message) .. 182
Roller sunblind of the panorama
roof
Opening and closing ........................ 77
Operating ......................................... 77 Index
15
Page 35 of 289
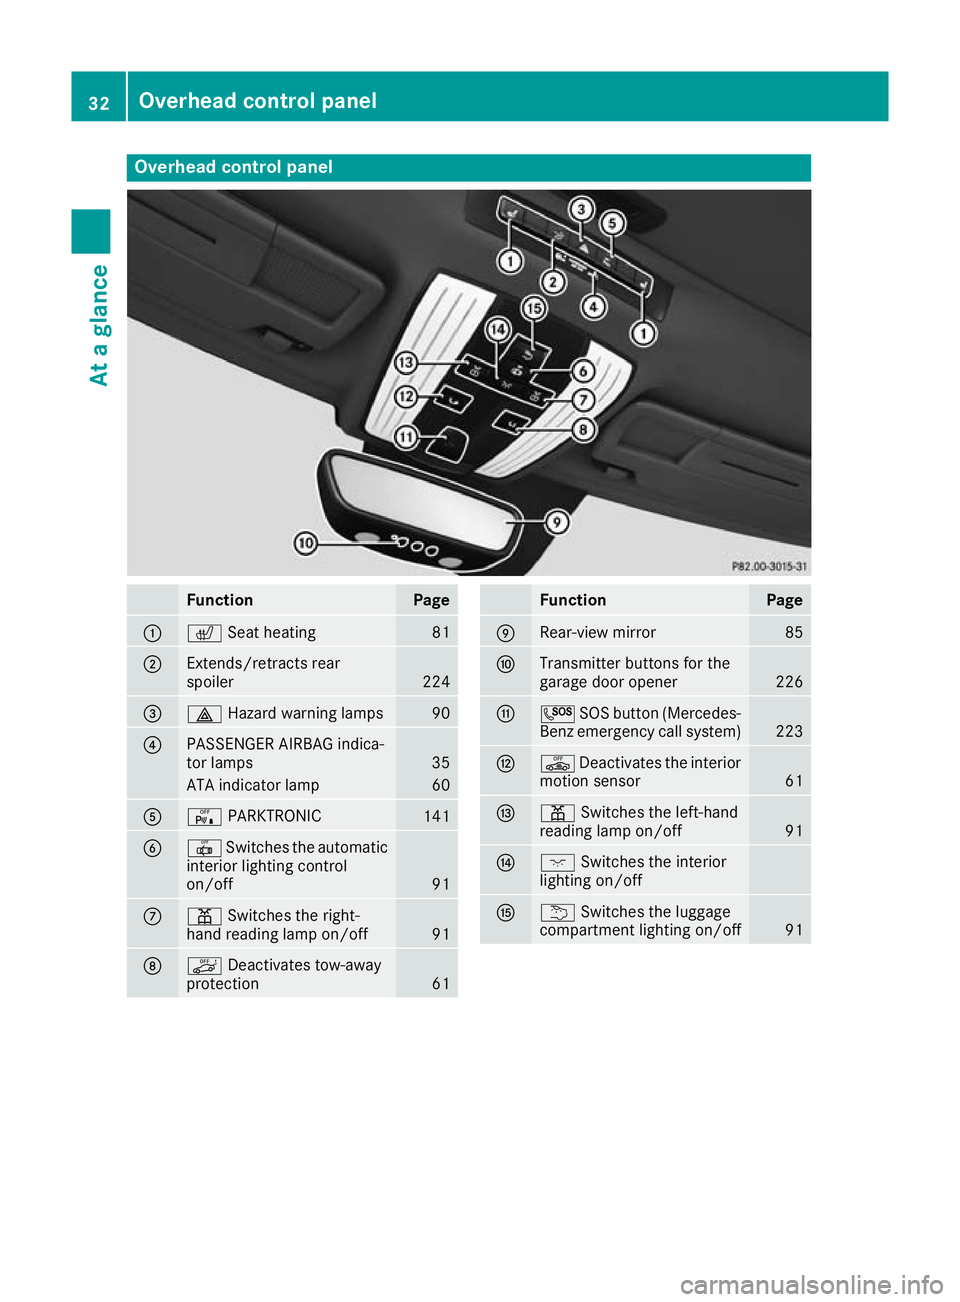
Overhead control panel
Function Page
:
c
Seat heating 81
;
Extends/retracts rear
spoiler
224
=
£
Hazard warning lamps 90
?
PASSENGER AIRBAG indica-
tor lamps
35
ATA indicator lamp 60
A
c
PARKTRONIC 141
B
|
Switches the automatic
interior lighting control
on/off 91
C
p
Switches the right-
hand reading lamp on/off 91
D
ë
Deactivates tow-away
protection 61 Function Page
E
Rear-view mirror 85
F
Transmitter buttons for the
garage door opener 226
G
G
SOS button (Mercedes-
Benz emergency call system) 223
H
ê
Deactivates the interior
motion sensor 61
I
p
Switches the left-hand
reading lamp on/off 91
J
c
Switches the interior
lighting on/off K
u
Switches the luggage
compartment lighting on/off 9132
Overhead control panelAt a glance
Page 228 of 289
When leaving the vehicle, always take the key
with you and lock the vehicle. Never leave
children unattended in the vehicle.
! Do not enter an automatic car wash with the
rear aerofoil extended. Otherwise, the rear
aerofoil may be damaged.
Only extend the rear aerofoil in order to wash
it by hand. Retract it again when you have fin- ished cleaning it.
You can extend and retract the rear spoiler man-
ually for cleaning.
X Close the tailgate.
X Select key position 2with the Start/Stop but-
ton (Y page 103). X
To extend: press button :.
The rear spoiler is extended.
Button :flashes until the rear spoiler has
extended and then lights up in red.
X To retract: press and hold button :until the
rear spoiler is completely retracted.
Button :flashes until the rear spoiler has
retracted and then goes out.
Rear spoiler retracts manually Rear spoiler retracts manually
appears in the display.
If you release button :while retracting the rear
spoiler, it extends again automatically.
Problems with the rear spoiler Problem
Possible causes/consequences and
M MSolutions The rear spoiler stops
before reaching the end
position when retracting
manually. You have opened the tailgate while manually retracting the rear
spoiler.
X Close the tailgate.
The rear spoiler extends or, if you press and hold the ¬button,
continues retracting. The rear spoiler stops
before reaching the end
position when retract-
ing/extending manually. You have switched off the ignition.
X Switch the ignition back on.
X Press the ¬button.
The rear spoiler extends/retracts. The rear spoiler cannot
be retracted again after
manually extending it. You have opened the tailgate while manually extending the rear
spoiler.
X Close the tailgate. The rear spoiler does not
extend or retract auto-
matically. The rear spoiler's movement is blocked, e.g. by an object jammed
between the body and the rear spoiler.
X Remove the object. Garage door opener
General notes The HomeLink
®
garage door opener integrated
in the rear-view mirror allows you to operate up
to three different door and gate systems.
Once programmed, the integrated garage door
opener in the rear-view mirror will assume the
function of the garage door system's remote control. Please also read the operating instruc-
tions for the garage door system.
When programming a garage door opener, park
the vehicle outside the garage. Do not run the
engine while programming.
The garage door opener is available only for cer- tain countries. Observe the legal requirements
for each individual country. Features
225Stowing and features Z
Page 229 of 289
The HomeLink
®
garage door opener is compat-
ible with most European garage and gate opener
drives.
More information on HomeLink ®
and/or com-
patible products is available:
R at a qualified specialist workshop
R via the HomeLink ®
hotline
(0) 08000 466 354 65 or alternatively
+49 (0) 6838 907-277
R on the Internet at http://www.homelink.com
Important safety notes G
WARNING
When you operate or program the garage door with the integrated garage door opener, per-
sons in the range of movement of the garage
door can become trapped or struck by the
garage door. There is a risk of injury.
When using the integrated garage door
opener, always make sure that nobody is
within the range of movement of the garage
door. G
WARNING
Combustion engines emit poisonous exhaust
gases such as carbon monoxide. Inhaling
these exhaust gases leads to poisoning. There is a risk of fatal injury. Therefore never leave
the engine running in enclosed spaces with-
out sufficient ventilation.
Programming Programming buttons
Observe the "Important safety notes"
(Y page 226). Garage door drive remote control
Ais not
included with the integrated garage door
opener.
X Select key position 2with the Start/Stop but-
ton (Y page 103).
X Select one of buttons ;to? to control the
garage door drive.
X To start programming mode: press and
hold one of buttons ;to? on the integrated
garage door opener.
The garage door opener is now in program-
ming mode. After a short time, indicator
lamp :begins to light up yellow.
Indicator lamp :lights up yellow immedi-
ately the first time button ;,=or? is pro-
grammed. If the selected button has already
been programmed, indicator lamp :lights
up yellow after ten seconds have elapsed.
X Release button ;,=or?. Indicator
lamp :flashes yellow.
X To program the remote control: point
remote control Atowards buttons ;to?
on the rear-view mirror at a distance of 5 to
20 cm.
X Press and hold button Bon remote control
A until indicator lamp :lights up green.
When indicator lamp :lights up green: pro-
gramming is finished.
When indicator lamp :flashes green: pro-
gramming was successful. The next step is to
synchronise the rolling code (Y page 226).
X Release button Bof remote control Aof the
garage door drive.
If indicator lamp :lights up red: repeat the
programming process for the corresponding
button on the rear-view mirror. When doing
so, vary the distance between remote control A and the rear-view mirror.
The required distance between remote con-
trol Aand the integrated garage door opener
depends on the garage door drive system.
Several attempts may be required. You
should test every setting position for at least
25 seconds before trying another position.
Synchronising the rolling code
Read the "Important safety notes" (Y page 226).
If the garage door system uses a rolling code,
you will also have to synchronise the garage
door system with the integrated garage door
opener in the rear-view mirror. To do this, you
will need to use the programming button on the 226
FeaturesStowing and features
Page 230 of 289
door drive control panel. The programming but-
ton may be placed at different locations depend- ing on the manufacturer. It is usually located on
the door drive unit on the garage ceiling.
Familiarise yourself with the garage door drive
operating instructions, e.g. under "Program-
ming of additional remote controls", before car-
rying out the following steps.
Your vehicle must be within range of the garage
door or gate opener drive. Make sure that nei-
ther your vehicle nor any persons/objects are
present within the sweep of the door or gate.
X Select key position 2with the Start/Stop but-
ton (Y page 103).
X Get out of the vehicle.
X Press the programming button on the door
drive unit.
Usually, you now have 30 seconds to initiate
the next step.
X Get into the vehicle.
X Press previously programmed button ;,=
or ? on the integrated garage door opener
repeatedly until the door closes.
Rolling code synchronisation is then com-
plete.
Problems when programming
If you have problems when programming the
integrated garage door opener on the rear-view mirror, please note the following:
R Check the transmitter frequency used by
garage door drive remote control Aand
whether it is supported. The transmitter fre-
quency can usually be found on the back of
remote control Afor the garage door drive.
R Replace the batteries in garage door drive
remote control A. This increases the likeli-
hood that garage door drive remote control
A will transmit a strong and precise signal to
the integrated garage door opener.
R When programming, hold remote control A
at varying distances and angles from but-
tons ;to? that you are programming. Try
various angles at a distance between 5and
20 cm or at the same angle but at varying
distances.
R If another remote control Ais available for
the same garage door drive, perform the pro-
gramming steps again using this remote con- trol A. Before performing these steps, make
sure that new batteries have been fitted in
garage door drive remote control A.R
Note that some remote controls transmit only
for a limited period (the indicator lamp on theremote control goes out). Press button Bon
remote control Aagain before transmission
ends.
R Align the aerial cable of the garage door
opener unit. This can improve signal recep-
tion/transmission.
Opening/closing the garage door Once programmed, the integrated garage door
opener will assume the function of the garage
door system's remote control. Please also read
the operating instructions for the garage door
system.
X Select key position 2with the Start/Stop but-
ton (Y page 103).
X Press button ;,=or? that you have pro-
grammed to operate the garage door.
Garage door system with a fixed code: indi-
cator lamp :lights up green.
Garage door system with a rolling code: indi-
cator lamp :flashes green.
The transmitter will transmit a signal for as
long as the button is pressed. The transmis-
sion is halted after a maximum of ten seconds and indicator lamp :lights up yellow.
X Press button ;,=or? again if necessary.
Clearing the memory Make sure that you clear the memory of the
integrated garage door opener before selling the
vehicle.
X Select key position 2with the Start/Stop but-
ton (Y page 103).
X Press and hold buttons ;and ?.
The indicator lamp initially lights up yellow
and then green.
X Release buttons ;and ?.
The memory of the integrated garage door
opener in the rear-view mirror is cleared. Features
227Stowing and features Z