seats MERCEDES-BENZ AMG GT ROADSTER 2018 Owner's Manual
[x] Cancel search | Manufacturer: MERCEDES-BENZ, Model Year: 2018, Model line: AMG GT ROADSTER, Model: MERCEDES-BENZ AMG GT ROADSTER 2018Pages: 409, PDF Size: 7.66 MB
Page 95 of 409
There is a
risk of injur y,particularly in the
ev ent of sudden braking or a sudden change
in direction. #
Alw aysstow objects in such a wayth at
th ey cannot be thro wn around. #
Before the journe y,secure objects, lug‐
ga ge or loads against slipping or tipping
ove r. &
WARNING Risk of inju rydue toobjects
being stowed incor rectly
If yo u inadequately stowobjects in theve hi‐
cle interior, they could slip or be tossed
around and thereby strike vehicle occupants.
In addition, cup holders, open stowage
spaces and mobile phone brac kets cann ot
alw aysre stra in the objects they contain in
th eev ent of an accident.
There is a risk of injur y,particularly in the
ev ent of sudden braking or a sudden change
in direction. #
Alw aysstow objects in such a wayth at
th ey cannot be tossed about in these or
similar situations. #
Alw ays make sure that objects do not
project from stowage spaces, luggage
nets or stowage nets. #
Close the loc kable stow age spaces
before starting a journe y. #
Alw aysstow and secure objects that
are heavy, hard, poin ted, sharp-edged,
fragile or too large in the boot. &
WARNING Risk of bu rning from theta il‐
pipe or tailpipe trim
The tailpipe and tailpipe trim can become
ve ry hot. If you come into contact with these
car parts, you could burn yourself. #
Alw ays be particular lycareful when in
th e vicinity of theta ilpipe and tailpipe
trims and supervise children very
closely when in this area. #
Before any con tact, allow the car parts
to cool down. The driving
characteristics of your vehicle are
dependent on the distribution of the load within
th eve hicle. You should bear thefo llowing in
mind when loading theve hicle:
R neverex ceed the permissible gross mass or
th e permissible axle loads forth eve hicle
(including occupants).
Information can be found on theve hicle iden‐
tification plate (/ page 306).
R position heavy loads as farfo rw ards as possi‐
ble and as low down in the boot as possible.
R the load must not pr otru de abo vethe upper
edge of the seat backrests.
R always place the load behind unoccupied
seats if possible.
R secure the load with suf ficiently tear-resist‐
ant and wear-resis tant lashing ma terial. Pad
sharp edges for pr otection. 92
Seats and stowing
Page 96 of 409
St
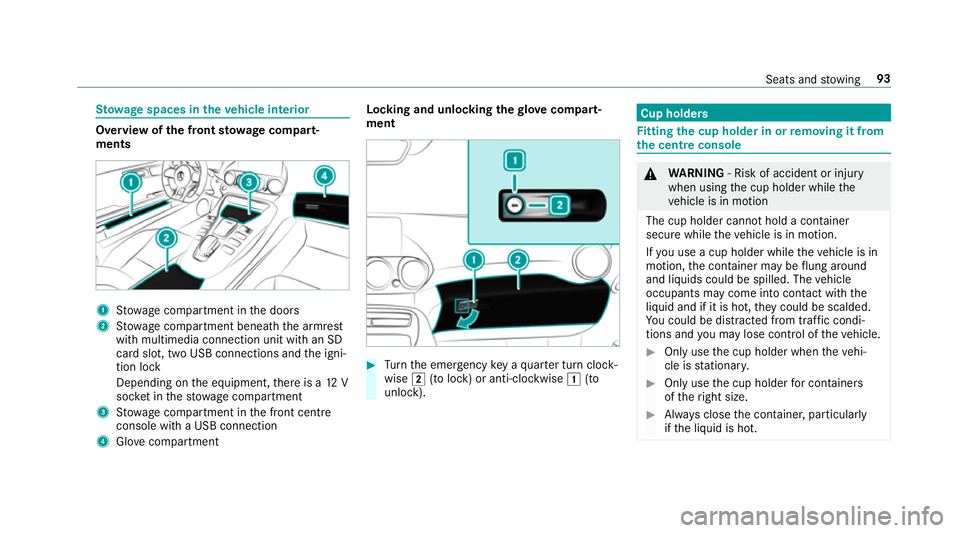
ow age spaces in theve hicle interior Overview of
the front stowage compa rt‐
ments 1
Stow age compartment in the doors
2 Stow age compartment beneath the armrest
with multimedia connection unit with an SD
card slot, two USB connections and the igni‐
tion lock
Depending on the equipment, there is a 12 V
soc ket in thestow age compartment
3 Stow age compartment in the front cent re
console wi tha USB connection
4 Glovecompa rtment Locking and unlo
cking thegl ove compa rt‐
ment #
Turn the emer gency key a quarter turn clock‐
wise 2(to lock) or anti-clockwise 1(to
unlock). Cup holde
rs Fi
tting the cup holder in or removing it from
the centre console &
WARNING ‑ Risk of accident or inju ry
when using the cup holder while the
ve hicle is in motion
The cup holder cannot hold a container
secure while theve hicle is in motion.
If yo u use a cup holder while theve hicle is in
motion, the conta iner may be flung around
and liquids could be spilled. The vehicle
occupants may come into contact with the
liquid and if it is hot, they could be scalded.
Yo u could be distracted from traf fic condi‐
tions and you may lose cont rol of theve hicle. #
Only use the cup holder when theve hi‐
cle is stationar y. #
Only use the cup holder for containers
of theright size. #
Alw ays close the conta iner, particularly
if th e liquid is hot. Seats and
stowing 93
Page 97 of 409
&
WARNING Risk of inju rydue toobjects
being stowed incor rectly
If yo u inadequately stowobjects in theve hi‐
cle interior, they could slip or be tossed
around and thereby strike vehicle occupants.
In addition, cup holders, open stowage
spaces and mobile phone brac kets cann ot
alw aysre stra in the objects they contain in
th eev ent of an accident.
There is a risk of injur y,particularly in the
ev ent of sudden braking or a sudden change
in direction. #
Alw aysstow objects in such a wayth at
th ey cannot be tossed about in these or
similar situations. #
Alw ays make sure that objects do not
project from stowage spaces, luggage
nets or stowage nets. #
Close the loc kable stow age spaces
before starting a journe y. #
Alw aysstow and secure objects that
are heavy, hard, poin ted, sharp-edged,
fragile or too large in the boot. Obser
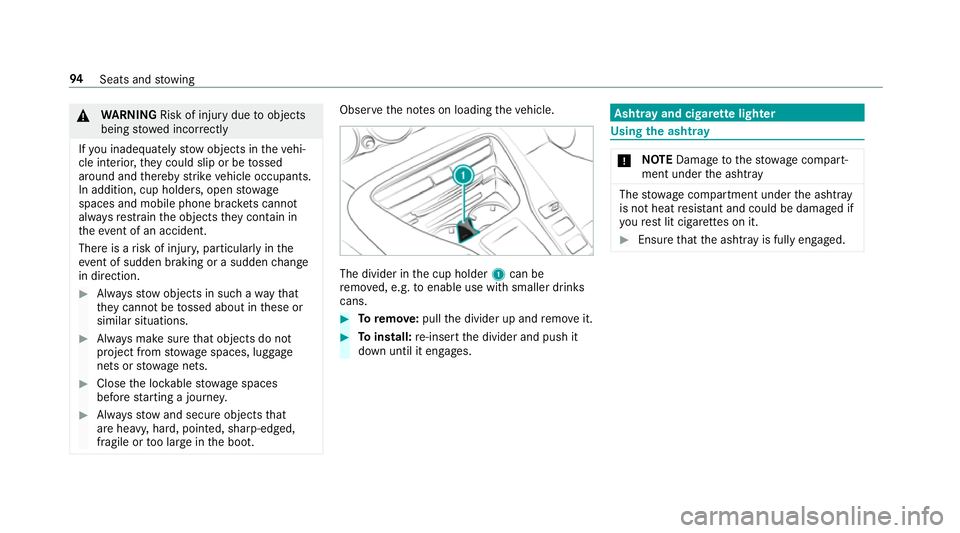
vethe no tes on loading theve hicle. The divider in
the cup holder 1can be
re mo ved, e.g. toenable use with smaller drinks
cans. #
Toremo ve:pull the divider up and remo veit. #
Toinstall: re-insert the divider and push it
down until it engages. Ashtr
ayand cigar ette lighter Using
the ashtr ay *
NO
TEDama getothestow age compart‐
ment under the ashtr ay The
stow age compartment under the ashtray
is not heat resis tant and could be dama ged if
yo ure st lit cigar ette s on it. #
Ensure that the ashtr ayis fully engaged. 94
Seats and stowing
Page 98 of 409
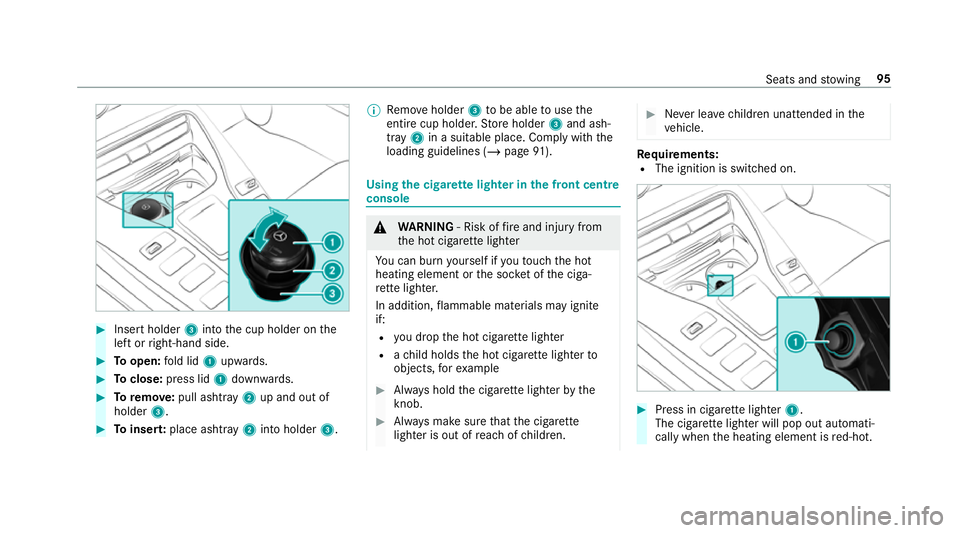
#
Insert holder 3into the cup holder on the
left or right-hand side. #
Toopen: fold lid 1upwards. #
Toclose: press lid 1down wards. #
Toremo ve: pull ashtray 2up and out of
holder 3. #
Toinser t:place ashtray 2into holder 3.%
Remo veholder 3tobe able touse the
entire cup holder. Store holder 3and ash‐
tr ay 2 in a suitable place. Comply with the
loading guidelines (/ page91). Using
the cigar ette lighter in the front centre
console &
WARNING ‑ Risk of fire and injury from
th e hot cigar ette lighter
Yo u can burn yourself if youto uch the hot
heating element or the soc ket of the ciga‐
re tte lighter.
In addition, flammable materials may ignite
if:
R you drop the hot cigar ette lighter
R ach ild holds the hot cigar ette lighter to
objects, forex ample #
Alw ays hold the cigar ette lighter bythe
knob. #
Alw ays make sure that the cigar ette
lighter is out of reach of children. #
Never lea vechildren unat tended in the
ve hicle. Re
quirements:
R The ignition is switched on. #
Press in cigar ette lighter 1.
The cigar ette lighter will pop out automati‐
cally when the heating element is red-hot. Seats and
stowing 95
Page 99 of 409
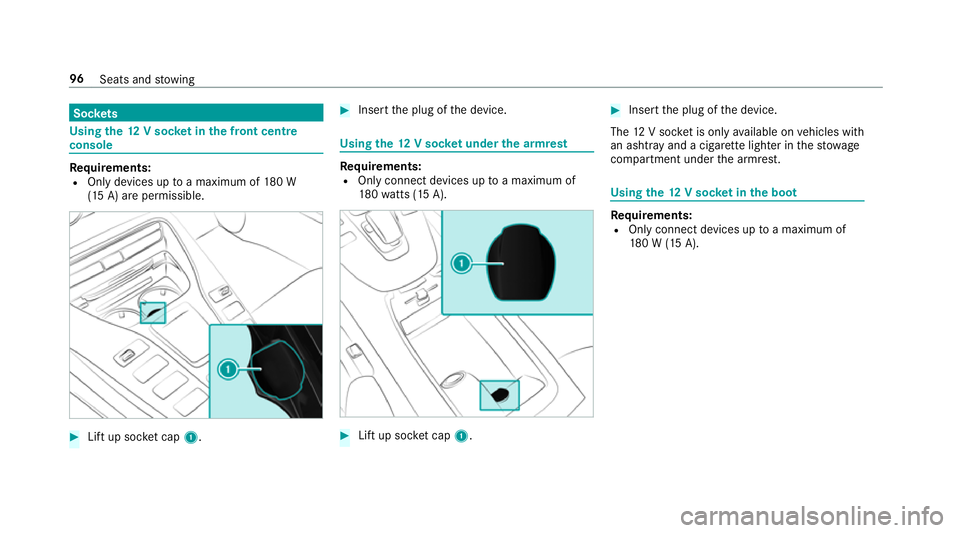
Soc
kets Using the
12V so cket inthe front centre
console Re
quirements:
R Only devices up toa maximum of 180 W
(15 A) are permissible. #
Lift up soc ket cap 1. #
Inse rtthe plug of the device. Using
the12 V so cket under the armrest Re
quirements:
R Only connect devices up toa maximum of
18 0wa tts (15 A). #
Lift up soc ket cap 1. #
Inse rtthe plug of the device.
The 12V soc ket is only available on vehicles with
an ashtr ayand a cigar ette lighter in thestow age
compartment under the armrest. Using
the12 V so cket inthe boot Re
quirements:
R Only connect devices up toa maximum of
18 0 W (15 A). 96
Seats and stowing
Page 100 of 409
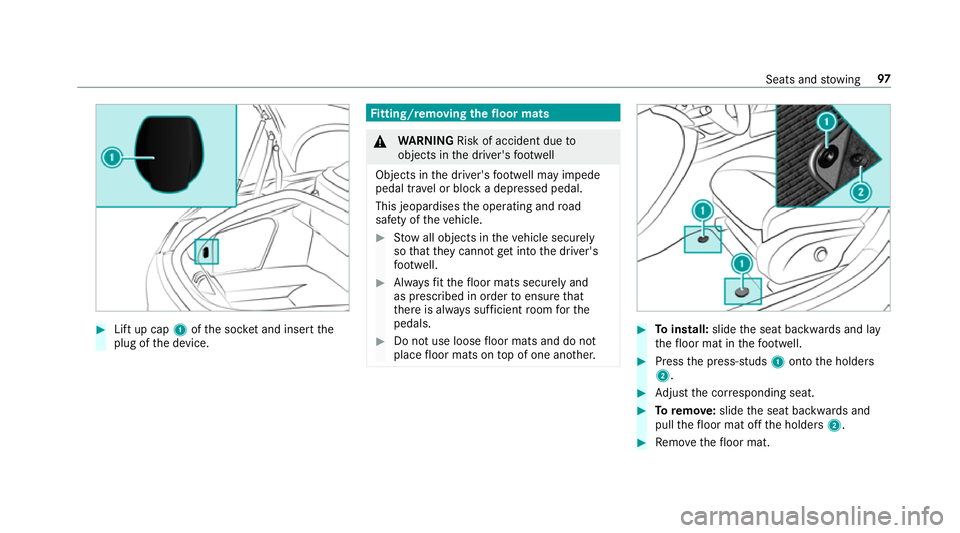
#
Lift up cap 1ofthe soc ket and insert the
plug of the device. Fi
tting/ removing the floormats &
WARNING Risk of accident due to
objects in the driver's foot we ll
Objects in the driver's foot we ll may impede
pedal tr avel or block a depressed pedal.
This jeopardises the operating and road
saf ety of theve hicle. #
Stow all objects in theve hicle securely
so that they cannot getinto the driver's
fo ot we ll. #
Alw aysfit th efloor mats securely and
as prescribed in order toensure that
th ere is alw ays suf ficient room forthe
pedals. #
Do not use loose floor mats and do not
place floor mats on top of one ano ther. #
Toinstall: slidethe seat backwards and lay
th efloor mat in thefo ot we ll. #
Press the press-studs 1onto the holders
2. #
Adjust the cor responding seat. #
Toremo ve:slide the seat backwards and
pull thefloor mat off the holders 2. #
Remo vethefloor mat. Seats and
stowing 97
Page 290 of 409
#
Ifyo u are unable torectify the damage,
conta ct aqualified specialist workshop. Information on
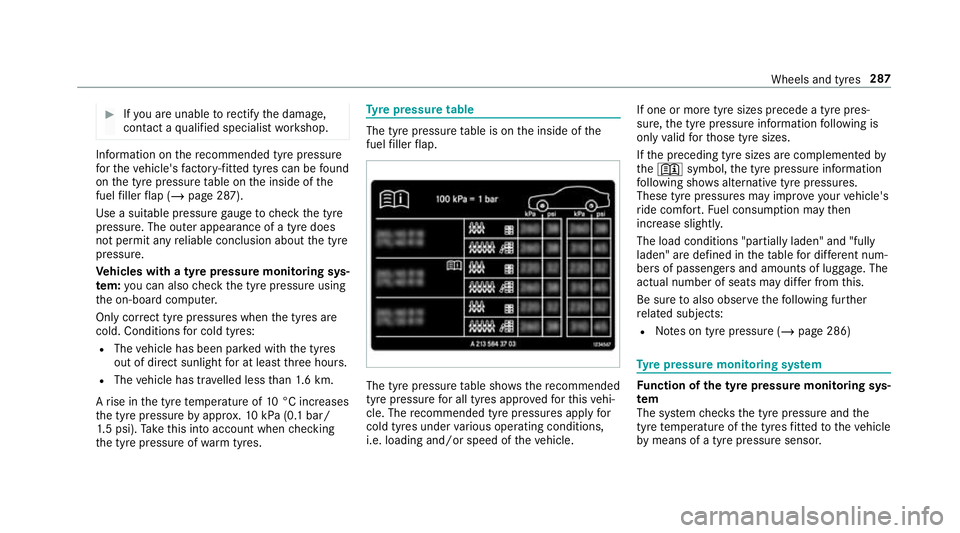
there commended tyre pressure
fo rth eve hicle's factor y-fitted tyres can be found
on the tyre pressure table on the inside of the
fuel filler flap (/ page 287).
Use a suitable pressure gauge tocheck the tyre
pressure. The outer appearance of a tyre does
not permit any reliable conclusion about the tyre
pressure.
Ve hicles with a tyre pressure monitoring sys‐
te m: you can also check the tyre pressure using
th e on-board computer.
Only cor rect tyre pressures when the tyres are
cold. Conditions for cold tyres:
R The vehicle has been par ked with the tyres
out of direct sunlight for at least thre e hours.
R The vehicle has tr avelled less than 1.6 km.
A rise in the tyre temp erature of 10°C increases
th e tyre pressure byappr ox.10 kPa (0.1 bar/
1. 5 psi). Take this into account when checking
th e tyre pressure of warm tyres. Ty
re pressure table The tyre pressure
table is on the inside of the
fuel filler flap. The tyre pressure
table sho ws there commended
tyre pressure for all tyres appro vedfo rth is vehi‐
cle. The recommended tyre pressures apply for
cold tyres under various operating conditions,
i.e. loading and/or speed of theve hicle. If one or more tyre sizes precede a tyre pres‐
sure,
the tyre pressure information following is
only valid forth ose tyre sizes.
If th e preceding tyre sizes are complemented by
th e+ symbol, the tyre pressure information
fo llowing sho wsalternative tyre pressures.
These tyre pressures may impr oveyour vehicle's
ri de comfort. Fuel consum ption may then
increase slightl y.
The load conditions "partially laden" and "fully
laden" are defined in theta ble for dif fere nt num‐
be rs of passengers and amounts of luggage. The
actual number of seats may dif fer from this.
Be sure toalso obse rveth efo llowing fur ther
re lated subjects:
R Notes on tyre pressure (/ page 286) Ty
re pressure moni toring sy stem Fu
nction of the ty repressure moni toring sys‐
tem
The sy stem checks the tyre pressure and the
tyre temp erature of the tyres fitted totheve hicle
by means of a tyre pressu resensor. Wheels and tyres
287
Page 380 of 409
Incoming call during an
existing call .... 208
Making ................................................ 207
Vi ath eove rhead control panel
(Mercedes me connect) ....................... 217
Camera see Reversing camera
Car key
see Key
Car wash
see Care
Car wash (care) ....................................... 254
Care ..........................................................2 63
Air-water duct ...................................... 254
Car wash ............................................. 254
Carpet .................................................2 63
Decorative foil .................................... .258
Displ ay................................................ 263
Exterior lighting ................................... 260
High-pressure cleaner ......................... 255
Matt finish ........................................... 257
Pa int wo rk ............................................ 257
Plastic trim .......................................... 263
Re alwo od/trim elements ...................2 63
Re ar wing (extendable) ........................ 260 Re
versing camera ................................ 260
Ro of lining ...........................................2 63
Seat belt .............................................. 263
Seat co ver ........................................... 263
Sensors ............................................... 260
Soft top ...............................................2 60
Ta ilpipes .............................................. 260
Wa shing byhand ................................. 256
Wheels/rims ....................................... 260
Wi ndo ws .............................................. 260
Wi per blades .......................................2 60
Carpet (Care) .......................................... .263
Changing gears ........................................ 124
Manually ..............................................1 24
Changing the lights
Driving abroad (symm etrical dipped
beam) .................................................... 98
Charging Battery (vehicle) ................................... 276
Child seat App rova l categories .............................. .49
At tach ing (no tes) ................................... 49
Basic instructions ..................................43
Fr ont passenger seat (no tes) ................. 53 Fr
ont passenger seat (without auto‐
matic airbag shutoff) ............................. 53
No tes on risks and dangers ...................44
Re commended child restra int sys‐
te ms ...................................................... 47
Seats suitable for belt-secu redch ild
re stra int sy stems ................................... 50
Securing on the front passenger seat ....54
Child ren
Av oiding dangers in theve hicle .............44
Basic instructions .................................. 43
Cho ck....................................................... 297
St orage location ..................................2 97
Chock see Chock
Cigar ette lighter
Fr ont centre console ............................ .95
Cleaning see Care
Climate control Activating/deactivating the A/C
function (cont rol panel) ...................... .109
Ac tivating/deactivating the A/C
function (multimedia sy stem) ............... 11 0 Index
377