KEY MERCEDES-BENZ B-CLASS HATCHBACK 2011 User Guide
[x] Cancel search | Manufacturer: MERCEDES-BENZ, Model Year: 2011, Model line: B-CLASS HATCHBACK, Model: MERCEDES-BENZ B-CLASS HATCHBACK 2011Pages: 329, PDF Size: 7.91 MB
Page 53 of 329
Proceed as follows:
R
do not use a rearward-facing child restraint
system on the front-passenger seat.
R fit a rearward-facing child restraint system
on a suitable rear seat.
or
R only use a forward-facing child restraint
system on the front-passenger seat and
move the front-passenger seat to the rear-
most position.
R have the automatic child seat recognition
checked at a qualified specialist workshop.
To ensure that the automatic child seat rec-
ognition on the front-passenger seat func-
tions/communicates correctly, never place
objects, e.g. a cushion, under the child
restraint system. The entire base of the child
restraint system must always rest on the seat
cushion. An incorrectly fitted child restraint
system cannot perform its intended protec-
tive function in the event of an accident, and
could lead to injuries. G
WARNING
Do not place electronic devices on the front-
passenger seat, e.g.:
R laptops, when switched on
R mobile phones
R cards with transponders, e.g. ski passes or
access cards
Signals from electronic equipment can cause
interference in the automatic child seat rec-
ognition sensor system. This can lead to a
system malfunction. This may cause the
4 PASSENGER AIRBAG OFF indicator
lamp to light up without there being a child
seat with transponders for automatic child
seat recognition fitted. The front-passenger
airbag will not then deploy during an accident.
It is also possible that the 6SRS warning
lamp lights up and/or the 4PASSENGER
AIRBAG OFF indicator lamp does not light up briefly when you turn the key in the ignition
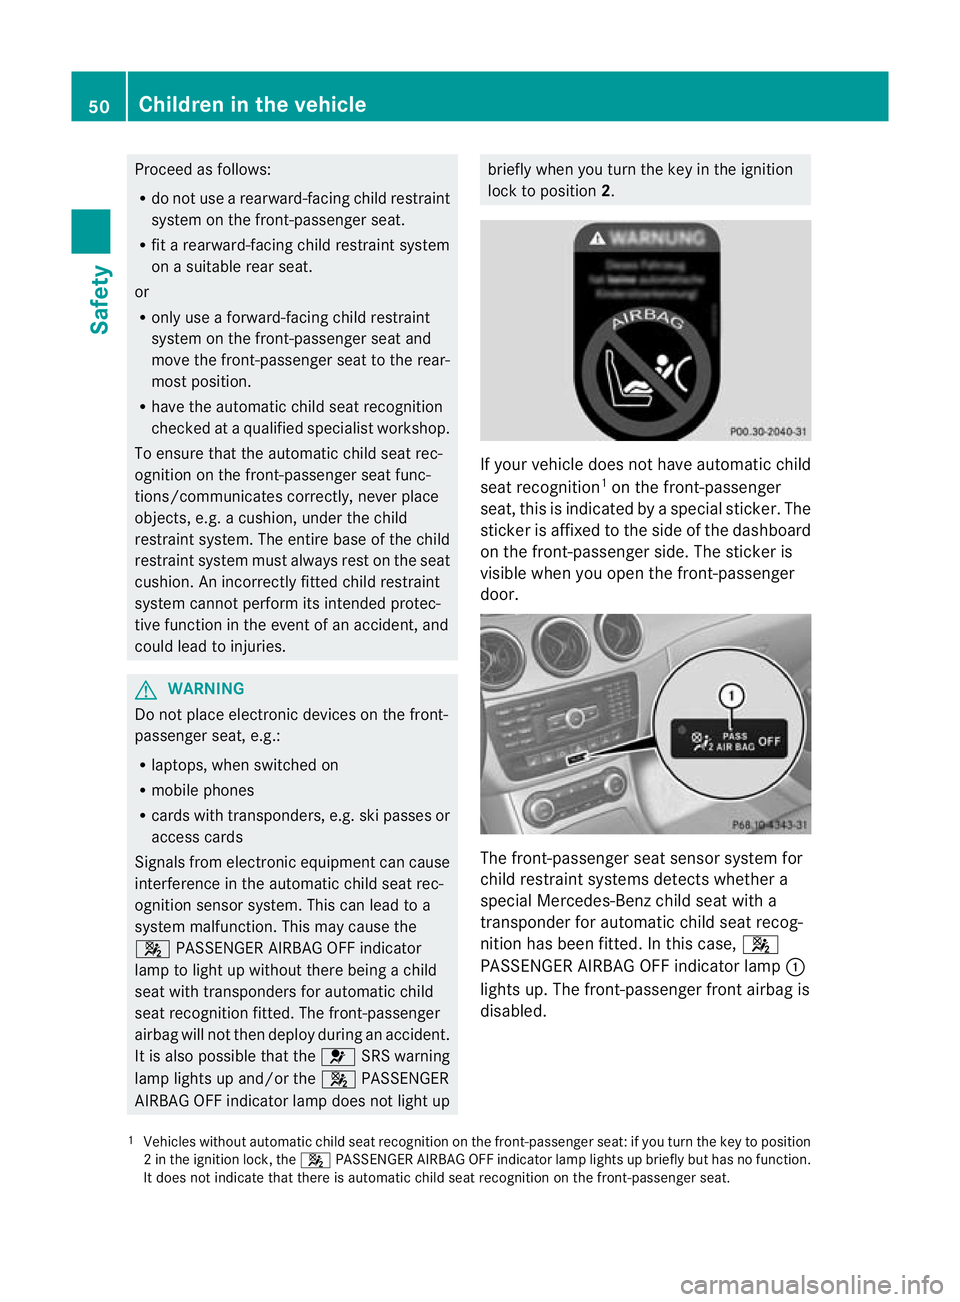
lock to position 2. If your vehicle does not have automatic child
seat recognition 1
on the front-passenger
seat, this is indicated by a special sticker. The
sticker is affixed to the side of the dashboard
on the front-passenger side. The sticker is
visible when you open the front-passenger
door. The front-passenger seat sensor system for
child restraint systems detects whether a
special Mercedes-Benz child seat with a
transponder for automatic child seat recog-
nition has been fitted. In this case,
4
PASSENGER AIRBAG OFF indicator lamp :
lights up. The front-passenger fronta irbag is
disabled.
1 Vehicles without automatic child seat recognition on the front-passenge rseat: if you turn the key to position
2int he ignition lock, the 4PASSENGER AIRBAG OFF indicator lamp lights up briefly but has no function.
It does not indicate that there is automatic child seat recognition on the front-passenger seat. 50
Children in the vehicleSafety
Page 61 of 329
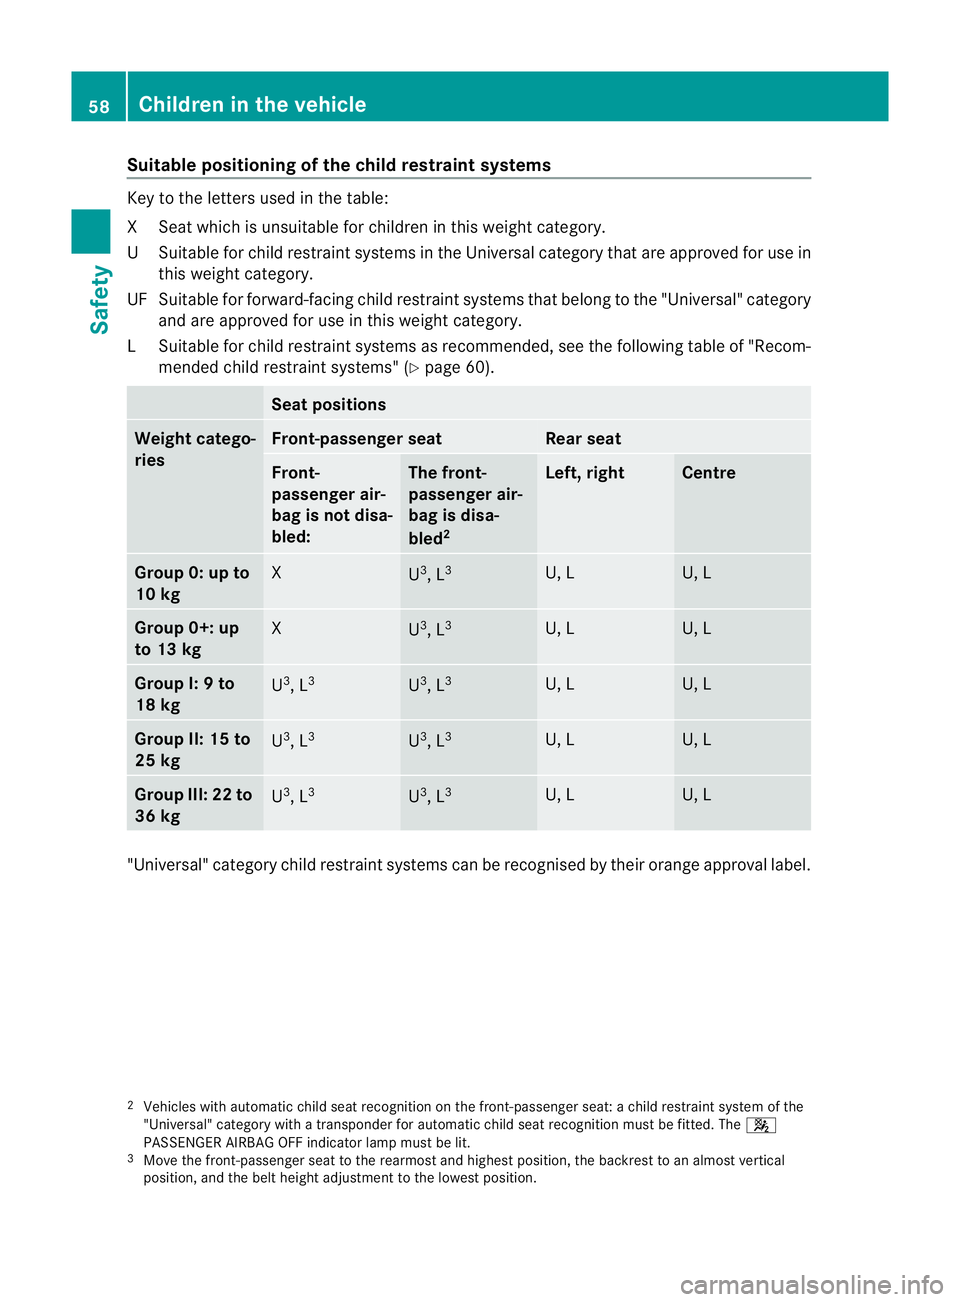
Suitable positioning of the child restraint systems
Key to the letters used in the table:
XS
eat which is unsuitable for children in this weight category.
US uitable for child restraint systems in the Universal category that are approved for use in
this weigh tcategory.
UF Suitable for forward-facing child restraint systems that belong to the "Universal" category and are approved for use in this weigh tcategory.
LS uitable for child restraint systems as recommended, see the following table of "Recom-
mended child restraint systems" (Y page 60). Sea
tpositions Weigh
tcatego-
ries Front-passenger seat Rear seat
Front-
passenge
rair-
bag is not disa-
bled: The front-
passenger air-
bag is disa-
bled
2 Left, right Centre
Group 0: up to
10 kg
X
U
3
, L 3 U, L U, L
Group 0+: up
to 13 kg
X
U
3
, L 3 U, L U, L
Group I: 9 to
18 kg
U
3
, L 3 U
3
, L 3 U, L U, L
Group II: 15 to
25 kg
U
3
, L 3 U
3
, L 3 U, L U, L
Group III: 22 to
36 kg
U
3
, L 3 U
3
, L 3 U, L U, L
"Universal" category child restraint systems can be recognised by their orange approval label.
2 Vehicles with automatic child seat recognition on the front-passenger seat: a child restraint syste mofthe
"Universal" category with a transponder for automatic child seat recognition must be fitted. The 4
PASSENGER AIRBAG OFF indicator lamp must be lit.
3 Move the front-passenger seat to the rearmost and highest position, the backrest to an almost vertical
position, and the belt height adjustment to the lowest position. 58
Children in the vehicleSafety
Page 62 of 329
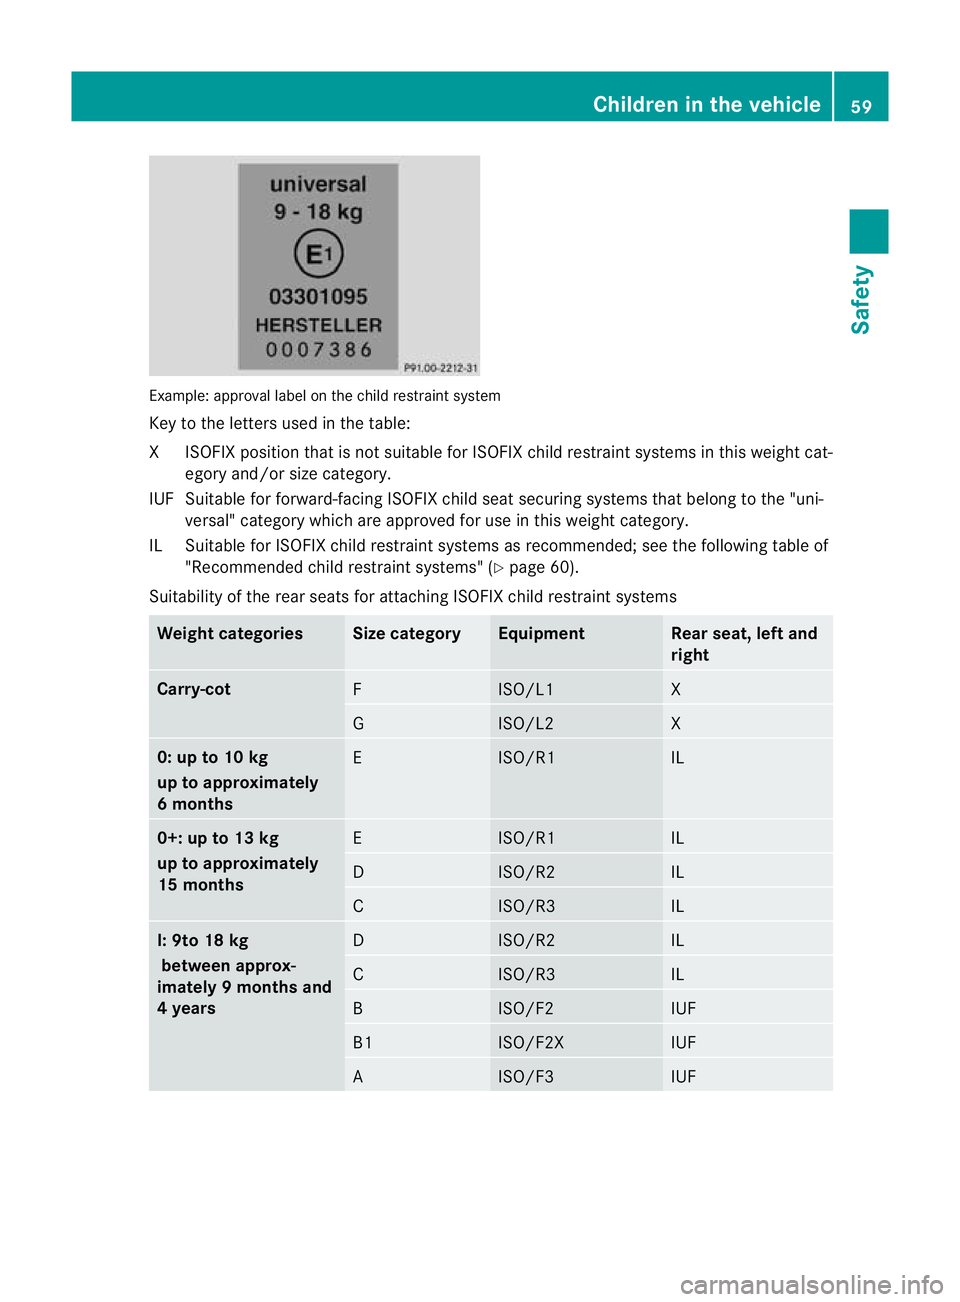
Example: approval label on the child restraint system
Key to the letters used in the table:
XI SOFIX position tha tis not suitable for ISOFIX child restraint systems in this weight cat-
egory and/or size category.
IUF Suitable for forward-facing ISOFIX child seat securing systems that belong to the "uni- versal" category which are approved for use in this weight category.
IL Suitable for ISOFIX child restraint systems as recommended; see the following table of "Recommended child restraint systems" (Y page 60).
Suitability of the rear seats for attaching ISOFIX child restraint systems Weight categories Size category Equipment Rear seat, left and
right
Carry-cot
F ISO/L1 X
G ISO/L2 X
0: up to 10 kg
up to approximately
6 months
E ISO/R1 IL
0+: up to 13 kg
up to approximately
15 months
E ISO/R1 IL
D ISO/R2 IL
C ISO/R3 IL
I: 9to 18 kg
between approx-
imately 9 months and
4 years D ISO/R2 IL
C ISO/R3 IL
B ISO/F2 IUF
B1 ISO/F2X IUF
A ISO/F3 IUFChildren in the vehicle
59Safety Z
Page 71 of 329
EBD monitors and controls the brake pres-
sure on the rea rwheels to improve driving
stability while braking.
i Observe the "Important safety notes" sec-
tion (Y page 62). ADAPTIVE BRAKE
ADAPTIVE BRAKE enhances braking safety
and offers increased braking comfort.Ina ddi-
tion to the brakin gfunction ,ADAPTIVE BRAKE
also has the HOLD functio n(Ypage 162 )and
hill start assist (Y page 129). For further
information, see Driving tips (Y page 146).STEER CONTROL
G
WARNING
If there is an ESP ®
malfunction, you will not
receive any steering assistance from the
STEER CONTROL. The steering continues to
functio nwith power assistance.
STEER CONTROL helps you by transmitting a
noticeable steering force to the steering
wheel in the direction required for vehicle
stabilisation.
This steering assistance is provided in partic-
ular if:
R both right wheels or both left wheels are on
a wet or slippery road surface when you
brake.
R the vehicle starts to skid.
You have control over the steering at all
times. Anti-theft systems
Immobiliser
X To activate: remove the key fro mthe igni-
tion lock.
X To deactivate: switch on the ignition. The immobiliser prevents your vehicle from
being started without the correct key.
i
The immobiliser is always deactivated
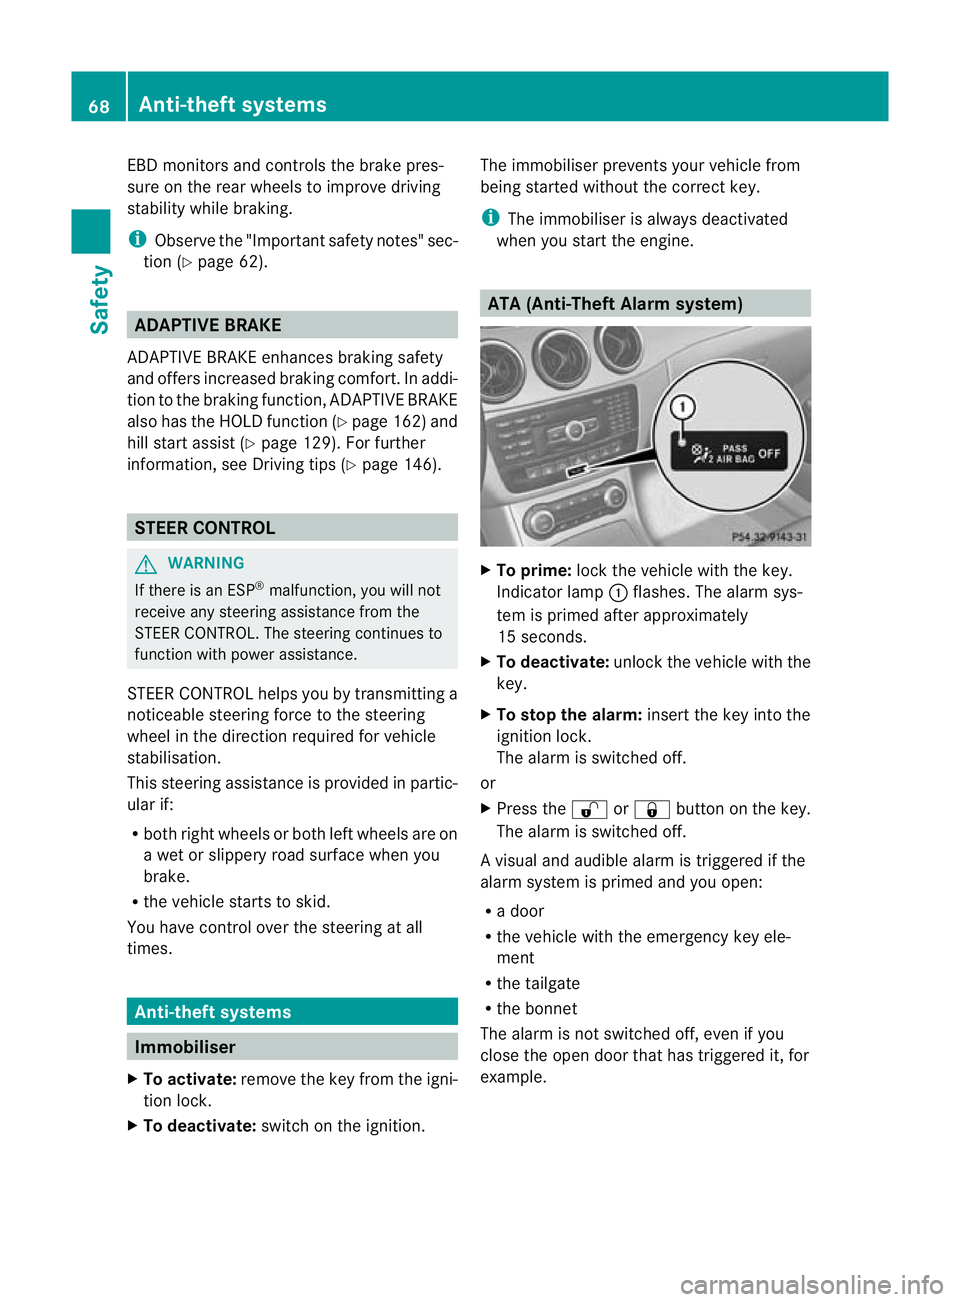
when you start the engine. ATA (Anti-Theft Alarm system)
X
To prime: lock the vehicle with the key.
Indicator lamp :flashes. The alarm sys-
tem is primed after approximately
15 seconds.
X To deactivate: unlock the vehicle with the
key.
X To stop the alarm: insert the key into the
ignition lock.
The alarm is switched off.
or
X Press the %or& button on the key.
The alarm is switched off.
Av isual and audible alarm is triggered if the
alarm system is primed and you open:
R a door
R the vehicle with the emergency key ele-
ment
R the tailgate
R the bonnet
The alarm is not switched off, even if you
close the open door that has triggered it, for
example. 68
Anti-theft systemsSafety
Page 72 of 329
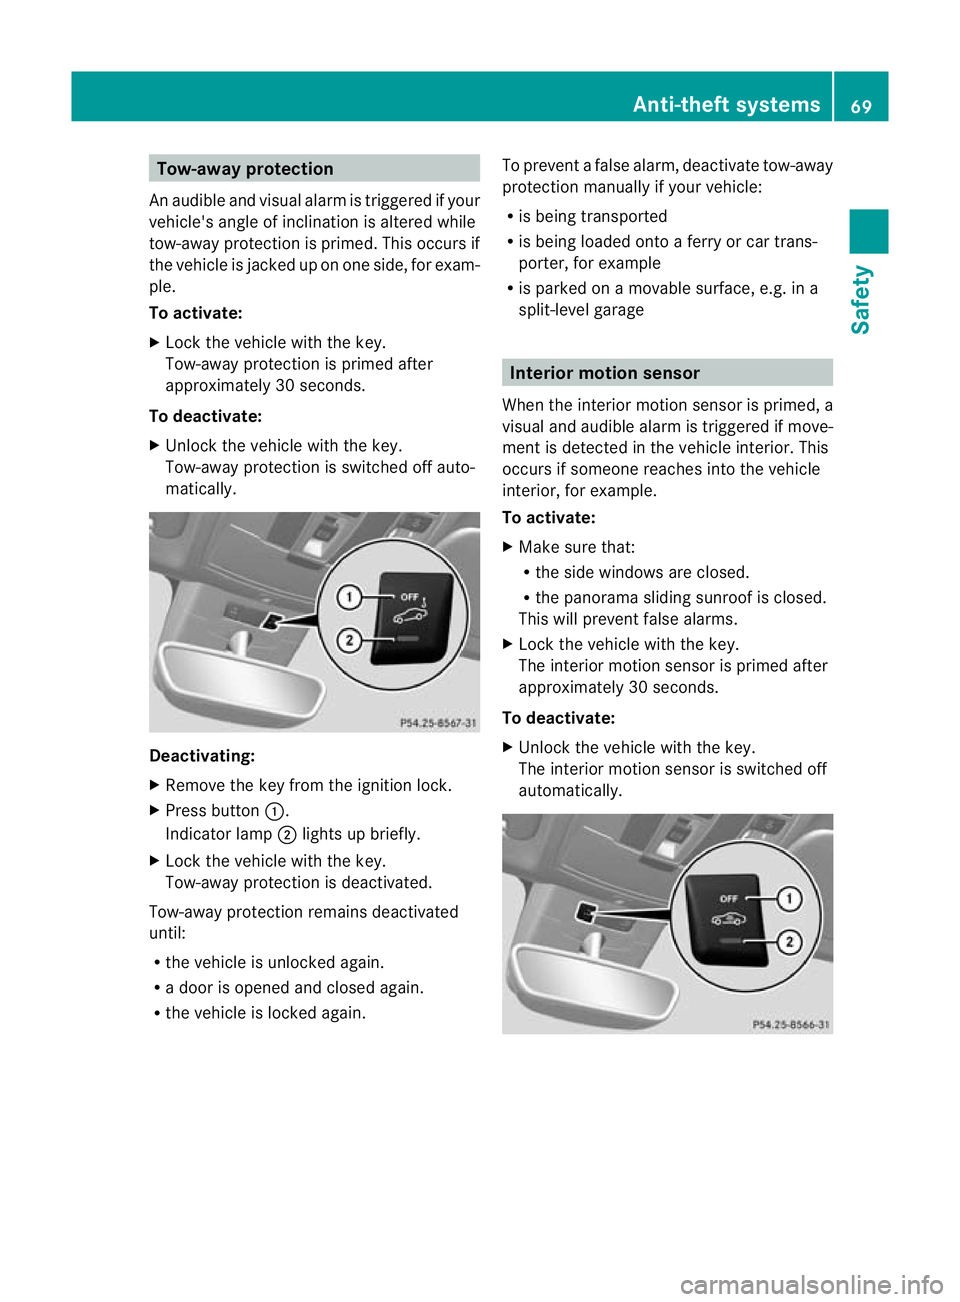
Tow-away protection
An audible and visual alar mis triggered if your
vehicle's angle of inclination is altered while
tow-away protection is primed. This occurs if
the vehicle is jacked up on one side, for exam-
ple.
To activate:
X Lock the vehicle with the key.
Tow-away protection is primed after
approximately 30 seconds.
To deactivate:
X Unlock the vehicle with the key.
Tow-away protection is switched off auto-
matically. Deactivating:
X
Remove the key from the ignition lock.
X Press button :.
Indicator lamp ;lights up briefly.
X Lock the vehicle with the key.
Tow-away protection is deactivated.
Tow-away protection remains deactivated
until:
R the vehicle is unlocked again.
R a door is opened and closed again.
R the vehicle is locked again. To prevent a false alarm, deactivate tow-away
protection manually if your vehicle:
R
is being transported
R is being loaded onto a ferry or car trans-
porter, for example
R is parked on a movable surface, e.g. in a
split-level garage Interior motion sensor
When the interior motion sensor is primed, a
visual and audible alarm is triggered if move-
ment is detected in the vehicle interior. This
occurs if someone reaches into the vehicle
interior, for example.
To activate:
X Make sure that:
R
the side windows are closed.
R the panorama sliding sunroof is closed.
This will prevent false alarms.
X Lock the vehicle with the key.
The interior motion sensor is primed after
approximately 30 seconds.
To deactivate:
X Unlock the vehicle with the key.
The interior motion sensor is switched off
automatically. Anti-theft systems
69Safety Z
Page 73 of 329
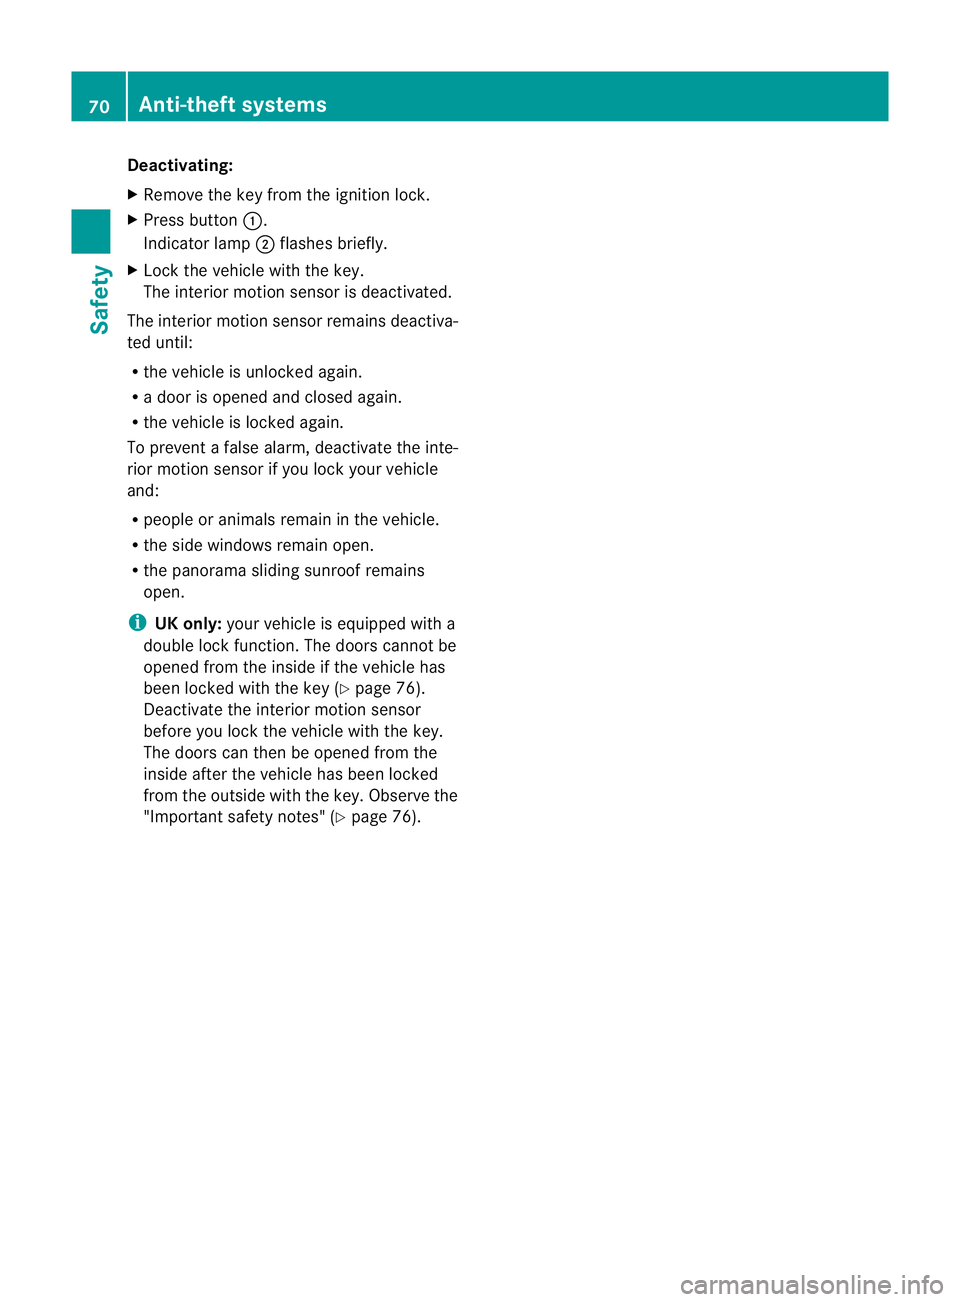
Deactivating:
X
Remove the key from the ignition lock.
X Press button :.
Indicato rlamp ;flashes briefly.
X Loc kthe vehicle with the key.
The interior motion sensor is deactivated.
The interior motion sensor remains deactiva-
ted until:
R the vehicle is unlocked again.
R a door is opened and closed again.
R the vehicle is locked again.
To prevent a false alarm, deactivate the inte-
rior motion sensor if you lock your vehicle
and:
R people or animals remain in the vehicle.
R the side windows remain open.
R the panorama sliding sunroof remains
open.
i UK only: your vehicle is equipped with a
double lock function. The doors cannot be
opened from the inside if the vehicle has
been locked with the key (Y page 76).
Deactivate the interior motion sensor
before you lock the vehicle with the key.
The doors can then be opened from the
inside after the vehicle has been locked
from the outside with the key. Observe the
"Important safety notes" (Y page 76).70
Anti-theft systemsSafety
Page 74 of 329
Useful information
..............................72
Key ....................................................... 72
Doors .................................................... 76
Luggage compartment .......................78
Side windows ...................................... 79
Sliding sunroof .................................... 82 71Opening and closing
Page 75 of 329
Useful information
i This Owner's Manual describes all models
and all standard and optional equipment
available to your vehicle at the time of pub-
lication of the Owner's Manual. Country-
specific deviations are possible. Please
note that your vehicle may not be equipped
with all features described. This also
applies to safety-relevan tsystems and
functions.
i Please read the information on qualified
specialist workshops (Y page 22).Key
Important safety notes
G
WARNING
If children are lef tunsupervised in the vehicle,
they could:
R open a door from inside the vehicle at any
time, eve nifithas been locked
R start the vehicle using akey which has been
left in the vehicle
R release the parking brake
They could thereby endanger themselves and
others. Never leave children unsupervised in
the vehicle. Always take the key with you
when leaving the vehicle, even if you are only
leaving it for a short time. G
WARNING
Do not attach any heavy or large key rings to
the key that is inserted in the ignition .Ifakey
ring is too heavy or too large, the weight acting
on the key could cause it to tur ninthe ignition
lock or catch on the steering wheel. This could
cause the engine to be switched off suddenly.
You could lose control of the vehicle and
cause an accident.
Do not use the key in the vicinity of strong
magnetic fields. Otherwise, the remote con-
trol function could be affected. Do not keep the key together with:
R
electronic devices, e.g. a mobile phone or
another key
R metallic objects, e.g. coins or metal foil Key functions
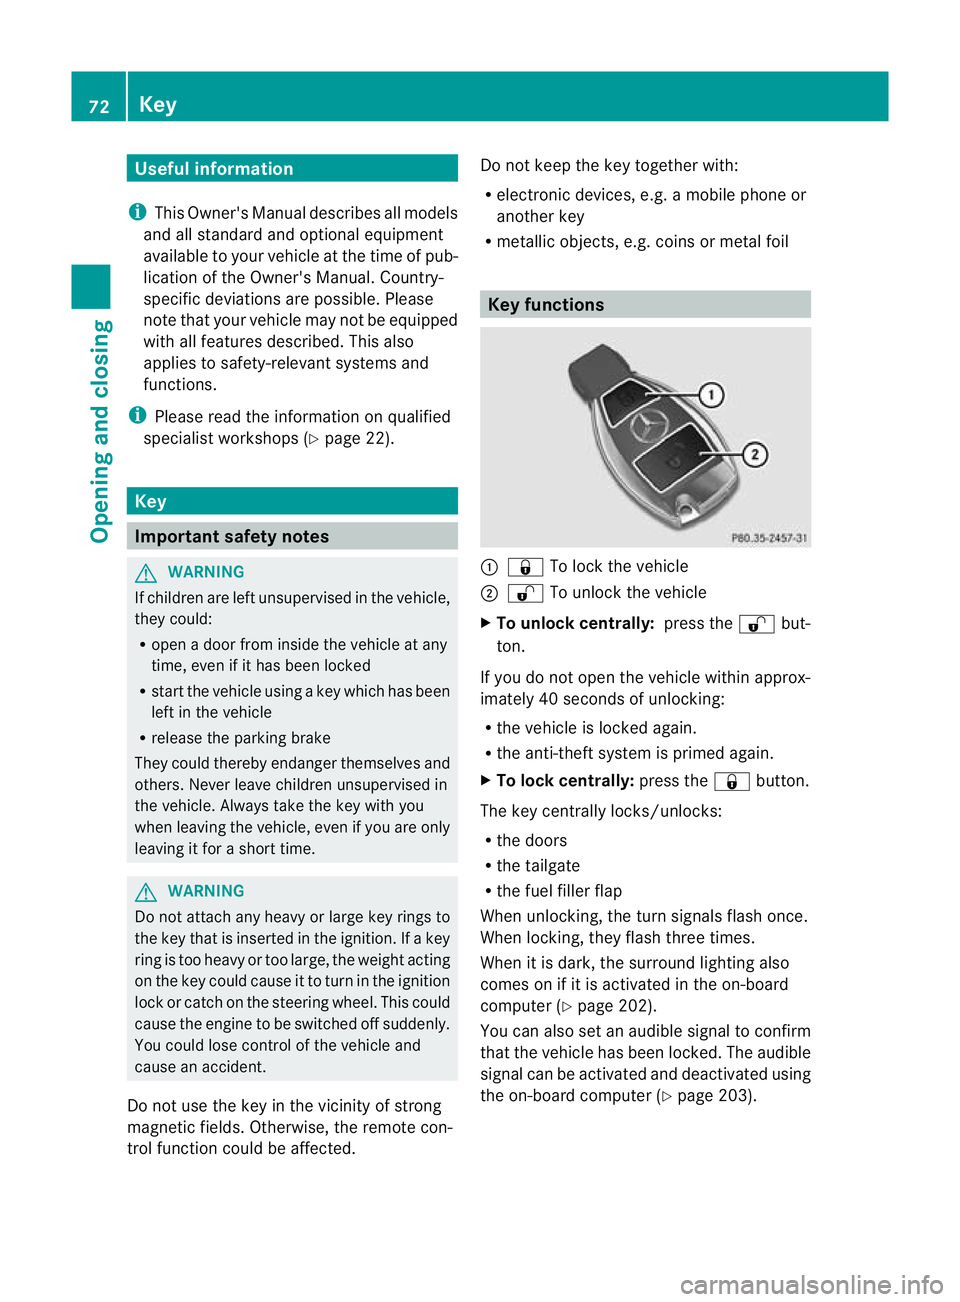
:
& To lock the vehicle
; % To unlock the vehicle
X To unlock centrally: press the%but-
ton.
If you do not open the vehicle within approx-
imately 40 seconds of unlocking:
R the vehicle is locked again.
R the anti-theft system is primed again.
X To lock centrally: press the&button.
The key centrally locks/unlocks:
R the doors
R the tailgate
R the fuel filler flap
When unlocking, the turn signals flash once.
When locking, they flash three times.
When it is dark, the surround lighting also
comes on if it is activated in the on-board
computer (Y page 202).
You can also set an audible signal to confirm
that the vehicle has been locked. The audible
signal can be activated and deactivated using
the on-board computer (Y page 203).72
KeyOpening and closing
Page 76 of 329

Changing the settings of the locking
system
X To change the setting: press and hold
down the %and& buttons simulta-
neously for approximately six seconds until
the battery check lamp flashes twice
(Y page 74).
i If the setting of the locking system is
changed within the signal range of the vehi-
cle, pressing the &or% buttonlocks
or unlocks the vehicle.
The key now functions as follows:
X To unlock the driver's door: press the
% button once.
X To unlock centrally: press the%but-
ton twice.
X To lock centrally: press the&button.
You can change the setting of the locking
system in such a way that only the driver's
door and the fuel filler flap are unlocked. This
is useful if you frequently travel on your own. Restoring factory settings
X Press the %and& buttons simulta-
neously for approximately six seconds until
the battery check lamp flashes twice. Emergency key element
General notes If the vehicle can no longer be unlocked with
the key, use the emergency key element.
If you use the emergenc ykey element to
unlock and open the driver's door, the anti-
thef talarm system will be triggered
(Y page 68).
There are several ways to tur noff the alarm:
X Press the %or& button on the key.
or
X Insert the key into the ignition lock. If you unlock the vehicle using the emergency
key element, the fuel filler flap will not be
unlocked automatically.
X
To unlock the fuel filler flap: insert the
key into the ignition lock.
Removing the emergency key element X
Push release catch :in the direction of
the arrow and at the same time, remove
emergency key element ;from the key. Battery of the key
Important safety notes G
WARNING
Batteries are toxic and contain caustic sub-
stances. For this reason, keep batteries out of
the reach of children.
If a battery has been swallowed, visi tadoctor
immediately. H
Environmental note Batteries contain pollutants.
It is illegal to dispose of them
with the household rubbish.
They must be collected sep-
arately and disposed of in an
environmentally responsible
recycling system.
Dispose of batteries in an
environmentally responsible
manner. Take discharged
batteries to a qualified spe- Key
73Opening and closing
Z
Page 77 of 329

cialist workshop or to a col-
lection point for used batter-
ies.
Have the batteries changed at a qualified spe-
cialist workshop.
Checking the battery X
Press the &or% button.
The battery is working properly if battery
check lamp :lights up briefly.
The battery is discharged if battery check
lamp :does not light up briefly.
X Change the battery (Y page 74).
i If the key battery is checked within the
signal receptio nrange of the vehicle, press-
ing the &or% button:
R locks or
R unlocks the vehicle
i You can get a battery in any qualified spe-
cialist workshop.
Replacing the battery You require a CR 2025 3 V cell battery.
X
Take the emergency key elemen tout of the
key (Y page 73). X
Press emergency key element ;into the
opening in the key in the direction of the
arrow until battery tray cover :opens.
When doing so, do no thold cover :shut.
X Remove battery tray cover :. X
Repeatedly tap the key against your palm
until battery =falls out.
X Insert the new battery with the positive ter-
minal facing upwards. Use a lint-free cloth
to do so.
X Make sure that the surface of the battery is
free from lint, grease and all other forms of
contamination.
X Insert the front tabs of battery tray
cover :and then press to close it.
X Insert the emergency key element into the
key.
X Check the function of all key buttons on the
vehicle. 74
KeyOpening and closing