KEY MERCEDES-BENZ B-CLASS HATCHBACK 2011 Service Manual
[x] Cancel search | Manufacturer: MERCEDES-BENZ, Model Year: 2011, Model line: B-CLASS HATCHBACK, Model: MERCEDES-BENZ B-CLASS HATCHBACK 2011Pages: 329, PDF Size: 7.91 MB
Page 112 of 329
windscreen wiper blades or scratch the
windscreen.
For this reason, you should always switch
off the windscreen wipers in dry weather.
Vehicles with arain sensor: in theÄor
Å position, the appropriate wiping fre-
quency is automatically set according to the
intensity of the rain. In the Åposition, the
rai ns ensor is more sensitive than in
the Ä position, causing the windscreen
wipers to wipe more frequently. Switching the rear window wiper on/
off
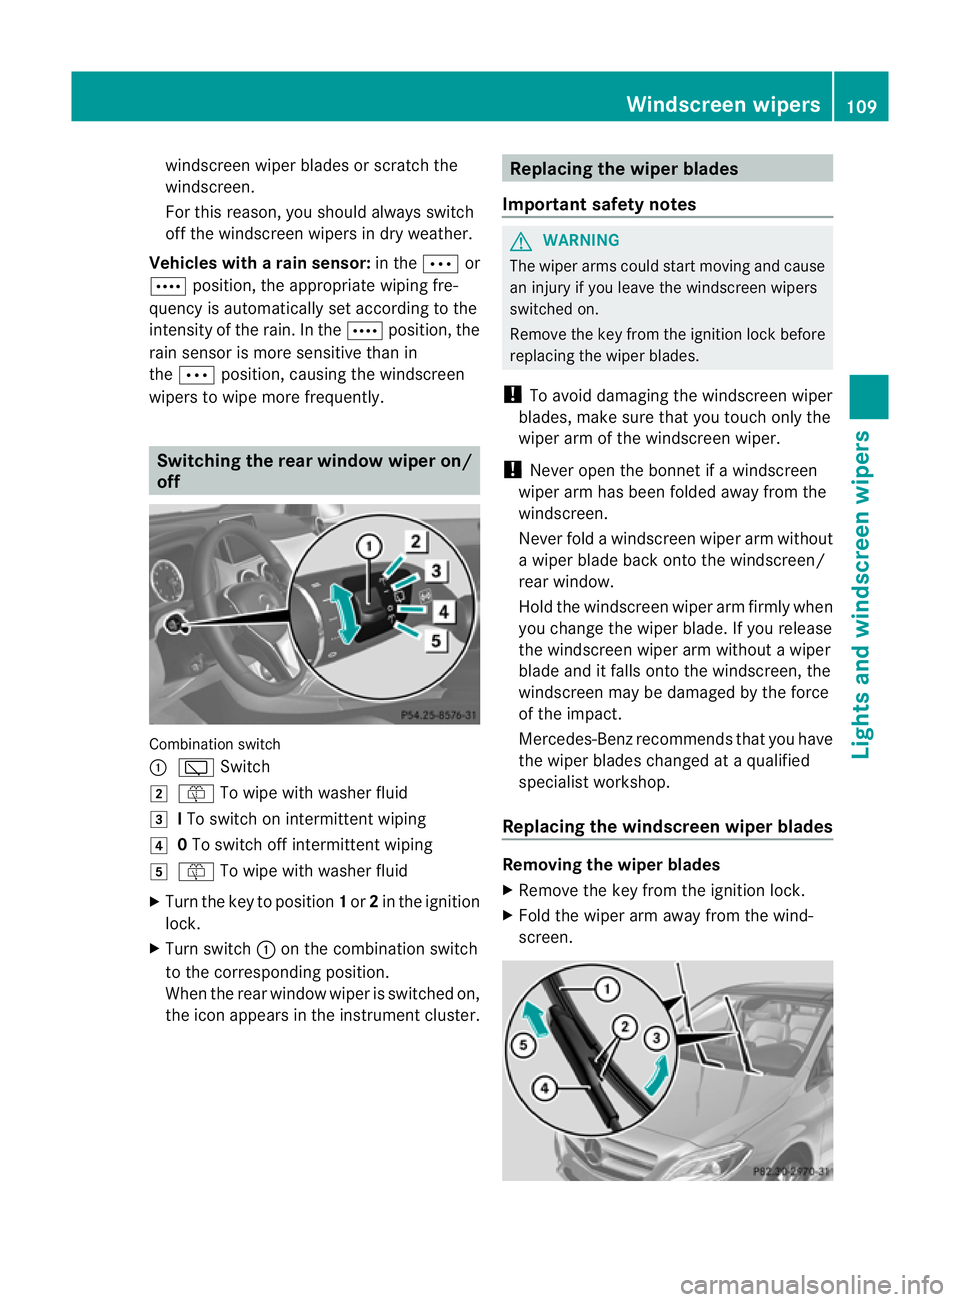
Combination switch
:
è Switch
2 ô To wipe with washer fluid
3 ITo switch on intermittent wiping
4 0To switch off intermittent wiping
5 ô To wipe with washer fluid
X Turn the key to position 1or 2in the ignition
lock.
X Turn switch :on the combination switch
to the corresponding position.
When the rear window wiper is switched on,
the icon appears in the instrument cluster. Replacing the wiper blades
Important safety notes G
WARNING
The wiper arms could start moving and cause
an injury if you leave the windscreen wipers
switched on.
Remove the key from the ignition lock before
replacing the wiper blades.
! To avoid damaging the windscreen wiper
blades, make sure that you touch only the
wiper arm of the windscreen wiper.
! Never open the bonnet if a windscreen
wiper arm has been folded away from the
windscreen.
Never fold a windscreen wiper arm without
a wiper blade back onto the windscreen/
rear window.
Hold the windscreen wiper arm firmly when
you change the wiper blade. If you release
the windscreen wiper arm without a wiper
blade and it falls onto the windscreen, the
windscreen may be damaged by the force
of the impact.
Mercedes-Benzr ecommends that you have
the wiper blades changed at aqualified
specialist workshop.
Replacing the windscreen wiper blades Removing the wiper blades
X
Remove the key from the ignition lock.
X Fold the wiper arm away from the wind-
screen. Windscreen wipers
109Lights and windscreen wipers Z
Page 113 of 329
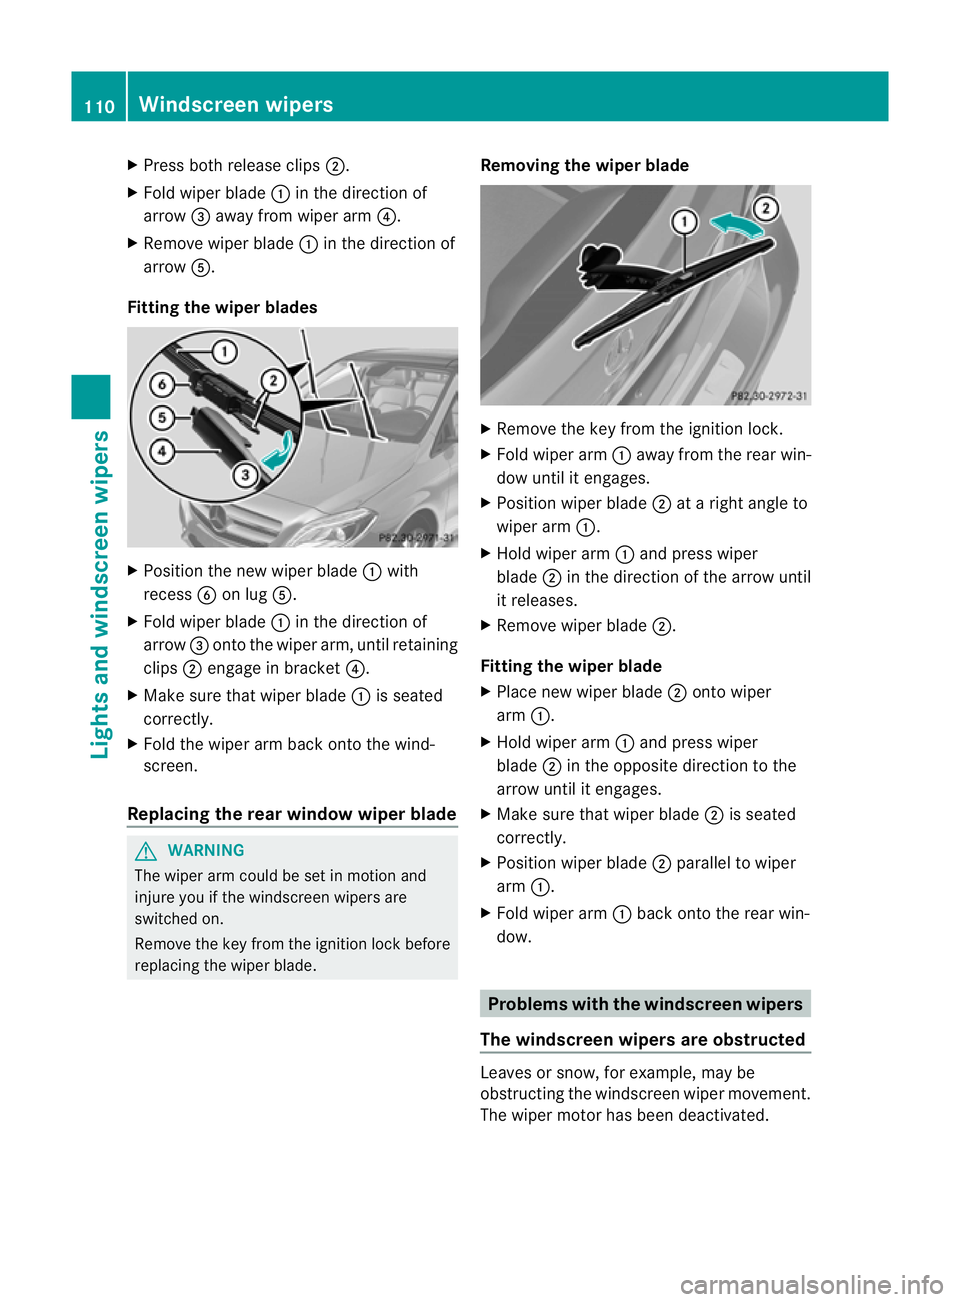
X
Press both release clips ;.
X Fold wiper blade :in the direction of
arrow =away from wiper arm ?.
X Remove wiper blade :in the direction of
arrow A.
Fitting the wiper blades X
Position the new wiper blade :with
recess Bon lug A.
X Fold wiper blade :in the direction of
arrow =onto the wiper arm, until retaining
clips ;engage in bracket ?.
X Make sure that wiper blade :is seated
correctly.
X Fold the wiper arm back onto the wind-
screen.
Replacing the rear window wiper blade G
WARNING
The wiper arm could be set in motion and
injure you if the windscreen wipers are
switched on.
Remove the key from the ignition lock before
replacing the wiper blade. Removing the wiper blade X
Remove the key from the ignition lock.
X Fold wiper arm :away from the rear win-
dow until it engages.
X Position wiper blade ;at a right angle to
wiper arm :.
X Hold wiper arm :and press wiper
blade ;in the direction of the arrow until
it releases.
X Remove wiper blade ;.
Fitting the wiper blade
X Place new wiper blade ;onto wiper
arm :.
X Hold wiper arm :and press wiper
blade ;in the opposite direction to the
arrow until it engages.
X Make sure that wiper blade ;is seated
correctly.
X Position wiper blade ;parallel to wiper
arm :.
X Fold wiper arm :back onto the rear win-
dow. Problems with the windscreen wipers
The windscreen wipers are obstructed Leaves or snow, for example, may be
obstructing the windscreen wiper movement.
The wiper motor has been deactivated.110
Windscreen wipersLights and windscreen wipers
Page 114 of 329
X
For safety reasons, yo ushould remove the
key from the ignition lock.
X Remove the cause of the obstruction.
X Switch the windscreen wipers back on.
The windscreen wipers are inoperative The windscreen wiper drive is malfunctioning.
X Select another wiper speed on the combi-
nation switch.
X Have the windscreen wipers checked at a
qualified specialist workshop.
The spray nozzles are misaligned The windscreen washer fluid from the spray
nozzles no longer hits the centre of the wind-
screen. The spray nozzles are misaligned.
X
Have the spray nozzles adjusted at a quali-
fied specialist workshop. Windscreen wipers
111Lights and windscreen wipers Z
Page 120 of 329
the front-passenge
rside as well. The indi-
cator lamp in the ábutton goes out.
R Use the residual heat function if you want
to heat or ventilate the vehicle interior
when the ignition is switched off .The resid-
ual heat function can only be activated or
deactivated with the ignition switched off. Operating the climate control system
Switching climate control on/off
Switching on/off THERMATIC automatic climate control
X Turn the key to position 2in the ignition
lock.
X To switch on: turn controlAclockwise
to the desired position (except position 0)
(Y page 115).
X To switch off: turn controlAanti-clock-
wise to position 0(Y page 115).
THERMOTRONIC automatic climate con-
trol
X Turn the key to position 2in the ignition
lock.
X To activate: press theÃbutton.
The indicator lamp in the Ãbutton lights
up. Airflow and air distribution are set to
automatic mode.
or
X Press the ^button.
The indicator lamp in the ^button goes
out. The previously selected settings come
into effect again.
X To switch off: press the^button.
The indicator lamp in the ^button lights
up.
i If climate control is switched off, the air
supply and air circulation are also switched
off. Only use this setting for a brief period.
The windows could otherwise mist up. i
THERMOTRONIC automatic climate con-
trol: switch on climate control primarily
using the Ãbutton. Activating/deactivating the cooling
with air dehumidification function
Important information G
WARNING
If the "cooling with air dehumidification" func-
tion is deactivated, the air inside the vehicle
will not be cooled (during warm weather) or
dehumidified. The windows could mist up
more quickly. This may prevent you from
observing the traffic conditions, thereby caus-
ing an accident.
The cooling with air dehumidification function
is only available when the engine is running.
The air inside the vehicle is cooled and dehu-
midified according to the temperature selec-
ted.
Condensation may drip from the underside of
the vehicle when cooling mode is active. This
is normal and not a sign that there is a mal-
function.
i The refrigerant that is used by the cooling
with air dehumidification does not contain
chlorofluorocarbons, and therefore does
not damage the ozone layer. You can obtain
more detailed information on refrigerants
from any qualified specialist workshop.
Switching on/off X
To activate: press the¿button.
The indicator lamp in the ¿button lights
up.
X To switch off: press the¿button.
The indicator lamp in the ¿button goes
out. The cooling with air dehumidification
function has a delayed switch-off feature. Operating the climate control system
117Climate control Z
Page 121 of 329
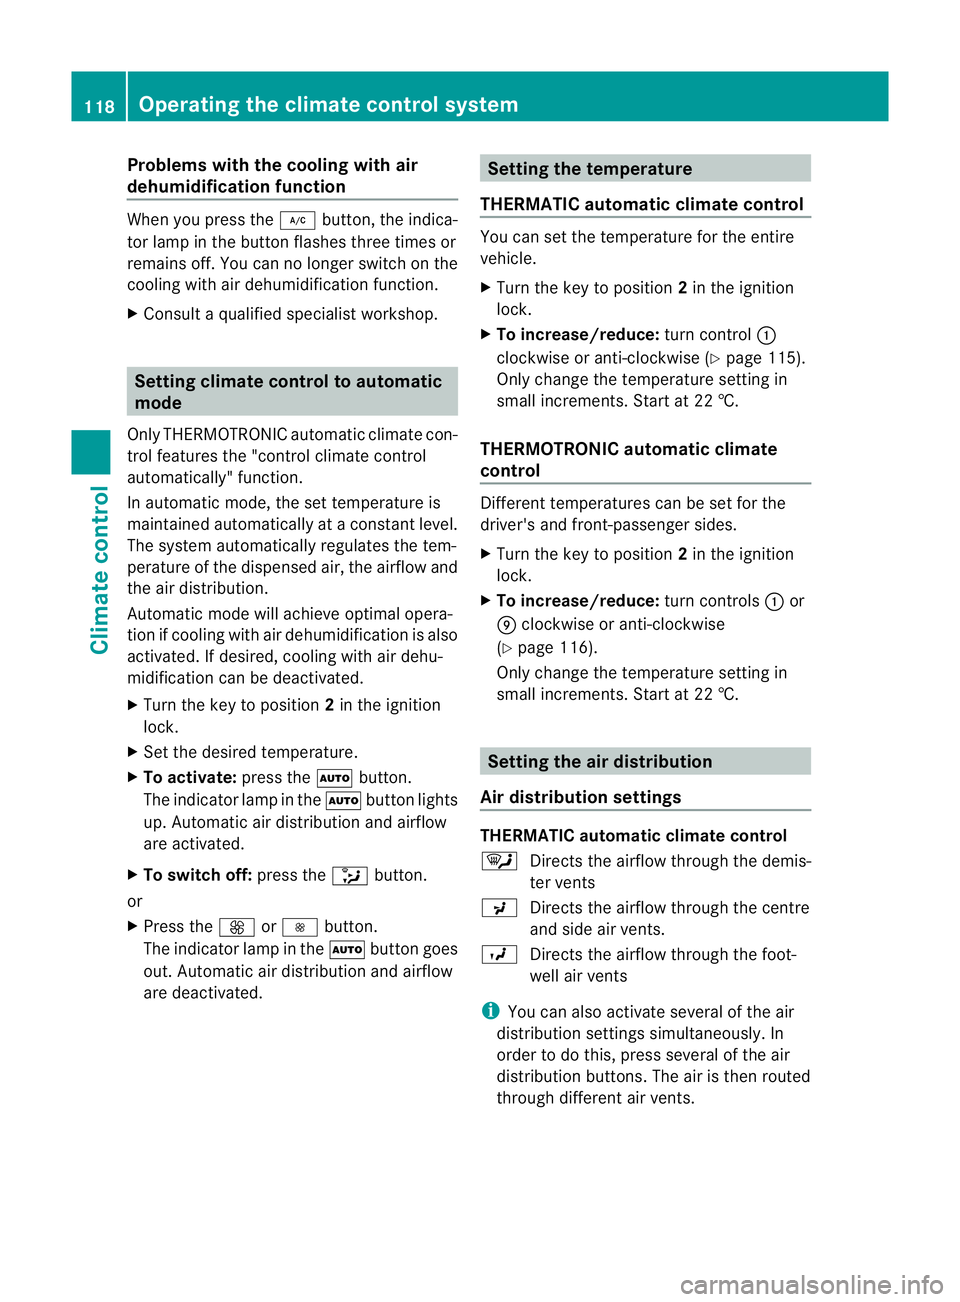
Problems with the cooling with air
dehumidification function
When you press the
¿button, the indica-
tor lamp in the button flashes three times or
remains off. You can no longer switch on the
cooling with air dehumidification function.
X Consult a qualified specialist workshop. Setting climate control to automatic
mode
Only THERMOTRONIC automatic climate con-
trol features the "control climate control
automatically" function.
In automatic mode, the set temperature is
maintained automatically at a constant level.
The system automatically regulates the tem-
perature of the dispensed air, the airflow and
the air distribution.
Automatic mode will achieve optimal opera-
tion if cooling with air dehumidification is also
activated. If desired, cooling with air dehu-
midification can be deactivated.
X Turn the key to position 2in the ignition
lock.
X Set the desired temperature.
X To activate: press theÃbutton.
The indicator lamp in the Ãbutton lights
up. Automatic air distribution and airflow
are activated.
X To switch off: press the_button.
or
X Press the KorI button.
The indicator lamp in the Ãbutton goes
out. Automatic air distribution and airflow
are deactivated. Setting the temperature
THERMATIC automatic climate control You can set the temperature for the entire
vehicle.
X
Turn the key to position 2in the ignition
lock.
X To increase/reduce: turn control:
clockwise or anti-clockwise (Y page 115).
Only change the temperature setting in
small increments. Start at 22 †.
THERMOTRONIC automatic climate
control Different temperatures can be set for the
driver's and front-passenger sides.
X Turn the key to position 2in the ignition
lock.
X To increase/reduce: turn controls:or
E clockwise or anti-clockwise
(Y page 116).
Only change the temperature setting in
small increments. Start at 22 †. Setting the air distribution
Air distribution settings THERMATIC automatic climate control
¯
Directs the airflow through the demis-
ter vents
P Directs the airflow through the centre
and side air vents.
O Directs the airflow through the foot-
well air vents
i You can also activate several of the air
distribution settings simultaneously .In
order to do this, press several of the air
distribution buttons. The air is then routed
through different air vents. 118
Operating the climate control systemClimate control
Page 122 of 329
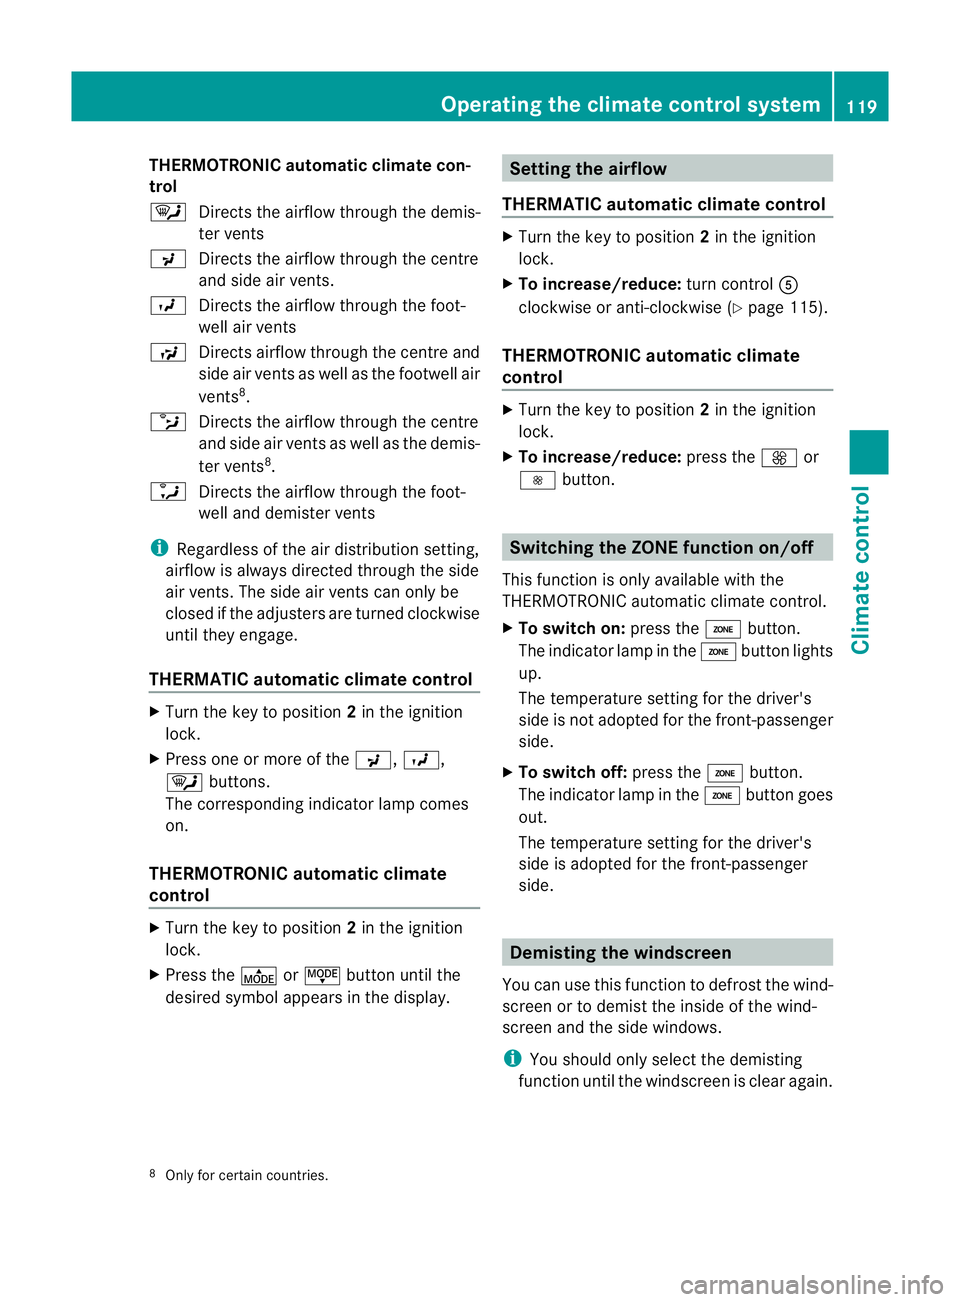
THERMOTRONIC automatic climate con-
trol
¯
Directs the airflow throug hthe demis-
ter vents
P Directs the airflow through the centre
and side air vents.
O Directs the airflow through the foot-
well air vents
S Directs airflow through the centre and
side air vents as well as the footwell air
vents8
.
b Directs the airflow through the centre
and side air vents as well as the demis-
ter vents 8
.
a Directs the airflow through the foot-
well and demister vents
i Regardless of the air distribution setting,
airflow is always directed through the side
air vents. The side air vents can only be
closed if the adjusters are turned clockwise
until they engage.
THERMATIC automatic climate control X
Turn the key to position 2in the ignition
lock.
X Press one or more of the P,O,
¯ buttons.
The corresponding indicator lamp comes
on.
THERMOTRONIC automatic climate
control X
Turn the key to position 2in the ignition
lock.
X Press the ÉorË button until the
desired symbol appears in the display. Setting the airflow
THERMATIC automatic climate control X
Turn the key to position 2in the ignition
lock.
X To increase/reduce: turn controlA
clockwise or anti-clockwise (Y page 115).
THERMOTRONIC automatic climate
control X
Turn the key to position 2in the ignition
lock.
X To increase/reduce: press theKor
I button. Switching the ZONE function on/off
This function is only available with the
THERMOTRONIC automatic climate control.
X To switch on: press theábutton.
The indicator lamp in the ábutton lights
up.
The temperature setting for the driver's
side is not adopted for the front-passenger
side.
X To switch off: press theábutton.
The indicator lamp in the ábutton goes
out.
The temperature setting for the driver's
side is adopted for the front-passenger
side. Demisting the windscreen
You can use this function to defrost the wind-
screen or to demist the inside of the wind-
screen and the side windows.
i You should only select the demisting
function until the windscreen is clear again.
8 Only for certain countries. Operating the climate control system
119Climate control Z
Page 123 of 329
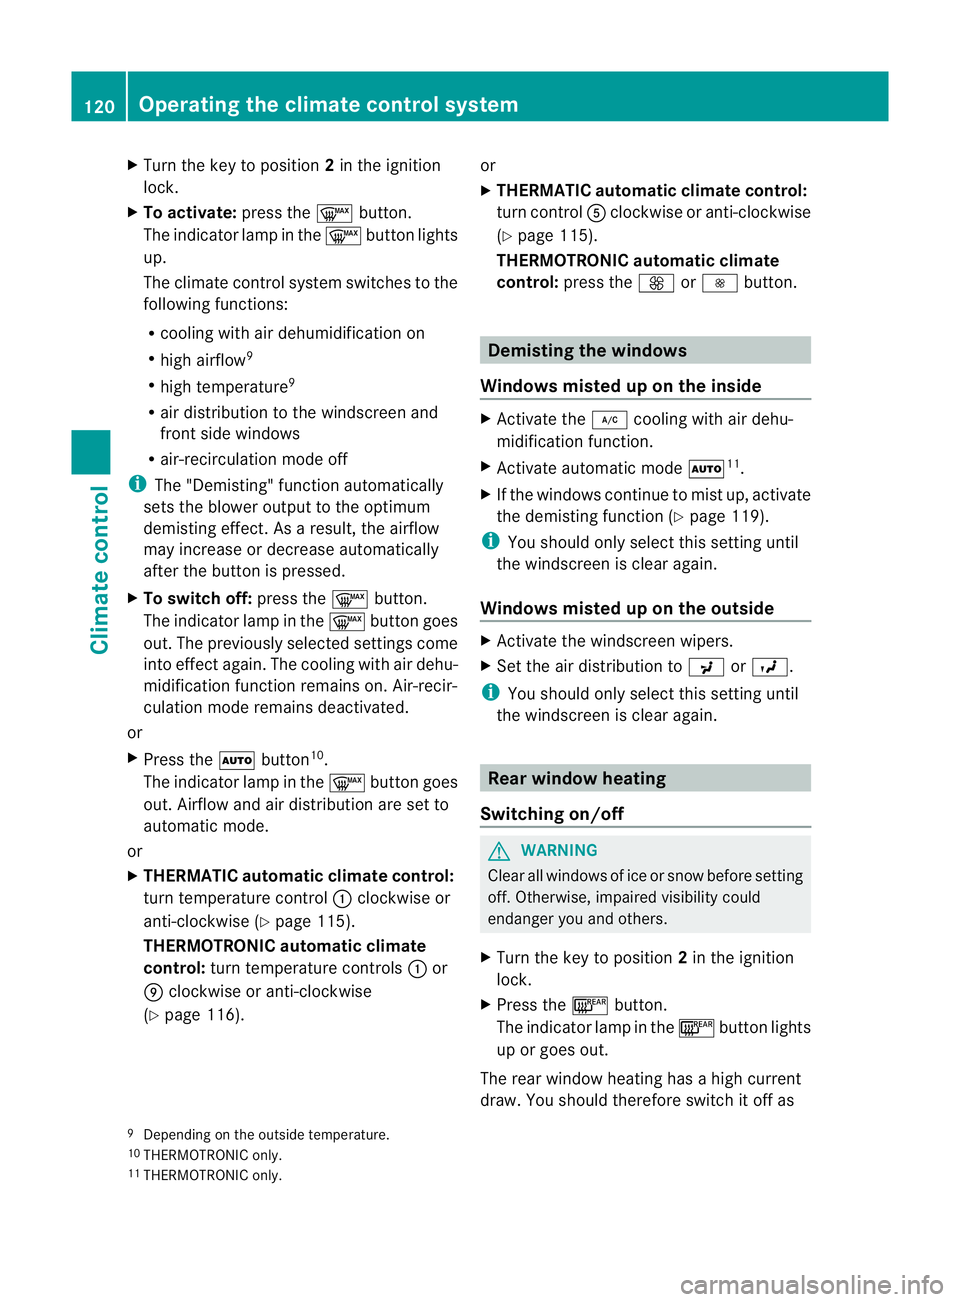
X
Turn the key to position 2in the ignition
lock.
X To activate: press the¬button.
The indicator lamp in the ¬button lights
up.
The climate control system switches to the
following functions:
R cooling with air dehumidification on
R high airflow 9
R high temperature 9
R air distribution to the windscreen and
fronts ide windows
R air-recirculation mode off
i The "Demisting" function automatically
sets the blower output to the optimum
demisting effect .As a result, the airflow
may increase or decrease automatically
after the button is pressed.
X To switch off: press the¬button.
The indicator lamp in the ¬button goes
out. The previously selected settings come
into effect again. The cooling with air dehu-
midification function remains on. Air-recir-
culation mode remains deactivated.
or
X Press the Ãbutton 10
.
The indicator lamp in the ¬button goes
out. Airflow and air distribution are set to
automatic mode.
or
X THERMATIC automatic climate control:
turn temperature control :clockwise or
anti-clockwise (Y page 115).
THERMOTRONIC automatic climate
control: turn temperature controls :or
E clockwise or anti-clockwise
(Y page 116). or
X
THERMATIC automatic climate control:
turn control Aclockwise or anti-clockwise
(Y page 115).
THERMOTRONIC automatic climate
control: press the KorI button. Demisting the windows
Windows misted up on the inside X
Activate the ¿cooling with air dehu-
midification function.
X Activate automatic mode Ã11
.
X If the windows continue to mist up, activate
the demisting function (Y page 119).
i You should only select this setting until
the windscreen is clear again.
Windows misted up on the outside X
Activate the windscreen wipers.
X Set the air distribution to PorO.
i You should only select this setting until
the windscreen is clear again. Rear window heating
Switching on/off G
WARNING
Cleara ll windows of ice or snow before setting
off .O therwise, impaired visibility could
endanger you and others.
X Turn the key to position 2in the ignition
lock.
X Press the ¤button.
The indicator lamp in the ¤button lights
up or goes out.
The rea rwindow heating has ahigh current
draw. You should therefore switch it off as
9 Depending on the outside temperature.
10 THERMOTRONIC only.
11 THERMOTRONIC only. 120
Operating the climate control systemClimate control
Page 124 of 329
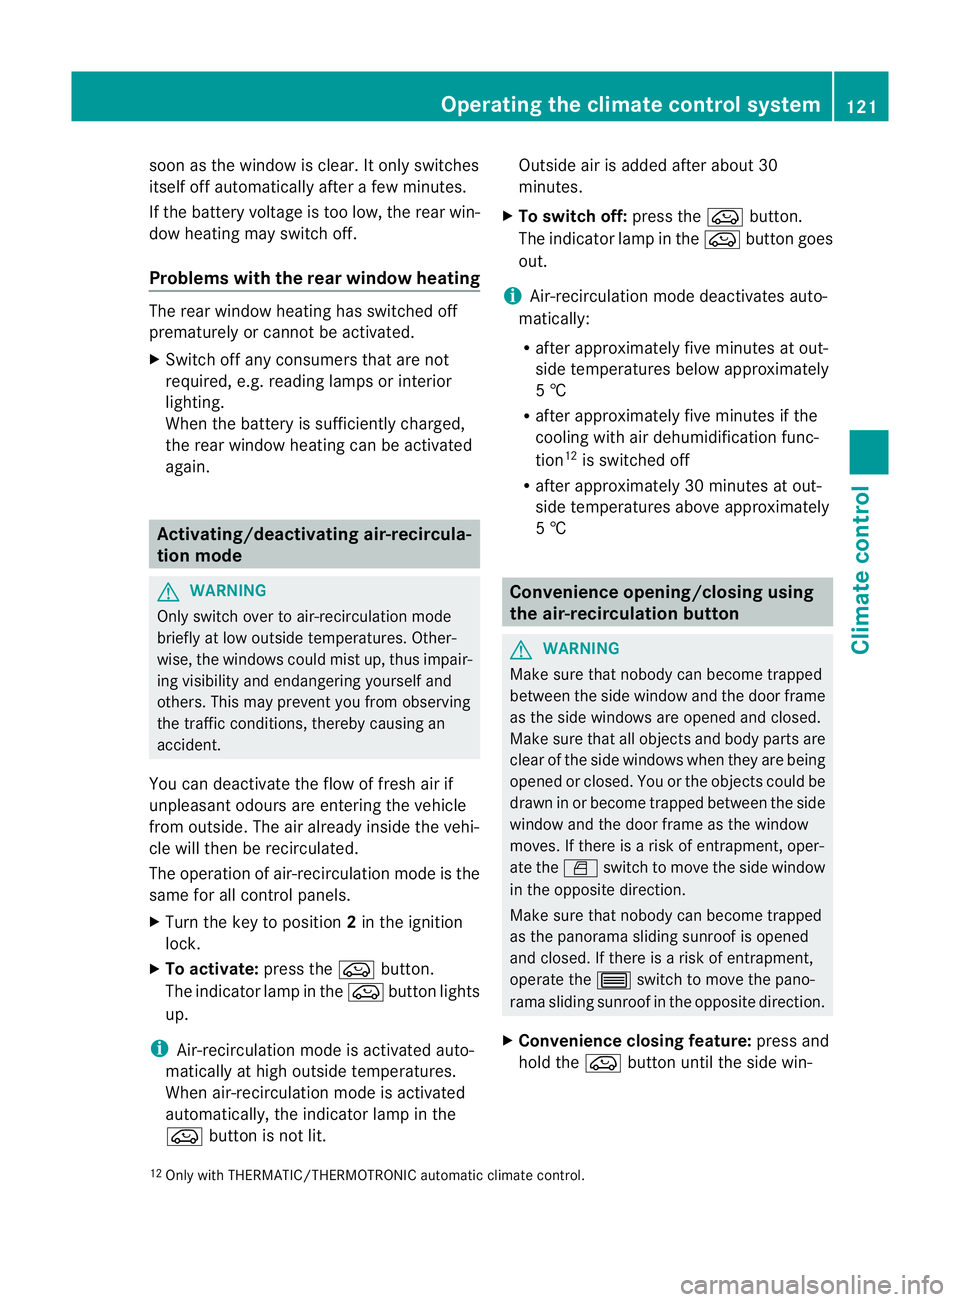
soon as the window is clear. It only switches
itself off automatically after a few minutes.
If the battery voltage is too low, the rear win-
dow heating may switch off.
Problems with the rear window heating The rear window heating has switched off
prematurely or cannot be activated.
X Switch off any consumers that are not
required, e.g. reading lamps or interior
lighting.
When the battery is sufficiently charged,
the rear window heating can be activated
again. Activating/deactivating air-recircula-
tion mode
G
WARNING
Only switch over to air-recirculation mode
briefly at low outside temperatures. Other-
wise, the windows could mist up, thus impair-
ing visibility and endangering yourselfa nd
others. This may prevent you from observing
the traffic conditions, thereby causing an
accident.
You can deactivate the flo woffresh air if
unpleasant odours are entering the vehicle
from outside. The air already inside the vehi-
cle will then be recirculated.
The operation of air-recirculation mode is the
same for all control panels.
X Turn the key to position 2in the ignition
lock.
X To activate: press theebutton.
The indicator lamp in the ebutton lights
up.
i Air-recirculation mode is activated auto-
matically at high outside temperatures.
When air-recirculation mode is activated
automatically, the indicator lamp in the
e button is not lit. Outside air is added after about 30
minutes.
X To switch off: press theebutton.
The indicator lamp in the ebutton goes
out.
i Air-recirculation mode deactivates auto-
matically:
R after approximately five minutes at out-
side temperatures below approximately
5 †
R after approximately five minutes if the
cooling with air dehumidificatio nfunc-
tion 12
is switched off
R after approximately 30 minutes at out-
side temperatures above approximately
5 † Convenience opening/closing using
the air-recirculation button
G
WARNING
Make sure that nobody can become trapped
between the side window and the door frame
as the side windows are opened and closed.
Make sure that all object sand body parts are
clear of the side windows when they are being
opened or closed .You or the objects could be
drawn in or become trapped between the side
window and the door frame as the window
moves. If there is arisk of entrapment, oper-
ate the Wswitch to move the side window
in the opposite direction.
Make sure that nobody can become trapped
as the panorama sliding sunroof is opened
and closed. If there is a risk of entrapment,
operate the 3switch to move the pano-
rama sliding sunroof in the opposite direction.
X Convenience closing feature: press and
hold the ebutton until the side win-
12 Only with THERMATIC/THERMOTRONIC automatic climate control. Operating the climate control system
121Climate control Z
Page 125 of 329
dows and the panorama sliding sunroof are
closed.
The indicator lamp in the
ebutton lights
up. Air-recirculation mode is activated.
X Convenience opening feature: press and
hold the ebutton until the side win-
dows and the panorama sliding sunroof
have opened. The side windows and the
panorama sliding sunroof move back to
their original position.
The indicator lamp in the ebutton goes
out. Air-recirculation mode is deactivated.
i If you open the side windows or the pan-
orama sliding sunroof manually after clos-
ing with the convenience closing feature,
they will remain in this position when
opened using the convenience opening fea-
ture. Activating/deactivating the residual
heat function
The residual heat function is only available
with THERMOTRONIC automatic climate con-
trol.
It is possible to make use of the residual heat
of the engine to continue heating the station-
ary vehicle for up to 30 minutes after the
engine has been switched off. The heating
time depends on the temperature that has
been set.
i The blower will run at a low speed regard-
less of the airflow setting.
i If you activate the residual heat function
at high temperatures, only the ventilation
will be activated. The blower runs at
medium speed.
i It is possible that the residual heat func-
tion may be activated automatically an hour
after the key has been removed. The vehi-
cle is then ventilated for 30 minutes to dry
the air-conditioning system. X
Turn the key to position 0in the ignition
lock or remove it.
X To activate: press theÌbutton.
The indicator lamp in the Ìbutton lights
up.
X To switch off: press theÌbutton.
The indicator lamp in the Ìbutton goes
out.
i Residual heat is deactivated automati-
cally:
R after about 30 minutes
R when the ignition is switched on
R if the battery voltage drops
R if the coolant temperature is too low Adjusting the air vents
Important safety notes
G
WARNING
Very hot or very cold air can flow from the air
vents. This could cause burns or frostbite to
bare skin in the immediate vicinity of the
vents. Keep bare skin away from these air
outlets. If necessary, direct the airflow away
to a different area of the vehicle interior.
In order to ensure the direct flow of fresh air
through the air vents into the vehicle interior,
please observe the following notes:
R keep the air inlet between the windscreen
and the bonnet free of blockages, such as
ice, snow or leaves.
R never cover the vents or ventilation grilles
in the vehicle interior.
i You can move the adjuster sfor the air
vents vertically or horizontally, to set the
direction of the airflow.
i Optimal climate control function is ach-
ieved by opening the air vents fully and set-
ting the adjusters to the middle position. 122
Adjusting the air ventsClimate control
Page 130 of 329
roads. Otherwise, you could damage the
drive train. Keyp
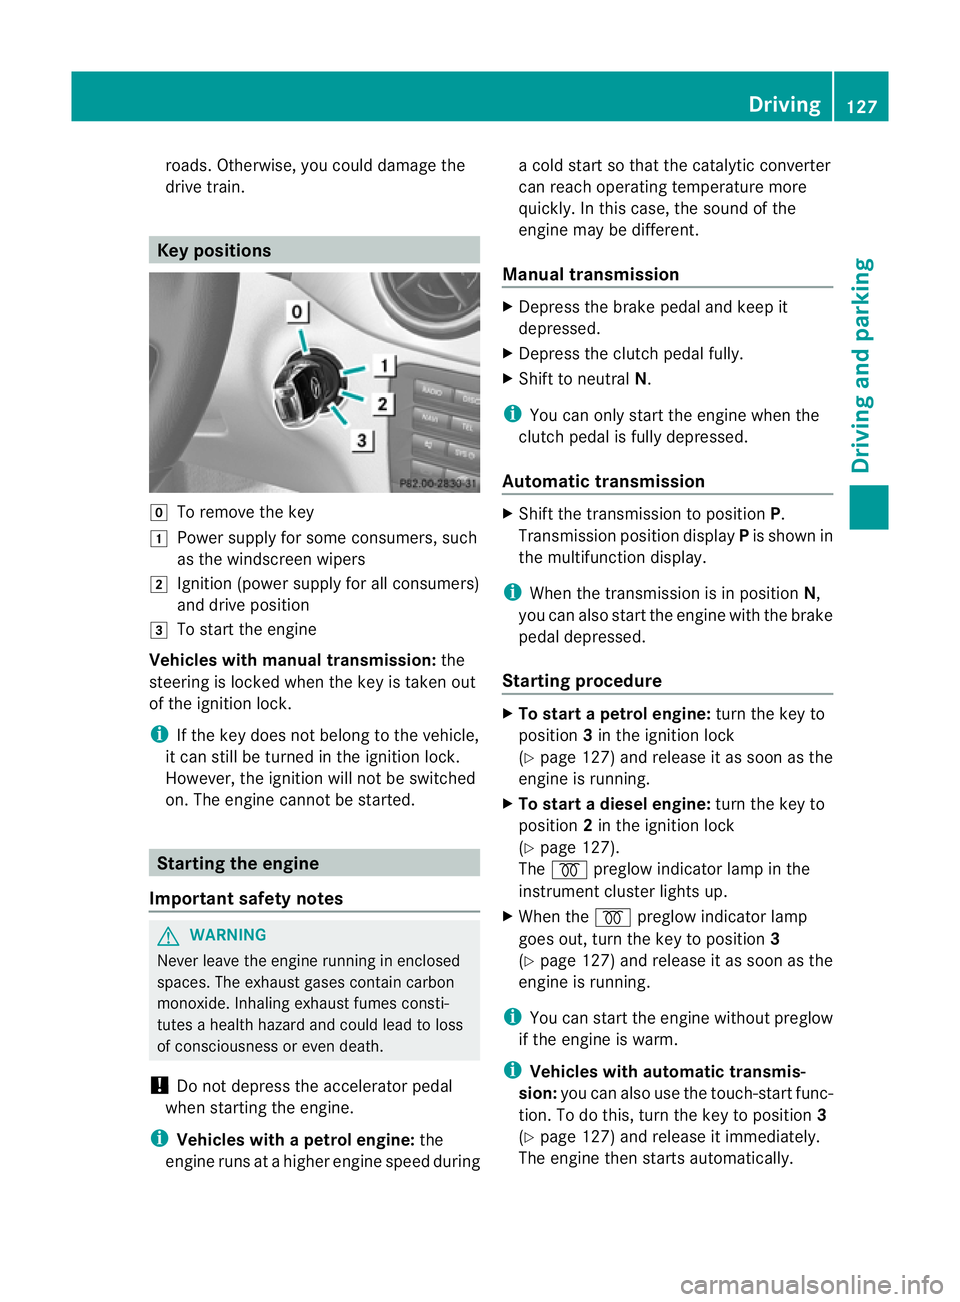
ositions g
To remove the key
1 Power supply for some consumers, such
as the windscreen wipers
2 Ignitio n(power supply for all consumers)
and drive position
3 To start the engine
Vehicles with manual transmission: the
steering is locked when the key is taken out
of the ignition lock.
i If the key does not belong to the vehicle,
it can still be turned in the ignition lock.
However, the ignition will not be switched
on. The engine cannot be started. Starting the engine
Important safety notes G
WARNING
Never leave the engine running in enclosed
spaces. The exhaust gases contain carbon
monoxide. Inhaling exhaust fumes consti-
tutes a health hazard and could lead to loss
of consciousness or even death.
! Do not depress the accelerator pedal
when starting the engine.
i Vehicles with apetrol engine: the
engine runs at a highe rengine speed during a cold start so that the catalytic converter
can reach operating temperature more
quickly. In this case, the sound of the
engine may be different.
Manual transmission X
Depress the brake pedal and keep it
depressed.
X Depress the clutch pedal fully.
X Shift to neutral N.
i You can only start the engine when the
clutch pedal is fully depressed.
Automatic transmission X
Shift the transmission to position P.
Transmission positio ndisplay Pis shown in
the multifunction display.
i When the transmission is in position N,
you can also start the engine with the brake
pedal depressed.
Starting procedure X
To start a petrol engine: turn the key to
position 3in the ignition lock
(Y page 127) and release it as soon as the
engine is running.
X To start adiesel engine: turn the key to
position 2in the ignition lock
(Y page 127).
The % preglow indicator lamp in the
instrumen tcluster lights up.
X When the %preglow indicator lamp
goes out, tur nthe key to position 3
(Y page 127) and release it as soon as the
engine is running.
i You can start the engine without preglow
if the engine is warm.
i Vehicles with automatic transmis-
sion: you can also use the touch-start func-
tion. To do this, turn the key to position 3
(Y page 127) and release it immediately.
The engine then starts automatically. Driving
127Driving and parking Z