height MERCEDES-BENZ B-CLASS HATCHBACK 2011 User Guide
[x] Cancel search | Manufacturer: MERCEDES-BENZ, Model Year: 2011, Model line: B-CLASS HATCHBACK, Model: MERCEDES-BENZ B-CLASS HATCHBACK 2011Pages: 329, PDF Size: 7.91 MB
Page 185 of 329
When towing a trailer, always adjust your
speed to the curren
troad and weather con-
ditions. Do not exceed the maximum permis-
sible speed for your vehicle/trailer combina-
tion. G
WARNING
Never depress the brake pedal continuously
while the vehicle is in motion, e.g. never cause
the brakes to rub by applying constant slight
pedal pressure. This causes the brake system
to overheat, increases the braking distance
and can lead to the brakes failing completely. G
WARNING
On no account should you attempt to draw the
vehicle/trailer combination out by increasing
speed. G
WARNING
If you exceed the maximum noseweight when
using a carrier system on the ball coupling:
R the carrier system may be thrown around.
R the ball coupling and the carrier system
may become detached from the vehicle.
As a result, you may injure others or cause an
accident.
Do not exceed the maximum noseweight.
When driving with a loaded carrier system,
always adjust your driving style to the prevail-
ing road, traffic and weather conditions and
drive particularly carefully.
You can use carrier systems, e.g. bicycle
racks or load-bearing implements, on the ball
coupling. The maximum noseweight of 75kg
applies when using carrier systems on the ball
coupling.
General notes !
Use a drawbar noseweight as close as
possible to the maximum permissible nose-
weight. Do not use a noseweight of less
than 50kg, otherwise the trailer may come
loose. Note that the payload and the rear axle load
are reduced by the actual payload.
X When towing a trailer, set the tyre pressure
on the rear axle of the towing vehicle for a
maximum load; see the tyre pressure table
in the fuel filler flap (Y page 295).
You will find installation dimensions and loads
in the "Technical data" section
(Y page 318).
The maximum noseweight of the trailer draw-
bar on the ball coupling is 75 kg. The actual
noseweight may however not be higher than
the value which is given on the trailer tow
hitch or trailer identification plates. The low-
est weight applies.
Please note that when towing a trailer, PARK-
TRONIC (Y page 163) and Blind Spot Assist
(Y page 177) are only available with limita-
tions, or not at all.
i The height of the ball coupling changes
with the load of the vehicle. If necessary,
use a trailer with a height-adjustable draw-
bar.
Driving tips i
Observe the notes on ESP ®
trailer stabi-
lisation (Y page 67).
The maximum permissible speed for vehicle/
trailer combinations depends on the type of
trailer. Before beginning the journey, check
the trailer's documents to see what the max-
imum permitted speed is. Observe the legally
prescribed maximum speed in the relevant
country.
For certain Mercedes-Benz vehicles, the max-
imum permissible rear axle load is increased
when towing a trailer. Refer to the "Technical
data" section to find out whether this applies
to your vehicle. If you utilise any of the added
maximum rear axle load when towing a trailer,
the vehicle/trailer combination may not
exceed a maximum speed of 100 km/h for
reasons concerning the operating permit.
This also applies in countries in which the 182
Towing
atrailerDriving an d parking
Page 253 of 329
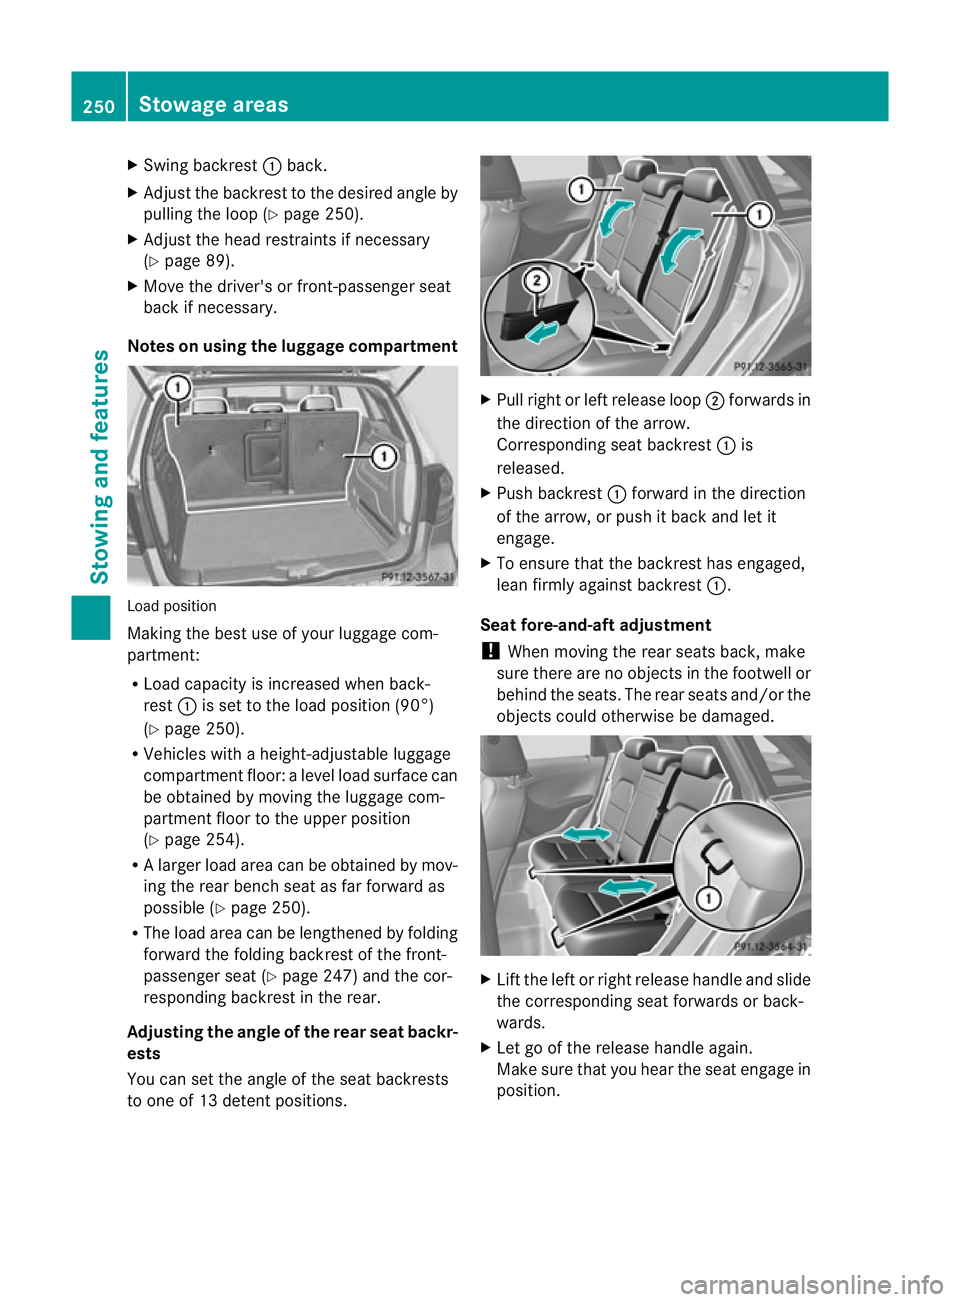
X
Swing backrest :back.
X Adjust the backres tto the desired angle by
pulling the loop (Y page 250).
X Adjust the head restraints if necessary
(Y page 89).
X Move the driver's or front-passenger seat
back if necessary.
Notes on using the luggage compartment Load position
Making the best use of your luggage com-
partment:
R Load capacity is increased when back-
rest :is set to the load position (90°)
(Y page 250).
R Vehicles with a height-adjustable luggage
compartment floor: a level load surface can
be obtained by moving the luggage com-
partmen tfloor to the upper position
(Y page 254).
R Al arge rload area can be obtained by mov-
ing the rear bench seat as far forward as
possible (Y page 250).
R The load area can be lengthened by folding
forward the folding backrest of the front-
passenger seat (Y page 247) and the cor-
responding backrest in the rear.
Adjusting the angle of the rear seat backr-
ests
You can set the angle of the seat backrests
to one of 13 detent positions. X
Pull right or left release loop ;forwards in
the direction of the arrow.
Corresponding seat backrest :is
released.
X Push backrest :forward in the direction
of the arrow, or push it back and let it
engage.
X To ensure that the backrest has engaged,
lean firmly against backrest :.
Seat fore-and-aft adjustment
! When moving the rear seats back, make
sure there are no objects in the footwell or
behind the seats. The rear seats and/or the
objects could otherwise be damaged. X
Lift the left or right release handle and slide
the corresponding seat forwards or back-
wards.
X Let go of the release handle again.
Make sure that you hear the seat engage in
position. 250
Stowage areasStowing and features
Page 257 of 329
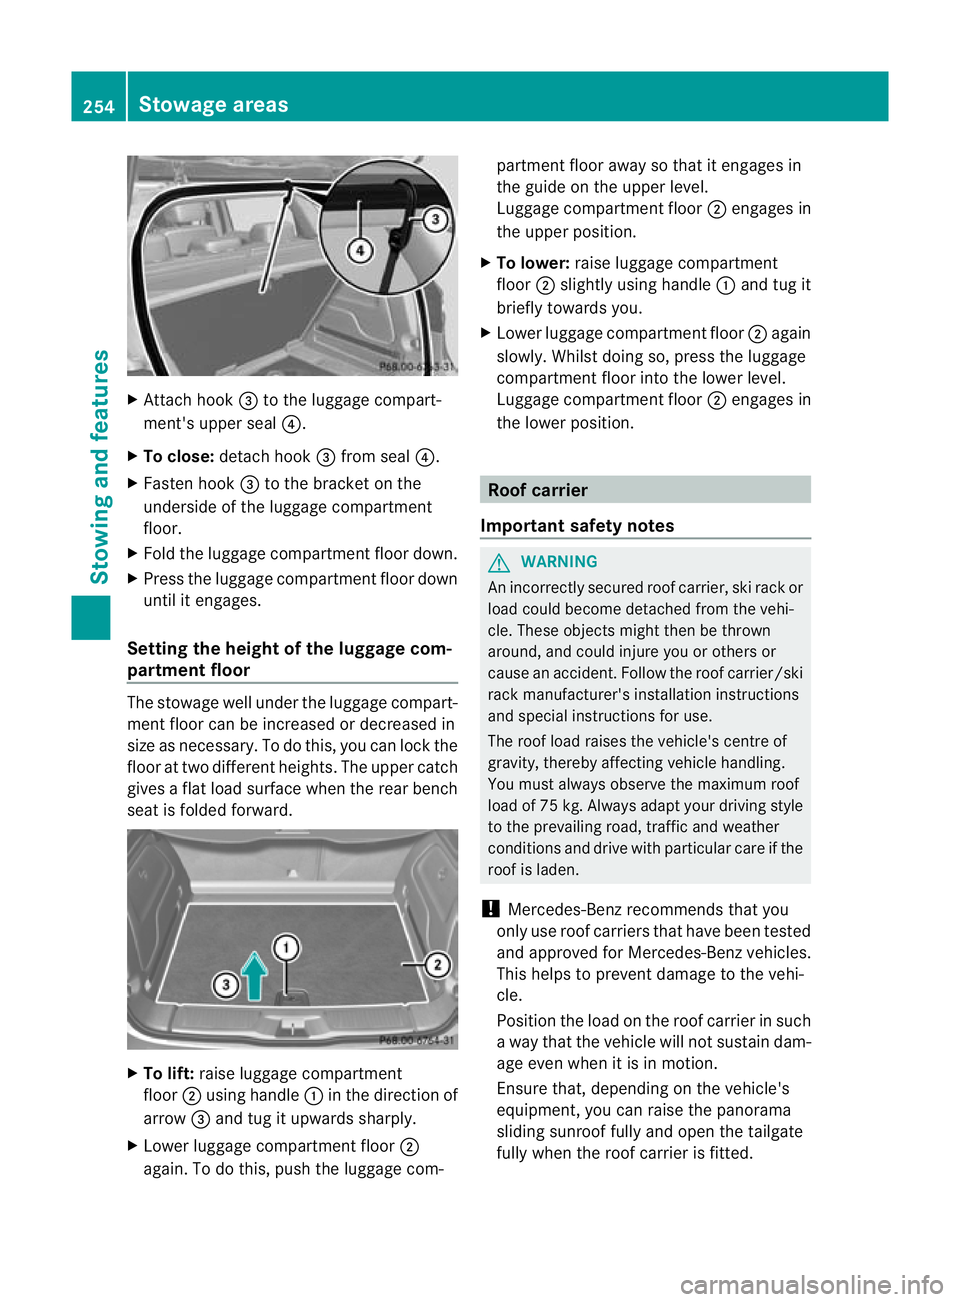
X
Attach hook =to the luggage compart-
ment's uppe rseal ?.
X To close: detach hook =from seal ?.
X Fasten hook =to the bracket on the
underside of the luggage compartment
floor.
X Fold the luggage compartment floor down.
X Press the luggage compartment floor down
until it engages.
Setting the height of the luggage com-
partment floor The stowage well under the luggage compart-
ment floor can be increased or decreased in
size as necessary. To do this, you can lock the
floor at two differen
theights. The upper catch
gives a flat load surface when the rear bench
seat is folded forward. X
To lift: raise luggage compartment
floor ;using handle :in the direction of
arrow =and tug it upwards sharply.
X Lower luggage compartment floor ;
again. To do this, push the luggage com- partmen
tfloor away so that it engages in
the guide on the upper level.
Luggage compartmen tfloor ;engages in
the upper position.
X To lower: raise luggage compartment
floor ;slightly using handle :and tug it
briefly towards you.
X Lower luggage compartmen tfloor ;again
slowly. Whilst doing so, press the luggage
compartmen tfloor into the lower level.
Luggage compartmen tfloor ;engages in
the lower position. Roof carrier
Important safety notes G
WARNING
An incorrectly secured roof carrier, ski rack or
load could become detached fro mthe vehi-
cle. These objects might then be thrown
around, and could injure you or others or
cause an accident. Follow the roof carrier/ski
rack manufacturer's installation instructions
and special instructions for use.
The roof load raises the vehicle's centre of
gravity, thereby affecting vehicle handling.
You must always observe the maximum roof
load of 75 kg .Always adapt your driving style
to the prevailing road, traffic and weather
conditions and drive with particular care if the
roof is laden.
! Mercedes-Ben zrecommends that you
only use roof carriers that have been tested
and approved for Mercedes-Benzv ehicles.
This helps to preven tdamage to the vehi-
cle.
Positio nthe load on the roof carrier in such
a way that the vehicle will not sustain dam-
age even when it is in motion.
Ensure that, depending on the vehicle's
equipment, you can raise the panorama
sliding sunroof fully and open the tailgate
fully when the roof carrier is fitted. 254
Stowage areasStowing and features
Page 266 of 329
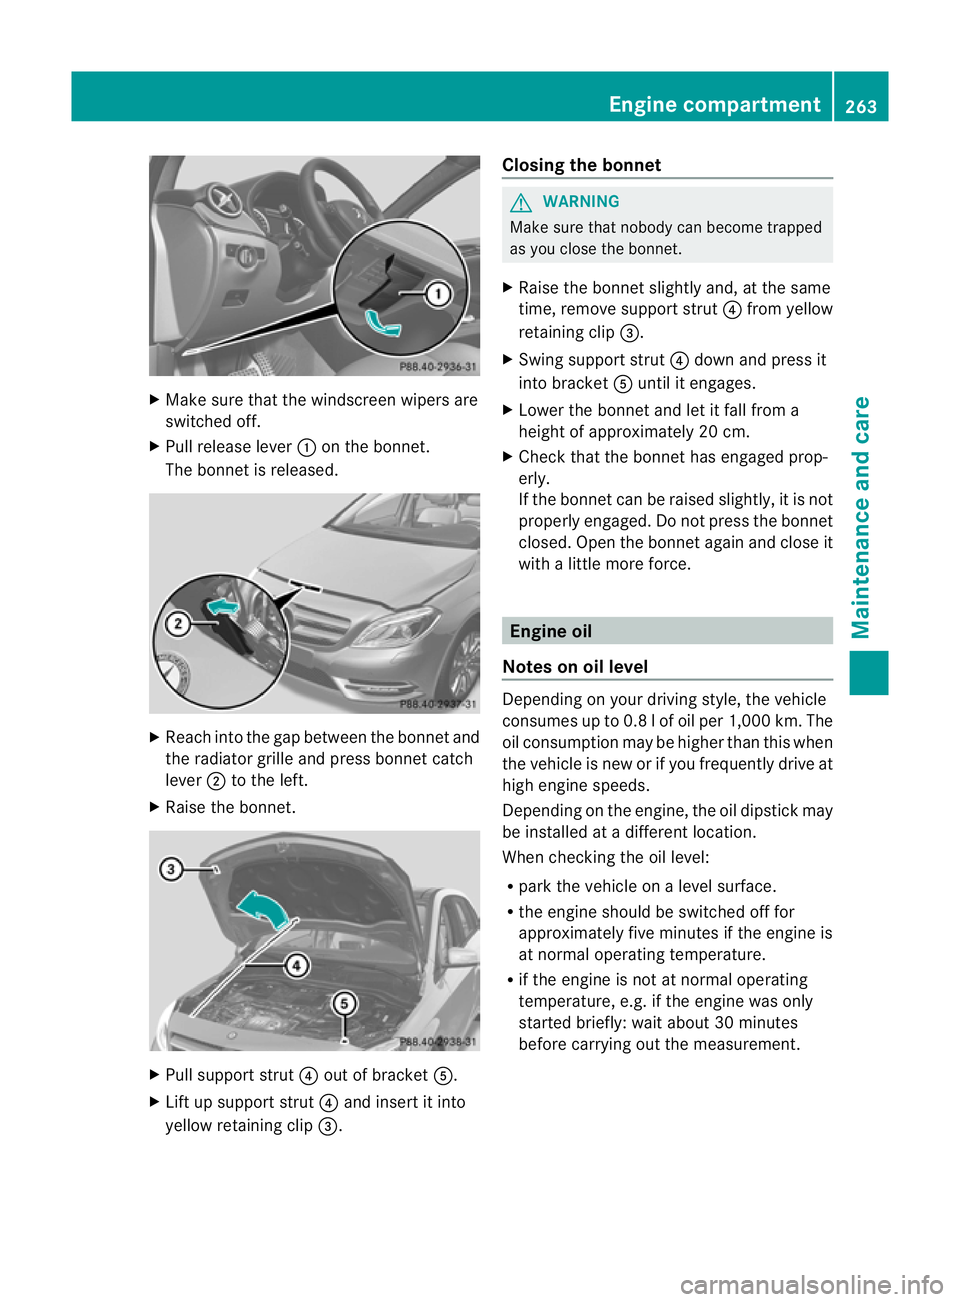
X
Make sure that the windscreen wipers are
switched off.
X Pull release lever :on the bonnet.
The bonnet is released. X
Reach into the gap between the bonnet and
the radiator grille and press bonnet catch
lever ;to the left.
X Raise the bonnet. X
Pull support strut ?out of bracket A.
X Lift up support strut ?and insert it into
yellow retaining clip =. Closing the bonnet G
WARNING
Make sure that nobody can become trapped
as you close the bonnet.
X Raise the bonnet slightly and, at the same
time, remove support strut ?from yellow
retaining clip =.
X Swing support strut ?down and press it
into bracket Auntil it engages.
X Lower the bonnet and let it fall from a
height of approximately 20 cm.
X Check that the bonnet has engaged prop-
erly.
If the bonnet can be raised slightly, it is not
properly engaged. Do not press the bonnet
closed. Open the bonnet again and close it
with a little more force. Engine oil
Notes on oil level Depending on your driving style, the vehicle
consumes up to 0.8 l of oil per 1,000 km. The
oil consumption may be higher than this when
the vehicle is new or if you frequently drive at
high engine speeds.
Depending on the engine, the oil dipstick may
be installed at a different location.
When checking the oil level:
R park the vehicle on a level surface.
R the engine should be switched off for
approximately five minutes if the engine is
at normal operating temperature.
R if the engine is not at normal operating
temperature, e.g. if the engine was only
started briefly: wait about 30 minutes
before carrying out the measurement. Engine compartment
263Maintenance and care Z
Page 303 of 329
The following must be observed when raising
the vehicle:
R
to raise the vehicle, only use the vehicle-
specific jack that has been tested and
approved by Mercedes-Benz.Ifu sed incor-
rectly, the jack could tip over with the vehi-
cle raised.
R the jack is designed only to raise and hold
the vehicle for a short time while a wheel
is being changed. It is not suited for per-
forming maintenance work under the vehi-
cle.
R avoid changing the wheel on uphill and
downhill slopes.
R before raising the vehicle, secure it from
rolling away by applying the parking brake
and inserting wheel chocks. Never disen-
gage the parking brake while the vehicle is
raised.
R the jack must be placed on a firm, flat and
non-slip surface. On a loose surface, a
large, load-bearing underlay must be used.
On a slippery surface, a non-slip underlay
must be used, e.g. rubber mats.
R do not use wooden blocks or similar
objects as a jack underlay.O therwise, the
jack will not be able to achieve its load-
bearing capacity due to the restricted
height.
R make sure tha tthe distance between the
underside of the tyres and the ground does
not exceed 3 cm.
R never place your hands and feet under the
raised vehicle.
R never lie under the raised vehicle.
R never start the engine when the vehicle is
raised.
R never open or close a door or the tailgate
when the vehicle is raised.
R make sure that no persons are present in
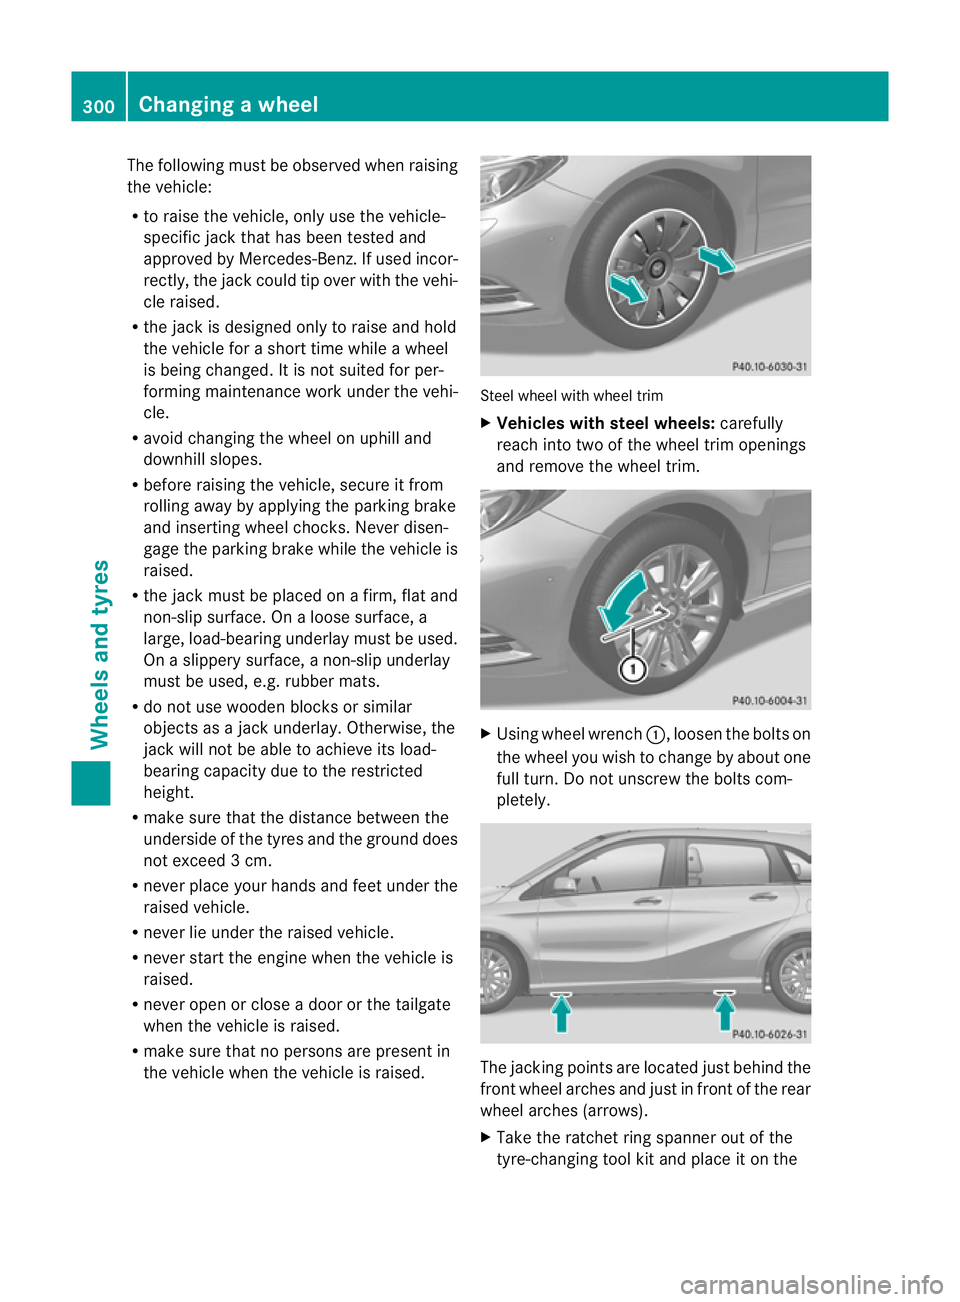
the vehicle when the vehicle is raised. Steel wheel with wheel trim
X Vehicles with steel wheels: carefully
reach into two of the wheel trim openings
and remove the wheel trim. X
Using wheel wrench :, loosen the bolts on
the wheel you wish to change by about one
full turn. Do not unscrew the bolts com-
pletely. The jacking points are located just behind the
front wheel arches and just in front of the rear
wheel arches (arrows).
X Take the ratchet ring spanner out of the
tyre-changing tool kit and place it on the 300
Changing
awheelWheels and tyres
Page 320 of 329
!
Do not use distilled or de-ionised water in
the washer fluid reservoir. Otherwise, the
level sensor may be damaged.
! Only the washer fluids SummerFit and
WinterFit can be mixed. Otherwise, the
spraying nozzles could become blocked.
At temperatures above freezing:
X Fill the washer fluid reservoir with a mixture
of water and washer fluid, e.g. MB Sum-
merFit.
X Mix 1 part MB SummerFit to 100 parts
water.
At temperatures below freezing:
X Fill the washer fluid reservoir with a mixture
of water and washer fluid, e.g. MB Winter-
Fit. Adapt the mixing ratio to the outside
temperatures.
X Down to Ò10 †: mix 1 part MB WinterFit
with 2parts water.
X Down to Ò20 †: mix 1 part MB WinterFit
with 1 part water.
X Down to Ò29 †: mix 2 parts MB WinterFit
with 1 part water.
i Add washe rfluid concentrate, e.g. MB
SummerFit or MB WinterFit, to the washer
fluid all year round. Vehicle data
Please note that for the specified vehicle
data:
R the heights specified may vary as a result
of:
- tyres
- load
- conditio nofthe suspension
- optional equipment
R Items of optional equipment increase the
unladen weight and reduce the maximum payload. The unladen weight is specified in
accordance with EC directive and includes:
-
driver (68 kg)
- luggage (7 kg)
- all fluids (fuel tank 90 % full)
R Vehicle-specific weight information can be
found on the vehicle identification plate
(Y page 310).
R Only for certain countries: you can find
vehicle-specific vehicle data in the COC
documents (CERTIFICATE OF CONFORM-
ITY). These documents are delivered with
your vehicle.
Missing values were not available at the time
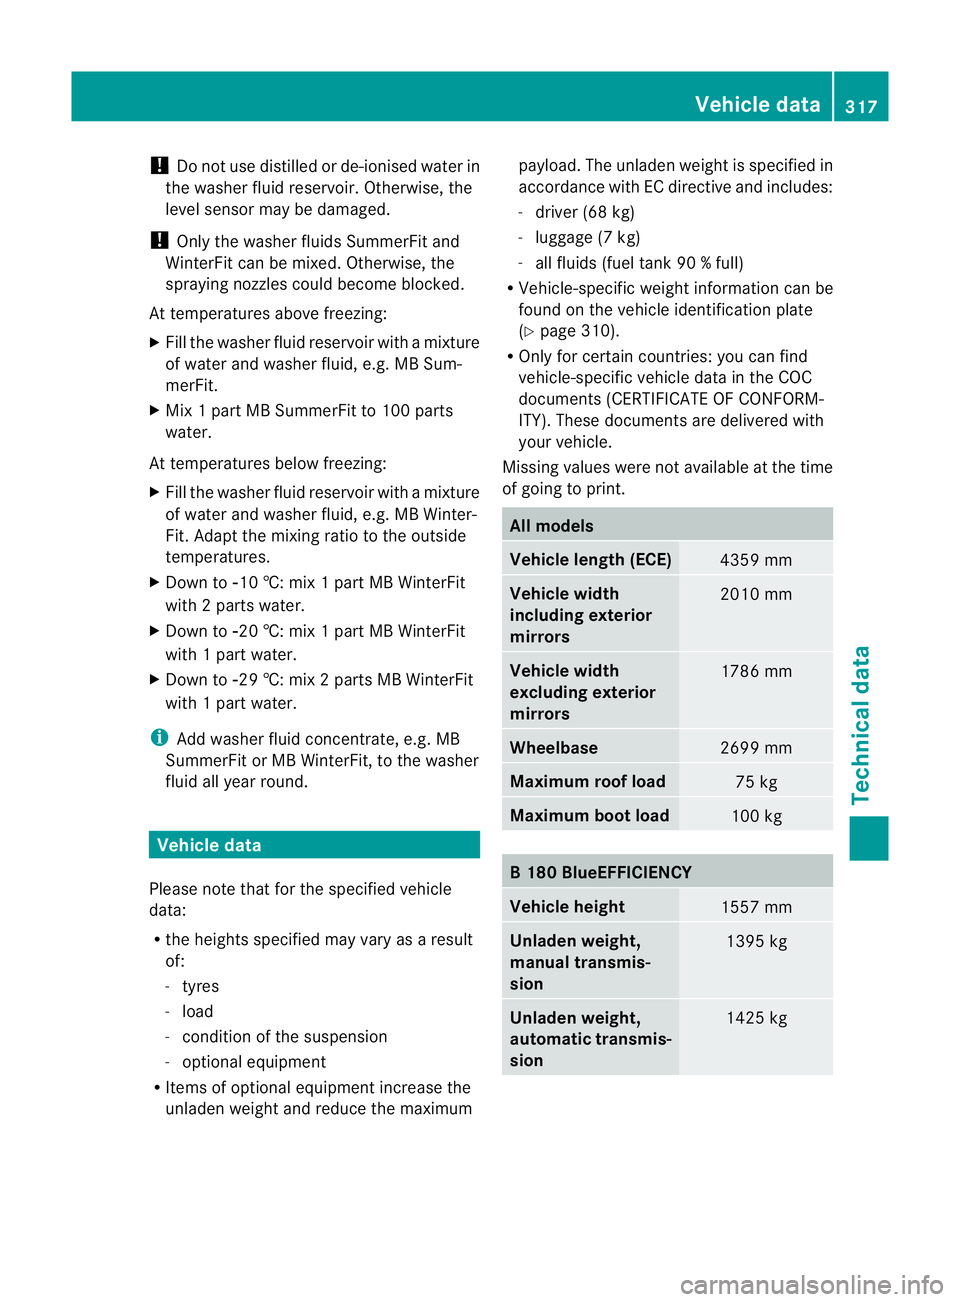
of going to print. All models
Vehicle length (ECE)
4359 mm
Vehicle width
including exterior
mirrors
2010 mm
Vehicle width
excluding exterior
mirrors
1786 mm
Wheelbase
2699 mm
Maximum roof load
75 kg
Maximum boot load
100 kg
B1
80 BlueEFFICIENCY Vehicle height
1557 mm
Unladen weight,
manual transmis-
sion
1395 kg
Unladen weight,
automatic transmis-
sion
1425 kgVehicle data
317Technical data Z
Page 321 of 329
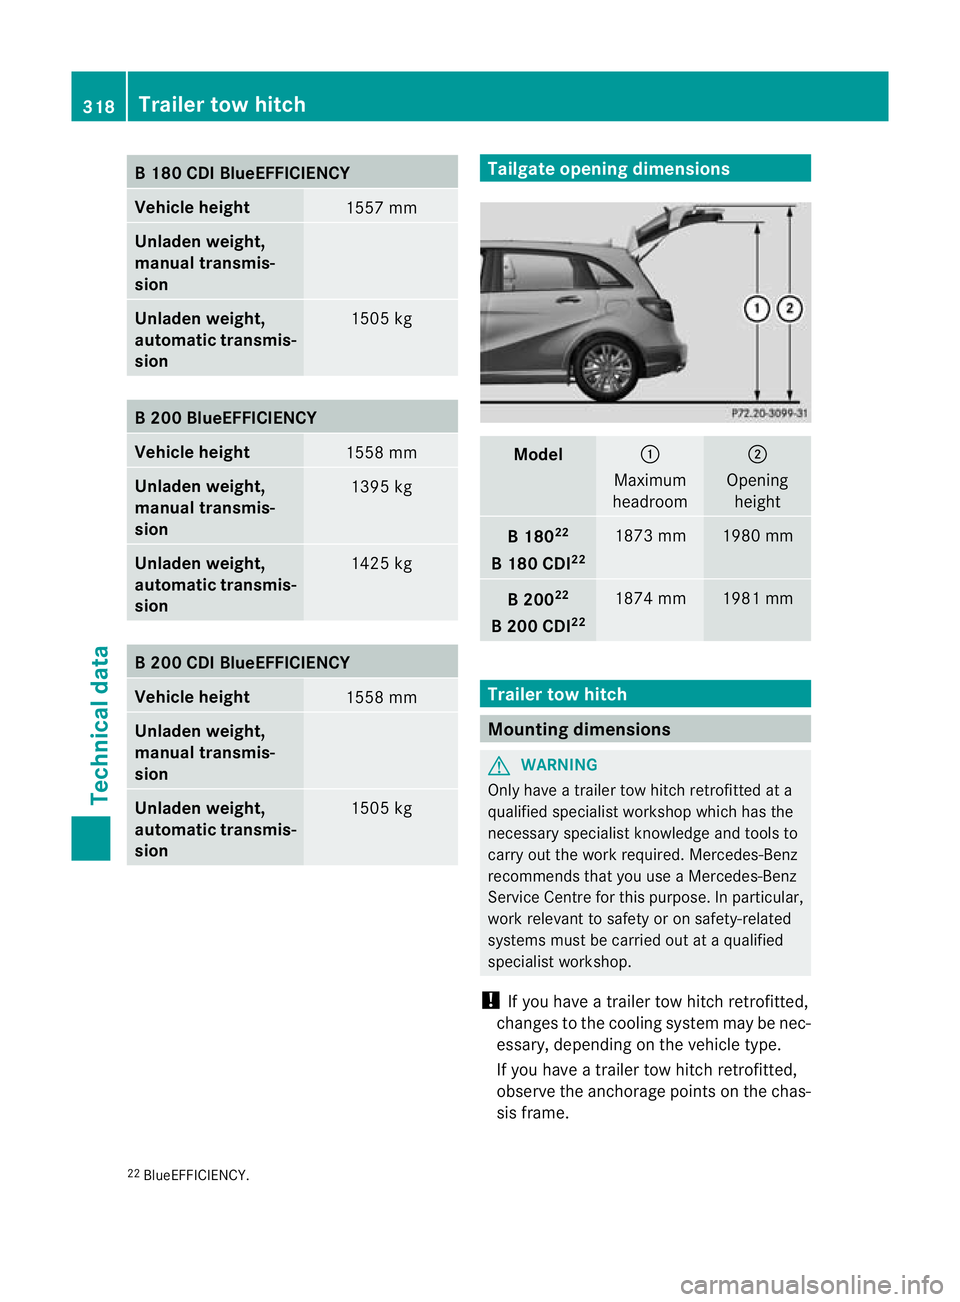
B1
80 CDI BlueEFFICIENCY Vehicle height
1557 mm
Unladen weight,
manual transmis-
sion
Unladen weight,
automatic transmis-
sion
1505 kg
B2
00 BlueEFFICIENCY Vehicle height
1558 mm
Unladen weight,
manual transmis-
sion
1395 kg
Unladen weight,
automatic transmis-
sion
1425 kg
B2
00 CDI BlueEFFICIENCY Vehicle height
1558 mm
Unladen weight,
manual transmis-
sion
Unladen weight,
automatic transmis-
sion
1505 kg Tailgate opening dimensions
Model :
Maximum
headroom ;
Opening height B1
8022
B1 80 CDI 22 1873 mm 1980 mm
B2
0022
B2 00 CDI 22 1874 mm 1981 mm
Trailer tow hitch
Mounting dimensions
G
WARNING
Only have a trailer tow hitch retrofitted at a
qualified specialist workshop which has the
necessary specialist knowledge and tools to
carry out the work required. Mercedes-Benz
recommends that you use aMercedes-Benz
Service Centre for this purpose. In particular,
work relevant to safety or on safety-related
systems must be carried out at a qualified
specialist workshop.
! If you have a trailer tow hitch retrofitted,
changes to the cooling system may be nec-
essary, depending on the vehicle type.
If you have a trailer tow hitch retrofitted,
observe the anchorage point sonthe chas-
sis frame.
22 BlueEFFICIENCY. 318
Trailer tow hitchTechnical data